VPro Intelligent RM-411 GENIUS User manual

v
pro
v
pro
RM-411
RM-411
INTELLIGENT
ติดต่อสอบถามข้อมูลผลิตภัณฑ์
หรือปัญหาในการใช้งาน
HOT LINE! 02 4264881-2
www.vpro.co.th
UNIVERSAL REMOTE
LEARN FUNCTION
UNIVERSAL
REMOTE
LEARN
FUNCTION

ภาษาไทย
English
ตารางรหัส Code Form
1~5
610~
11 15~
16 40~
CONTENTSCONTENTS
German

รีโมทคอนโทรลอัจฉริยะพร้อมระบบเรียนรู้ ออกแบบด้วยเทคโนโลยีล่าสุดช่วยให้
การ
สามารถควบคุมอุปกรณ์
ต่างๆได้มากถึง14อุปกรณ์ในเวลาเดียวกันอาทิ ทีวี กล่องรับสัญญาณเคเบิ้ลทีวี
ดาวเทียม ทีวีดิจิตอลดีวีบี เครื่องเล่นดีวีดี ซีดี แอมป์ วิทยุคอมโพเนนท์เป็นต้น
ช่วยควบรวมการทำงานจากรีโมทต่างๆที่มีเป็นจำนวนมาก มารวมไว้ในรีโมทเพียง
ตัวเดียวหรือใช้ทดแทนรีโมทเดิมที่สูญหาย
ตั้งค่าอุปกรณ์ต่างๆทำได้อย่างง่ายดาย ทั้งแบบป้อนรหัสค้นหารหัสอัตโนมัติ
ค้นหารหัสเอง หรือใช้ระบบเรียนรู้ตั้งค่ารหัสจากรีโมทเดิม
1
¢éÍÁÙżÅÔµÀѳ±ì
ÃÒÂÅÐàÍÕ´ἧ¤Çº¤ØÁ¡Ò÷ӧÒ
ไฟแอลอีดี
ปุ่มตั้งค่า
เพิ่มช่องสถานี+
ลดช่องสถานี -
ปุ่มตัวเลข
ช่องสถานี
ปุ่มสำรอง
ปุ่มเรียนรู้
แนะนำ
ค่าปกติ
ปุ่มเลือก
อุปกรณ์
ปุ่มรายการ
ปิดเสียง
เพิ่มเสียง+
ปุ่มเปิด/ปิด
TV/AV
ปุ่มหยุดเล่น
ถัดไป
ปุ่มออก
ปุ่มถอยหลัง
ปุ่มเล่น
ปุ่มเดินหน้า
ปุ่มบันทึก ปุ่มหยุดชั่วขณะ
แผงควบคุม
TV VCR/
ลดเสียง -
v
pro RM-411
v
pro
RM-411
รีโมทอัจฉริยะ
พร้อมระบบเรียนรู้
2
¡ÒÃãÊèẵàµÍÃÕè
เปิดฝาครอบแบตเตอรี่แล้วใส่แบตเตอรี่ชนิดอัลคาไลน์ขนาด 2 ก้อนตาม
ขั้ว+/-ให้ถูกต้อง
AA
àÅ×Í¡ÍØ»¡Ã³ìªØ´·Õè 2 SHIFT ÀÒÂãµé»ØèÁà´ÕÂÇ¡Ñ
ปุ่มเลือกอุปกรณ์6ปุ่มตามแผนภาพด้านล่าง ออกแบบมาให้ทำงานกับอุปกรณ์ได้
2ชุดเช่นปุ่มหมายถึงใช้ควบคุมอุปกรณ์ทีวีได้2 เครื่องTV1 (TV2)
ท่านสามารถเลือกอุปกรณ์แรกได้โดยการกดปุ่ม1ครั้ง ไฟแอลอีดีจะกระพริบ
1ครั้งหรือหากต้องการเลือกควบคุมอุปกรณ์ที่ 2ให้กดปุ่มเดียวกันนี้ 2ครั้ง
ไฟแอลอีดีก็จะกระพริบ2ครั้ง
เมื่อต้องการตั้งค่าหรือควบคุมก็ให้กดปุ่มเดียวกันนี้ สองครั้ง ไฟแอลอีดี
จะกระพริบตามจำนวนครั้งที่ท่านกดเพื่อให้ทราบว่าเลือกอุปกรณ์ใด
ตัวอย่างเช่นเมื่อต้องการตั้งค่าหรือควบคุมก็ให้กดปุ่มหนึ่งครั้งTV1 TV1
TV2
¡ÒõÑ駤èÒÃÕâÁ·¤Í â·ÃÅà¾×èͤǺ¤ØÁÍØ»¡Ã³ì
ก โดยการป้อนรหัสอุปกรณ์.
1.
AWA
เปิดตารางแสดงรหัสของอุปกรณ์ในคู่มือนี้
เลือกดูรหัสของอุปกรณ์ตามชนิดและยี่ห้อของ
อุปกรณ์นั้นๆ เช่นต้องการตั้งค่ากับทีวียี่ห้อ
ให้จดค่าแรกของรหัสคือ 0102 ไว้
2. ให้กดปุ่มค้างไว้แล้วกดปุ่มอุปกรณ์ที่ต้องการ
ตั้งค่าในตัวอย่างต้องการตั้งค่าก็ให้กดปุ่ม
ค้างไว้จากนั้นกดปุ่ม1(หรือ ตามความ
ต้องการ กรณีที่ต้องการเลือก ต้องกดปุ่ม
สองครั้ง)
SET
TV SET
TV TV2 TV3
TV2 TV1
3. สังเกตไฟแอลอีดีจะติดค้างอยู่ ให้ปล่อยมือออก
จากปุ่มพร้อมกัน
4.กดรหัส 0 1 0 2 ที่ตัวรีโมท
หมายเหตุไฟแอลอีดีจะกระพริบเมื่อกดตัวเลขรหัส
ในแต่ละครั้ง
5. เมื่อป้อนรหัสครบ 4 หลัก ไฟแอลอีดีจะดับแสดงว่า
รีโมทได้้ทำการบันทึกรหัสอุปกรณ์ไว้เรียบร้อยแล้ว
6.ทดลองใช้รีโมทกับอุปกรณ์ที่เลือกไว้ว่าทำงานได้ครบตามต้องการหาก
พบว่ารีโมทไม่สามารถควบคุมอุปกรณ์หรือควบคุมได้ไม่ครบทุกปุ่มให้ลอง
เปลี่ยนเลขรหัสในข้อ1แล้วทำตามขั้นตอน 2 ถึง5ใหม่จนกว่าจะใช้งานได้
※
※
ห้ามใช้แบตเตอรี่ต่างชนิดกันหรือแบตเตอรี่เก่ากับใหม่ร่วมกัน
หากแบตเตอรี่เกิดการรั่วไหลให้ถอดแบตเตอรี่เก่าทิ้ง ทำความสะอาดกล่อง
บรรจุแบตเตอรี่ให้สะอาดก่อน จึงใส่แบตเตอรี่ใหม่
หากท่านไม่ได้ใช้รีโมทเป็นเวลานานควรถอดแบตเตอรี่ออกจากรีโมท
เพราะหากเกิดการรั่วไหลของแบตเตอรี่ วงจรภายในรีโมทอาจได้รับความ
เสียหาย
※

3
ข.โดยการค้นหารหัสด้วยตนเอง
1เปิดสวิตซ์อุปกรณ์ที่ต้องการควบคุม (ตัวอย่างเช่นทีวี)
แล้วหันรีโมทชี้เข้าไปยังอุปกรณ์นั้นๆ
.
2. กดปุ่มค้างไว้แล้วกดปุ่มเลือกอุปกรณ์ที่ต้องการSET
3. สังเกตไฟแอลอีดีติดแล้วจึงปล่อยมือออกจากปุ่ม
และปุ่ม
SET
TV1 พร้อมกัน
4. กดปุมอีกครั้งหนึ่ง (กดแล้วปล่อย) จนไฟแอลอีดี
เริ่มกระพริบ
SET
6.เปิดอุปกรณ์ด้วยรีโมทคอนโทรลแล้วทดลองกดปุ่มควบคุมต่างๆเพื่อตรวจสอบ
ว่ารีโมททำงานได้ทุกฟังก์ชั่นการใช้งานกับอุปกรณ์นั้นๆ หากรีโมททำงานได้
ตามที่ต้องการแสดงว่ารีโมทได้บันทึกค่ารหัสของอุปกรณ์นั้นได้ถูกต้องแล้ว
แต่หากไม่สามารถทำงานได้ครบตามที่ต้องการให้ดำเนินการตั้งค่าใหม่ตาม
ขั้นตอนที่ 2-5 ไปเรื่อยๆจนกว่าจะได้รหัสควบคุมที่ถูกต้อง
5.ในขณะที่ยังหันรีโมทไปยังอุปกรณ์ให้กดปุ่มเปิด/ปิด
ไปเรื่อยๆ จนกระทั้งอุปกรณ์นั้นถูกปิดได้ด้วยรีโมท
ให้กดปุ่มอุปกรณ์ที่เลือกไว้ในข้อ2(ตามตัวอย่างคือ)
อีกครั้งหนึ่ง
(power)
TV1
ตัวอย่างเช่นต้องการควบคุมทีวี โดยเลือกใช้ ก็ให้
กดปุ่มค้างไว้แล้วกดปุ่ม
TV1
SET TV1
ค.โดยการค้นหารหัสอัตโนมัติ
1. เปิดสวิตซ์อุปกรณ์ที่ต้องการควบคุม (ตัวอย่างเช่นทีวี)
แล้วหันรีโมทชี้เข้าไปยังอุปกรณ์นั้นๆ
2. กดปุ่มเลือกอุปกรณ์ที่ต้องการตั้งค่าตัวอย่าง
เช่นต้องการตั้งค่าทีวี ให้กดปุ่ม ไฟแอลอีดี
จะกระพริบ1ครั้ง
TV1
3. กดปุ่มค้างไว้แล้วกดปุ่มเปิด/ปิด
สังเกตไฟแอลอีดีจะติดให้ปล่อยมือออกจากปุ่ม
และ ปุ่มเปิด/ปิดพร้อมกัน
SET (power)
SET
4. ในขณะที่ยังหันรีโมทชี้ไปยังอุปกรณ์ไฟแอลอีดี
จะกระพริบแสดงว่ารีโมทได้เริ่มทำการค้นหารหัสแบบ
อัตโนมัติแล้ว
5. รอจนกระทั้งอุปกรณ์ในตัวอย่างนี้คือทีวีถูกปิดด้วยรีโมทคอนโทรล ให้รีบกด
ปุ่มใดๆก็ได้บนรีโมท เป็นการหยุดการค้นหาและบันทึกรหัส
6.เปิดอุปกรณ์ด้วยรีโมทคอนโทรลแล้วทดลองกดปุ่มควบคุมต่างๆเพื่อตรวจสอบ
ว่ารีโมททำงานได้ทุกฟังก์ชั่นการใช้งานกับอุปกรณ์นั้นๆ หากรีโมททำงานได้
ตามที่ต้องการแสดงว่ารีโมทได้บันทึกค่ารหัสของอุปกรณ์นั้นได้ถูกต้องแล้ว
แต่หากไม่สามารถทำงานได้ครบตามที่ต้องการให้ดำเนินการตั้งค่าใหม่ตาม
ขั้นตอนที่ 3-6 ไปเรื่อยๆจนกว่าจะได้รหัสควบคุมที่ถูกต้อง
¡ÒõÑ駤èÒÃÕâÁ·¤Í â·ÃÅà¾×èͤǺ¤ØÁÍØ»¡Ã³ì
4
การตั้งค่ารีโมทด้วยฟังก์ชั่นการเรียนรู้จากรีโมทเดิม
วิธีการ :
1. กดปุ่มเลือกอุปกรณ์ที่ต้องการตั้งค่าก่อน 1 ครั้ง จากนั้น
กดปุ่มค้างไว้3วินาที สังเกตไฟแอลอีดีจะกระพริบ
แสดงให้ทราบว่าพร้อมทำการเรียนรู้รหัสแล้ว
LEARN
หากท่านต้องการล้างข้อมูลการเรียนรู้ในแต่ละอุปกรณ์ให้กดปุ่ม และ
ปุ่มอุปกรณ์ที่ต้องการลบข้อมูลพร้อมกันตามด้วยรหัส 9981 ไฟแอลอีดีจะติด
ค้างแสดงว่าข้อมูลการเรียนรู้นั้นได้ถูกลบทิ้งเป็นที่เรียบร้อยแล้ว
SET
※ฟังก์ชั่นการเรียนรู้มีความสามารถในการจดจำข้อมูลได้จำกัดตามขนาด
หน่วยความจำที่มีหาก หน่วยความจำของรีโมท เต็ม ไฟแอลอีดีจะติด
และกระพริบถี่ๆห้าครั้งเพื่อแจ้งให้ทราบว่าหน่วยความจำเต็มแล้ว ไม่สามารถ
เรียนรู้และจดจำข้อมูลเพิ่มเติมได้
RM-411
2. วางรีโมทต้นแบบกับรีโมท โดยหันภาค
ส่งสัญญาณอินฟาเรดเข้าหากัน และให้วางห่างกัน
ประมาณ 2-5 ซม.
RM-411
3. กดปุ่มที่ต้องการตั้งค่าทีละปุ่ม โดยให้กดปุ่มบนรีโมท
ต้นแบบก่อน สังเกตไฟแอลอีดีของ จะกระพริบ
ถี่ๆ จากนั้นจึงกดปุ่ม่บนรีโมท
เพื่อจดจำรหัสจากรีโมทต้นแบบ
RM-411
RM-411 ให้ตรงกันกับ
หน้าทีการทำงาน
4. ทำตามขั้นตอนที่ 3 ไปเรื่อยๆจนครบทุกปุ่มตามที่
ต้องการ เมื่อทำการเรียนรู้จากรีโมทต้นแบบจนครบ
ทุกฟังก์ชั่นการใช้งานแล้วให้กดปุ่ม เพื่อจบ
การตั้งค่า จากนั้นให้ทดลองรีโมทในการควบคุม
อุปกรณ์นั้นๆ ตรวจสอบว่ารีโมททำงานได้ครบทุกปุ่ม
หากปุ่มใดไม่ทำงานสามารถตั้งค่าใหม่เฉพาะปุ่มนั้นๆ
ได้ใหม่โดยไม่ต้องตั้งค่าปุ่มอื่นที่ทำงานได้ถูกต้องแล้ว
SET
รีโมท RM-411
รีโมท RM-411
1.
2.
3.
4.
5.
กดปุ่มเลือกอุปกรณ์ที่ต้องการอ่านค่ารหัสเช่น ... ตามต้องการ
กดปุ่มค้างไว้(อย่าปล่อย) จากนั้นให้กดปุ่มเลข4สังเกตว่าไฟแอลอีดี
กระพริบกี่ครั้ง จำนวนครั้งที่กระพริบคือค่ารหัสในหลักหน่วย
TV1 (DVD1 )
SET
กดปุ่มค้างไว้(อย่าปล่อย) จากนั้นให้กดปุ่มเลข3สังเกตว่าไฟแอลอีดี
กระพริบกี่ครั้ง จำนวนครั้งที่กระพริบคือค่ารหัสในหลักสิบ
กดปุ่มค้างไว้(อย่าปล่อย) จากนั้นให้กดปุ่มเลข2สังเกตว่าไฟแอลอีดี
กระพริบกี่ครั้ง จำนวนครั้งที่กระพริบคือค่ารหัสในหลักร้อย
กดปุ่มค้างไว้(อย่าปล่อย) จากนั้นให้กดปุ่มเลข สังเกตว่าไฟแอลอีดี
กระพริบกี่ครั้ง จำนวนครั้งที่กระพริบคือค่ารหัสในหลักพัน
SET
SET
SET 1
¡ÒõÃǨÊͺ¤èÒÃËÑʨҡÃÕâÁ·
ท่านสามารถทราบค่ารหัสของการตั้งค่าอุปกรณ์แบบอัตโนมัติและ
แบบตั้งค่าค้นหารหัสเองได้ตามขั้นตอนต่อไปนี้ :
หมายเหตุหากไฟแอลอีดี ไม่กระพริบหมายถึงค่ารหัสในหลักนั้นเป็น0
¡ÒõÑ駤èÒÃÕâÁ·¤Í â·ÃÅà¾×èͤǺ¤ØÁÍØ»¡Ã³ì

5
Ãкº¡ÒäǺ¤ØÁàÊÕ§ÃèÇÁ¡Ñº·ÕÇÕ
ท่านสามารถตั้งค่าปุ่ม เพิ่ม/ลด เสียง ให้ทำงานร่วมกับอุปกรณ์ ทีวี แทนอุปกรณ์ที่ใช้งานอยู่
เช่นต้องการใช้ปุ่มเพิ่ม/ลด เสียงของอุปกรณ์ควบคุมการ เพิ่ม/ลดเสียงของทีวีแทนDVD
วีธีการตั้งค่า :
※
※
กดปุ่มค้างไว้แล้วกดปุ่มเลือกอุปกรณ์ที่ต้องการ ไฟแอลอีดีจะติด จากนั้นให้ใส่รหัส
9901 รีโมทจะ จดจำ การใช้ปุ่ม เพิ่ม/ลดเสียง ควบคุมทีวีแทน
SET
กดปุ่มค้างไว้แล้วกดปุ่มเลือกอุปกรณ์ที่ต้องการ ไฟแอลอีดีจะติด จากนั้นให้ใส่รหัส
9902 รีโมทจะ ยกเลิกการใช้ปุ่ม เพิ่ม/ลดเสียง ควบคุมทีวี
SET
¡ÒÃÅçͤÃËÑÊ áÅÐ ¡ÒáàÅÔ¡¡ÒÃÅçͤÃËÑÊ
การล็อครหัส
กดปุ่มค้างไว้กดเลือกปุ่มอุปกรณ์ที่ต้องการล็อครหัสเช่น(หรืออื่นๆตาม
ต้องการ) ไฟแอลอีดีจะติด จากนั้นจึงใส่รหัส 9911 รีโมทจะทำการล็อครหัสเพื่อ
ป้องกันไม่ให้มีการตั้งค่ารหัสใดๆได้ใหม่
SET TV
การยกเลิกการล็อครหัส
กดปุ่มค้างไว้กดเลือกปุ่มอุปกรณ์ที่ต้องการล็อครหัสเช่น(หรืออื่นๆตาม
ต้องการ) ไฟแอลอีดีจะติด จากนั้นจึงใส่รหัส 9912 รีโมทจะทำการยกเลิกการล็อครหัส
และสามารถป้อนข้อมูลรหัสใหม่ได้
SET TV
หมายเหตุเมื่อทำการล็อครหัสแล้วท่านจะไม่สามารถตั้งค่ารีโมทใดๆได้อีก
จนกว่าจะทำการยกเลิกการล็อครหัส
:
¡ÒõÑ駤èÒÃÕâÁ·¡ÅѺ价Õè¤èÒàÃÔèÁµé
กดปุ่มค้างไว้กดเลือกปุ่มอุปกรณ์ที่ต้องการตั้งค่าเริ่มต้นเช่น(หรืออื่นๆตาม
ต้องการ) ไฟแอลอีดีจะติด จากนั้นจึงใส่รหัส 9990 รีโมทจะใช้รหัสข้อมูลที่ตั้งมาจาก
โรงงาน
SET TV
ËÁÒÂà˵Ø
1.
2.
3.
4.
การใช้งานรีโมท ต้องแน่ใจว่าภาคส่งสัญญาณอินฟาเรดของรีโมทชี้ไปยัง
ภาครับสัญญาณของอุปกรณ์ตามทิศทางและระยะที่เหมาะสม ไม่ห่างจนเกินไป
รีโมทไม่สามารถเพิ่มฟังก์ชั่นการทำงานใดๆให้กับอุปกรณ์นั้นๆได้และไม่สามารถ
ควบคุมอุปกรณ์ที่ไม่มีภาครับสํญญาณอินฟาเรดได้
การใส่แบตเตอรี่ ต้องให้แน่ใจว่าถูกต้องตามขั้ว+/-ที่ระบุไว้เท่านั้น
การใช้งานในสภาพที่ไม่เหมาะสมเช่นในสภาพอากาศที่หนาวจัดร้อนจัด ความชื้นสูง
อาจทำให้ รีโมทไม่สามารถควบคุมอุปกรณ์ได้หากรีโมทยังคงไม่ทำงานในสภาพปกติ
ให้ทดลองถอดแบตเตอรี่ออก พักรีโมทไว้นาน 20 นาที จึงใส่แบตเตอรี่กลับตามเดิม
รีโมทอาจกลับมาทำงานได้ตามปกติ
¤Ø³ÅѡɳзҧÇÔÈÇ¡ÃÃÁ
ระยะการควบคุม มากกว่า8เมตรขึ้นอยู่กับภาครับของอุปกรณ์ที่ใช้ร่วมกัน
ภาคกำลัง ไฟตรง 3 โวลท์แบตเตอรี่ชนิดอัลคาไลน์ขนาด 2 ก้อน
:
:AA
※หมายเหตุทางบริษัทฯขอสงวนสิทธิ์ในการเปลี่ยนแปลงคุณลักษณะและ
ฟังก์ชั่นการทำงานของสินค้าตามความเหมาะสมโดยมิต้องแจ้งให้ทราบ
ล่วงหน้า เพื่อความเหมาะสมในการพัฒนาผลิตภัณฑ์ต่อไป
This product is an intelligent remote control integrating the latest
technology. With simple setup, it ensures you easy and combined
control over your daily-used appliances, such as TV set, STB, DVD
and audio equipment etc. Its innovative digital reproduction
technology enables you to fully transfer and integrate the functions
of your original remote controls. It is your best choice to replace
any lost or damaged remote control as well as to integrate several
remote controls.
Product introduction
Description of the control panel
Channel
selection
Subsidiary
functions
Guidance
Normal
Learn function key
Subsidiary
functions
indicator
Selection key
for models
Channel +
Channel -
SET key
Pause
Fast Forward
Play Stop
Menu
Backward
Record
Mute key
Exit
Volume+
Volume- TV/video
Menu function keys
Power key
TV VCR/
v
pro RM-411
v
pro
RM-411
6

7
.
Open the battery cover, put in two new AA (No.5#) alkaline
batteries (not attached) according to the “+/-”symbol inside the
battery pack
Battery Installation:
※
※
Never mix different types of batteries, or an old battery with a
new one;
In case of battery leakage, the batteries must be taken out, and the
battery compartment should be cleaned before new batteries are
installed;
If you are not going to use this remote control for a long time, please
make sure to take the batteries out from the compartment.
※
Composite device switching
Composite device: a device key containing two device pages;
6 device keys in total have such function. Method:
Press a composite device key once to select the device outside the
brackets, the indicator light flashes once; press the key twice swiftly
and successively, the indicator light flashes twice and the device
inside the brackets is selected.
Take “TV1” key for example. Press “TV1” key to select the device “Tv1”,
the indicator light flashes once; press the “TV1” key twice swiftly and
successively, the indicator light flashes twice and the remote control
switches to “TV2” device.
A.How to Enter Codes
1.Look up the first set of Code of the home
appliance that you wish to control on the
Code Chart. For Example: If your first
TV set is an AWA, the first set of Code
shall be 0102.
2.Press and hold the SET Button,
and then press the Select Equipment
Button to set the mode to your desired
home appliance. For Example Press
the SET Button and TV1 Button
to set the mode to your first television set.
“
“
:
““”
”
”
”
3.When the Indicator Light is switched on,
release the Settings Button and TV1
Button at the same time.
”“”
4. Input the four-digit Code 0102 in the
order as seen on the Code Chart.
Note The Indicator Light will flash once
each time you input a single unit
:
5. After you have completed inputting
the Code, the Indicator Light will
switch off.
6. Check to see if the other buttons can be operated normally. If the
buttons can be operated normally, Settings is successful. If the
buttons cannot be operated normally, please repeat Steps 2 to 5.
Setting of the remote controller
8
Setting of the remote controller
B.How to Search for Codes Manually
1.Switch on the Power Switch of the home appli
ance you wish to control (for example, television
or recording machine) manually. Place the
remote control directly at the receive window
of the home appliance.
2.Press and hold the “SET Button, and
then press the Select Equipment Button
to set the mode to your desired home
appliance.
”
”
”
For example: Press the
SET Button and TV1 Button to
set the mode to your first television set.
““”
3. When the Indicator Light is switched on, release
the Settings Button and TV1 Button at the
same time.
“” “”
4. Press and release the SET Button again.
The Indicator Light will start to flash.
“”
5.
which you control switches
off/ switches on. Then press the Select Equipment
Button (for example TV1 ) you have pressed in
Step 2 again.
Press the " Power Source" Button continuously until
the home appliances
“”
6.Switch on the home appliance which you have just switched off . Check
to see if the other buttons on the Remote Control can be operated
normally. If the buttons can be operated normally, Settings is successful.
If the buttons cannot be operated normally, please repeat Steps 2 to 5,
until you found the Code that is suitable for your home appliances.
C.How to Search for Codes Automatically
1. Switch on the home appliance you wish to
control manually, and place the remote
control directly at the receive window of
the home appliance.
2. Press the Equipment Interface that you
wish to Set, for example: TV1 . The
Operation Indicator Light will flash once.
“”
3. Press and hold the SET Button.
Then press the Power Source Button
until the Operation Indicator Light lights
up. Then, release the “SET” Button”
and the “Power Source” Button.
“
“”
”
4. The Operation Indicator Light will start
to flash. The Automatic Search Mode
comes into operation.
5. When your television is shutting down, press the “Random” Button on
the Remote Control immediately and lock in the Code.
6.Check to see if the other buttons on the Remote Control can be operated
normally. For example: Press Power Source Button to see if the
television can be switched off, and whether the television can be
operated normally after Settings is completed. If the television cannot be
operated normally, please repeat Steps 3 to 6.
“”

9
Setting of the remote controller
Key learning function:
Setup method:
1. Press once the device key of the page to be
learned, and then press and hold down Learn
key for three seconds to start the learning function.
""
2. Horizontally aim the infrared emission
window (usually refers to the infrared
emission device installed on the front of
a remote control) of the original remote
control of the TV set at the infrared
emission window of this remote control
(with a distance of 2cm-5cm).
3. Press any function key of the original TV
remote control and release it when the
indicator light is continuously on; instantly,
the data of the function key is copied
and transmitted to this remote control.
4. Press the corresponding key in the TV area
on the panel of this remote control; now the
indicator light flashes again, and the above
data has been instantly transferred to the
selected corresponding key of this remote
control! According to your needs, you may
repeat steps 3-4 to copy and transfer the
data of each key; when finish, press “SET”
key to exit and cease the Remote Control
Keys Copying and Transferring Function status. This remote control
This remote
control
※Copying and transferring function has specific storage space; when
the storage space is used up, the indicator light turns on and rapidly
flashes five times, prompting that the copying and transferring
function cannot be used.
If you want to clear copied and transferred information under a
device of the remote control, please press tightly “SET” key and
simultaneously press the said device key; then enter 9981 when
the indicator light is on, and the information is cleared.
Code inquiring mode
After making manual automatic search of the code, perform the following
steps and you will get the code that controls your home appliance device:
1. First press "device type selection" key of the home appliance device you
search for such as TV 1, VCR 1 etc., and the indicator will flash once
in the meantime .
2. Push down “SET ”key and do not release, then press number key “4”on
the remote controller and pay attention to the times the indicator flashes.
The flashing times of the indicator stands for the number at the units digit
of a 4 digit code.
3. Push down “SET ”key and do not release, then press number key “3”on
the remote controller and pay attention to the times the indicator flashes.
The flashing times of the indicator stands for the number at the tens digit
of a 4 digit code.
4. Push down “SET ”key and do not release, then press number key “2”on
the remote controller and pay attention to the times the indicator flashes.
The flashing times of the indicator stands for the number at the hundreds
digit of a 4 digit code.
5. Push down “SET ”key and do not release, then press number key “1”on
the remote controller and pay attention to the times the indicator flashes.
The flashing times of the indicator stands for the number at the thousands
digit of a 4 digit code.
Note In inquiry of a code no flashing of the indicator means zero.
()
:, 10
Volume sharing
By setting this function, you can use the volume control under the
TV device mode to control the TV device even if the remote control
is not currently matched with such device.
Setting method:
※
※
Press and hold down “SET” key, and then press “DEVICE” key; now
the indicator light is on; please enter the code 9901, and the volume
sharing function is on.
Press and hold down “SET” key, and then press “DEVICE” key; now
the indicator light is on; please enter the code 9902, and the volume
sharing function is cancelled.
Code locking and unlocking
Code locking
First press and hold down “SET” key, and finally press “DEVICE” key
(such as selecting TV device), and the indicator light will turn on; now
please enter 9911 and the code will be instantly locked; no data through
any operation can overwrite this code.
Code unlocking
First press and hold down “SET” key, and finally press “DEVICE” key
(such as selecting TV device), and the indicator light will turn on; now
please enter 9912 and the code will be instantly unlocked; the user can
re-enter a code normally.
Note: when the code is locked, the user cannot switch the appliance
used or enter the remote control code until code unlocking is carried
out for the locked appliance.
Restore to factory defaults
Press and hold down “SET” key, and finally press “DEVICE” key, and
now the indicator light is on; please enter 9990, and this remote control
will be restored to factory defaults.
Special notes:
1. Please make sure that the infrared emission end of this remote control aims
properly at the counterpart of the original remote control of the appliance,
and that the two controls keep a working distance.
2. This remote control cannot add any new function to any appliance; therefore
this remote control cannot be used if your appliance does not have an
emitting and receiving device.
3. When putting batteries into this remote control, please check and make sure
that all batteries are at the correct polarity.
4. In case of improper operation, this remote control may not be normally used
and controlled; under such circumstances, please try to take out the
batteries and reinstall them in 20 minutes, and the remote control will be
back to normal.
Technical parameters
Remote control distance: larger than 8 meters (depending on the
machine types)
Power: DC 3V (two AA alkaline batteries)
This company reserves the right of final interpretation for this instruction
manual and it will make no specific notice in case of changes for the
design and technical data.

11
Produktübersicht
Erklären der Systemsteuerung
Setup
Menü
LED
Menü
Lautstärke +
Lautstärke -
Stummschaltung
Beenden
Wiedergabe
Zurückspulen Vorspulen
Video aufzeichnen Pause
Stopp
Kanal „+“
Kanal „-“
Wahltaste für
die Geräte
Betriebstaste
Fernseher/Vedeo
Kanalauswahl
Hilfsfunktion
Learn
Anleitung
Normal
Hilfsfunktion
TV VCR/
Diese Fernbedienung ist eine intelligente Fernbedienung, die die
neueste Technologie kombiniert. Durch nur einfache Einstellung
kann sie Ihre alltäglichen Elektrogeräte steuern: TV-Gerät, STB,
DVD, Stereo und so weiter. Die innovative Digitaltechnik des
Kopierens kann für Sie die originalen Funktionen der
Fernbedienung gänzlich umsetzen und integrieren. Im Fall des
Verlierens, der Beschädigung, der Substitution und Integration
der Fernbedienung der Elektrogeräte ist diese Fernbedienung
die beste Wahl für Sie.
v
pro RM-411
v
pro
RM-411
12
Batterien einlegen
Öffnen Sie den Deckel des Batteriefachs und legen Sie zwei neueAA
Batterien (Nr. 5, nicht im Lieferumfang enthalten) entsprechend der
Polaritätsmarkierungen “+/-” im Batteriefach ein.
※Bitte mischen die neuen und alten Batterien oder verschiedene Typen von
Batterien nicht!
Falls eine Batterie ausläuft, müssen Sie die Batterie entfernen, reinigen
das Batterie-Pack und setzen Sie eine Neue ein.
Entfernen Sie die Batterien von dem Batterie-Pack, wenn Sie für eine
lange Zeit die Fernbedienung nicht benutzen werden.
※
※
Shift der mehreren Geräte
Mehrere Geräte: Eine Taste enthält zwei Gerätsseite. Insgesamt gibt es 6
diese Taste. Folgenderweise:
Sie schalten das Gerät außerhalb den Klammern ein, wenn Sie die Taste
einmal drücken und die LED einmal blinkt; Sie schalten das Gerät innerhalb
den Klammern ein, wenn Sie die Taste zweimal kurz drücken und die LED
zweimal blinkt.
Z.B. : die Taste “TV”. Sie schalten das Gerät “TV1” ein durch einmaliges
Drücken auf die Taste “TV1” und die LED blinkt einmal; weckseln zum Gerät
“TV2” durch zwei kurze Drücken auf die Taste “TV1” und die LED blinkt zwei
Mal.
Einstellungen der Fernbedienung
A Eingabe von Codes.
1 Suchen Sie den ersten Code für das Gerät,
welches Sie bedienen möchten, auf der
Code-Tabelle. Beispiel: Wenn Ihr erster
Fernseher ein AWAist, dann wäre der
erste Code 0 02.
.
1
2 Halten Sie die "Settings" Taste gedrückt und
drücken Sie dann die "Select Equipment"
Taste, um den Modus auf ihr gewünschtes
Gerät einzustellen. Zum Beispiel: Drücken
Sie die "Settings" Taste und die "TV1” Taste,
um den Modus auf Ihren ersten Fernseher
einzustellen.
.
3 Wenn die Anzeigeleuchte aufleuchtet,
lassen Sie gleichzeitig die "Settings"
und die "TV1” Taste los.
.
4 Geben Sie den vierstelligen Code 0102
in der gleichen Reihenfolge wie auf der
Code-Tabelle ein.
Hinweis: Die Anzeigeleuchte wird jedesmal,
wenn Sie eine Ziffer eingeben, einmal kurz
aufleuchten.
.
5 Nachdem Sie den gesamten Code
eingegeben haben, wird die
Anzeigeleuchte erlöschen.
.
6 Überprüfen Sie, ob die anderen Tasten normal funktionieren. Wenn die
Tasten ordnungsgemäß funktionieren, war die "Settings" Einstellung
erfolgreich. Wenn die Tasten nicht normal funktionieren, wiederholen
Sie bitte die Schritte 2 bis 5
.

13
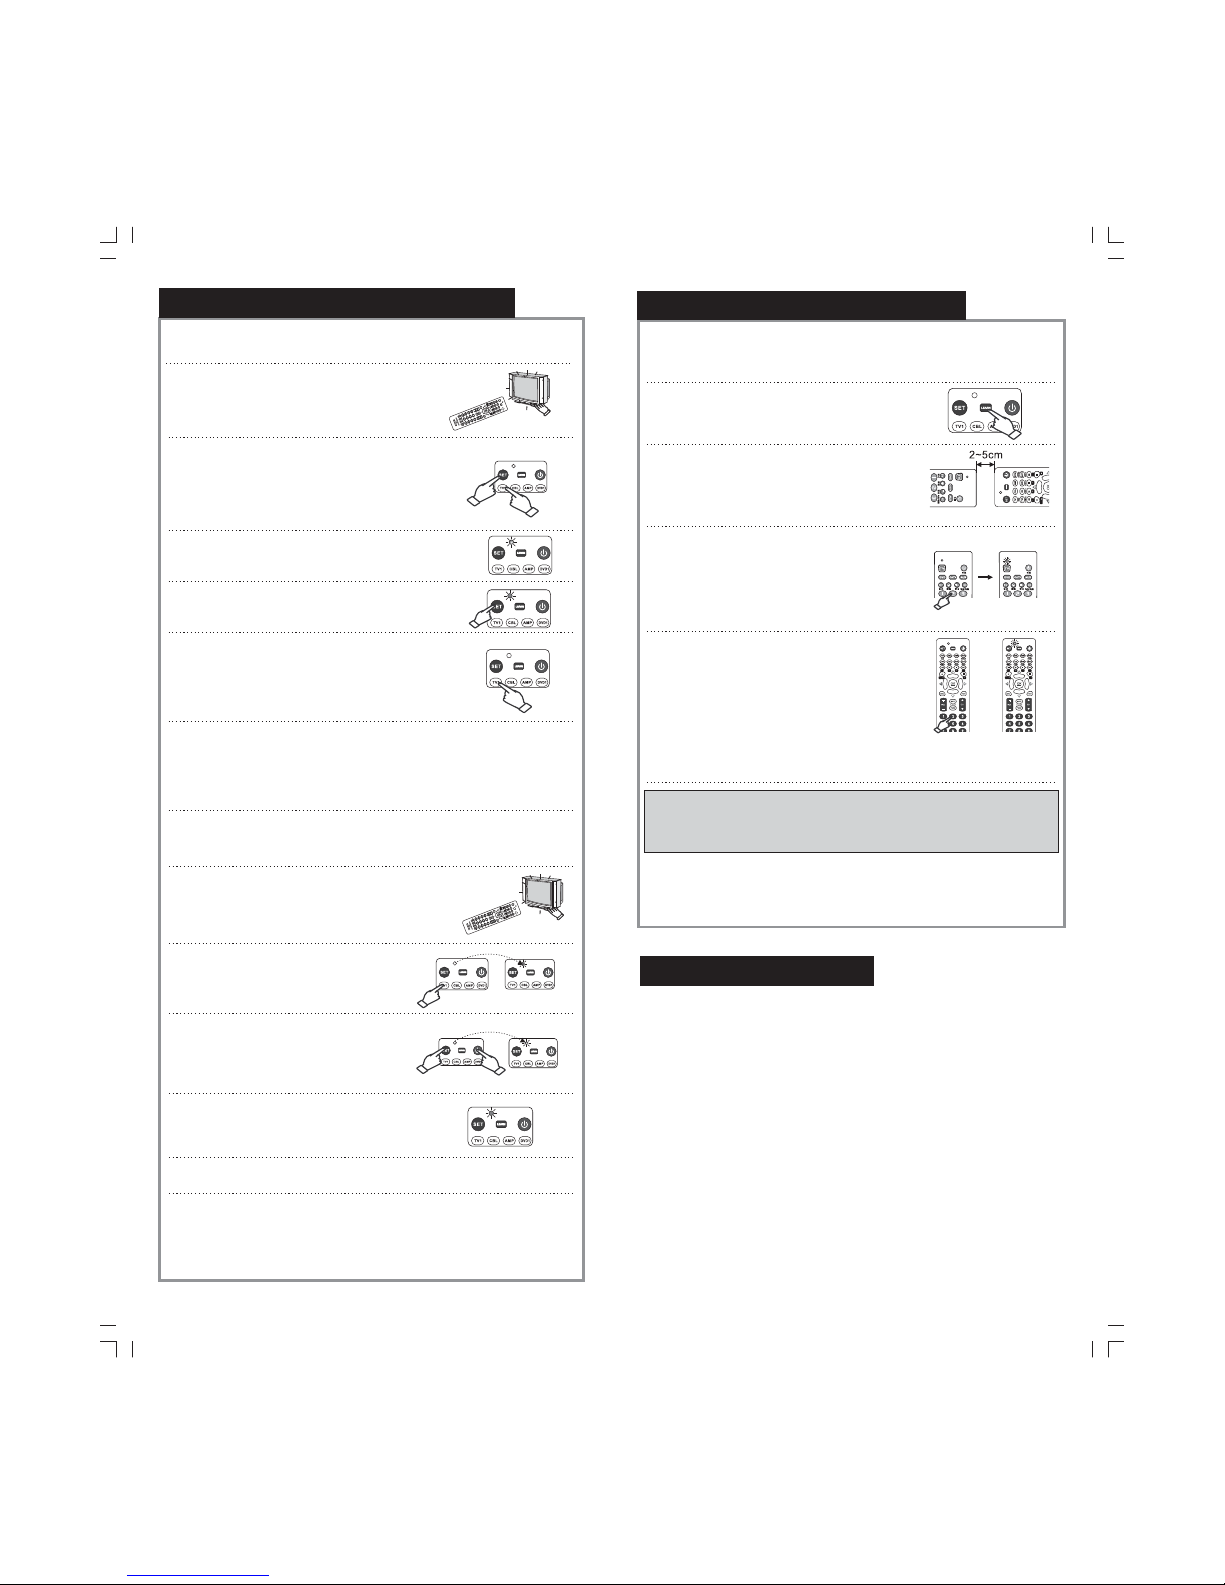
B Manuelle Codesuche.
1.Schalten Sie das Gerät (z.B. Fernseher
oder Videorekorder), welches Sie bedienen
möchten, manuell mit der "Power" Taste ein.
Richten Sie die Fernbedienung direkt auf
das Empfangsfenster des Geräts.
2.Halten Sie die "Settings" Taste gedrückt und
drücken Sie dann die "Select Equipment"
Taste um den Modus auf ihr gewünschtes
Gerät einzustellen.
For example: Press the “SET”Button and
“TV1” Button to set the mode to your first
television set.
3 Wenn die Anzeigeleuchte aufleuchtet,
lassen Sie gleichzeitig die "Settings"
und die "TV1” Taste los.
.
4 Drücken Sie die "Settings" Taste noch einmal
und lassen Sie diese dann wieder los. Die
Anzeigeleuchte wird anfangen, zu blinken.
.
5 Drücken Sie die "Power Source" Taste
solange, bis sich das Gerät, welches Sie
bedienen, an- bzw. ausschaltet. Drücken
Sie dann erneut die "Select Equipment "
Taste, die Sie in Schritt 2 gedrückt hatten
(z.B. "TV1”)
.
6 Schalten Sie das Gerät, welches Sie soeben abgeschaltet haben,
wieder an. Überprüfen Sie, ob die restlichen Tasten der Fernbedienung
normal funktionieren. Wenn die Tasten ordnungsgemäß funktionieren,
war die "Settings" Einstellung erfolgreich. Wenn die Tasten nicht normal
funktionieren, wiederholen Sie bitte die Schritte 2 bis 5, bis Sie einen
Code gefunden haben, der für Ihr Gerät geeignet ist.
.
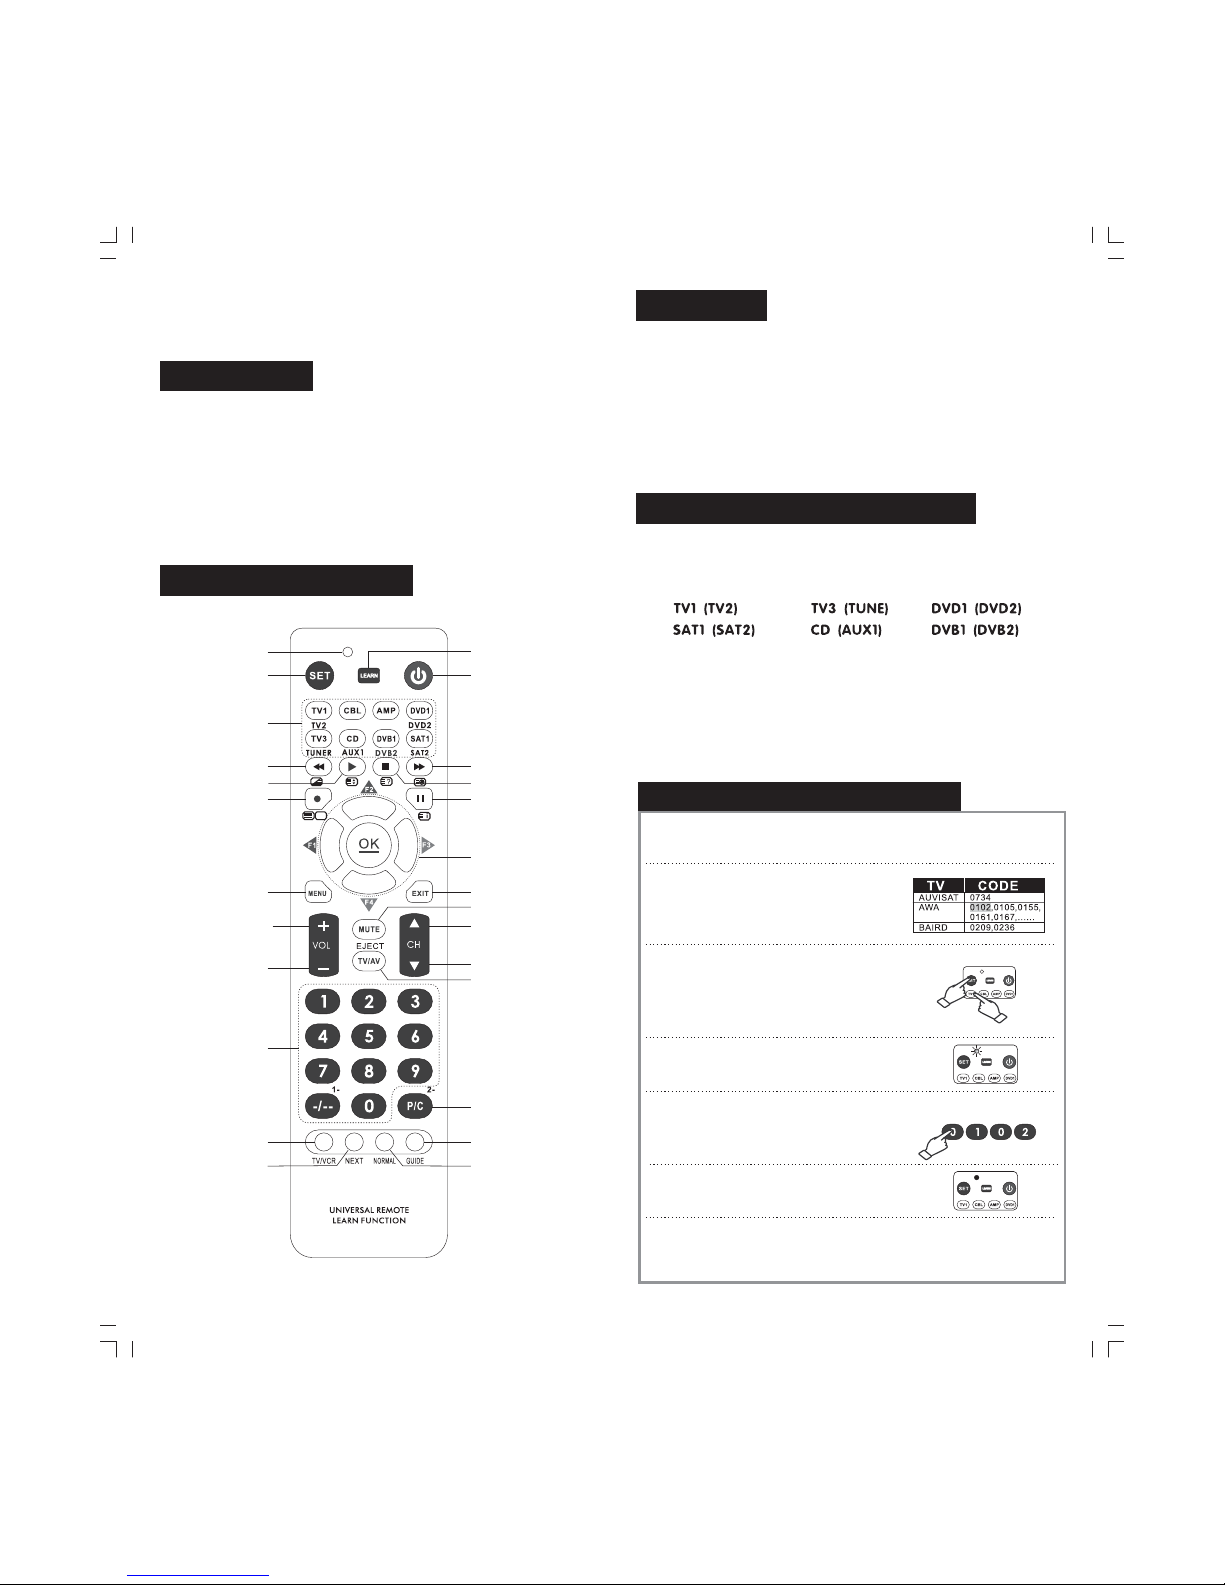
C Automatische Codesuche.
1 Schalten Sie das Gerät, welches Sie
bedienen möchten, manuell ein und
richten Sie die Fernbedienung direkt
auf das Empfangsfenster des Geräts.
.
2 Drücken Sie die Geräteschnittstelle,
welche Sie einstellen möchten
(z.B. "TV1”). Die Betriebskontrolllampe
wird kurz aufleuchten.
.
3.Halten Sie die "Settings" Taste gedrückt
und drücken Sie dann die "Power Source"
Taste bis die Betriebskontrolllampe
aufleuchtet. Lassen Sie dann die "Settings"
und die "Power Source" Tasten los.
4 Die Betriebskontrolllampe wird zu blinken
anfangen. Der automatische Suchmodus
ist aktiviert.
.
5 Wenn Ihr Fernseher sich abschaltet, drücken Sie sofort die "Random"
Taste der Fernbedienung und speichern somit den Code.
.
6 Überprüfen Sie, ob die restlichen Tasten der Fernbedienung normal
funktionieren. Zum Beispiel: Drücken Sie die "Power Source" Taste,
um zu sehen, ob der Fernseher dadurch ausgeschaltet wird und ob
der Fernseher nach Ende der Einstellung normal bedient werden kann.
Wenn der Fernseher nicht normal funktioniert, wiederholen Sie bitte
die Schritte 3 bis 6.
.
Einstellungen der Fernbedienung
14
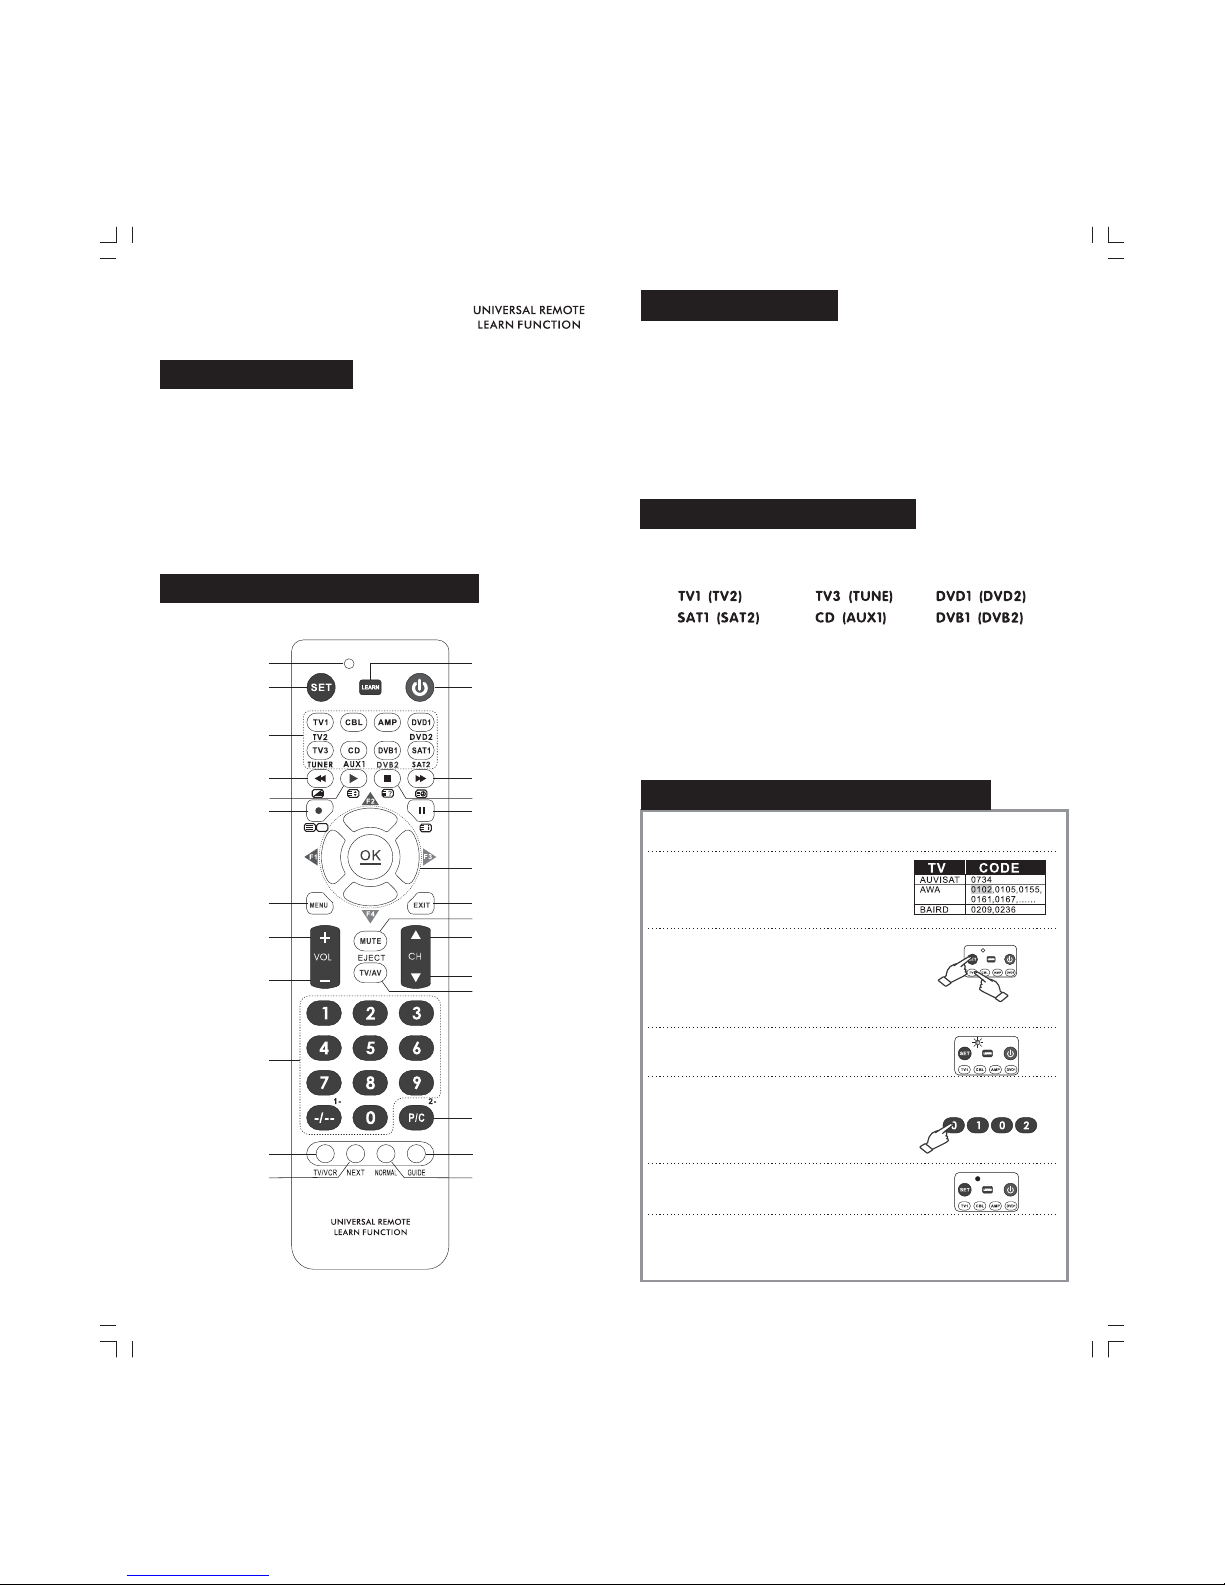
Die Learn-Funktion der Fernbedienung:
Einstellungsmethode:
Einstellungen der Fernbedienung
1 Drücken Sie zuerst die Mode-Taste der
Learn-Seite. Dann drücken Sie die Learn-Taste.
Halten Sie die Taste für ca. 3 Sek. Gedrückt, bis
die Learn-Funktion eingeschaltet wird.
.
※Bei der Funktion des Kopierens und der Umsetzung gibt es einen
gegebenen Datenstauraum. Wenn der Raum gefüllt ist, leuchtet die
LED und blinkt kurz fünf Mal, um aufzuweisen, dass die Funktion
nicht mehr wahrgenommen kann.
Wenn Sie wollen löschen einige kopierte oder umgesetzte Daten, halten
Sie die SET-Taste gedrückt, und gleichzeitig die Taste des Moduses.
Nachdem die LED leuchtet, geben Sie 9981 ein. So ist die Daten gelöscht.
2 Richten Sie den Infrarotlichtsender des Geräts,
die Sie kopieren und umsetzen wollen,
(normalerweise der Infrarotlichtsender, der
sich an der Spitze der Fernbedienung befindet)
mit dem Infrarotlichtsender dieser
Fernbedienung aus. (einen Abstand von etwa
2CM-5CM aufhalten)
.
3 Drücken Sie irgendwelche Funktiongstaste auf
der originalverpackten TV Fernbedienung.
Wenn die LED dauerhaft leuchtet, können Sie
die Taste loslassen. Nun werden die Daten der
Funktionstaste sofort kopiert und der
Fernbedienung übermittelt.
.
4.Drücken Sie die Tasten für den TV-Modus auf
der Fernbedienung. Nun blinkt die LED wieder.
Die Daten, die gerade kopiert und übermittelt
zu dieser Fernbedienung werden, sind sofort
auf die entsprechenden Tasten der
Fernbedienung umgesetzt. Bei Bedarf können
Sie die Schritte 3-4 wiederholen, die Daten
jeder Tasten einer nach der anderen kopieren
und umsetzen. Wenn Sie die Operation
schaffen, drücken Sie die Taste “SET”, um das
Kopieren und die Umsetzung zu beenden. Diese Fernbedienung
Diese Fernbedienung
Codesuche
Verfahren Sie wie folgt, wenn Sie den Code, die Ihr Gerät steuert, möchten,
nachdem Sie die automatische Codesuche geschafft.
1
3
.
.
Drücken Sie zuerst die Modus-Taste, die Sie wollen. (z.B. TV1, VCR1 etc.)
Gleichzeitig blinkt die LED einmal.
2.Halten Sie die Taste “SET” dauerhaft gedrückt. Dann drücken Sie die Taste “4”
und sehen, wie viele Male die LED blinkt. Anzahl der Male ist die vierte
Nummer des Codes.
Halten Sie die Taste “SET” dauerhaft gedrückt. Dann drücken Sie die Taste “3”
und sehen, wie viele Male die LED blinkt. Anzahl der Male ist die dritte
Nummer des Codes.
4.Halten Sie die Taste “SET” dauerhaft gedrückt. Dann drücken Sie die Taste “2”
und sehen, wie viele Male die LED blinkt. Anzahl der Male ist die zweite
Nummer des Codes.
5.Halten Sie die Taste “SET” dauerhaft gedrückt. Dann drücken Sie die Taste “1”
und sehen, wie viele Male die LED blinkt. Anzahl der Male ist die erste
Nummer des Codes.
Hinweis: Beim Suchen des Codes bedeutet es 0, wenn die LED gar nicht blinkt.

15
Lautstärkeaustausch
Durch die Einstellung dieser Funktion ist es zu realisieren, dass Sie
können die Lautstärke-Taste des TV-Geräts das TV-Gerät steuern,
obwohl es momentan nicht TV-Gerät ist.
Einstellungsmethode:
※Halten die Taste “SET” gedrückt. Dann drücken Sie die Taste “Modus”.
Nun leuchtet die LED. Bitte geben Sie den Code 9901 ein. Die Funktion
der Lautstärke wird eingeschaltet.
Halten die Taste “SET” gedrückt. Dann drücken Sie die Taste “Modus”.
Nun leuchtet die LED. Bitte geben Sie den Code 9902 ein. Die Funktion
der Lautstärke wird ausgeschaltet.
※
Code sperren, entsperren
Code sperren
Zuerst halten Sie die SET-Taste gedrückt,Danach drücken Sie die
Modus-Taste, (z.B. TV-Modus) Nachdem die LED leuchtet, geben Sie
die Nummer 9911 ein. Nun wird der Code sofort gesperrt. Andere
Daten können diesen Code keinesfalls ersetzen.
,
Entsperren
Zuerst halten Sie die SET-Taste gedrückt,Danach drücken Sie die
Modus-Taste, (z.B. TV-Modus) Nachdem die LED leuchtet, geben
Sie die Nummer 9912 ein. Nun wird der Code sofort entsperrt. Der
Verwender kann den Code wieder normal eingeben.
,
Hinweis: Wenn der Code gesperrt wird, können sie den Modus nicht
umschalten oder den Code der Fernbedienung eingeben, bis der
gesperrte Modus entsperrt wird.
Reichweite der Fernbedienung: weiter als 8 m (je nach Gerät)
Strom: DC 3V (zwei AA Batterien)
Technische Daten
Auf den Werkstandard zurücksetzen
Hinweise
1.Versuchen Sie sicherzugehen, dass die Fernbedienung und der
Infrarotlichtsender der originalverpackte Fernbedienung des Geräts, die
gepaart werden werden, abstimmen und innerhalb der Reichweite sind
2.Diese Fernbedienung funktioniert nicht als eine neue Funktion
irgendeines Geräts. Wenn Ihr Gerät über keinen Sender und Receiver
verfügen, funktioniert die Fernbedienung gar nicht.
3.Achten Sie auf die richtige Polarität, wenn Sie die Batterien einlegen.
4.Im Fall der unsachgemäßer Behandlung kann es geschehen, dass die
Fernbedienung nicht mehr richtig funktionieren oder steuern. Nun
versuchen Sie, die Batterien zu entfernen und nach 20 Minuten wieder
einzulegen. So kehrt die Fernbedienung wieder zum Normalzustand
zurück.
Halten Sie die Taste“SET”gedrückt Und “Modus” Nun leuchtet die LED.
Geben Sie anschließend die Codenummer 9990, damit die Fernbedienung
auf die Werkeinstellungen zurückgesetzt wird.
,,
Unsere Firma behält sich das Recht der endgültigen Interpretation dieses
Handbuchs vor. Design und technische Daten unterliegen unangekündigten
Änderungen.
16

17 18

19 20

21 22

23 24

25 26

27 28

29 30

31 32

33 34

35 36
Other manuals for Intelligent RM-411 GENIUS
1
Table of contents