Wacom Cintiq Companion 2 User manual

About your Cintiq Companion 2
Introduction
Your Cintiq Companion 2 is a high-performance mobile computer that supports both pen and
touch input, and is designed to accommodate your work preferences. The Cintiq operates in two
different modes: plugged into your computer, or as a completely mobile, battery-powered device.
See Cintiq Companion 2 Modes for descriptions of Desktop and Mobile Mode features.
Desktop Mode. When you connect the Cintiq to a computer using the Windows™ or
Macintosh™ operating system, it functions as a pen display that supports pen and touch
input for design and graphics work. It also can be used to play music from your
computer, or for video conferencing.
Mobile Mode. When the Cintiq is disconnected from your computer, it functions as a
Windows tablet with its own processor, pen and touch input, and connections to the
Internet and accessory devices. While on the go you can review and edit your work, and
access the Internet, email, and the features and functionality of the operating system.
If you change modes by connecting or disconnecting the Cintiq, it will automatically switch to
the new mode. You can move and share information between the two modes using a Micro SD
card.
The Cintiq Companion 2 can be used in landscape or portrait orientation, lying flat on your desk
or in your lap. In landscape orientation, it can be placed in one of three inclined positions, using
the optional stand. When drawing or sketching, you have up to 2048 pressure levels and a
comfortable drawing surface.
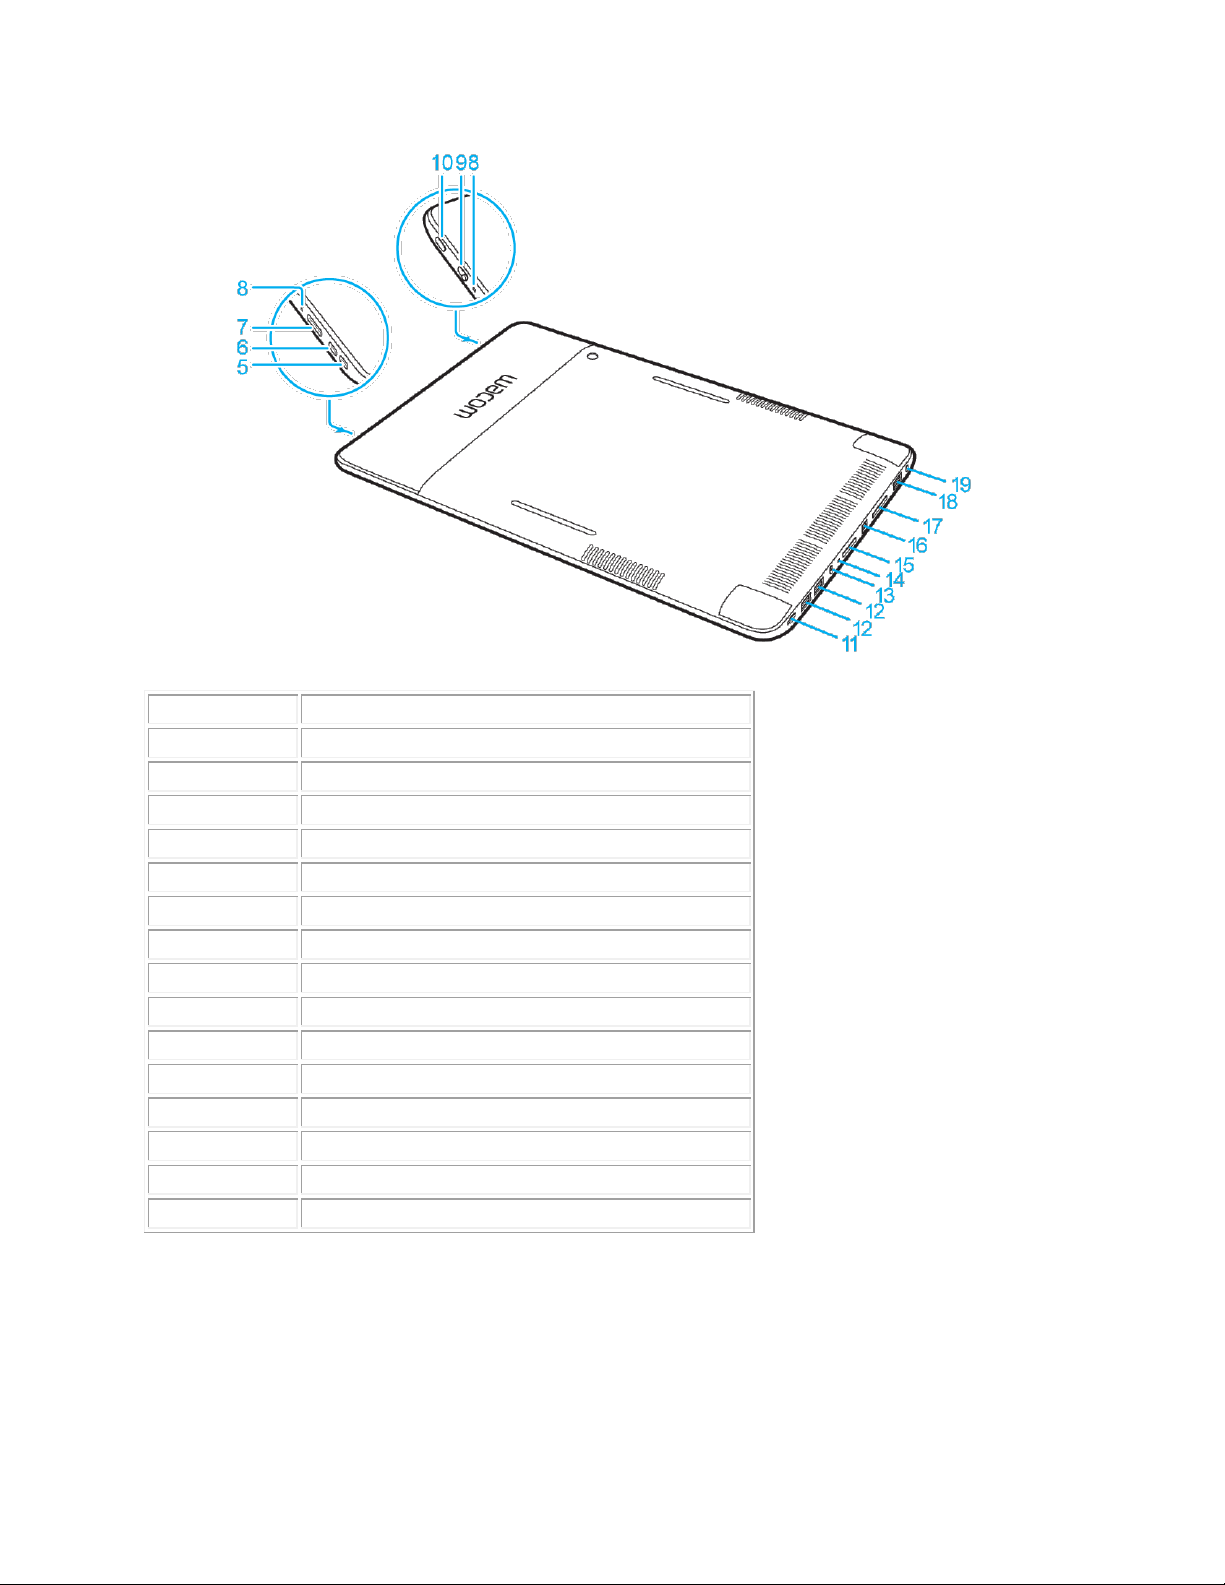
See Cintiq Companion 2 features for illustrations of your pen display, and Using your Cintiq for
general information and system requirements. Refer to your Quick Start Guide for additional
information and illustrations. The product Help topics can also help you make the best use of
your new Cintiq, and can be accessed from the Wacom Tablet Properties or the Wacom Desktop
Center.
Your Cintiq can be used with the pen that came with your product, or a Wacom™ accessory pen
or tool specified for use with the Cintiq Companion 2.
Cintiq Companion 2 components
Professional-level pen input
Multi-finger touch input
Two speakers

Headphone and microphone jacks
Volume control button
Autorotate toggle switch
Front camera for web conferencing
Rear camera for taking pictures or recording videos
Three USB ports for attaching peripheral devices
Mini DisplayPort for video out
MicroSD card slot for additional storage and file exchange
SDXC card slot
Eight GB RAM (standard model)
Built-in Global Positioning System (GPS)
Bluetooth 4.0
Wifi network capability
Note: Accessories may not be supplied with all models. Check the contents listed on the
product packaging.
Battery status and operation
Battery status for the Cintiq Companion 2 is shown in the Wacom Desktop Center and on the
pen display.
The level of charge is shown by the battery icon in the top corner of the Wacom Desktop
Center. The icon will be be green, yellow, amber or red to indicate battery status.
Text beside the icon indicates Charging or Not Charging.
The color of the battery status LED on the pen display also indicates battery condition.
To charge the Cintiq in Mobile Mode, connect the Cintiq to a power source using the provided
power cable. If the battery charge falls to a low level, the battery status icon and the battery
status LED will turn red. Completely discharging the battery will cause the Cintiq to shut down.
If you have a problem with battery operation and are not able to resolve it, contact Wacom
Technical Support.
To protect and maximize the life of your battery:
Operate and store your Cintiq at room temperature.
Do not allow your battery to be completely discharged.
Do not ignore low-battery notifications.
When you disconnect the Cintiq from the power cable to begin using it as a mobile
device, check to see that the battery status LED is green.
If you will not be using your Cintiq for an extended period of time, charge the battery
before your final use.
Restart the Cintiq approximately once a month and check the battery status icon. Charge
the battery if it is low.

Important: Do not attempt to access, remove, repair, or alter the Cintiq battery. If you experience
a problem with the battery, contact Wacom Technical Support for your region.
Cintiq Companion 2 features
The controls of your Cintiq Companion 2 include:
Customizable ExpressKeys™: Six keys on the front of the creative pen display allow
you to set frequently used functions or keystrokes, simulate button clicks or modifier
keys, or create automatic settings for a number of applications. See Customizing the
ExpressKeys and About your Cintiq Companion 2.
Rocker Ring: The four-position Rocker Ring allows you to further customize your
functions. You can assign the positions of the Rocker Ring and Center Button to various
settings, menu and keystroke options from the Rocker Ring tab in the Wacom Tablet
Properties. See Using the Rocker Ring.
The front and rear illustrations show the features of your pen display. For a general description
of your Cintiq, see About your Cintiq Companion 2.
Number
Item
1
ExpressKeys
2
Rocker Ring
3
Front camera
4
Speakers

Number
Item
5
Volume up
6
Volume down
7
Power button
8
Microphone
9
Auto-rotate switch
10
Kensington security slot
11
Micro SD port
12
USB 3.0 port
13
DC jack
14
Power Status LED
15
2-in-1 connector
16
MiniDisplay port
17
SD port
18
USB 3.0 port
19
Headphone jack
Cintiq Companion 2 Mobile and Desktop Modes
The Desktop Mode is enabled when the Cintiq is connected to your computer with the 2-in-1
cable, and the Wacom driver software for PC or Mac operation has been installed. The driver for

Desktop Mode can be installed and updated using the Updates section of the Wacom Desktop
Center.
The Cintiq is in Mobile Mode when it is not connected to your computer with the 2-in-1 cable.
When in Mobile Mode, the Cintiq will function as an Windows tablet with pen and touch input
capability. The Windows 8.1 software used in Mobile Mode operation is pre-installed on your
Cintiq.
You can move files between Desktop and Mobile Modes using a MicroSD card, which is
accessible in both modes.
See the Quick Start Guide included with your Cintiq for specific instructions on setup and driver
installation. See About your Cintiq Companion 2 for a description of the features of your new
Cintiq.
Pen and touch
Pen and touch in Mobile Mode function much the same as in Desktop Mode. In some instances,
Mobile Mode applications may not support all pen features. Touch is disabled when the pen is
brought within proximity of the screen (approximately 5 mm or 0.2 inch).
Rocker Ring and Center Button
The Rocker Ring and Center Button functions are much the same in Desktop and Mobile Modes.
The settings can be changed in the Wacom Tablet Properties, and the Wacom Desktop Center.
Calibrating your Cintiq
For optimum performance, calibrate the Cintiq to align the screen cursor with the position of the
pen on the screen. This is required to compensate for viewing angle, and to adjust for parallax.
1. Set up your Cintiq in its working position.
2. Open the Wacom Tablet Properties. If more than one tablet or pen display is installed on
your system, select the pen display you are working with from the Device list.
3. Select a pen from the Tool list.
4. Select the Calibrate tab.

5. If you are working with multiple monitors, select the monitor corresponding to your
Cintiq from the dropdown menu. Only monitors set to one of the resolutions supported by
Cintiq will appear in the list.
6. Click Calibrate... to activate the calibration screen.
7. Holding the pen, sit or stand as you normally would when working with the Cintiq. Use
the pen tip to click on the center of the crosshairs in the upper-left corner.
8. Click on the center of the crosshairs that are displayed in the remaining corners.
9. Test the alignment by positioning the pen at a few different points on the display.
10. Click OK to accept the calibration, or Try Again to recalibrate.
Care and maintenance
Simple care and maintenance will ensure optimum performance from your Wacom product.
Keep the pen and pen display clean and free of dust and dirt.
Replace your pen nibs frequently to avoid scratching the surface with worn pen nibs.
Clean the surface using an anti-static cloth or slightly damp cloth and light pressure. Do not use
detergent.
Use and store your pen display and pen in a clean, dry location, and avoid extremes in
temperature.
Do not disassemble the pen tablet or the pen, except to add a color ring to the pen. Taking apart
the product will void your warranty.
Important: Take care to not spill liquids onto your pen display or pen. Both contain electronic
parts that will fail if exposed to liquids.

Replacing the pen nib
To protect your pen display from scratches and for best performance, replace your pen nib when
it becomes too short or has a sharp edge. A nib should be replaced when it is approximately 1
mm (1/25 inch) in length. Replacement nibs and a nib removal tool are provided inside the pen
case.
If you need pen nibs or other accessories, please visit the Store page of the Wacom website.
To replace the pen nib:
1. Clasp the old nib and pull it straight out of the pen using the nib removal tool, a pair of tweezers,
needle-nosed pliers, or similar tool.
2. Slide the end of the new nib straight into the barrel of the pen and push the nib slowly and
firmly until it stops.
Note: Stroke nibs are spring-loaded, providing additional tactile feedback when you are working
an Airbrush. They are installed in the same manner as a standard pen nib.
Wacom Tablet Properties overview
Use the Wacom Tablet Properties to customize your pen tablet or tools. When you open Tablet
Properties, icons for all connected tablets and all tools that have been used on the tablet are
displayed in the Tool list, as well as a Touch icon for tablets with touch. All settings apply to the
selected tablet or pen display.
To customize, make changes to the controls available on the tabs for ExpressKeys, Display
Toggle, Touch Ring, and other features. Changes will take effect immediately. Click Default to
return to the factory settings. You can use your keyboard tab and arrow keys to navigate around
Tablet Properties.
Tool Tips are available for most Tablet Properties items. Position the screen cursor over an item
and let it rest there. The appropriate Tool Tip will pop up in a few moments.

Tablet Properties features:
The Device, Tool, and Application icons show your settings for those items.
oClick Functions to customize the ExpressKey and Touch Ring settings.
oDisplay Toggle options are available on multiple monitor systems.
oClick Touch to customize your touch settings.
oClick the other Tool icons to customize those settings. A tool icon appears after
you have used that tool.
Default returns the selected tab to its default settings.
About displays the software version and diagnostic information.
Options displays Advanced settings.
The ?icon displays the Help topics for the selected tab.
Notes:
Wacom Tablet Properties will not launch unless a supported tablet or pen display is
connected to the computer.
If you have only an Intuos connected, you will not see the Device and Tool rows in
Tablet Properties.

Settings can only be viewed or changed for an attached tablet or pen display.
The Application list is optional. It is not necessary to select or add applications in order
to customize your pen tablet tool(s).
Advanced options
The Options dialog lets you set several use preferences for your pen tablet. Click on the Wacom
Tablet Properties Options... button to access the Options dialog.
Note: The Brightness Adjustment setting is available only on the Intuos Pro.
The side switch mode settings are:
Hover Click will perform click functions without touching the pen tip to the tablet
surface.
Click & Tap will enable the precise placement of click functions. It requires pressing the
side switch and then touching the pen tip to the tablet surface to perform the function.
The remaining settings are:

Handedness sets the button orientation of the optional Mouse for right- or left-handed
use.
Brightness Adjustment adjusts the brightness level, or to turn off status LEDs and active
area markers.
The Pressure Compatibility box should be checked if you are using graphics
applications that only support a maximum of 1024 levels of pressure (such as Adobe CC,
and Corel Painter), so the pen will not feel overly sensitive.
On Intuos or Intuos Pro, the Show wireless tablet battery box enables or disables
display of the battery status icon in your system tray for wireless operation.
Application-specific settings
The Application list enables you to add individual applications, and then customize your tool
settings for that application. For example, if you select an application icon and change the Grip
Pen settings, the changes will apply to the Grip Pen only while you are using that application.
Application-specific settings can be used with all Intuos and Cintiq products, and with the
ExpressKey Remote device.
When application-specific settings are added, the All icon changes to All Other, and an
application icon is displayed for the newly added application(s).
After adding an application, its icon appears in the Application list whenever the
associated tool is selected in the Tool list.
Select the application, then customize the Wacom Tablet Properties tab settings for your
tool and application.

To create an application-specific setting:
1. In Tablet Properties, choose the Device and the Tool for which you want to create an
application-specific setting.
2. Select the application from the Application list and click the +button.
3. In the Currently Open Applications box, select an application for which to create
custom settings, or browse to select the executable file of any application installed on
your computer.
4. Click OK.
To remove an application-specific setting:
1. In the Tool list, select the tool from which you want to remove the application-specific
setting.
2. In the Application list, select the application you want to remove.
3. Click on the Application list –button. In the dialog, click Delete to confirm your
selection. The selected application is removed from the list, along with any custom tool
settings.

4. To remove all application-specific settings from a tool, remove it from the Tool list. Then
place the tool back on the tablet. The tool will be added back to the Tool list using the
default settings.
Note: This method cannot be used to remove custom Functions settings.
If you are working with a commonly used application such as Photoshop®or Illustrator®, your
tablet's software will identify the application and set the ExpressKeys™ to commonly used
functions for that application.
Notes:
If two programs have the same executable file name, they will share the same customized
settings.
If you are using an application for which you have already customized your ExpressKeys,
those settings will take precedence over any automatic ExpressKey default settings
provided by that application. Default settings will take effect automatically only if you
have not entered your own ExpressKey settings for that application.
Button functions
Use the Wacom Tablet Properties to customize the functions that are assigned to tool buttons,
ExpressKeys or the Touch Ring settings. Note that button function options may vary, depending
on your tablet model. Button functions for toggle-only controls are described in Button functions:
Toggle settings.
Click: Simulates a primary mouse button click. Be sure at least one button performs this
function so you can always navigate and click.
Right click: Simulates a right mouse button click to display a context menu.
Middle click: Simulates a middle mouse button click.
Double click: Simulates a double-click. For easier double-clicking, use this function
instead of tapping twice with the pen tip.
Click lock: Simulates holding down the primary mouse button. Press the tool button once
to initiate click lock, and again to release it. Use Click lock to drag objects or select
blocks of text.
4th click or 5th click: Simulates a fourth or fifth mouse button click.
Keystroke: Displays the Define Keystroke dialog to create keystroke combinations for
ExpressKeys, mouse, and other functions.
The Define Keystrokes dialog is used with the Touch Ring, ExpressKeys or pen buttons.

Enter your keystroke combination in the Keys box. The combinations can include letters,
numbers, function keys and modifier keys. You can also choose combinations from the
Add Special drop-down menu.
Enter a Name for the defined keystrokes pair(s) and click OK.
The Delete button removes the last entry in the Keys box. The Clear button clears the
Keys box.
After defining a keystroke sequence, click OK.
oNote: Because the Enter (Windows®) and return (Mac®) keys can be selected as
a defined keystroke, they cannot be used to select OK.
Enter a name for the keystroke definition. You can create different keystroke functions
for different applications.
When defining keystrokes for the Touch Ring or the mouse fingerwheel, use the two
Keys entry boxes for clockwise and counter-clockwise movement on the ring, or for front
and back movement of the mouse fingerwheel.
To learn which keystroke shortcuts are supported by a particular application, see the instructions
for the application.

Modifier...: Dialog that enables you to simulate modifier keys: Shift, Alt, or Ctrl for Windows,
or Shift, Option, Command, and Control for Mac. Use the Key setting to perform modifier
functions, and a modifier to simulate pressing the associated button on a mouse.
Back and Forward: Simulates the Back or Forward command in browser applications.
Pan/Scroll: Enables you to position a document or image within the active pane by pressing a
pen button set for Pan/Scroll and then dragging with the pen tip across the tablet active area. Use
the Pan/Scroll slider to set a scrolling speed for use in applications that do not support grabber
hand (pixel-level) panning.
Auto Scroll/Zoom: (Intuos Pro.) Sets the Touch Ring to zoom in most graphics applications and
scroll in most other applications.
Scroll and Zoom: (Intuos Pro.) Sets the Touch Ring for scrolling or zooming action.
Show Desktop: Minimizes all open windows to display a clean desktop.
Switch Application: Brings up the application switching dialog with focus on the next open
application. On Windows 7®and Windows Vista®systems running Aero, Flip 3D will focus on
the next open application.
Open/Run: Opens a dialog to select a specific application, file, or a script to launch. Browse to
select the item, and it will appear in the Name box. Click OK to assign the item as your tool
button option. If you select OSC Radial Menu, your selection will be displayed there.
Exposé: (Mac®) Tiles all open windows. To access this option, choose Keystroke... and then
click on the Add Special menu within the dialog.
Pressure Hold: Locks the pressure at the current pressure level until the button is released. For
example, you can paint with pressure sensitivity until you reach the brush size you like. You can
then press the button and continue painting with the same size brush until the button is released.
Disabled: Disables the button function.
Application Defined: This is for applications, such as CAD programs, that have built-in tablet
support. It reports only the button number to the application. It may also be used by some
integrated applications for direct control of the ExpressKeys and Touch Ring.
Settings: Displays an interactive diagram showing the current settings of the current
ExpressKey, Touch Ring, pen, and touch settings. Click on any section of the diagram to open
the appropriate Tablet Properties tab and adjust settings as needed.
Button functions: Toggle settings

You can use the Wacom Tablet Properties to customize the functions that are assigned to tool
buttons, ExpressKeys, Touch Ring, or OSC Radial Menu settings. The following button
functions control toggle settings. Other button functions are described in Button functions.
Precision Mode: Use the slider to change the mapping around the current pen tip position. You
can assign the function to a tool button, or press and hold the button until you want to return to
normal mapping. When using a tool in Mouse mode, screen cursor movement is adjusted as if
acceleration were off and speed set to slow.
Display Toggle: This setting is for multiple monitor systems. It toggles the current tablet
mapping and screen cursor between different displays when you press an ExpressKey that has
been assigned to this function.
Mode Toggle: This setting for pen buttons toggles between Pen mode and Mouse mode. When
first setting a button to Mode Toggle... in Mouse mode, use the sliders to adjust the screen cursor
acceleration and tracking speed.
Skip: Sets the Toggle Button to skip a function mode that has been assigned this option in the
toggle sequence.
Ink Toggle: (Mac) Toggles the Ink in any Application function of Ink on and off. When
Handwriting recognition is turned on, Ink recognizes and converts your handwriting into text and
inserts it into a document.
Touch On/Off: Use Touch On/Off when you want to work in pen mode only. Disable touch by
pressing an ExpressKey you have assigned to Touch On/Off. Press the ExpressKey again to
enable touch.
Mouse mode settings can be accessed from a number of different locations within the Wacom
Tablet Properties. However, only one Mouse Acceleration and Speed setting can be made for
each tool and application you are customizing.
Note: The mouse mode settings are independent of system settings. Changes you make to these
settings in the Wacom Tablet Properties do not affect similar computer system settings.
However, changes made to similar system settings may affect your tablet settings.
Display Toggle
Display Toggle is available when working on multiple monitor systems. This feature allows you
to work with your tablet on all displays or on one display at a time. See Working with multiple
monitors.
In Wacom Tablet Properties, the Display Toggle tab is automatically available when your pen
tablet is installed on a multi-monitor system. This tab lets you select the monitor(s) to be
included in the toggle sequence.

After setting an ExpressKey or pen side switch to Display Toggle, you can use it to toggle the
current tablet mapping between a base mapping and other monitors. The display options are:
Pen display to desktop toggles the screen cursor from Cintiq to the entire system
desktop. Press the button a second time to return the cursor to Cintiq.
Pen display to other displays toggles the screen cursor from Cintiq to another active pen
display or monitor. The cursor toggles to each connected display in turn, then returns to
the Cintiq where the first toggle began.
Active Area options determine the size of the area where the pen will function on the pen
display.
Force Proportions adjusts the size of the active area to maintain correct vertical and
horizontal proportions between Cintiq and the entire desktop or display. Depending on
your settings, some portions of the active area may no longer be usable when this option
is selected. When deselected, the correct scale or proportions are not maintained.
Use Inset Area limits the active area to a sizing of 6 x 8 inches. If Force Proportions is
also selected, this sizing may be less. When deselected, as much of the active area as
possible will be used for tablet-to-display mapping.
Important: When using application-specific settings with Display Toggle, be sure that each
customized application in the Application list (including All Other) has a tool button or
ExpressKey assigned to Display Toggle.
Any of the following actions will return the toggle sequence to the base mapping:
Launching a graphics application that supports pressure sensitivity.
Logging out of or rebooting the system.
Switching users.
Placing the system in sleep mode.
Changing the Display Toggle settings.
Changing the resolution or number of displays on your system.

Using the Mode Toggle... function.
Selecting Pen Mode or Mouse Mode from the OSC Radial Menu.
Customizing the ExpressKeys for Cintiq
You can customize the ExpressKeys to execute the functions that make your work quickest and
easiest for you. Your Cintiq has four or more ExpressKeys, depending on the model.
Select the ExpressKeys tab in Wacom Tablet Properties, then choose functions from the
dropdown menus. For the Cintiq 22HD and Cintiq 24HD, which have a set of ExpressKeys on
both the left and right bezels, there is a separate Left and Right designation or button that allows
you to customize the ExpressKeys on each side individually.
Lightly touch any ExpressKey to view the current ExpressKeys settings on your screen at any
time. For some Cintiq models, you will need to click the Show Express View checkbox on the
ExpressKeys tab to activate Express View.

Note: The functions can be defined for use with specific applications. However, some
applications can override and control the Rocker Ring functions you select from the Wacom
Tablet Properties. For details, see Using integrated applications.
Radial Menu
The Radial Menu feature for all Intuos and Cintiq products is now available from the On-Screen
Controls tab in Wacom Tablet Properties. You can choose a Radial Menu display by clicking the
circular icon in the dialog that opens from the On-Screen Controls tab when you create, edit or
duplicate a screen key panel.
To learn how to use On-Screen Controls, see Creating On-Screen Controls, Using On-Screen
Controls, and Customizing On-Screen Controls.
Glossary
Active area. The navigation and drawing area of the tablet where touch or your pen tablet tools
are detected.

Application-specific settings. Pen tablet tool and tablet settings that have been customized for
individual applications. Application-specific settings are in effect whenever you use the
application.
Aspect. The ratio between the vertical and horizontal dimension of the tablet or display.
Click force. The amount of force you must apply to the pen tip for a click to occur.
Digital Ink. Typically, handwritten content which has been created using a pen on a computer in
the form of sketches, ink mark-up, or handwriting. The handwriting can be converted to
typewritten text or used in its original format.
Display Toggle. A feature that allows you to work with your tablet on all displays or on one
display at a time. Available only on multiple monitor systems.
Double-click assist. A feature that makes it easier to double-click by setting the size of the
double-click distance.
Double-click distance. The maximum distance (in screen pixels) that the screen cursor can
move between clicks and still be accepted as a double-click. Increasing the double-click distance
makes double-clicking easier, but may cause a delay in brush strokes in some graphics
applications.
Double-click speed. The maximum time that can pass between clicks and still be accepted as a
double-click.
Eraser-aware application. A software application that has built-in support for the pen eraser.
These applications take advantage of the eraser in different ways, depending on what makes
sense for the application.
Expand. A motion used when navigating with touch. Touch the tablet surface with two fingers
spaced closely together, then move your fingers apart.
ExpressKeys. The customizable control keys located on your pen tablet.
ExpressKeys Left. Setting with the Touch Ring and ExpressKeys oriented to the left of the
tablet.
ExpressKeys Right. Setting with the Touch Ring and ExpressKeys oriented to the right of the
tablet.
Fingerwheel. The control wheel on the optional Airbrush.
LED. Light-Emitting Diode. Used as tablet indicator light(s).

Mapping. The relationship between the tool position on your pen tablet and the cursor position
on the monitor screen.
Modifier. Modifier keys include Shift, Alt, and Ctrl for Windows, or Shift, Control, Command,
and Option for Mac. You can customize your tool buttons or ExpressKeys to simulate a modifier
key.
Mouse Acceleration. A setting on the Mapping tab that allows you to adjust the screen cursor
acceleration when using mouse mode.
Mouse mode. A method for positioning the screen cursor. When you place a tool on the pen
tablet, you can move the screen cursor with a pick-up-and-slide motion similar to using a
traditional mouse. This is known as relative positioning, and is the default setting for the optional
mouse.
Mouse Speed. A setting on the Mapping tab that allows you to adjust the speed at which your
screen cursor moves when using mouse mode.
Nib. The replaceable pen tip.
Pairing. A method of creating a virtual cable link between two devices.
Pan. A motion used when navigating with touch. Touch the tablet surface with your fingers and
move them in the same direction.
Pen input. A method of controlling a computer using the pen.
Pen mode. A pen input method of positioning the screen cursor. When you place your pen on
the tablet, the screen cursor will jump to the corresponding point on the screen. This is known as
absolute positioning, and is the default setting for the pen tablet tools. Pen mode allows you to
quickly position the screen cursor without having to first find it and then move it across the
desktop.
Pinch. A motion used when navigating with touch. Touch the tablet with two fingers spaced
slightly apart, then move or ‘pinch’ your fingers together on the tablet surface.
Pixel. The smallest unit of measure on your display screen.
Pressure sensitive. A quality of the Wacom pen tip and eraser that senses the amount of
pressure being applied. This is used to create natural-looking pen, brush, and eraser strokes in
applications that are pressure-sensitive.
Pressure-sensitive application. Any application that supports pressure-sensitive input.
Proximity. The height above the tablet active area where pen detection occurs.
Table of contents