Walker WP5570LED User manual

COLOUR TELEVISION WITH REMOTE CONTROL
OPERATING INSTRUCTIONS
WP5570LED
BE WALKER WISE...logon to www.walker.ie
APPROVED

English - 1 -
Safety Precautions
Please read these instructions fully
before installing or operating.
Preparation
Place the device on a solid even surface. For
ventilation, leave a free space of at least 10 cm
all around the set. To prevent any fault and unsafe
situations, do not place any objects on top of
the set. Use this device in moderate climates.
Operation temperature and operation humidity:
5ºC up to 45ºC, 85% rel. humidity max. (not blocking
ventilation openings).
Intended Use
This device is used to receive and display TV
programmmes.The different connection options
make an additional expansion of the reception and
display. This device is only suitable for the operation
in dry interiors. This appliance is intended solely
for private domestic use and may not be used for
industrial and commercial purposes. We exclude
liability in principle, if the device is not used as
intended, or unauthorized modications have been
made. To operate your LED TV in extreme ambient
conditions may cause the damage of the device.
WARNING: Never let people (including
children) with physical, sensory or mental
abilities or lack of experience and / or knowledge
unsupervised use electrical device!
Children may not recognize dangers right!
The swallowing of batteries can be fatal. Keep
batteries always out of reach of small children.
If a battery is swallowed, immediately seek
medical attention. Keep the packaging lms out
of reach of children. Risk of suffocation.
Power source
• The TV should be operated only from a 220-240 V
AC, 50 Hz outlet.
• Warning: Do not leave your TV in standby or
operating mode when you leave your house.
Positioning the TV
• For ventilation, please leave a clear space of at least
10cm all around the TV.
• Do not block the ventilation openings.
• Do not place the TV on sloping or unstable surfaces,
the TV may tip over.
• To prevent damage to the TV, do not place any
objects on top of the TV.
• Only use the TV in moderate climates.
Contents
Safety Precautions ................................................. 1
Environmental Information ..................................... 2
TV - Features ......................................................... 3
Viewing the TV ...................................................... 3
Accessories included.............................................. 4
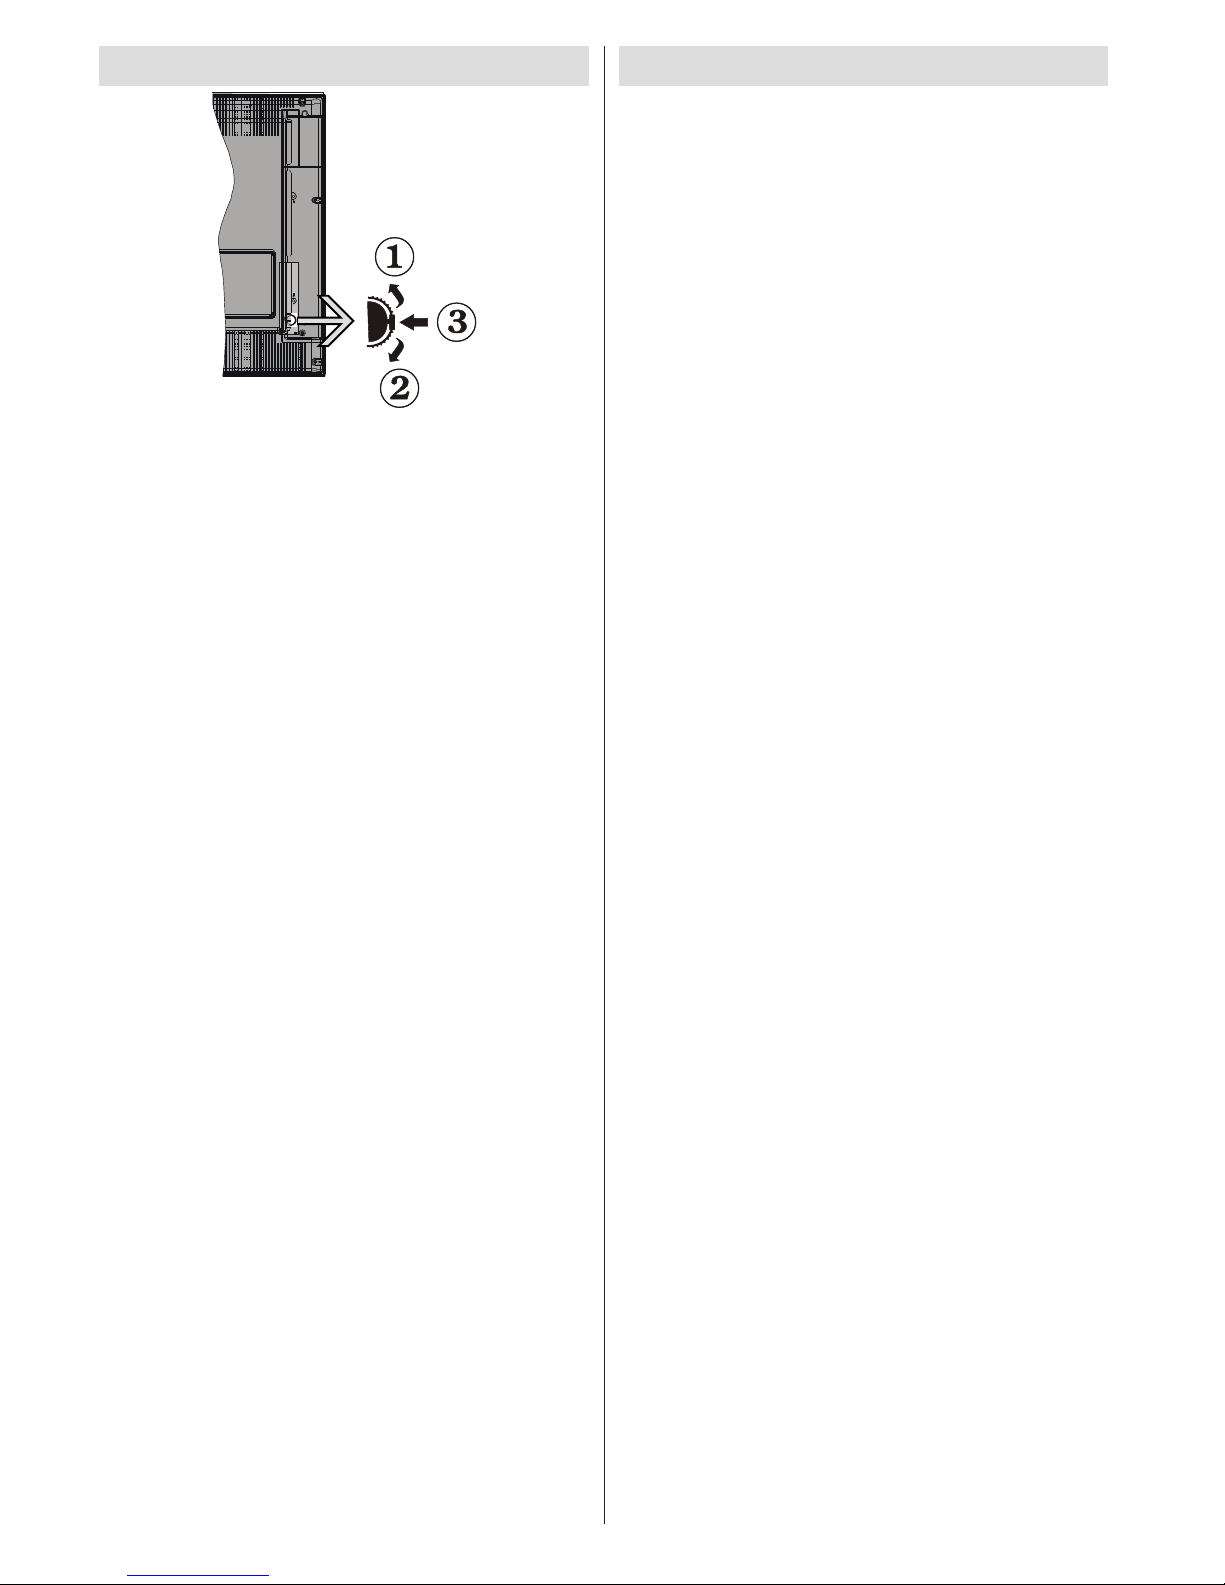
TV Control buttons & Operation ............................. 4
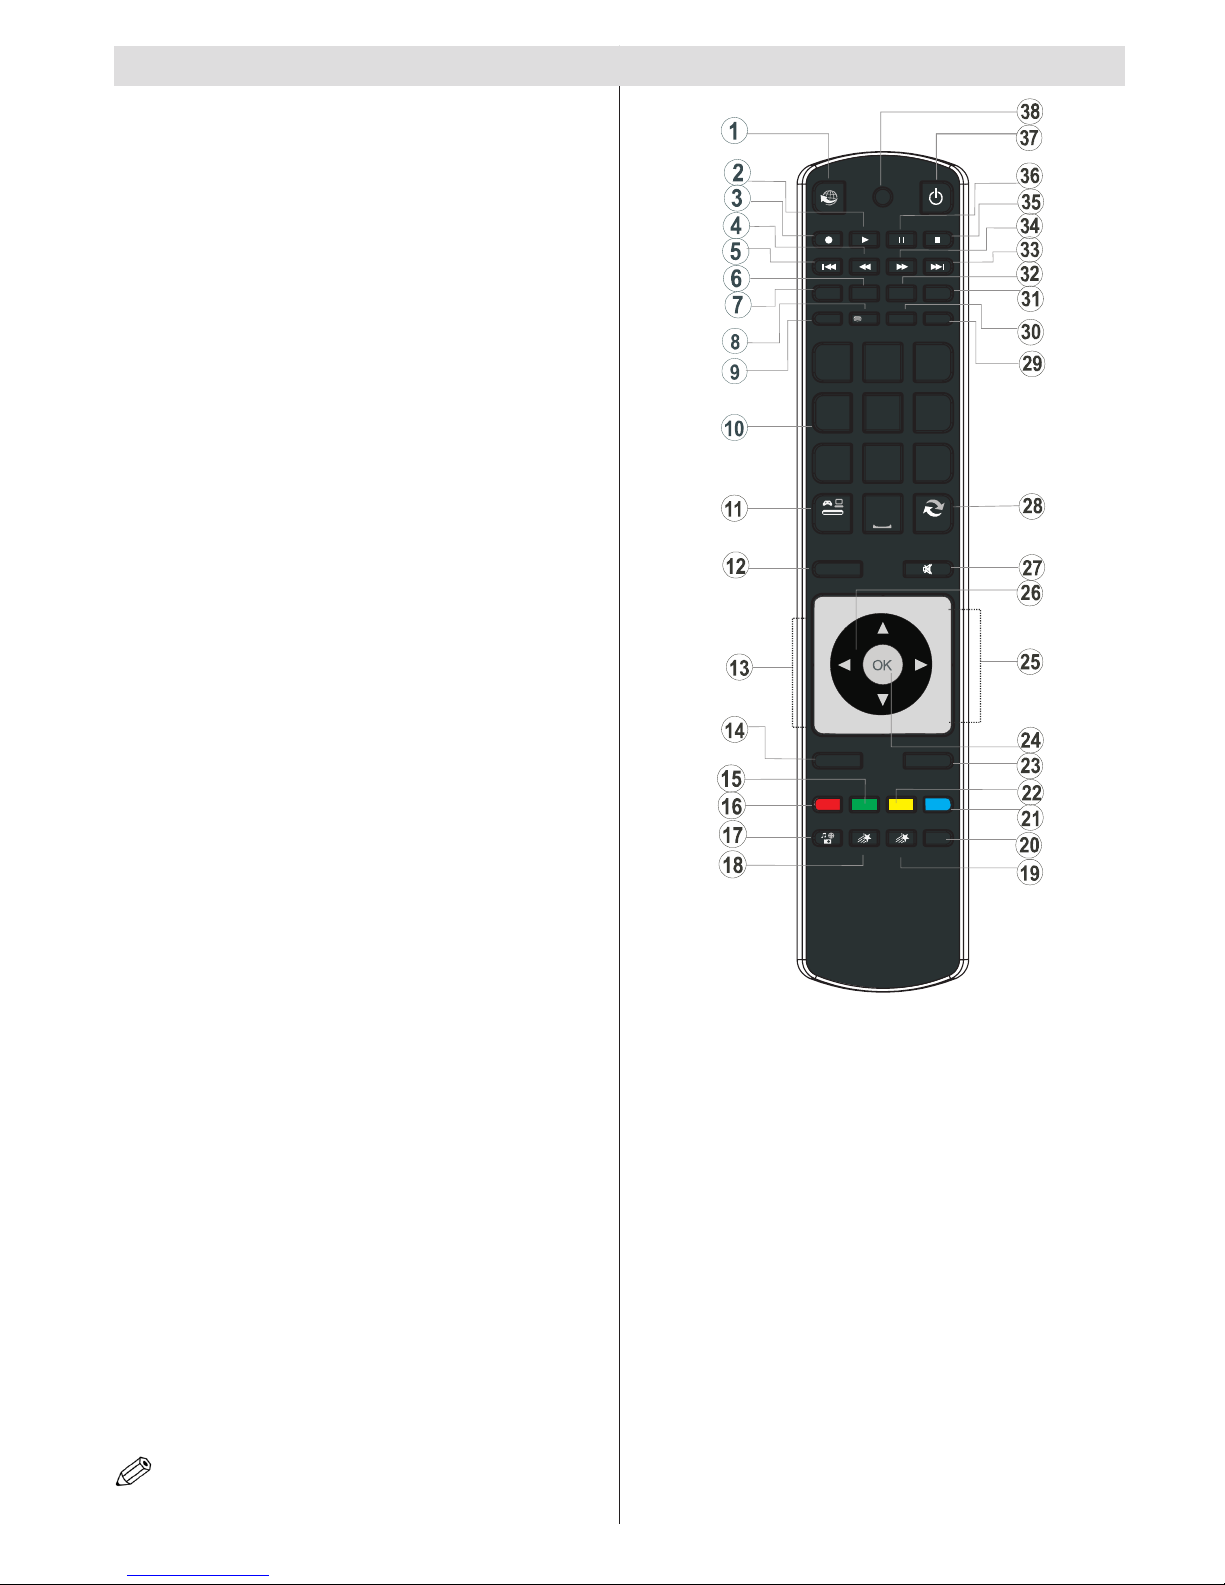
Viewing remote control .......................................... 5
Installing the Batteries to the Remote..................... 7
Connect Power & Antenna/Cable/Satellite ............. 7
Switching On/Off..................................................... 7
First Time Installation.............................................. 7
Media Playback via USB Input ............................... 9
Changing Image Size: Picture Formats................ 10
Using the Channel List ......................................... 10
Menu Features and Functions...............................11
Menu Features and Functions.............................. 12
Menu Features and Functions.............................. 13
Menu Features and Functions.............................. 14
Electronic Programme Guide (EPG) .................... 15
Recording a Programme ...................................... 15
Timeshift Recording ............................................. 16
Instant Recording ................................................. 16
Watching Recorded Programmes ....................... 16
Recording Conguration....................................... 16
Connectivity Functions ......................................... 17
Teletext ................................................................. 20
Using SatcoDX Feature........................................ 20
Software Upgrade................................................. 20
Troubleshooting & Tips......................................... 21
Internet Connection Not Available / DLNA Mode Not
Operating.............................................................. 22
Invalid Domain ..................................................... 22
Appendix A: PC Typical Display Modes ............... 23
Appendix B: AV and HDMI Signal Compatibility.... 23
Appendix C: Supported File Formats for USB Media
Browser ................................................................ 24
Appendix D: Supported DVI Resolutions .............. 25
Appendix E: Nero MediaHome Installation.......... 26
Specications .............................................................28
Licence Notications............................................. 28
Important Instruction............................................. 29

English - 2 -
Power cord and plug
• The power cord plug should be easily accessible.
In case of storms and lightning, when going on
holiday, or when the TV is not used for a long period
of time disconnect the power cord from the mains
power socket.
• The mains plug is used to disconnect TV set from
the mains and therefore it must remain readily
operable.
• Do not place the TV, furniture, etc. on the power
cord or pinch the cord.
• Handle the power cord by the plug, do not unplug
the TV by pulling the power cord.
• Never touch the power cord/plug with wet hands as
this could cause a short circuit or electric shock.
• Never make a knot in the power cord or tie it with
other cords.
• Power cords should be placed in such a way that
they are not likely to be stepped on or driven over.
• A damaged power cord/plug can cause re or give
you an electric shock. When damaged it must be
replaced, this should only be done by qualied
personnel.
Moisture and Water
• Do not use this TV in a humid or damp place (avoid
bathrooms, the sink in the kitchen, and near the
washing machine).
• Do not expose this TV to rain or water, as this may
be dangerous.
• Do not place objects lled with liquids, such as
ower vases, on top of the TV. Avoid from dripping
or splashing.
• If any solid object or liquid falls into the cabinet,
unplug the TV and have it checked by qualied
personnel before operating it any further.
Ventilation
• The slots and openings on the TV set are intended
for ventilation and to ensure reliable operation.
• To prevent overheating, these openings must not be
blocked or covered in anyway.
Heat sources and Flames
• Do not expose the TV to direct sunlight or other
heat sources.
• The TV should not be placed near to open ames
and sources of intense heat such as an electric
heater.
• Ensure that no open ame sources,
such as lighted candles, are placed
on top of the TV.
Headphone Volume
• Excessive sound pressure from
earphones and headphones can cause
hearing loss, please take care.
Wall Mounting (optional)
• To prevent injury, this TV must be securely attached
to the wall in accordance with the installation
instructions (if the option is available).
LCD Screen
• Occasionally, a few non-active pixels may appear
on the screen as a xed blue, green or red point.
Please note that this does not affect the performance
of your product.
• Take care not to scratch the screen with ngernails
or other hard objects.
Cleaning
• Before cleaning, unplug the TV from the wall
socket.
• Do not use liquid or aerosol cleaners. Only use a
soft, dry cloth.
Environmental Information
This television is designed to consume less energy
to save environment. You not only help to save the
environment but also you can save money by reducing
electricity bills thanks to the energy efciency feauture
of this TV. To reduce energy consumption, you should
take the following steps:
You can use Power Save Mode setting, located in the
Picture menu. If you set Power Save Mode as On, the
TV will switch to energy-saving mode and luminance
level of TV set will be decreased to optimum level.
Note that some picture settings will be unavailable to
be changed when the TV is in Power Save Mode.
When the TV is not in use, please switch off or
disconnect the TV from the mains plug. This will also
reduce energy consumption.
Disconnect power when going away for longer time.
It is highly recommended to activate Power Save Mode
setting to reduce your annual power consumption.
And also it is recommended to disconnect the TV
from the mains plug to save energy more when you
do not use.
Please helps us to save environment by following
these steps.
Repair Information
Please refer all servicing to qualied personnel. Only
qualied personnel must repair the TV. Please contact
your local dealer, where you have purchased this TV
for further information.

English - 3 -
TV - Features
• Remote controlled colour LED TV.
• Fully integrated digital/cable/satellite TV (DVB-
T/C/S-S2).
• HDMI connectors for digital video and audio.This
connection is also designed to accept high denition
signals.
• USB input.
• Programme recording.
• Programme timeshifting.
• 10000 programmes.
• OSD menu system.
• Scart socket for external devices (such as video,
video games, audio set, etc.).
• Stereo sound system.
• Teletext, fastext, TOP text.
• Headphone connection.
• Automatic programming system.
• Forward or backward manual tuning.
• Automatic power down after up to six hours.
• Sleep timer.
• Child lock.
• Automatic sound mute when no transmission.
• NTSC playback.
• AVL (Automatic Volume Limiting).
• PLL (Frequency Search).
• PC input.
• Plug&Play for Windows 98, ME, 2000, XP, Vista,
Windows 7.
• Game Mode (optional).
• Picture off function.
• Ethernet (LAN) for Internet connectivity and service.
• DLNA.
• 100Hz.
Viewing the TV

English - 4 -
TV Control buttons & Operation
1. Up direction
2. Down direction
3. Programme/Volume / AV / Standby-On selection
switch
Operation with the Buttons on the TV
Volume Setting
• You can move the control switch upward or
downward for changing the volume. To increase
volume, please move the switch upward. Move the
switch downward to decrease the volume. A volume
level scale (slider) will be displayed on the screen.
Programme Selection
• First press the control switch once to change
channel. You can move the switch upward to select
the next programme or move it downward to select
the previous programme.
Viewing Main Menu
• Menu screen cannot be displayed by using the
control switch.
AV Mode
• Press the control switch consecutively until the
source OSD is displayed on the screen.
Operation with the Remote Control
Press MENU button on your remote control to display
main menu screen. Use Left or Right button to select
a menu tab and press OK to enter. Use Left / Right /
Up / Down to select or set an item. Press BACK/EXIT
or MENU button to quit a menu screen.
Input Selection
Once you have connected external systems to your
TV, you can switch to different input sources. Press
SOURCE button on your remote control consecutively
to select the different sources.
Changing Channels and Volume
You can change the channel and adjust the volume
by using the V+/- and P+/- buttons on the remote.
Accessories included
Remote Control
Batteries: 2 x AAA
Instruction Book
Side AV Connection Cable
Nero Media Home CD

English - 5 -
Viewing remote control
1. Internet
2. Play (in Media Browser mode &Playback mode)
3. Programme recording
4. Fast rewind (in Media Browser mode)
5. No function
6. Mono/Stereo - Dual I-II / Current Language
7. Image size
8. Teletext / Mix
9. Electronic Programme Guide
10. Numeric buttons
11. AV / Source
12. Menu on/off
13. Programme Down - Page up / Programme Up -
Page down
14. Back to previous menu / Index page (in TXT
mode)
15. Green button
16. Red button
17. Media Browser
18. My Button 1 / Youtube link (*)
19. My Button 2(**)
20. Info / Reveal (in TXT mode)
21. Blue button
22. Yellow button
23. Exit
24. OK / Select / Hold (in TXT mode)
25. Volume up / down
26. Navigation buttons
27. Mute
28. Previous programme
29. Sleep timer
30. Favourite mode selection
31. Picture mode selection
32. Subtitle on-off / Subtitle (in Media Browser
mode).
33. No function
34. Fast forward ((in Media Browser&PVR mode)
35. Stop (in Media Browser mode&PVR mod)
36. Pause / Timeshift recording
37. Standby
38. Operation LED light
P -
P +
SOURCE
GHI
PQRS
SCREEN
MENU
EPG
BACK
1
4
7
-
V +
V
SWAP
ABC DEF
JKL MNO
TUV WXYZ
LANG SUBTITLE
INFO
PRESETS
FAV SLEEP
TEXT
EXIT
23
56
89
0
Y B T N 1M UT O Y B T N 2M UT OMULTIMEDIA
INTERNET
Using My button 1 (*)
This button’s main function is to run Youtube link.
However, if you want to change this function, you can
press MY BUTTON 1 for ve seconds when on a desired
source, channel or link, until the “MY BUTTON IS SET”
message is displayed on the screen. This conrms
that the selected MY BUTTON is now associated with
the selected function. Note that if you perform rst time
installation, MY BUTTON 1 will return to its default
function.
Using My Button 2 (**)
This button’s main function is to switch between
DVB-T, DVB-C and DVB-S broadcasts. However,
if you press MY BUTTON 2 for five seconds, you
can set a function to it as described in My Button 1.
Note that if you perform first time installation, MY
BUTTON 2 will return to its default function, switching
between DVB-T, DVB-C and DVB-S broadcasts.
NOTE: The Remote Control range is approximately 7m
/ 23ft.

English - 6 -
Viewing the Connections
AV Connection
Cable (supplied)
Scart
Connection
(back)
VGA
Connection
(back)
PC/YPbPr Audio
Connection
(back)
HDMI
Connection
(back & side)
S/PDIF Optical Out
(back)
S/PDIF
Side AV
Connection
(side)
Headphone
Connection
(side)
USB
Connection
(side)
Connector Type Cables Device
Y BPRP
AUDIO L&R
SIDE AV
HEADPHONE
YPbPr Video
Connection
(back)
CI
Connection
(side)
CAM
module
Subwoofer
Connection
(back)
NOTE: When connecting a device via the Side AV input, you must use the supplied connection cables to enable connection.
See the illustrations above. | To enable PC audio, you will need to use PC/YPBPR AUDIO CONNECTION cable’s WHITE &
RED inputs. | If an external device is connected via the SCART socket, the TV will automatically switch to AV mode.| When
receiving DTV channels (Mpeg4 H.264) or while in Media Browser mode, output will not be available via the scart socket.
| When using the wall mounting kit (optional), we recommend that you plug all your cables into the back of the TV before
mounting on the wall. | Insert or remove the CI module only when the TV is SWITCHED OFF. You should refer to the module
instruction manual for details of the settings. | Insert the CAM and then the viewing card to the slot that is located in the
terminal cover at the rear side of the TV. The module should be correctly inserted, it is impossible to insert fully if reversed.
The CAM or the TV terminal may be damaged if the CAM is forcefully inserted.

English - 7 -
Installing the Batteries to the Remote
1. Lift the cover on the back of the remote upward
gently.
2. Install two AAA batteries. Make sure to match the +
and - ends of the batteries in the battery compartment
(observe the correct polarity.
3. Replace the cover.
Connect Power & Antenna/Cable/Satellite
IMPORTANT: The TV set is designed to operate on
220-240V AC, 50 Hz socket. After unpacking, allow
the TV set to reach the ambient room temperature
before you connect the set to the mains. Plug the
power cable to the mains socket outlet.
1 3
Aerial or Cable
Satellite
DiSEqC
Switch
300mA Max.
Switching On/Off
To Switch the TV On
With power cord plug connected to the mains power
socket, the TV is in ‘Standby’ mode.
To switch the TV on from standby mode:
Press the “ ” button and the TV will switch to
standby mode. Then the standby LED lights up.
To switch on the TV from standby mode either:
a. Press the “ ” button, P+ / P- or a numeric button
on the remote control.
b. Press the middle of the “ ” button on the TV.
By either method the TV will switch on.
Switching the TV Off
Press the “ ” button on the remote control or press
the standby “ ” button, so the TV will switch to
standby mode.
To turn off the TV completely, remove the power
cord plug from the mains power socket.
Note: When the TV is switched to standby mode, standby LED
can blink to indicate that features such as Standby Search,
Over Air Download or Timer is active. The LED can also blink
when you switch on the TV from standby mode.
First Time Installation
When turned on for the rst time, the “language
selection” menu appears. The message “Welcome
please select your language!” is displayed in all
language options listed alphabetically.
Press the “ ” or “ ” button to highlight the
required language, press OK button to select. “First
Time Installation” appears. Use “ ” or “ ” button
to set the required country, and press “ ” button
to select Search Type. Use “ ” or “ ” to set the
desired search type. Available search types are Digital
and analog, digital only and analog only. When set,
press “ ” to select Teletext Language. Use “ ” or
“ ” button to set the “Teletext Language” and select
“Scan Encrypted” using “ ” or “ ” button. You
can set Scan Encrypted as Yes if you want to scan
coded stations.
Default PIN code can change depending on the
selected country.

English - 8 -
If you are asked to enter a PIN code for viewing a
menu option, use one of the following codes: 4725,
0000 or 1234.
Press OK button on the remote control to continue and
the following message will be displayed on the screen.
You can activate Store mode (optional) option by
using “ ” or “ ” button. If Store Mode (optional)
is selected, Store mode option will be available in
other settings menu and your TV’s settings will be
optimized for best display quality. A confirmation
screen will be displayed after selecting the
Store Mode (optional). Select YES to proceed.
If Home Mode is selected, Store mode (optional) will
not be available after the First Time Installation. Press
OK button on the remote control to continue and the
following message will be displayed on the screen.
You must select a search type to search and store
broadcasts from the desired source.
Aerial Installation
If you select AERIAL option from the Search Type
screen, the television will search for digital terrestrial
TV broadcasts.
NOTE: You can press MENU button to cancel.
After all the available stations are stored, Channel
List will be displayed on the screen. If you like the
sort channels, according to the LCN(*), please select
“Yes” and than press OK.
Press OK button to quit channel list and watch TV.
(*) LCN is the Logical Channel Number system that organizes
available broadcasts in accordance with a recognizable
channel sequence.
Cable Installation
If you select CABLE option and press OK button on
the remote control to continue, the following message
will be displayed on the screen:
To continue please select YES and press OK. To
cancel operation, select NO and press OK.
*
You can select frequency ranges from this screen. For
highlighting lines you see, use “ ” or “ ” button.
You can enter the frequency range manually by using
the numeric buttons on the remote control.
Set Start and Stop Frequency as desired by using
numeric buttons on the remote control.

English - 9 -
After this operation, you can set Search Step as 8000
KHz or 1000 KHz.
If you select 1000 KHz, the TV will perform search
process in a detailed way. Searching duration will
thus increase accordingly. When nished, press OK
button to start automatic search. The TV will search
and store available broadcasts.
(*) Network option will not be available for UK.
Satellite Installation
If you select Satellite option from the Search Type
screen, you can set a satellite and watch satellite
channels.
There are three types of antenna selection. You can
select Antenna type as Direct, Unicable or DiSEqC
switch by using “ ” or “ ” buttons.
Direct: If you have a single receiver and a direct satellite
dish, select this antenna type. After selecting Direct,
another menu screen will be displayed. Select an
available satellite and press OK to scan for services.
Unicable: If you have multiple receivers and a
unicable system, select this antenna type. Press OK to
continue. Congure settings by following instructions
on the screen. Press OK to scan for services.
DiSEqC switch: If you have multiple satellite dishes
and a DiSEqC switch, select this antenna type. After
selecting DiSEqC switch, another menu screen will
be displayed. You can set four DiSEqC options (if
available). Press GREEN button to scan all satellites
or press YELLOW button to scan only the highlighted
satellite. To save and exit press OK button.
Media Playback via USB Input
You can connect a USB hard disk drive or USB
memory stick to your TV by using the USB inputs of
the TV. This feature allows you to play les stored in a
USB drive. 2.5” and 3.5” inch (hdd with external power
supply) external hard disk drives are supported.
IMPORTANT! You should back up your les before
making any connections to the TV set in order to
avoid any possible data loss. Manufacturer will not
be responsible for any le damage or data loss. It is
possible that certain types of USB devices (e.g. MP3
Players) or USB hard disk drives/memory sticks may
not be compatible with this TV. The TV supports FAT32
and NTFS disk formatting but recording will not be
available with NTFS formatted disks. Note: While
formatting a USB hard disk that has 1TB (Tera Byte)
or more le capacity, you can experience problems
with the formatting process.
Quickly plugging and unplugging USB devices, is a
very hazardous operation. Do not repeatedly quickly
plug and unplug the drive. This may cause physical
damage to the USB player and USB device itself. Do
not pull out USB module while playing a le.
Media Browser Menu
You can play photo, music, and movie les stored
on a USB disk by connecting it to your TV and using
the Media Browser screen. To do this, perform the
following: Connect a USB disk to one of the USB
inputs located on the side of the TV.
You can connect two USB devices to your TV. If both
USB devices include music, picture or video les, USB
selection OSD will be displayed on the screen. The
rst USB device connected to the TV will be named
as USB Drive1. Select a device by using “ ” or “ ”
button and press OK.
Press MENU button and select Media Browser tab by
using Left/Right and OK buttons. Main media browser
screen will be displayed. You can display the related
content by selecting the Video, Music or Picture tab.
Follow the button indications under each on screen
menu for media playback features.
You can set your Media Browser preferences by using
the Settings dialog.

English - 10 -
Using MENU button in Media Browser Mode
Pressing MENU button in Media Browser mode
displays the following menu screen:
You can access Picture, Sound and Settings menu
options using this screen. Press MENU again to exit
from this screen.
Changing Image Size: Picture Formats
Programmes can be watched in different picture
formats, depending on the transmission received.
You can change the aspect ratio (image size) of the
TV for viewing the picture in different zoom modes.
Press SCREEN button repeatedly to change the
image size. You can shift the screen up or down by
using “ ” or “ ” buttons while in 14:9 Zoom,
Cinema or Subtitle.
Using the Channel List
The TV sorts all stored stations in the Channel List.
You can edit this channel list, set favourites or set
active stations to be listed by using the Channel List
options. Press MENU button to view main menu.
Select Channel List item by using Left or Right button.
Press OK to view menu contents. Select Edit Channel
List to manage all stored channels. Use Up or Down
and OK buttons to select Edit Channel List. Press
Up or Down button to select the channel that will be
processed. Press Left or Right button to select a
function on Channel List menu. Use P+/P- buttons to
move page up or down. Press MENU button to exit.
Sorting Channel List
You can select broadcasts to be listed in the channel
list. To display specic types of broadcast, you should
use Active channel list setting. Select Active channel
list from the Channel list menu by using “ ” or “
” button. Press OK button to continue. You can select
a network type option from the list by using “ ” or “
” and OK buttons.

English - 11 -
Menu Features and Functions
Picture Menu Contents
Mode For your viewing requirements, you can set the related mode option. Picture mode
can be set to one of these options: Cinema, Game, Sports, Dynamic and Natural.
Contrast Sets the lightness and darkness values of the screen.
Brightness
Sets the brightness value for the screen.
Sharpness Sets the sharpness value for the objects displayed on the screen.
Colour Sets the colour value, adjusting the colors.
Power Save Mode
To set Power Save Mode as Eco, Picture Off and Disabled. See the section, “Environmental
Information” in this manual for further information on Power Save Mode. If Picture Off is
selected, “Screen will be off in 15 seconds” message will be displayed on the screen. Select
PROCEED and press OK to continue. The screen will be off in 15 seconds. If you disable
Power Save Mode, Picture mode will be automatically set to Dynamic.
Backlight (optional)
This setting controls the backlight level and it can be set to Auto, Maximum, Minimum
and Eco Mode. Backlight function will be inactive if Power Save Mode is set to On.
Backlight cannot be activated in VGA, Media Browser mode or while the picture mode
is set to Game.
Noise Reduction
If the broadcast signal is weak and the picture is noisy, use Noise Reduction setting
to reduce the noise amount. Noise Reduction can be set to one of these options: Low,
Medium, High or Off.
Advanced Settings
Dynamic Contrast You can change contrast rate by using dynamic contrast function. Dynamic contrast can
be set to one of these options: Low, Medium, High or Off.
Colour Temp
Sets the desired colour tone.
Picture Zoom Sets the picture size to Auto,16:9, Subtitle,14:9, 14:9 Zoom, 4:3 or Cinema.
Movie Sense
(optional)
Movie Sense: Press Use “Left” / “Right” to set Movie Sense Low, Med, High or Off.
While Movie Sense is active, it will optimize the TV’s video settings for motional images
to acquire a better quality and readability.
When Movie Sense option is set to Low, Med or High, Movie Sense demo option will
be available. If one of these options is selected and if you press OK button, then the
demo mode starts. While demo mode is active, the screen will be divided into two
sections, one displaying the movie sense activity, the other displaying the normal
settings for TV screen.
HDMI True Black
(optional)
While watching from HDMI source, this feature will be visible in the Picture Settings
menu. You can use this feature to enhance blackness in the picture.
Film Mode
(optional)
Films are recorded at a different number of frames per second to normal television
programmes. Turn this feature on when you are watching lms to see the fast motion
scenes clearly.
Skin Tone Adjust the desired skin tone.
Colour Shift Adjust the desired colour tone.
RGB Gain Press OK button to edit RGB gain. You can congure the colour temperature values
using the RGB Gain feature.
Reset
Resets the picture settings to factory default settings.
Autoposition
(in PC mode) Automatically optimizes the display. Press OK to optimize.
H Position
(in PC mode) This item shifts the image horizontally to right hand side or left hand side of the screen.
V Position
(in PC mode)
This item shifts the image vertically towards the top or bottom of the screen.
Dot Clock
(in PC mode)
Dot Clock adjustments correct the interference that appear as vertical banding in dot
intensive presentations like spreadsheets or paragraphs or text in smaller fonts.

English - 12 -
Menu Features and Functions
Advanced Settings
Phase (in PC mode)
Depending on the resolution and scan frequency that you input to the TV set, you
may see a hazy or noisy picture on the screen. In such a case you can use this
item to get a clear picture by trial and error method.
While in VGA (PC) mode, some items in Picture menu will be unavailable. Instead, VGA mode settings will be added to
the Picture Settings while in PC mode.
Sound Menu Contents
Volume Adjusts volume level.
Equalizer
In equalizer menu, the preset can be changed to Music, Movie, Speech, Flat,
Classic and User. Press the MENU button to return to the previous menu.
Equalizer menu settings can be changed manually only when the Equalizer
Mode is in User.
Balance This setting is used for emphasizing left or right speaker balance.
Headphone Sets headphone volume.
Sound Mode You can select Mono, Stereo, Dual I or Dual II mode, only if the selected channel
supports that mode.
AVL
Automatic Volume Limiting (AVL) function sets the sound to obtain xed output
level between programmes (For instance, volume level of advertisements tend to
be louder than programmes).
Headphone/Lineout
When you connect an external amplier to your TV using the headphone jack, you
can select this option as Lineout. If you have connected headphones to the TV,
set this option as Headphone.
Dynamic Bass Enables or disables the Dynamic Bass.
Surround Sound Surround sound mode can be changed as On or Off.
Digital Out Sets digital out audio type.
Install and Retune Menu Contents
Automatic Channel
Scan (Retune)
Displays automatic tuning options.
Digital Aerial: Searches and stores aerial DVB stations.
Digital Cable: Searches and stores cable DVB stations.
Analogue: Searches and stores analogue stations.
Digital Aerial & Analogue: Searches and stores aerial DVB and analogue
stations.
Digital Cable & Analogue: Searches and stores cable DVB and analogue
stations.
Satellite: Searches and stores satellite channels.
Manual Channel
Scan This feature can be used for direct broadcast entry.
Network Channel
Scan Searches for the linked channels in the broadcast system.
Analogue Fine Tune You can use this setting for ne tuning analogue channels. This feature is not
available if no analogue channels are stored.
First Time
Installation
Deletes all stored channels and settings, resets TV to factory settings and starts
rst time installation. You can follow the instructions in the Initial Installation section
for more information on this process.
Clear Service List (*) This setting is visible only when the Country option is set to Denmark, Sweden,
Norway or Finland. Use this setting to clear channels stored.

English - 13 -
Menu Features and Functions
Settings Menu Contents
Conditional Access Controls conditional access modules when available.
Language Congures language settings.
Parental
Congures parental settings.
Default PIN code can change depending on the selected country.
If you are asked to enter a PIN code for viewing a menu option, use one of the following
codes: 4725, 0000 or 1234.
Timers Sets timers for selected programmes.
Recording
Conguration Displays recording conguration menu.
Date/Time
Sets date and time.
Note:
* The TV takes the time info via the broadcast. Correct time will be available on Date/Time
Settings, if the time info is provided in the broadcast.
If the TV is in no channel mode, Date/Time settings can be changed. However, if there is a
channel preset, only “Time Settings Mode” can be changed and if this is set to Manual, Time
Zone will be enabled.
* If the TV is switched to standby mode and switched on later and there is no broadcast
available, time information will not be updated. If there is a present broadcast; however, time
information will be taken via the broadcast. In other words, time information will be available
according to these priorities: The TV rst looks for the time info in the broadcast, then to the
user preference, and lastly to the teletext time information.
Sources Enables or disables selected source options.
Satellite Settings Displays satellite settings.
Network Settings Displays network settings.
Other Settings: Displays other setting options of the TV set:
Menu Timeout Changes timeout duration for menu screens.
Scan Encrypted When this setting is on, search process will locate the encrypted channels as well. If it is set
as Off, encrypted channels will not be located in automatic search or manual search.
Blue Background Activates or deactivates blue background system when the signal is weak or absent.
Software Upgrade To ensure that your TV always has the most update information, you can use this setting. In order
for the proper operation, please ensure that the TV is set to standby mode.
Application Version Displays application version.
Hard of Hearing If the broadcaster enables any special signal concerning the audio, you can set this setting
as On to receive such signals.
Audio Description
Audio description refers to an additional narration track for blind and visually impaired viewers of
visual media, including television and movies. You can use this feature, only if the broadcaster
supports that additional narration track.
Auto TV Off You can set the timeout value of auto off feature.After the timeout value is reached and the
Tv is not operated for selected time , the TV will go off.
Standby Search
(optional)
If you change Standby Search to Off, this function will be unavailable. To use Standby search
please make sure that you select Standby Search as On. If the Standby Search is set to On,
when the TV is in standby mode, available broadcasts will be searched. If the TV locates any
new or missing broadcasts, a menu screen will be displayed, asking you whether or not to
execute these changes. Channel list will be updated and changed after this process. Please
activate Standby Search setting in order to enable your TV for automatically updating the
broadcast frequency of the broadcaster, broadcast denition and similar changes.

English - 14 -
Menu Features and Functions
Other Settings: Displays other setting options of the TV set:
Store Mode
(optional)
If you are displaying the TV in a store, you can activate this mode. While Store
Mode is enabled, some items in the TV menu may not be available to be set.
DLNA Renderer
DLNA Renderer feature allows you to share les stored on your smartphone. If you
have a DLNA Renderer compatible smartphone and software installed, you can
share/play photos with your TV. See instructions of your sharing software for more
information. DLNA renderer mode will not be available with internet portal feature.
Power Up Mode
This setting congures the power up mode preference. Always On: The TV always
switches on when main on/off button is pressed. / Standby: The TV always powers
up in Standby mode. / Last State: The TV always switches on with the last selected
channel/source.
Biss Key
Biss is a satellite signal scrambling system that is used for some broadcasts. If
you need to enter BISS key on a broadcast, you can use Biss Key setting located
in the Other Settings menu. Highlight Biss Key and press OK to enter keys on the
desired broadcast.
Virtual Remote
Enables or disables the virtual remote feature.

English - 15 -
Electronic Programme Guide (EPG)
Some, but not all channels send information about the
current and next programmes. Press the EPG button
to view the EPG menu.
Up/Down/Left/Right: Navigate EPG.
OK: Displays programme options.
INFO: Displays, in detail information on programme
selected.
GREEN: Switches to List Schedule EPG.
YELLOW: Switches to Timeline Schedule EPG.
BLUE: displays ltering options.
(RECORD): the TV will start to record the selected
progamme. You can press again to stop the recording.
IMPORTANT: To record a programme, you should first
connect a USB disk to your TV while the TV is switched off.
You should then switch on the TV to enable recording feature.
Otherwise, recording feature will not be available.
Note: Switching to a different broadcast or source is not
available during the recording.
Programme Options
In EPG menu, press the OK button to enter the Event
Options menu.
Select Channel
In EPG menu, using this option, you can switch to the
selected channel.
Record / Delete Record Timer
After you have selected a programme in EPG menu,
press the OK button and and Options screen will be
displayed. Select “Record” option and press the OK
button. After this operation, a recording becomes set
to the selected programme.
To cancel an already set recording, highlight that
programme and press the OK button and select the
option “Delete Rec. Timer”. The recording will be
cancelled.
Set Timer / Delete Timer
After you have selected a programme in EPG menu,
press the OK button and and Options screen will
be displayed. Select “Set Timer on Event” option
and press OK button. You can set a timer for future
programmes. To cancel an already set timer, highlight
that programme and press the OK button. Then select
“Delete Timer” option. The timer will be cancelled.
Note: It is not possible to record or set timer for two or more
individual events at the same time interval.
Recording a Programme
IMPORTANT: When using a new USB hard disk drive, it is
recommended that you rst format the disk using your TV’s
“Format Disk” option.
To record a programme, you should rst connect a
USB disk to your TV while the TV is switched off.
You should then switch on the TV to enable recording
feature.
For using recording function, you should connect a
USB disk or an external hard disk drive to the TV
and connected USB disk should have at least 1 GB
capacity and should have 2.0 speed compatibility.
If the connected USB device does not support 2.0
speed, an error message will be displayed.
Note: Recorded programmes are saved into the connected
USB disk. If desired, you can store/copy recordings on a
computer; however, these les will not be available to be
played on a computer. You can play the recordings only
via your TV.
Note: Lip Sync delay may occur during the timeshifting.
Radio record is not supported. The TV can record
programmes up to ten hours.
Recorded programmes are split into 4GB partitions.
If the writing speed of the connected USB disk is not
sufcient, recording may fail and timeshifting feaute
may not be available.
Recordings of HD programmes can occupy bigger
size on the USB disk depending on the broadcast’s
resolution. For this reason it is recommended to use
USB hard disk drives for recording HD programmes.
Do not plug out the USB/HDD during the recording.
This may harm the connected USB/HDD.
Multipartiton support is available. Maximum two
different partitions are supported. If the disk have more
than two partitions, crash may occur. First partition
of the usb disk is used for PVR ready features. It also
must be formatted as primary partition to be used for
PVR ready features.
Some stream packets may not be recorded because
of signal problems, so sometimes video may freezes
during playback.

English - 16 -
Record, Play, Pause, Display (for PlayListDialog) keys
could not be used when teletext is ON. If a recording
starts from timer when teletext is ON, teletext is
automatically turned off. Also teletext usage is
disabled when there is ongoing recording or playback.
Timeshift Recording
Press (PAUSE) button while watching a broadcast
for switching to timeshifting mode. In timeshifting
mode, the programme is paused and simultaneously
recorded to the connected USB disk. Press (PLAY)
button again to watch the paused programme from
the stopped moment. You will see the timeshift gap
between the real and the timeshifted programme in
the info bar.
Instant Recording
Press (RECORD) button to start recording an
event instantly while watching a programme. You can
press (RECORD) button on the remote control
again to record the next event on the EPG. In this
case, OSD will display the programmed events for
recording. Press (STOP) button to cancel instant
recording. Switching to a different broadcast or source;
and viewing Media Browser are not available during
the recording.
Watching Recorded Programmes
In the main menu, use “ ” or “ ” buttons to select
Media Browser. Highlight Recordings Library item
by using “ ” or “ ” button and press OK button to
enter. Recordings Library will then be displayed.
Select a recorded item from the list (if previously
recorded) by using “ ” / “ ” button. Press OK button
to view Play Options. Select an option by using “ ”
/ “ ” or OK buttons.
Available playback options:
• Play from start: Plays the recording from the
beginning.
• Resume: Recommences the recordings.
• Play from offset: Species a playing point.
Note: Viewing main menu and menu items will not be available
during the playback.
Press (STOP) button to stop a playback and return
to return to Recordings Library.
Slow Forward
If you press (PAUSE) button while watching
recorded programmes, slow forward feature will be
available. You can use button to slow forward.
Pressing button consecutively will change slow
forwarding speed.
Recordings Library
To view the list of recordings, select “Recordings
Library” and press the OK button. Recordings Library
will then be displayed with available recordings. All the
recordings are kept in a list in the recordings library.
(Resume): Recommences the recordings.
RED button (Delete): Erases the selected recording.
GREEN button (Edit): Makes changes on the
selected recording.
BLUE button (Sort): Changes the order of the
recordings. You can select from a wide range of
sorting options.
OK button: Activates play options menu:
INFO (Details): Displays the short extended programmes
in detail.
Recording Conguration
Select Recording Conguration item in the Settings
menu to congure recording settings.
Format Disk: You can use Format Disk feature for
formatting the connected USB disk.
IMPORTANT: Note that ALL the data stored on the
USB disk will be lost and then the disk format will
be converted to FAT32 if you activate this feature. If
your USB disk malfunctions, you can try formatting
the USB disk. In most cases formatting the USB disk
will restore normal operation; however, ALL the data
stored on the USB disk will be lost in such a case.
Note: If “USB is too slow” message is displayed on the
screen while starting a recording, try restarting the recording.
If you still get the same error, it is possible that your USB
disk does not meet the speed requirements. Try connecting
another USB disk.

English - 17 -
Connectivity Functions
Connecting to a Wired Network
For connecting to a wired LAN network, you
should perform the following steps:
• Connect broadband ISP connection ethernet cable
to the ETHERNET INPUT of your modem.
• Ensure that Nero Media Home software is installed
to your PC.(for DLNA function). See Appendix G for
more information on the installation process.
• Afterwards, you should connect your PC to the one
of your modem’s LAN connectors (e.g. LAN 1) by
using a proper LAN cable.
• Use another LAN output of your modem (e.g. LAN
2) to enable the connection to your TV. You can add
your TV to your LAN by connecting the LAN port at
the rear of your TV to your modem’s LAN connector
as illustrated.
Lan(Ethernet cable)
Broadband ISP
Connection
Rear of TV
• To access and play shared les, you must Select
Media Browser. Press Menu button and select Media
Browser by using Left or Right button. Press OK to
continue. Select the desired le type and press OK.
You must always use the Media Browser screen to
access and play shared network les.
• PC/HDD/Media Player or any other devices that are
DLNA 1.5 compatible should be used with wired
connection for higher playback quality.
To congure wired settings please refer Network
Settings section in Settings menu.
• You might be able to connect your TV to your LAN
network depending on your network’s conguration.
In such a case, use an ethernet cable to connect
your TV directly to the network wall outlet.
The modem port
on the wall
Rear of TV
Connecting to a Wireless Network
IMPORTANT: “Veezy 200” USB dongle is required to
use wireless network feature.
• To use your TV with your wireless network, you
need a Veezy 200 Wireless USB dongle. To make
your modem’ s SSID visible, you should change
your SSID settings via modem’s software. The TV
cannot connect to the networks with hidden SSID.
For connecting to a wireless LAN network, you
should perform the following steps:
1. Connect broadband ISP connection ethernet
cable to the ETHERNET INPUT of your modem.
2. Ensure that Nero Media Home software is
installed to your PC (for DLNA function).
3. Afterwards, you should connect wireless adaptor
to one of the USB inputs of the TV.
4. To configure wireless settings please refer
Network Settings section in the following sections.
Wireless Lan
Adaptor
USB Inputs (Side of the TV)
Broadband ISP
Connection
• A Wireless-N router (IEEE 802.11a/b/g/n) with
simultaneous 2.4 and 5 GHz bands designed to
increase bandwidth. Optimized for smoother and
faster HD video streaming, file transfers, and
wireless gaming.
• Use LAN connection for quicker le sharing between
other devices like computers.
• The frequency and channel differ depending on
the area.

English - 18 -
• The transmission speed differs depending on the
distance and number of obstructions between the
transmission products, the conguration of these
products, the radio wave conditions, the line trafc,
and the products that you use. The transmission
may also be cut off or get disconnected depending
on the radio wave conditions DECT phones, or any
other WiFi 11b appliances. The standard values of
the transmission speed are the theoretical maximum
values for the wireless standards. They are not the
actual speeds of data transmission.
• The location where the transmission is most effective
differs depending on the usage environment.
• Wireless LAN adaptor should be connected directly
to the TV’s USB port. USB hubs are not supported.
• To configure wireless settings please refer wifi
section in Settings menu.
• Wireless LAN adaptor supports 802.11 a,b,g & n
type modems. It is highly recommended that you
should use IEEE 802.11n communication protocol
in order to avoid any possible problems while
watching videos.
• Use the other usb input, if you experience problems
with audio/video performance.
• You must change your modem’s SSID when there
are any other modems around with the same SSID.
You can encounter connection problems otherwise.
Use wired connection instead if you experience
problems with wireless connection.
Conguring Network Settings
Your TV’s Network Settings include Wired and Wireless
Connection options. However, if your TV does not have USB
Wi-Fi dongle, you should use Wired Connection type. If you
try to connect via Wireless Connection when your TV does not
have a USB Wi-Fi dongle, a warning screen will appear and
the TV will not get an IP address. Try connecting the LAN cable
after this and then the TV will be able to get an IP address.
Conguring Wired Device Settings
If you are connecting the TV via ETHERNET INPUT,
select Network Type as Wired Device to congure.
Network Type
Network type can be set as Wired device.
Conguration Status
This section displays the status of the connection.
Select Connected if you want to activate connection.
Select as Not Connected to end an active connection.
Connecting to a Smartphone/Tablet (Optional)
• You can also play content from your smartphone/
tablet device, located in your home network, using
the DLNA/DMR feature of your television.
• For this, your cell phone must have an appropriate
sharing software.
• If the connection is established correctly, you should
now access the shared les of your device.
• Enter Media Browser menu and playback device
selection OSD will be displayed. Select your cell
phone’s ident and press OK to continue.
Note: This feature may not be supported by some cell phones.
Connectivity Troubleshooting
Using DLNA Network Service
DLNA (Digital Living Network Alliance) is a standard
that eases viewing process of digital electronics and
makes them more convenient to use on a home
network. For further information, visit www.dlna.org.
DLNA standard allows you to view and play photos,
music and videos stored in the DLNA media server
connected to your home network.
Step 1: Nero Media Home Installation
DLNA function cannot be used if the server program
is not install to your PC. Please prepare your PC
with the provided Nero Media Home programme. For
more information about the installation, please refer
to appendix E.
Step 2: Connect to a Wired Network
See the chapter Network Settings for detailed
conguration information.
Step 3: Play Shared Files via Media Browser
Select Media Browser by using Left or Right button
from the main menu and press OK button. Media
browser will be then displayed.
DLNA support is available only with Media Browser
folder mode. To enable folder mode, go to Settings
tab in the main media browser screen and press
OK. In the settings options, highlight View Style and
change to Folder using Left or Right button.
Please select desired media type and press OK.

English - 19 -
If sharing congurations are set properly, the following
OSD message will be displayed after selecting the
desired media type. Select OK to display the selected
network or USB memory content. If you want to refresh
the device list, press GREEN button. You can press
MENU to exit.
If available networks are found, they will be listed
on this screen. Select media server or network that
you want to connect by using “ ” or “ ” buttons and
press OK button.
If you select media type as Video and choose a
device from the selection menu, a new menu screen
will appear on the screen as below:
Select Videos from this screen to list all the available
video les from the selected network.
To play other media types from this screen, you
must go back to main Media Browser screen and
select media type as desired and then perform the
network selection again. Refer to Media Browser
USB Playback section for further information on le
playback.
Subtitle les do not work if you watch video from
network through DLNA.
You can connect only one television with DLNA to
same network. If a problem occurs with DLNA network,
please switch on/off your television. Trick mode and
jump are not supported with DLNA function.
CAUTION:
There may be some PC’s which may not be able to
utilize the DLNA function due to administrator and
security settings. (such as business PC’s).
For best home network streaming with this set, the
supplied Nero software should be installed.
Internet Portal
You can access PORTAL mode using your TV. To
do this, an active internet connection is required.
Follow the steps on Connecting to a Wired (optional)
Network section to connect your TV to internet. After
the connection is established, you can select or view
portal options.
Note: Broadband internet connection is required
for high quality viewing. Ensure that the internet
connection is made properly. You must set the
Country and Language data correctly in the First Time
Installation for the proper operation of internet portal.
Press “ ” button on your remote control and portal
application options will be displayed. Application
options will be displayed as the template below.
Available applications’ contents may change
depending on the application content provider.
Select a link or application using the Left and Right or
Up or Down buttons and press OK to activate.
• Use Up/Down and Left/Right buttons to navigate
between the items on Portal screen.
• Press OK button to conrm your selection.
• Press BACK to go to the previous screen.
• Press EXIT to quit internet portal mode.
Note: Possible application dependent problems may
be caused by the content service provider.
Not: Virtual remote controller application could be
available to be downloaded from your smartphone
application provider.
Not all smartphones are supported by this application.
Table of contents
Other Walker LED TV manuals