water source NMP-9000T User manual
MADE IN KOREA
User Manual
■
■
■
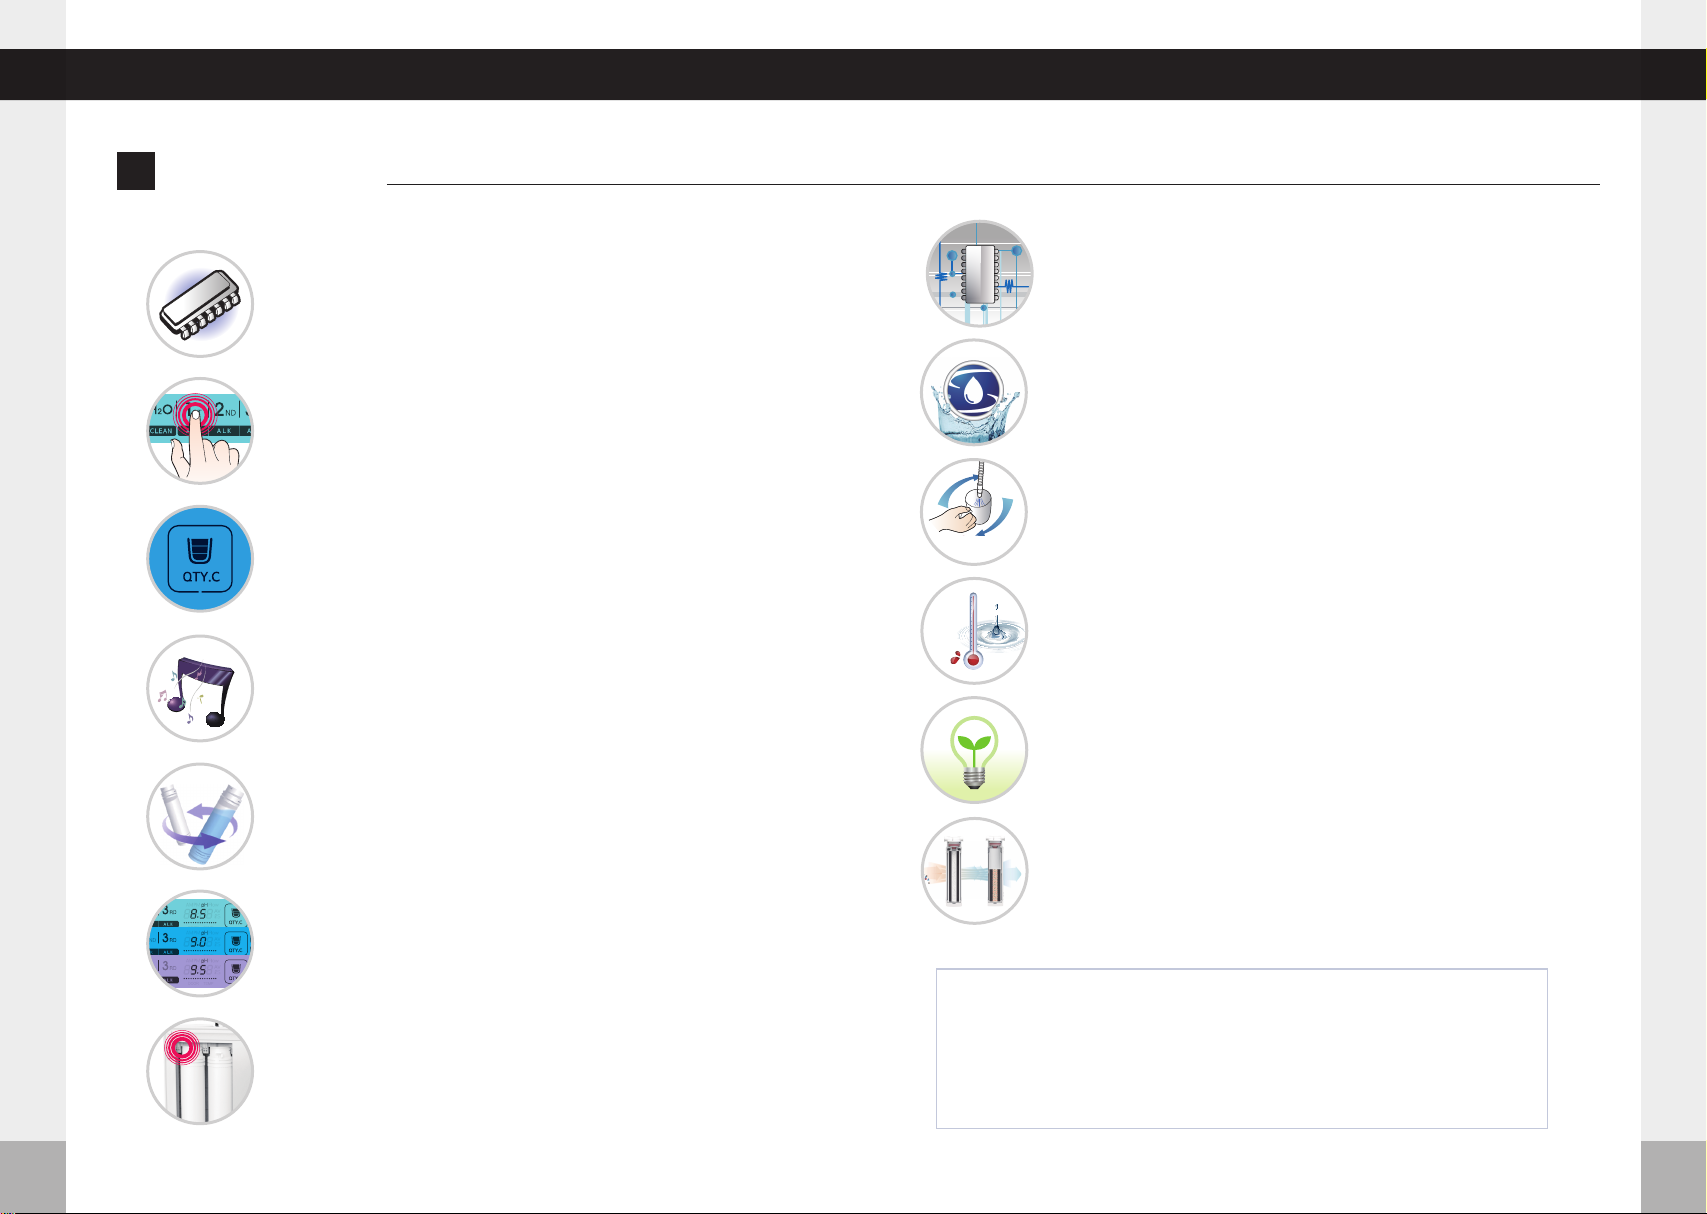
pH Chart
How to Measure: Place 10-15 mL of test water in a container and
add 2-3 drops of reagent. Then mix well and check the color of the
water with the pH chart above.
(The color depends on water quality and reagent.)
The user should be responsible for failure or
improper selection or improper use of the products
such as use in any manner for which the product was
not originally intended.
This product is subject to changes that enhance its
performance without prior notication.
If the supply cord is damaged, it must be replaced by the
manufacturer, its service agent or similarly qualied persons in
order to avoid a hazard.
This appliance is not intended for use by persons (including
children) with reduced physical sensory or mental capabilities or
lack of experience and knowledge, unless they have been given
supervision or instruction concerning use of the appliance by a
person responsible for their safety.
Children should be supervised to ensure that they do not
play with the appliance.
R
WaterSource®Cellular Functional Water®
23
Table of Contents
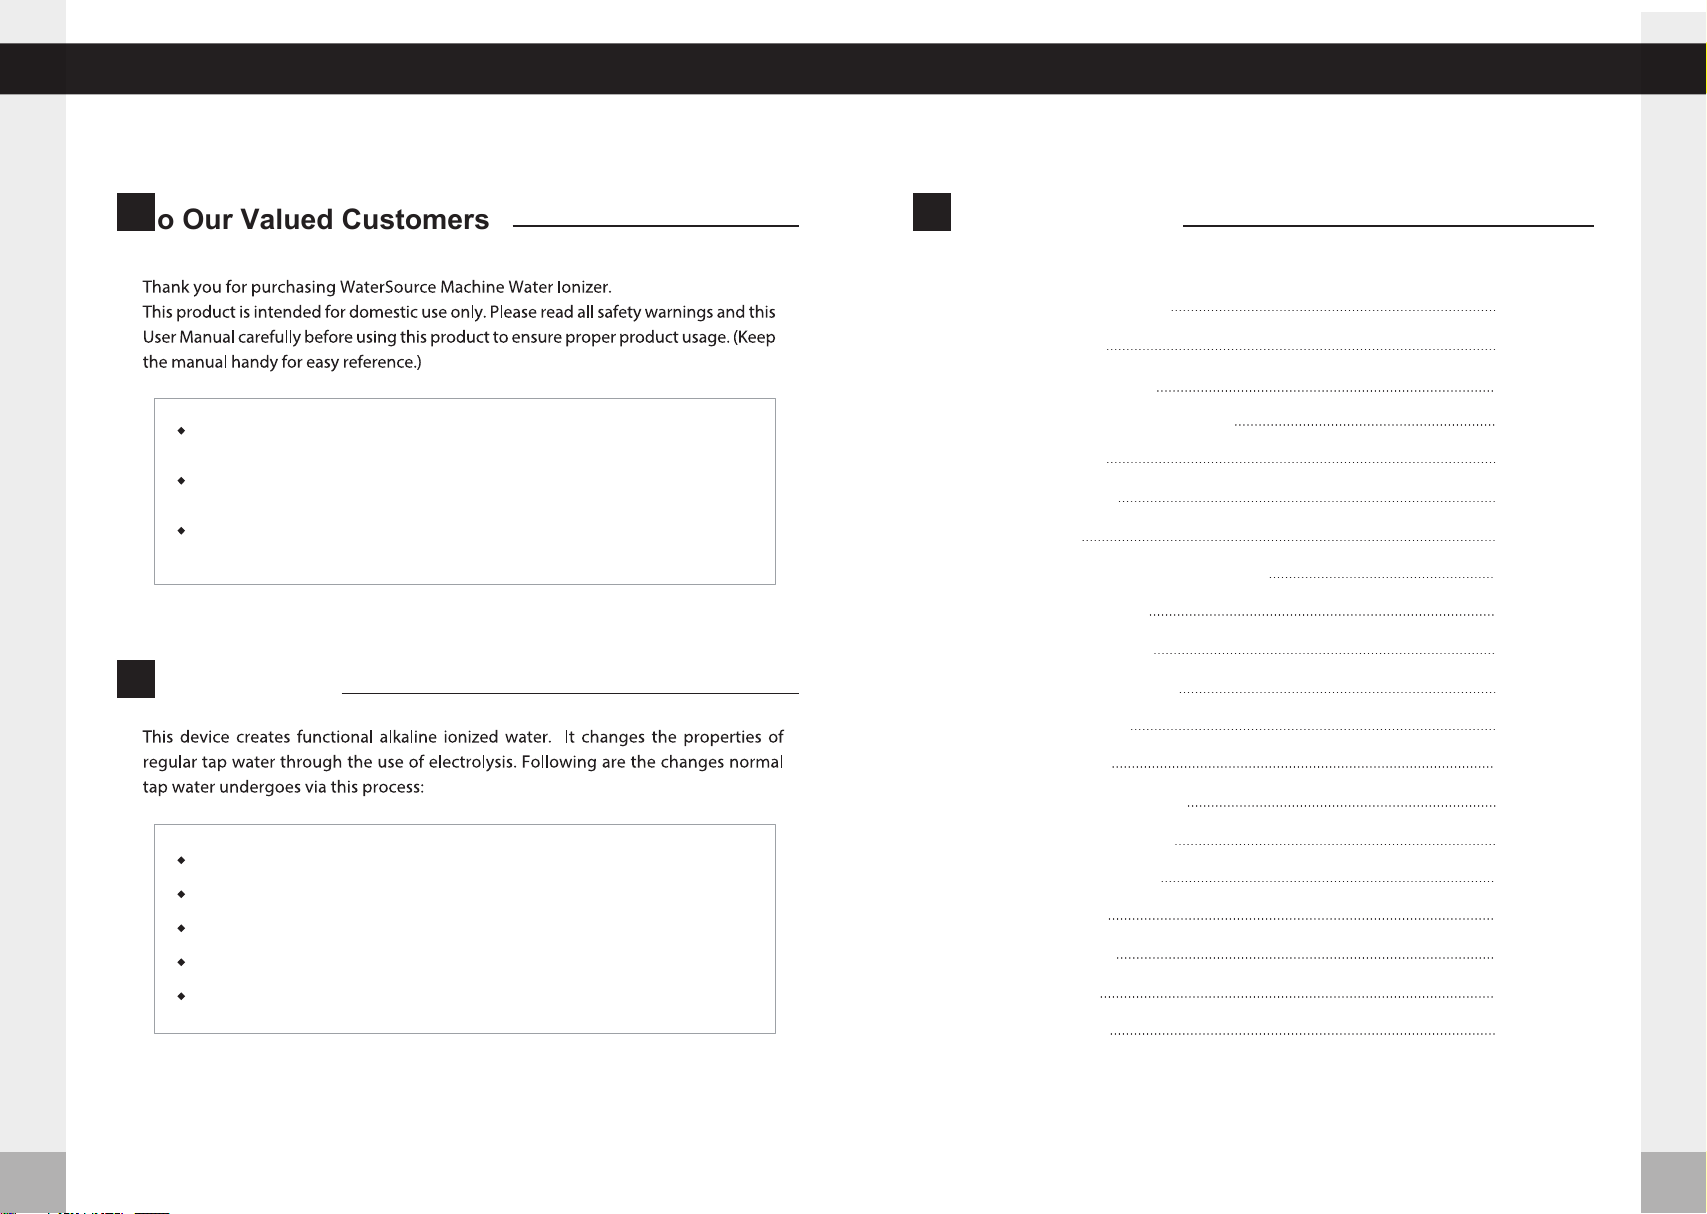
To Our Valued Customers
To Our Valued Customers
Table of Contents
Precautions Before Use
Safety Precautions and Warnings
Product Features
Package Contents
Unit Overview
LCD Display and Touch Pad Overview
How to Install the Unit
Water Hose Installation
Directions for Product Use
System Setup Mode
Cleaning Function
Customer Serviceable Parts
How to Change the Filters
How to Reset the Filters
TURBO Function
Unit Specications
Troubleshooting
Product Warranty
2
3
4
5
10
12
13
14
16
18
20
22
24
25
26
27
28
29
30
31
o Our Valued Customers
able of ContentsT
ntended UseI
We are not responsible for any accidents and/or malfunctions due to the
improper use of this machine
Please keep the manual and warranty card in a safe place, so that it’s easily
accessible when you need it
Please refer to this manual often when you have questions during usage
or when troubleshooting this unit
An increase or decrease in pH level
Creation of negatively charged hydrogen ions (antioxidants)
Smaller water molecule clusters for better absorption
An increase in oxygen
Purication through ltration
T
45
Precautions Before Use
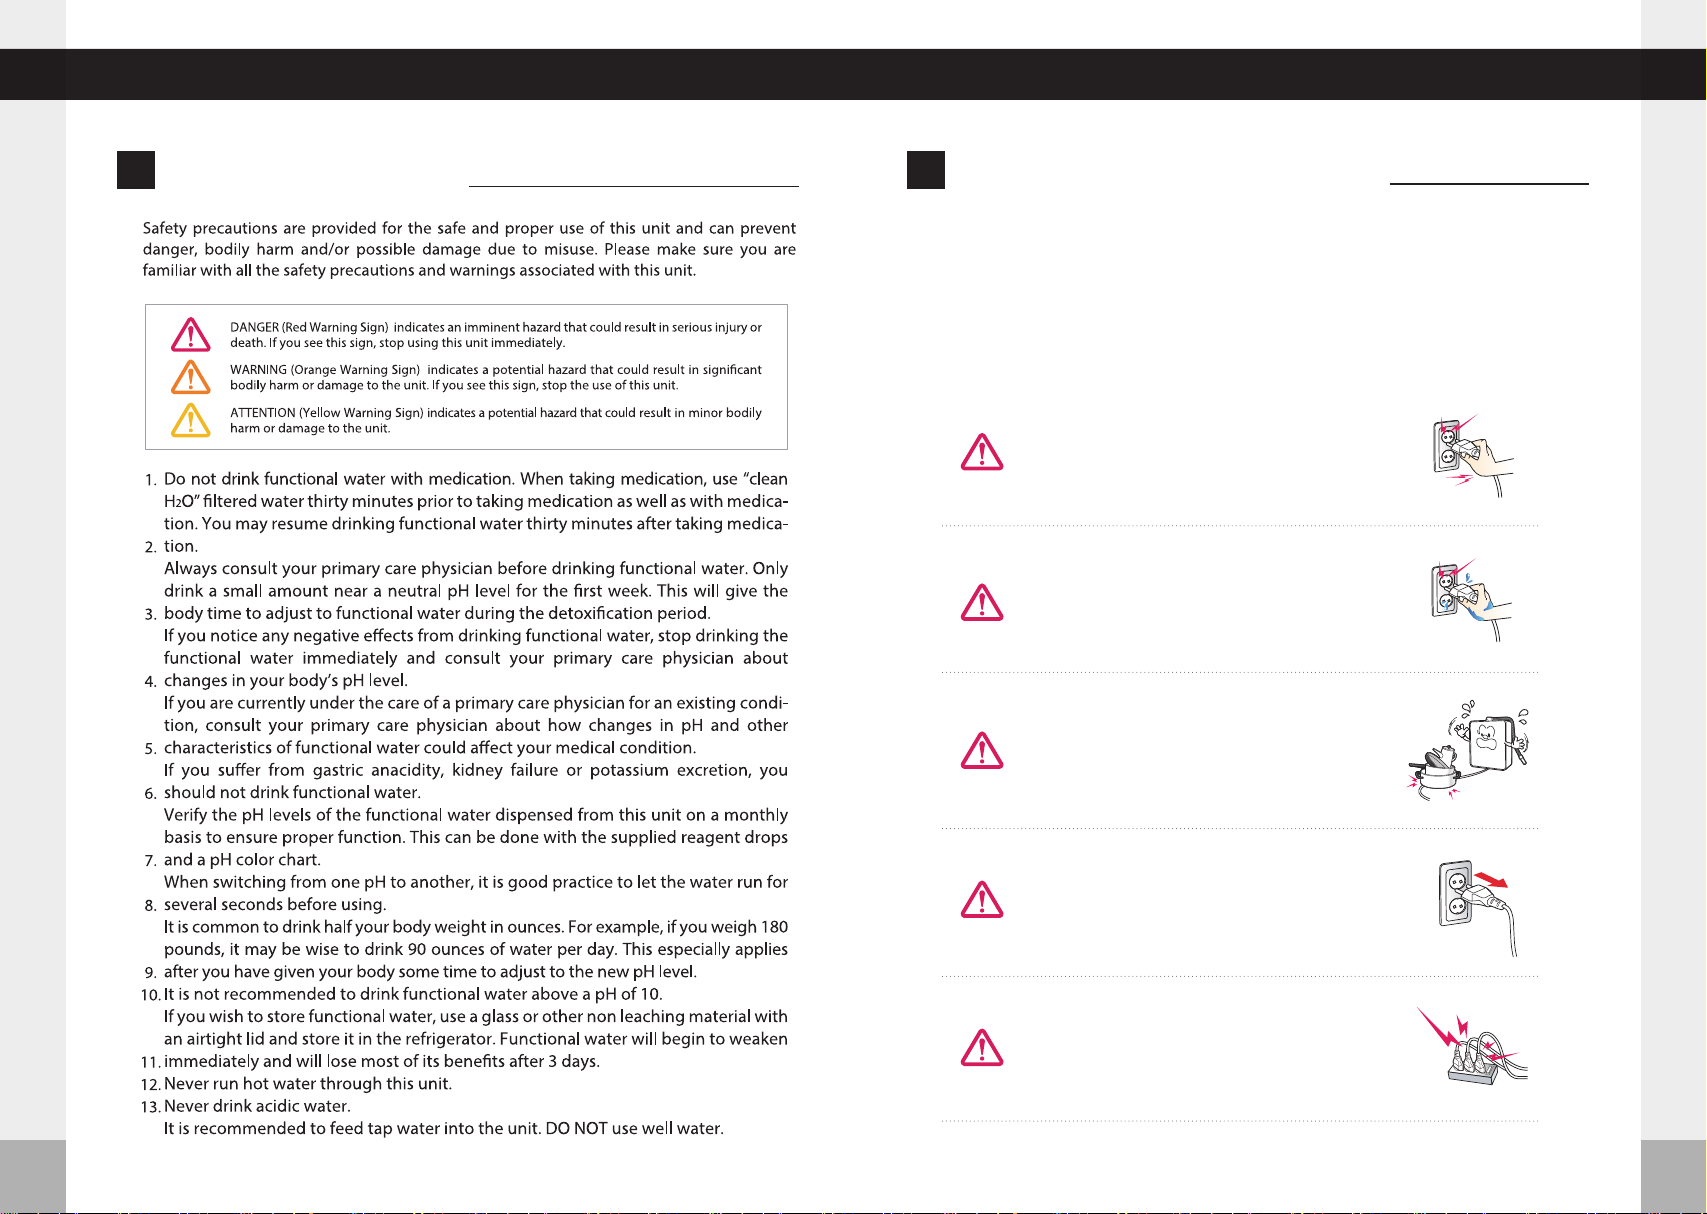
Safety Precautions and Warnings
afety Precautions and WarningsSrecautions Before UseP
WaterSource®Cellular Functional Water®
Do not use if the power cord is damaged or in a
loose power outlet.
Do not pull the power cord. Never touch the
power cord or the power outlet with wet hands.
Do not forcibly bend, squeeze, damage or crush
the power cord under heavy objects.
Unplug the power cord during general mainte-
nance, repair and inspection and while replacing
Do not use power surge protectors with this unit.
Use unit with its own dedicated power source.
Regarding the Power Supply
This appliance is not intended for use by persons (including children) with reduced physical,
sensory or mental capabilities, or lack of experience and knowledge, unless they have been
given supervision or instruction concerning use of the appliance by a person responsible for
their safety. Children should be supervised to ensure that they do not play with the
67
Safety Precautions and Warnings
Safety Precautions and Warnings
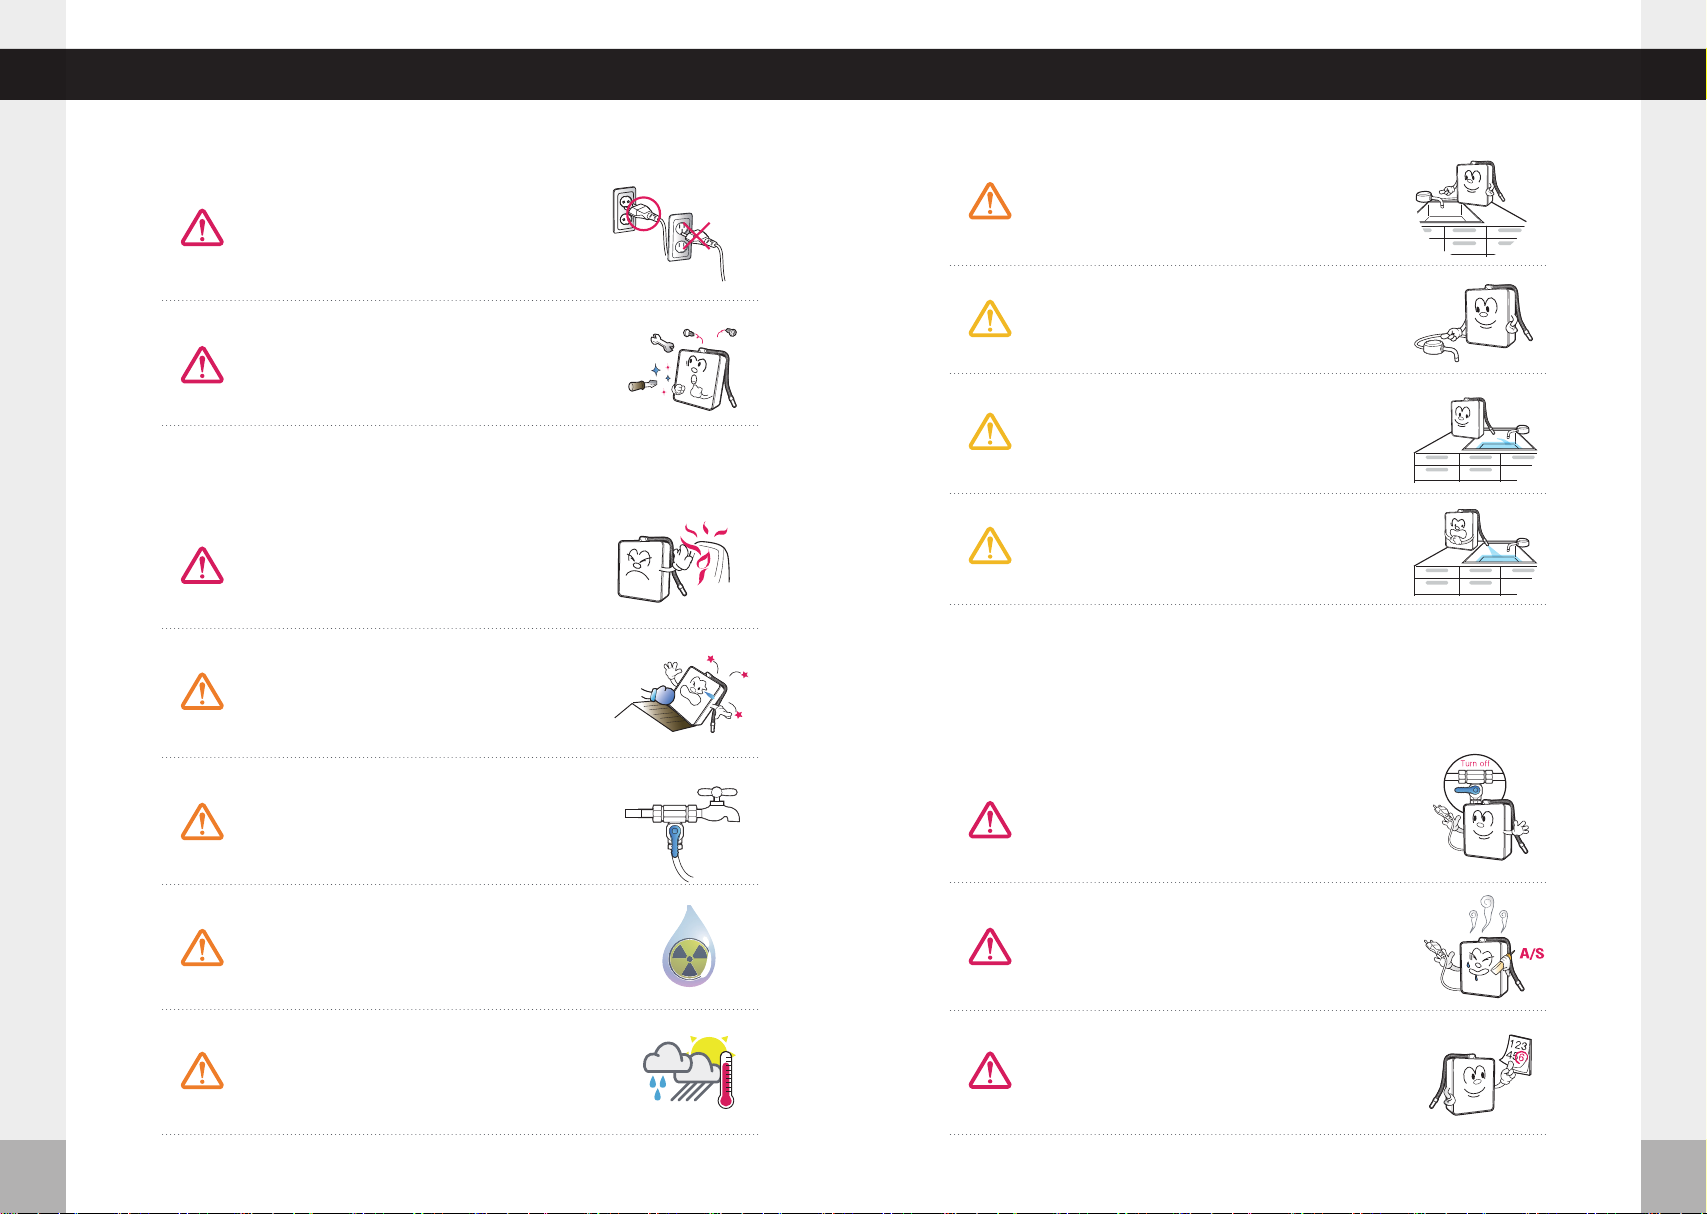
To reduce the risk of electric shock, do not remove
the cover; there are no user-serviceable parts
inside. Refer servicing to qualied service person-
nel. Removing the cover will void the warranty.
Only use the unit with the correct voltage.
Do not place this unit near heat sources.
Do not place this unit on an uneven surface.
Do not drop or use excessive force on this unit.
Do not use unt raw water in accordance with the
standards of the water service act.
Installation
Do not use in areas of high humidity and/or high
temperature.
Usage
Install the drain faucet near sink and adjust the
position of drain faucet to drain away to the sink.
Make sure the drain faucet is positioned lower than
the unit.
Do not discharge water over 1 hour.
In the case where the unit isn’t used over a long
period of time, shut o the valve and unplug the
power cord.
In case of strange noises, burning odor or smoke,
unplug the power cord immediately and refer
servicing to qualied service personnel.
Replace lters every 6 months to optimize the
purication performance of this unit even if the
replacement indicator light isn’t turned on.
If the unit is not used for a few days, let the water run
for 1-2 minutes before drinking functional water.
WaterSource®Cellular Functional Water®
Do not connect the water line to a hot water supply.
Please use a new hose to connect to water line.
(Do not reuse old hose as it can cause leakage.)
new hose

89
Safety Precautions and Warnings
Safety Precautions and Warnings
Do not poke or scratch the touch pad or LCD
display with sharp objects.
Do not place any objects on top of this unit no
matter how small they are.
If water leaks out of the unit (other than the
hoses) or if the unit is standing in a puddle of
water, shut o the water supply, unplug the
power cord and contact qualied service personnel
for service.
Do not use alkaline or acidic water in sh bowls
or aquariums. The sudden change in pH could
be harmful or fatal to some marine life.
In areas of hard water (calcium scaling present
on faucets), notify your service provider and
install a antiscale prelter to protect the ionizer
from scaling.
It is benecial for the maintenance of the
machine to run a strong acidic level for 5-minute
cycles twice weekly. This will help to maintain a
clean chamber.
It is normal for condensation to be present on
the unit during humid summer months. If
condensation persists despite weather
conditions, unplug the power cord and refer
servicing to qualied service personnel.
Turn off
Cleaning
Do not store the unit near chemicals, food,
metals or medication
Do not spray water on the main unit. Do not
clean the unit with benzene or other chemicals,
which may leak into the unit. If using a damp
cloth, be very careful not to get electronic
display wet.
Storage
If the original packaging is not available, cover
the unit in plastic to avoid scratching the
Store the unit in its original packaging in a cool,
dry place when not in use.
Carefully remove this unit from its packaging.
Keep the original packaging for future storage
and unit transportation.
Remove the lters and turn them upside down
to remove excess water before storing.
WaterSource®Cellular Functional Water®
10 11
Product Features
Product Features
WaterSource®Cellular Functional Water®
roduct FeaturesP
Fully automatic system with embedded central
processing unit (CPU)
Fixed quantity discharge function
It generates desired amount of water by convenient operation.
SMPS type power supply
A CPU monitors the power that is supplied to dierent parts of the
unit, thereby ensuring ecient performance.
Automatic water ow
Simply pressing the touch button allows you to start and stop the
ow of functional water.
Voice announcement
Voice announcement for dierent functions and safety warnings
ensure safe and convenient use.
RTR(Real Time Refresh)
Automatic cleaning function
Unit features an automatic plate cleaning function using polarity
oscillation.
Automatic Stop Function
15 minutes after a function is selected, water outow will stop to
prevent overow or ooding.
Temperature Sensor Function for Safe Operation
If the temperature of the source water exceeds 95℉(35℃) then
water will stop owing and a warning message will appear on the
screen.
Eco mode
The LCD backlight will be turned o automatically during periods
of non-use and the Time function is displayed.
Filter replacement cycle
This unit features a lter life cycle display and voice announce-
ments designed to let you know when it is time to change the
lters. Every 6 months is best for optimal performance.
Touch LCD display color backlight
The color back light on the LCD display allows you to distinguish
alkaline water from acidic water.
Advanced water purication system
The advanced performance of the primary lter and functional
secondary lter enable optimal purifying conditions for tap water.
Detects if lter door is open
When door is open, the water supply will be suspended for your safety.
15min
Safety Functions
The outow of functional water stops automatically when raw water is not
supplied, preventing the electrolytic cell and power supply unit from being
damaged due to current overow, water from being wasted and accidental
water leaks. This function also allows you to set pH and ORP levels according to
the amount of water inow, to distinguish pH from backlight colors and set the
auto cleaning function.
Every aspect of creating functional water is controlled by the CPU
chip that automatically nds an optimal operating condition.
12 13
Unit Overview
Package Contents
WaterSource®Cellular Functional Water®
ackage ContentsPnit OverviewU
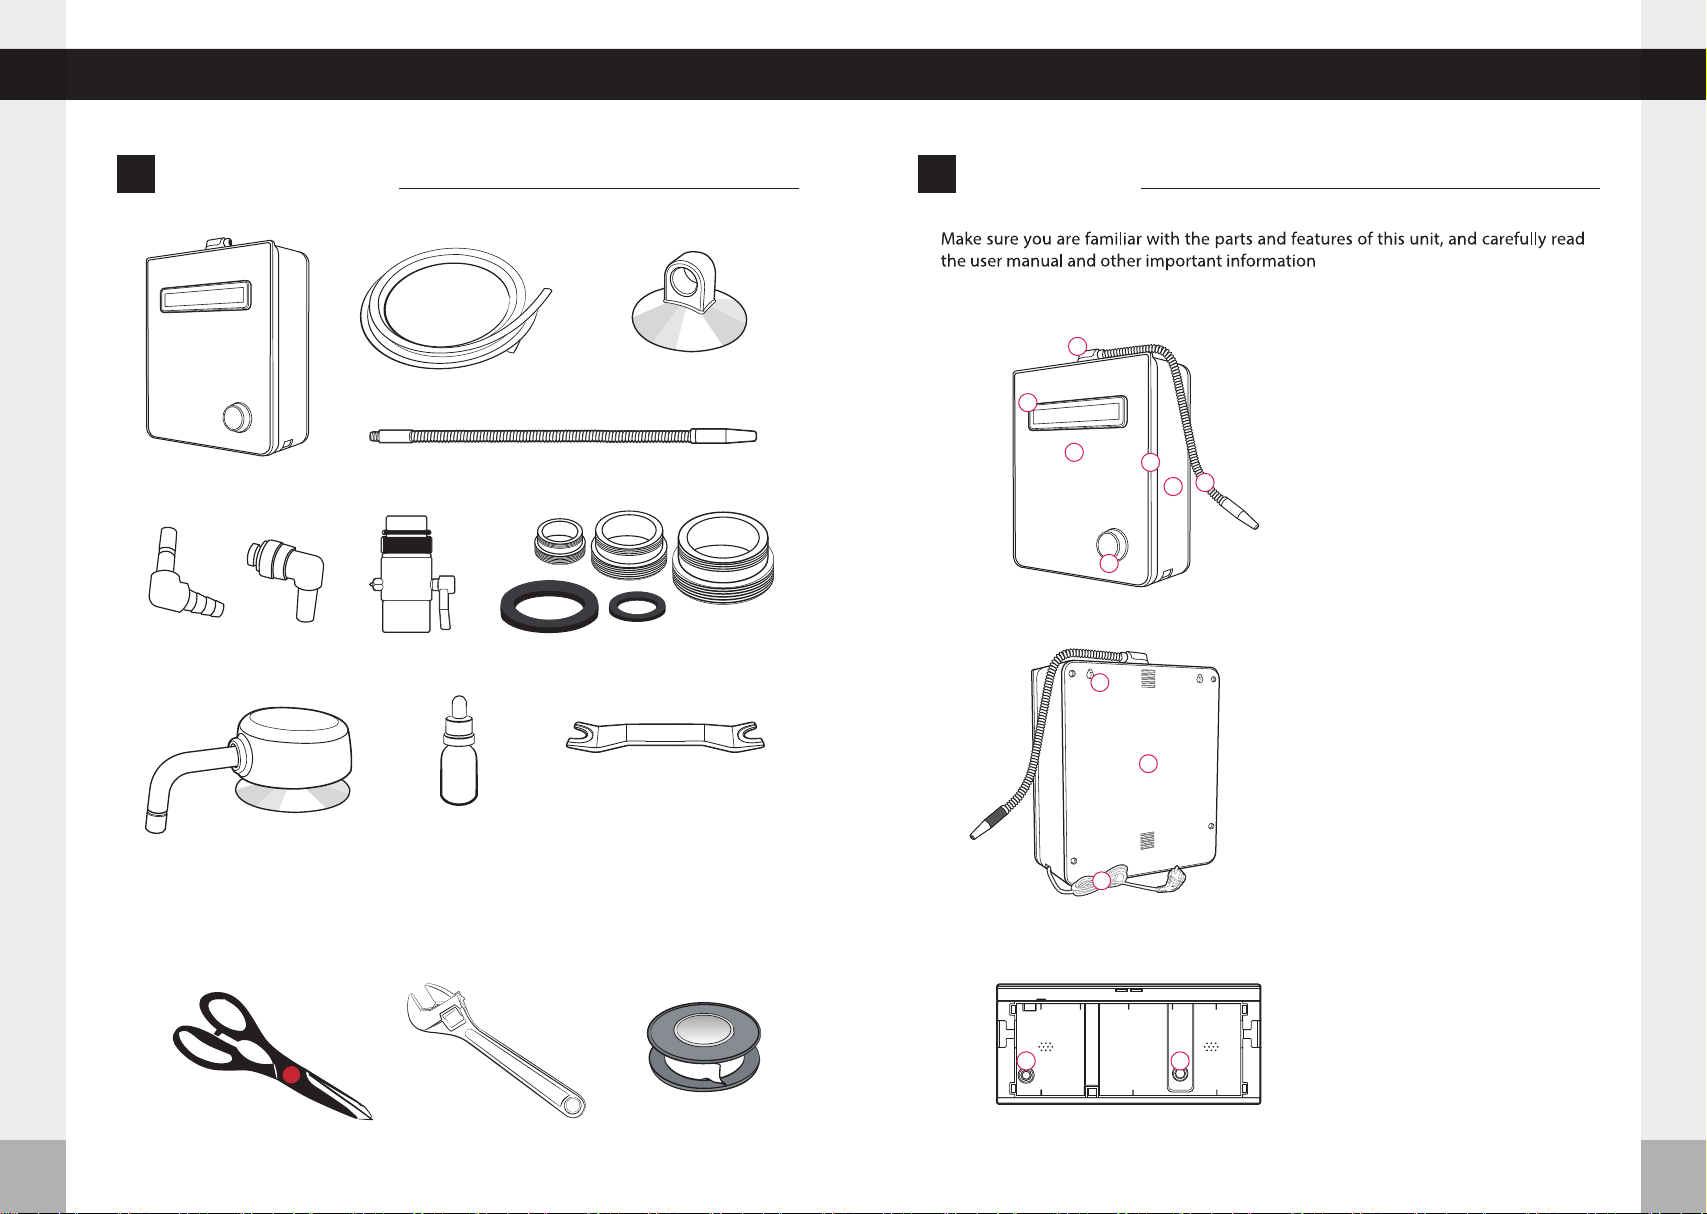
Tools You Will Need
Water Outlet Tube
Water Ionizer
Faucet Diverter
pH Testing
Solution Bottle
8.2 ft (2.5 m)
of Hose
Tube Suction Cup
Assortment of Connectors
and Rubber Washers
Adjustable
Wrench
Utility
Scissors Plumber’s Tape
Front View
Water Outlet Unit
LCD Display
Front Cover
Door Case
Front Case
Water Outlet Tube
JOG Dial
①
②
③
④
⑤
⑥
⑦
①
②
③
①
②
Rear View
Hanging Groove
Rear Case
Power Cord
Bottom View
Water Inow
Water Outow
Wrench
1
56
4
7
2
12
3
2
3
1
(Model: NMP-9000T, S11T, S13T)
Drain Faucet
Stem ElbowTube Elbow
- Drain Hose
- User Manual
WaterSource®Cellular Functional Water®
14 15
LCD Display and Touch Pad Overview
LCD Display and Touch Pad Overview
CD Display and Touch Pad OverviewL
ⓐ ⓑ ⓒ ⓓ ⓔ ⓕ ⓖ
ⓗ
ⓚ ⓝ
ⓘ ⓙ
ⓞ
ⓟ ⓠ ⓡ
ⓢ ⓣ
ⓛ ⓜ
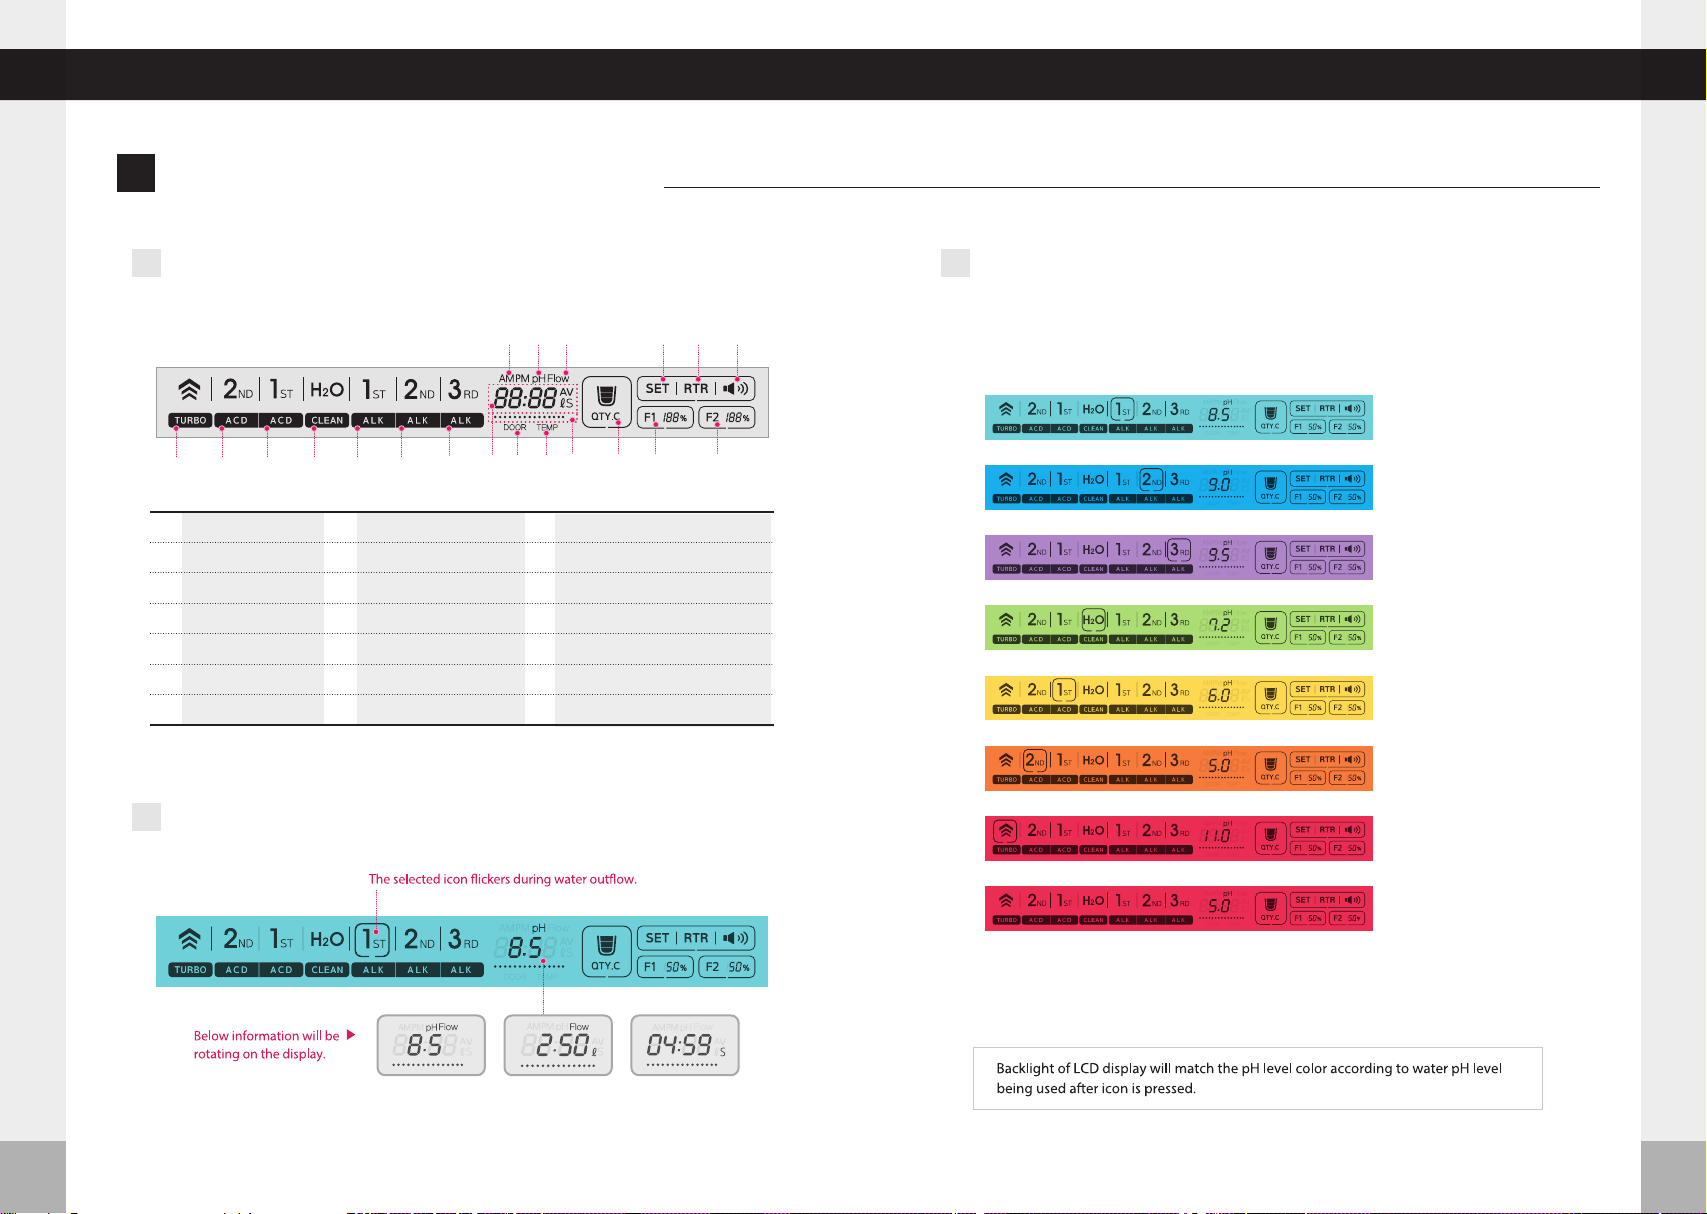
Turbo
Acidic level 2
Acidic level 1
Puried water
Alkaline level 1
Alkaline level 2
Alkaline level 3
ⓐ
ⓑ
ⓒ
ⓓ
ⓔ
ⓕ
ⓖ
ⓗ
ⓘ
ⓙ
ⓚ
ⓛ
ⓜ
ⓝ
ⓞ
ⓟ
ⓠ
ⓡ
ⓢ
ⓣ
Time
pH
Water ow
Voltage/Flow/Time
Door open
Temperature
Remaining time
Fixed quantity discharge
System set up
Cleaning
Volume On / O
1st Filter reset
2nd Filter reset
When Alkaline Water (1, 2 & 3), Puried Water (H2O), Acidic Water (1 & 2)
and Turbo Water icons are selected, backlight colors are as follows :
Alkaline level 1
Light Alkaline water
Alkaline level 2
Medium Alkaline water
Alkaline level 3
Strong Alkaline water
Puried water
Creates puried water
Acidic level 1
Non-Drinkable
Acidic level 2
Non-Drinkable
Turbo mode
Non-Drinkable
Real Time Refresh
Non-Drinkable
Standby screen1
Water Outflow screen2
Display color3
Selected pH level Amount of
supply water
Remaining
discharge time
WaterSource®Cellular Functional Water®
16 17
How to Install the Unit
How to Install the Unit
ow to Install the UnitH
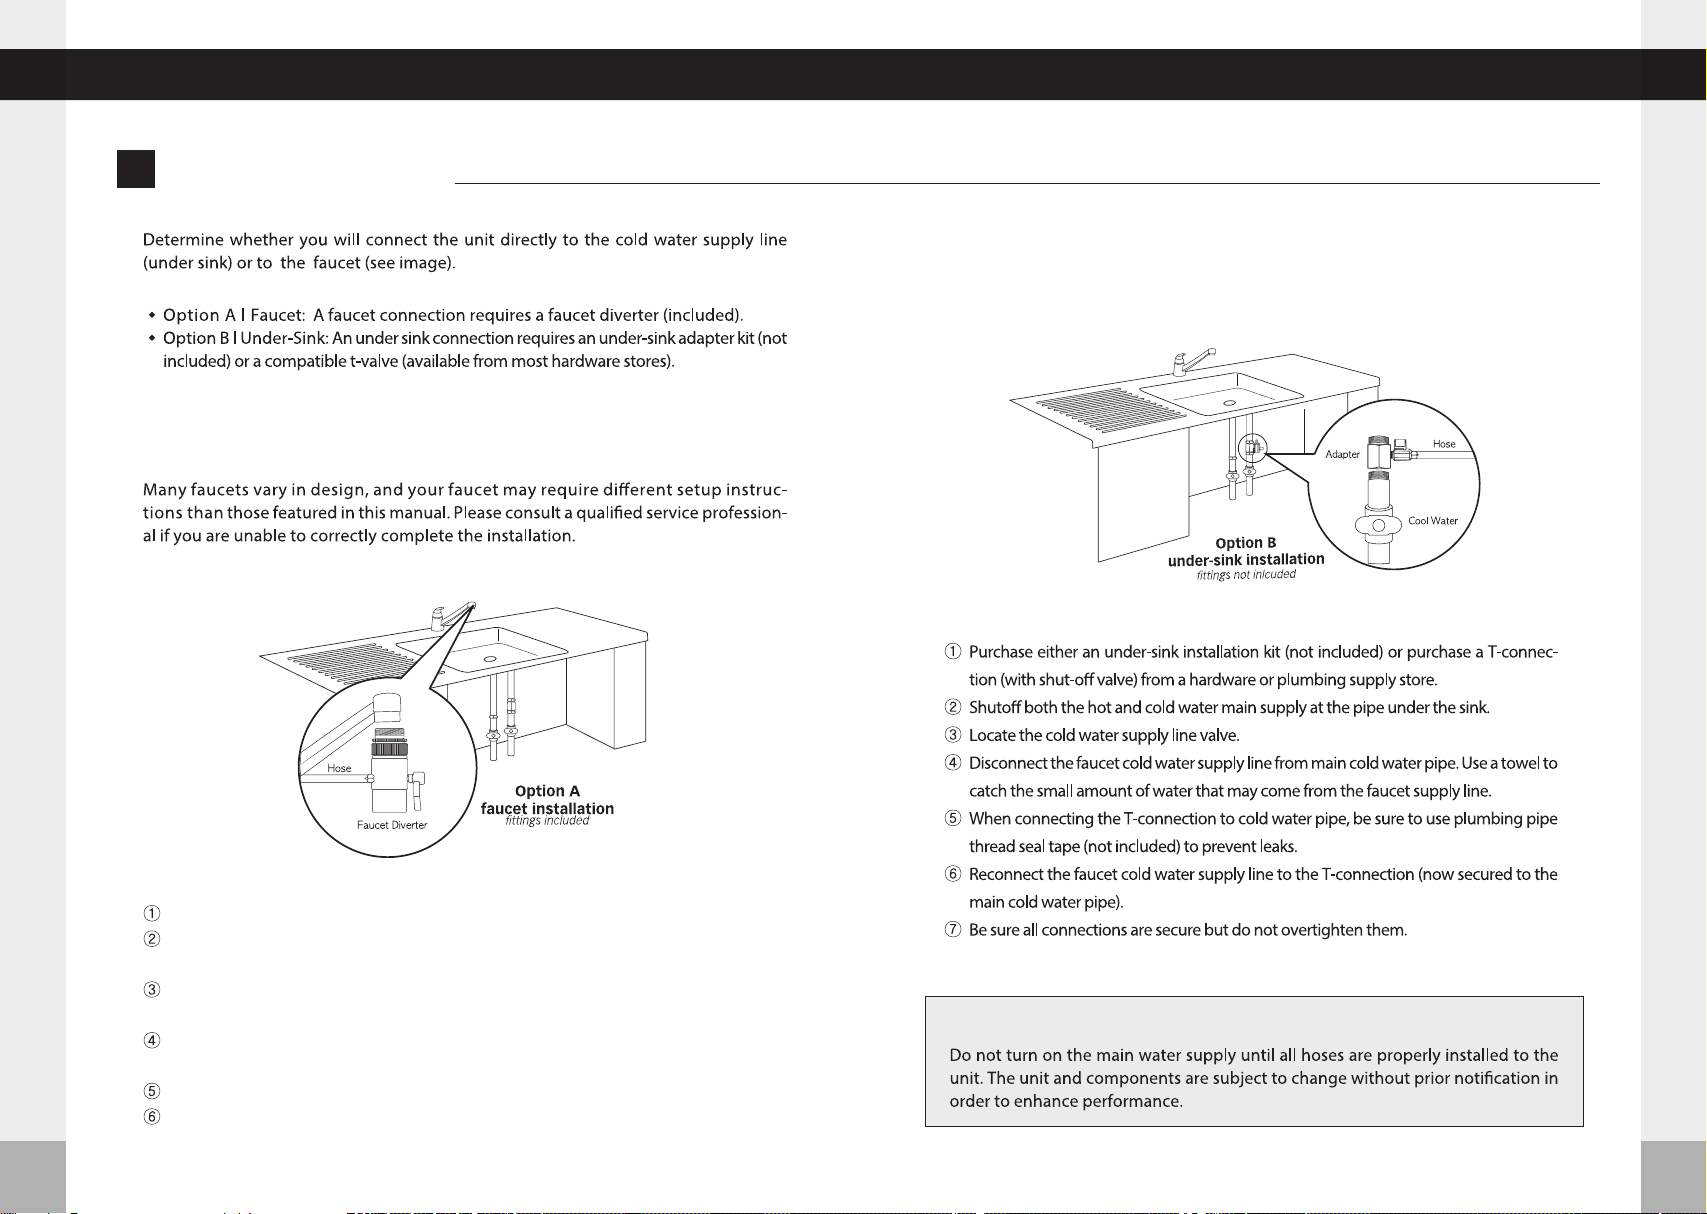
Shut o both the hot and cold water main supply at the pipe under the sink.
If your faucet features a screw-on style aerator, remove it by unscrewing it from the tip of
the faucet.
If the included faucet diverter does not t directly to the tip of the faucet, select an appro-
priate size connector and rubber washer (included).
When connecting the diverter or adapter to the faucet, be sure to use plumbing pipe
thread seal tape (not included) to prevent leaks.
Connect the faucet diverter with the appropriate connector to the faucet.
Be sure all connections are secure but do not overtighten them.
Option A – Faucet Installation
Option B – Under-Sink Installation
Both Options

WaterSource®Cellular Functional Water®
18 19
Water Hose Installation
Water Hose Installation
ater Hose InstallationW
Inow
③
⑤
⑥
④
①
①
②
③
hose to faucet
Be careful not to touch the touch screen at initial
power up. The touch sensor may not operate caused
by touch sensibility change. If the touch sensor does
not operate due to contact with a part of the body,
reconnect the power cord.
⑦
※
How to Install the Drain Faucet
②
As shown above each elbow must ow in In/out
ow. Press the Stem elbow into the Inow and
Tube elbow into the outow on the bottom of the
unit until you hear a click and feel the hose sit
rmly in place.
Connect with the tube elbow connected to the drain
hose to the outow hole on the bottom of the product.
Connect the drain hose to the tube suction cup and
secure it so that it does not move.
Connect the drain hose to the faucet and secure it to the
proper position on the sink.
◀
◀

WaterSource®Cellular Functional Water®
20 21
Directions for Product Use
Directions for Product Use
irections for Product UseD
When using the Touch screen1
When using fixed quantity discharge function
When using fixed quantity discharge function
When using the Jog dial2
Select a desired water mode.
①
Water Outow Stop: Lightly touch the blinking icon again to stop water ow.
③
②
Water Outow: The selected icon ickers during water outow. If the selected
icon is not pressed again, the unit will automatically stop after 15 minutes of
water outow.
※NOTE: Remember, a LIGHT TOUCH is all that is required when pressing the LCD.
Touch the QTY,C icon and choose a xed amount of water. (0.5ℓ, 1.0ℓ,1.5ℓ)
( 0.5 》1.0 》1.5 》release )
Select a desired water mode.
Water outow stops automatically.
(Fixed quantity discharge function is released after water collection.)
①
②
③
Touch the "QTY,C" button.
Select the xed amount of water you need by turning the jog dial.
- Clockwise : Increasing by 100ml ( Max.5L )
- Counterclockwise : Decreasing by 100ml ( Min. 200ml )
Push the discharge level you need.
Automatic stop after discharging xed amount of water you selected.
(Discharge of water will stop when you touch the button while water is coming out.)
After water collection, xed quantity discharge function is released.
①
②
③
④
⑤
Turn Dial either direction to select function.
Push center of Dial to start water outow. The selected icon ickers
during water outow.
Push center of Dial to stop water outow.
①
②
③
》
》 》
WaterSource®Cellular Functional Water®
22 23
system setup mode
system setup mode
ystem setup modeS
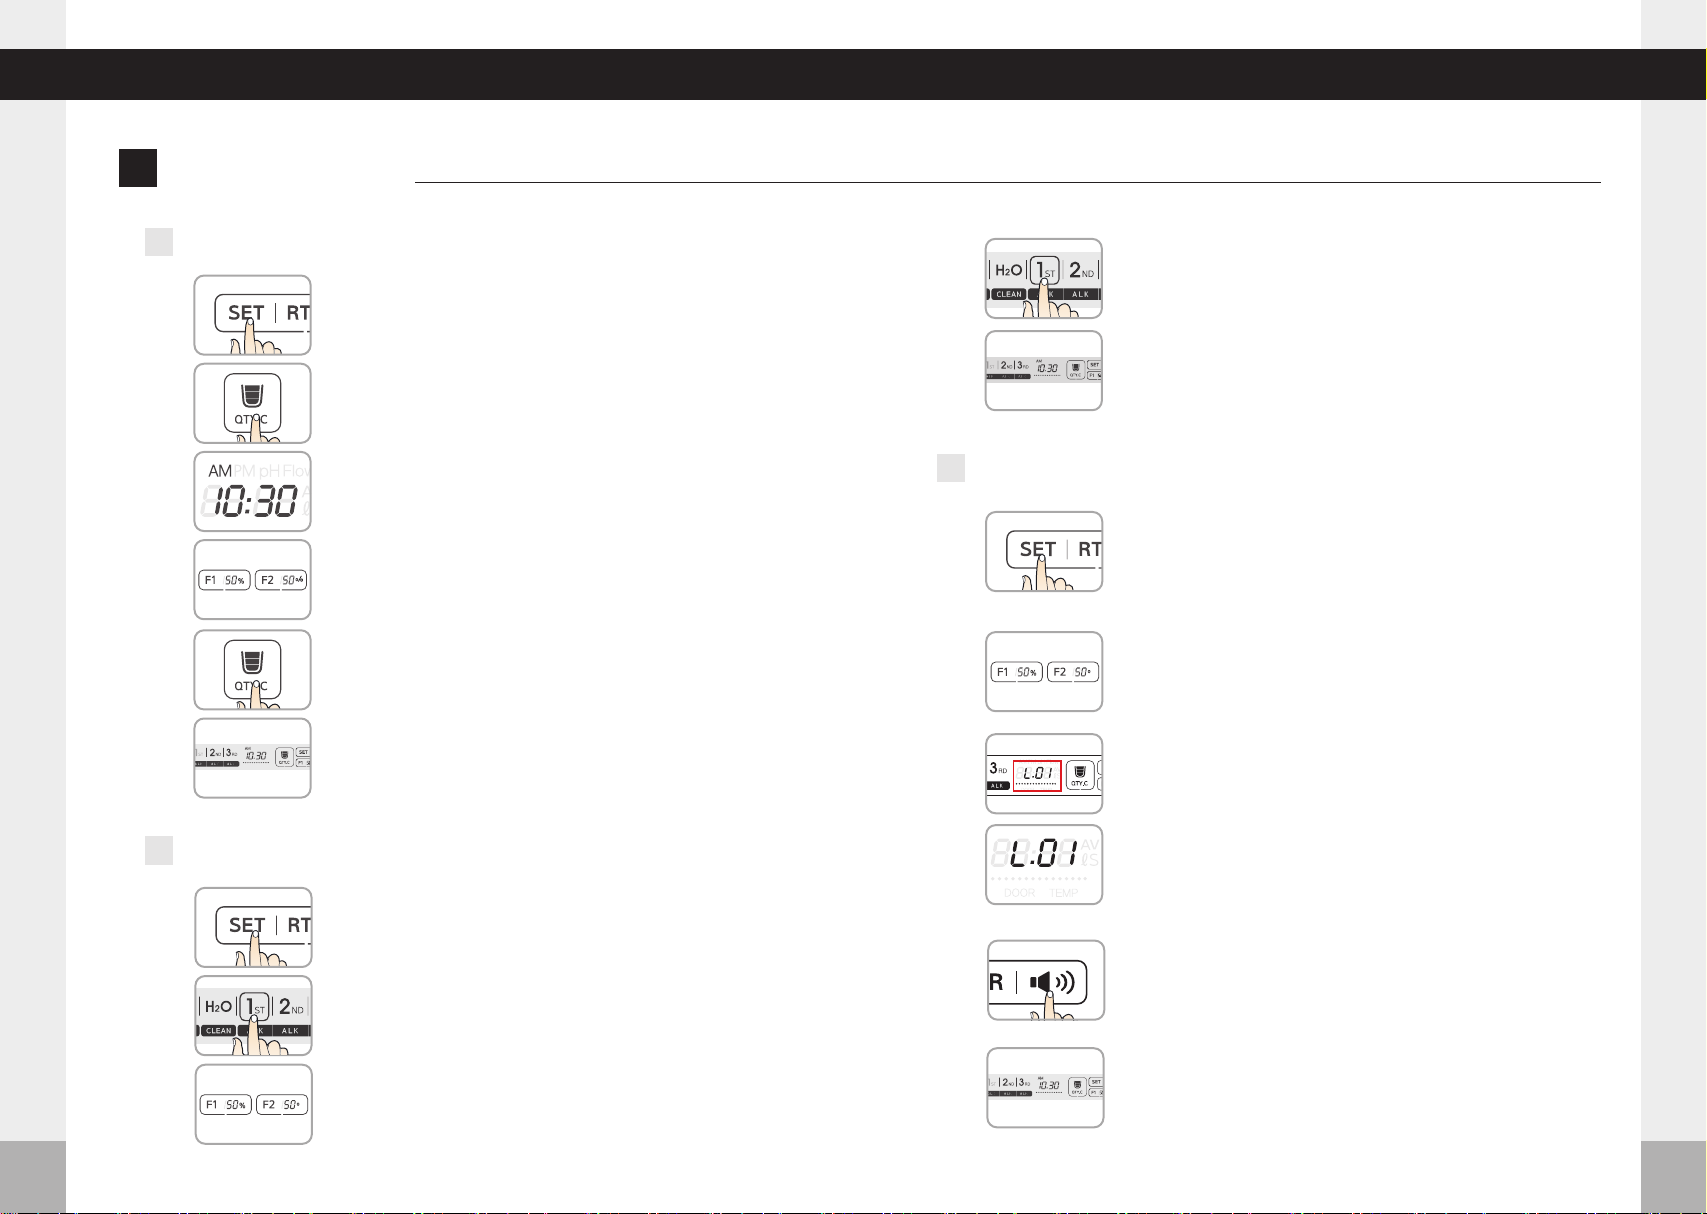
2pH Control Function
③Press F1 to raise pH. Press F2 to lower pH.
(Adjustable by Jog dial)
④Once setup is complete, press the water level
button you selected for 3 seconds.
(beeps 2 times)
1Setting the time
①Change to the system setting mode by pressing
the SET icon on the LCD for 3 seconds.
(beeps 2 times. Voice says ,“System setup mode”)
①Change to the system setting mode by pressing
the SET icon on the LCD for 3 seconds.
(beeps 2 times. Voice says ,“System setup mode”)
②Press the xed quantity discharge icon for
3 seconds. (beeps 2 times)
③The mode (AM-Hour-Minute) will be changed by
selecting the xed quantity discharge icon in this
sequence.
④Press F1 or F2 to set the time.
(Adjustable by Jog dial)
⑤Once setup is complete, press the xed quantity
discharge icon for 3 seconds. (beeps 2 times)
⑥Press setup icon for 3 seconds to return to
standby screen.
(beeps 2 times. Voice says ,“Setup was completed”)
⑤Press setup icon for 3 seconds to return to
standby screen.
(beeps 2 times. Voice says ,“Setup was completed”)
②Press the desired water level button for 3 seconds.
(beeps 2 times)
3Setting the Language
①Change to the system setting mode by pressing
the SET icon on the LCD for 3 seconds.
(beeps 2 times. Voice says ,“System setup mode”)
②Press the Volume icon for 3 seconds. (beeps 2 times)
③You can select language with F1 and F2 icon.
( Press F1 or F2 to change the language )
L.01 - Korean
L.02 - English
L.03 - Spanish
L.04 - Japanese
L.05 - Chinese
④Please confirm selected language with Codes,
displayed on screen and voice.
⑤Once setup is complete, Press the Volume icon
for 3 seconds. (beeps 2 times)
⑥Press setup icon for 3 seconds to return to
standby screen.
(beeps 2 times. Voice says ,“Setup was completed”)
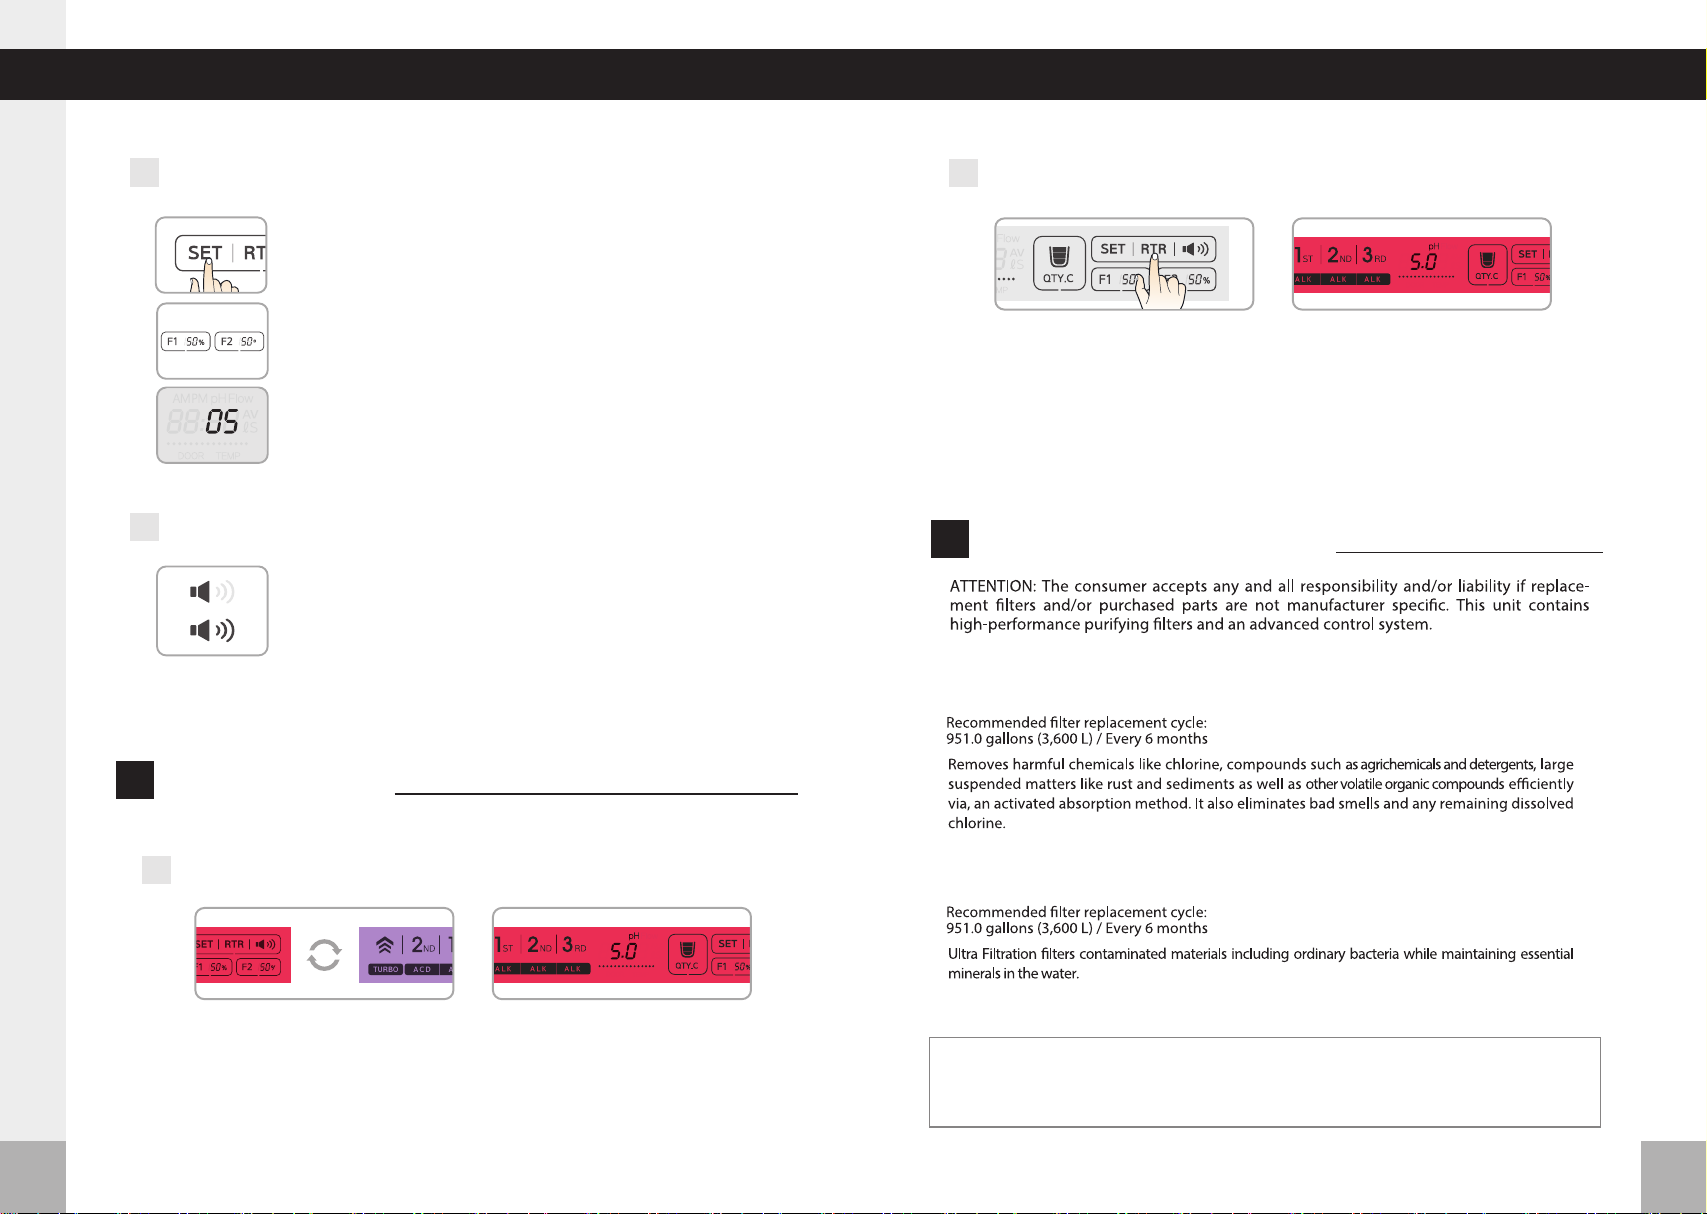
The voice icon will disappear by selecting the voice icon
in this sequence.
Voice message - On : “ Voice function works ”
O : “ Voice function terminates ”
①
②
4Volume Level Adjustment
5Selecting Voice On / Off
①Change to the system setting mode by pressing the
SE T icon on the LCD for 3 seconds.
(beeps 2 times. Voice says ,“System setup mode”)
④
Press setup icon for 3 seconds to return to standby screen.
(beeps 2 times. Voice says ,“Setup was completed”)
Control the voice volume by F1 and F2 button on the bottom.
Current voice volume level is displayed on LCD.
- F1 icon : Volume decrease - F2 icon : Volume increase
②Press the voice icon to control volume.
③
④
WaterSource®Cellular Functional Water®
24 25
Customer Serviceable Parts
Cleaning Function
leaning FunctionC
Performed during water outow after more than 24 hours of non-operation.
Performed after 30 liters of water outow.
Performed each time power is turned on.
(Note: RTR icon and backlight will icker before automatic cleaning is performed)
①
②
③
1Auto Cleaning Function (15 Sec)
Press the RTR button on stand-by screen.
The cleaning (Voice message: “It’s under washing, do not drink”)
- Automatic stop: The cleaning will be stop automatically when the washing
time is done.
- Manual stop: The cleaning will be stop when touching the screen during
washing
The screen changes to the standby screen once the cleaning is done.
①
②
③
2Manual Cleaning Function (15 Sec)
Primary Filter: YT20 1st Filter
The life of the lter can vary greatly due to use, water pressure, water quality and the
change of seasons. Filters may need to be replaced sooner than the scheduled time due to
these reasons, as you may notice reduced water quality or declining water taste.
ustomer Serviceable PartsC
SecondaryFilter: YT20 2nd Filter
WaterSource®Cellular Functional Water®
26 27
How to reset the lters
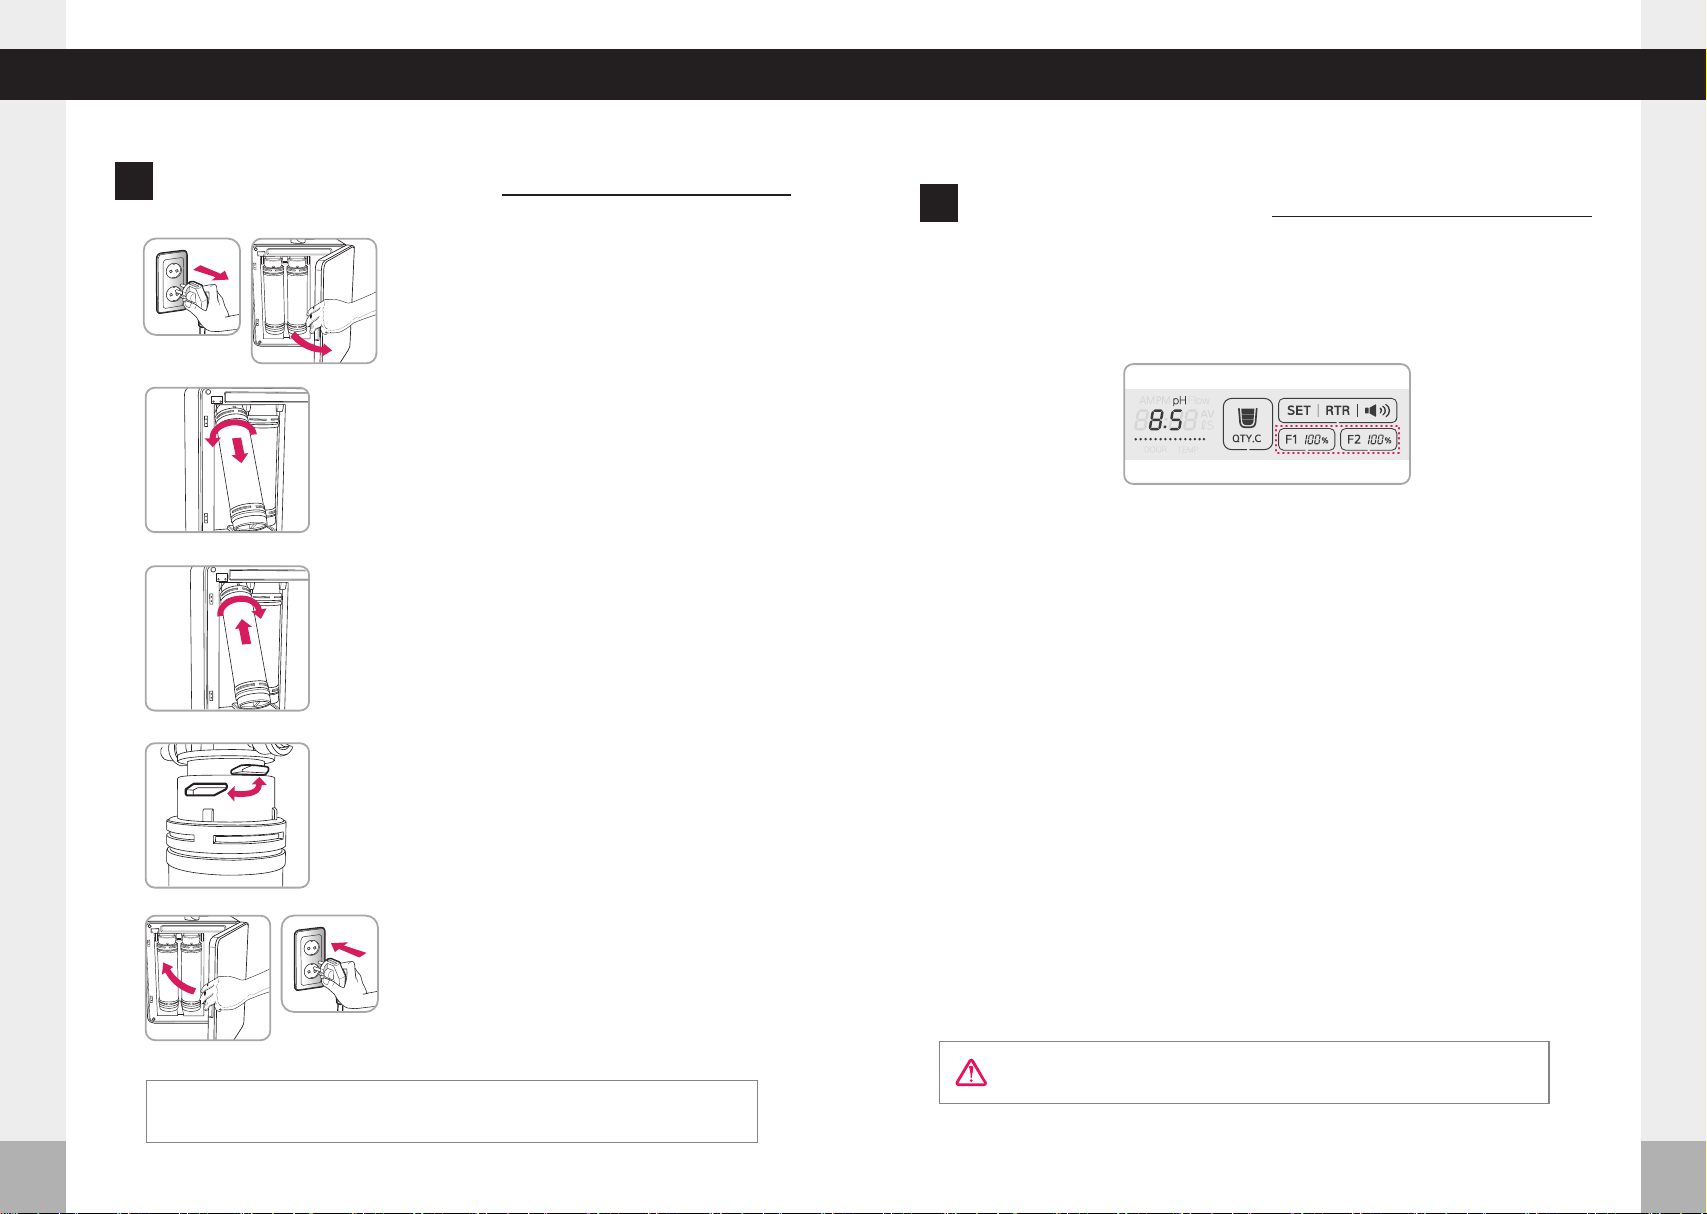
how to change the lters
①
ow to Change the FiltersH
②
③
④
⑤
Shut o the water supply to the unit.
Turn the power o and unplug the
power cord. Open the front door of the
product.
Raise the lter to be replaced and turn it
counter clockwise to remove it.
Put the new lter into the right position
by turning it clockwise.
When installing the lter, the connec-
tion bump of the head and the connec-
tion groove on the top of the lter
should be completely combined.
Close the door, plug the power cord
back in, reengage the water supply and
switch the unit back on.
Close
Open
After initializing the lter, press the H
2
O button and run puried water for 3minutes.
You are highly recommended to follow this process to use the machine properly.
ow to Reset the FiltersH
①
②
③
④
⑤
Replace the target lter.
After replacing the lter, press the F1 icon for 3 seconds.
Selected lter is initialized and beeps twice.
Voice announcement : "1st Filter / initializing was performed."
Next, press the F2 icon for 3 seconds.
Selected lter is initialized and beeps twice.
Voice announcement : "2nd Filter / initializing was performed."
Filter usage is displayed in 0 percent(0%) when the lter is
initialized properly.
The water outow selection mode is available for operation.
Unless the quantity ltered is reset, the corresponding lter replacement
message keeps responding.
28 29
Unit specications
Turbo function
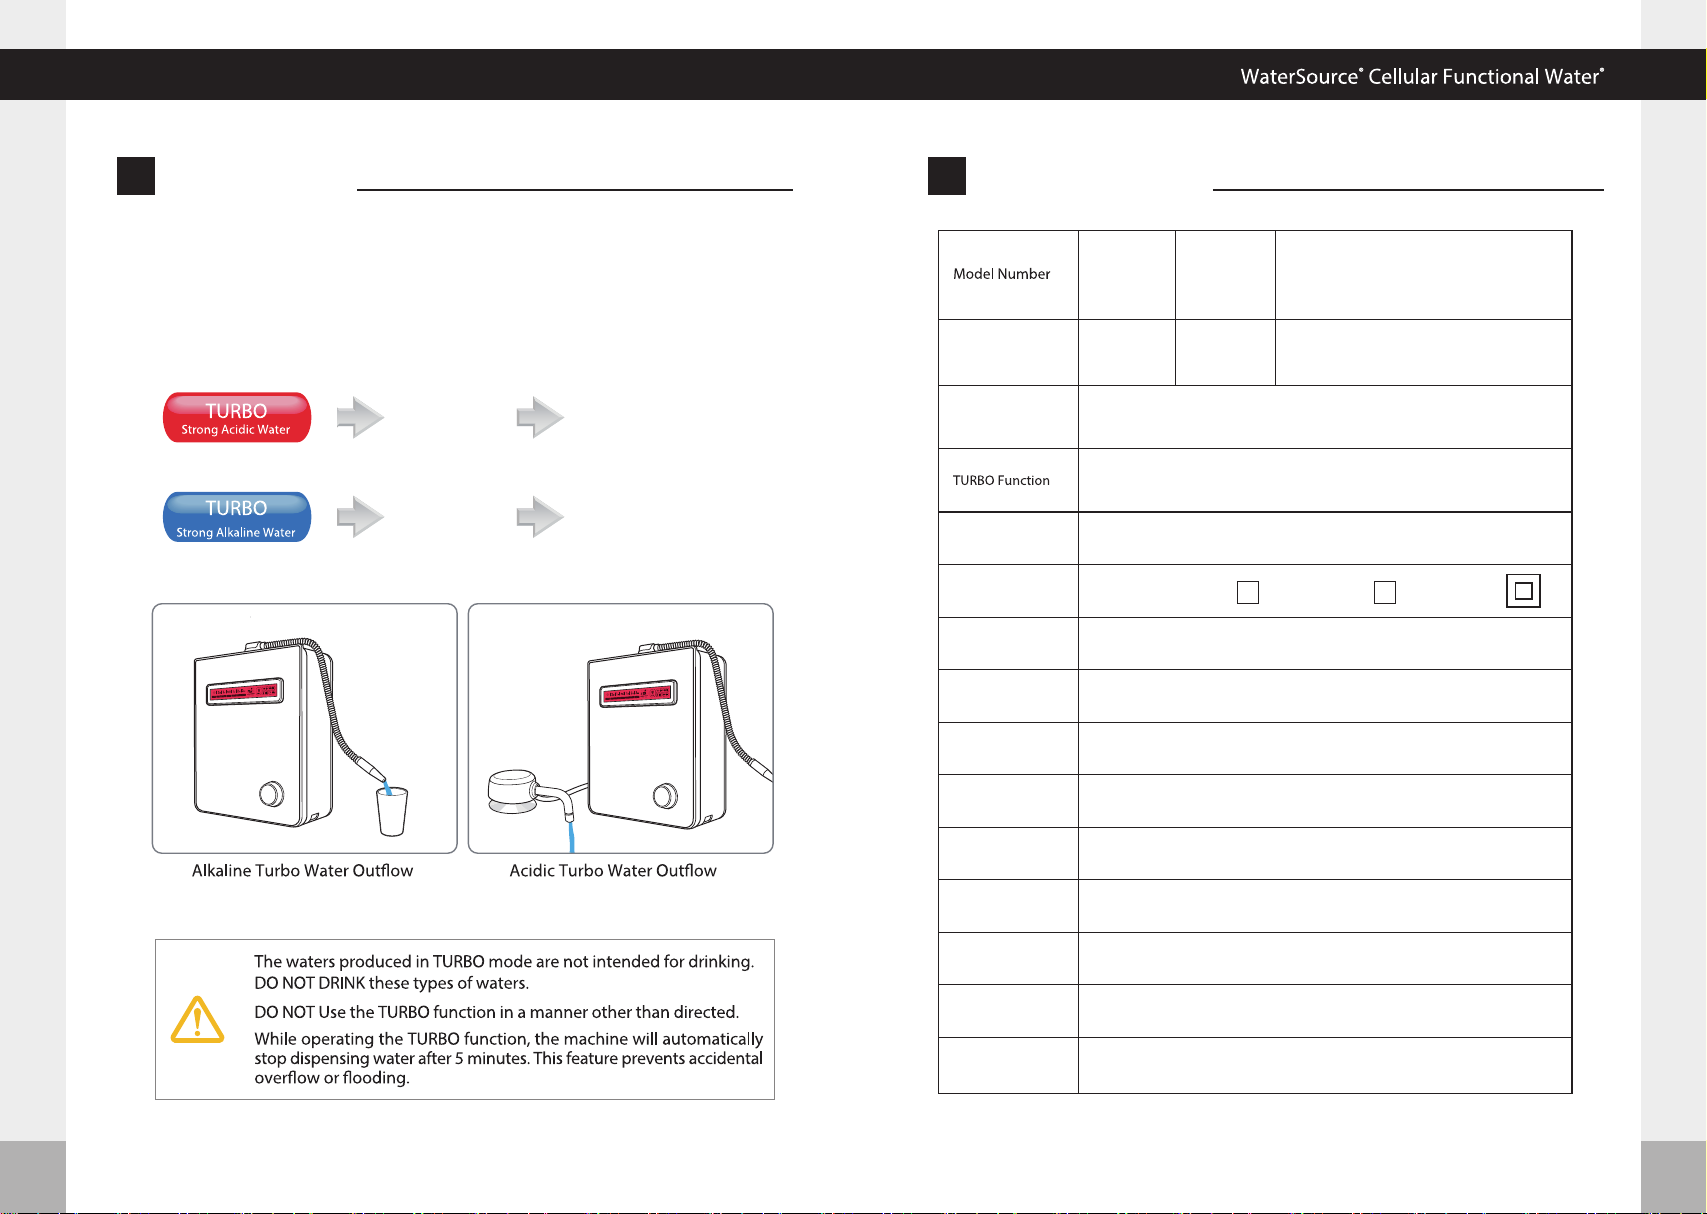
urbo FunctionTnit specificationsU
The TURBO function allows you to create strong alkaline and strong acidicwater. These
types of waters are ONLY to be used for cleaning, sanitizing, and disinfecting purposes.
NEVER DRINK THESE TYPES OF WATER.
pH 2
~ pH 3
Used to Disinfect
and Sterilize
pH 11
~ pH 12
Removal of pesticides and
herbicides in vegetables
and fruits
※This product is subject to changes that enhance its performance without prior notication.
GEM 5000T
Max 220W
O
5
GEM 9000T
9
Water Cell Plate
Materials
Product Name
Rated Voltage
pH Levels
Adjustable pH
Filters Conguration
Filter Life Display
Product Size
Product Weight
Electrolytic Cell
Quantity of Poles
Power
Consumption
Operating
Pressure Range
Available
temperature
V
Water Ionizer
100 -130 V~ , 200 -240 V~ / 50-60 Hz
4 -35ºC ( 39 -95ºF )
0.1- 0.5 MPa
3 Alkaline, 1 Neutral, 2 Acidic, Turbo
User adjustable pH levels control
2 Filters System
LCD lter replacement and announcement
Platinum and Titanium
W300 x D135 x H355 mm (11.8 x 5.3 x 13.9 inches)
approx 5.0kg (11.1 Lbs )
●
●
●
WaterSource®Cellular Functional Water®
30 31
Product warranty
Troubleshooting
We cannot accept any responsibility or liability for errors and/or problems rising from the customer's use of parts that aren't manufactured by our company.
Product Warranty
Product Name
Date of Purchase
Customer's Name
Customer's Address
Installation Engineer Name
Customer's Phone
One Year from the Date of
Purchase [12months]
Warranty PeriodWater Ionizer
GEM 5000T GEM 9000T
1. This product is warranted for one year (12 months). Any manufacturing
defects or spontaneous failures that may occur during the warranty period
will be repaired or replaced at no charge.
2. If any failure occurs, please call for service.
3. In the following cases, the customer shall pay repair or replacement costs.
- In the case where a failure occurs resulting from improper use or negligence by the
customer.
- In the case where repairs or modications are performed by non-authorized
representatives.
- In the case where a failure due to natural disasters (res, salt damage, damage from
natural gas, earthquakes, oods, lightning, and etc.)
- In the case of absence of the product warranty or no information is provided in the
warranty.
- Usage other than domestic use.
4. We shall charge the customer for repairs and replacement costs against
failures after the warranty period expires.(one year after the date of
purchase).
5. Our customers are asked to show their warranty to us when requesting
after-sales service.
6. This warranty will not be reissued. Make sure to keep it in a safe place.
v
Model Number
roubleshootingT
The screen turns o.
Symptoms
Abnormal Taste
Water Outow Change
Incorrect pH levels
Unit stops during use.
Unit leaks.
Settlement in extracted water.
The Unit doesn’t operate in
cleaning mode.
Only puried water is extracted.
Filter replacement icon
remains“on”even after
lter has been replaced
Checkpoints Measures to be Taken
Check period of use.
Check lters for clog.
Run unit for one minute, draining stagnant
water.
Check lter for replacement time.
Check if the lter ow rate is initiated.
Check lter for proper mounting.
Check other areas of unit.
Check for excessive calcium in source
water.
Check if amount of working water
exceeds 30ℓ.
Check if operating time exceeds 24 hrs.
Check if non-operating time
exceeds 10 minutes.
Check if cleaning icon is pressed.
Check water for solidity. Water quality varies by region.
Reduce amount of raw water.
Contact us. Request after-sales service.
Initialize lter ow rate.
(System setting mode.)
or Request service
Unit stops automatically after 15 min.
Unplug unit. Contact us.
Contact us for additional lter.
Contact us to install a pressure reducing
valve.
The unit returns to normal after performing
auto cleaning for 15 seconds.
When the unit is not used for
10 minutes, it changes to the ECO mode
automatically. The unit returns to
normal after touching the screen.
Check ow rates for higher levels.
Check if amount of drained water is
small.
Check if hose is bent or folded.
Check if ow rates are low.
(less than 1ℓ/ min.)
Check if water supply is cut o or if the
water supply line is frozen.
Check if the operating time exceeds
15 min. ※Turbo : 5 min
Check if valve on water supply is closed.
Replace lter.
Open Valve.
Stretch out hose.
Change lter.
Contact us to install water pump.
Wait until water comes out of the water
supply pipe.
Check if ow rate is high. (5kgf/cm
or faster.)
2
This manual suits for next models
2
Table of contents


