Wattwerx Little Dragon User manual

Hugh’s Wattwerx
Little Dragon
b
User/Maintenance Manual
Use What Works!

F H Y
ank you for trusting my amplier to be a part of this most
important part of your life: your MUSIC!
I build ampliers for my own use, and hence, put the best of
myself into every unit. I part with them, reluctantly, in order to
share with others the joy that their design, construction, and use
have brought to my own life. I cut no corners—neither in parts nor
in construction—and hence, they are by nature costly to construct,
but if a lifetime of experience has taught me anything, it’s simply
this: Initial price is but a small part of the overall cost of ownership
over the lifetime of a thing well made.
I’ve heard it said that “it’s a poor crasman who blames his tools,”
and that is undoubtedly true. Its corollary, however, is that the best
crasmen recognize the nest in tools. Your choice speaks well of
your taste, discretion, and experience, and I am fully aware of the
honor your selection conveys.
ank you! I shall ever endeavor to be worthy of your trust.
“A thing of beauty is a joy forever.”
John Keats, Endymion

Little Dragon
T C
Section One: Operations
Input.......................................................................................................................................8
HighBoost.............................................................................................................................8
Low Boost..............................................................................................................................9
Volume.................................................................................................................................10
Middle..................................................................................................................................11
Treble....................................................................................................................................11
Bass......................................................................................................................................12
Front Panel Controls, Switches, and Jacks
Rear Panel Controls, Switches, and Jacks
Master...................................................................................................................................13
Pentode/Triode...................................................................................................................13
Presence...............................................................................................................................14
Speaker.................................................................................................................................14
Bottom Chassis Components
Overview..............................................................................................................................15
Mains Input.........................................................................................................................15
Mains Power........................................................................................................................15
Mains Fuse..........................................................................................................................15
Standby Switch....................................................................................................................16
Warnings and Precautions.................................................................................................1
Warranty...............................................................................................................................2
Specications.......................................................................................................................3
Overview..............................................................................................................................4
Hints and Tips.....................................................................................................................6
Quick Start Instructions.....................................................................................................7

P 4

P 1
W P
is device must be properly grounded!
Ampliers generate heat. Do not cover or in any way impede ventilation during
operation or a re and/or serious circuit damage may result.
Never remove the amplier chassis (upper or lower). ere are no user-serviceable
parts inside. e maintenance section in this manual is intended only for qualied
technicians.
Use only the supplied power cord. Protect the power cord from being damaged,
pinched, or abraded.
Never operate or store the amplier in damp or wet conditions.
Never operate the amplier without an appropriate loudspeaker connected.
Always unplug the amplier when not in use.
Never attempt to bypass the fuse, or operate with a fuse of other than the
recommended value.
Only replace tubes with replacements of the identical type.
is amplier is LOUD. Exposure to high sound levels without appropriate hearing
protection can cause permanent hearing damage.
Do not use excessive force in handling control buttons, switches, and controls. Do
not use solvents such as benzene, paint thinner, or acetone to clean any part of the
amplier.

P 2
Hugh’s Wattwerx warrants this product against defects in materials and workmanship for ONE (1)
YEAR from date of original retail purchase (30 days for tubes). Hugh’s Wattwerx reserves the right,
before having any obligation under this limited warranty, to inspect the damaged product, and all costs
of shipping the product to Hugh’s Wattwerx for inspection shall be borne solely by the purchaser. In order
to recover under this limited warranty, Purchaser must make claim to Hugh’s Wattwerx within 30 days
of occurrence, and must present acceptable proof of original ownership (such as original receipt) for the
product. Hugh’s Wattwerx, at its option, shall repair or replace the defective unit covered by this warranty.
is limited warranty does not cover any damage to this product that results from improper installation,
accident, abuse, misuse, neglect, natural disaster, insucient or excessive electrical supply, abnormal
mechanical or environmental conditions, or any unauthorized disassembly, repair, or modication. is
limited warranty also does not apply to any product on which the original identication information
has been altered, obliterated or removed, has not been handled or packaged correctly, has been sold as
second-hand or has been resold contrary to the US export regulations.
is limited warranty covers only repair or replacement of defective Hugh’s Wattwerx products, as
provided above. In the event of a claim, Hugh’s Wattwerx’s sole obligation shall be replacement of the
product.
DISCLAIMER OF WARRANTY
EXCEPT FOR THE LIMITED WARRANTY PROVIDED HEREIN, TO THE EXTENT PERMITTED
BY LAW, HUGH’S WATTWERX DISCLAIMS ALL WARRANTIES, EXPRESS OR IMPLIED,
INCLUDINGALLWARRANTIESOFMERCHANTABILITYAND/ORFITNESSFORAPARTICULAR
PURPOSE. TO THE EXTENT THAT ANY IMPLIED WARRANTIES MAY NONETHELESS EXIST BY
OPERATION OF LAW, ANY SUCH WARRANTIES ARE LIMITED TO THE DURATION OF THIS
WARRANTY. SOME STATES/PROVINCES DO NOT ALLOW LIMITATIONS ON HOW LONG AN
IMPLIED WARRANTY LASTS, SO THE ABOVE LIMITATIONS MAY NOT APPLY TO YOU.
LIMITATION OF LIABILITY
REPAIRORREPLACEMENTOFTHISPRODUCT,ASPROVIDEDHEREIN,ISYOUREXCLUSIVE
REMEDY. HUGH’S WATTWERX SHALL NOT BE LIABLE FOR ANY SPECIAL, INCIDENTAL OR
CONSEQUENTIALDAMAGES,INCLUDING,BUTNOTLIMITEDTO,PROPERTYDAMAGE,LOST
REVENUES, LOST PROFITS, RENTAL OF REPLACEMENT EQUIPMENT, DOWNTIME, DAMAGE
TO PROPERTY, AND THIRD-PARTY CLAIMS, ARISING OUT OF ANY THEORY OF RECOVERY,
INCLUDING WARRANTY, CONTRACT, STATUTORY OR TORT. NOTWITHSTANDING THE
TERM OF ANY LIMITED WARRANTY OR ANY WARRANTY IMPLIED BY LAW, OR IN THE
EVENT THAT ANY LIMITED WARRANTY FAILS OF ITS ESSENTIAL PURPOSE, IN NO EVENT
WILL HUGH’S WATTWERX’S ENTIRE LIABILITY EXCEED THE PURCHASE PRICE OF THIS
PRODUCT. SOME STATES/PROVINCES DO NOT ALLOW THE EXCLUSION OR LIMITATION OF
INCIDENTAL OR CONSEQUENTIAL DAMAGES, SO THE ABOVE LIMITATION OR EXCLUSION
MAY NOT APPLY TO YOU. THIS WARRANTY GIVES YOU SPECIFIC LEGAL RIGHTS AND YOU
MAY ALSO HAVE OTHER RIGHTS THAT VARY FROM STATE TO STATE AND PROVINCE TO
PROVINCE.
W

P 3
S
I : 1 Megohm
O : 16 Ohms
P : One 12AX7, one EF86, one 12AT7
P : Two EL34
H : 440 Volts
F : 6.3V A/C
O : 40W RMS into 16 ohms
O 115V A/C 60Hz
I : NOS British made Celestion G8 Vintage 8
I : 16 Ohms
I : 60W
E : 16-ohm, 60W min power handling
H: 15”
W: 12”
D: 4-1/2”
W: 40 pounds
C: Mojotone Brown Bualo Tolex
C : Moist cloth, dish-washing liquid

P 4
Portability, simplicity, power, and tone…ese were the design criteria for Little Dragon.
Bruce Lee (the Little Dragon), whose Chinese name was Jun Fan (李振藩 in traditional Chinese
characters), was an actor, martial arts teacher, philosopher, lm director, and screenwriter. e philosophy
and martial art style he developed is called Jeet Kune Do, and emphasizes an eclectic approach not only
to combat, but to all aspects of life; summarized by the credo: Use what works. In the founder’s own
words: “Adapt what is useful, reject what is useless, and add what is specically your own.”
is philosophy perfectly exemplies my own approach to music in general, and amplier design in
particular, and as such, inspired the homonymous brand name: Hugh’s Wattwerx.
My approach to amp design/construction is pretty simple: I build what I want to use myself, one amp
at a time. at way, if nobody ever buys one, who cares? Ihave my ideal amp for my own use. If/when
one sells, then I’ll build another.
Since starting to design my own amps in 2009, I’ve assembled numerous successful prototypes,
embodying dozens of unique features and topologies. When it came time to choose just one as my
premier model oering, there was little doubt which one it should be: Little Dragon.
Also, as described on the overview page, it is the design which, if I never sell a single unit, I would be
ree goals underlie this design.
First, foremost, and almost requiring no mention, it had to sound great, for a multitude of styles and
usages, and had to pack adequate cojones to hang with a full band, including an acoustic drummer.
Second, it had to be compact. I drive a Ford Escort, so I need something I can easily stow in the tiny
trunk along with my guitar case. With knees not what they once were, and many venues located atop
ights of stairs, I wanted to be able to grab my amp in one hand, my guitar case in the other, and arrive
ready to play with just a single trip.
ird, it had to be simple. With 40 years experience as a Computer Systems Engineer, I am anything
but a technophobe; nevertheless, when it comes time to make music, I prefer to leave my pocket protector
at home and shi fully into music making mode. Moreover, aer a couple of beers a/o a toke or two, the
last thing with which I care to contend is a control panel that resembles a jumbo jet console!
Despite its diminutive size, Little Dragon packs a 40W punch, courtesy of a pair of EL34 output tubes,
cathode biased, and equipped with a ne-tune balance control for achieving optimum bias even with
unmatched tubes. For those of technical inclination, the circuit embodies a wide-bandwidth, parallel
triode rst gain stage, with volume-, treble-, and bass-boost switches, followed by an EF86 small-signal-
pentode, carefully congured to avoid microphponics, despite its combo-amp environment. Tone stack
consists of a low-loss Baxandall lter for bass-treble control, coupled with an independent, inductor-
based mid control. Bass/treble and mid sections can be individually bypassed for maximum volume and
extensive tonal variation.
O

P 5
e phase inverter is a well-established LTP (Long-Tail-Pair) conguration, and the power section
includes a bypassable master volume control, for those who prefer to emphasize preamp distortion.
By default, the master volume is completely removed from the circuit, since most connoisseurs of
tube amp tone prefer that conguration. Pulling the back-panel MV knob engages the control. e
output transformer is a well-respected Hammond unit, while the power transformer is from renowned
American transformer shop, Edcor.
A Pentode/Triode switch allows power reduction from 40W to 20W, and is carefully implemented to
allow ‘hot switching’ without danger of damage to tubes or circuitry.
is amp is built with all power supply components in a separate chassis, mounted in the bottom of
the cabinet where a reverb pan might normally reside. is results in drastically decreased A/C hum.
e connection between the two units utilizes a costly aerospace-grade coupler and cable, rated for
600V D/C.
Finally, the speaker is a remarkable little NOS Celestion Vintage 8 -- little brother to the popular
Vintage 30. No longer oered by Celestion, these British-made speakers oer broad frequency response,
60W power-handling capacity, and a volume level that belies their compact dimensions. I have side-by-
sided this amp with the internal speaker and an external 2X12 cabinet, and the internal speaker acquits
itself admirably. e amp is easily capable of pushing a 4X12 half stack if more volume is required.
e main chassis is extra-heavy 12-gauge aluminum, while the smaller lower chassis is 14-gauge
aluminum.
My goal of maximizing simplicity and portability meant foregoing such extraneous features as
multiple channels,foot switching, and eects. My view is that while these features may be nice to have
(particularly if size and weight are of no concern), they are inherently extraneous to the essential function
of a tube amplier. Don’t misunderstand; I’m a big fan of reverb, but the quality of todays reverb pedals
makes implementing this function with tubes something of an anachronism. If I was willing to allow
additional space and transformer capability for one or two additional tubes, there other functions to
which I would apply them--additional switchable gain stages, for example. As it stands, I simply pack
2 small pedals into my guitar case: a Boss FRV-1 ‘63 Fender Reverb and a Danelectro Transparent
Overdrive and I have everything I need.
Another consideration is that the more circuitry you pour into a given space, the more there is to go
wrong, and the more your signal is apt to be compromised/degraded.
Finally, this amp is designed to oer maximum clean headroom until you reach the point of everything
being ‘dimed’. is was a deliberate decision. If you NEVER need to be loud and clear, then a roaring
metal machine may be for you. On the other hand, there are myriad ways to create a great dirty sound,
regardless of your tastes, but if the clean headroom isn’t there, there’s no way to create it aer the fact.
Again, these are simply my priorities, not a critique of the priorities of others. If this is what you want,
then this is an amp that does it exceedingly well.

P 6
1. Aer unpacking your new amplier, save the box and packing material in case you even need to
ship your amplier for any reason.
2. Connect the A/C power cable ONLY to a properly grounded, 3-hole electrical receptacle.
3. When connecting an external speaker, be sure to use an unshielded speaker cable.
4. Little Dragon is high gain amplier with very sensitive input circuitry. It is therefore very
important to use a high-quality, well-shielded, low-capacitance cable between your instrument
and the amplier in order to prevent unwanted noise and ensure the highest quality tone.
5. All of my ampliers are designed and built for use by responsible adults. Every control has great
range and is extremely powerful, so simply spinning everything up to its maximum setting is
likely to result in unpleasant, even painful sounds. Yes, I could have incorporated training wheels
to prevent kiddies from hurting themselves, but so doing would have entailed a reduction of
capabilities for everyone else, which I refuse to do.
H T

P 7
Q S I
N / A
BEFORE connecting the power cord:
Inspect the entire amp for signs of damage. If anything appears amiss, do not use the amp. Contact
the manufacturer, seller, or shipping company immediately for further instructions.
Look in the back of the cabinet and check the following:
1. All tubes are securely seated in their sockets (see ____) for instructions on how to check for
loose tubes.)
2. Internal speaker or an external cabinet are plugged into the speaker jack.
3. e modular power cable is fully inserted into its socket.
4. Power toggle switch is in the o (down) position.
5. Standby toggle switch is in the standby (down) position.
Examine the front panel and make sure:
1. Volume control is set at low level (~2).
2. Tone controls are positioned at number 5.
3. All boost switches are turned o.
AFTER conrming the above:
1. Plug the power cable into a grounded, 3-hole electrical receptacle
2. Plug your instrument into the front panel input jack.
3. Set the controls to one of the quick-start settings listed below.
4. Turn the power switch (rear, bottom chassis, far le position) to the on (upward) position
5. Wait approximately sixty seconds for the tube laments to warm up.
6. Turn the standby switch (rear, bottom chassis, le side of fuse holder) to the operate (upward)
position.
7. Make some music!
Quick Start Settings (Presence and Pentode/Triode controls to taste)
Volume middle Treble bass masTer HiboosT low boosT Vol boosT
Clean blues 3 3 7 8 10 Off Off Off
CrunCH 7 3 7 9 3 Off Off On
lead 10 8 6 7 5 OnOnOn

P 8
F P C, S, J
I
In the interest of simplicity and compactness, Little Dragon has only one input. is is congured
to correspond to the high-sensitivity input on most double-input ampliers (which is the only one
most players usually use anyway). If your guitar has extremely hot pickups that produce distortion even
on low control settings, simply roll back the volume control on your guitar. e Little Dragon input
circuitry is specically designed to react dynamically to signal strength variations resulting from guitar
controls and picking dynamics.
H B
e purpose of the Hi Boost switch is to compensate for the unequal treble attenuation normally
associated with turning down the volume control. is is accomplished by engaging a carefully chosen
capacitor to bypass the volume control for hight frequencies only. us, it will have little or no eect
when the volume control is turned to its maximum (clockwise) position. e following graphs illustrate
the eect of the Hi Boost switch at 100%, 50%, 25& and 5% volume.
I
NPUT
V
OLUME
M
ID
T
REBLE
B
ASS
H
I
B
OOST
L
OW
B
OOST
0
2
4 6
8
10 0
2
4 6
8
10 0
2
4 6
8
10 0
2
4 6
8
10
Little
Dragon
PULL BOOST PULL BYPASS PULL BYPASS
O
FF
O
N
O
FF
O
Nb
Hugh’s Wattwerx

P 9
L B
e low boost switch functions by attenuating the upper frequencies, thereby making the low
frequencies more prominent. Engaging the Low Boost will actually reduce the overall loudness of the
output—this is shown in the following graph.
For a more bass-heavy tone, you would normally engage this switch and raise the volume (and/or
Master) controls to compensate. is is illustrated in the following graph

P 10
V ( )
Although this control is labeled ‘Volume’ for clarity, its functionality is more complex than merely
adjusting how loud the amp sounds. is control governs how hot a signal is sent to the second preamp
stage (the EF86), and consequently, the texture of the resultant tone. In practice, it’s action is tightly
coupled with that of the Master Volume control (when engaged). As a basic rule of thumb, the higher
you turn the Volume control, the more distortion you will generate. With the Master Volume in its
default (bypassed) position, the amplier will react similarly to a vintage (non-master-volume) amp;
that is, you will be able to play quite loud while still maintaining a fairly clean sound, and will not
generate signicant distortion unless you turn it up very loud. is conguration is excellent for clean
articulated styles such as jazz and some country and funk, and is also perfect for those who prefer to rely
on pedals to create their crunch/distorted tones.
Pulling the Volume control out engages the boost circuit. is results in both an increase in overall
volume, as well as a punchier, more aggressive sound. Conversely, disabling the boost enables negative
feedback in the rst preamp stage, resulting in a smoother, creamer tone. e eect of the boost control
is shown in the following graph.

P 11
M (P B)
e Little Dragon Middle Control is fully segregated from the Bass and Treble controls, and can be
individually bypassed without aecting the other two tone controls. e midrange circuit produces a
sharp bump at around 450Hz when maximized, and a deep notch (scoop) at a similar frequency when
minimized. ese extremes are illustrated in the following two graphs.
T
e high end of the audio spectrum is controlled by the Treble Control. Along with the Bass Control
(discussed next), this component is implemented in a circuit known as a Baxandall Tone Stack. e
Baxandall lter is a classic, well proven circuit, somewhat more common in high-delity components than
musical instrument amps, but nevertheless appearing in some highly-regarded guitar amps as well. It’s
most prominent features are lower insertion loss than the more familiar FMV (Fender/Marshall/Vox)
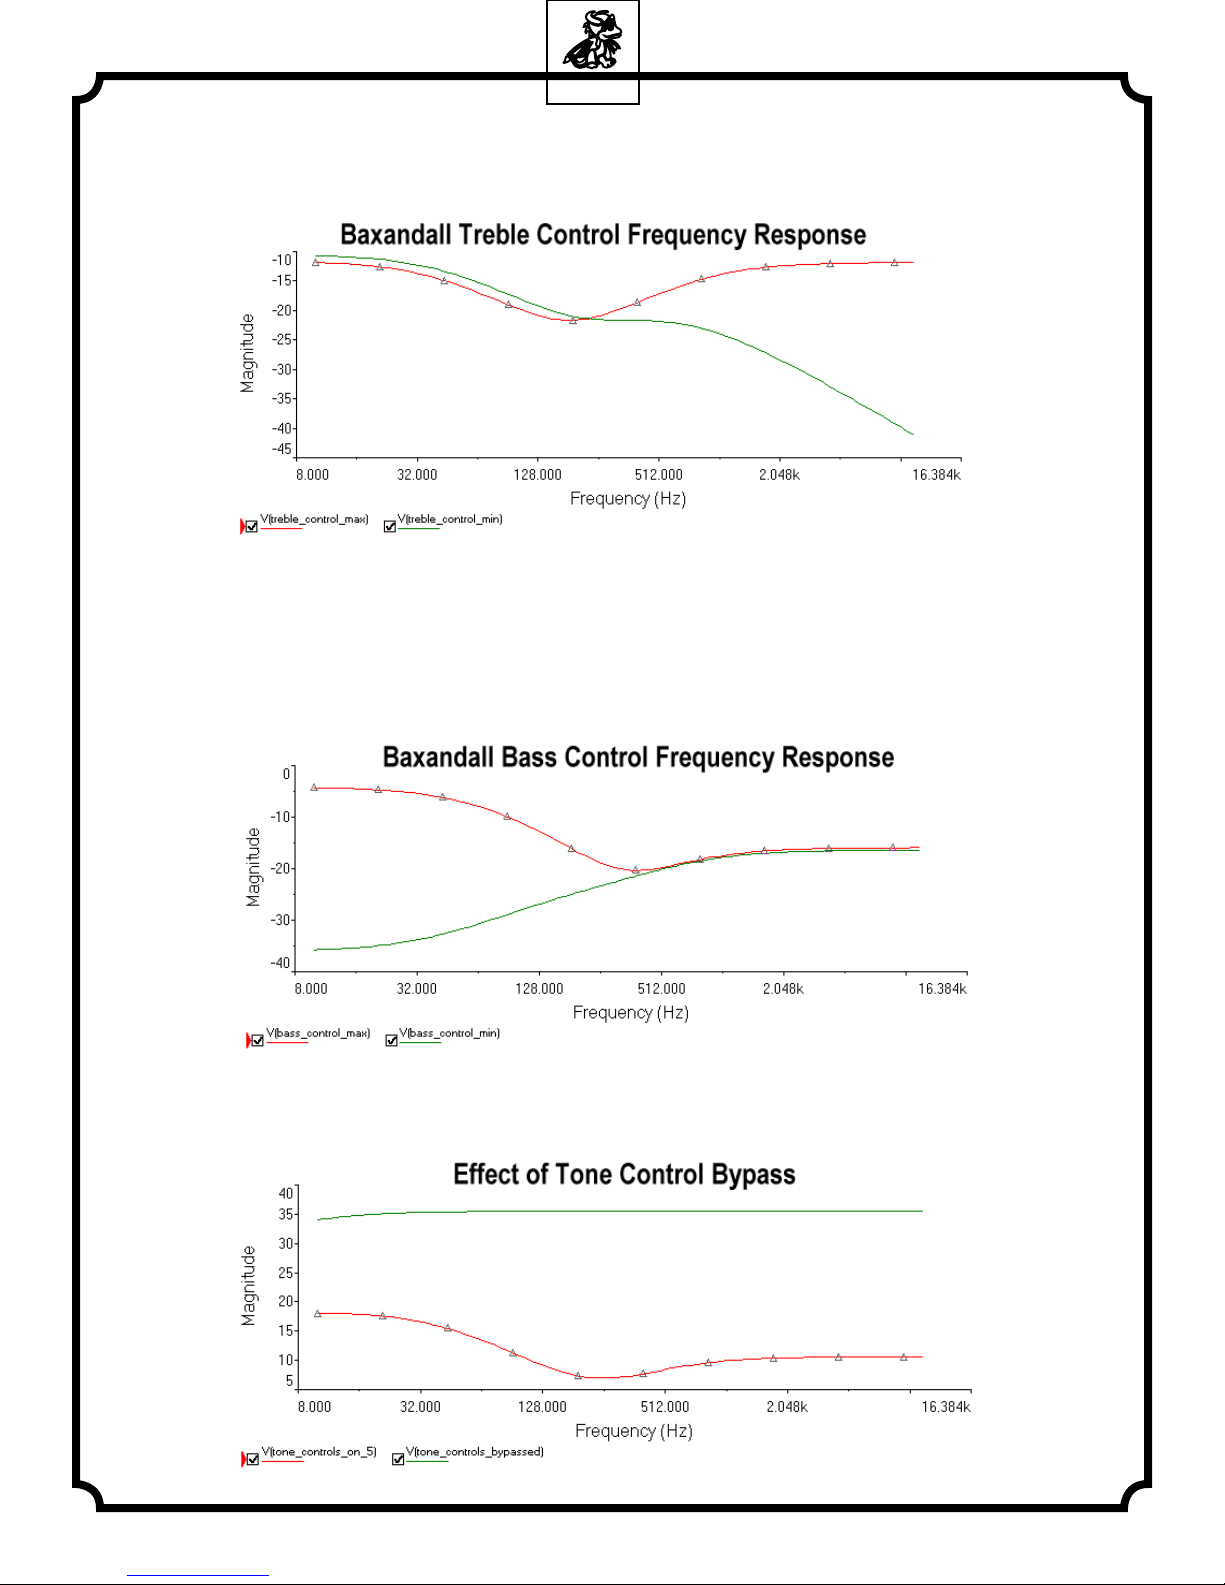
P 12
tone stacks, and a nearly at frequency response with Bass and Treble controls set at their middle
(5) position. e Treble Control’s response is shown graphically in the following illustration:
B (P B)
Like the Treble Control just described, the Bass control is implemented as a component of a classic
Baxandall lter. Also like the Treble (and Mid) controls, its specic eect will depend on your overall
volume, distortion level, and the settings of the other tone controls. Its eect is shown in the following
graph:
Pulling the Bass Control bypasses both the Bass and the Treble controls, and results in a signicant
boost in overall volume, as shown below:

P 13
R P C, S, J
SPEAKER
16-OHMS
Hugh’s Wattwerx
WWW.WATTWERX.COM
PENTODE
TRIODE
MASTER
PULL TOENGAGE
PRESENCE
PULL BYPASS
S/N: LD-0001
USE WHAT WORKS
12AX7EF8612AT7 EL34EL34
M (P T E)
Most tone acionados eschew Master Volumes in any form, and for that reason, the default condition of
the Little Dragon’s Master Volume is bypassed. To engage this feature, simply pull the knob gently outward,
and adjust to taste. When engaged, the Master Volume circuit is engineered so as to exert the least possible
impact on tone when turned up to maximum volume. e dierence between the bypassed state and
engaged but set to maximum volume is illustrated below:
Unlike the simple ‘Shunt-to-Ground’ style master volume, it clear from the above that even though a bit
of volume is lost when the MV is engaged, even when it is set to maximum volume, the tone spectrum is
virtually unchanged. Either way, the choice is yours.
When engaged, the master volume acts as a sort of governor, setting the maximum volume of the entire
amplier. It can be thought of as a counterpart to the Volume control, to which it is conceptually coupled.
As discussed earlier, turning the Volume control up increases not only volume, but distortion (overdrive)
as well throughout the preamp section of the amplier. When used in conjunction with the Master, it is
possible to introduce any desired degree of overdrive while maintaining a reduced volume level. In a
nutshell, turning the Master up (or bypassing it altogether) and the Volume down generates the cleanest
sound, whereas turning the Master down and the Volume up results in the most distortion.
P/T S
Oen referred to as a ‘half power switch’, this control, as the name implies, switches the power output
section of the circuit between two distinctly dierent topologies, with a corresponding dierence in
operating mode. e ‘half-power’ label, however, while technically correct, is somewhat misleading. is is

P 14
because our perception of loudness is nonlinear; which is to say that the output of a y-watt amplier is not
heard as half as loud as that of a one-hundred watt amplier. Perhaps a more noticeable eect of this switch is
the more tactile feel of the amplier in the triode position. In any case, this is a very useful option for nding
that exact sweet spot for a given style, preference, or tune.
P C
Aurally, the presence control seems like another tone control—one which aects the upper mid-range
frequencies, to impart more or less sparkle to the output; however, it’s operation is fundamentally dierent
from the other tone controls. A true presence control (which this is), works by tapping a small amount of
the nal output to the speakers, and mixing it back into the signal at an earlier point of the circuit chosen so
that the two are 180-degrees out of phase. In fact, it’s more related to the way in which the cone reacts, than a
tone control as such. is circuitry is technically known as a negative feedback loop, and is most commonly
found in xed-bias ampliers. e negative feedback loop in an amp is a sort of ‘damping’ eect that
functions as a sort of self-regulation. What the Presence Control does is to shunt varying amounts of the
higher frequency feedback to ground, thereby preventing it from negating the corresponding frequencies
in the signal. is allows the negative feedback to tighten up the lower end of the signal, while leaving the
high frequencies unaected. Negative feedback loops (and hence, presence controls) are relatively rare
in cathode-biased power ampliers (such as that in the Little Dragon), for a number of reasons. For the
most part, this is simply a result of ‘designers’ copying earlier designs, however, there are some functional
reasons. Most signicant is that negative feedback can cause the cathode bypass capacitor(s) used in a
cathode biased amp to charge up to a point where an unpleasant eect known as blocking distortion
can occur when the power section is driven hard. Nevertheless, I nd the combination to be very useful
under most circumstances. To deal with the possible negative eects, pulling the Presence Control on
Little Dragon completely removes the entire negative feedback loop from, the circuit, providing the best of
both worlds. Once you have dialed in all the other settings on the amp, experiment with dierent settings
of the Presence Control, and with it bypassed, and let your ears be your guide.
S O
Tube ampliers must NEVER be operated without a speaker connected to the output jack. Failure to
heed this precaution will result in the utter destruction of the output transformer, power tubes, and related
circuitry—negating your warranty and incurring some very expensive repairs. Don’t do it! Little Dragon
is designed to expect a 16-ohm load, which is exactly what is presented by the internal speaker. You can
optionally connect an external cabinet if you wish, but that cabinet MUST present a 16-ohm load, and be
rated for at least 40-watts RMS. If in doubt, stick with the internal speaker.

P 15
B C C
Hugh’s Wattwerx
WWW.WATTWERX.COM 4A SLO BLOWSTANDBY
OPERATE
OFF
ON120V
S/N: LD-0001
O
In order to minimize extraneous hum, all power supply components are isolated from the signal path
in a separate chassis. ese two segregated units are connected using aerospace industry cable and locking
couplings rated for 600V. e power supply is located at the bottom of the cabinet, in the space generally
reserved for a reverb pan. is results in the quietest possible operation, and also shis some of the unit’s
weight downward for added stability. is component contains the Mains Input, the power (On/O)
switch, the mains fuse, and the standby switch.
M I
Little Dragon utilizes a standard detachable power cord that connects to the A/C (IEC) connector at the
far right side of the bottom chassis. Although any cord will mechanically t the receptacle, if replacement
ever becomes necessary, it is critical that you select one of similar capacity as the original. You should use
only a grounded electrical outlet. e supplied power cord has a 3-pin plug. NEVER remove or damage
the ground pin! Doing so could result in electrocution. If you must connect to a two-pin outlet, rst,
ensure that it grounded through the electrical box, and if so, use a suitable ground-li adapter. Avoid
using long extension cords. Long cords may add enough resistance so that the voltage feeding your amp is
signicantly reduced, is will negatively aect your tone.
M P S
e heavy duty toggle switch directly to the le of the IEC socket is the main power switch. e downward
position disconnects power from the power supply. When Switched upward, the amp is activated, and this
will be indicated by the small red LED at the center of the front panel. Before turning the amp on, always
verify that a speaker is connected, and that the power cord is rmly seated into both the amp socket
and the wall receptacle. For safety, the Mains Power Switch is a DPST (double-pole, single throw) type,
meaning that both the positive and neutral lines are both disconnected when the amp is turned o.
M F
e A/C line fuse protects your amplier from damage due to shorts, momentary surges, and defective
power tubes. In the event of a fuse failure, always replace it with a fuse of the same type and rating. e
specication for this fuse is a 4-Amp, 250-Volt Slo-Blo type. is is printed beneath the fuse holder.

P 16
S S
To the le of the Mains fuse holder is the standby toggle switch. Like the power switch, the downward
position puts the amp in the ‘standby’ state (heater laments are active, but D/C power is not). When
turning the amp on, it is advisable to begin with both switches in the downward position. en, turn on
the Mains Power switch, wait approximately sixty seconds, and then ip the standby switch upward, into
the ‘operate’ position. Like the power switch, the standby switch interrupts both lines of the high-voltage
A/C power before it reaches the rectiers. is approach is far safer than the more common approach of
interrupting the rectied D/C power.
Table of contents


