WeatherFlow Tempest User manual

SUMMARY
1. Parts List:
•Tempest sensor device
•Flat base and pole mount attachments
•WiFi hub
•USB power cable and wall socket for Hub
•Does not include hardware for installation.
1. Parts List:!2"...............................................................................................................
2. Measured variables and characteristics:!3"................................................................
3. Detailed installation instructions!4"............................................................................
4. Positioning and installation of the AIR & SKY device!5".............................................
5. Simple Installation Kit Instructions!7".........................................................................
6. Solar Power & Rechargeable Battery!9".....................................................................
7. Tempest device LED status indicators!12".................................................................
10. TECHNICAL DATA!16................................................................................................
2
https://weatherflow.com/

2. Measured variables and characteristics:
•Outdoor temperature, humidity, dew point, temp. Perceived
•Station pressure and sea level pressure
•Wind speed, wind direction, average and gusts
•Lightning activity (hits and range up to 25 miles)
•Beginning, intensity, duration and accumulation of rain
•DeltaT, wind chill, wet bulb temperature, air density
•UV index, brightness, solar radiation
•IOS and Android app and free personal weather page
•Free personal weather page: https://tempestwx.com/station/12949/Self-
calibrationwithcontinuouslearningsystem
•Works with Alexa, Google Home, IFTTT, and more
3
https://weatherflow.com/

3. Detailed installation instructions
Download the app and create an account
1. Download the ‘Tempest Weather’ mobile app. Follow these links to get the
Tempest Weather app in the Google Play Store!or the Apple App Store.
2. Enable Bluetooth on your smartphone or tablet and launch the app. If you
are using an Android device, make sure you enable Location Services for
the Bluetooth connection services to work properly.
3. Enter an email address and password. (Write it down so you don't forget!)
The hardware (Hub + Tempest device) can only be configured on one
account at a time. You can share the account login or public URL
generated for your station after it is set up.
4. Now tap "Setup Station" and follow the guided steps in the app to set up
your hardware on a "station". A station consists of a Hub and connected
sensor devices, such as the Tempest device.
5. Plug in the hub. Tap the NEXT button and proceed with the configuration.
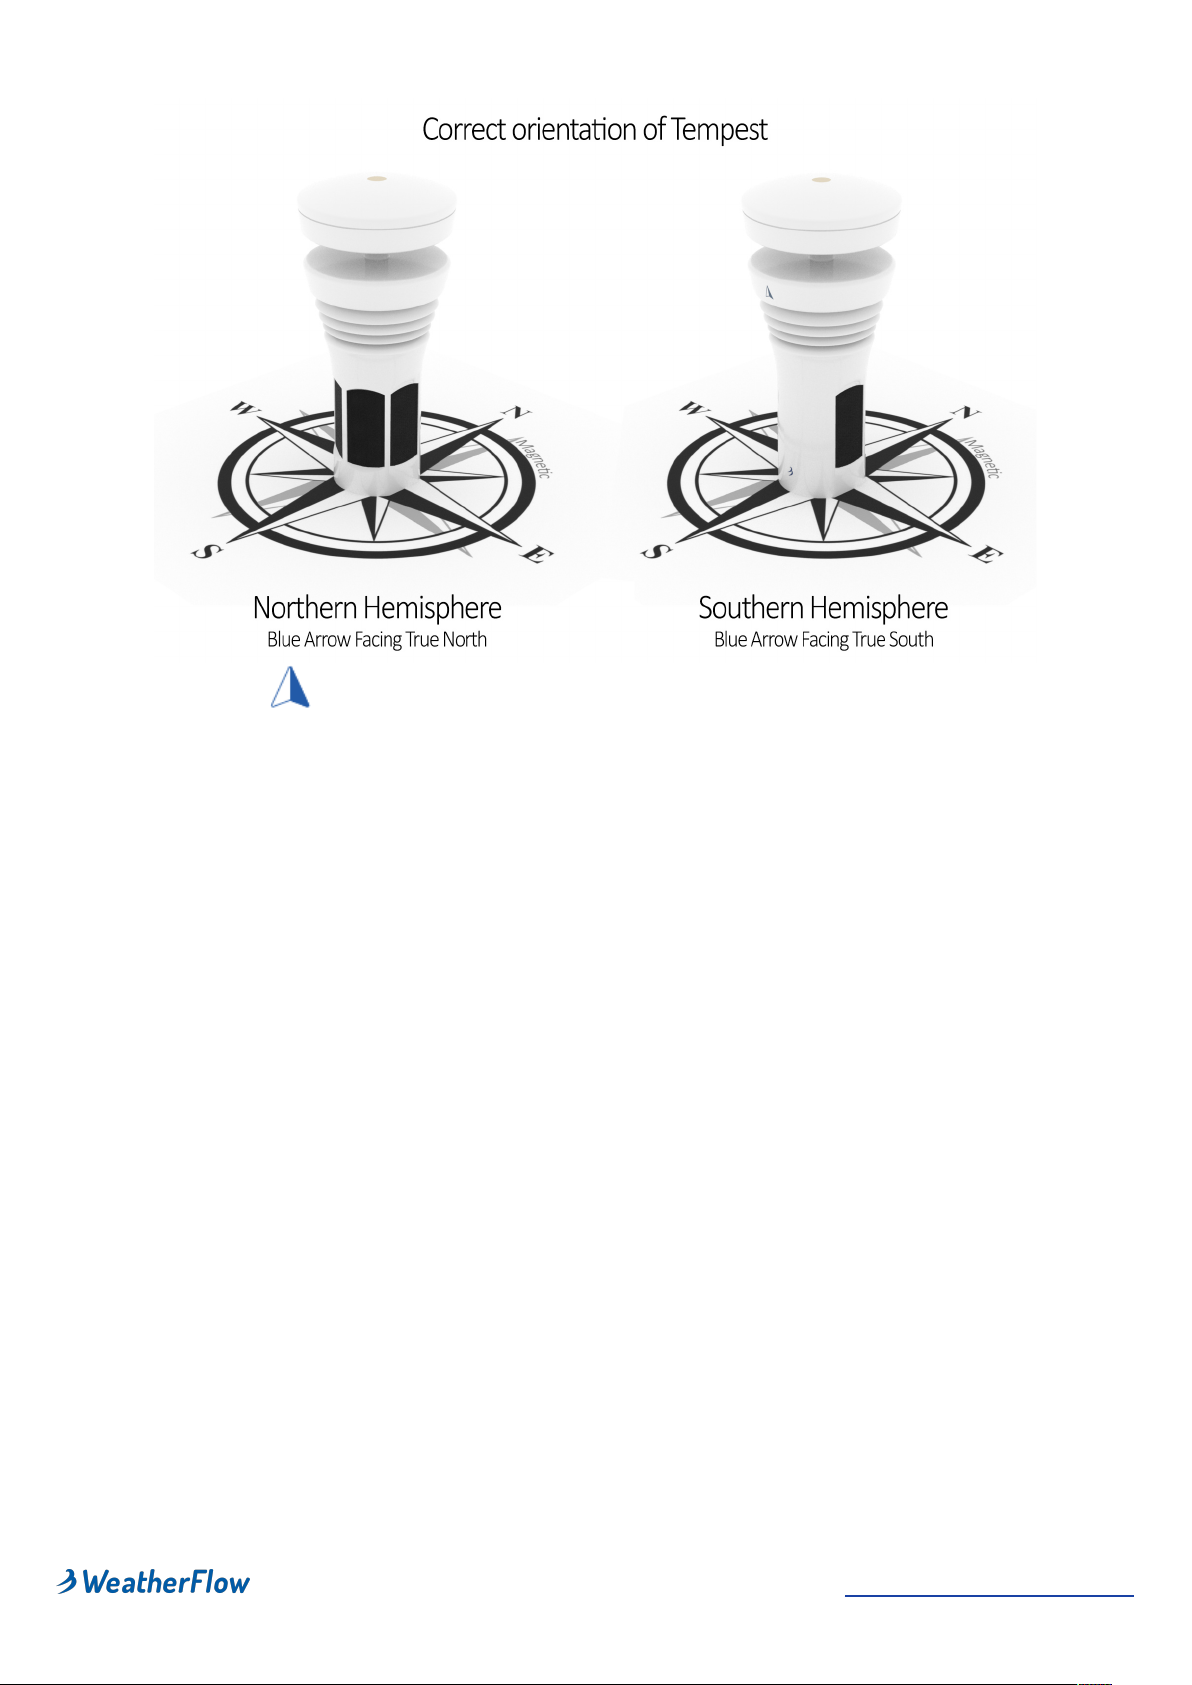
6. Twist off the base of your AIR & SKY device. (It's water tight - twist hard!).
Insert 4 AA lithium batteries in AIR and use the solar panel accessory for
SKY device (recommended) or 8 AA batteries. Make sure batteries are
oriented correctly.!See!Batteries & Solar Power!for further installation
instructions.!Tap NEXT and proceed.
7. Enter your Hub serial number (located on a sticker at the bottom of your
Hub). Tap the NEXT button.
8. Give the station a name. (We suggest you choose a name that describes
the place like "NW River Bend" or even the name of the town and street
works great.)
9. Tap "Set" to set the geographic location. A map should appear to pinpoint
your geographic location (make sure location services on your phone or
tablet are enabled). If necessary, you can drag the map to adjust the
marked position. Once the pin is in the desired location, tap the check
mark in the top right corner. Tap NEXT and proceed. The altitude above
sea level is automatically determined based on your geographic location.
10. Click the "Next" button.
11. Give your AIR/ SKY device a familiar name (e.g. for!AIR - backyard, upper
deck, or patio and for!SKY - roof, chimney, or fence). Choose if the device
will be located outdoors or indoors. Input the approximate height you will
place the device above the ground. Then tap the "Save" button.
12. Gather your home WiFi network name and password. Tap the "Next"
button.
4
https://weatherflow.com/

13. Select your desired WiFi network. Enter the WiFi password. !(If you don’t
see your desired WiFi network, tap "Refresh" in the upper right and/or
reboot your WiFi router.)
14. Success!!Wait about 5 minutes for the initial sensor data to start filling in,
then it's time to site your sensors.
15. See, AIR & SKY siting and installation for the installation. Here are
installation examples: https://help.weatherflow.com/hc/en-us/articles/
360059011334-Tempest-Installation-Gallery. Step by step guide for
mounting on flat base and pole: https://help.weatherflow.com/hc/en-us/
articles/360047672153-Flat-Base-Pole-Mount-Step-by-Step-Guide
Check out the community forum! Chat with other station owners, forecasters,
weather enthusiasts, developers, and WeatherFlow staff and stay up to date on
all of Tempest.
4. Positioning and installation of the AIR & SKY device
Location and installation for AIR & SKY
AIR and SKY can be easily placed and installed in various locations around your
property. The sensor devices are capable of maintaining a connection to the hub
up to 1000 feet (300m) away without obstacles.
The Tempest device can maintain a connection to the hub up to 300m away with
direct line of sight. Obstacles such as walls and ceilings will reduce signal
strength and weather. You can make sure your Tempest device is getting a good
signal with the hub by viewing the RSSI value in the app, go to settings>
stations> select station> status. An RSSI close to 0 indicates a good connection
while weaker connections are between -80 and -100.
The Tempest device should be mounted vertically and as horizontal as possible
for accurate wind readings.
Correct alignment is critical for accurate wind direction and exposure of the
panels to the sun for solar charging.
5
https://weatherflow.com/

The blue arrow on the side of the device should face true north or true north
and the solar panels aligned south for optimal sun exposure. If your station is in
the Southern Hemisphere, point the arrow south with the panels aligned north.
Tempest devices configured in the Southern Hemisphere will automatically
receive a 180 ° wind direction correction via the software.
True or geographic north / south is not the same as magnetic north / south. A
compass will point towards the magnetic poles. Geographical north / south is the
true center point of a hemisphere and is the basis for referring to wind direction.
A compass can help you align your Tempest, but you need to adjust the compass
reading with your magnetic declination. An easy way to accurately align the
device is to find a north or south landmark on the map when locating the station
and use it to align the arrowhead. For example, the side of your house or any
landmark you can see that gives you a clue to a known cardinal direction.
6
https://weatherflow.com/

5. Simple Installation Kit Instructions
Be sure to read our!Siting & Installation guide!to help you decide the best
location on your property to install your Tempest. The Simple Installation
Kit,!available in our online store, can be attached to any vertical structure like a
fence post, a shed, the side of your house, etc. The Tempest should extend
above the structure as far as possible.
7
https://weatherflow.com/

Basic Instructions
Follow the diagram to assemble your Simple Installation kit. The PVC parts can be
press-fit together. For a more secure installation, PVC glue may be used, but it is not
required. The kit includes six stainless steel screws suitable for attachment to sturdy
wood, plastic or metal. You may need to obtain alternative hardware if the screws are
not appropriate.
8
https://weatherflow.com/

Customization
Feel free to make adjustments if you find that the dimensions of the Simple Installation
Kit do not accommodate your installation location. You can customize the length of the
pipes by cutting the included pipes or by purchasing additional PVC pipe from your
local hardware store. Be sure to use schedule 40 or schedule 80 PVC pipe. Individual
pipe sections should not exceed 36 inches.
6. Solar Power & Rechargeable Battery
Solar Power Module & Internal Rechargeable Battery
The Tempest device uses an integrated solar power charge module with four
south-facing (north-facing in the southern hemisphere), vertically-oriented solar
panels. This geometry provides optimal solar charging even in low sun angles at
high latitude locations.
The internal rechargeable battery in Tempest is an LTO (Lithium-titanate) type,
1300mAh battery. This is ideal for use outdoors and in extreme temperatures.
LTO batteries are safe on the environment and have a very long lifetime of
almost 50,000 cycles - which is decades of recharging.
Operation
Your Tempest is shipped with a full battery and!should give you about 2 weeks of
operation without any additional power input, but you should put it in the sun as
soon as possible. Note, it must be powered on in order for battery charging to
occur.
From an empty state, it takes about 4 hours of adequate sunlight (350 W/m2 or
so) on one or more of the four solar panels to reach a full charge. This is a rule-
of-thumb and your mileage may vary. It will charge faster in direct sun but can
still charge slowly with indirect sunlight. As long as your Tempest gets the
equivalent of at least 4 hours of!adequate sunlight every two weeks, it will
continue happily running along. In the event of extended periods of low light
conditions, power management code in the firmware will help your Tempest
operate for as long as possible.
The LTO battery will continue normal charging up to about 113°F (45°C) and
down to about -40°F (-40°C). And the battery will continue providing power well
outside this temperature range for as long as it has a charge - usually long
enough to return to a range where the battery can resume charging again.
!
Battery Level Indicator
You can check the battery level for your device by viewing the status page for
your station: In the app, go to Settings > Stations > (choose a station) > Status
9
https://weatherflow.com/

Battery Card Display
You can display a device's battery voltage in the app. To enable a battery card
indicator on the data display, go to Settings > Stations > (choose a station) >
Advanced > toggle Enable Battery Card
If you're watching the voltage level (because you are a true weather geek!), it
may appear the Tempest is not charging even when the sun is out. That's
because there is a "start-charge" threshold that must be reached before charging
begins. This prevents the battery from going through a multiple charge cycle "yo-
yo" during the day. Don't worry, that's normal. Every battery is a little different, but
once it starts charging it will continue until the sun is no longer shining or it gets
to a maximum of around 2.7 or 2.8 volts. From there, with no further input, it will
decrease relatively quickly (over a couple hours) to around 2.6v, and then very
slowly from there until the cycle starts again when the sun comes back out. This
is perfectly normal too!
Power Save Modes
Mode 0: Voltage ≥2.455
•All sensors enabled and operating at full performance
Mode 1: Voltage ≤2.415 from Mode 0 or ≥! 2.41 from Mode 2
•Wind sampling interval set to 6 seconds
Mode 2: Voltage ≤2.39 from Mode 1 or ≥! 2.375 from Mode 3
•Wind sampling interval set to one minute
Mode 3: Voltage ≤2.355
•Wind sampling set to 5 minutes
•All other sensors' sampling interval set to 5 minutes
•Lightning sensor disabled
•Haptic Rain sensor disabled
Need some simple installation ideas? Check out some simple
installation example!esempi di installazione!
10
https://weatherflow.com/

More information about the installations and height from the recommended
land ...
•About 4 feet above the surface are sufficient for good reading and humidity
reading.
•If you measure the speed and direction of the wind is important for you, we
recommend that you get a cleaner wind. At about 6-10 feet from the ground
is better if the surrounding area is free and open. Mounting above any
nearby obstacles is better for ideal winds, but do so if the installation is
feasible and easily accessible. Do not worry about mounting a roof line or a
line of trees if it is too tiring. Professional anemometers are positioned at a
standard height of 10 m (~ 33 feet from the ground) and have a clean wind
detection (no obstacle to that height) for 10 times the distance of height, eg.
It is almost impossible for the owner of a home meteorological station to
meet these professional installation standards.
•For more ideal rain readings, it is recommended to place any all-in-one
weather station at soil level in a waterproof area, away from trees, etc. For a
higher precision, mounting on a robust structure, lowering the ground is
particularly important for the Tactile Rain Temperature, which detects and
quantifies the rain from vibrations.
Flat base, wood screw & keyhole slot$
mount option
Flat base & ¼-20 camera$
mount option
11
https://weatherflow.com/

Additional Resources
Here is a link to the CWOP guide which outlines the general advice for the
location of the personal meteorological stations: https://www.weather.gov/media/
epz/mesonet/cwop-siting.pdf.
The CWOP location guide is a great reference, but for the vast majority of the
user-friendly users simply you can not satisfy every guide line (especially being
100 feet from any concrete and no closer to 4 times the height of trees or
buildings). It's okay! Your Tempest system is not a reference location for climate
research. We invite you to consider your unbealing challenges / opportunities
and observation needs when you decide where to fit your Tempest. Do not
discuss you if your options are not ideal for each parameter. A common question
among the observer meteorologists is that "you know a observation, is more
useful", so we encourage all users to maintain their accurate and up-to-date
metadata. This will improve your capacity of the Tempest system to provide you
with the best weather data for your location.
7. Tempest device LED status indicators
The Tempest device LED will not remain illuminated, even when powered. To
activate the LED status indicator, press the translucent button on the base of the
unit once next to the power switch.
RED LED: sensor fault; the state replaces all other states. If you see a failed
sensor status in the app or a red LED on the device itself, check the Tempest
device troubleshooting steps above. Contact us https://help.weatherflow.com/
hc/en-us/requests/new for assistance if you can't solve the problem.
1. Try turning the unit off and on again; For AIR, open and close the battery
door. For SKY, disconnect and reconnect the solar power accessory.
Check the status again: Press the clear button on the base of the unit for an
indicator light. Do you use the SKY solar accessory? Use a thin tool to go
12
https://weatherflow.com/

through the slot in the bottom of the solar power accessory and press the
LED button.
2. If your unit still has a bad sensor status (red LED) you may need to contact
us https://help.weatherflow.com/hc/en-us/requests/new for assistance.
PURPLE LED: The device has not connected properly to a hub. Reset the
device and reconnect it to the Station Hub:
1. Remove the mounting attachment from the Tempest device.
2. On the base of the device, press and hold the translucent button next to
the power switch until the LED lights up flashes.
3. After a few seconds, the LED will slowly flash green, indicating it is ready
to pair with a Hub.
4. Open the app, go to settings> stations> (select your station)> manage
devices> tap "+" to add the device to the station Hub.
GREEN LED: the device is associated with a Hub.
The Tempest device should be connected and reporting data to the station hub.
If you have a green status and don't see any minute-by-minute observations, you
may need to reset and re-pair your device:
1. Reset the drive: Press and hold the clear LED button next to the battery
door for five seconds, then release it when the LED flashes green.
2. Using the SKY Solar Panel Accessory: Use a thin tool to go through the slot
in the solar panel and press and hold the LED button for five seconds, then
release when the LED flashes green.
3. Reboot the hub - Unplug the hub for a few moments, then reapply power.
4. Add the device to your station again: go to Settings> Stations (select
station)> Manage devices> tap "+" (top right) to add the device and follow
the procedure.
8. Web Access and Sharing Station Data
Private online access: !You can access your weather data anytime, anywhere
from any browser. Go to https://tempestwx.com/!and login with the same
username & password that you created for!the mobile app.
!
Shared online web access: To enable others to see your weather data, make
sure your station is sharing data publicly. Check the settings in the mobile app:$
Go to Settings > Stations > choose your station > Public Data > Share Publicly
(toggle on).$
Then simply log into!https://tempestwx.com/!and click on the share button in the
13
https://weatherflow.com/

bottom left corner to get your station URL. You can also find the share button in
the mobile app.
!
Shared mobile app access: Each station can only be linked to one user
account. If you want to share your station data with someone else in the app,
they will need to sign into your account. There are no sign in restrictions with the
app, so you and multiple family members can all have the app open at the same
time.
9. Hub Power Bank
The!Hub Power Bank!(HPB) is designed to be used
with the WiFi Hub device from the!Tempest Weather
System!and is!available for purchase in our store.
Using a battery backup to keep power to your Hub is
ideal for Tempest owners living in areas prone to
power outages or severe weather. While powered, the
Hub will continue to receive weather observations
from Tempest devices and can store up to 7 days
worth of data from a single Tempest device. Once an
internet connection is restored, the Hub will be able to
backfill stored weather data.
The power bank provides pass-through charging, powering the Tempest's WiFi
Hub while charging itself. It will fully charge in 1-2 hours, and can keep a single
Hub powered for up to 7 days. Upon power loss, the device will automatically
begin powering the Hub so the Hub can continue storing data.
Operation
• Use the!Power Button!to turn on the
device, allowing power bank to supply
power to the Hub.
• The power adapter gets plugged into
the power bank's!Input!port and
plugged into a wall outlet.
• There are two!Outputs!to supply
power to multiple Hubs if you have them. Plug your Hub's USB power cable
into the first or second output port on the power bank.
14
https://weatherflow.com/

• The power bank has four!Charge Indicator Lights!to indicate charge level.
Pressing the power button with nothing plugged in lights up the LEDs to
indicate the current charge level of the battery.
!
Technical Specifications
• Capacity: 20000mAh 74 WH
• Input: 5V-2.0A, (Micro USB/Type-C)
• Output 5V-1.0A (USB1), 5V-2.0A (USB2)
•Weight: 1.1 lbs
15
https://weatherflow.com/

10. TECHNICAL DATA
REALIZED BY IVAN COMPARETTO
16
https://weatherflow.com/
MEASUREMENTS
RANGE
ACURACY
INTERVAL
Air Temperature
-35°F - 140°F "
-37°C - 60°C
±0,7°F o ±0,7°C
1 minute
Relative humidity
0 - 100%
±2%
1 minute
Atmospheric pressure
Up to 1100mb
±1mb; station and
sea level
1 minute
Lighting activity
0 to 40km (25
miglia)
Varies by distance
Instantly
Wireless
300 m (1000 ft++)
Sub-gHz telemetry
Wind speed
0 to 100 mph "
0 to 160km/h
±0,5 mph or
±0,5km/h
Continuous
sampling
Wind direction
0 - 359°
±5°
Continuous
sampling
Ambient light
1 to 128 kLUX
±100 mLUX
1 minute
UV index
0 to 11 +index
1 minute
Solar irradiance
0 to 1900 w/m2
±5%
1 minute
Rain onset
First rain drops
Instantly
Rain intensity
Light to torrential
±0,2mm / hr
Instantly
Rain duration
Daily total
1 minute
1 minute
Rain accumulation
Daily total
±10%
1 minute
Mount
Adjustable pole mount
Power
Solar powered
Table of contents
Other WeatherFlow Weather Station manuals