manuals.online logo
Brands
  1. Home
  2. •
  3. Brands
  4. •
  5. WeatherMaster
  6. •
  7. Watch
  8. •
  9. WeatherMaster A User manual

WeatherMaster A User manual

90 mm
Size:130 x 90 mm
Type: book type
Body copy: 44 pages
color: 1C+1C (Black)
paper: 100 gsm white wood free paper
Binding: Saddle wire
Paper: Wood free paper
Paper weight: 100 gsm
folding line
saddle wire
130 mm 130 mm
WeatherMaster : Instruction Manual
A88159 Project no:MKT05062, D92C93G Prepared by: Tom & Richard Copyright: Latitude Limited Date: 15 Feb 2011
Prepared by: Date:
Date:
Date:
Checked by:
Approved by:
Front CoverBack Cover
Instruction Manual
WEATHERMASTER
1.0 Introduction
2.0 Buttons and Its Functions -Model A and Model B 3.0 Major Function Modes - Timekeeping Mode and Sensor Mode
2.0 Buttons and Its Functions -Model A and Model B
Model A Model B
!Thank you for purchasing this Watch. Your Watch
features electronic sensors, which measures and
shows the outdoor conditions: weather forecast,
te mperature, pr essure, altit ude and compas s
directions.
Your Watch provides the essential information
you need you hiking, wild camping and
other
also includes current time, daily
alarm, chronograph, timer, pacer and
!
!
when go
outdoor activities especially for a prolonged
period.
Your Watch
dual time
functions.
!Your Watch is carefully designed and produced
for outdoor activities. In order to utilize the
features, it is advisable to read the following
instructions before using the Watch.:
!Avoid exposing your Watch to extreme
conditions for an unreasonable time.
!Avoid rough usage or severe impact on
your Watch.
!Do not open the Watch's case unless by
a certified service agency because your
W e a t h e r M a s t e r c o n t a i n s d e l i c a t e
electronic sensors and components.
!Cl e an y our W a tch wi t h a s o ft c lot h
occasionally for a longer useful life.
!Keep your Watch away from magnets or
any appliances which contain magnetic
objects such as mobile phones, speakers
and motors.
!Store your Watch in a dry place when it is
not in use.
Mode Button [M]
!To select among the Current Time, Daily Alarm, Chronograph, Timer, Pacer and Dual Time Modes.
!To select among the setting items in setting display.
Sensor Button [SR]
!To select among the Altimeter, Barometer and Compass Modes.
Start/Stop Button [S/S]
!To select between functional displays under the same mode.
!To activate the 'start' or 'stop' chronograph function in the chronograph mode.
!To toggle Yes/No.
!To increase the digits in setting display.
Lap/Reset Button [L/R]
!To activate the 'lap' or 'reset' chronograph function in the chronograph mode.
!To move the cursor to the left by one in the History recalling display.
!To decrease the digits in setting display.
!To toggle Yes/No.
EL Button [EL]
!To turn on the EL back light for about 3 seconds.
Note
Press any button to activate the watch under Power Saving Mode. (For more information, please refer to
Chapter 14.0)
Sensor
[SR]
Lap/Reset
[L/R]
Mode
[M]
Start/Stop
[S/S]
ALTI/BARO/
COMP
[SR]
Light
[EL]
Lap/Reset
[L/R]
Mode
[M]
Start/Stop
[S/S]
Light
[EL]
BARO
ALT I
Current Time Mode
[SR]
[SR]
hold [SR] [SR]
[SR]
Sensor Mode Timekeeping Mode
Daily Alarm Mode Chronograph Mode
Timer Mode Pacer ModeDual Time Mode
[M] [M]
[M] [M]
[M]
[M]
Compass Mo de
Altimete r Mode
Baromete r Mode
COM P
4.0 Current Time Mode - Functional Display
4.1 Current Time Mode - Weather Forecast Feature
4.2 Current Time Mode - Setting the Current Time
Functional Display
!
Automatic Display Switching
Th e Curren t Time Mod e includ es 4 kinds of
functional displays:
!Day of Week
!Temperature
!Altitude Tendency
!Sea Level Pressure Tendency
!To select among different functional displays,
press the [S/S] button following the adjacent
diagram.
!To activate the automatic switching feature, hold
the [S/S] button.
!As long as the button is held, one of the 4
functional displays appears on the screen one by
one.
Weather Forecast Feature
!A special feature of the Watch is the coming
weather predicting function. It works by analyzing
the changes of the past air pressure.
How to Indicate the Coming Weather
!The Watch provides 4 different symbols to indicate
the forecast weather, which are:
!Sunny
!Cloudy with Sun
!Cloudy
!Raining
!The symbols will only be shown in Current Time
and Dual Time Modes.
IMPORTANT: Since the Watch predicts the coming
weather by using the data of the changes in the air
pressure, a higher accuracy may result when the
user stays at the same altitude for at least 24 hours.
IMPORTANT: The Watch predicts the weather by
adopting general weather prediction principles, it is
NOT capable to reflect the dramatic changes of
weather within a very short period of time.
How to Set the Current Time
!To select the setting display, press and hold the
[M] button for about 2 seconds in the Current
Time Mode. In setting display, the flashing "SET"
icon will appear.
!In the setting display, press the [M] button to
chang e t h e selection following t h e a djacent
Current Time Setting Sequence.
!When the second digits are flashing (selected),
press the [S/S] or [L/R] button to reset the digits
to "00".
!When the digits are flashing (selected), press
the [S/S] or [L/R] button to increase / decrease
the number. (Hold down the button to change
the number at a higher speed).
!When month-day order setting is selected, press
the [S/S] or [L/R] button to select either month-
day or day-month format. When 12/24 hour
format setting is selected, press the [S/S] button
to select either 12 or 24 hour format.
!When the LCD contrast is selected, press the
[S/S] or [L/R] button to increase / decrease the
contrast level (1 to 10). When key beep setting is
selected, press the [S/S] or [L/R] button to turn
ON or OFF the beep.
!When the setting is completed, press and hold
the [M] button to exit the setting display.
Current Time Display
Current Time Setting Se quence
Hold
[M]
Increase /Decrease
the number a t
a highe r spe ed
Increase /Decrease
the number
12/24
hour forma t
minute hou r
day
year
month
Curre nt Time Setting Di splay
digits hav e been
selected ( flashing)
secon d
[S/S] / [L/R ]
Hold
[M]
[M]
Month/Da y
LCD
Contrast
Key
Beep
[M] [M]
[M]
[M]
[M]
[M]
[M]
[M]
[M]
hold
[S/S] / [L/R ]
Current Time Mode
Weather Forecast Symbols
day of week
sea level
pressure
tendency
temperature
date
current time
weather forecast
altitude
tendency
[S/S]
[S/S]
[S/S]
[S/S]
Day of Week Display Tempe rature Display
Altitude Tendency
Display
Sea Level
Press ure Tendency
Display
Cloudy
Sunny Cloudy
with sun
Raining
5.0 Daily Alarm Mode - Daily Alarm 1, Daily Alarm 2 and Chime Display
Daily Alarm 1 and Daily Alarm 2
!The Watch includes two daily alarms: Daily Alarm
1 and Daily Alarm 2. The Daily Alarm 1 and Daily
Alarm 2 are working independently.
!Press the [S/S] button to switch among the Daily
Ala rm 1, Dail y A larm 2 and Chime Dis play
following the adjacent diagram.
How to Turn ON/OFF the Daily Alarm
!To turn ON/OFF the Daily Alarm 1 (2), press the
[L/R] button in Daily Alarm 1 (2) Display.
!When the Daily Alarm 1 (2) is ON, the alarm
indicator ' ' will appear.
!If the alarm indicator appears, the Watch will
sound at the preset alarm time every day. When
the alarm sounds, press any button to stop the
beep.
How to Turn ON/OFF the Hourly Chime
!To turn ON/OFF the Hourly Chime, press the
[L/R] button in the Chime Display.
!When the chime is ON, the chime indicator
' ' will appear. If the Chime indicator
appears, the Watch will beep on the hour.
Daily Alarm 2 Displ ay
Daily Alarm 1 Displ ay
Hourly Chi me Display
[S/S]
[S/S]
[S/S]
Daily Alarm Mode
5.1 Daily Alarm Mode - Setting the Alarm
6.0 Chronograph Mode - Start/Stop the Chronograph
6.1 Chronograph Mode - Recording and Recalling Lap Time
7.0 Timer Mode - Countdown Timer and the Quick-Set-Value
How to Set the Alarm 1 and Alarm 2
!To select the setting display, hold the [M] button
for about 2 seconds in the Alarm 1 (2) Display,
then the flashing "SET" icon will appear.
!In the setting display, press the [M] button to
change the selection between minute and hour.
!When the digits are flashing (selected), press
the [S/S] or [L/R] button to increase / decrease
the number. (Hold down the button to change
the number at a higher speed).
!When the setting is completed, press and hold
the [M] button to exit the setting display.
Chronograph Mode
!The Watch includes a function to measure
elapsed time, accumulative elapsed time and
lap times - Chronograph Mode.
!The display shows an 'All Zeros' display
when the chronograph is selected the first
time or it is reset.
How to Start/Stop the Chronograph
!Whe n t he chro nogra ph is stop ped (no t
counting), press the [S/S] button once to
start the chronograph (counting); press the
[S/S] b u t t o n o n c e a g a i n t o s t o p t h e
chronograph (not counting).
How to Reset the Chronograph
!To record a new set of elapsed time, hold
the [L/R] button for 2 seconds to reset the
chronograph to the 'All Zeros' display when
the chronograph is stopped.
!In the 'All Zeros' display, the chronograph is
ready for a new counting.
Repeating these
steps will get an accumulative elapsed time.
How to Record Lap Time
!Th e chro nograph can measure elapsed ti me
without stopping the counting - lap time.
!The Chronograph Mode allows recording lap time
up to 100 laps.
!When the chronograph is counting, press the
[L/R] button once to record a lap time (this key
operation will not affect the counting).
!The lap number and lap time will appear on the
display for 10 seconds, and it returns to counting
display automatically.
!Repe a t the s t e ps men t io ne d abov e to ge t
another lap time.
How to Recall Lap Times
!To recall lap time, hold down the [M] button in
the Chronograph Display.
!When the Total Time Display appears, press the
[S/S] o r [ L / R] button to check the ne x t o r
previous lap time respectively.
!Hold down the [M] button to go back to the
Chronograph Display.
How to Reset Lap times
!To record a new set of lap time, hold the [L/R]
button for 2 seconds when it is stopped.
Countdown Timer
!The Watch includes a countdown timer feature:
the Timer Mode.
!The Timer starts counting from the pr es e t v a lu e
to zero and stops at zero.
The Quick-Set-Value (QSV)
!The Quick-Set-Value is a set of values preset in
the Watch for using the timer more easily.
!There are 6 Quick-Set-Values: 1, 3, 5, 10, 15
and 45 minutes, and these values CANNOT be
changed by the user.
The User Preset Value (UPV)
!The User Preset Value is a value which can be
set by the user.
!The setting limit is up to 99 hours 59 minutes 59
seconds.
!Once the User Preset Value is set, like 30
minutes, the value is stored into the Watch for
the user to recall it in the future.
!To set the UPV, check the coming section "How
To Set the User Preset Value" for more details.
Note: The adjacent diagram shows how to select
the preset timer value. Press [L/R] button to select
the preset timer value.
Chronogr aph
Counting D isplay
Chronogr aph Stop Display
Chronogr aph
'All Zero' D isplay
hold
[L/R]
the digits
stop counting
Digits
running
1/100 sec
Total
Time
hours
minutes
seconds
[S/S]
Elapsed
time
[S/S]
[S/S]
1/10s
indicator
the ne xt l ap
memo ri es
Lap Ti mes Recall Seq uenc e
the ne xt l ap
memo ri es
Chronograph
Lap Display
Chronograph
Running Display
[L/ R]
the digits
is running
10
seconds
the lap
number
To Record Lap Time
1st la p me mory
the la st
lap me mo ry
the lap time
will freeze
for 10 seconds
[S/S]
[L/R]
[L/R]
[S/S]
[S/S]
[S/S]
[L/R]
[L/R]
Total Time
Display
Time r Display
3 min
1 min 5 min
45 min
10 min
15 min
Time r Setting Sequenc e
the indica tor
flashing
the time fro m which the
timer will c ountdown
(hour, minu te and second)
[L/R]
[L/R]
User
Preset
Value
(UPV) Quic k-Set-Valu e (QSV)
[L/R]
[L/R]
[L/R]
[L/R]
[L/R]
Current Tim e
Daily Alarm 1 Displ ay
Daily Alarm Time Setting Seque nce
hold
[M]
Increase /Decrease
the number a t
a highe r spe ed
Increase /Decrease
the number
Hour
Setting Di splay
digits have been
selected (flashing)
Minute
[S/S] / [L/R ]
hold
[M]
[M]
hold
[S/S] / [L/R ]
SET S ET
7.1 Timer Mode - Setting the User Preset Value
7.2 Timer Mode - Using the Timer
How to Set the User Preset Value
!To select the setting display, hold the [M] button
for 2 seconds, and the flashing "SE T" icon will
appear.
!In the setting display, press the [M] button to
change the selection among hour, minute and
second.
!When the digits are flashing (selected), press the
[S/S] or [L/R] button to increase / decrease the
number. (Hold down the button to change the
number at a higher speed).
!When the setting is completed, hold the [M]
button to exit the setting display.
How to Use the Timer
!When the Timer is set, press the [S/S] button to
start the timer. Press the [S/S] button once
again to stop the timer.
Timer Alarm Sound
!In the last 10 minutes, the Watch will beep
for every minute.
!In the last minute, the Watch will beep for
every 10 seconds. In the last 5 seconds,
the Watch will beep for every second.
!When it reaches 0, a beep sound will last for
30 seconds. Pressing any button can stop
the beep sound.
How to Reload the Timer
!Th e la st t arg et t im e wi ll b e r el oa ded
automatically at the end of the 30-second
beep sound.
!Press the [L/R] button when the timer is
stopped.
!To start a new counting by using a new
target time, set the timer again either by
QSV or UPV.
Increase / decrease
the number
Increase /decrease
the number a t
a higher spe ed
hold [S/S] / [ L/R][S/S] / [L/R ]
User Pr ese t Value Setting Sequ ence
Time r Display
Time r Display
(Tim er is set at 10 minutes )
Counting D isplay
Stop Count ing Display
Counting D isplay
digits sta rt
counting
digits sto p
counting
digits sta rt
counting
again
[S/S]
[L/R]
hold
[M]
Setting Di splay
minute Sec ond
hour
hold
[M]
[M] [M]
[M]
Real Tim e
Clock
[S/S]
[S/S]
8.0 Pacer Mode - Using the Pacer
Pacer Mode
!When the pacer is activated, it will generate beeps at
a pre-defined beeping rate.
!The beeping rate can be set from 30 to 180 beats per
minute (BPM) in an increment of 5.
How to Use the Pacer
!When the beeping rate is set (for example 30 BPM),
press the [S/S] button to start the beeping.
!When the watch is beeping, press the [S/S] button to
stop the beeping.
Step Counter
!In supplementary to the Pacer Function, when the
Pacer beeps once, the step counter will advance one.
!When the pacer is activated and the step counter
starts counting, pressing the [S/S] button stops the
pacer and step counter.
!The maximum counting limit of the step counter is
99999 steps.
!To reset the step counter to 0, hold the [L/R] button
when the pacer is stopped.
N OT E : W h e n t h e p a c e r h a s b e e n r u nn i n g
continuously for 8 hours, it will stop automatically.
step counter
stop counting
pacer beeping rate
(in beats per minute)
step counter
is counting
8.1 Pacer Mode - Setting the Pacer value
How to Set the Beeping Rate
!To select the setting display, hold the [M] button for 2
seconds in the Pacer Mode.
!When the beeping rate digits start flashing, press the
[S/S] or [L/R] button to increase / decrease the
number. (Hold down the button to change the number
at a higher speed).
!When the setting is completed, press and hold
the [M] button to exit the setting display.
Pacer Mode
30 180
In an increm ent of
5 BPM
Increase / decrease
the number
Increase /decrease
the number a t
a highe r spe ed
[S/S]
hold [M] hold [M]
[S/S]/[L /R] hold [S/S]/ [L/ R]
SET
digits hav e been
selected ( flashing)
beep-beep
9.0 Dual Time Mode - Dual Time and Setting the Dual Time
Dual Time Mode
!The Watch includes a function to show the
time of a second time zone - Dual Time
Mode.
!The second digit of the dual time synchronizes
with the Current Time.
To Set the Dual Time
!To select the setting display, hold the [M] button
for 2 seconds in the Dual Time Mode and the
flashing "SET" icon will appear.
!In the setting display, press the [M] button to
change the selection between minute and hour.
!When the digits are flashing (selected), press the
[S/S] / [L/R] button to increase / decrease the
number. (Hold down the button to change the
number at a higher speed).
!When the setting is completed, press and hold
the [M] button to exit the setting display.
Increase / decrease
the number
Increase /decrease
the number a t
a highe r spe ed
hold [S/S] / [ L/R][S/S] / [L/R ]
hold
[M]
digits have been
selected (flashing)
Setting Di splay
minute hou r
hold
[M]
[M]
[M]
Dual Tim e Mod e
8.2 Pacer Mode - Link with Chronograph
How to use the Pacer with the Chronograph
!When the Pacer Mode is ON: Press the [M] button to
select the Chronograph Mode.
!Press the [S/S] button to start the counting and
beeping at the same time.
!When the Chronograph is counting and the watch is
beeping, pressing the [S/S] button stops the beeping
sound and chronograph simultaneously.
Pacer Mode
Chronograph
Stops Counting
Display
Chronograph
Counting Display
. . .
beep-beep
beep-beep
[M]
[M]
10.0 Altimeter Mode - Temperature and History Display
Functional Display
!The Wa t ch in c lude s two Al t im eter f unct i onal
displays: Temperature and History Displays.
!One of the two functional displays will appear in
the top row of the display. The current (history)
altitude and the current (history) time are shown in
the middle row and bottom row of the display
respectively.
History Display
!T h e W a t c h r e c o r d s t h e a lt i t u d e r e a d i n g s
automatically on the hour, i.e 1:00, 2:00, 3:00 and
etc. These data will be used to plot an altitude
record graph.
!In the History Display, the altitude graph is shown
in the top row of the display.
!To review the altitude records of the last 23 hours,
press the [L/R] button to move the cursor to the
left cyclically, then the respective altitude record
and its recording time (flashing) will appear on the
display following the adjacent diagram.
Temperature Display
!In Temperature Display, the top display shows
the current temperature in degree Celsius ( C) or
degree Fahrenheit ( F).
IMPORTANT: If you want to have an accurate reading
of air temperature, you must take off the watch from
the wrist that prevents body temperature effect on
your watch.
the
°
°
ALT I
[L/R]
[S/S] [S/S ]
[L/R]
[L/R]
[L/R]
- 23
hour
current
time
History Display
(Current Time)
History Display
(1st Record at the hour)
flashing
ALT I
cursor moving
direction
flashing cursor
(1st record
at the hour)
current
altitude
current ti me
Tempe rature Display
Altimeter Mode
Altitude
History Review
ALT I
current
temperat ure
History Display
(-2 to -23 hour)
10.1 Altimeter Mode -Unit Selection and Altimeter Adjustment
How to Switch between Units
!The Watch can display altitude in meter (m) or
feet (ft) and temperature in degree Celsius ( C)
or degree Fahrenheit ( F).
!To switch among different units, hold the [S/S]
button to change the unit following the adjacent
unit selection sequence.
NOTE: The Watch includes an automatic Sea Level
Pressure comparison feature, this smart feature
prevents fluctuation altitude readings from being
recorded when staying at the same altitude.
°
°
Altimeter Adjustment
!There are 4 kinds of adjustment methods: the Zero
Altitude, Absolute Altitude, Sea Level Pressure and
Factory Default Adjustment.
!Zero Altitude: Adjust the altitude mandatorily to
zero for relative altitude measurement. If the
altimeter is adjusted by Zero Adjustment, the
indicator " r " will appear on the display.
!Absolute Altitude: Set the altitude to a known
value and it can be recalled for the next setting.
!Sea Level Pressure: Inp u t a specific s e a level
pressure obtained from an official site.
!Factory Default: Restore the Watch to the default
factory setting (1013.2mb) which is assumed to
be the Sea Level Pressure.
NOTE: Altitude is calibrated independently of each
mode. For example, if the absolute altitude is
selected, the effect of previously set sea level
pressure will be ignored.
Zero Altitude Dis play Absolute Altitu de Display
Factory De fault Display Sea Level Pr essure Display
Adjustment Displays
AL I
T
SET
AL I
T
SET
AL I
T
SET
AL I
T
Unit Selec tion Sequence
hold
[S/S]
hold
[S/S]
hold
[S/S]
hold
[S/S]
°C (Cel sius)
m (Met er)
°C (Cel sius)
ft (Fe et)
°F(Fa hrenhei t)
ft (Fe et)
°F (Fah renheit )
m (Met er)
[S/S]
SET
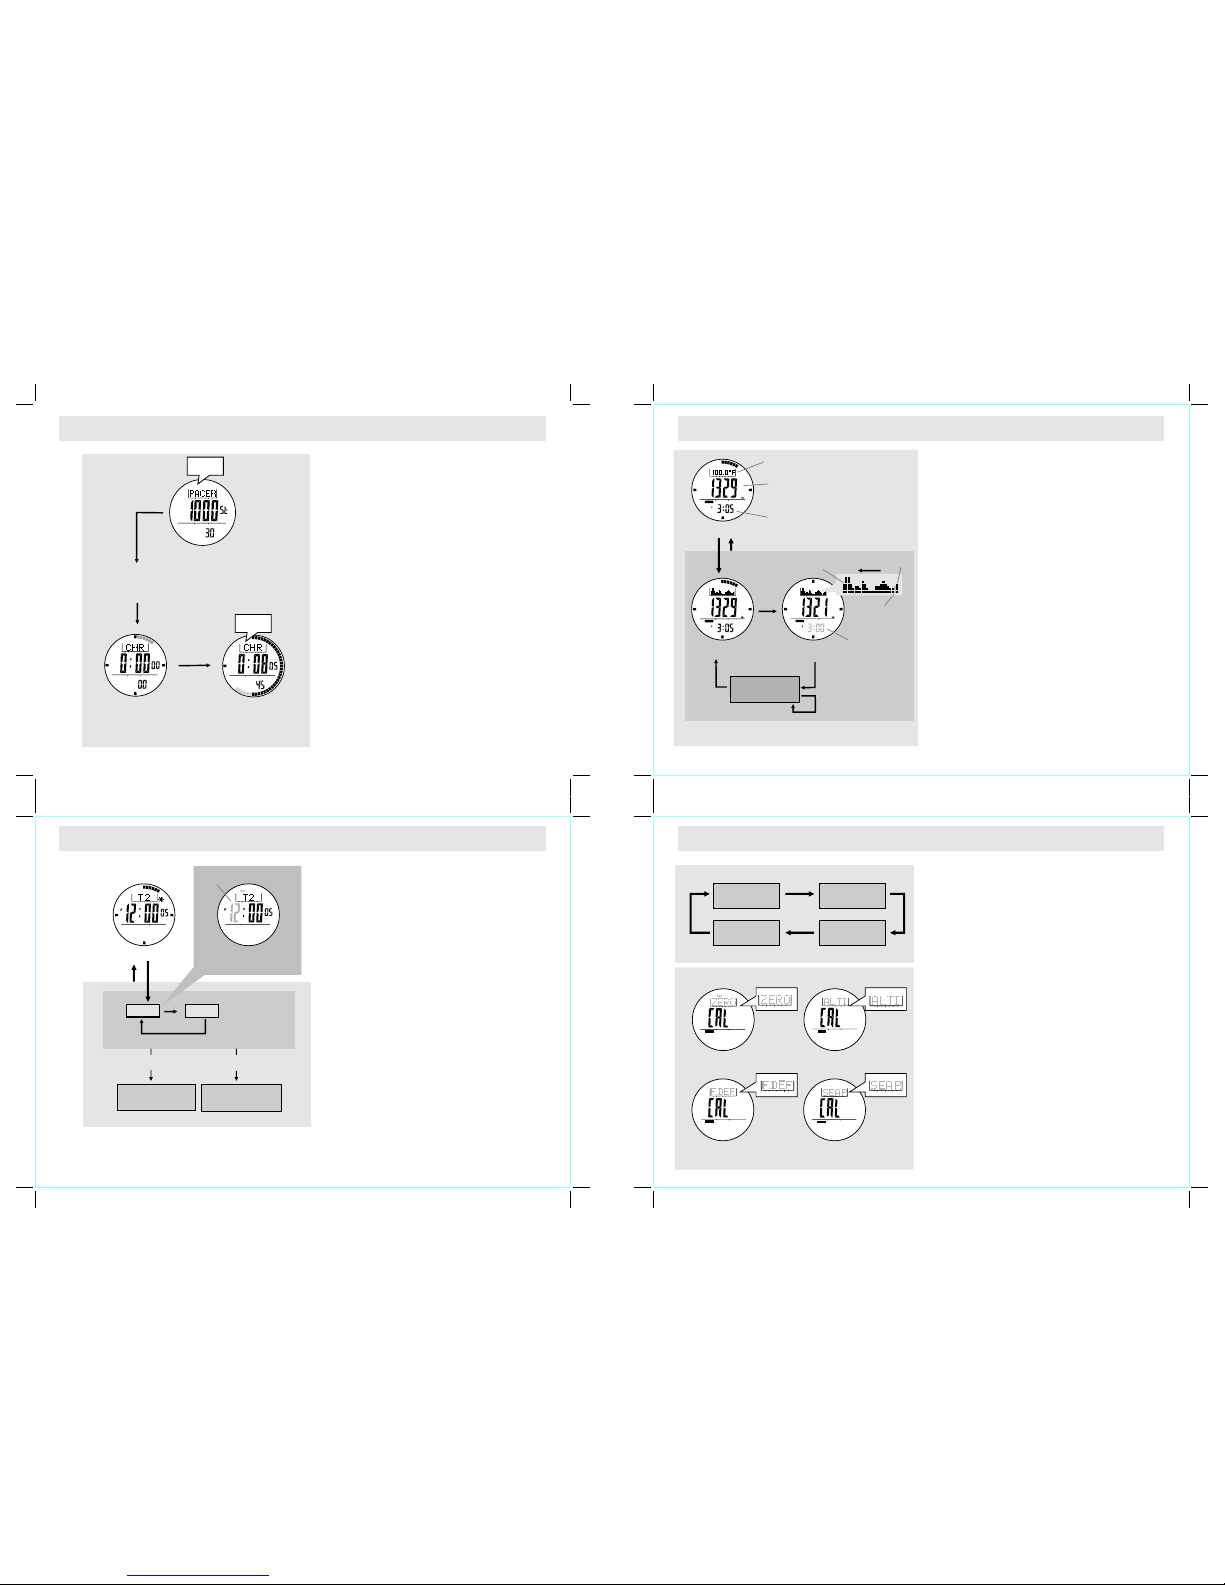
10.4 Altimeter Mode - Sea Level Pressure Adjustment
Why Need to adjust the Sea Level Pressure
!As altitude is calculated from the mean sea level.
Air pressure changes contribute to the changes of
the mean sea level.
!To achieve a more accurate reading, sea level
pressure needs to be updated from place to p l a c e
and from time to time.
How to Adjust the Altimeter Using Sea Level
Pressure Adjustment
!You can adjust the current altitude reading by sea
level pressure adjustment.
!To adjust the altitude using
, press the [S/S] button on the
Di s pla y, a n d th e se a le vel
pressure reading will appear.
!When sea level pressure reading appears, press
the [S/S] or [L/R] button to increase or decrease
the number to the target one. (Hold down the
button changes the number at a higher speed).
!If the adjustment is completed, hold the [M] button
to confirm and exit the adjustment display.
!To select the Adjustment Display, hold the [M]
button in the Altimeter Mode. Then press the [M]
button to select among the Zero Altitude, Absolute
Altitude, Sea Level Pressure and Factory Default
Adjustment.
Sea Level Pressure
Adjustment Sea
Le v el P res s ure
ALT I
AL I
T
[M] [M] [M][M]
Altitude Adjustment Sea Level
Pressure Display
Absolute Altitu de Display
Altimete r Mode
hold
[M]
hold
[M]
[S/S]
[S/S]/[L /R]
hold
[S/S]/[L /R]
Increase / D ecrease
the number
Increase / D ecrease
the number
at a higher sp eed
AL I
T
10.5 Altimeter Mode - Factory Default Adjustment
BARO
How to Adjust the Altimet e r Using Facto r y
Default Adjustment
You can adjust the altitude reading calculation
back to the factory default value.
To adjust the altitude using the factory default
adjustment (restore to the factory default by
setting the sea level pressure at 1013.2mb),
press the [S/S] button on the Factory Default
Display, and the indicator "NO" will appear.
!When the indicator "NO" appears, press the [S/S]
or [L/R] button to select between "YES" (reset
the pressure to factory default) or "NO" (abort
the resetting).
!To exit the Adjustment Display, hold the [M]
button for 2 seconds, and then the Watch will go
back to the Altimeter Mode. If the "YES" Display
is selected when exiting the Adjustment Display,
the "DONE" Display will appear for 2 seconds
prior to the normal operation.
!
!To select the adjustment display, hold the [M]
button in the Altimeter Mode. Then press the [M]
but t on t o sel e ct am o ng th e Ze r o Al t itud e ,
Abso l u te Alt i tu de , S ea Level P re ss ur e a nd
Factory Default Adjustment.
!
2 secon ds
"DONE" Dis play
Factory Default Adjustment
"YES" Disp lay"NO" Displ ay
[S/S] / [L/R ]
hold
[M]
ALT I
[M] [M]
[M]
[M]
Altitude Adjustment
Altimete r Mode
hold
[M]
hold
[M]
SET
AL I
T
Factory De fault Display
[S/S]
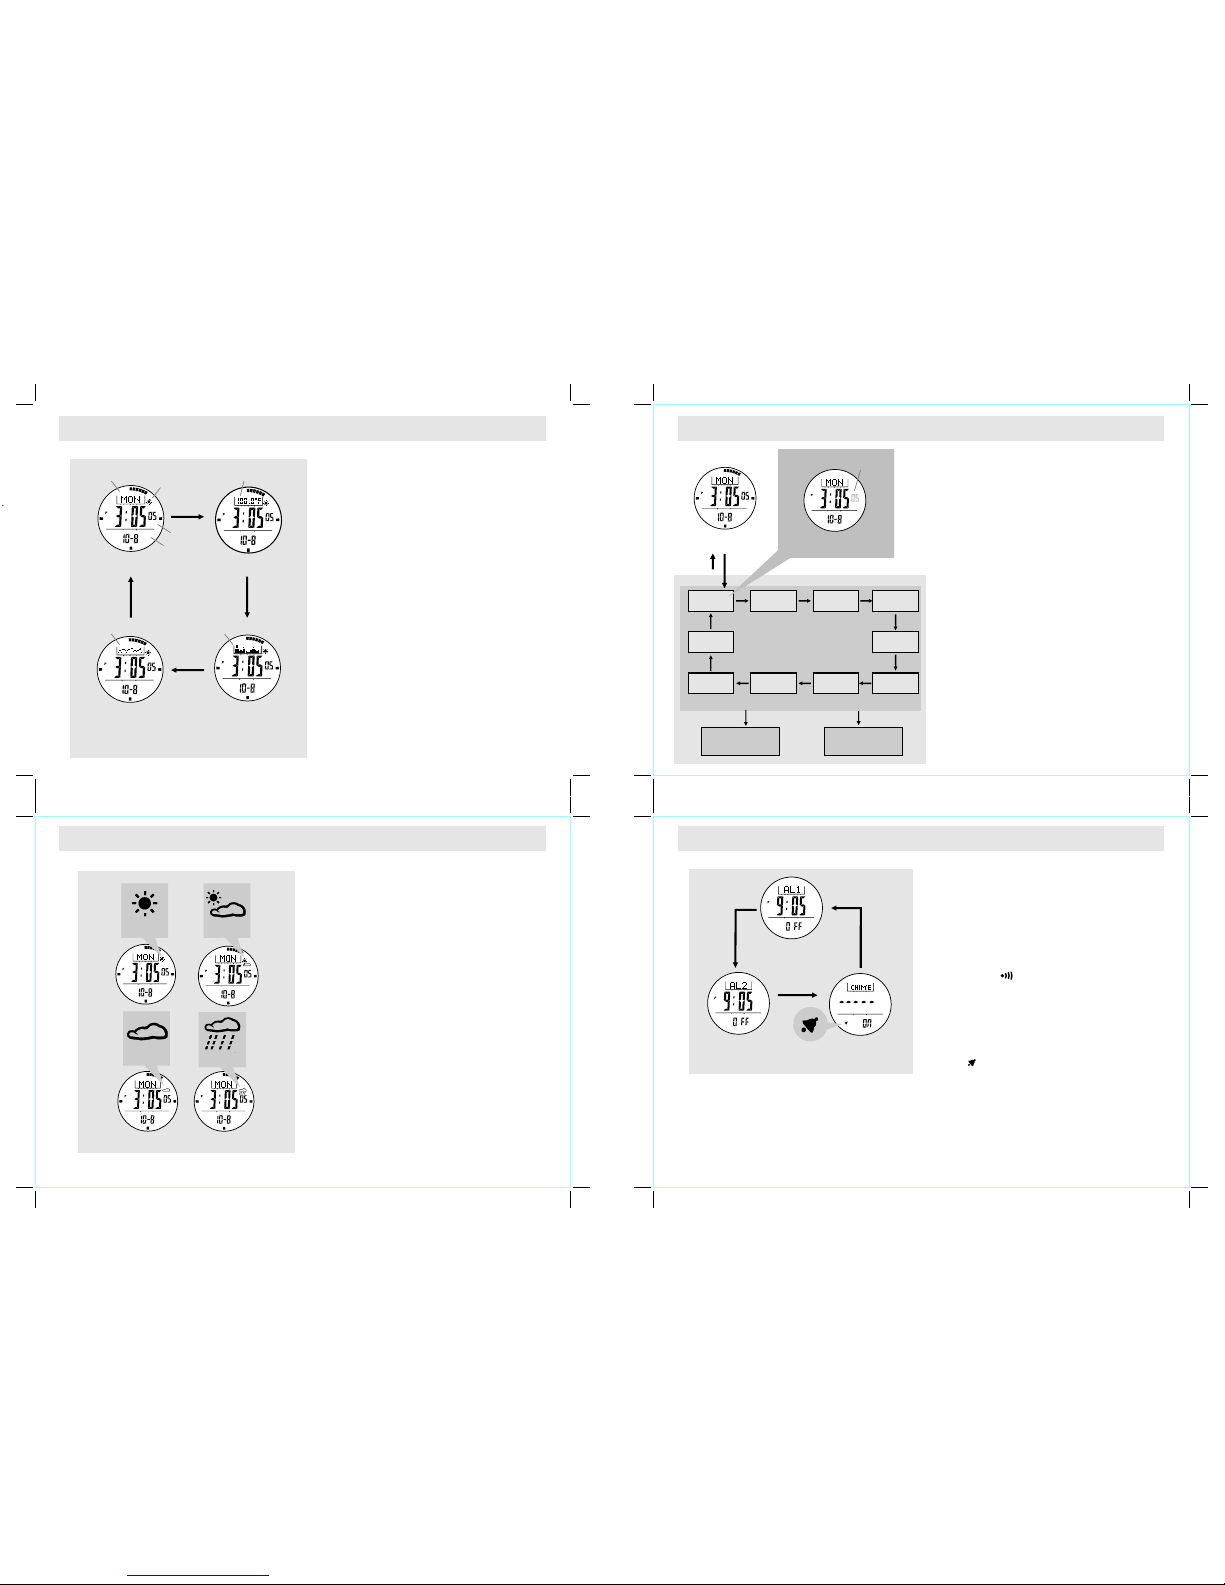
10.2 Altimeter Mode - Zero Altitude Adjustment
How to Measure the Relative Altitude
!Th e Watch can meas ure relative altit ude, for
example, it c a n m e as u r e the a s c en d i n g o r
descending altitude between the starting point and
the finish point of a trail.
!To measure the ascending or descending a l t i t u d e
of a trail by setting the current altitude to 'zero'
mandatorily at a reference point like the starting
point of a trail. An ‘r’ indicator will appear on the
display.
Adjus t t he Al t i me te r by Usin g Z er o Alt i t ud e
Adjustment
!
!To a d j u s t t h e Watch b y u s i n g
, press the [S/S] button in
Display, and the indicator "NO" will appear.
!When the indicator "NO" appears, press the [S/S]
or [L/R] button to select between "YES" (reset the
altitude to zero) or "NO" (abort the resetting).
!To exit the Adjustment Display, hold the [M] button
for 2 seconds, and then the Watch will go back to
the Altimeter Mode. If the "YES" Display is
selected when exiting the Adjustment Display, the
"DONE" Display will appear for 2 seconds prior to
the normal operation.
!To restore the Watch to factory default, please
refer to the coming section "Altimeter Mode -
Factory Default Adjustment" for more details.
To select the Adjustment Display, hold the [M] button in
Altimeter Mode. Then press the [M] button to select
among the Zero Altitude, Absolute Altitude, Sea Level
Pressure and Factory Default Adjustment.
Zero Alt i t u d e
Adjustment Zero Altitude
ALT I ALT I
[M] [M]
[M]
[M]
2 seconds
Done Displ ay
Zero Altitude Adjustme nt
Altitude Adjustment
Yes Disp layNO Display
Zero Altitude Dis play
Altimete r Mode Altimete r Display
hold
[M] hold
[M]
[S/S] / [L/R ]
hold [M]
[S/S]
AL I
T
AL I
T
SET
AL I
T
AL I
T
10.3 Altimeter Mode - Absolute Altitude Adjustment
Why the Altitude Needs to be Adjusted
!As the ab s o lute al t itude i s calcula t ed from air
pressure, the change of air pressure will affect the
altitude reading.
!To a c h i ev e a m or e a c c ur a t e r e a d i n g, t h e
WeatherMaster needs to be calibrated from time to
time as pressure may change gradually even within
hours.
Before Adjusting the Altitude
!Adjust the altimeter at a place where the altitude is
known, such as sea level (0m) or beside an a l t i t u d e
sign pole (e.g., 89 m) because the altitude will be
input into the Watch during the adjustment.
IMPORTANT: Inputting an incorrect altitude value during
the adjustment results a mistaken altitude reading in
future.
To Adjust the Altimeter by Using Absolute Altitude
Adjustment
!You can adjust the current altitude reading to an
absolute altitude value.
!To a d just the a l t it ud e u s ing
, press the [S/S] button on the
Display, and the altitude reading will appear.
!When the altitude reading appears, press the [ S / S ]
or [L/R] button to increase or decrease the number
to the target one. (Hold down the button to change
the number at a higher speed).
!If the setting is completed, hold the [M] button to
confirm setting and exit the adjustment display.
!To select the Adjustment Display, hold the [M] button
in the Altimeter Mode. Then press the [M] button
onc e again to se lect am ong th e Zero Al titude,
Absolute Altitude, Sea Level Pressure and Factory
Default Adjustment.
Abso l ut e Altit u de
Adjustment Absolute
Altitude
ALT I
AL I
T
[M] [M] [M][M]
Altitude Adjustment
Absolute Altitu de Display
Altimete r Mode
hold
[M]
hold
[M]
[S/S]
[S/S]/[L /R]
hold
[S/S]/[L /R]
Increase / D ecrease
the number
Increase / D ecrease
the number
at a higher sp eed
AL I
T
AL I
T
AL I
T
AL I
T
AL I
T
AL I
T
AL I
T
AL I
T
11.1 Barometer Mode - Unit Selection and Barometer Adjustment
How to Switch between Units
!The Watch can display pressure in mb/hPa or
inHg and temperature in degree Celsius ( C) or
degree Fahrenheit ( F).
!To switch among different units, hold the [S/S]
button to change the units following the adjacent
unit selection sequence.
Why the Barometer Needs to be Adjusted
!The Watch has been calibrated for you in the
factory. For normal use, you do not need to
calibrate the Barometer.
!For serious users, the watch can be adjusted or
calibrated.
°
°
Barometer Adjustment
!Th ere are 2 kinds of Barome ter adj ustment
methods: Absolute Pressure and Factory Default
Adjustment.
!Absolute Pressure: Input the known atmospheric
pressure into the Watch directly.
!Factory Default: Restore the Watch to the factory
default setting.
!For in-depth information for each adjustment
method, please read the coming sections for
details.
Factory De fault Display
Absolute P ressure Display
Adjustment Displays
Unit Selec tion Sequence
°C (Celsiu s)
inHg °C (Celsiu s)
mb/hPa
°F(Fahre nheit)
mb/hPa
°F (Fahren heit)
inHg
hold
[S/S]
hold
[S/S]
hold
[S/S]
hold
[S/S]
hold
[S/S]
11.2 Barometer Mode - Absolute Pressure Adjustment
Before Calibrating the Barometer
!You have to know the absolute pressure of your
current position because that pressure value will
be input into the Watch during the adjustment.
IMPORTANT: Inputting an incorrect pressure during
th e ca lib r at i on p roc e dur e re s ul t s a m ist a ken
pressure reading in future.
How to Adjust the Barometer Using Absolute
Pressure Adjustment
!You can adjust the current pressure reading to
an absolute pressure value.
To adjust the pressure using
, pre s s the [ S / S] butt o n on the
Display, and the pressure
reading will appear.
!When the pressure reading appears, press the
[S/S] or [L/R] button to increase / decrease the
number. ( Hold the button to change the number
at a higher speed).
!If the setting is completed, hold the [M] button to
confirm setting and exit the adjustment display.
!To select the Adjustment Display, hold the [M]
button in the Barometer Mode. Then press the
[M] bu t to n t o selec t b et we en the A b so lu t e
Pr es su re Ad ju st me n t a nd Fa ct or y D e fa ul t
Adjustment.
!Absolute Pressure
Adju s t ment
Absolute Pressure
BARO
[M]
Factory De fault Display
Absolute P ressure Display
Barom ete r Mode
hold
[M] hold
[M]
BAROBARO
BARO
BARO
[S/S]
[S/S]/[L /R]
hold
[S/S]/[L /R]
Increase ( decrease)
the number
Increase ( decrease)
the number
at a higher sp eed
11.3 Barometer Mode - Factory Default Adjustment
How to Adjust the Barom eter Using F actory
Default Adjustment
You can adjust the pressure reading calculation
back to the factory default value.
To adjust the pressure using the factory default
adjustment, press the [S/S] button on the Factory
Def ault Disp lay, and t he indica t or "NO" will
appear.
!When the indicator "NO" appears, press the [S/S]
or [L/R] button to select between "YES" (reset
the pressure to the factory default) or "NO"
(abort the resetting).
!To exit Adjustment Display, hold the [M] button
for 2 seconds, and then the Watch will go back
to the Barometer Mode. If the "YES" Display is
selected when exiting the Adjustment Display, the
"DONE" Display will appear for 2 seconds prior
to the normal operation.
!
!To select the Adjustment Display, hold the [M]
button in the Barometer Mode. Then press the
[M] bu t to n t o selec t b et we en the A b so lu te
Pr es su re Ad ju st me n t a nd Fa ct or y D e fa ul t
Adjustment.
!
[M]
2 seconds
Factory De fault Display
"DONE" Dis play
Factory Default Adjustment
"YES" Disp lay"NO" Displ ay
Absolute P ressure Display
Baromete r Mode
hold
[M] hold
[M]
hold
[M]
[S/S] / [L/R ]
BARO
SET
BARO
SET
BARO
BARO
BARO
BARO
[S/S]
BARO
BAROBARO
11.0 Barometer Mode - Temperature and History Display
Functional Display
!Th e Watch i ncludes three Baro meter functio nal
di splay s: Tem perature, Sea Level Pre ssure and
History Displays.
!One of the three functional displays will appear in
the top row of the display. The current (history)
pressure and the current (history) time are shown in
the middl e row and bottom row of the display
respectively.
Temperature Display
!O n t h e Te m p er a t u r e D i sp l a y , t h e c u rr e n t
temperature in degree Celsius ( C ) o r deg r e e
Fahrenheit ( F) is shown in the top row of the
display.
IMPORTANT: If you want to have an accurate reading
of air temperature, you must take off the watch from
the wrist that prevents body temperature effect on
your watch.
Sea Level Pressure Display
!On the Sea Level Pressure Display, the current sea
level pressure is shown in the top row of the display.
Sea Level Pressure History Display
!The Watch records the sea level pressure readings
automatically on the hour, i.e 1:00, 2:00, 3:00 and
etc. These records will be plotted into a pressure
record graph.
!In Sea Level History Display, the pressure record
graph is shown in the top row of the display.
!To review the pressure records of the last 23 hours,
press the [L/R] button to move the cursor to the left
cyclically, and the corresponding pressure record
and its recording time (flashing) will appear on the
display according the adjacent diagram.
°
°
BARO
Barometer Mo de
current
temperat ure
Sea level
pressure
current
pressure
current
time
[L/R]
[L/R]
Current Pr essure
Display
(Current Time)
Tempe rature Display Sea Level Pr essure Display
[S/S]
[S/S]
[S/S]
BARO
BARO
Sea Level Pressure
History Display
(1st Record at the hour)
cursor moving
direction
flashing cursor
(1 st record at the hour)
respective sea level
pressure flashing
BARO
[L/R]
[L/R]
Sea Level Pressure
History Display
(-2 to -23 hour)
Sea Level Pressure
History Review
- 23
hour cu rre nt
time
Current
pressure
12.0 Compass Mode - Precautions
12.1 Compass Mode - Compass Directions and Bearing Directions
12.2 Compass Mode - Compass Mode
12.3 Compass Mode - Backward Bearing Direction and Compass Lock
Backward Bearing Direction
!The Watch includes a backward bearing function.
!The backward bearing direction is the bearing
dir e ction in th e opposite d i rection fro m the
normal bearing direction.
!When the 'Backward Bearing' indicator " "
appears, the Watch is showing the backward
bearing direction of the navigation direction.
!In the Compass Mode, press the [S/S] button to
select between normal and backward bearing
directions.
Compass Lock
!The Watch includes a compass lock function that
locks useful direction reading.
!In the Compass Mode, press the [L/R] button to
lock/unlock the direction reading.
!When the "Lock" indicator " " appears, the
compass direction, bearing direction and the
magnetic north pole pointer are locked.
!Compass Lock will be released automatically
when the Watch enters IDLE Mode.
0°
COMP
Norm a l Bea rin g Dire ctio n Bac kward Bearin g Dire ctio n
305°
125°
0°
0°
backward
bearing
indicator
normal
bearing
direction
backward
bearing
direction
[S/S]
Dire ctio n Unlo cked Dire ctio n Lock ed
compass
lock indic ator
[L/R]
COMP
COMP C OMP
Precautions for using the Compass
!
Check the 'What is Magnetic
Declination' section for more details.
Keep your Watch away from magnets or any
appliances which may contain magnetic objects
such as mobile phones, speakers, motors and
etc.
!The Watch, like most magnetic compass, points
to the magnetic north which is slightly different
from the true north.
!Perform the compass calibration from time to
time, because the calibration can ensure the
precision of the compass.
!To achieve an accurate result, you should avoid
measuring direction on the following conditions:
1) The watch is placed close to the magnetic
objects,
2) The watch is placed close to the metal
objects,
3) The watch is placed close to the electrical
appliances
4) The watch is placed inside a moving object or
a ferroconcrete building.
The Direction of an Object
!The direction of an object from a point can be
specified in either compass directions or bearing
directions.
!The Watch includes both compass directions and
bearing directions.
The Compass Directions
!The c ompa s s dir e ctio n s are s hown in th e
adjacent table.
!For example , in the f igure on t he left, the
compass direction of object B from point A is due
East. The compass direction of object C from
point A is Southeast. The compass direction of
object D from point A is Northwest.
The Bearing Directions
!The Bearing direction of an object is defined as
the angular difference between North and the
obj e ct. ( A ss ume 0 f o r d ue No r th, an d the
measuring range is from 0 to 359 ).
!For example, in the figure on the left, the bearing
direction of object B from point A is 90 . The
bearing direction of object C from point A is 135 .
The bearing direction of object D from point A is
315 .
°
° °
°
°
°
Compass Mode
!In the Compass Mode, the top row of the display
shows the compass direction.
!The middle row of the display shows the bearing
direction.
!The bottom row of the display shows the current
time in hour and minute.
!The p o inter e nc ircle d the d i sp lay sh o ws the
direction of magnetic North analogically.
IDLE Mode
!If no key is pressed for about 1 minute, the watch
will go to the IDLE Mode automatically. To activate
the compass again, press any button.
Distortion
!If distortion is detected, the indicator "O FF CAL"
and flashing bearing direction will appear.
!Please refer to the coming section "Calibrating the
Comp a s s" to res t o re the com p as s t o n or ma l
operation when distortion is detected.
COMP
Dig it al Compass Mode
current ti me
beari ng di rection
of navigat ion
directio n
magne tic n orth pole
pointer
navig ati on direction
compass di rection
obje ct B obje ct B
obje ct C
Compass Di rections Bearing Di rections
obje ct C
obje ct D obje ct D
angu la r
differen ce
poin t A
N
E90°
SE 135 °
NW 315 °
poin t
A
0°
0°
N
Marks
N
NE
E
SE
SSE
SSW
WNW
NNW
Compa ss Direct ions Beari ng Direct ions
North
North east
East
South east
East So utheast
South S outhwes t
North N orthwes t
S
SW
W
NW
South
South west
West
North west
ESE
ENE
WSW
NNE
West Northwest
West Southwest
South S outheas t
East No rtheast
North N ortheas t
Compass Mode
Idle Displ ayNorma l Dis play
Distorti on display
COMP
COMP
COMP
12.5 Compass Mode - Magnetic Declination
12.4 Compass Mode - Applications of the Compass 12.6 Compass Mode - Magnetic Declination Compensation
12.7 Compass Mode - Magnetic Declination at Major Cities
What is Magnetic Declination
!
!
!The angular difference between Magnetic North Pole
and True North Pole is called magnetic declination. Its
mag ni tud e (de g rees and m inut e s) a n d dir e ctio n
(easterly and westerly) depend on where you are in the
world.
!
!The Watch also includes a compensation setting for
Magne t i c D ec li na ti o n. Check t h e c o mi ng sectio n
"
for more details.
Magnetic Declination Information
!Most topographic maps include a small arrow which
s h o w s t h e m ag ne ti c n or th p o l e a n d m a gn et ic
declination information.
!For the benefit of the user, this m an u a l i n cl ud e s t he
magnetic declinations for some major cities. Check the
coming section 'Magnetic Declination at Major Cities'
for more details.
!For those cities, their names are not included on the
list, please check the online magnetic declination
information at:
1.http://www.geolab.nrcan.gc.ca/geomag/e_cgrf.html
2.Http://www.ngdc.noaa.gov/cgi-
bin/seg/gmag/fldsnth1.pl
The Magnetic North Pole is slightly different from the
True North Pole.
Th e WeatherMas ter, lik e most magneti c compa ss,
points to the Magnetic North Pole. On the contrary,
everything measured on a map is related to the True
North Pole.
For a serious compass user who intends to perform an
accurate navigation, the compass must be adjusted for
magnetic declination.
Calibrating the compass - Magnetic Declination Mode"
Check your position by Backward Bearing Directions
!Spot two distant identifiable landmarks like mountains,
light-house, fort or building from your current position,
for example the mountains A and B.
!Ch e ck o u t th e bac kwa r d bea rin g dir ecti ons o f
mountains A and B from your current position, for
exam p le 135 fro m moun t a in A a nd 270 fro m
mountain B.
!Use a ruler to draw a line 135 from the north at the
mountain A to your current position on the map. Draw
another line 270 from the north at the mountain B to
your current position on the map.
!You r cu r ren t pos iti o n on t he m a p wi l l be t he
intersection (point A) of the lines 1 3 5 from the
mountain A and 270
!Check the Trek Course Correctly
!During a trekking, the Watch can keep your course in
a correct way. For example, the correct trail starts
from point A and finishes at point E as drawn on the
adjacent map.
!Mark the points (identifiable landmarks) where the trail
turns its direction or the trail branches its way, such
as the points A, B, C, D and E on the adjacent map.
!Find out the bearing directions of point B from point A
(315 ), point C from point B (0 ), point D from point C
(225 ), and then point E from point D (315 ).
!During the trekking, make sure that the heading
direction is 315° from point A to point B. Performing
the similar checking in other sections of the trail
helps you keep your course correctly.
IMPORTANT: If you are in doubt of the directions and
positions of the trail, consult the park administration office
before starting the trekking.
° °
°
°
°
° from the mountain B.
° °
° °
Magnetic Declination Compensation
!To compensate for an object's bearing, either
subtract westerly (W) magnetic declination or add
ea st er l y( E) m a g ne ti c d ec l in at i o n w i th th e
magnetic bearing.
° °
° °
° °
° °
!Exa m ple 1 : West e rly m a gnet i c dec l inat i on
23°and the compass needle points 323°.
!TB = MB - W. When MB = 323 ; W =23
!TB = 323 - 23
!TB = 300°
!The true bearing is 300°.
!Example 2: Easterly magnetic declination 22°
and the compass needle points 278°.
!TB = MB + E. When MB = 278 ; E = 22
!TB = 278 + 22
!TB = 300°
!The true bearing is 300°.
!The Wat c h a llows y ou to co m pe nsate t h e
compass bearing at a place where the magnetic
dec l ination is e i ther Wes terly decli n ation or
Easterly declination.
!Chec k t he comin g s ec ti on "Cali b ra ti ng the
Compass" for more details of the setting.
Tru e No rth
Magn et ic
Decl in ation
Magn et ic
Decl in ation
Magn et ic
Nort h
4110 m
2120 m
3120 m
point A
(startin g point)
point B
A Sample Tr ail o n a Map
point D
point E
(finish po int)
point C
315°
225° 0°
315°
mountain B
Check Current Position By Backward Bearing
mountain A
270°
135°
point A
0
0
Compensa te th e Bearin g
with Weste rly (W) Mag netic Declin atio n
Compensa te th e Bearin g
with Easte rly (E ) Magnetic Declin atio n
Tru e Bearin g (TB) =
Magne ti c B earin g (MB) - Weste rly Magne ti c Decli nati on (W )
Tru e Bearin g (TB) =
Magne ti c B earin g (MB) + Easte rly Magneti c Declinati on (E )
300° (TB) = 278° (M B ) + 22° (E)
300° = (MB) - 2 3 (W ) (TB) 323° °
magne tic
decli nat ion
23° W
magne tic
declinat ion
22° E
true
beari ng
300°
true
beari ng
300°
magne tic
beari ng
323°
magne tic
beari ng
278°
true north
0°
true north
0°
magnetic
north
magne tic
north
obje ct B
objec t B
point A
point A
No. Country/Place Major City Declination
1 Afghanistan Kabul +3E
2 Australia Canberra +12E
3 Austria Vienna +3E
4 Bahrain Manama +2E
5 Bangladesh Dhaka +0E
6 Belgium Brussels +0E
7 Brazil Brasilia -21W
8 Canada Ottawa -14W
9 Chile Santiago +3E
10 China Beijing -6W
11 China Hong Kong -2W
12 Costa Rica San Jose -1W
13 Cuba Havana -4W
14 Czech Republic Prague +3E
15 Denmark Copenhagen +3E
16 Egypt Cairo +4E
17 Finland Helsinki +8E
18 France Paris -1W
19 Germany Berlin +3E
20 Greece Athens +4E
21 Hungary Budapest +4E
22 India New Delhi +1E
23 Indonesia Jakarta +1E
24 Israel Jerusalem +4E
25 Italy Rome +2E
26 Japan Tokyo -7W
27 Jordan Amman +4E
28 Kenya Nairobi +0E
29 Korea Seoul -8W
30 Malaysia Kuala Lumpur +0E
31 Mexico Mexico City +6E
32 Nepal Kathmandu +0E
No. Country/Place Major City Declination
33 Netherlands Amsterdam +0E
34 New Zealand Wellington +22E
35 Norway Oslo +2E
36 Pakistan Islamabad +2E
37 Philippines Manila -1W
38 Portugal Lisbon -3W
39 Russia Moscow +10E
40 Singapore Singapore +0E
41 South Africa Cape Town -24W
42 Spain Madrid -2W
43 Sweden Stockholm +5E
44 Switzerland Bern +1E
45 Taiwan Tai-pei -4W
46 Thailand Bangkok -1W
47 UAE Abu Dhabi +2E
48 United Kingdom London -2W
49 United States Washington, DC -11W
50 United States Juneau +22E
51 United States Phoenix +11E
52 United States Little Rock +1E
53 United States Sacramento +14E
54 United States Denver +9E
55 United States Atlanta -4W
56 United States Honolulu +10E
57 United States Boston -15W
58 United States Saint Paul +1E
59 United States Jackson +0E
60 United States Santa Fe +9E
61 United States Oklahoma City +5E
62 United States Salem +16E
63 United States Harrisburg -11W
64 United States Salt Lake City +12E
NOTE: Since magnetic declinations will be changed with time, it is recommended to check the updated data from following sites:
http://www.magnetic-declination.com/ & http://www.ngdc.noaa.gov/geomagmodels/Declination.jsp
12.8 Calibrating Mode - Calibration the Compass
12.9 Calibrating the compass - Compass Rotation Calibration Mode
12.10 Calibrating the compass - Magnetic Declination Mode
13.0 Low Battery Indication & Battery Replacement
Low Battery Detection
!When the battery-low indicator appears on the
displ a y, it mean s t ha t t he capac i t y o f t he
battery is low. It is recommended to replace the
battery with a new CR2032 battery.
!How e v er, i f the a pp earan c e o f batt e ry-lo w
indicator is caused by using the Watch under
very cold condition, the indicator will disappear
when normal temperature returns.
NOTE: It is recommended to complete the battery
replacement by
Watch
NOT E: The memo r y will be cl eared when the
battery is replaced. Follow the previous section
"Calibrating the Compass" to calibrate the compass
before using the Compass.
a certified service agency because
this contains delicate electronic sensors and
components.
Low Batte ry Indic atio n
When to Calibrate the Compass
!The Watch has to employ a compass calibration
in one of the following conditions:
1) The Watch is being used for the first time,
How to Calibrate the Compass
!The compass calibration includes two different
pro cess e s: Ro ta tio n Cal i bra t ion M ode a n d
Magnetic Declination Setting.
!It is advisable to conduct both calibrations from
time to time to achieve a more accurate reading.
IM PO R TA NT : I f t h e c om p as s h a s n ot b ee n
calibrated, the direction made by the compass may
be inaccurate.
2) The battery is replaced,
3) The bearing direction digits are flashing and
the "OFF CAL" indicator appears,
4) The compass is used in a location that is
apart from the place in which the compass
has been calibrated,
5) The user intends to manitain the precision of
the digital compass.
Rotation Calibration Display
!To select the Rotation Calibration Display, hold
the [M] button in the Compass Mode.
!To start rotation calibration, press [S/S] button
once. The pointers will start rotating, turning the
watch (keep your watch horizontally) in the same
direction of the rotating pointers for more than 2
turns.
!Press [S/S] or [L/R] button to stop the calibration
when the 2-turn rotation calibration is completed.
!When the pointer stops rotating, hold the [M]
button to go back to the Compass Mode or press
th e [M ] bu tt o n o n ce to s et th e m a gn e ti c
declination.
Magnetic Declination Mode
!Check the coming section "Magnetic Declination
at Ma jo r C i ti es " t o c h oo se t he m ag ne t ic
declination of the city which is close to your
current position. The angle will be input into the
Watch during the calibration.
!To select Magnetic Declination Display, press the
[M] button in Rotation Calibration Display.
!When the current magnetic declination appears,
press the [S/S ] or [L/ R ] b ut to n to inc r e ase/
decrease the number. (Hold down the button to
change the number at a higher speed).
!When the setting is completed, hold the [M]
button to confirm t h e s e t ti n g a n d e x i t t h e
adjustment display.
Magnetic
Declinat ion Display
Magnetic
Declinat ion Display
Magnetic
Declinat ion Display
Magnetic
Declinat ion Display
Compass Calibration
Compass Calibration
Compass Calibration
Rotation
Calibrat ion Display
Rotation C alibration
Stop Displ ay
Rotation C alibration
Stop Displ ay
Rotation C alibration
Turni ng Display
hold [M]
hold [M]
hold [M]
hold [M]
hold [M ]
hold [M]
[M]
[M]
[M]
Compass Mo de
Compass Mo de
Compa ss Mo de
COMP
COMP
COMP
COMP
COM P
COMP
COMP
COMP
COMP
SET
[S/S] / [L/R ] [S/S]
pointers
rotated at
15 seconds
per turn
COMPCOMP
[S/S]/[L /R]
hold [S/S] /[L/R]
Increase / D ecrease
the number
Increase / D ecrease
the number
at a higher sp eed
15.0 Specifications
15.0 Specifications
Timer Mode
Resolution
!1 second resolution
Measuring range
!99 hours 59 minutes 59 seconds
Operation Mode
!Countdown
Quick Set
!6 quick preset Values (1, 3, 5, 10, 15 and 45
minutes)
Timer Sounds
!Sounds for 30 seconds when counting to zero
Pacer Mode
Measuring range
!30 BPM to 180 BPM (an increment of 5)
Step counter
!Up to 99999 steps
Current Time Mode
!Hour, minute, second, am, pm, month, date, and
day of week/ sea level pressure history display/
altitude history/ temperature
Time System
!12-hour or 24-hour format
Calendar System
!Auto-Calendar pre-programmed from the year
2004 to 2099
Weather Forecast
!4 symbols to indicate the predicated weather
Daily Alarm Mode
!2 daily alarms
!Hourly chime
Alarm Sound
!Sounds for 30 seconds at preset time of real time
clock
Chronograph Mode
Resolution
!1/100 second
Measuring Range
!99 hours 59 minutes 59.99 seconds
Measuring Mode
!100 laps memory
!Recall lap memory and total time
Compass Mode
Measuring range
Backlight
!Electro-Luminescent (EL) backlight
Battery
!Single 3V lithium battery (CR2032)
Resolution
!1° display (digital)
!1 to 60 pointers (graphical)
!0° to 359° (digital)
!1 to 60 pointers (graphical)
Others
!Digital bearing reading Lock
!Digital backward bearing
Altimeter Mode
Resolution
!1m (1ft)
Measuring range
!-706m to 9164m (-2316ft to 30065ft)
Sampling Interval
!First 5 minutes: 1 second
!After 5 minutes: 1 minute
History Recall
Barometer Mode
Resolution
!1 hPa/mbar (0.01 inHg)
Measuring Range
!300 hPa/mbar to 1100 hPa/mbar (8.85 inHg to
32.48 inHg)
Sampling Interval
!First 5 minutes: 1 second
!After 5 minutes: 1 minute
History Recall
Thermometer
Resolution
!0.1 °C (0.1°F)
Measuring range
!-10.0 °C to 60.0 °C (14.0 °F to 140.0 °F)
Power Saving Mode
+This Watch has a Power Saving Function which can
turn off the LCD display so that the battery can last
longer.
+In the Power Saving Mode, the watch function is still
working normally. (i.e. The timekeeping function is
still running in Power Saving Mode.)
How to enter/exit the Power Saving Mode
+To enter the Power Saving Mode, hold down the
[L/R] button in Current Time Mode for about 5
seconds and the LCD display will be turned off.
+Press any key in Power Saving Mode to exit this
mode and the LCD display will be resumed.
Current Time Mode
Power Saving Mode
(LCD display turned off)
Hold [L/R] Any button
5 second
14.0 Power Saving Mode

This manual suits for next models

1

Popular Watch manuals by other brands

STENLILLE Actío manual

STENLILLE

STENLILLE Actío manual

Casio QW-389 manual

Casio

Casio QW-389 manual

Calypso IKMS063TR instruction manual

Calypso

Calypso IKMS063TR instruction manual

Garmin D2 AIRX10 owner's manual

Garmin

Garmin D2 AIRX10 owner's manual

Amazfit Nexo user manual

Amazfit

Amazfit Nexo user manual

Casio GW-1200BCJ Service manual & parts list

Casio

Casio GW-1200BCJ Service manual & parts list

TMI Products NE88A Technical guide & parts catalogue

TMI Products

TMI Products NE88A Technical guide & parts catalogue

Casio QW-1160 user manual

Casio

Casio QW-1160 user manual

Suunto SPARTAN ULTRA 1.11 user guide

Suunto

Suunto SPARTAN ULTRA 1.11 user guide

Oakley D1 instruction manual

Oakley

Oakley D1 instruction manual

Armitron MD07120 user manual

Armitron

Armitron MD07120 user manual

iTOUCH Sport 2 user manual

iTOUCH

iTOUCH Sport 2 user manual

Activinsights GENEActiv Instructions for use

Activinsights

Activinsights GENEActiv Instructions for use

TUDOR CLASSIC DATE 22010 manual

TUDOR

TUDOR CLASSIC DATE 22010 manual

Garmin VENU SQ 2 MUSIC Quick start manual

Garmin

Garmin VENU SQ 2 MUSIC Quick start manual

Citizen miyota instruction manual

Citizen

Citizen miyota instruction manual

Microgate REI2 user manual

Microgate

Microgate REI2 user manual

Casio 3170 Operation guide

Casio

Casio 3170 Operation guide

manuals.online logo
manuals.online logoBrands
  • About & Mission
  • Contact us
  • Privacy Policy
  • Terms and Conditions

Copyright 2025 Manuals.Online. All Rights Reserved.