Westfield GEMINI 390 CARAVAN User manual

TRAVEL-SMARTAWNINGSERIES
Document-No.: FC-90015-390
Issue:October 2015
»GEMINI390CARAVAN«
Top Quality Camping
Model No. 12010223900000

PLEASE READ INSTRUCTIONS AND WARNINGS
CAREFULLY BEFORE ATTEMPTING TO SET UP!
PLEASE KEEP IT FOR FUTURE REFERENCE!
SUMMARY
WELCOME
ABOUT THE INFLATABLE FRAME 2
2SNOITADNEMMOCER
1TSILSTRAPYLBMESSA
3NOITALFNIDNAPMUP
8
PITCHING INSTRUCTIONS 4-7
GENERAL CARE AND USAGE INSTRUCTIONS
Thank you for purchasing your Westfield awning.
Please read these instructions carefully before
attempting to set up your awning and retain them for
future reference.
If used correctly, your awning should give you years of
trouble free use. We recommend that your awning is
insured against accidental and storm damage as this is
not covered by the warranty.

1
ASSEMBLY PARTS LIST
OPTIONAL
Storm Roof Pole Canopy Poles Kit Rear Poles Kit
x3 x1
Inner Tent
x1
Carry Bag Flysheet
Draft Skirt & Wheel Cover Pump & Safety Pressure Valve
x1 x1 x1 x1
Metal /Plastic Peg
x24/36
Model No. 12010223900000
Zip
x6 x24
x1
Guy rope
Pegging Ladder
x2
TPU repair patch

2
RECOMMENDATIONS
ABOUT THE INFLATABLE FRAME
The zips on the air tube sleeve and protective cover
are locked together by a plastic tie.
Never remove this plastic tie under normal use.
If this tie is removed then it could cause damage to
your air tubes or awning and is not covered by the
warranty.
Never inflate the air tube if either of the zips
are undone.
zipped protective covers making them secure, protected and
easy to replace if required.
which is strong, resistant to weather and will last for years.
resistant PE material. The protective cover is zipped inside the
sleeve on the awning.
The zips on the sleeve and protective cover are locked
together with ties. These ties should never be removed
under normal use. They are only to be removed if you need
to remove, replace or repair your air tube.
If you do remove the ties then you must replace them before
inflating your awning otherwise you could cause damage to
the air tube, even puncturing it which is not covered under
your warranty.
check that the protective cover is located on the velcro pads at
all times.
ATTENTION!
Seleve
Zipper
damaged, before uppacking.
assembly and ensure you have not forgotten anything, especially the first use.
Under certain conditions awnings will suffer from condensation.
Depending upon the conditions, the weather and the amount of moisture in the ground, the
condensation could be quite severe and is commonly mistaken for leaking, it can run down
the inside of the roof and drips off internal fittings. If you suspect your awning is leaking it
is almost certainly condensation this can be improved by ensuring adequate ventilation.
During strong winds or snowfall we recommend that you take the awning down.
This awning is not designed for static, seasonal, permanent pitching or commercial use.

3
PUMP AND INFLATION
PUMP:
Connect the safety valve to the inflate side of the pump and
attach the hose to the safety valve as shown in the diagram to
the left. Never attach the pump to the awning without the
included safety pressure valve. The safety pressure valve
ensures that you cannot over inflate the awning.
Failure to use the safety pressure valve when inflating the
awning could case you to over inflate the air tube which would
invalidate your warranty.
IMPORTANT :
The ideal inflation pressure for this awning is 7 PSI (0.48 BAR).
Do not inflate the awning any more than this. If you use your
own pump then ensure it is connected to a safety pressure
valve set to 7PSI or has a pressure gauge on so you can tell
what the pressure is at all times.
Over inflation is not covered under your warranty.
DO NOT OVER INFLATE. OVER INFLATION IS NOT
COVERED UNDER YOUR WARRANTY AND COULD
DAMAGE YOUR AWNING!
INFLATION:
pump nozzle to the air inlet (as shown below).
You are now ready to pump your air tube up.
If your air tube deflates straight away check that the value is
correctly fitted as this could lead to air escaping from the tube.
DEFLATION:
unscrewing it from the tube.
Be careful when unscrewing the valve as twisting the valve and
tube unnecessarily could cause unneeded stress on the valve.
When unscrewing the valve hold the tube in place with one
hand and unscrew the valve with the other thus ensuring the
valve and tube are not twisted.
it caught on the rim of the valve pocket as this can stop you
creating a seal with the valve and can lead to air being lost
from the tube even though there is no puncture.
If your air tube does deflate always first check that the valve is
correctly screwed into place.
Safety
Pressure
Valve
Inflate
CAP
AIR INLET
DEFLATION PLUG

3
2
1
4
PITCHING INSTRUCTIONS
the bottom of your caravan, motorhome or vehicle.
The wheel cover either slides into the rail on the wheel arch
or uses the figure of eight tubing and connects to the top of
the draft skirt.
the floor strap is attached.
motorhome or vehicle and pull the awning along the rail to
the desired position.
NOTE:
There are two sizes of beading on this awning. It has 6mm
beading for caravans and 4mm beading for motorhomes.
pulling the awning as close to the caravan as possible.
1
2
3

4
5
PITCHING INSTRUCTIONS
read and understood the pump and inflation section of
these instructions.
You must follow these instructions to ensure proper
inflation of your awning.
ensuring the safety pressure valve is connected
to the pump at all times.
4
5
strap as shown in the diagram.
5
6
pumped up and sprung into place.
depending upon ground conditions you may have to move
the awning in or our slightly to get the correct shape.
in the correct shape peg the other storm strap.
You can now peg the awning.
working forward from the rear corner in turn until
all pegging points have been pegged.
6

6
PITCHING INSTRUCTIONS (OPTIONAL)
1
Storm Roof Poles
2
Rear Pole Kit
side panel and extend the leg until it touches the ground.
or vehicle. This creates the seal against your vehicle.
it could cause damage if over tensioned.
rear of the panel.
O2
O1
OPTIONAL
OPTIONAL

7
3
Inner Tent
Ensure the attachment straps on the top of the inner tent are at their maximum as this makes
it easier to attach the inner tent.
of the awning.
(for example connect the buckle on the red strap on the inner tent to the red strap in the roof
of the awning)
all around.
O3
OPTIONAL
PITCHING INSTRUCTIONS (OPTIONAL)

8
GENERAL CARE AND USAGE INSTRUCTIONS
Seams
We tape all the main seams on our awnings to help prevent leakage.
Depending upon your expectations, it may be necessary to treat the remaining seams with a
seam sealant. Seam sealant should also be applied to areas where the taping is damaged or
has peeled away through wear and tear. It can also be applied to areas where a leak may have
developed. Seam sealant is available from your dealer. The awning beading is sewn to the
awning with a special waterproof sewing thread. This thread swells when wet to fill the needle
holes but thread needs to become wet several times before it is totally effective.
This is known as ‘weathering’.
U.V. Degradation
awning will give long service. This degradation can be lessened by the use of proofing solutions
but improves waterproofing and lengthens the life span of your awning.
Condensation
Depending upon the conditions, the weather and the amount of moisture in the ground, the
condensation could be quite severe and is commonly mistaken for leaking, it can run down the
inside of the roof and drips off internal fittings. If you suspect your awning is leaking it is almost
certainly condensation this can be improved by ensuring adequate ventilation. Condensation
and its effects are not covered under the warranty.
Usage
This awning is designed as a touring awning and for touring use in light to moderate weather.
During strong winds or snowfall we recommend that you take the awning down.
This awning is not designed for static, seasonal, permanent pitching or commercial use.
Disregarding this could lead to invalidation of your warranty.
Storage
Store in a well-ventilated dry place. A wet/damp awning will develop mildew surprisingly quickly.
Dirty awnings can be washed using clean water and a soft brush. Do not scrub and never use
detergents.
Safety
NEVER cook in the awning or use any naked flame inside the awning as this could lead to fire,
damage to the awning or even death.
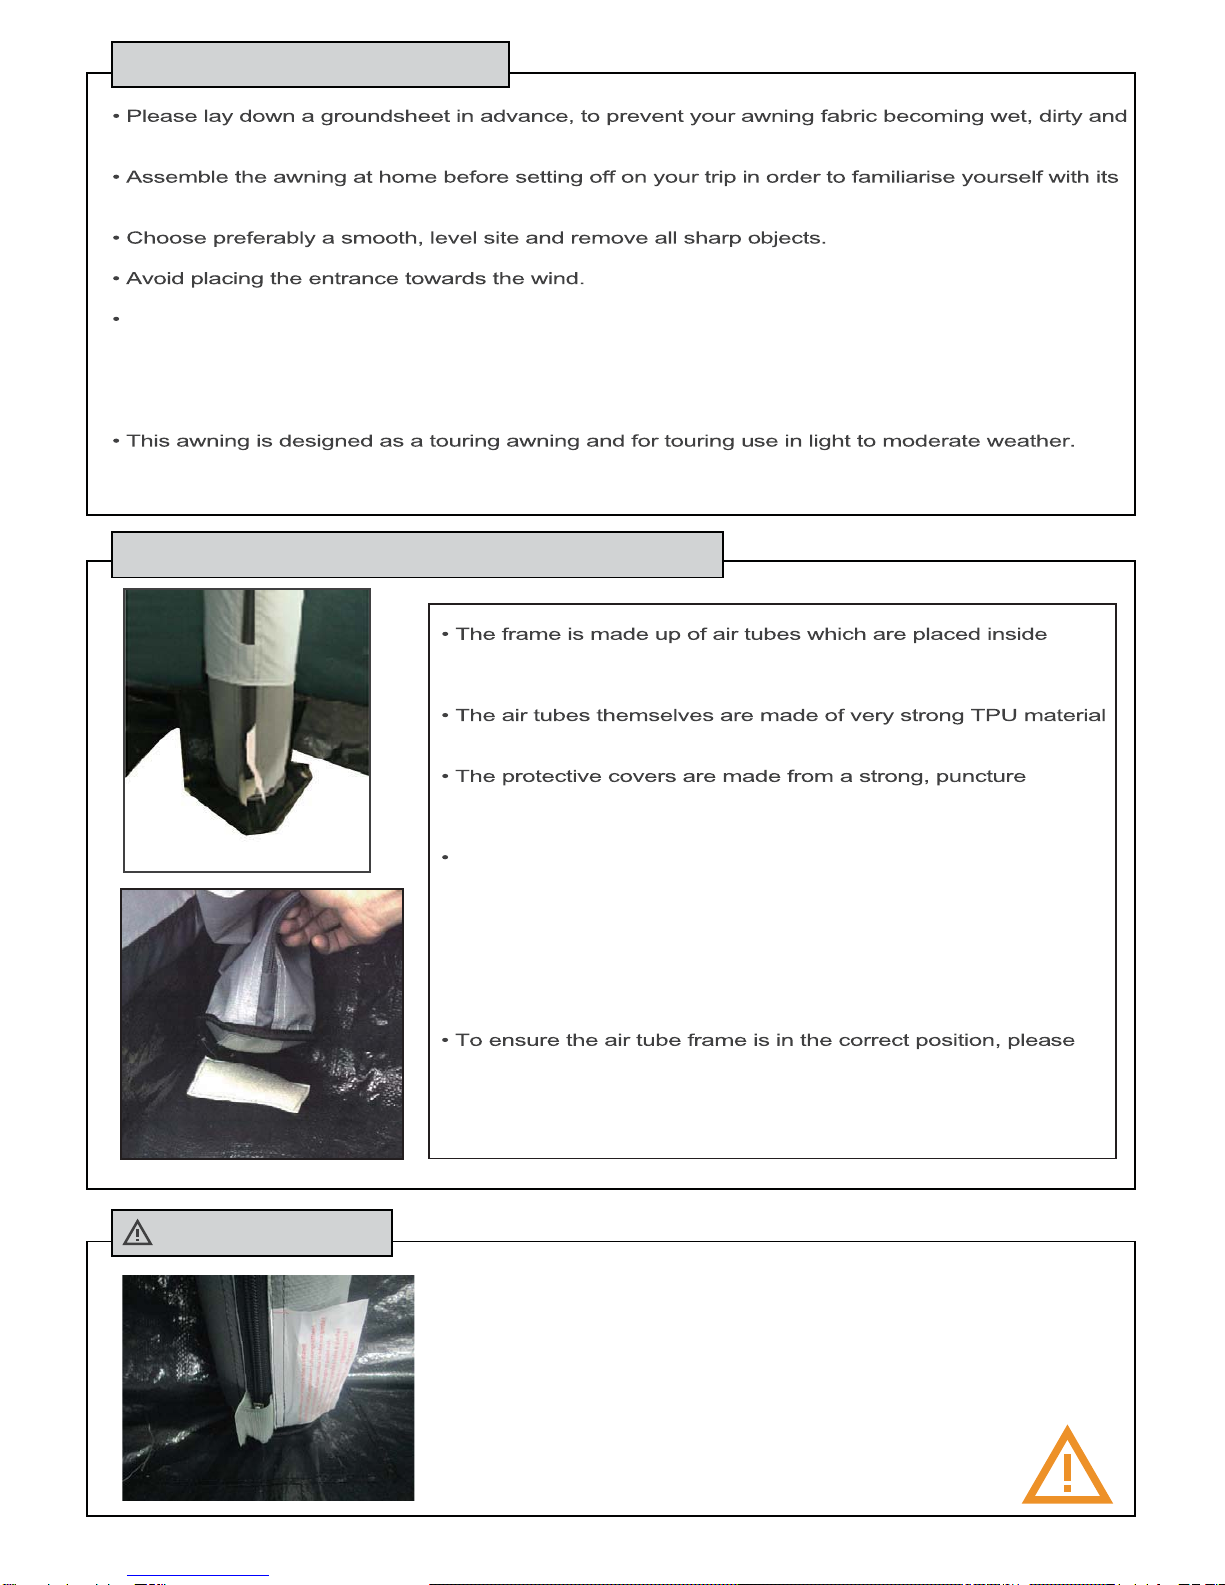
Replacing or Repairing an Air Tube
Deflate the air tube fully. NEVER replace or repair a tube before deflating it fully.
Break the plastic ties on the sleeve of the air tube and unzip the sleeve. Then remove the
protective cover and air tube from inside the sleeve. Break the plastic ties on the protective cover
material. It needs to be a flexible repair as the tube is inflated and thus the tube flexes in use.
Locate and repair the puncture following the instructions in your repair kit.
Once the puncture is repaired or your are simply replacing the tube, place inside the protective
cover being careful to ensure that it is not twisted as a twist in the bladder could cause damage
when it is inflated.
Once the tube has been fitted zip the protective cover shut.
YOU MUST THEN RELOCK THE ZIPS WITH A NEW PLASTIC TIE OR SIMILAR SOLUTION.
If you do not re-lock the zips then you could well cause damage to your awning when it is inflated.
If the zips are allowed to come apart (even a small amount) then when inflated the bladder will
expand out of the gap caused by the zips moving apart and will cause damage.
Any damage caused by failing to re-lock the zips is not covered by your warranty.
Once the zips are shut and locked on the protective cover place the cover back in the sleeve.
Then zip the sleeve shut and again YOU MUST THEN RELOCK THE ZIPS WITH A NEW
PLASTIC TIE OR SIMILAR SOLUTION. Failure to do so could cause damage to your awning
when inflated and is not covered by your warranty.


Drawings in this manual are for illustration purposes only, actual product may vary. Manufacturer reserves the right to change any
specification or features without prior notice. Should you have any questions about your product or experience any difficulties, please
contact the retailer from which you purchased the product. Your local retailer is in the best position to promptly address any requirements.
www.westfieldoutdoors.eu
Top Quality Camping
Westfield Outdoors GmbH
Moselstr. 19
D-41464 Neuss
Germany
This manual suits for next models
1
Table of contents
Other Westfield Camping Equipment manuals