Westinghouse PT20115 User manual

INSTRUCTION MANUAL
PT20115
HAMMER DRILL
Note : Before operating or installing this hammer drill, read this
manual and follow all safety rules and operating instructions.
6.3A
800W120V
60Hz
13
mm rpm
0~2,900

1
9
2
13
VISTA EN DESPIECE
1
2
3
4
5
6
7
8
9
10
11
12
13
14
15
16
17
18
19
20
21
22
23
24
25
25
26
27
28
29
30
31
32
33
34
35
36
37
38
39
40
41
42
43
44
45
46
47
48
49
50
51
52
53
54
55
56
57

8
2
!
12
3
GENERAL POWER TOOL SAFETY WARNINGS
WARNING:Read all safety warnings and all instructions. Failure to follow
the warnings and instructions may result in electric shock, fire and/or serious
injury.
Save all warnings and instructions for future reference.
The term "power tool" in the warnings refers to your mains-operated (corded)
power tool or battery-operated (cordless) power tool.
1) Work area safety
a) Keep work area clean and well lit. Cluttered or dark areas invite accidents.
b) Do not operate power tools in explosive atmospheres, such as in the presence
of flammable liquids, gases or dust. Power tools create sparks which may ignite
the dust or fumes.
c) Keep children and bystanders away while operating a power tool. Distractions
can cause you to lose control.
2) Electrical safety
a) Power tool plugs must match the outlet. Never modify the plug in any way. Do
not use any adapter plugs with earthed (grounded) power tools. Unmodified plugs
and matching outlets will reduce risk of electric shock.
b) Avoid body contact with earthed or grounded surfaces, such as pipes, radiators,
ranges and refrigerators. There is an increased risk of electric shock if your body is
earthed or grounded.
c) Do not expose power tools to rain or wet conditions. Water entering a power
tool will increase the risk of electric shock.
d) Do not abuse the cord. Never use the cord for carrying, pulling or unplugging
the power tool. Keep cord away from heat, oil, sharp edges or moving parts.
Damaged or entangled cords increase the risk of electric shock.
e) When operating a power tool outdoors, use an extension cord suitable for
outdoor use. Use of a cord suitable for outdoor use reduces the risk of electric
shock.
f) If operating a power tool in a damp location is unavoidable, use a residual
current device (RCD) protected supply. Use of an RCD reduces the risk of electric
shock.
3) Personal safety
a) Stay alert, watch what you are doing and use common sense when operating a
power tool. Do not use a power tool while you are tired or under the influence of
drugs, alcohol or medication. A moment of inattention while operating power tools
may result in serious personal injury.
LISTA DE PARTES
NO. Descripción
Cant.
31
placa de prensa del cable 2
32 manga de aluminio 1
33
placa 120V 1
34 estator (120V) 1
35
tornillo ST4.2X60 2
36
deflector de aire 1
37
cubierta de balinera 1
38
balinera 607-2Z 1
39
porta brochas 2
40
brochas de carbon (120V) 2
41
terminal 2
42
cubierta de brochas 2
43 armadura (120V) 1
44
tornillo ST3X6 2
45 placa de la perilla de impacto 1
46
balin de acero 4 1
47
resorte 1
48 perilla de impacto 1
49
balinera 609-2Z 1
50
cubierta media 1
51
perilla D 1
52 medidor de profundidad 1
53
segmento de cierre 1
54
tuerca M6 1
55
perilla E 1
56
manubrio auxiliar 1
57
tuerca M6 1

3
1 7
4
11
GENERAL POWER TOOL SAFETY WARNINGS
b) Use personal protective equipment. Always wear eye protection. Protective
equipment such as dust mask, non-skid safety shoes, hard hat, or hearing
protection used for appropriate conditions will reduce personal injuries.
c) Prevent unintentional starting. Ensure the switch is in the o-position before
connecting to power source and/or battery pack, picking up or carrying the tool.
Carrying power tools with your finger on the switch or energizing power tools that
have the switch on invites accidents.
d) Remove any adjusting key or wrench before turning the power tool on. A
wrench or a key left attached to a rotating part of the power tool may result in
personal injury.
e) Do not overreach. Keep proper footing and balance at all times. This enables
better control of the power tool in unexpected situations.
f) Dress properly. Do not wear loose clothing or jewellery. Keep your hair, clothing
and gloves away from moving parts. Loose clothes, jewellery or long hair can be
caught in moving parts.
g) If devices are provided for the connection of dust extraction and collection
facilities, ensure these are connected and properly used. Use of dust collection
can reduce dust-related hazards.
4) Power tool use and care
a) Do not force the power tool. Use the correct power tool for your application.
The correct power tool will do the job better and safer at the rate for which it was
designed.
b) Do not use the power tool if the switch does not turn it on and o. Any power
tool that cannot be controlled with the switch is dangerous and must be repaired.
c) Disconnect the plug from the power source and/or the battery pack from the
power tool before making any adjustments, changing accessories, or storing
power tools. Such preventive safety measures reduce the risk of starting the
power tool accidentally.
d) Store idle power tools out of the reach of children and do not allow persons
unfamiliar with the power tool or these instructions to operate the power tool.
Power tools are dangerous in the hands of untrained users.
e) Maintain power tools. Check for misalignment or binding of moving parts,
breakage of parts and any other condition that may aect the power tools
operation. If damaged, have the power tool repaired before use. Many accidents
are caused by poorly maintained power tools.
LISTA DE PARTES
NO. Descripción
Cant.
1 tornillo M5x18 1
2 arandela elastica 5 1
3 porta brocas 13mm 1
4 eje 1
5 llave de ajuste 3X3.7X10 1
6 anillo elastico para hoyo 32 1
7 cubierta del polvo 1
8 anillo de lana 1
9 balinera 6002-2Z 1
10
tornillo ST4.2X40 1
11 caja de engranaje 1
12 anillo elastico paa eje 15 1
13 engranaje 1
14 anillo elastico paa eje 10 1
15 resorte de impacto 1
16 equipo de impacto (estatico) 1
17 alinera 608-2Z 1
18 placa de la marca 1
19 inductor B 1
20 indicador de encendido 120v 1
21 manuabrio izquierdo 1
22 manga del cable 1
23 cordon de corriente 1
24 abrazadera del cordon 1
25
tornillo ST4.2X14 3
26 interruptor (120V 1
27 manubrio derecho 1
28 carcasa 1
29
tornillo ST4.2X16 6
30 etiqueta derecha 1

10
PRECAUCIÓN
Siempre asegúrese de que la herramienta se encuentra apagada antes de realizar
un mantenimiento o una inspección de la máquina.
• Revise todos los tornillos frecuentemente para asegurarse de que siguen bien
ajustados.
• Limpie los respiraderos regularmente con aire seco comprimido. No intente
limpiar insertando objetos puntiagudos en las aberturas.
PRECAUCIÓN
Existen determinados solventes de limpieza que pueden dañar las partes plásticas.
Algunos de ellos son: gasolina, cloruro de carbono, solventes de limpieza que
contengan cloro, amoníaco y detergente domésticos que contengan amoníaco.
Revise las brochas regularmente. Las brochas gastadas deben ser reemplazados
cuanto antes.
ADVERTENCIA
Si algo de lo siguiente ocurriera, desconecte inmediatamente la herramienta de la
fuente de energía. La máquina debe ser inspeccionada y reparada por un profesio-
nal calificado:
• Las partes movibles se atascan o la velocidad disminuye en exceso.
• La herramienta se sacude exageradamente y hace un ruido extraño.
• El compartimento del motor se calienta demasiado.
Limpie la herramienta con un paño húmedo bien escurrido y siempre mantenga
libre de polvo y tierra la superficie y los respiraderos. Nunca utilice detergentes
abrasivos o corrosivos ya que pueden dañar las partes plásticas de la máquina.
Reemplazar las brochas de carbono
Por razones de seguridad, la máquina se apagará automáticamente si las brochas
de carbono se encuentran gastados de manera tal que ya no entran en contacto
con el motor. De ser así, reemplácelos por un par similar que provea el distribuidor
o un profesional calificado.
No deseche los aparatos eléctricos con el resto de la basura doméstica,
utilice un servicio especialmente dedicado a eso. Contáctese con el
gobierno local para que le informe sobre los sistemas de recolección
disponibles. Si se desechan aparatos eléctricos en basureros, puede que
ciertas sustancias peligrosas se filtren en el agua subterránea e ingresen
en la cadena de comida, dañando su salud y bienestar.
5
GENERAL POWER TOOL SAFETY WARNINGS
f) Keep cutting tools sharp and clean. Properly maintained cutting tools with sharp
cutting edges are less likely to bind and are easier to control.
g) Use the power tool, accessories and tool bits etc. in accordance with these
instructions, taking into account the working conditions and the work to be
performed. Use of the power tool for operations dierent from those intended
could result in a hazardous situation.
5) Service
Have your power tool serviced by a qualified repair person using only identical
replacement parts. This will ensure that the safety of the power tool is maintained.
1. Hold tool by insulated gripping surfaces when performing an operation where
the cutting tool may contact hidden wiring or its own cord. Contact with a “live”
wire will make exposed metal parts of the tool “live” and shock the operator.
2. Always use auxiliary handle for maximum control over torque reaction or kick
back.
3. Use thick cushioned gloves and limit the exposure time by taking frequent rest
periods. Vibration caused by hammer-drill action may be harmful to your hands
and arms.
4. Secure the material being drilled. Never hold it in your hand or across legs.
Unstable support can cause the drill bit to bind causing loss of control and injury.
5. Position the cord clear of rotating bit. Do not wrap the cord around your arm or
wrist. If you lose control and have the cord wrapped around our arm or wrist it
may entrap you and cause injury.
6. If the bit becomes bound in the work-piece, release the trigger immediately,
reverse the direction of rotation and slowly squeeze the trigger to back out the bit.
The drill body will tend to twist in the opposite direction as the drill bit is rotating.
7. Do not grasp the tool or place your hands too close to the spinning chuck or drill
bit.
8. Do not operate the tool in explosive atmospheres, such as in the presence of
flammable liquids, gases or dust. Power tools create sparks, which may cause fire
or explosions.
9. Do not touch the bit after operation. It will be very hot.
SPECIFIC SAFETY RULES
LIMPIEZA Y MATENIMIENTO
REGLAS DE SEGURIDAD ESPECÍFICAS

1
4
5
9
Taladrar sobre metal
• Para un mejor desempeño, utilice brocas de acero de alta velocidad para utilizar
con metales o acero.
• Utilice el selector de modo del taladro para seleccionar el modo.
• Utilice un punzón de marcar para marcar el lugar sobre la pieza de trabajo donde
realizará el agujero.
• Comience por taladrar a una baja velocidad para que la broca no se corra del
punto marcado.
• Mantenga una velocidad y una presión que permita trabajar sin sobrecalentar la
broca. Aplicar mucha presión puede sobrecalentar la broca, gastar la balinera,
doblar o quemar la broca o producir agujeros no centrados o deformados.
• Cuando deba realizar agujeros grandes sobre metal, se recomienda primero
taladrar con una broca pequeña y luego terminar con una broca grande. Lubrique
la broca con aceite para mejorar su funcionamiento y para hacerla más durable.
Taladrar sobre madera
•Para un mejor desempeño, utilice brocas de acero de alta velocidad para utilizar
con madera.
• Utilice el selector de modo del taladro para seleccionar el modo.
• Asegure la pieza de trabajo para que no se mueva mientras taladra.
• Comience por taladrar a una baja velocidad para que la broca no se corra del
punto marcado. Aumente la velocidad a medida que la broca ingresa en el material.
• Cuando taladre agujeros, coloque un bloque de madera detrás de la pieza de
trabajo para evitar que los bordes del agujero de la parte de atrás queden
desprolijos o astillados.
• No trabe el taladro en la posición de encendido si puede que necesite detener el
taladro repentinamente.
Taladrar sobre mampostería
• Para obtener el mejor resultado, utilice una broca de mampostería con carburo de
tungsteno cuando taladre ladrillo, baldosas, concreto, etc.
• Coloque el selector de modo en taladro percutor.
• Aplique poca presión y utilice una velocidad media para obtener mejores
resultados para taladrar ladrillo.
• Aplique más presión y utilice una velocidad alta con materiales más duros como
el concreto.
• Cuando taladre baldosa, utilice una pieza aparte para determinar la presión y la
velocidad más adecuada.
SPECIFIC SAFETY RULES
10. Only use accessory bit in good condition.
11. Keep your hands away from under the work-piece.
12. Periodically check that all nuts, screws and other fixings are properly tightened.
13. Rags, cloths, cord, string and the like should never be left around the work
area.
14. After a period of time used, the carbon brushes may be worn o to the limit
and with more sparks appearing, it is the time to replace the brushes, otherwise
the motor may be damaged.
Explanation of symbols
Functional Description(Fig1)
This impact drill intended for drill and impact drill.
Mostly, drilling of various qualities of wood, steel, bronze and aluminum materials
and castings, etc.
Use tungsten carbide-tipped masonry impact bits when drilling holes in brick, tile,
concrete, etc.
To reduce the risk of injury, the user must read and understand this
manual before using this product.
Wear ear protectors. Exprosure to noise can cause hearing loss.
Wear eye protection.
Wear respiratory protection.
Do not dispose of old appliances with domestic rubbish.
Double insulation.
REGLAS DE SEGURIDAD ESPECÍFICAS
6

3
8
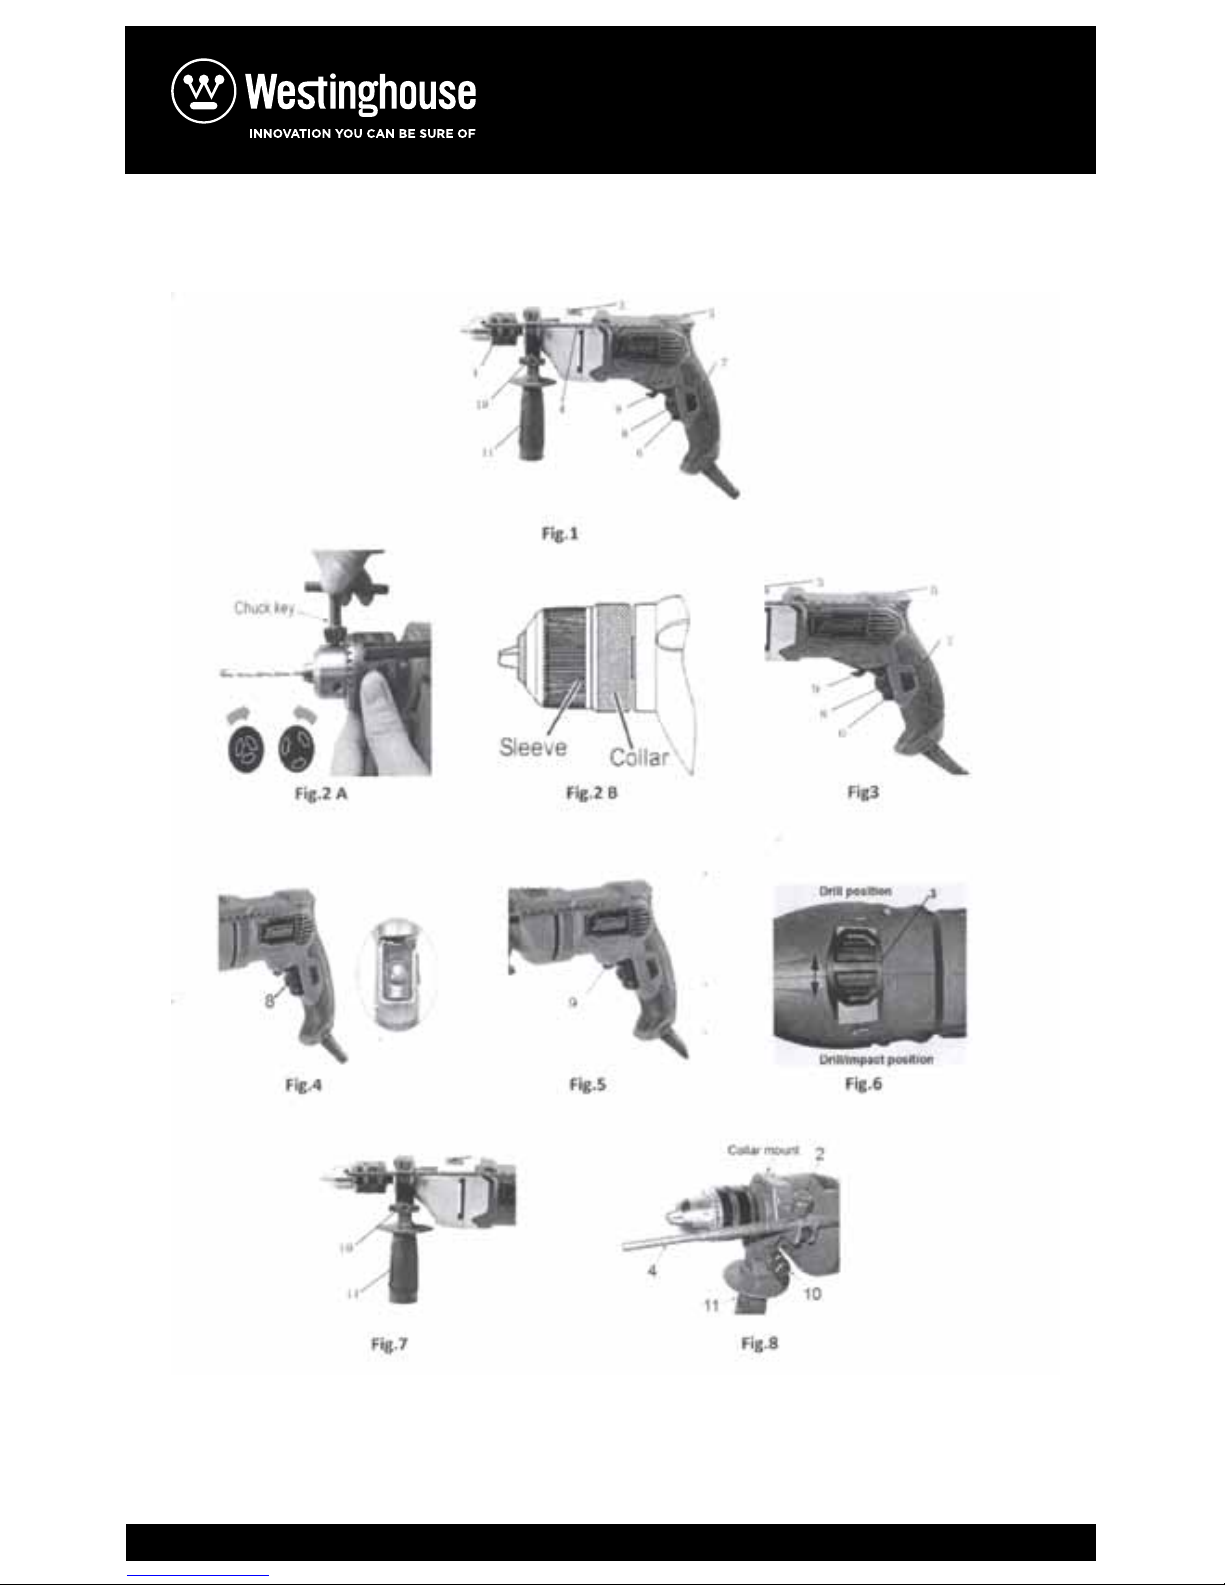
Instalar la manija auxiliar:
Gire la perilla de ajuste para la manija auxiliar (10).
Deslice la manija sobre el mandril y asegúrela en la posición que muestra la figura,
luego deslice la manija en el soporte del collar para la manija en la posición
adecuada. Por último, ajuste utilizando la perilla de ajuste (10).
Nota: Utilice la manija auxiliar que viene con esta herramienta. La pérdida de
control puede ocasionar graves daños personales.
Medidor de profundidad (Fig. 8)
• La profundidad de taladrado se puede pre establecer o volver a repetir
utilizando el medidor de profundidad (4). Éste permite realizar una profundidad
de taladrado más precisa cuando desea alcanzar una cierta profundidad.
• Establecer la profundidad: afloje la perilla de ajuste del medidor de profundidad
(2), coloque la parte recta del medidor en el agujero y deslícelo hasta la
profundidad deseada. Por último, vuelva a ajustar la perilla de ajuste del medidor
de profundidad.
• Revisar la profundidad: revise la profundidad utilizando una regla de acero para
obtener una medida más precisa. Vuelva a girar la perilla (2) para ajustar la manija
auxiliar en la posición deseada.
Para operar la máquina correctamente
• Sostenga el taladro con los primeros dos dedos puestos en el interruptor de
encendido/apagado.
• Para madera, utilice brocas helicoidales, brocas de paleta, brocas para berbiquí o
sierras cilíndricas.
• Para metal, utilice brocas helicoidales de acero de alta velocidad o sierras
cilíndricas.
• Para mampostería, como ladrillo, bloques de ceniza, cemento, etc., brocas con
carburo de tungsteno.
• Ejerza suficiente presión para mantener la broca trabajando pero no empuje de
manera tal que el motor se atasque y la broca se dañe.
• Siempre aplique la presión en línea recta con la broca.
• Sostenga el taladro firmemente para controlar sus movimientos.
ADVERTENCIA: Si el taladro se atasca, suelte el gatillo de inmediato, retire el
taladro de la pieza de trabajo y determine la causa del atascamiento. No presione
el interruptor de encendido/apagado ya que se podría dañar el motor.
• Para minimizar el riesgo de atascamiento y de que se rompa la pieza de trabajo,
reduzca la presión sobre el taladro y afloje la parte de la broca que se encuentra al
final del agujero.
• Mantenga el motor trabajando cuando quite la broca del agujero para evitar que
se atasque.
1 7
7
This tool has drill and impact drill function. The main features are listed below:
1. Chuck 7. Lock-on button
2. Adjustment knob for depth gauge 8. Speed control dial
3. Drill / impact mode selector 9. Forward/reverse lever
4. Depth gauge 10. Adjustment knob for auxiliary handle
5. Indicator light 11. Auxiliary handle
6. ON/OFF switch
Technical Specification:
WARNING: Prior to assembly and adjustment always pull out the power plug from
the mains socket.
Changing drill or screwdriver bits (Fig. 2)
A: For key chuck
1. Insert the chuck key in one of the three holes on the side of the chuck (1), turn to
open.
2. Insert the desired bit or drill in the chuck and turn the chuck key the opposite way
until the chuck has a firm grip on the bit or drill.
3. Check that the bit is in the center of the chuck and is secure.
Switching on/o (Fig. 3)
• Plug the cord set into power socket, the power-on indicator (5) is illumed until the
tool disconnect from the power mains.
• To start the tool by squeezing the ON/OFF switch (6).
Model PT20115
Rated voltage / frequency
Rated power (W)
No load speed (r/min)
Standard accessories
120V/60Hz
800
0-3000
Φ13mm
13mm
Max. Chuck size
Max. drilling dia. in steel
Carbon brush --1pair
Auxiliary handle --1set
Depth gauge --1pc Drill
Chuck key --1pc
PREPARATION AND ADJUSTMENT
REGLAS DE SEGURIDAD ESPECÍFICAS

• Release the ON/OFF switch to stop the tool.
• Press the lock-on button (7) when the ON/OFF switch (6) is completely depressed
if the continuous operation is required.
• Press the trigger switch then release it to disengage the lock-on button.
• To release the ON/OFF switch and turn the tool o.
Variable speed (Fig. 4)
This tool has a speed control dial (8) that delivers higher speed by turning to the “+”
direction, and delivers lower speed by turning to “-”direction.
Forward/reverse lever (Fig. 5)
• The forward/reverse lever (9) is to determine the rotation direction of the chuck.
• To select forward rotation, release the on/o switch and push the forward/reverse
lever to right (R) side of the tool. To select reverse rotation, push the lever to left (L)
side of the tool.
NOTE: When changing the position of the forward/reverse lever, be sure the
ON/OFF switch (6) is released and the motor is stationary.
Drill and impact mode selector (Fig. 6)
The drill/impact mode selector (3) is on the top of this impact drill.
• Turn the drill /impact mode selector (3) to the impact position “ ” to select the
impact mode of action.
•Turn the drill/impact mode selector to the drill position “ ” to select the drill mode
of action.
Auxiliary handle subassembly (Fig. 7)
The auxiliary handle subassembly (11) will provide additional control; support and
guidance for the drill. The handle is adjustable to any position around the
360°handle collar mount.
Installing the auxiliary handle subassembly:
Loosen the collar mount by turning the adjustment knob for auxiliary handle (10)
adequately.
Slide the handle over the chuck and secure in the position shown, then slide the
handle over the handle collar mount on the suitable position of this tool. Finally
securely tighten the adjustment knob (10).
NOTE: Use auxiliary handle supplied with the tool. Loss of control can cause perso-
nal injury.
Depth Gauge (Fig. 8)
• Your drilling depth can be pre-set and/or repeated by using the depth gauge (4).
The depth gauge helps keep an accurate depth when drilling holes to a set depth.
• Setting depth: loosen the adjustment knob for depth gauge (2) adequately, place
the straight part of the depth gauge (4) in the hole and slide the depth gauge to
desired depth and securely tighten the adjustment knob again.
3
1 7
8
7
2. Inserte la broca elegida en las quijadas del mandril y gire la llave del mandril en la
dirección opuesta hasta que se ajuste firmemente la broca.
3. Verifique que la broca se encuentre firme en el centro del mandril.
Encendido/Apagado (Fig.3)
• Conecte el enchufe, la luz indicadora de energía (5) se encenderá hasta que
desconecte la herramienta de la fuente de energía.
• Encienda la máquina utilizando el interruptor de Encendido/Apagado (6).
• Para apagar la herramienta, deje de presionar el interruptor de Encendido
Apagado.
• Si presiona el botón de bloqueo de encendido (4) mientras el interruptor de
encendido/apagado se encuentra presionado, éste se mantendrá la posición de
funcionamiento.
• Presione el gatillo y luego suéltelo para destrabar el botón de bloqueo de
encendido.
• Para apagar la herramienta, deje de presionar el interruptor de Encendido
Apagado.
Velocidad variable (Fig. 4)
Esta herramienta posee un dial para controlar la velocidad (8), el cual genera un
incremento de velocidad si se lo coloca en “+”, y disminuye la velocidad si se coloca
en “-“.
Palanca de adelante/reversa (Fig.5)
• La palanca de adelante/reversa determina la dirección de rotación del mandril.
• Para seleccionar la rotación hacia adelante, suelte el interruptor de encendi-
do/apagado y coloque la palanca de adelante/reversa del lado derecho (R) de la
herramienta. Para seleccionar la rotación en reversa, coloque la palanca del lado
izquierdo (L).
Nota: Cuando cambie la posición de la palanca, asegúrese de que el botón de
encendido/apagado no se encuentra presionado y que el motor se encuentra
completamente detenido.
Selector de modo taladro/taladro percutor (Fig.6)
El selector de modo taladro/taladro percutor (3) se encuentra en la parte superior
del taladro.
• Coloque el selector de modo taladro/taladro percutor (3) en la posición “ ” para
seleccionar el modo taladro percutor.
• Coloque el selector de modo taladro/taladro percutor en la posición “ ” para
seleccionar el modo taladro.
Subensamblaje de la manija auxiliar (Fig. 7)
La manija auxiliar (11) ofrece un mayor control, soporte y orientación al taladro. La
manija se puede ajustar en cualquier posición alrededor del soporte de la manija de
PREPARATION AND ADJUSTMENT
REGLAS DE SEGURIDAD ESPECÍFICAS

3
6
LEA Y GUARDE ESTAS INSTRUCCIONES PARA CONSULTARLAS EN EL FUTURO
Este producto se puede utilizar como taladro o como taladro percutor.
Es posible taladrar varios tipos de madera, acero, bronce y aluminio.
Utilice una broca de mampostería con carburo de tungsteno cuando taladre en
ladrillo, baldosa, concreto, etc.
A continuación se detallan las características principales:
1. Mandril 7. Botón de bloqueo de encendido
2. Perilla de ajuste del medidor 8. Dial para controlar la velocidad
de profundidad
3. Selector de modo Taladro/Taladro 9. Palanca de Adelante/Reversa
percutor
4. Medidor de profundidad 10. Perilla de ajuste de la manija auxiliar
5. Luz indicadora 11. Manija auxiliar
6. Interruptor de Encendido/Apagado
Especificaciones técnicas
Preparación y ajustes
ADVERTENCIA: Desconecte la herramienta antes de comenzar el ensamblado.
Insertar brocas de taladros o destornilladores (Fig. 2)
A: Para el mandril
1. Inserte la llave del mandril en uno de los tres agujeros que se encuentran al
costado del mandril. Gire para abrir.
1 7
9
• Checking the depth: check the depth with a steel rule for most accurate measure-
ment and then turn the adjustment knob (2) to tighten the auxiliary handle in the
required position.
For Proper Operations
• Hold the drill with your first two fingers on the on/o switch.
• Use the auxiliary handle where possible to gain extra control and to prevent
fatigue.
• For wood, use twist drill bits, spade bits power auger bits, or hole saw.
• For metal use high seed steel twist drill bits or hole saws.
• For masonry, such as brick, cinder block, cemetery, etc, use carbide tipped drill
bits.
• Use enough pressure to keep the bit biting but do not push so hard that do not stall
the motor or damage the bit.
• Always apply pressure in a straight line with the bit.
• Hold the drill firmly to control the twisting of the drill.
Warning:If the drill stalls, release the trigger immediately, remove the drill from the
work and determine the cause of the stalling. Do not click the switch on and o as
this can damage the motor.
• To minimize the chance of stalling and breaking through the material, reduce the
pressure on the drill and ease the bit through the last part of the hole.
•Keep the motor running when pulling the bit back out of a drilled hole. This will help
prevent jamming.
Metal drilling
• For maximum performance, use high speed steel bits for metal or steel drilling.
• Push drilling mode selector to drilling mode.
• Use a center punch to mark the hole location on the work-piece.
• Begin drilling at a very low speed to prevent the bit from slipping o the starting
point.
• Maintain a speed and pressure which allows cutting without overheating the bit.
Applying too much pressure will: overheat the drill; wear the bearing, bend or burn
bits, produce o-center or irregular shaped holes.
• When drilling large holes in metal it is recommended to drill with a small bit at first,
then finish with a larger bit, also, lubricate the bit with oil to improve drilling action
and increase bit life.
Wood drilling
• For maximum performance, use high speed steel bits for wood drilling.
• Push the drilling mode selector to drilling mode.
• Secure the work-piece to prevent it from turning when drilling.
REGLAS DE SEGURIDAD ESPECÍFICAS
120V/60Hz
Modelo PT20115
Voltaje / frecuencia
Potencia nominal (W)
Velocidad sin carga (r/min)
Accesorios estándares
800
0-2900
13mm
Φ13mmTamaño máxima del
mandril
Diámetro máximo de
taladro en acero
Cepillo de carbono --1 par
Medidor de profundidad --1 pieza
manija auxiliar --1 set
Llave del mandril --1 pieza

• Begin drilling at a very low speed to prevent the bit from slipping o the starting
point. Increase the speed as the drill bit bites into the material.
• When drilling through holes, place a block of wood behind the work-piece to
prevent ragged or splintered edges on the back side of the hole.
• Do not lock the trigger in the “on” position when the drill may need to be
stopped suddenly.
Masonry drilling
• For maximum performance use tungsten carbide-tipped masonry impact bits
when drilling holes in brick, tile, concrete, etc.
• Push the drilling mode selector to impact mode
• Apply light pressure and medium speed for best results in brick.
• Apply additional pressure and high speed for hard materials such as concrete.
• When drilling in tile, practice on a scrap piece to determine the best speed and
pressure.
CAUTION!
Always be sure that the tool is switched o and unplugged before attempting to
perform inspection or maintenance.
• Inspecting the mounting screws regularly inspect all mounting screws and ensure
that they are properly tightened.
• Regularly clean the tool’s air vents with compressed dry air. Do not attempt to
clean by inserting pointed objects through openings.
CAUTION! Certain cleaning agents and solvents damage plastic parts. Some of
these are: gasoline, carbon tetrachloride, chlorinated cleaning solvents, ammonia
and household detergents that contain ammonia.
• The brushes should be checked periodically and worn-out brushes should be
replaced in time.
WARNING!
If any of the following events occur during normal operation, the power supply
should be shut o at once and tool thoroughly inspected by a qualified person
and repaired if necessary:
• The rotating parts get stuck or speed drops abnormally low.
• The tool shakes abnormal accompanied by some unusual noise
• The motor housing gets abnormal hot.
• Heavy sparks occur around the motor area.
3
1 7
10
5
1. Siempre tome la herramienta por una manubrio aislada cuando deba utilizarla
para cortar por un lugar donde pueda haber cables escondidos o donde pueda
entrar en contacto con su propio cable. Si las partes metálicas de la herramienta
entran en contacto con un cable, el usuario puede recibir un choque eléctrico.
2. Siempre utilice una manubrio auxiliar para tener el máximo control sobre los
rebotes y la fuerza de respuesta.
3. Utilice guantes gruesos. Siempre limite el tiempo de exposición, haga períodos
de descanso frecuentes.
4. Asegure el material que va a taladrar. Nunca lo sostenga en sus manos o entre las
piernas. Los soportes inestables pueden hacer que la broca se salga de control y
ocasiones daños.
5. Coloque el cable en un lugar alejado de las partes movibles. No enrolle el cable
en su brazo o en su muñeca ya que si pierde el control podría ocasionarse daño.
6. Si la broca se atasca en la pieza de trabajo, suelte el gatillo de inmediato, cambie
la dirección de rotación y presione el gatillo cuidadosamente para poder destrabar
la broca. El cuerpo del taladro tiende a girar en la dirección opuesta que la
dirección de la broca.
7. No coloque las manos cerca del mandril giratorio o de la broca.
8. No opere una herramienta eléctrica en ambiente explosivos, como en lugares
donde haya líquidos inflamables, gases o polvo. Las herramientas eléctricas hacen
chispas las cuales podrían encender fuego con el polvo o el humo.
9. No toque la broca después de terminar de utilizarla ya que estará muy caliente.
10. Solo utilice brocas en buen estado.
11. Mantenga las manos alejadas debajo de la pieza de trabajo.
12. Verifique frecuentemente que las tuercas, los tornillos y otras partes se encuen-
tren bien ajustadas.
13. Los trapos, las cuerdas y los cables no deben estar cerca del área de trabajo.
14. Después de un tiempo de uso, las brochas de carbón se gastarán hasta un punto
en que empezarán a sacar más y más chispas. Es en este momento en que debe
cambiar las brochas o el motor se dañará.
REGLAS DE SEGURIDAD ESPECÍFICAS
Para reducir el riesgo de lesiones, lea y comprenda el manual de
instrucciones antes de usar el producto.
Utilice protección para los oídos. La exposición a ruidos fuertes puede
causar pérdida de audición.
Utilice protección para los ojos.
Utilice protectores respiratorios.
No deseche aparatos antiguos junto a residuos domésticos.
Doble aislamiento.

4
d) Retire las llaves de ajuste o llaves de tuerca antes de encender la herramienta.
Las llaves que se han dejado insertadas en una parte movible de la herramienta
pueden ocasionar daños.
e) No se exceda, mantenga un equilibrio todo el tiempo. Esto permite tener un
mayor control de la herramienta en situaciones inesperadas.
f) Use ropa adecuada. No use ropa suelta o prendas. Mantenga alejados el cabello,
la ropa y los guantes de las partes movibles. La ropa, el cabello y las prendas
podrían engancharse en las partes movibles.
g) Si se utilizaran aparatos para conectar extractores del polvo, asegúrese de que
sean conectados y utilizados correctamente. El uso de extractores de polvo
reduce el riesgo de accidentes ocasionados por polvo.
4) Uso y cuidado de la herramienta eléctrica
a) No force la herramienta. Utilice la herramienta adecuada para el trabajo que
desea realizar ya que realizará mejor el trabajo y de manera más segura.
b) No utilice la herramienta si el interruptor no la enciende y la apaga. Las
herramientas que no puedan ser controladas con el interruptor son peligrosas y
deben ser reparadas.
c) Desconecte el enchufe de la fuente de energía antes de realizar cualquier
ajuste, cambiar el accesorio o guardar la herramienta. Estas medidas preventivas
de seguridad reducen el riesgo de que se encienda accidentalmente.
d) Mantenga la herramienta que no esté usando alejada del alcance de los niños y
de las personas que no están familiarizadas con este manual de instrucciones. Las
herramientas eléctricas son muy peligrosas en manos de personas que no saben
utilizarlas.
e) Realice un mantenimiento a la herramienta. Verifique que no se haya
desalineado, que las partes movibles no estén enganchadas, que las partes no
estén rotas y cualquier otra condición anormal que pueda afectar el funciona-
miento de la máquina. Si la herramienta se encuentra dañada, repárela
inmediatamente antes de volver a utilizarla. Muchos accidentes son causados por
herramientas que no reciben mantenimiento frecuente.
f) Mantenga limpias las partes cortantes. Las herramientas cortantes que reciben
un mantenimiento adecuado corren un menor riesgo de trabarse y son más fáciles
de controlar.
g) Utilice la herramienta, los accesorios y las brocas, etc. tal cual lo indica este
manual de instrucciones, teniendo en cuenta las condiciones de trabajo y el
trabajo a realizar. Utilizar la herramienta para otro propósito diferente para el cual
fue diseñada podría causar serios accidentes.
5) Mantenimiento
Su herramienta eléctrica solo puede recibir mantenimiento por una persona
calificada que utilice partes idénticas en caso de que se las deba reemplazar. Esto
le brindará más seguridad a su herramienta eléctrica.
1
11
Wipe the drill using a well-wrung cloth after use and always keep the surface and
ventilation holes free of dirt.
Never use corrosive or abrasive detergents, as they may attack the plastic parts of
the machine.
Replacing carbon brushes
For safety reasons, the machine automatically switches o if the carbon brushes are
so worn out that they no longer have contact with the motor. In that case, the
carbon brushes must be replaced by a pair similar carbon brush available through
the after-sales service organization or qualified professional person.
Recycling
Do not dispose of electrical appliances as unsorted municipal waste, use
separate collection facilities. Contact you local government for information
regarding the collection systems available. If electrical appliances are
disposed of in landfills or dumps, hazardous substances can leak into the
groundwater and get into the food chain, damaging your health and
well-being.
CLEANING AND MAINTENANCE
REGLAS GENERALES DE SEGURIDAD PARA HERRAMIENTAS ELÉCTRICAS

1
12
3
ADVERTENCIA: Lea todas las advertencias de seguridad y las instruccio-
nes. No leer las instrucciones correctamente podría generar riesgo de incendio,
choques eléctricos o graves lesiones.
Guarde estas instrucciones para volver a revisarlas en el futuro.
El término “herramienta eléctrica” se refiere a la herramienta operada con una
fuente de electricidad (con cable) o a la herramienta operada con baterías (sin
cable).
1) Seguridad en el área de trabajo
a) El área de trabajo debe estar siempre limpio e iluminado. Los lugares oscuros y
desordenados pueden ocasionar accidentes.
b) No opere una herramienta eléctrica en ambiente explosivos, como en lugares
donde haya líquidos inflamables, gases o polvo. Las herramientas eléctricas hacen
chispas las cuales podrían encender fuego con el polvo o el humo.
c) Mantenga alejados a los niños y a los espectadores cuando opere la herramienta.
Las distracciones podrían hacerlo perder el control.
2) Seguridad eléctrica
a) Los enchufes de las herramientas eléctricas deben coincidir con el tomacorrien-
te. Nunca modifique el enchufe. Nunca utilice adaptadores con enchufes que
tengan cable a tierra. Los enchufes que no estén modificados y que coincidan con
el tomacorriente son más seguros y reducen el riesgo de choques eléctricos.
b) Evite el contacto con objetos que vayan bajo tierra, como las tuberías, los radia-
dores, las estufas y las heladeras. El riesgo de choque eléctrico aumenta si entra en
contacto con un artefacto de este tipo.
c) No exponga una herramienta eléctrica bajo la lluvia o climas húmedos. El riesgo
de choque eléctrico aumenta si entra agua en la herramienta.
d) No abuse del cable. No tire del cable para desenchufar la herramienta. Mantén-
galo alejado del calor, los aceites y las partes movibles o filosas. Los cables enreda-
dos o dañados aumentan el riesgo de choque eléctrico.
e) Utilice una extensión de cable apropiada para el uso en exteriores cuando utilice
la herramienta en exteriores. El uso de una extensión de cable apropiada reduce el
riesgo de choque eléctrico.
f) Si no se puede evitar el uso de la herramienta en un ambiente húmedo, utilice un
disyuntor para mayor protección. El uso de disyuntor reduce el riesgo de choque
eléctrico.
3) Seguridad personal
a) Manténgase alerta, siempre haga todo con cuidado y use el sentido común
cuando opere una herramienta eléctrica. No utilice una herramienta si está cansado
o si se encuentra bajo la influencia de drogas, alcohol o medicamentos. Si se
desconcentra por un momento podría lastimarse gravemente.
b) Utilice un equipo de seguridad personal. Siempre use protección para los ojos. El
equipo de seguridad personal reducirá el riesgo de que se lastime (máscara de
polvo, calzado antideslizante, casco y protección auditiva).
c) Prevenga el encendido accidental. Asegúrese de que el interruptor se encuentra
en la posición de apagado antes de enchufar la herramienta, insertar baterías o
transportarla. Tener el dedo sobre el interruptor mientras se transporta una herra-
mienta puede ocasionar un accidente.
PART LIST
NO. Description
Cant.
1 screw M5X18 1
2 spring washer 5 1
3 drill chuck 13mm 1
4 output spindle 1
5 key 3X3.7X10 1
6 circlip for hole 32 1
7 dust cover 1
8 woolen ring 1
9 ball bearing 6002-2Z 1
10 screw ST4.2X40 1
11 gear box 1
12 circlip for shaft 15 1
13 gear 1
14 circlip for shaft 10 1
15 Impact spring 1
16 Impact gear(static) 1
17 bearing 608-2Z 1
18 brand plate 1
19 Inductor B 1
20 power-on indicator 120V 1
21 left handle 1
22 cable sleeve 1
23 power cord 1
24 cord clamp 1
25 screw ST4.2X14 3
26 switch 120V 1
27 right handle 1
28 housing 1
29 screw ST4.2X16 6
30 right label 1
REGLAS GENERALES DE SEGURIDAD PARA HERRAMIENTAS ELÉCTRICAS
!

2
1
13
PART LIST
NO. Description
Cant.
31 cable pressplate 2
32 auliminium sleeve 1
33 rating label 120V 1
34 stator 120V 1
35 screw ST4.2X60 2
36 air bae 1
37 bearing cover 1
38 ball bearing 60-2Z 1
39 brush holder 2
40 carbon brush 120V 2
41 terminal 2
42 brush cover 2
43 armature 120V 1
44 screw ST3X6 2
45 impact knob plate 1
46 steel ball 4 1
47 spring 1
48 impact knob 1
49 ball bearing 609-2Z 1
50 middle cover 1
51 knob D 1
52 depth gauge 1
53
latch segment 1
54 nut M6 1
55 knob E 1
56 auxiliary handle 1
57 nut M6 1

14
1
EXPLODED VIEW
MANUAL DE INSTRUCCIONES
PT20115
TALADORA PERCUTOR
Note : Lea este manual y siga todas las reglas de seguridad
antes de utilizar esta taladora.
6.3A
800W120V
60Hz
13
mm rpm
0~2,900
1
2
3
4
5
6
7
8
9
10
11
12
13
14
15
16
17
18
19
20
21
22
23
24
25
25
26
27
28
29
30
31
32
33
34
35
36
37
38
39
40
41
42
43
44
45
46
47
48
49
50
51
52
53
54
55
56
57

INSTRUCTION MANUAL
PT20115
HAMMER DRILL
Note : Before operating or installing this hammer drill, read this
manual and follow all safety rules and operating instructions.
6.3A
800W120V
60Hz
13
mm rpm
0~2,900
Table of contents
Other Westinghouse Drill manuals