Whitestone P331 User manual

1

3
4
5
6-7
8
9-13
14
INTRODUCTION
UNPACKING & INSTALLING
FEATURES & CONTROLS
REAR PANEL CONNECTIONS
OPERATION
WARRANTY
TABLE OF CONTENTS
Whitstone Audio Instuments Company, USA Logos
Logo should without exception be either BLACK on light colored
backgrounds or WHITE on dark colored backgrounds.
4 5
UNPACKING & INSTALLING
SERVICING
The user should not aempt to service the P331 Tube Loading Amplifier.
NEVER REMOVE THE P331’S TOP COVER. Potentially lethal voltages are
present inside the unit. It should only be opened by qualified service
personnel. To reduce the risk of fire or electrical shock, do not expose to rain
or moisture,or operate it where it will be exposed to liquid.Refer all servicing,
or any questions about servicing, to Whitestone Audio Instruments, LLC.
UNPACKING
Make sure to carefully inspect the P331’s carton for any signs of shipping damage. If you find damage
from shipping, please contact your dealer right away for further instructions. We strongly recommend
you not discard the P331’s carton and custom foam insert. These cartons were specifically designed
to protect the P331 during shipping and will ensure your P331 will remain protected if you ever need
to send in for service.
The carton contains the following items:
1. P331 Tube Loading Amplifier
2. Three prong IEC power cord
3. This manual
MOUNTING
The P331 uses two EIA standard rack spaces and can be mounted in any standard 19” (482.6 mm)
rack. If the P331 is used in a mobile rack or road case, the rear of the chassis should be supported to
help prevent against damage from mechanical shock and vibration. Please handle your P331 with
loving care and it should deliver many years (or many decades) of high performance, high fidelity
audio processing.
VENTILATION
It is important to adequately ventilate your P331 as it does contain two 6SN7GT vacuum tubes and
high voltage power supply which produce heat. The side panel and top panel vents should never be
blocked. We suggest leaving at least one rack space above and below the unit and use a rack spacer
with ventilation such as the optional Whitestone VP-1RU matching vent panel.
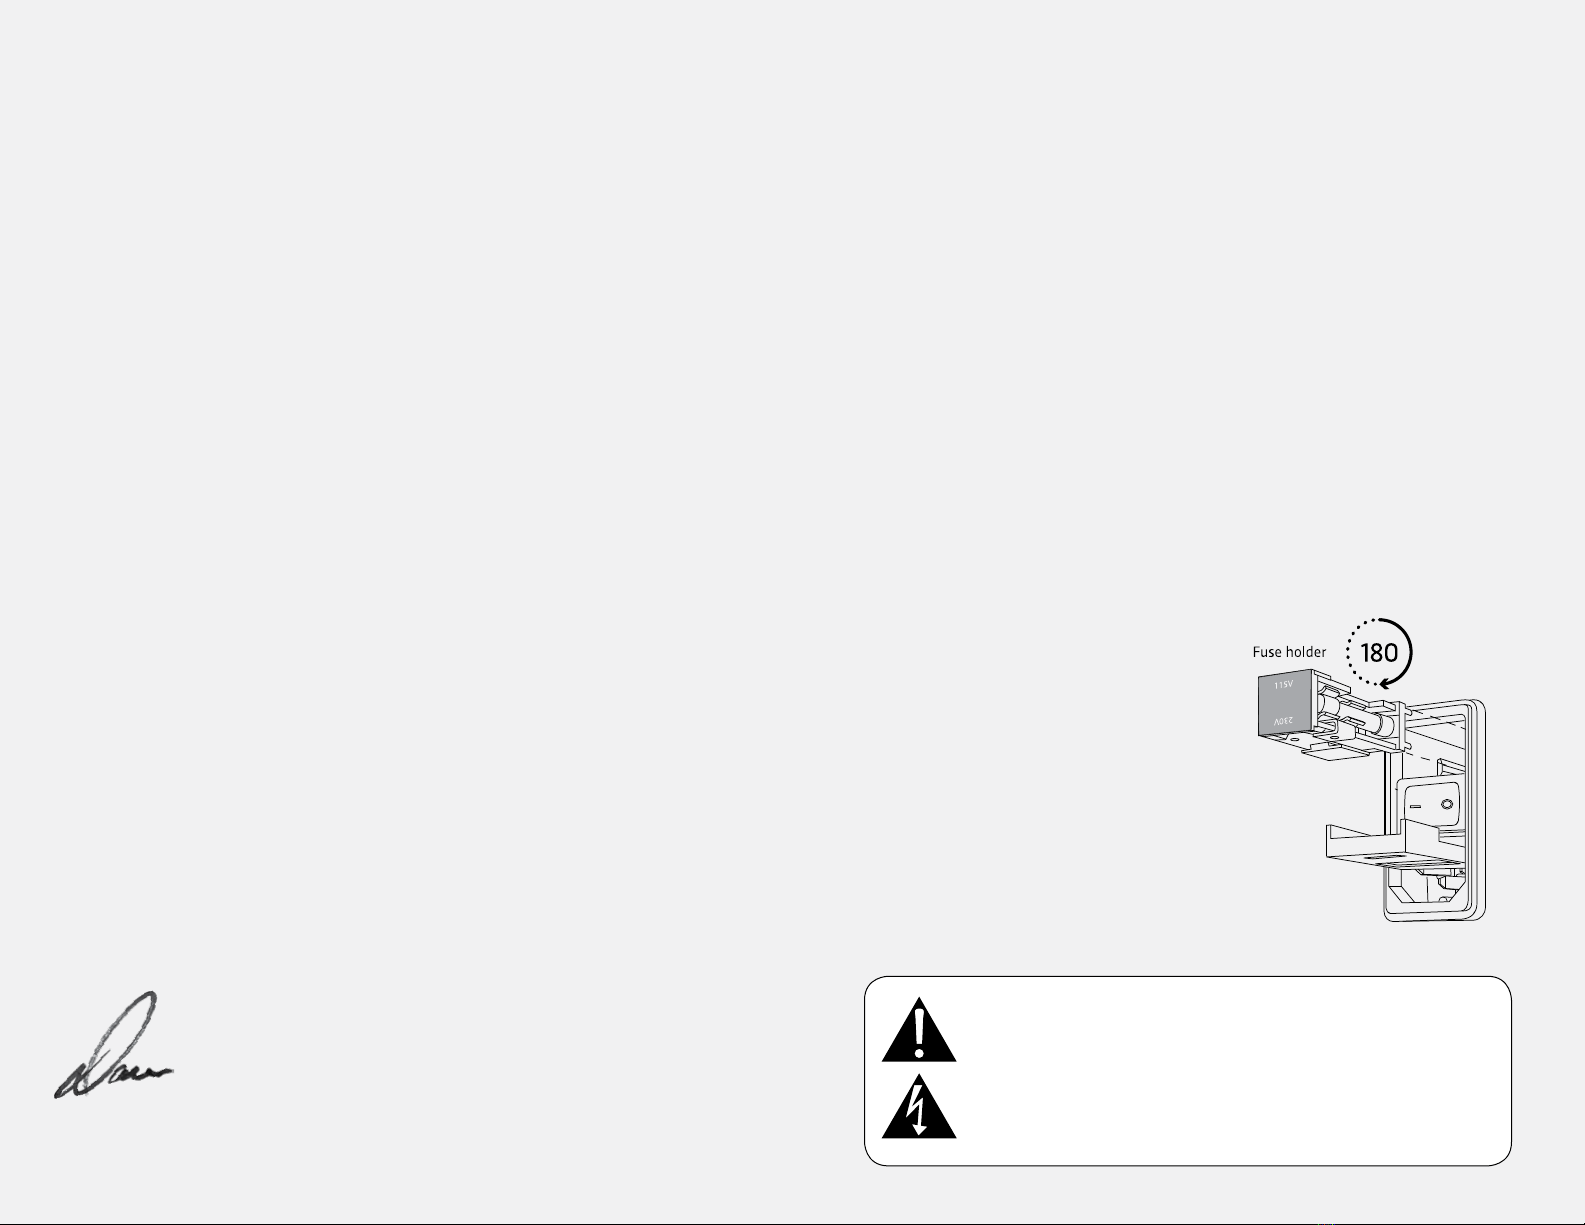
POWER REQUIREMENTS
The P331 is shipped with a 3-prong IEC power inlet
module and cord and has a custom-designed universal
power supply that can operate in all countries around
the world. When purchased new the power inlet will be
set for the appropriate voltage. This is indicated in the
lile red window on the inlet module. Double-check the
inlet is displaying the correct voltage for your country
before powering up. Operating voltage can be changed
by simply removing and rotating the fuse holder 180˚
within the inlet module (Fig. 1). Please contact us for
additional information or if you have any questions.
Input power range is 115V to 230V at 50/60 Hz. To check
or replace the fuses, make sure the unit is unplugged.
Fuses = T4A L 250VAC SLO-BLO
Never operate the P331 with the ground on the power cord defeated. (Fig. 1)
Thank you for deciding to add the Whitestone Audio Instruments P331 Tube Loading Amplifier to your
audio production tool set.
The P331 had its genesis when my wife (and multi-Grammy® nominated mastering engineer) Kim
Rosen was looking for a custom piece of analog gear for her new mastering room. Something unique.
We ended up brainstorming on an idea for a versatile tube stage for her analog chain. Much of the
way Kim works is exploiting the sound of the input and output gain stages of some of her favorite
equalizers and compressors with actual processing bypassed. Just the subtle enhancement some of
these analog gain circuits provide oen times is just the thing to add a bit of “magic”. The goal for the
P331 was to capture this kind of enhancement potential in a line amplifier that delivers the natural
clarity of a well-designed tube circuit. At the same time, we wanted to bring fully switched controls
that introduce harmonics and other carefully implemented, and repeatable, non-linearities to subtly
enhance the signal without harming the recording’s original intent. We really had no idea what we
were geing ourselves in to!
For the next five years we worked with our electrical engineer, (who’s other position of employment
involves projects he doesn’t have clearance to discuss) on how to implement the features we
envisioned...circuit design, prototypes...add features, scrap features, new prototypes, listen...tweak...
build revisions...listen some more...tweak some more...over and over. We’re so happy we didn’t throw
in the towel (we nearly did on several occasions) because we feel what we’ve ultimately created is a
truly unique, truly exceptional processing device.
We wanted the P331 to have just a few great sounding and useful features. Chief among them being its
Class A fully-dierential (balanced) tube amplifier designed around 6SN7GT dual triode vacuum tubes.
This tube was introduced in 1939 and while the 6SN7GT is somewhat rare in pro audio applications, it is
relied upon in the hi-fi market for its inherent “clean and silky” characteristics in audiophile preamps.
The tubes are still in production and can be purchased new without hassle. With the LOADING circuit,
we give you the ability to control where the signal hits these tube along its response curve. There’ll be
a bit more detail on this in the Operation section of this manual.
Taking mixes to new levels without harming what’s already there is what the world’s best mastering
engineers dedicate their life’s work to achieving. When processing on your mix-buss, in your mastering
chain or even enhancing individual tracks...subtlety more oen than not is the name of the game.
With that in mind we set upon designing features into the P331 that never sound overly processed,
unnatural or heavy-handed. From the gentle parallel LIFT filter to the optional output transformers
and clean solid-state output gain, all aspects of the P331 were designed to provide a tool which helps
achieve that elusive element, that “something special” which is diicult to describe but unmistakable
when heard.
We believe a greatsounding recording is the sum of an accumulation of subtleties. With the Whitestone
P331 Tube Loading Amplifier, we’ve worked to put a palee of these subtleties at your fingertips.
Dave Rosen
Co-Founder/President
INTRODUCTION

6 7
TUBE LOADING CONTROL
LOADING controls how the input signal is aected as it travels through the P331’s fully
balanced class-A tube amplifier. This rotary switch ensures your seings are always precise
and repeatable. How and where the input signal hits the tube along its response curve
depends on dial seings as well as which MODE the unit is operating in. More detailed info in
the OPERATION section of this manual.
MODE SELECTOR
The P331’s MODE section is controlled by a three position “momentary” toggle switch. When
this switch is ipped and held all the way to the right for “a moment” you’re able to select
between three auto-pad seings. Within each of these three seings (PRE, POST and OPEN)
you can control whether the unit will be operating in CLEAN (Feedback) or BLOOM (Feed-
forward) mode. Again, we’ll go into further detail in the OPERATION section.
LIFT SELECTOR
The four position LIFT selector switch allows you to engage or fully bypass the P331’s parallel
li circuit and select between its three seings. The LIFT filter is a gentle boost of high (HF),
low (LF) or both high and low frequencies (DUO) as they pass through and are aected by
the tube LOADING circuit. It can be used to add subtle energy to your audio signal where
necessary without sounding or feeling like heavy-handed equalization.
XFORMER SELECTOR
The P331 is designed to run fully transformerless but oers the option of adding an output
transformer into the signal path for additional texture. The XFORMER circuit allows you to
select two dierent ways of loading the transformer (1or 2) or can be fully bypassed (OUT).
BOOST/CUT SELECTOR
The BOOST/CUT selector switch toggles the fully balanced solid-state output GAIN control
between BOOST mode, CUT mode or OUT which completely removes the GAIN circuit from
the audio path. There is an indicator LED that will alert you when CUT mode is engaged.
GAIN CONTROL
This rotary switch allows for up to 11dB of boost or cut in 1dB increments. The output GAIN
circuit is a fully balanced low distortion solid state amplifier designed to faithfully reproduce
the sound of the audio passing through the tubes and other circuits of the P331.
RESOLUTION SELECTOR
The RESOLUTION switch allows you to “back-o” 0.25dB or 0.5dB to whatever seing you
have dialed in on the GAIN control. Great for level matching or for geing just the perfect
amount of gain out of the unit.
VU METER
The VU Meters are calibrated to “0VU” = +4dBm.
METER ATTENUATION
The P331 is designed to work with hot signals at times so we oer the option of a 6dB or 9dB
pad on the meter.
BYPASS
The BYPASS is a true hardwire bypass which eectively removes the entire unit from your
signal path. When it’s out...it’s out.
INDICATOR PILOT LIGHT
The P331 is designed with a timed so-start power-up that applies voltage to the tubes
gracefully. This can help increase tube life and performance over the life of your unit.
During power-up, you will see the INDICATOR PILOT gently pulse on and o as this process
takes place. During this “warm-up” period the output is automatically muted. When the
P331 is ready for use (approximately 3 minutes) the pulsing will stop and the muting will
automatically disengage.
A
B
C
D
E
F
G
H
I
J
K
FEATURES & CONTROLS
A
B
C
E
F
G
H
J
I
D
K
The P331 is digitally controlled analog. All switches (rotary and toggle) accurately and
predictably command over 80 sealed precision relays. No audio runs to the unit’s front panel
and only the finest components are used thoroughout the audio path.
8 9
OPERATING THE P331 TUBE LOADING AMPLIFIER
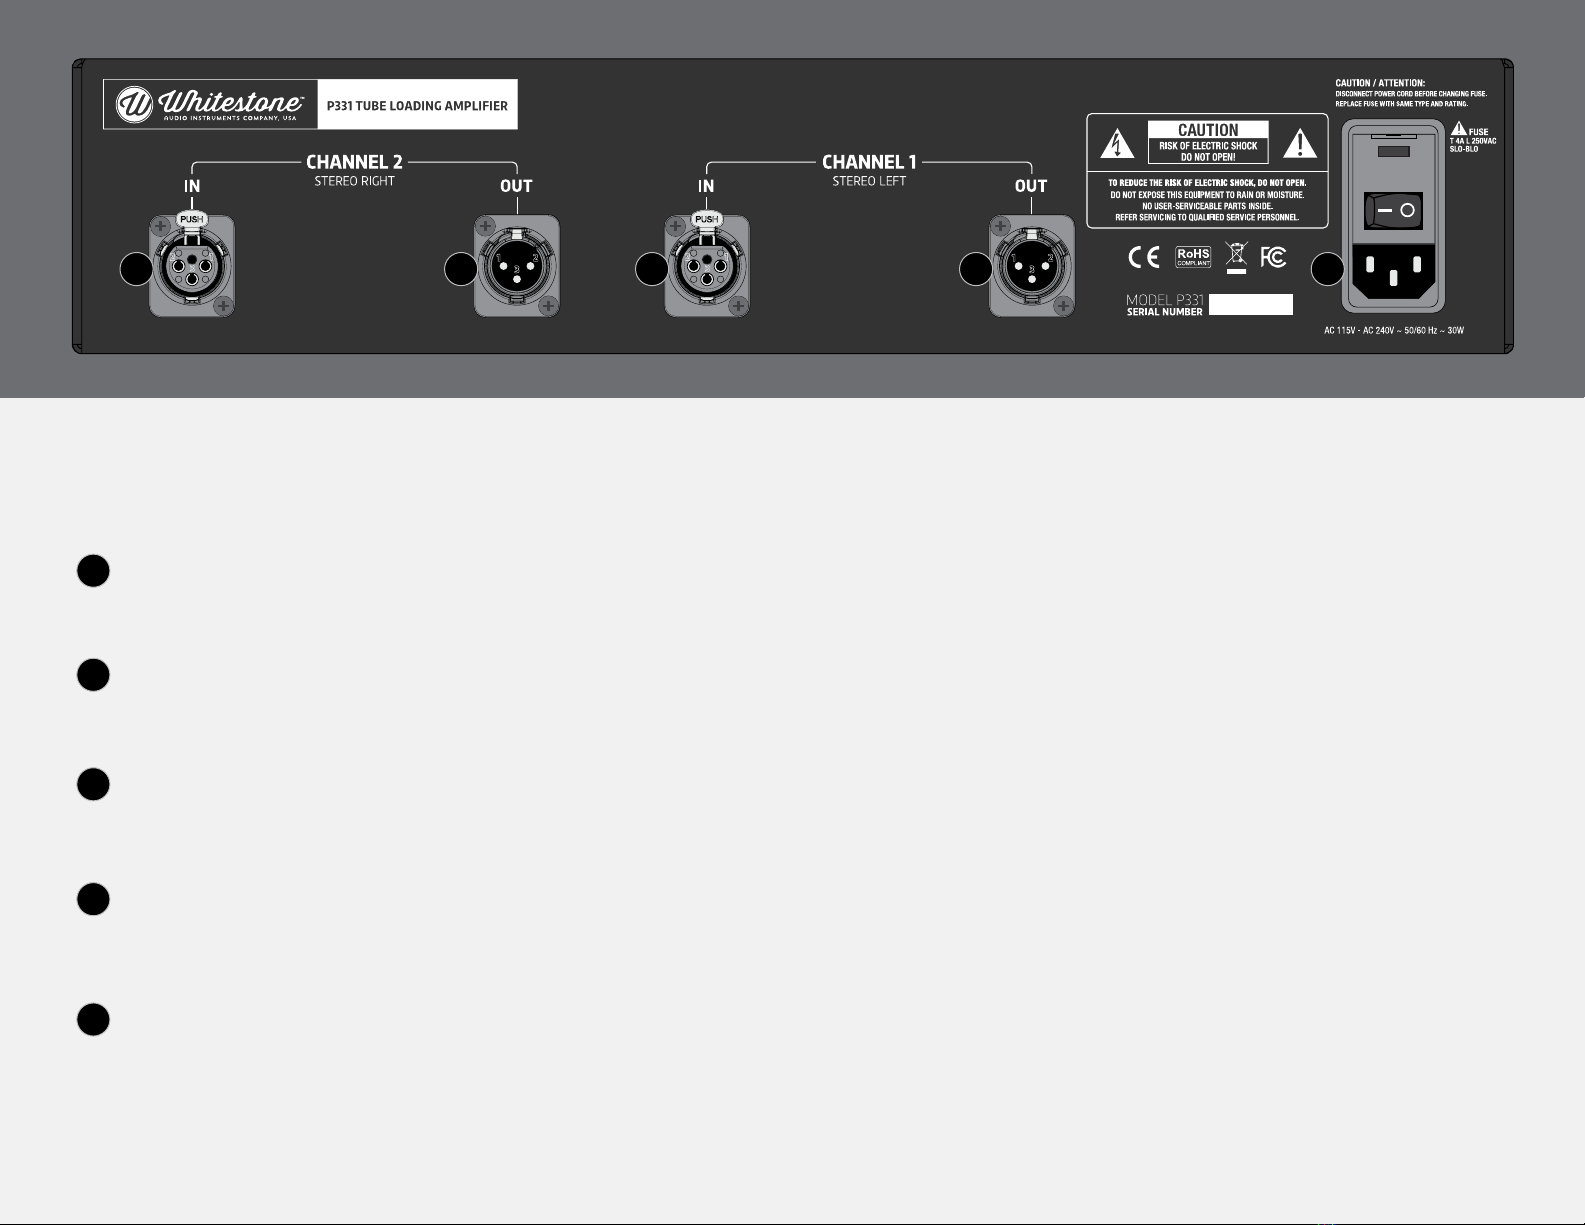
XLR INPUT - CHANNEL 2 (STEREO RIGHT)
BALANCED
Pin 2 Hot
XLR OUTPUT - CHANNEL 2 (STEREO RIGHT)
BALANCED
Pin 2 Hot
XLR INPUT - CHANNEL 1 (STEREO LEFT)
BALANCED
Pin 2 Hot
IEC POWER INLET MODULE
High quality IEC mains connector for 50 /60 Hz AC with integrated fuse holder.
(INPUT MAINS VOLTAGE 115VAC - 230VAC) Fuses = T4A L 250VAC SLO-BLO
XLR OUTPUT - CHANNEL 1 (STEREO LEFT)
BALANCED
Pin 2 Hot
115V
A
A B C D E
B
C
E
D
The P331 was originally conceived as a mastering and mix buss processor, however, the circuit was
designed to enhance anything that runs through it. When we decided to oer this unit to others we
didn’t want to limit its potential. For this reason we designed it as dual mono as opposed to stereo
only. We wanted to ensure tracking and mix engineers had the ability to experiment with enhancing
any of their tracks or captured performances. While the P331 does not have the available gain to
function as a standalone microphone preamp, it can be used eectively as a worthy addition to any
traditional recording chain.
The P331 can be somewhat of a chameleon in that how it reacts is highly dependent on the source
material its being fed. We are of the school that there is no right and wrong when it comes to art.
Close your eyes, turn the knobs. Ultimately, your ears will and should guide you.
GETTING STARTED
Make sure all XLR connections are made before hooking up the AC Power Supply cord and powering
the P331 on. Aer the Power is switched to the on position (switch is integrated into the Power
Inlet Module at the rear of the unit), the INDICATOR PILOT LIGHT on the front panel will begin to
gently pulse. This pulsing indicates the unit is in “warm-up” mode. During this warm up period
(approximately 3 minutes) the outputs are automatically muted. Once the P331 is ready for use the
pilot light will stop pulsing and will remain lit, the outputs will be automatically taken out of auto-
mute and the unit is ready to rock. We do typically, however, let any of our tube gear (including the
P331) warm up for 30-45 minutes prior to any critical listening or processing.
REAR PANEL CONNECTIONS
10 11
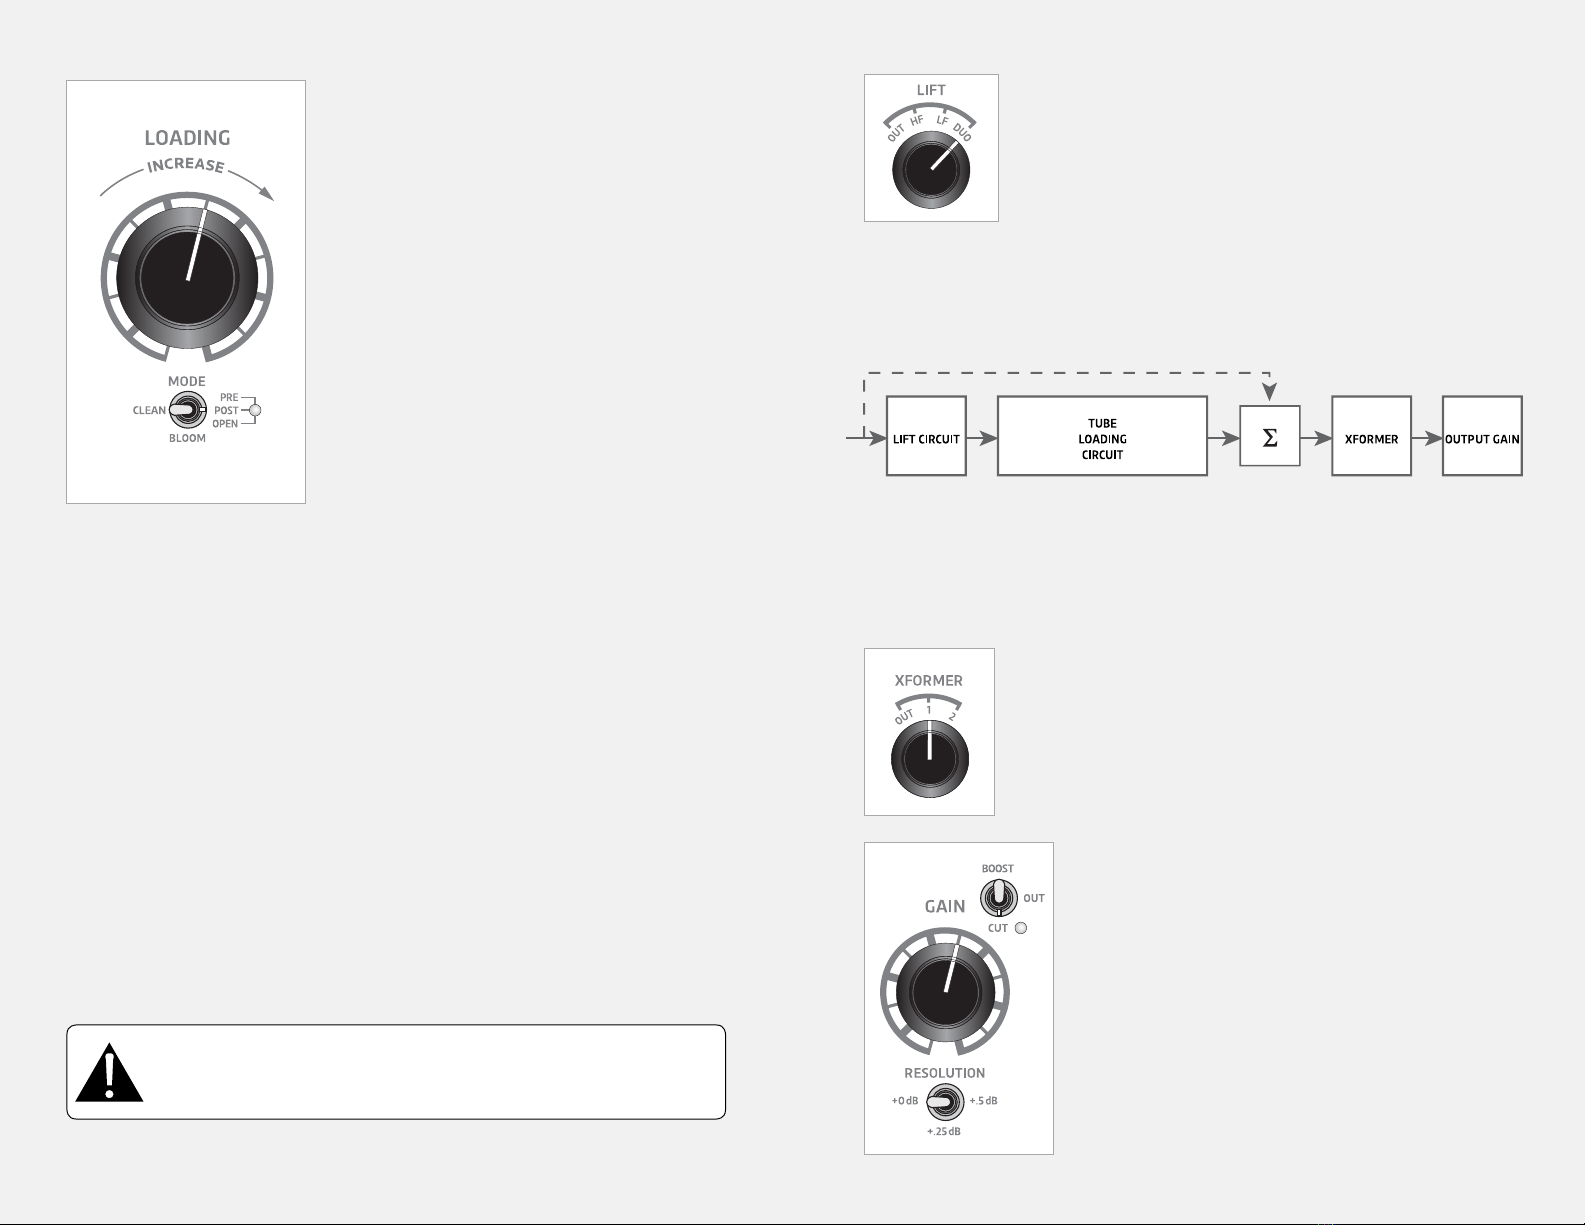
LOADING
The soul of the P331 Tube Loading Amplifier is its LOADING
controls. It’s where the tubes live and allows you to vary
at which point the audio hits the tube along its response
curve. This is accomplished in a few dierent ways
depending on your seings. It gets even more interesting
as you experiment with the dierent modes...as well
as the level of signal you feed into the unit. You’ll find
dierent recordings are aected in slightly dierent ways
even with the same seings. The enhancement is very
much program dependent.
MODE
There are two main modes to the LOADING circuit. CLEAN
or BLOOM. While in CLEAN you are operating in “feedback”
mode, utilizing the manipulation of feedback to aect
internal tube gain. While in BLOOM, you’re operating in
“feed-forward” mode, utilizing the manipulation of plate
loading to aect internal tube gain. Two dierent ways to
add subtle harmonics to your signal.Your ears will tell you
which is right for the material you’re working with.
AUTO-PADDING (PRE, POST, OPEN)
One of the key elements of the P331’s LOADING circuit is its auto-padding feature.As gain is increased
to the tubes, the signal is padded down in equal measure. This allows for precise and repeatable
loads to be applied to the tubes. It also ensures minimal level gain or loss during operation, giving
you the ability to audition what the tubes are doing without distraction from drastic changes in level.
It’s a cool feature and essential to the concept of the unit. To make it even cooler, we provide the
ability to control where in the circuit the padding occurs (PRE or POST) or disable the auto-padding
all together (OPEN). When in PRE, the auto-padding occurs to the signal before it hits the tube. In
POST, the auto-padding occurs aer the tubes. While in OPEN the auto-padding is disabled and your
Loading knob allows you to crank it up while using your output Gain as a “master volume” of sorts
similar to how a guitar amplifier with a master volume would function. It’s all about experimenting
and leing your ears guide you.
The toggle switch is a “momentary” switch. As you move the toggle actuator to the right, you notice
it will “snap back” to the center position. Move it to the right again and you’ll notice the LED next to
PRE, POST and OPEN will change color.
PRE = GREEN
POST = ORANGE
OPEN = BLUE
You can operate in CLEAN (toggle le) or BLOOM (toggle center) within any of the three auto-padding
modes.
XFORMER
The P331 is designed to run fully transformerless in its default state. The OUT
seing is a hard wire bypass. This provides the purest, cleanest and most
unaected audio path through the unit. However, in keeping with the P331’s
versatility, the operator may switch in output transformers and select two
optional seings to load them in dierent ways. This provides additional
options for enhancing the subtle textures of your audio.
LIFT
GAIN
The LIFT circuit is a gentle parallel filter that enhances the highs, lows or
both the highs and lows of the signal. Audio passes through the LIFT circuit
before the LOADING circuit. With any of the LIFT filters engaged, the audio
is passed unscathed through the fully balanced P331 circuitry and blended
with harmonic content of the LIFT and LOADING circuits working in concert.
OUT = Hard Wire Bypass
HF = Gentle High Frequency Li
LF = Gentle Low Frequency Li
DUO = Both High and Low Frequency Li
We hesitate to specify exact frequencies designed into the LIFT circuit as depending on your seings
(and how much the signal is being aected by harmonics) the lied frequencies can shi slightly. As
with all seings and controls on the P331, it’s best to simply use your most valuable assets...your ears
when determining if the LIFT circuit is working for the audio you’re presenting it with.
We decided to give the P331 a clean, fully-balanced solid-state
output gain. We weren’t interested in coloring the sound here.
We wanted the ability to faithfully reproduce what was happening
in the LOADING and other circuits while providing the ability to
boost or cut up to 11dB in 1dB increments.
For even finer control we added a RESOLUTION switch that allows
you to “back-o” 0.25dB or 0.5dB to whatever your current seing
is on the rotary switch. Use this for even finer level matching
between your P331 seings and your bypassed signal, or for geing
that lile bit of extra level out of your analog chain before clipping
your A/D.
LIFT CIRCUIT OUTPUT GAIN
TUBE
LOADING
CIRCUIT
XFORMER
Li Circuit Engaged
Li Circuit Engaged Lied frequencies are aected
by tube loading harmonic content
Lied frequencies are aected
by tube loading harmonic content
IN IN
OUT OUT
Signals are
blended
(optional)
Signals are
blended
Input signal passes through 100% unscathed
Input signal passes through 100% unscathed
CAUTION: Be careful when selecting the OPEN mode, as you are disengaging the
auto padding. Depending on where you have the LOADING and GAIN knobs set,
switching to OPEN can unexpectedly and dramatically increase the output level.

12 13
P331 TUBE LOADING AMPLIFIER IN USE
There’s really no “right” or “wrong” way to use the P331. We believe in experimentation and that
trusting your ears will guide you to the seings that sound “right” to you. With that said, the following
may be a helpful guide to geing started and becoming accustomed to the P331’s controls.
FINDING UNITY
The below seings are calibrated to provide unity gain at the output. It’s a good starting point.
When processing stereo sources, we suggest ensuring your seings on the P331 are matched on the
Le and Right channels.
Begin with the unit in BYPASS (OUT) with the LIFT, XFORMER and GAIN sections in their OUT (bypassed)
position and the LOADING knob set all the way down (to the le) in its first position.
In the MODE section, set the auto-pad to PRE by ensuring the GREEN LED is illuminated. If the LED is
any color other than GREEN, ip the momentary toggle all the way right as many times as necessary
to get to GREEN, then set the toggle to the CLEAN position.
Take the unit out of BYPASS (IN) and you will be at unity gain.
GETTING LOADED
Now that you have a starting point it’s time to start experimenting with how the LOADING circuit
will aect the audio source. Start clicking through seings on your LOADING knob. You’ll notice lile
to no level gain or loss as you run through dierent seings. This is due to the auto padding which
is working in the background before the signal hits the tube (PRE). Even though you are aecting
internal tube gain, you are not hearing drastic changes in level. This helps when using your main
BYPASS to A/B between the processed and unprocessed signal without being inuenced by drastic
level changes.
Try changing the MODE from CLEAN to BLOOM and experiment some more with the LOADING knob.
Now, instead of manipulating feedback to aect internal tube gain, you’re manipulating plate loading
to aect internal tube gain. Again, all being automatically padded behind the scenes to keep levels
fairly matched.
Frequently use your main bypass switches to A/B between the processed and unprocessed audio.
Now try ipping your MODE switch to the right to change from PRE (GREEN) to POST (ORANGE). The
auto-padding is now occurring aer the tube as opposed to before the tube. Running through the
same seings you used in PRE now take on a slightly dierent vibe...and driving the input with louder
or quieter signals adds additional possibilities.
OPEN UP WIDE
When you switch to OPEN (BLUE) you’re completely disabling the auto padding. This is a good time
to start geing acquainted with your solid-state output GAIN section.
Before engaging OPEN, put the GAIN circuit into CUT mode and turn the knob all the way to the right.
This starts you o with 11dB of aenuation. Since in OPEN you now have no auto-padding going on,
the LOADING knob turns into a tube gain control. As you turn up the LOADING knob your level will
increase with each switch position. Using your GAIN control in CUT mode to manually pad the signal
functions like a master volume on a guitar amp. Now you are in full control of the tube gain (LOADING
knob)...and the padding (GAIN knob). And of course, you still have your CLEAN (feedback) or BLOOM
(feed-forward) modes to switch between. Prey sweet!
GETTING A LIFT
Don’t let the simplicity of this control fool you. What’s going on behind the scenes took us a whole
lot of experimentation to ensure the integrity of the original signal remains intact while gently liing
either the highs, lows or both the highs and lows of the source.
Like all the other features of the P331, the eect can be more or less subtle depending on the source
and what seings you’ve chosen on the LOADING control. Sometimes it’s just what’s needed...
sometimes the best position is OUT. It’s your call.
GETTING TRANSFORMED
We allow the user to hit the optional output transformers in two dierent ways which changes their
load and, in turn, provides additional sonic options. This control is also heavily dependent on the
audio source it is being fed and the level of the signal. Experiment between the 1 and 2seings to
find the sweet spot or OUT for hard wire bypass.
MORE TO GAIN
Although we’ve le the GAIN section for last, it’s an integral part of using the P331 eectively. It’s a
fully-balanced, low-distortion output amplifier which allows you to take all that you are doing with
the LOADING, LIFT and XFORMER circuits and boost or cut up to 11dB.
The GAIN knob gives you 11dB of BOOST or CUT in 1dB increments, while the RESOLUTION switch
allows you to back-o 0.25dB or 0.5dB from whatever seing you’re at on your GAIN control. The
first position on the GAIN knob is 0dB. This allows you to select just 0.25dB or 0.5dB as a starting
point if necessary by utilizing the RESOLUTION toggle. Aer that first position the resolution switch
is “subtractive”. For instance, if you are in BOOST and are adding 2dB on the GAIN rotary switch, by
engaging the toggle switch to 0.25 you are REDUCING the level by 0.25dB.
The RESOLUTION switch really lets you fine tune your level-matching to A/B your processed vs
unprocessed signal while experimenting with the other circuits in the P331 or to squeeze out every
last bit of analog level at the end of an analog mastering chain.

14 15
WARRANTY
The P331 Tube Loading Amplifier is covered by a limited warranty against manufacturing defects
in materials and/or workmanship for a period of five (5) years from the date of original purchase
and only aer proper registration which should be submied by completing the on line registration
form at: www.whitestoneaudio.com/register
Whitestone Audio Instruments, LLC’s sole obligation under this warranty is to provide, without
charge
, replacement parts and labor for the above referenced defects. Vacuum tubes and other
consumables such as LEDs are not covered under these terms. Vacuum tubes and LEDs are covered
for a period of six (6) months with proper registration.
This warranty does not cover damage due to misuse or abuse, modification, accidental damage or
negligence. The warranty is also void if the P331 is repaired or altered by anyone not authorized, in
writing, by Whitestone Audio Instruments, LLC.
If it is determined the P331 is eligible for warranty repair, a return authorization must be obtained
from Whitestone Audio Instruments, LLC prior to shipment. Please don’t ship equipment back to us
without first obtaining this authorization. It’s simply for organizational reasons and will expedite
your warranty claim. Please return the unit in its original packaging. Make sure to not discard the
P331’s carton and custom foam insert aer purchase. These cartons were specifically designed
to protect the P331 during shipping. If the unit is not returned in original packaging, owner will
be charged for new factory packaging. Include a note in the box that includes the owner’s name,
address, telephone number, email address as well as a description of the issue to be repaired. The
owner pays for shipping the unit to the address provided with the return authorization and we
suggest the shipment be insured for the P331’s full value. Whitestone Audio Instruments will not be
held liable for damage during shipping.Aer repair, the unit will be shipped to the customer prepaid
and insured. Whitestone Audio Instruments, LLC will not pay for express or overnight shipping nor
for shipments to locations outside the USA.
Whitestone Audio Instruments, LLC is in no way responsible for indirect, incidental or consequential
damages arising from the use or failure of this product, including injury to persons or property. Any
and all warranties of merchantability and fitness implied by law are limited to the duration of this
warranty. This limited warranty gives you specific legal rights, and you may also have other rights
which vary from state to state.
All specifications are subject to change without notice.
Statements in this manual regarding the suitability of the P331 for certain types of applications are
based on Whitestone Audio Instruments, LLC’s knowledge of typical requirements that are oen
placed on pro audio products in generic applications. Such statements are not binding statements
about the suitability of the P331 for a particular application. It is the customer’s responsibility to
validate thatthe P331Tube Loading Amplifier is suitable foruse in aparticular application.Parameters
provided in this manual, data sheets and/or specifications may vary in dierent applications and on
dierent source material. Performance may vary over time.
©2019 WHITESTONE AUDIO INSTRUMENTS, LLC

Copyright ©2019 Whitestone Audio Instruments, LLC
32 Cupsaw Drive
Ringwood, NJ 07456
(201) 207-9884
www.whitestoneaudio.com
REV. 1
Table of contents


