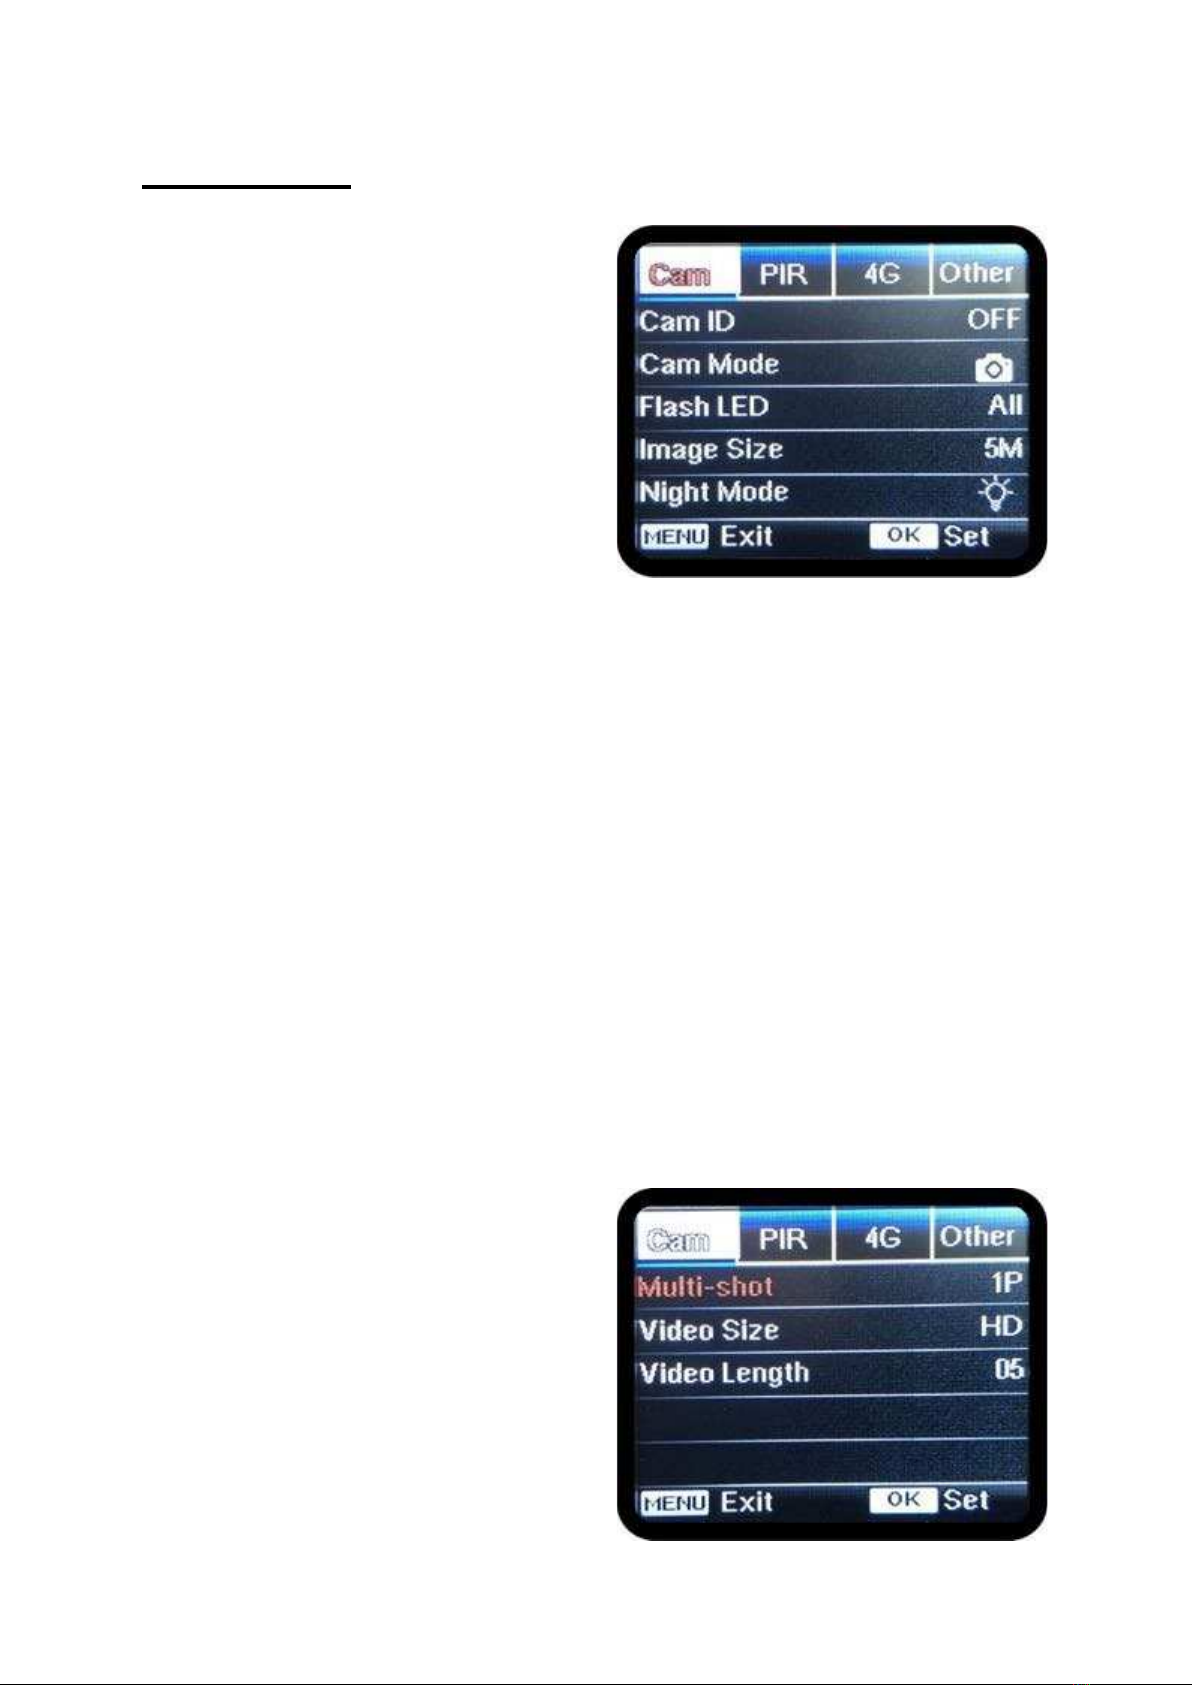
Wildlife Monitoring Solutions Wilsus Tradenda 4G Wireless User manual

Quick start guide
Please note: in order to receive the captured images on your phone or e-mail, it is
necessary to configure the correct settings in the camera. You will find detailed instructions
for this later in the manual. For the quick start guide below, we assume that the camera
has already been configured by Wildlife Monitoring Solutions or by yourself.
Step 1: Place 12 AA batteries, SD card, SIM card and antennas in/on the camera. There
is an app available for your IOS or Android smartphone (called "TrailCamera"), which allows
you to give instructions to the camera remotely. A detailed explanation of how the app
works can be found later in the manual. It is not necessary to install the app, but it can be
useful in daily use of your camera.
Step 2: Switch the main switch to the SETUP position, the display will turn on. The game
camera will now search for a network signal. If a signal bar appears, this means that a
network has been found and the camera is connected to this network. You will also see the
message "Time Sync" on the screen briefly. This means that the camera is connected to
the network and that the system time of the camera is equal to the time it received from
the network (this automatic time synchronisation can be turned off in the menu of the
camera). To check whether the date/time is set correctly, press and hold the right arrow
button. You will now see the date/time and the GSM network appear in red letters. If the
date/time is incorrect, you can adjust this in the menu (see further down in the manual).*
Step 3: You can now move the camera switch to the ON position, close the camera securely
and leave the location. After about 15 seconds, the camera will be active and the recorded
images will be transmitted according to the settings configured in the camera.
* If the message: "SIM Auto Failed" appears, the camera has not been able to recognise
the inserted SIM card automatically. There are a large number of providers preinstalled in
the camera, but not all of them are. If you therefore see this message, all network settings
must still be configured manually in the camera's 4G menu (see below). Only then will it
be possible to send photos and videos to the specified e-mail addresses.

Smartphone APP (IOS / Android)
For the Wilsus Tradenda 4G Wireless wildlife camera there is a special app for IOS and
Android devices. With the app, called "TrailCamera", you can operate the camera remotely.
For example, you can request a test photo of that moment at any time, or you can adjust
the settings in the camera via the app. You can scan the QR code below (also printed on
the box in which the camera is packed) with your phone to download the app, or you can
look up the app in the Google Play Store / Apple App Store. Pay close attention to the app's
name and icon, as shown above.
For IOS For Android

Step 1: Install the app on your phone using the instruction above. Please note that the
app is only available in English.
Step 2: Start the app and add the game camera (screenshot 1, 2) by entering a name for
the camera and the phone number of the sim card in the field "Camera sim number"
(standard format, so without country code. E.g. 0612345678). Then select the correct trail
camera model from the 4 icons (screenshot 2). Then click on ADD.
Step 3: The camera has now been added to the app (screenshot 3). You will now see it
displayed as in the third screenshot. If you have several cameras, you will see them listed
below each other.
Step 4: By clicking on your camera in this list, the window as in screenshot 4 will appear.
Here you will see 5 options:
1. General Setting gives you insight into the general settings of the camera
(especially related to the transmission of images).
2. Other Setting gives insight into the other camera settings.
3. Get a Picture allows you to retrieve an image of that moment from the camera.
4. Change Camera Name allows you to change the name of your camera as just
described in step 2.
5. Delete Camera allows you to delete the camera from the app.
All options are discussed in detail below.
1
1 2 3
4

General Setting and Other Setting (screenshots 5 and 6): Here you can view and
adjust all kinds of settings for the camera. All these options can also be found in the camera
menu itself (more options can be set in the camera itself than in the app). For the
functionality and explanation of how the various options work, we refer you to the
explanation of the camera menu further on in this manual. If you adjust settings in the
app, you then need to press the "Send" button to send these new settings to the camera.
The settings for different aspects of the camera can be adjusted individually. This explains
why there are 3 "Send" buttons on screen in screenshot 5. The top "Send" button only
sends the adjusted settings related to the 7 options directly above it. The middle "Send"
button only sends a modification in the mobile phone numbers on which the images should
arrive, etc. In screenshot 6, only a "Send" button is visible in the top right corner of the
green bar. Adjustments to these settings are therefore always sent as a whole. Please
make sure that all settings are always configured exactly as desired.
5 6

Get a Picture (screenshot 7): By pressing this button you can instruct the camera to
take a picture and send it to you. Depending on the setting for "SMS Remote Control (in
the APP) / SMS Codes (in the camera menu)", this command will be processed
immediately and you will receive the picture in your e-mail after about 30 seconds (setting
"Instant (in the app) / Immediately (in the camera menu)", or this command will be
processed at the next synchronisation moment of the camera (setting "Daily (in the app)
/ 1x per day (in the camera menu)"). After pressing this button, a pop-up window appears
asking you to confirm your request (screenshot 7). Click Confirm to actually send the
command.
Change Camera Name (screenshot 8): By clicking this you can change the camera
name as shown in the app. Press Save to save the new camera name.
Delete Camera (screenshot 9): Clicking this button will delete the camera from the app.
Press Confirm to confirm your request.
CAUTION:
Depending on the setting for "SMS Remote Control", the instructions that you send from
the app (both for adjusting the settings and for the "Get a Picture" command) are either
processed immediately (setting "Instant", or they are processed at the camera's next
synchronisation moment (setting "Daily"). The setting "Daily" is much more energy
efficient than the setting "Instant", because with the latter option, the camera needs to be
constantly connected to the GSM network to 'listen' for instructions coming in from the
app. So keep this in mind!
7 8 9

In the camera menu, under the tab "Other => Language", you can
set the language of the camera menu. In this manual, we assume
that you have set the wildlife camera to English.

Power supply: You can use this trail camera with 6 or 12 AA batteries (alkaline, NiMH
rechargeable, or lithium), with the Wilsus 12V solar panel or with the Wilsus 12V external
power supply. For use with batteries, we recommend the Panasonic Eneloop or Eneloop
PRO rechargeable batteries or the Energizer Ultimate Lithium batteries.
SD memory card: The memory card can be inserted at the bottom of the camera with
the contact points facing downwards. The camera works with an SDHC memory card with
a maximum capacity of 32GB.
Note: When describing the options in the menu, we always give the name of the
menu item as it appears in the app in brackets. Sometimes this is the same as
the name in the camera, but often this is the English term for the same function.
If a function is not present in the app, then "not in app" is shown in brackets.

Camera menu diagram

Tab: Cam
Cam ID (not in app): Turn on CAM ID and
press OK , you can enter a name using the
arrow keys. The name can be up to 12
characters long and can include spaces.
Cam Mode: The camera has three recording
modes. Use the arrow keys to navigate to the
CAM MODE option. By clicking OK, you can
select the desired mode. You can choose
between PHOTO, VIDEO or
PHOTO+VIDEO. Option 1 (PHOTO) is for
still images, Option 2 (VIDEO) is for videos
and Option PHOTO+VIDEO will first take
one or more still images and then record a
video.
Flash LED: You can choose whether to use all available LEDs (ALL LEDS) or only a portion
of the available LEDs (PART; only the top 27 LEDs). If you choose to use some of the
LEDs, you can reduce the risk of images being overexposed (for example, when placing
the camera in a small space or in a place where you know that activity will take place close
to the camera). It also saves on power consumption.
Image Size: Here you can set the resolution of the pictures (obviously only applicable in
PHOTO and PHOTO+VIDEO mode). The options are 5MP, 8MP, and 12MP. Generally,
the 8MP option is a good compromise between image quality and file size. It is also worth
noting that the camera has a 5MP image sensor, so the 8MP and 12MP options are
interpolations of the actual image resolution.
Night Mode: The flash range is adjustable in 3 different modes; Min. Blur, Balanced,
and Max. Range. Min. Blur provides a short exposure time so there is little motion blur,
which improves the quality of the images. The downside is that the range is shortened and
images will be less brightly exposed. Max. Range provides a longer range and a brighter
exposed image but also a greater chance of motion blur due to the slower shutter speed.
Balanced is, as the name suggests, a compromise between the two options and thus the
default setting.
Multi-shot : Here you can specify how many
photos the camera should take for each
observation. The options are 1-5. It is
generally recommended to set this to 3 or
higher. With multiple shots of a single
observation, it is easier to identify where the
movement is in the image.
Video Size: Here you can set the resolution
of the video (obviously only applicable in
VIDEO and PHOTO+VIDEO mode). The
options are WVGA (848x480), HD-720P

(1280x720) and FULL HD 1080P (1920x1080).
Video Length: Here you can set the length of the video. The video length can be set
between 5 and 59 seconds. Please note that if the camera is set to forward videos, the
maximum video length is reduced to 10 seconds.
Tab: PIR
PIR Switch: The PIR sensor is the motion
sensor. It registers the detection of a contrast
in the thermal image and ensures that the
camera is switched on according to the
selected settings. Here you can switch this
PIR sensor ON or OFF. If you turn the PIR
sensor off, the camera will no longer take
pictures on the basis of movement. Of course,
this is rarely desirable, but it can be used, for
example, when taking Time Lapse recordings.
This option is also handy when using the app
on the phone. By setting the PIR Switch to
OFF via the app, the camera is in fact put to
sleep, but it remains accessible to receive a new instruction via the app to, for example,
switch the PIR sensor back on.
Sensitivity: Here you can set the sensitivity of the PIR sensor. You can choose HIGH,
MEDIUM or LOW. A higher sensitivity provides a better response to smaller animals, a
longer detection distance and a more sensitive contrast between ambient and body
temperature of the object of interest. However, it also increases the chance of false
detections of, for example, sun/shadow spots in the image or waving grass or reeds.
Conversely, a lower sensitivity increases the chance of missing moving objects.
Delay: Here you can set the time interval between capturing motion and taking pictures
or videos. For example, if you set it to 5 minutes, then every time the camera detects a
movement and takes a picture, it will not respond for 5 minutes and will not take pictures
again. After the 5-minute interval has elapsed, the camera will again detect motion and
take a new shot. You can set the trigger interval between 3 seconds (00:00:03) and almost
24 hours (23:59:59). This option is particularly interesting for feeding areas, to prevent
the camera from filling up with images of one or more animals staying at the feeding area
for a long time.
Time Lapse: You can set a fixed interval at which the camera takes photos or videos. For
example, this setting is used to take a picture every 5 minutes, regardless of whether there
is anything interesting in the picture at that time. This can be used perfectly for mapping
the construction of a house or other object over time, and making a video of it later. It's
also a great setting for capturing the development of a flower, for example. You can set
the Time Lapse interval between 5 seconds (00:00:05) and almost 24 hours (23:59:59).
The Time Lapse setting begins when the camera switch is turned ON. For example, if the
Time Lapse interval is set to 8 hours, the first Time Lapse recording will be made 8 hours

after the camera switch is moved to the ON position. It is possible to combine the Time
Lapse setting with regular recordings based on movements detected by the PIR Sensor.
Timer 1 and Timer 2 (Timer 1 / Timer 2): Here you can set the time periods during
which you want recordings to be made. This means you can set two different periods during
the day when the camera operates. For example, you can set the camera to record only
during the morning and evening twilight. You can also choose to use just one timer and
set it to run from 8pm to 6am (i.e. active between 8pm and 6am).
Tab: 4G
Note: For some of the options described below, a keyboard will appear on the
screen for data entry. Pressing the MENU button changes the punctuation.
Pressing the "less than..." ("<") sign will delete the punctuation already entered.
By selecting the "roof-top character" ("^") and then pressing OK your entry will
be saved and you will return to the higher menu item.
SIM auto match (not in app): The camera
will automatically try to connect to the
network of the SIM card inserted in the
camera. If the SIM card is not recognised, the
message "SIM AUTO MATCH FAILED"
appears on the screen after the camera has
been started. KPN and T-Mobile SIM cards
from the Netherlands are automatically
recognised and therefore do not require any
further manual configuration in the camera.
However, if the SIM card is not recognised
automatically, go to SIM AUTO MATCH and
select MANUAL here. The "Manual Setup"
option then becomes available. Read below under the heading "Set up manually".
Manuel Setup (not in app): You see two options here, MMS and 4G. MMS has not been
supported for some time now by most providers (it has been outsold by Whatsapp, among
others), so we will not go into this now. Choose the 4G option and go to APN. Fill in the
APN of your chosen network provider here. For example, for KPN this is "portalmmm.nl".
Depending on your provider, you also need to enter a user name and password in the
same way.
MMS: Here you can turn the MMS transmission mode ON or OFF to have the recorded
images sent to your phone number. As described above, most providers do not support
MMS anymore and we therefore do not recommend you to use this function (the rare
provider that still supports it often charges very high rates).
SMTP: Here you can configure the settings for sending emails with the images as
attachment. This concerns the settings for the sender of these emails, so not for the
email address where the images are to be received (this is done under the heading "SEND
TO"). The options that can be selected here are "D" (which stands for Default Setting in
the option list), "M" (which stands for Manual Setting in the option list) and "OFF" (which

stands for OFF in the option list). Note: In the app you can only slide this setting ON or
OFF.
The camera already has a mail server configured by the manufacturer from which e-mails
will be sent to you, this is the default setting (letter "D" in the menu and corresponding to
the "Default " option in the drop-down list of options within the SMTP setting). So if you
leave it on D (Default Setting), the emails will be sent from the email address
getpic@wuyuansys.net. This has a daily limit of 50 e-mails. For most users, this limit is not
a problem, but in some cases it can be a limitation. In that case, and in case you do not
want to use the manufacturer's suggested mail server for sending e-mails, you can choose
the option "Manual Setup" here.
If you choose Manual Setup, the following fields must still be configured:
-Mail Server IP: This is the mail server of the sender account that you want to use for
sending the e-mails to your receiving e-mail account. For example, for Gmail this is
"smtp.gmail.com".
-Port: This is the communication port for the sender account. For example, for Gmail
this is "465".
-Email Account: This is the email address you want to use as the sender account. For
example, for Gmail this is "yourname@gmail.com" or any other gmail account you may
have.
-Email Password: This is the password that belongs to the sender account you set
above.
N.B.: A Gmail account usually works very well for this, but you should make sure that the
"Access by less secure apps" is switched ON for the Google account to which this Gmail
address belongs (to be found under: https://myaccount.google.com). This is only possible
when 2-factor authorisation is switched off.
FTP: Here you can configure settings for automatically forwarding images to an FTP server
address. We will not go into this further in this manual, as it is quite advanced, and for
those for whom it is relevant, it is often clear how this setting should be configured. In all
other cases, this setting can simply be turned OFF.
Send to Phone / Send to E-mail: You can
enter where you want to send the pictures.
You can input 1-4 phone numbers, and/or 1-
4 email addresses. Phone numbers are used
for forwarding via MMS (which, as mentioned
above, does not work in most cases), and E-
mail addresses are used for receiving the
pictures by E-mail (the most commonly used
method).
Transfer mode: You can choose to transfer
photos, videos or photos and videos
(depending on the selected camera mode in
the CAM tab, of course).
SMTP/FTP Pic Options: Here you can specify in which PHOTO FORMAT the captured
pictures should be transmitted. You can choose between: SMALL (640*480), BIGGER
(1920*1440), or ORIGINAL (actual size as indicated in the CAM tab under PHOTO

RESOLUTION). In addition, you can specify here how the camera should handle the
transmission of multiple images from one motion capture (multishot). The option
MULTISHOT SEND gives you the option of indicating, for each of the maximum 5 photos
per motion capture, whether or not it should be forwarded. Your options here depend on
what you have set in the CAM tab under the MULTISHOT option. For example, if you
choose to forward Photo 1 and Photo 3 from a trigger, you will receive 1 email message
with both photos attached.
Max Num/Day: Here you can set whether you want to use a daily limit for the number of
transmitted images. By default this option is set to unlimited, you can also choose to set
it between 1-99 images. This function is mainly meant to keep the costs in check. Note:
this limit is separate from the above described limit of 50 mails per day of the default
configured mail server under SMTP.
SMS CTRL: Here you can configure how you communicate with the camera via the app on
your phone. The options are "INSTANT" or "By Trigger". Depending on the setting for
SMS Codes, the instructions that you send from the app (both for adjusting the settings
and for the "Get a Picture" command) will either be processed immediately (setting
"Instant"), or they will be processed at the next synchronisation moment of the camera
(setting "By Trigger"). The setting "By trigger" is much more energy efficient than the
setting "Instant", because with the latter option, the camera needs to be constantly
connected to the GSM network to 'listen' for instructions coming in from the app. So keep
this in mind!
Daily Report: Here you can specify whether
you want to receive a daily status report via
the recipient's e-mail address. If you set this
option to ON, you can then specify at what
time you would like to receive the report each
day. The report contains the following data:
IMEI: 15-number IMEI number of
your camera
CSQ: a value between 1 and 31,
which indicates the signal
strength of the network signal.
The higher the better.
CamID: Your camera ID will be
displayed here, if entered.
Temp: This indicates the ambient temperature, as currently measured.
Date: This displays the date and time of the status report.
Battery: This shows the battery percentage.
SD: This shows the remaining memory and total capacity of the memory card (in
MBs)
Total Pics: This shows the total number of pictures taken in the last 24 hours.
Send times: This indicates how often images have been forwarded to your e-mail.
If the daily report is ON, you will also receive an e-mail with a picture of that moment
immediately after receiving the daily report.
SIM PIN: If the SIM card you inserted in the camera still has a SIM pin code, you can
enter it here (if this is the case, a message about this will appear in the camera screen

after starting the camera in SETUP mode). After entering the SIM pin code once, the
camera will not ask for the SIM pin code next time. If this function is greyed out in your
camera menu, this means that there is no SIM pin code on your SIM card.
GPS: Here you can turn the GPS function ON or OFF. The camera can determine its
location quite accurately based on the network signal from multiple cell towers in the area,
and this GPS location can then be stored in the metadata of the captured images. However,
it is not possible to use this feature to find out where your camera is if it is stolen, for
example, because the GPS location determination and transmission only takes place when
the camera is switched on and an email is sent to your account. There is no chance that
someone who stole the camera would leave it on with your email address in it as the
recipient of the images. In addition, turning this feature on uses more batteries than
turning it off.
Tab: OTHER
Language: Here you can set the language of
the camera menu.
Date/time: Here you can set the date and
time manually or automatically. If you choose
Automatic, the camera will automatically
synchronise the date and time with the data
sent by the mobile network every time it is
switched on. You still need to indicate in which
time zone you are (for the Netherlands this is
"+ 01:00"). If you choose manual, you can
configure the date and time manually here.
Please note that in this case, the camera does
not adjust itself according to summer and winter time.
Date format: Here you can select how you want the date to be displayed, you can choose
from YYYY/MM/DD (CN), MM/DD/YYYYY (US), EN DD/MM/YYYY (EU). The EU format is our
standard.
Stamp: Here you can turn the information bar that normally appears at the bottom of each
photo ON or OFF. When it is ON, the following things will be shown on the photos/videos:
camera ID, moon phase, temperature, date and time.
Battery type: Here you can specify the type of batteries you use. You can choose from
ALKALINE/LITHIUM or NIMH rechargeable. Because NiMH rechargeable batteries
(e.g. our Panasonic Eneloop and Eneloop Pro batteries) have a lower voltage than non-
rechargeable alkaline and lithium batteries, this setting ensures that the camera displays
the battery percentage as accurately as possible. By choosing this setting correctly, the
camera will therefore work optimally.
Frequency: Here you can set the frequency of the monitor in the camera, you can choose
between 50Hz and 60H z. The default is 50Hz.

SD Cycle: By setting this option ON, the
camera will continue to record photos/videos
even if the SD card is full. The oldest images
are automatically overwritten. We see this
function mostly on security cameras.
Password: Here you can choose to set a 6-
digit PIN code to protect your camera. Turn
password ON and choose a password of up to
6 digits to use this function.
Reset: Selecting "YES" will reset the camera
to factory settings. Please be careful when
using this option.
FW Update: Here you can update the software of your camera. In principle, this is never
necessary. Only in case of problems with the camera, you can contact us and ask if there
might be an update available.
About: Here you can see the system information of your camera, such as the serial number
and software version.
Troubleshooting
1. The camera takes photos/videos without any target objects in them (false
triggers)
A. The PIR sensitivity is set too high: in addition to troubleshooting using the solutions
below, you should first check the camera’s PIR sensitivity level.
B. Hot air: The camera is triggered by detecting the movement of heat sources, so
avoid mounting the camera near any equipment that emits hot air.
C. Reflecting light: Light can trigger the camera, so avoid targeting the camera at
anything that can reflect light (e.g. mirrors or moving bodies of water).
D. Rising/setting sun: So as to avoid targeting the sun as it rises or sets, mount the
camera to face north or south.
E. Unstable mounting: If the camera’s mounting is not stable, then it may move and
mistake this for the movement of objects in its field of view. When mounting the
camera check that it is completely stable and avoid mounting it on anything that
can move or shake, e.g. small/weak trees.
F. Target objects moving too quickly: In the case of fast-moving objects, e.g. animals,
if the camera is positioned too close, or perpendicular to the target trail, there is a
possibility that the trigger will not go off in time. Mount the camera further back
from the trail. Mount it at a 45° angle to the trail.
G. Tree leaves/branches: Grass swaying in the wind, falling leaves or falling/moving
tree branches/twigs can reflect the sun’s heat and potentially cause false triggers.
Mount the camera away from such objects, preferably slightly higher up (around
5ft from the ground) to avoid swaying grass. Clear the target area as much as
possible of twigs, leaves and branches.

2. The camera is not capturing any photos/videos
A. Camera is not in ON Mode: In addition to troubleshooting using the solutions below,
you should first ensure that the Power Switch is set to ON.
B. Batteries have insufficient power: Check the battery power bar directly on the
camera’s screen. If the battery power is very low, replace/recharge the batteries.
C. SD card is full: Upload the files saved on the SD card to your computer, delete them
from the card and re-use the same card, or put a new SD card into the camera, or
turn on SD Cycle mode.
D. SD card is corrupted: Due to physical damage, improper insertion/removal or
viruses, SD cards can become corrupted. If this happens, you will need to
format/reformat the SD card.
3. Night vision range is limited
A. “Night Mode” is set to “Min.Blur”: In addition to troubleshooting using the solutions
below, you should first ensure that “Night Mode” is set to “Max.Range” or “Balanced”
B. Batteries have insufficient power: Check the battery power bar directly on the
camera’s screen. If the battery power is very low, replace/recharge the batteries.
C. Nearby light source: If there is a significantly bright light source near the camera it
may interfere with the functioning of the camera’s night vision. Avoid placing your
camera near a bright light source.
D. Target area is too open: The camera’s night vision works via infrared light that is
emitted and reflected back off the objects in the target area, then captured by the
camera’s image sensor. Therefore, if the target area is too open, i.e. with very few
objects to reflect the IR light, then the night vision image will appear very dark. For
night vision purposes, target the camera at an area that contains objects, e.g. trees,
bushes, walls, etc.
Warranty
Based on a strict QC system, we offer all our customers two year long time limited
warranty. Our products are warranted against defects in materials and workmanship for a
period of two years from the date of original purchase. If a defect exists, we will, at our
option and to extent permitted by law (1) repair the product at no charge using new or
refurbished parts; (2) exchange the product with a functionally equivalent product that is
new or refurbished. This warranty excludes damage resulting from abuse, accident,
modifications or other causes that are not defects in materials and workmanship, or by
someone other than our authorized technicians. This warranty only covers failures due to
defects in materials or workmanship under normal usage. To obtain warranty service,
please contact us to determine the nature of problem before returning the product under
this warranty (with a written description of the problem and print samples) for repairing or
exchanging.

We hope that these brief instructions will help you set up and use the wildlife camera!
Should you have any further questions, please feel free to contact us at
info@wildlifemonitoringsolutions.nl.
We also love to receive images that you have made with the wildlife camera. You can email
please send them as a link via www.wetransfer.com) or by tagging us in your message on
social media: #WildlifeMonitoringSolutions.
Finally, you might like to subscribe to our newsletter! It is published quarterly, so not too
often, and contains all kinds of nice updates on wildlife cameras and other "Wildlife
Monitoring Solutions". It also contains nice images of our customers and we discuss
common challenges when using wildlife cameras. You can subscribe to the newsletter on
our website!
Table of contents