Wilfley SolidLock User manual

5870 E. 56th Avenue, Commerce City, CO 80022 USA • Toll Free: 1-800-525-9930 • Phone: +1 (303) 779-1777 • Fax: +1 (303) 779-1277 • www.wilfley.com • pumps@wilfley.com
HEAVY DUTY CENTRIFUGAL PUMPS
Supplemental Assembly Manual
SolidLock®Static Seal Cartridge


A.R. Wilfley and Sons, Inc.
Rev 4
February 2020
5870 E. 56th Avenue, Commerce City, CO 80022 USA • Toll Free: 1-800-525-9930 • Phone: +1 (303) 779-1777 • Fax: +1 (303) 779-1277 • www.wilfley.com • pumps@wilfley.com
Foreword
This manual contains instructions and guidelines for the assembly of the Wilfley SolidLock®static seal cartridge.
There are many factors affecting the successful assembly of a seal cartridge, which makes it impossible to create
a manual that covers all situations. Therefore, the information contained herein is meant to serve only as a
general guideline. If detailed questions or problems arise, contact Wilfley or your authorized Wilfley
representative.
Supplemental manuals may be required depending on the configuration of the pump.
It is extremely important that this entire manual be read prior to installation or start-up of the pump.
Use of the equipment on a service other than what was outlined at the time of purchase could void the warranty,
unless Wilfley has been consulted and provided written approval in advance.
To assure proper installation, supervision from an authorized Wilfley representative is recommended.
A.R. Wilfley and Sons, Inc. shall not be liable for damage or delays caused by a failure to observe the instructions
that are contained in this manual.
Warranty is only valid when genuine Wilfley parts are used. Contact your authorized Wilfley representative for
basic warranty information and before making any changes.


A.R. Wilfley and Sons, Inc.
Rev 3
October 2018
5870 E. 56th Avenue, Commerce City, CO 80022 USA • Toll Free: 1-800-525-9930 • Phone: +1 (303) 779-1777 • Fax: +1 (303) 779-1277 • www.wilfley.com • pumps@wilfley.com
Table of Contents
Foreword.....................................................................................................................................................................3
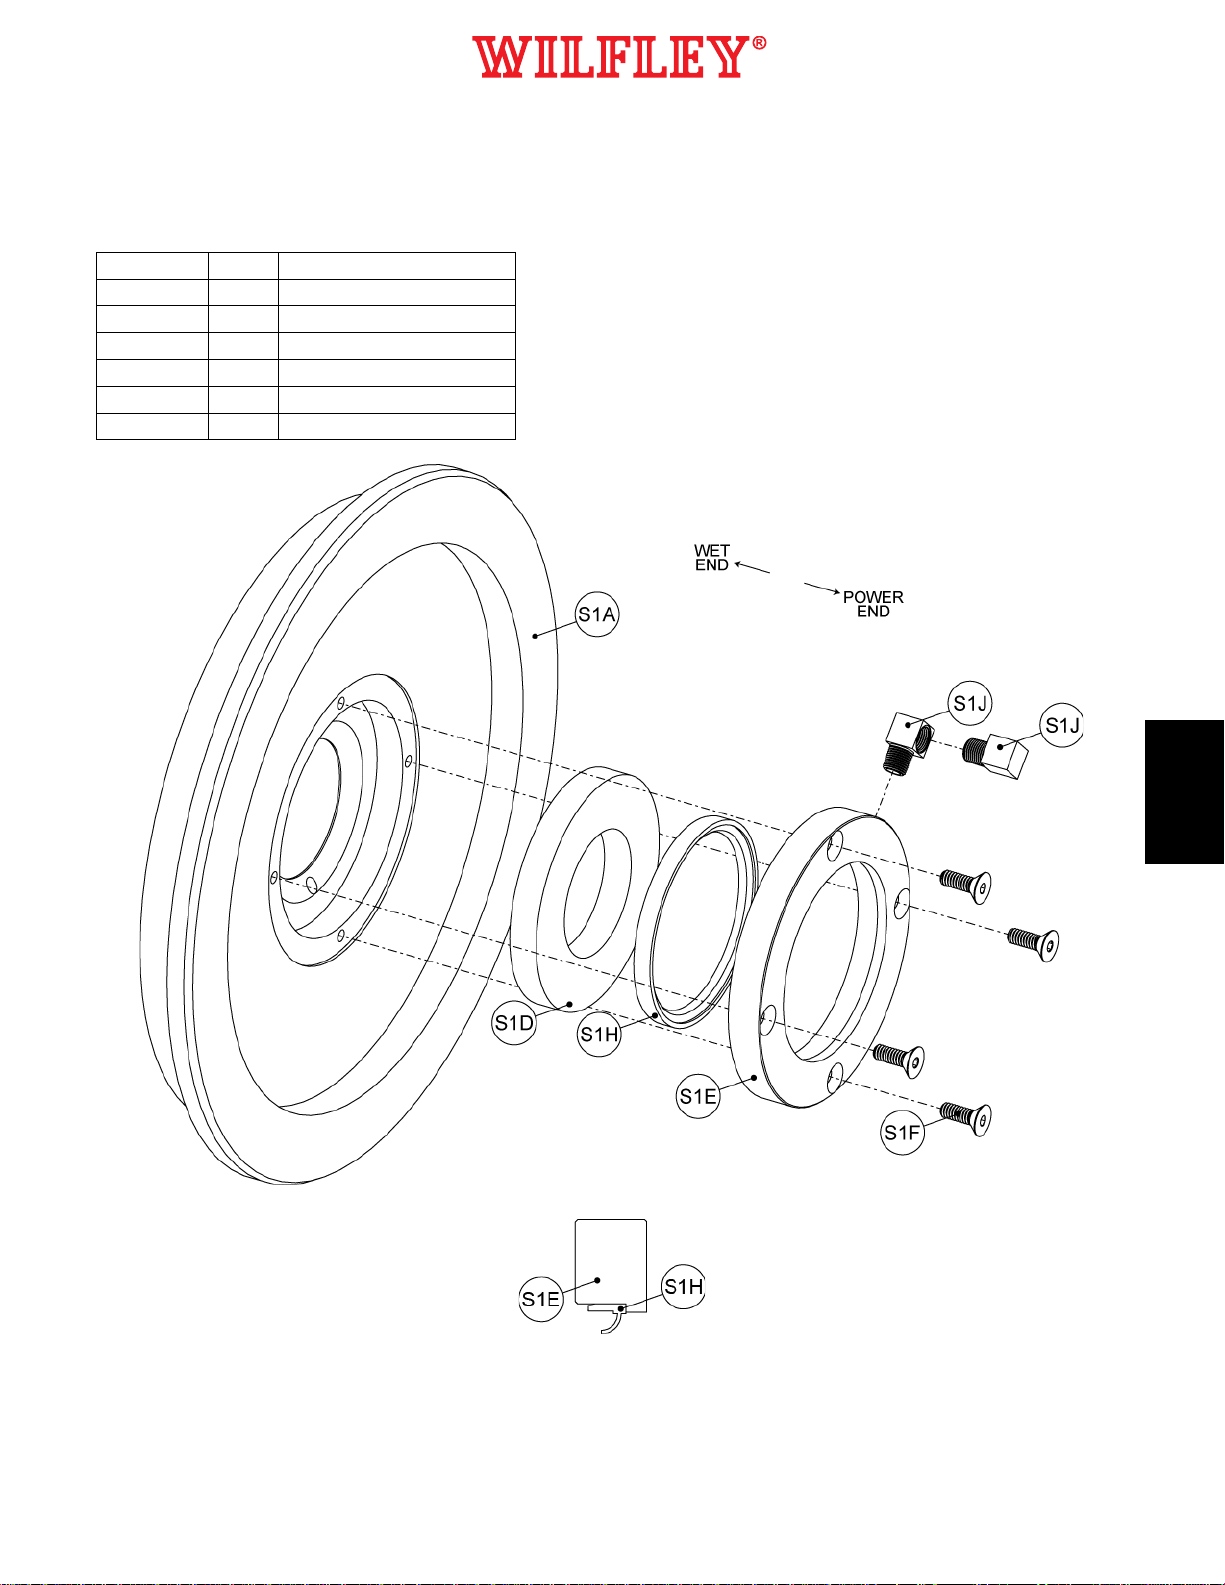
1.0 Stationary Seal Subassembly...............................................................................................................................7
1.1 A7/A9 Chemical Pump (Purge Port Configuration)........................................................................................7
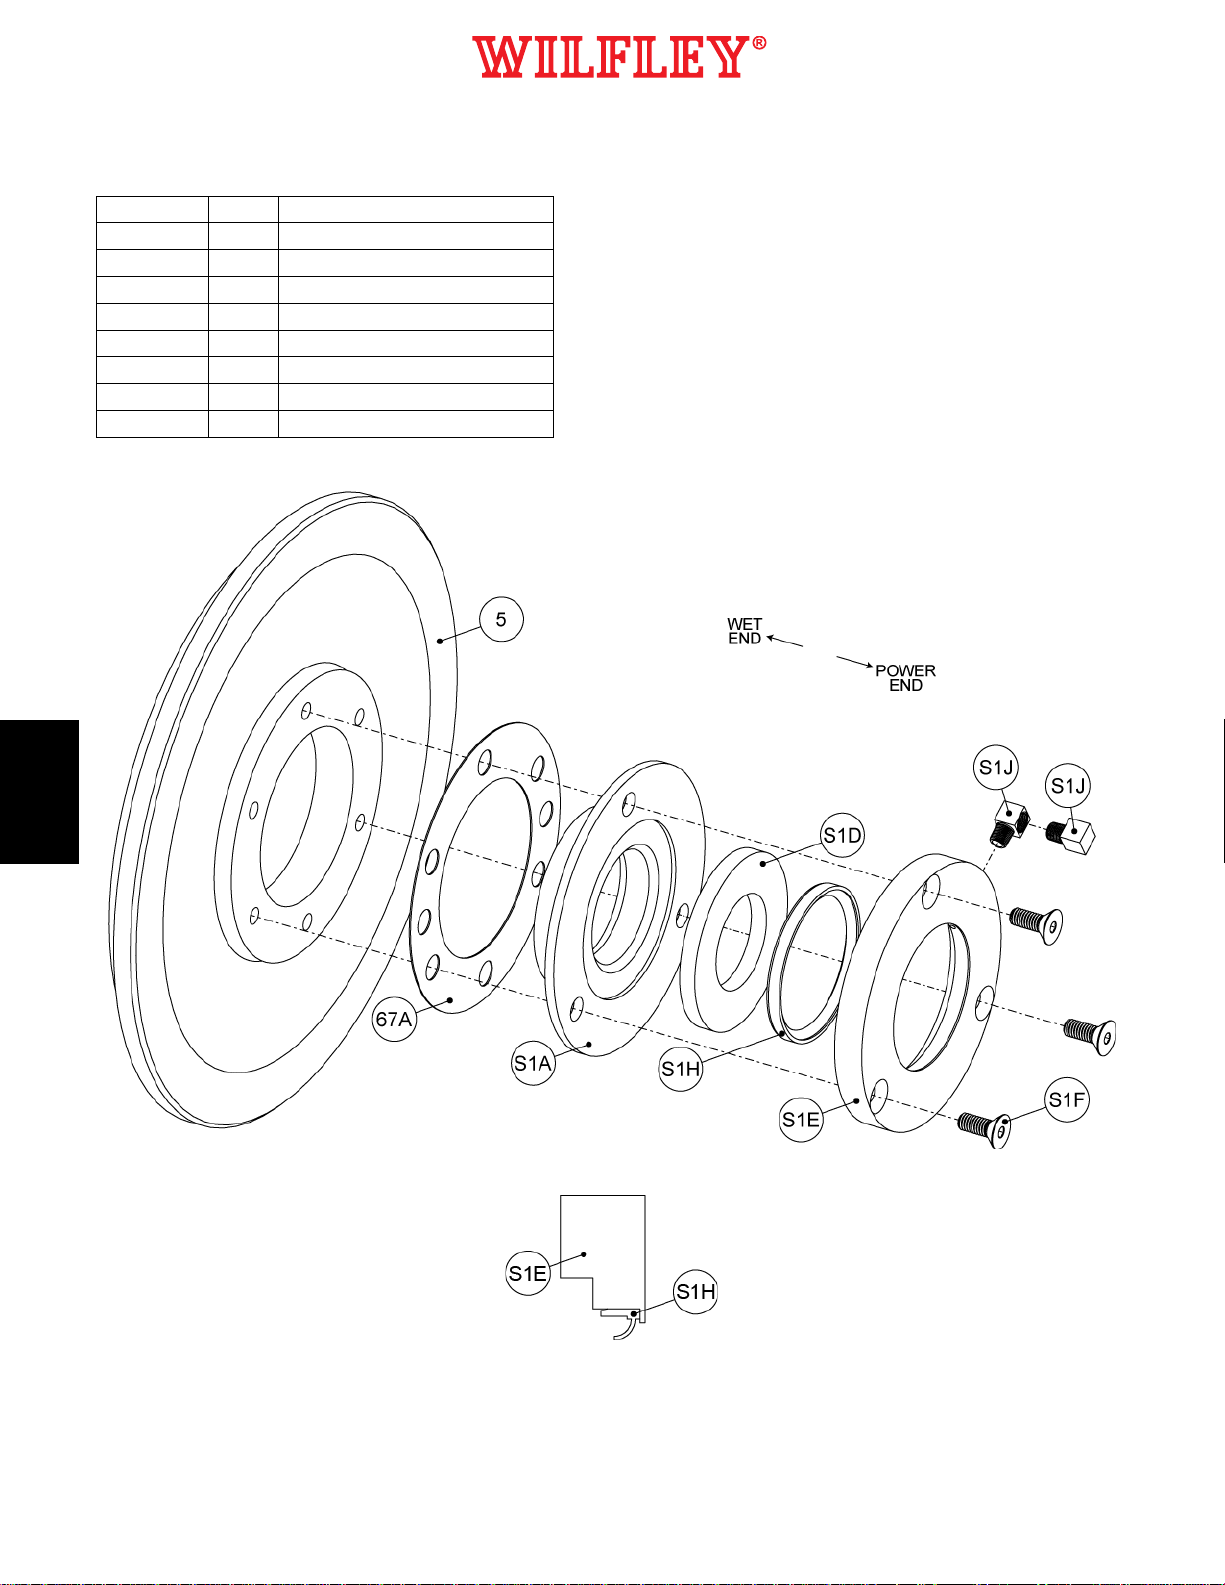
1.2 AF Chemical Pump (Purge Port Configuration) ............................................................................................8
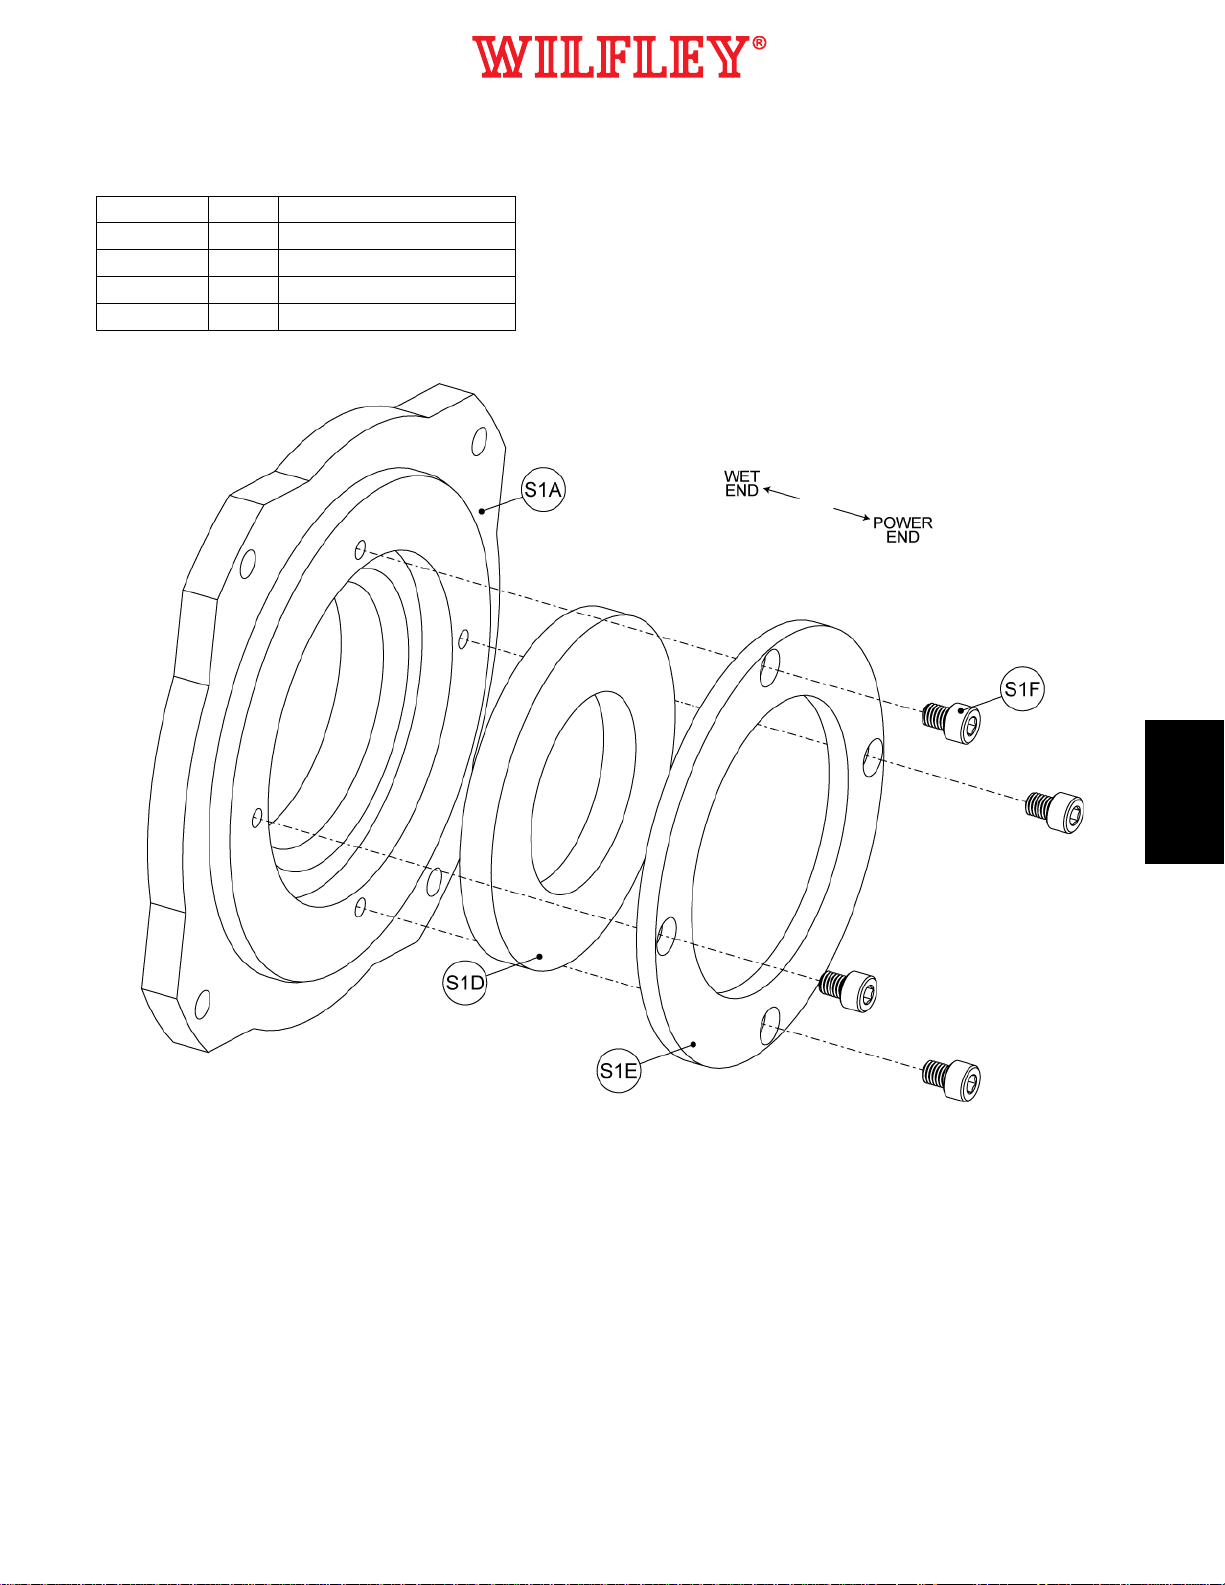
1.3 EMW®Slurry Pump (Standard Configuration) ..............................................................................................9
1.4 EMW®Slurry Pump (Purge Port Configuration) ..........................................................................................10
1.5 HD Slurry Pump – 8x4 & 8x6 (Standard Configuration) .............................................................................11
1.6 Kpro®Slurry Pump (Standard Configuration) .............................................................................................12
1.7 Kpro®Slurry Pump (Purge Port Configuration) ...........................................................................................13
1.8 S3 Chemical Slurry Pump............................................................................................................................14
1.9 S3 Chemical Slurry Pump (Lip Seal Configuration).....................................................................................15
2.0 Rotary Seal Subassembly ..................................................................................................................................16
2.1 Step 1...........................................................................................................................................................16
2.2 Step 2...........................................................................................................................................................17
3.0 Pump Assembly..................................................................................................................................................18
4.0 SolidLock®Seal Adjustment...............................................................................................................................19
5.0 Quantity of Springs Based on Operating Speed ................................................................................................20
6.0 Cross Section .....................................................................................................................................................21
6.1 Standard Configuration ................................................................................................................................21
6.2 Purge Port Configuration..............................................................................................................................22
7.0 Revision History..................................................................................................................................................23


A.R. Wilfley and Sons, Inc.
Rev 3
October 2018
5870 E. 56th Avenue, Commerce City, CO 80022 USA • Toll Free: 1-800-525-9930 • Phone: +1 (303) 779-1777 • Fax: +1 (303) 779-1277 • www.wilfley.com • pumps@wilfley.com
7
1.0 Stationary Seal Subassembly
1.1 A7/A9 Chemical Pump (Purge Port Configuration)
ITEM NO.
QTY.
DESCRIPTION
S1A
1
Stationary Seal Housing
S1D
1
Stationary Seal
S1E
1
Seal Lock
S1F
4
Stationary Seal Bolt
S1H
1
Lip Seal
S1J
2
Elbow
Ensure lip seal (S1H) is installed in the correct direction:
1. Press lip seal (S1H) into the seal lock (S1E).
2. Insert elbows (S1J) into the seal lock (S1E).
3. Insert stationary seal (S1D) and seal lock (S1E) into the stationary seal housing (S1A). Secure in place with
the stationary seal bolts (S1F). Tighten in a crisscross fashion.
A7 / A9

A.R. Wilfley and Sons, Inc.
Rev 3
October 2018
5870 E. 56th Avenue, Commerce City, CO 80022 USA • Toll Free: 1-800-525-9930 • Phone: +1 (303) 779-1777 • Fax: +1 (303) 779-1277 • www.wilfley.com • pumps@wilfley.com
8
1.2 AF Chemical Pump (Purge Port Configuration)
ITEM NO.
QTY.
DESCRIPTION
5*
1
Case Plate
67A
1
Case Plate Lab Ring Gasket
S1A
1
Lab Ring
S1D
1
Stationary Seal
S1E
1
Seal Lock
S1F
3
Stationary Seal Bolt
S1H
1
Lip Seal
S1J
2
Elbow
* Not included in retrofit kits
Ensure lip seal (S1H) is installed in the correct direction:
1. Press lip seal (S1H) into the seal lock (S1E).
2. Insert elbows (S1J) into the seal lock (S1E).
3. Insert gasket (67A), lab ring (S1A), and stationary seal (S1D) into the case plate (5).
4. Secure in place with the seal lock (S1E) and bolts (S1F). Tighten in a crisscross fashion.
AF

A.R. Wilfley and Sons, Inc.
Rev 3
October 2018
5870 E. 56th Avenue, Commerce City, CO 80022 USA • Toll Free: 1-800-525-9930 • Phone: +1 (303) 779-1777 • Fax: +1 (303) 779-1277 • www.wilfley.com • pumps@wilfley.com
9
1.3 EMW®Slurry Pump (Standard Configuration)
ITEM NO.
QTY.
DESCRIPTION
S1A
1
Stationary Seal Housing
S1D
1
Stationary Seal
S1E
1
Seal Lock
S1F
4-6*
Stationary Seal Bolt
* Depends on pump size
1. Insert stationary seal (S1D) into the stationary seal housing (S1A).
2. Secure in place with the seal lock (S1E) and bolts (S1F). Tighten in a crisscross fashion.
EMW®

A.R. Wilfley and Sons, Inc.
Rev 3
October 2018
5870 E. 56th Avenue, Commerce City, CO 80022 USA • Toll Free: 1-800-525-9930 • Phone: +1 (303) 779-1777 • Fax: +1 (303) 779-1277 • www.wilfley.com • pumps@wilfley.com
10
1.4 EMW®Slurry Pump (Purge Port Configuration)
ITEM NO.
QTY.
DESCRIPTION
S1A
1
Stationary Seal Housing
S1D
1
Stationary Seal
S1E
1
Seal Lock
S1F
4-6*
Stationary Seal Bolt
S1H
1
Lip Seal
S1J
1
Elbow
S1L
1
Elbow
* Depends on pump size
Ensure lip seal (S1H) is installed in the correct direction:
1. Press lip seal (S1H) into the seal lock (S1E).
2. Insert elbows (S1J & S1L) into the seal lock (S1E).
3. Insert stationary seal (S1D) into the stationary seal housing (S1A).
4. Secure in place with the seal lock (S1E) and bolts (S1F). Tighten in a crisscross fashion.
EMW
®

A.R. Wilfley and Sons, Inc.
Rev 3
October 2018
5870 E. 56th Avenue, Commerce City, CO 80022 USA • Toll Free: 1-800-525-9930 • Phone: +1 (303) 779-1777 • Fax: +1 (303) 779-1277 • www.wilfley.com • pumps@wilfley.com
11
1.5 HD Slurry Pump – 8x4 & 8x6 (Standard Configuration)
ITEM NO.
QTY.
DESCRIPTION
S1A
1
Stationary Seal Housing
S1C
1
O-Ring, Stationary Seal Housing
S1D
1
Stationary Seal
S1E
1
Seal Lock
S1F
8
Stationary Seal Bolt
S1G
1
Stationary Seal Holder
1. Insert o-ring (S1C), seal lock (S1E), and stationary seal (S1D) into the stationary seal housing (S1A).
2. Secure in place with the stationary seal holder (S1G) and bolts (S1F). Tighten in a crisscross fashion.
HD

A.R. Wilfley and Sons, Inc.
Rev 3
October 2018
5870 E. 56th Avenue, Commerce City, CO 80022 USA • Toll Free: 1-800-525-9930 • Phone: +1 (303) 779-1777 • Fax: +1 (303) 779-1277 • www.wilfley.com • pumps@wilfley.com
12
1.6 Kpro®Slurry Pump (Standard Configuration)
ITEM NO.
QTY.
DESCRIPTION
S1A
1
Stationary Seal Housing
S1D
1
Stationary Seal
S1E
1
Seal Lock
S1F
4
Stationary Seal Bolt
1. Insert stationary seal (S1D) into the stationary seal housing (S1A).
2. Secure in place with the seal lock (S1E) and bolts (S1F). Tighten in a crisscross fashion.
Kpro
®

A.R. Wilfley and Sons, Inc.
Rev 3
October 2018
5870 E. 56th Avenue, Commerce City, CO 80022 USA • Toll Free: 1-800-525-9930 • Phone: +1 (303) 779-1777 • Fax: +1 (303) 779-1277 • www.wilfley.com • pumps@wilfley.com
13
1.7 Kpro®Slurry Pump (Purge Port Configuration)
ITEM NO.
QTY.
DESCRIPTION
S1A
1
Stationary Seal Housing
S1D
1
Stationary Seal
S1E
1
Seal Lock
S1F
4
Stationary Seal Bolt
S1H
1
Lip Seal
S1L
1
Flush Block
S1M
1
Transfer Tube
S1N
2
O-Ring, Transfer Tube
Ensure lip seal (S1H) is installed in the correct direction:
1. Press lip seal (S1H) into the seal lock (S1E).
2. Insert o-rings (S1N), transfer tube (S1M), and flush block (S1L) into the seal lock (S1E).
3. Insert stationary seal (S1D) into the stationary seal housing (S1A).
4. Secure in place with the seal lock (S1E) and bolts (S1F). Tighten in a crisscross fashion.
Kpro®

A.R. Wilfley and Sons, Inc.
Rev 3
October 2018
5870 E. 56th Avenue, Commerce City, CO 80022 USA • Toll Free: 1-800-525-9930 • Phone: +1 (303) 779-1777 • Fax: +1 (303) 779-1277 • www.wilfley.com • pumps@wilfley.com
14
1.8 S3 Chemical Slurry Pump
ITEM NO.
QTY.
DESCRIPTION
S1A
1
Stationary Seal Housing
S1C
1
O-Ring, Stationary Seal Housing
S1D
1
Stationary Seal
S1E
1
Seal Lock
S1F
4
Stationary Seal Bolt
S1G
1
Stationary Seal Holder
1. Insert o-ring (S1C), stationary seal holder (S1G), and stationary seal (S1D) into the stationary seal
housing (S1A).
2. Secure in place with the seal lock (S1E) and bolts (S1F). Tighten in a crisscross fashion.
S3

A.R. Wilfley and Sons, Inc.
Rev 3
October 2018
5870 E. 56th Avenue, Commerce City, CO 80022 USA • Toll Free: 1-800-525-9930 • Phone: +1 (303) 779-1777 • Fax: +1 (303) 779-1277 • www.wilfley.com • pumps@wilfley.com
15
1.9 S3 Chemical Slurry Pump (Lip Seal Configuration)
ITEM NO.
QTY.
DESCRIPTION
S1A
1
Stationary Seal Housing
S1C
1
O-Ring, Stationary Seal Housing
S1D
1
Stationary Seal
S1E
1
Seal Lock
S1F
4
Stationary Seal Bolt
S1G
1
Stationary Seal Holder
S1H
1
Lip Seal
Ensure lip seal (S1H) is installed in the correct direction:
1. Press lip seal (S1H) into the seal lock (S1E).
2. Insert o-ring (S1C), stationary seal holder (S1G), and stationary seal (S1D) into the stationary seal
housing (S1A).
3. Secure in place with the seal lock (S1E) and bolts (S1F). Tighten in a crisscross fashion.
S3

A.R. Wilfley and Sons, Inc.
Rev 3
October 2018
5870 E. 56th Avenue, Commerce City, CO 80022 USA • Toll Free: 1-800-525-9930 • Phone: +1 (303) 779-1777 • Fax: +1 (303) 779-1277 • www.wilfley.com • pumps@wilfley.com
16
2.0 Rotary Seal Subassembly
2.1 Step 1
ITEM NO.
QTY.
DESCRIPTION
S2A
1
Rotary Seal
S2B
4
Rotary Seal Bolt
S2C
1
Rotary Seal Carrier
S2D
1
Weight Spider
S2K
1
O-ring, Rotary Seal
S2L
1
O-ring, Rotary Seal Carrier
S2M
1
O-ring, Weight Spider
S2N
1
O-ring, Weight Spider to Shaft Sleeve
S2P
4
Shaft Sleeve Set Screw
1. Install o-ring (S2K) into the rotary seal (S2A).
2. Install o-ring (S2L) into bore of the rotary seal carrier (S2C).
3. Insert rotary seal (S2A) into the rotary seal carrier (S2C) attaching them with bolts (S2B).
4. Insert o-ring (S2N) into the bore on the weight spider (S2D), and o-ring (S2M) onto the outer diameter groove
of the weight spider (S2D).
5. Loosely install set screws (S2P) into the weight spider (S2D).
6. Insert weight spider (S2D) into the rotary seal carrier (S2C) in the orientation shown above, making sure the
two sets of radial holes line up with each other.

A.R. Wilfley and Sons, Inc.
Rev 3
October 2018
5870 E. 56th Avenue, Commerce City, CO 80022 USA • Toll Free: 1-800-525-9930 • Phone: +1 (303) 779-1777 • Fax: +1 (303) 779-1277 • www.wilfley.com • pumps@wilfley.com
17
2.2 Step 2
ITEM NO.
QTY.
DESCRIPTION
S2E
2
Weight
S2F
TBD*
Spring Bolt
S2G
TBD*
Spring
S2H
2
Pull Pin
S2J
2
Weight Bolt
* Refer to section 5.0 for quantities
1. Insert pins (S2H) to hold the rotary seal carrier (S2C) and weight spider (S2D) together.
2. Install weights (S2E) using the weight bolts (S2J) making sure the weights (S2E) are hooking onto the lip on
the rotary seal carrier (S2C).
3. Install springs (S2G) and spring bolts (S2F), spacing them out evenly. Springs and spring bolts should be in
an even pattern starting with one bolt directly under each weight.
4. Insert shaft sleeve into the subassembly.
The shaft sleeve item number varies with pump model:
PUMP
ITEM NO.
A7
39
A9
5A
AF
14
EMW®
14
HD
17
Kpro®
19C
S3
39

A.R. Wilfley and Sons, Inc.
Rev 3
October 2018
5870 E. 56th Avenue, Commerce City, CO 80022 USA • Toll Free: 1-800-525-9930 • Phone: +1 (303) 779-1777 • Fax: +1 (303) 779-1277 • www.wilfley.com • pumps@wilfley.com
18
3.0 Pump Assembly
1. Assemble pump according to the pump IOM manual until the step to install the seal assembly is reached.
2. Install rotary seal subassembly onto the pump shaft so that the rotary seal (S2A) is facing away from the
power end of the pump. Do not tighten the four set screws (S2P) on the subassembly.
3. Install stationary seal subassembly onto the pump so that the stationary seal (S1D) is facing towards the
power end of the pump.
4. Complete final assembly of the pump according to the pump IOM manual.
5. Set the impeller clearances according to the pump IOM manual.
6. Proceed to next section to set the seal clearances.
*Stationary seal subassembly varies with pump model (Kpro®shown above)

A.R. Wilfley and Sons, Inc.
Rev 3
October 2018
5870 E. 56th Avenue, Commerce City, CO 80022 USA • Toll Free: 1-800-525-9930 • Phone: +1 (303) 779-1777 • Fax: +1 (303) 779-1277 • www.wilfley.com • pumps@wilfley.com
19
4.0 SolidLock®Seal Adjustment
The seal MUST be adjusted and locked AFTER the pump has been assembled AND the impeller clearance has
been set according to pump IOM. Before you begin, ensure that the set screws (S2P) are loose and that the
rotary seal subassembly can freely move axially along the shaft sleeve.
1. Firmly push the rotary seal subassembly against the stationary subassembly until the seal faces come into
contact.
2. Evenly tighten the four set screws (S2P) to lock the position of the rotary seal subassembly.
3. Pull the two pins (S2H) out of the rotary seal subassembly. It may be necessary to pull on the weights (S2E)
to be able to pull the pins (S2H).
**The pump is now ready for use**
When resetting pump clearances, performing maintenance, or disassembling the pump, the rotary seal
subassembly must be reset with the pull pins (S2H). First ensure that the pump casing is void of fluid and
pressure. Pulling up on the weight (S2E) nearest the hole with the pin (S2H) will help line up the two radial holes.
Once both pins (S2H) are in, the set screws (S2P) may be loosened and the rotary seal subassembly may be
adjusted or disassembled from the pump.

A.R. Wilfley and Sons, Inc.
Rev 3
October 2018
5870 E. 56th Avenue, Commerce City, CO 80022 USA • Toll Free: 1-800-525-9930 • Phone: +1 (303) 779-1777 • Fax: +1 (303) 779-1277 • www.wilfley.com • pumps@wilfley.com
20
5.0 Quantity of Springs Based on Operating Speed
Use the table below to determine the quantity of springs required for your application. If you are using a variable
frequency drive and are operating the pump as various speeds, use your lowest operating speed to determine the
quantity of springs.
1A7 – 2A7
1A9 – 2A9
1AF – 4AF
EMW50 – EMW75
1Kpro – 3Kpro
3A7 – 4A7
3A9
EMW100
4Kpro – 5Kpro
4A9 – 5A9
EMW150
6Kpro
1S3
EMW200 – EMW250
HD8x4 – HD8x6
8Kpro
2S3
Small Weight
Medium Weight
Medium Weight
Large Weight
Speed
Spring Qty.
Speed
Spring Qty.
Speed
Spring Qty.
Speed
Spring Qty.
< 1,400
4
< 600
6
< 600
4
< 400
4
1,400-1,600
6
600-800
8
600-700
8
400-500
6
1,600-1,800
8
800-900
10
700-800
12
500-600
8
1,800-2,000
10
900-1,000
12
800-900
14
600-700
10
> 2,000
12
1,000-1,100
14
900-1,100
16
700-800
12
1,100-1,200
16
Small Weight
800-900
16
Small Weight
Speed
Spring Qty.
900-1,000
20
Speed
Spring Qty.
1,100-1,300
8
1,000-1,100
24
1,200-1,400
6
1,300-1,500
10
Medium Weight
1,400-1,700
8
1,500-1,700
12
Speed
Spring Qty.
1,700-2,000
10
1,700-1,900
14
> 1,100
24
2,000-2,200
12
> 1,900
16
2,200-2,400
14
> 2,400
16
Notes:
SolidLock assemblies are shipped with the correct quantity of springs and weight size for your application.
Small weight = A3193
Medium weight = A3199-02
Large weight = A3199
Other manuals for SolidLock
1
Table of contents
Other Wilfley Water Pump manuals
Popular Water Pump manuals by other brands

Sulzer
Sulzer XJC AT Series Starting and operating instructions

Pentair
Pentair STA-RITE HN Series owner's manual

Roper
Roper 3511 owner's manual

Resol
Resol FlowCon S Installation Operation Commissioning

Pratissoli
Pratissoli KS Series Use and maintenance manual

Oase
Oase Aquarius Universal Classic 600 operating instructions

Jebao
Jebao DC-6000 user manual

Pentair
Pentair Sta-Rite J Series owner's manual

GP
GP K2 Pumps WPD07502K owner's manual

Pittsburgh Automotive
Pittsburgh Automotive 63682 Owner's manual & safety instructions

GORMAN-RUPP PUMPS
GORMAN-RUPP PUMPS 08C1-GA Installation, operation, and maintenance manual with parts list

Powerfix
Powerfix PBMP 30 A1 operating instructions