Willis WST09MH16S User manual

Split Air Conditioner
Thank you for choosing our product.
For proper operation, please read and keep this manual carefully.
WST09MH16S
WST12MH16S
WST12MC16S
MODEL :

This appliance is not intended for use by persons (including children) with reduced
physical,
sensory
or mental capabilities or lack of experience and knowledge, un-
less they have been given supervision or instruction concerning use of the appli-
ance by a person responsible for their safety.
Children should be supervised to ensure they are away from the appliance.
Content
Operation Notices
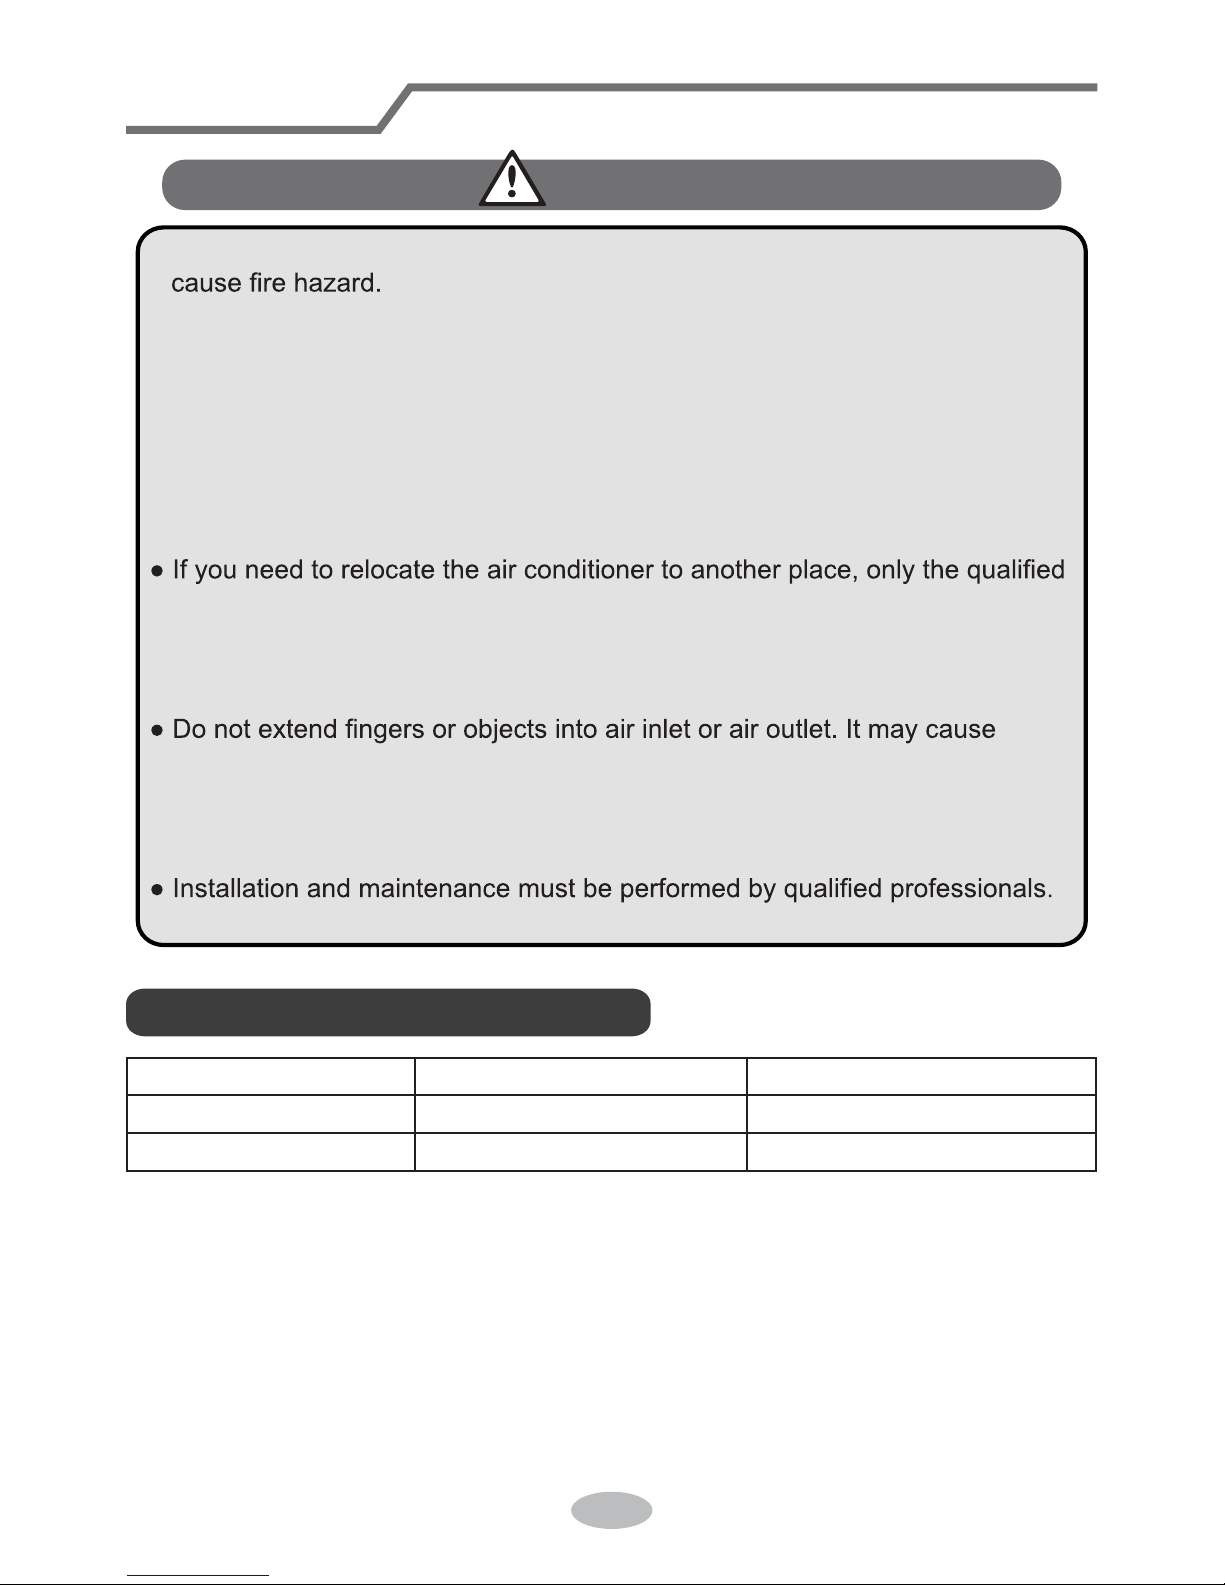
Precautions............................................................................................................1
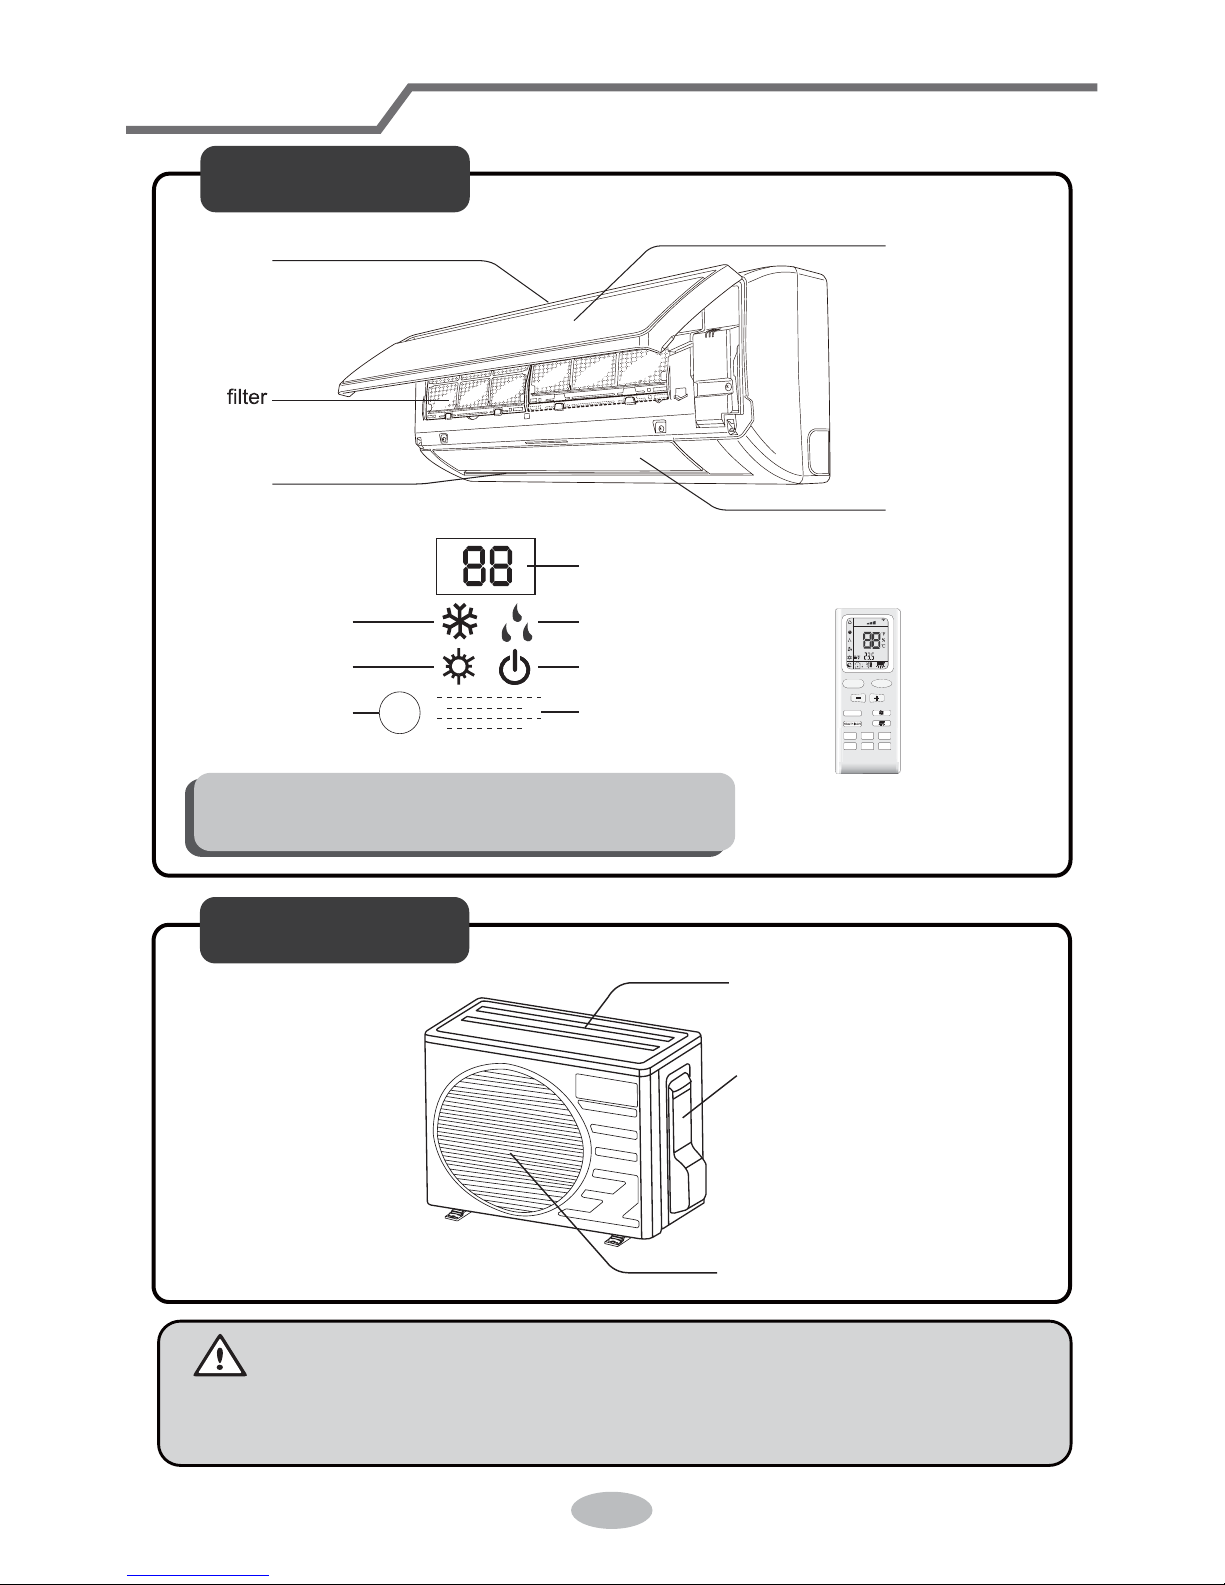
Parts name ............................................................................................................2
Screen Operation Guide
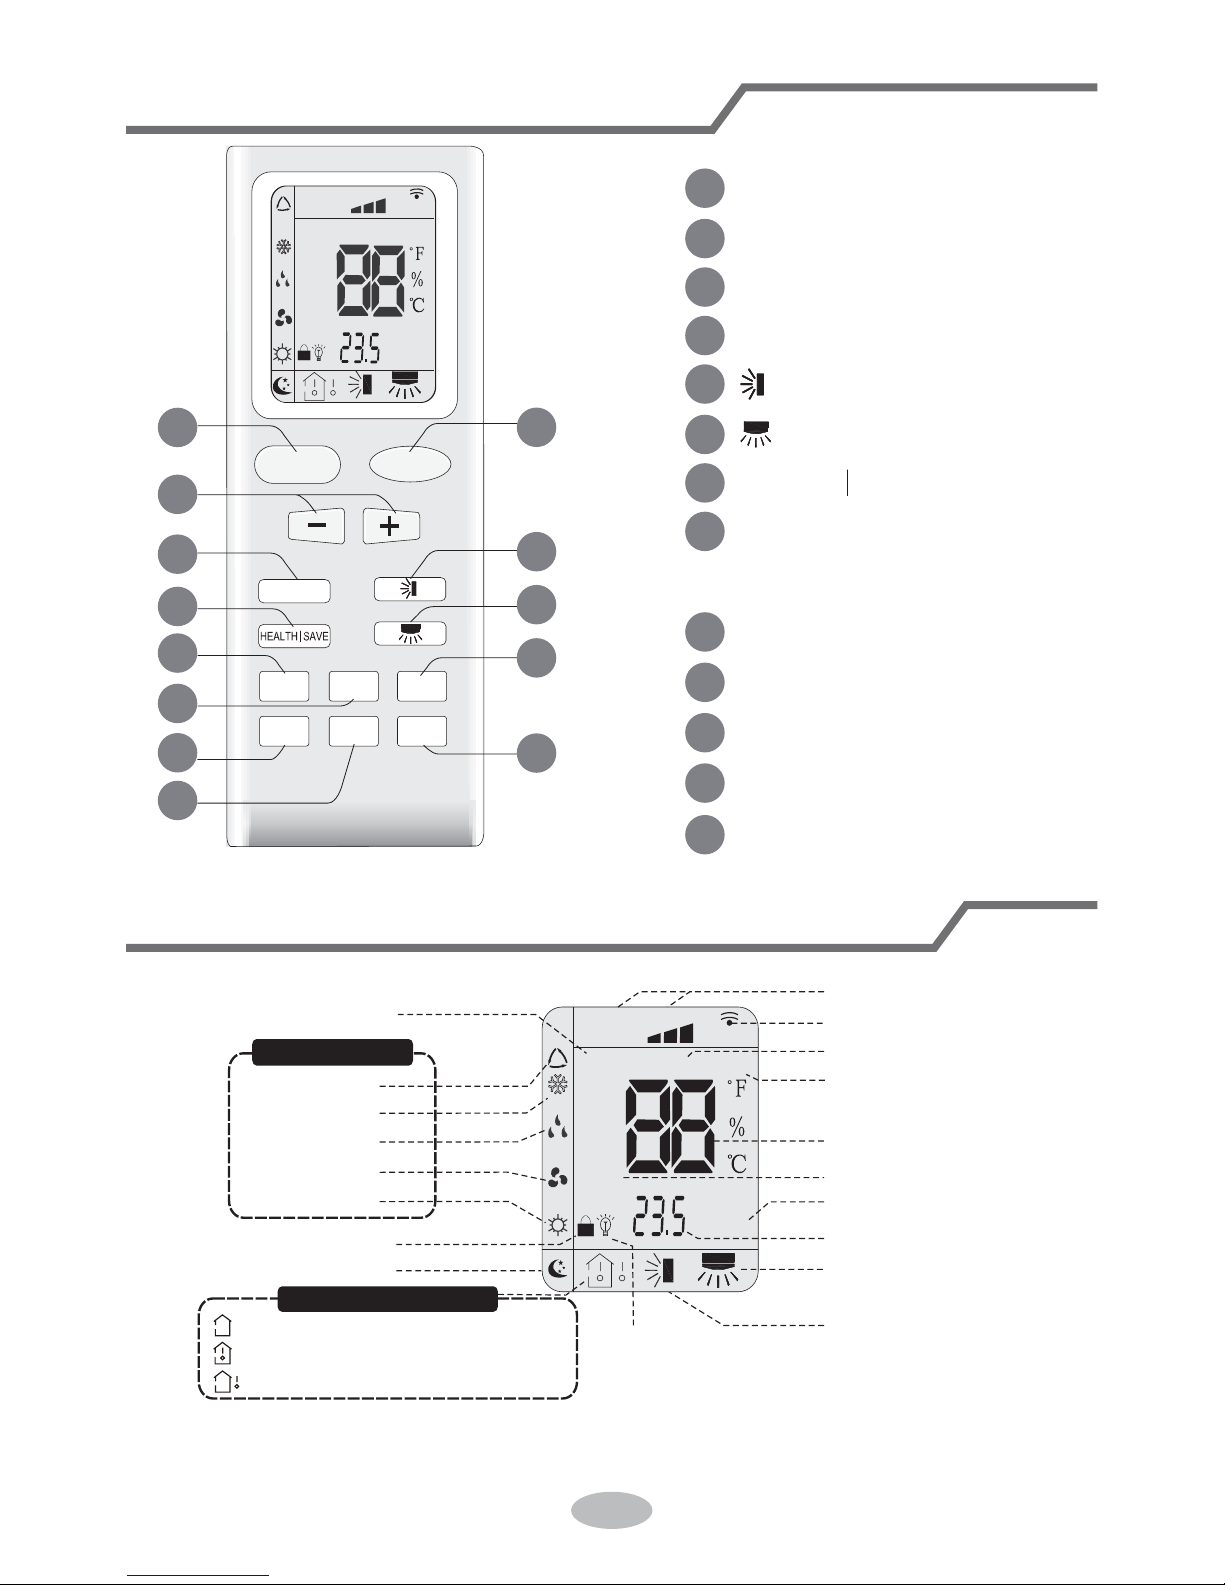
Buttons on remote controller .................................................................................3
Introduction for icons on display screen ................................................................3
Introduction for buttons on remote controller.........................................................4
Function introduction for combination buttons.......................................................8
Operation guide.....................................................................................................9
Replacement of batteries in remote controller.......................................................9
Emergency operation ..........................................................................................10
Maintenance
Clean and maintenance.......................................................................................10
Malfunction
Malfunction analysis ............................................................................................13
Installation Notice
Installation dimension diagram............................................................................17
Tools for installation.............................................................................................18
Selection of installation location ..........................................................................18
Requirements for electric connection ..................................................................19
Installation
Installation of indoor unit......................................................................................20
Installation of outdoor unit ...................................................................................25
Vacuum pumping.................................................................................................29
Leakage detection ...............................................................................................29
Check after installation ........................................................................................30
Test and operation
Test operation......................................................................................................30
Attachment
.........................................................................31
Pipe expanding method
Configuration of connection pipe
.......................................................................................33

1
Precautions
Warning
Ɣ'RQRWFRQQHFWDLUFRQGLWLRQHUWRPXOWLSXUSRVHVRFNHW 2WKHUZLVHLWPD\
Ɣ'RGLVFRQQHFWSRZHUVXSSO\ZKHQFOHDQLQJDLUFRQGLWLRQHr2WKHUZLVHLWPD\
FDXVHHOHFWULFVKRFN
Ɣ'RnRWVSUa\ZaWHrRnLQGRRrXQiW,WPa\FaXVHHOHFWriFVKRFNRrPDOfXnFWLRn
Ɣ'RQRWVSLOOZDWHURQWKHUHPRWHFRQWUROOHrRWKHUZLVHWKHUHPRWHFRQWUROOHU
PD\EHEURNHQ
Ɣ'RQRWUHSDLUDLUFRQGLWLRQHUE\\RXUVHOI,WPD\FDXVHHOHFWULFVKRFNRU
GDPDJH3OHDVHFRQWDFWGHDOHUZKHQ\RXQHHGWRUHSDLUDLUFRQGLWLRQHr
Ɣ'RQRWEORFNDLURXWOHWRUDLULQOHW,WPD\FDXVHPDOIXQFWLRQ
SHUVRQFDQSHUIRUPWKHZRUN2WKHUZLVHLWPD\FDXVHSHUVRQDOLQMXU\RU
GDPDJH
Ɣ'RQRWVWHSRQWRSSDQHORIRXWGRRUXQLWRUSXWKHDY\REMHFWV,WPD\FDXVH
GDPDJHRUSHUVRQDOLQMXU\
SHUVRQDOLQMXU\RUGDPDJH
Ɣ$LU&RQGLWLRQHUVKRXOGEHSURSHUO\JURXQGHG,QFRUUHFWJURXQGLQJPD\FDXVH
HOHFWULF VKRFN
Ɣ'RLQVWDOOWKHDLUVZLWFK,IQRWLWPD\FDXVHPDOIXQFWLRQ
2WKHUZLVHLWPD\FDXVHSHUVRQDOLQMXU\RUGDPDJH
Working temperature range
,QGRRUVLGH'B/WB(ć)2XWGRRUVLGH'%:%ć)
0D[LPXPFRROLQJ 32/23 43/26
0D[LPXPKHDWLQJ 24/18
7KHRSHUDWLQJWHPSHUDWXUHUDQJHRXWGRRUWHPSHUDWXUHIRUFRROLQJRQO\XQLWLV
18ćaćIRUKHDWSXPSXQLWLVć
ać

2
(Display content or position may be different from above
graphics, please refer to actual products)
Parts name
Indoor Unit
Outdoor Unit
air inlet panel
horizontal louver
air outlet
heating indicator
temp. indicator
cooling indicator
power indicator
receiver window
aux.button
drying indicator
display
FAN
AUTO
OPER
HEALTH
AIR
FILTER
TURBO
ON/OFF
X-FAN
HOUR
HUMIDITY
ON/OFF
MODE
FAN
X-FAN
TURBO
TEMP
TIMER
SLEEP LIGHT
remote control
air inlet
handle
air outlet
Notice:
Actual product may be different from above graphics, please refer to actual
products.

3
Buttons on remote controller
Introduction for icons on display screen
FAN
AUTO
OPER
HEALTH
AIR
FILTER
TURBO
ON/OFF
X-FAN
HOUR
HUMIDITY
ON/OFF
MODE
FAN
X-FAN
TURBO
TEMP
TIMER
SLEEP LIGHT
2
5
6
10
13
12
11
9
8
3
4
7
1
1ON/OFF button
2MODE button
3+/- button
4FAN button
5button
8X-FAN button
(Note: X-FAN is same with BLOW)
9TEMP button
10 TIMER button
11 TURBO button
12 SLEEP button
13 LIGHT button
7HEALTH SAVE button
6button
FAN OPER
AUTO
HEALTH
AIR
FILTER
TURBO
ON/OFF
X-FAN
HOUR
HUMIDITY
Up & down swing
left & right swing
set time
TIMER ON/TIMER OFF
turbo mode
set temperature
X-fan
health mode
send signal
set fan speed
light
Temp. display type
:Set temp.
:Outdoor ambient temp.
:Indoor ambient temp.
Sleep mode
Clock
Heat mode
Fan mode
Dry mode
Cool mode
Auto mode
Operation mode
air mode

4
ƔAfter selecting auto mode, air conditioner will operate automatically according to
ambient temperature. Set temperature can’t be adjusted and also can’t be displa-
yed. Press
"
FAN
"
button can adjust fan speed. Press
""
button and
""
button
can adjust swing angle.
Ɣ
After selecting cool mode, air conditioner operates under cool mode. Cool indicator
" " on indoor unit is ON. You can press "+" or "-" button to adjust set temperature.
Press
"
FAN
"
button can adjust fan speed. Press
" "
button and
" "
button can
adjust swing angle.
ƔAfter selecting dry mode, air conditioner operates under dry mode at low speed.
Dry indicator
" "
on indoor unit is ON. Under dry mode, fan speed can’t be ad-
justed. Press
" "
button and
" "
button to adjust swing angle.
ƔAfter selecting fan mode, air conditioner operates only under fan mode, All mode
indicators on indoor unit is OFF. Operation indicator is on. Press
"
FAN
"
button can
adjust fan speed. Press
" "
button and
" "
button to adjust swing angle.
Ɣ
After selecting heat mode, air conditioner operates under heat mode. Heat indicator
"
" on indoor unit is ON. You can press "+" or "-" button to adjust set temperature
.
Press "FAN" button to adjust fan speed. Press " " button and " " button to adjust
swing angle. (Cooling only unit can’t receive the signal for heating mode.)
Introduction for buttons on remote controller
Note:
ƔAfter putting through power, air conditioner will give out a sound and operation
indicator
""
is ON (red indicator). You can operate the air conditioner through
the remote controller.
Ɣ
At ON status, after each pressing button on remote controller, the signal icon " "
indicates the signal has been sent to air conditioner.
ƔAt OFF status, display screen on remote controller displays set temperature.
At on status, display screen on remote controller displays the corresponding startup
function’s icon.
ON/OFF button
MODE button
1
2
Press this button can turn on or turn off the air conditioner. After turning on the unit,
operation indicator
""
on indoor unit is ON (green indicator. Color may be differ-
ent for different models) and indoor unit gives out a sound.
Press this button can select your required operation mode.
AUTO COOL FANDRY HEAT

5
Introduction for buttons on remote controller
"
+
"
or
"
-
"
button
FAN button
3
4
5
ƔAfter each pressing of "+" or "-" button, it can increase or decrease set temper-
ature 1ć. Hold
"
+
"
or
"
-
"
button, 2s later, set temperature on remote controller
will change quickly. After reaching to your required time, loosen the button.
Temperature indicator on indoor unit will also change accordingly. (Temperature
can’t be adjusted under auto mode)
Ɣ8QGHU TIMER ON, TIMER OFF or Clock setting, you can press "+" or "-" button to
adjust time. (Refer to TIMER button for details)
Press this button can select up&down swing. Swing angle can be selected in sequ-
ence as below:
When selecting " " with remote controller, it’s auto swing. Horizontal louver of air
conditioner will swing up&down automatically at the maximum angle.
When selecting " ǃǃ ǃǃ
swing. Horizontal louver of air conditioner will stop at that position as shown by the
icon to swing.
no display
(horizontal louvers stops
at current position)
button
Note:
For preventing cold wind, after starting up heating mode, indoor fan will blow fan
afterdelaying 1-5min. (Details time is decided by indoor ambient temperature)
Temperature setting range on remote controller: 16ć-30ć. Fan speed setting
range: auto, low speed, medium speed and high speed.
Pressing this button can set fan speed circXODUO\DVDXWR$872ORZ medium
( ), high( ).
Auto
Note:
Ɣ8QGHU$8726SHHG ,'8IDQPRWRUZLOODGMXVWWKHIDQVSHHGKLJKPHGLXPRUORZ
speed) according to ambient temperature.
Ɣ)DQVSHHGXQGHUGU\PRGHLVORZVSHHd.

6
Ɣ:KHQVHOHFWLQJ
" "
ZLWKUHPRWHFRQWUROOHULW¶VDXWRVZLQJ+RUL]RQWDOORXYHURI
air conditioner will swing left&right automatically at the maximum angle.
Ɣ:KHQVHOHFWLQJ
"
ǃǃǃǃ
"
ZLWKUHPRWHFRQWUROOHULW¶VWKH¿[HG
SRVLWLRQVZLQJ+RUL]RQWDOORXYHURIDLUFRQGLWLRQHUZLOOVWRSDWWKDWSRVLWLRQDV
shown by the icon to swing.
Ɣ:KHQVHOHFWLQJ
" "
LW¶VWKHFLUFXODWLQJVZLQJ+RUL]RQWDOORXYHURI
air conditioner will swing circularly according to the angle as shown by the icon.
HEALTH SAVE button
7
Introduction for buttons on remote controller
X-FAN button
8
6button
Press this button can select left&right swing. Swing angle can be selected
circularly in sequence as below:
no display
KRUL]RQWDOORXYHUVVWRSV
at current position)
(swing angle is dis-
played dynamically)
(swing angle is displayed dynamically)
HEALTH FUNCTION:
After pressing HEALTH button, remote controller will switch circularly as below:
+($/7+ ĺ $,5 ĺ $,5+($/7+ ĺ QRGLVSOD\
Ɣ
When selecting "HEALTH" by remote controller, HEALTH function will be started up.
Ɣ:KHQVHOHFWLQJ$,5E\UHPRWHFRQWUROOHU$,5IXQFWLRQZLOOEHVWDUWHGXS
Ɣ:KHQVHOHFWLQJ$,7+($/7+$,5DQG+($/7+IXQFWLRQZLOOEHVWDUWHGXS
Ɣ:KHQWKHUH¶VQRGLVSOD\RQUHPRWHFRQWUROOHU$,5DQG+($/7+IXQFWLRQZLOOEH
turned off.
SAVE function:
Under cool mode, press SAVE button and the unit will operate under SAVE mode.
Dual-8nixie tube on remote controller displays "SE". Air conditioner will operate at
auto speed. Set temperature can’t be adjusted. Press SAVE button again to exit
SAVE mode. Air conditioner turn back to original set speed and set temperature.
Ɣ7KLVIXQFWLRQLVDSSOLFDEOHWRSDUWLDORIPRGHOV
After pressing this button under cooling or dry mode, remote controller displays the
character of "X-FAN" and X-FAN function is started up. Press this button again to
cancel X-FAN function. The character of "X-FAN" will disappear.
Note:
Ɣ
After starting up X-FAN function, when turning off the unit, indoor fan will continue

7
Note:
Ɣ2XWGRRUDPELHQWWHPSHUDWXUHGLVSOD\PD\FDQ¶WEHVHOHFWHGIRUVRPHPRGHOV
When indoor unit receives " " signal, it displays indoor set temperature.
Ɣ2QO\IRUWKHPRGHOZKRVHLQGRRUXQLWKDVGXDOGLVSOD\
Note:
Ɣ7LPHVHWWLQJUDQJHKRXUV
Ɣ7LPHLQWHUYDOEHWZHHQWZRRSHUDWLRQVFDQ¶WH[FHHGV2WKHUZLVHUHPRWH
controller will exit the setting status automatically.
Introduction for buttons on remote controller
TEMP button
TIMER button
9
10
to
operate for a while at low speed to dry the residual water inside the indoor unit.
Ɣ:KHQWKHXQLWRSHUDWHVXQGHU;)$1PRGHSUHVV;)$1EXWWRQFDQWXUQRII
X-FAN function. Indoor fan stops operation immediately.
Press this button can see indoor set temperature, indoor ambient temperature or
outdoor ambient temperature on indoor unit’s display. Temperature is set circularly
by remote controller as below:
Ɣ
At ON status, press this button once can set TIMER OFF. The character of HOUR
DQG2))ZLOOÀDVK3UHVVRUEXWWRQZLWKLQVFDQDGMXVWWKHWLPHRI7,0(5
ON. After each pressing of "+" or "-" button, time will increase or decrease half an
hour. When holding "+" or "-" button, 2s later, the time will change quickly until to
UHDFKWR\RXUUHTXLUHGWLPH$IWHUWKDWSUHVV7,0(5EXWWRQWRFRQ¿UPLW7KH
FKDUDFWHURI+285DQG2))ZRQ¶WÀDVKDJDLQ
Cancel TIMER OFF: Press "TIMER" button again under TIMER OFF status.
Ɣ$W2))VWDWXVSUHVVWKLVEXWWRQRQFHFDQVHW7,0(5213OHDVHUHIHUWR7,0(5
off for detailed operation.
Cancel TIMER ON: Press "TIMER" button again under TIMER ON status.
no display
Ɣ:KHQVHOHFWLQJE\UHPRWHFRQWUROOHURUQRGLVSOD\WHPSHUDWXUHLQGLFDWRURQ
indoor unit displays set temperature.
Ɣ:KHQVHOHFWLQJE\UHPRWHFRQWUROOHUWHPSHUDWXUHLQGLFDWRURQLQGRRUXQLW
displays indoor ambient temperature.
Ɣ:KHQVHOHFWLQJE\UHPRWHFRQWUROOHUWHPSHUDWXUHLQGLFDWRURQLQGRRUXQLW
displays outdoor ambient temperature.

8
Function introduction for combination buttons
Introduction for buttons on remote controller
TURBO button
SLEEP button
LIGHT button
11
12
13
When pressing this button under cooling or heating mode, air conditioner will enter
into quick cooling or quick heating mode. The character of "TURBO" is displayed
on remote controller. Press this button again to exit turbo function and the character
of "TURBO" will be disappeared on remote controller.
Press this button can turn off the light for indoor unit’s display. " " icon on remote
controller will disappear. Press this button again to turn on the light for indoor unit’s
display. " " icon on remote controller will be displayed.
Child lock function
Switchover function for temperature display
Press "+" and "-" buttons simultaneously can turn on or turn off child lock function.
When child lock function is started up, " " icon will be displayed on remote
controller won’t send signal.
After turning off the unit by remote controller, press "-" button and "MODE" button
simultaneously to switch between ćand °F .
Press this button under cooling, heating mode can start up sleep function.
" " icon will be displayed on remote controller. Press this button again to cancel
sleep function. " " icon on remote controller will be displayed.

9
Operation guide
Replacement of batteries in remote controller
1. Press the back side of remote controller marked
ZLWKDVVKRZQLQWKH¿JDQGWKHQSXVKRXW
the cover of battery box along the arrow direction.
2. Replace two 7# (AAA 1.5V) dry batteries, and
make sure the position of "+" polar and "-" polar
are correct.
3. Reinstall the cover of battery box.
signal sender battery
Cover of battery box
remove
reinstall
Note:
Ɣ'XULQJRSHUDWLRQSRLQWWKHUHPRWHFRQWUROVLJQDOVHQGHUDWWKHUHFHLYLQJ
window on indoor unit.
Ɣ7KHGLVWDQFHEHWZHHQVLJQDOVHQGHUDQGUHFHLYLQJZLQGRZVKRXOGEHQR
more than 8m, and there should be no obstacles between them.
Ɣ6LJQDOPD\EHLQWHUIHUHGHDVLO\LQWKHURRPZKHUHWKHUHLVÀXRUHVFHQWODPS
or wireless telephone; remote controller should be close to indoor unit during
operation.
Ɣ5HSODFHQHZEDWWHULHVRIWKHVDPHPRGHOZKHQUHSODFHPHQWLVUHTXLUHG
Ɣ:KHQ\RXGRQ¶WXVHUHPRWHFRQWUROOHUIRUDORQJWLPHSOHDVHWDNHRXWWKH
batteries.
Ɣ,IWKHGLVSOD\RQUHPRWHFRQWUROOHULVIX]]\RUWKHUH¶VQRGLVSOD\SOHDVH
replace batteries.
1. After putting through the power, press " " button on remote controller to
turn on the air conditioner.
2. Press " " button to select your required mode: AUTO, COOL, DRY, FAN,
HEAT.
3. Press "+" or "-" button to set your required temperature. (Temperature can’t be
adjusted under auto mode).
4. Press " " button to set your required fan speed: auto, low, medium and
high speed.
5. Press " " and " " button to select fan blowing angle.
ON/OFF
MODE
FAN

10
Emergency operation
If remote controller is lost or damaged, please use auxiliary button to turn
on or turn off the air conditioner. The operation in details are as below:
$VVKRZQLQWKH¿JSUHVVDX[EXWWRQWRWXUQRQRUWXUQRIIWKHDLU
conditioner. When the air conditioner is turned on, it will operate under
auto mode.
aux. button
panel
Clean and maintenance
Note:
Ŷ7XUQRIIWKHDLUFRQGLWLRQHUDQGGLVFRQQHFWWKHSRZHUEHIRUHFOHDQLQJWKHDLU
conditioner to avoid electric shock.
Ŷ'RQRWZDVKWKHDLUFRQGLWLRQHUZLWKZDWHUWRDYRLGHOHFWULFVKRFN
Ŷ'RQRWXVHYRODWLOHOLTXLGWRFOHDQWKHDLUFRQGLWLRQHU
Clean surface of indoor unit
When the surface of indoor unit is dirty, it is recommended to use a soft dry cloth
or wet cloth to wipe it.
Note:
Ɣ'RQRWUHPRYHWKHSDQHOZKHQFOHDQLQJLW

11
Clean and maintenance
&OHDQ¿OWHU
1
2
3
4
Open panel
5HPRYH¿OWHU
&OHDQ¿OWHU
,QVWDOO¿OWHU
Pull out the panel to a certain
DQJOHDVVKRZQLQWKH¿J
5HPRYHWKH¿OWHUDVLQ
GLFDWHGLQWKH¿J
Ɣ8VHGXVWFDWFKHURUZDWHUWR
FOHDQWKH¿OWHU
Ɣ:KHQWKH¿OWHULVYHU\GLUW\XVH
the water (below 45ć) to clean
it, and then put it in a shady
and cool place to dry.
,QVWDOOWKH¿OWHUDQGWKHQFORVHWKH
panel cover tightly.
Note:
Ŷ7KH¿OWHUVKRXOGEHFOHDQHGHYHU\WKUHHPRQWKV,IWKHUHLVPXFKGXVWLQWKH
operation environment, clean frequency can be increased.
Ŷ$IWHUUHPRYLQJWKH¿OWHUGRQRWWRXFK¿QVWRDYRLGLQMXU\
Ŷ'RQRWXVH¿UHRUKDLUGU\HUWRGU\WKH¿OWHUWRDYRLGGHIRUPDWLRQRU¿UHKD]DUG

12
Clean and maintenance
Checking before use-season
Checking after use-season
1. Check whether air inlets and air outlets are blocked.
2. Check whether circuit break, plug and socket are in good condition.
&KHFNZKHWKHU¿OWHULVFOHDQ
4. Check whether mounting bracket for outdoor unit is damaged or corroded.
If yes, please contact dealer.
5. Check whether drainage pipe is damaged.
1. Disconnect power supply.
&OHDQ¿OWHUDQGLQGRRUXQLW¶VSDQHO
3. Check whether mounting bracket for outdoor unit is damaged or corroded.
If yes, please contact dealer.
Notice for recovery
1. Many packing materials are recyclable materials.
Please dispose them in appropriate recycling unit.
2. If you want to dispose the air conditioner, please contact local dealer or
consultant service center for the correct disposal method.

13
Malfunction analysis
General phenomenon analysis
Please check below items before asking for maintenance. If the malfunction still
FDQ¶WEHHOLPLQDWHGSOHDVHFRQWDFWORFDOGHDOHURUTXDOL¿HGSURIHVVLRQDOV
Phenomenon Check items Solution
Indoor unit
can’t receive
remote
controller’s
signal or
remote
controller
has no
action.
Ɣ:KHWKHULWVLQWHUIHUHGVHYHUHO\
(such as static electricity, stable
voltage)?
Ɣ:KHWKHUUHPRWHFRQWUROOHULV
within the signal receiving
range?
Ɣ:KHWKHUWKHUHDUHREVWDFOHV"
Ɣ:KHWKHUUHPRWHFRQWUROOHULV
pointing at the receiving
window?
Ɣ,VVHQVLWLYLW\RIUHPRWHFRQWUR
OOHUORZIX]]\GLVSOD\DQGQR
display?
Ɣ1RGLVSOD\ZKHQRSHUDWLQJ
remote controller?
Ɣ)OXRUHVFHQWODPSLQURRP"
Ɣ3XOORXWWKHSOXJ5HLQVHUW
the plug after about 3min, and
then turn on the unit again.
Ɣ6LJQDOUHFHLYLQJUDQJHLVP
Ɣ5HPRYHREVWDFOHV
Ɣ
Select proper angle and point
the remote controller at the re-
ceiving window on indoor unit.
Ɣ&KHFNWKHEDWWHULHV,IWKH
power of batteries is too low,
please replace them.
Ɣ7DNHWKHUHPRWHFRQWUROOHU
close to indoor unit.
Ɣ7XUQRIIWKHÀXRUHVHQWODPS
and then try it again.
Ɣ&KHFNZKHWKHUUHPRWHFRQW
roller appears to be damaged.
If yes, replace it.
No air
emitted
from
indoor
unit
Ɣ$LULQOHWRUDLURXWOHWRILQGRRU
unit is blocked?
Ɣ(OLPLQDWHREVWDFOHV
Ɣ8QGHUKHDWLQJPRGHLQGRRU
temperature is reached to set
temperature?
Ɣ$IWHUUHDFKLQJWRVHWWHPSHU
ature, indoor unit will stop bl-
owing out air.
Ɣ+HDWLQJPRGHLVWXUQHGRQMXVW
now?
Ɣ,QRUGHUWRSUHYHQWEORZLQJ
out cold air, indoor unit will be
started after delaying for sev-
eral minutes, which is a nor-
mal phenomenon.

14
Malfunction analysis
Ɣ3RZHUIDLOXUH"
Ɣ,VSOXJORRVH"
Ɣ&LUFXLWEUHDNWULSVRIIRU
fuse is burnt out?
Ɣ:LULQJKDVPDOIXQFWLRQ"
Ɣ8QLWKDVUHVWDUWHGLPPHGLDWHO\
after stopping operation?
Ɣ:KHWKHUWKHIXQFWLRQVHWWLQJ
for remote controller is
correct?
Ɣ5HVHWWKHIXQFWLRQ
Ɣ:DLWIRUPLQDQGWKHQWXUQ
on the unit again.
Ɣ$VNSURIHVVLRQDOWRUHSODFHLW
Ɣ$VNSURIHVVLRQDOWRUHSODFH
circuit break or fuse.
Ɣ5HLQVHUWWKHSOXJ
Ɣ:DLWXQWLOSRZHUUHFRYHU\
Air condit-
ioner can’t
operate
Mist is em-
itted from
indoor unit’s
air outlet
Ɣ,QGRRUWHPSHUDWXUHDQGKXP
idity is high?
Ɣ%HFDXVHLQGRRUDLULVFRROHG
rapidly. After a while, indoor
temperature and humidity will
be decrease and mist will
disappear.
Phenomenon Check items Solution
Set temper-
ature can’t
be adjusted
Ɣ8QLWLVRSHUDWLQJXQGHUDXWR
mode?
Ɣ7HPSHUDWXUHFDQ¶WEHDGMX
sted under auto mode.
Please switch the operation
mode if you need to adjust
temperature.
Ɣ<RXUUHTXLUHGWHPSHUDWXUH
exceeds the set temperature
range?
Ɣ6HWWHPSHUDWXUHUDQJH
16ć~30ć.
Cooling
(heating)
effect is
not good.
Ɣ9ROWDJHLVWRRORZ" Ɣ:DLWXQWLOWKHYROWDJH
resumes normal.
Ɣ)LOWHULVGLUW\" Ɣ&OHDQWKH¿OWHU
Ɣ6HWWHPSHUDWXUHLVLQSURSHU
range?
Ɣ$GMXVWWHPSHUDWXUHWRSURSHU
range.
Ɣ'RRUDQGZLQGRZDUHRSHQ" Ɣ&ORVHGRRUDQGZLQGRZ

15
Phenomenon Check items Solution
Odours are
emitted
Ɣ:KHWKHUWKHUH¶VRGRXUVRXUFH
such as furniture and cigarette,
etc.
Ɣ(OLPLQDWHWKHRGRXUVRXUFH
Ɣ&OHDQWKH¿OWHU
Air conditioner
operates nor-
mally suddenly
Ɣ:KHWKHUWKHUH¶VLQWHUIHUHQFH
such as thunder, wireless
devices, etc.
Ɣ'LVFRQQHFWSRZHUSXWEDFN
power, and then turn on the
unit again.
Outdoor
unit has
vapor
Ɣ+HDWLQJPRGHLVWXUQHGRQ"
Ɣ'XULQJGHIURVWLQJXQGHUKH
ating mode, it may generate
vapor, which is a normal
phenomenon.
“Water
ÀRZLQJ´
noise
Ɣ$LUFRQGLWLRQHULVWXUQHGRQRU
turned off just now?
Ɣ7KHQRLVHLVWKHVRXQGRI
UHIULJHUDQWÀRZLQJLQVLGH
the unit, which is a normal
phenomenon.
Cracking
noise
Ɣ$LUFRQGLWLRQHULVWXUQHGRQRU
turned off just now?
Ɣ7KLVLVWKHVRXQGRIIULFWLRQ
caused by expansion and/or
contraction of panel or other
parts due to the change of
temperature.
Malfunction analysis

16
Malfunction analysis
Error Code
Ɣ:KHQDLUFRQGLWLRQHUVWDWXVLVDEQRUPDOWHPSHUDWXUHLQGLFWRURQLQGRRUXQLWZLOO
DWLRQRIHUURUFRGH
,QGRRU
GLVSOD\
(UURUFRGH
$ERYHLQGLFDWRUGLDJUDPLVRQO\
IRUUHIHUHQFH3OHDVHUHIHUWR
DFWXDOSURGXFWIRUWKHDFWXDO
LQGLFDWRUDQGSRVLWLRQ
Ŷ:KHQEHORZSKHQRPHQRQRFFXUVSOHDVHWXUQRIIDLUFRQGLWLRQHUDQGGLVFRQ
IRUVHUYLFH
Ɣ3RZHUFRUGLVRYHUKHDWLQJRUGDPDJHG
Ɣ7KHUH¶VDEQRUPDOVRXQGGXULQJRSHUDWLRQ
Ɣ&LUFXLWEUHDNWULSVRIIIUHTXHQWO\
Ɣ$LUFRQGLWLRQHUJLYHVRIIEXUQLQJVPHOO
Ɣ,QGRRUXQLWLVOHDNLQJ
Ŷ,IWKHDLUFRQGLWLRQHURSHUDWHVXQGHUDEQRUPDOFRQGLWLRQVLWPD\FDXVH
Warning
%HORZOLVWHGHUURUFRGHVDUHRQO\SDUWHUURUFRGHV3OHDVHUHIHURWRHUURUFRGH
OLVWLQVHULYHPDQXDOIRUPRUHLQIRUPDWLRQ
(UURUFRGH
E5
E6
E8
U8
H6
&
F1
F2
TURXEOHVKRRWLQJ
,WFDQEHHOLPLQDWHGDIWHUUHVWDUWLQJWKHXQLW,IQRWSOHDVH
,WFDQEHHOLPLQDWHGDIWHUUHVWDUWLQJWKHXQLW ,IQRW SOHDVH
,WFDQEHHOLPLQDWHGDIWHUUHVWDUWLQJWKHXQLW,IQRW SOHDVH
0HDQVGHIURVWLQJVWDWXV,W¶VWKHQRUPDOSKHQRPHQRQ
+HDWLQJLQGLFDWRU
21V2))V

17
Installation dimension diagram
Space to the wall
e
vobA
m
c002
evobAm
c
03
Space to the obstruction
Air outlet side
Space to the wall
Air inlet side
evo
b
A
m
c
0
3
50cm Above
evobAm
c0
5
Drainage pipe
At least 250cm
At least 15cm
At least 300cm
Space to the ceiling
Space to the obstruction
At least 15cm
At least 15cm
Space to the wall
Space to the wall

18
1. There should be no obstruction near air
inlet and air outlet.
2. Select a location where the condensat-
ion water can be dispersed easily and
ZRQWDIIHFWRWKHUSHRSOH
3. Select a location which is convenient to
connect the outdoor unit and near the
power socket.
4. Select a location which is out of reach
for children.
5.
The location should be able to withstand
WKHZHLJKWRILQGRRUXQLWDQGZRQWLQFU
ease noise and vibration.
6.
The appliance must be installed 2.5m
DERYHÀRRU
'RQWLQVWDOOWKHLQGRRUXQLWULJKWDERYH
the electric appliance.
8. Please try your best to keep way from
ÀXRUHVFHQWODPS
Tools for installation
Selection of installation location
1 Level meter 2 Screw driver 3 Impact drill
4 Drill head 5 Pipe expander 6 Torque wrench
7 Open-end wrench 8 Pipe cutter 9 Leakage detector
10 Vacuum pump 11 Pressure meter 12 Universal meter
13 Inner hexagon spanner 14 Measuring tape
Note: Ɣ3OHDVHFRQWDFWWKHORFDODJHQWIRULQVWDOODWLRQ
Ɣ'RQWXVHXQTXDOL¿HGSRZHUFRUG
Basic requirement
Outdoor unit
Indoor unit
Installing the unit in the following pla-
ces maycause malfunction. If it is un-
avoidable, please consult the local
dealer:
1.The place with strong heat sources,
YDSRUVÀDPPDEOHRUH[SORVLYHJDV
,
or volatile objects spread in the air.
2.The place with high-frequency
devices (such as welding machine,
medical equipment).
3.The place near coast area.
4.
The place with oil or fumes in the air.
5.The place with sulfureted gas.
6.Other places with special circums-
tances.
7.Do not use the unit in the immediate
surroundings of a laundry a bath a
shower or a swimming pool.
6HOHFWDORFDWLRQZKHUHWKHQRLVHDQGRXWÀRZDLUHPLWWHGE\WKHRXWGRRUXQLW
will not affect neighborhood.
2. The location should be well ventilated and dry, in which the outdoor unit
ZRQWEHH[SRVHGGLUHFWO\WRVXQOLJKWRUVWURQJZLQG
3. The location should be able to withstand the weight of outdoor unit.
4. Make sure that the installation follows the requirement of installation
dimension diagram.
5. Select a location which is out of reach for children and far away from animals
or plants.If it is unavoidable, please add the fence for safety purpose.
This manual suits for next models
2
Table of contents
Other Willis Air Conditioner manuals

Willis
Willis WST12MC16S User manual

Willis
Willis WCM30MH16S User manual

Willis
Willis WCS09MH21S User manual

Willis
Willis WMI09MH16S User manual

Willis
Willis WMCS09MH16S User manual

Willis
Willis WMI12MH16S User manual

Willis
Willis WAM09MH27S User manual

Willis
Willis WCM18MH18S/I User manual

Willis
Willis WMO18MH16S User manual