WITHROBOT oCam-2WRS-U User manual

oCam-2WRS-U™
User Manual
2019. 4.
WITHROBOT Inc.

oCam-2WRS-U User Manual
www.withrobot.com Page 1
Revision History
Rev
Date
Description
Author
1.0
2019. 4
1st Release
PD
Note
This product is for indoor use only. Severe electrostatic stress can damage the
product.

oCam-2WRS-U User Manual
www.withrobot.com Page 2
CONTENST
Revision History 1
1. INTRODUCTION....................................................................................................................... 3
Features 3
External View 4
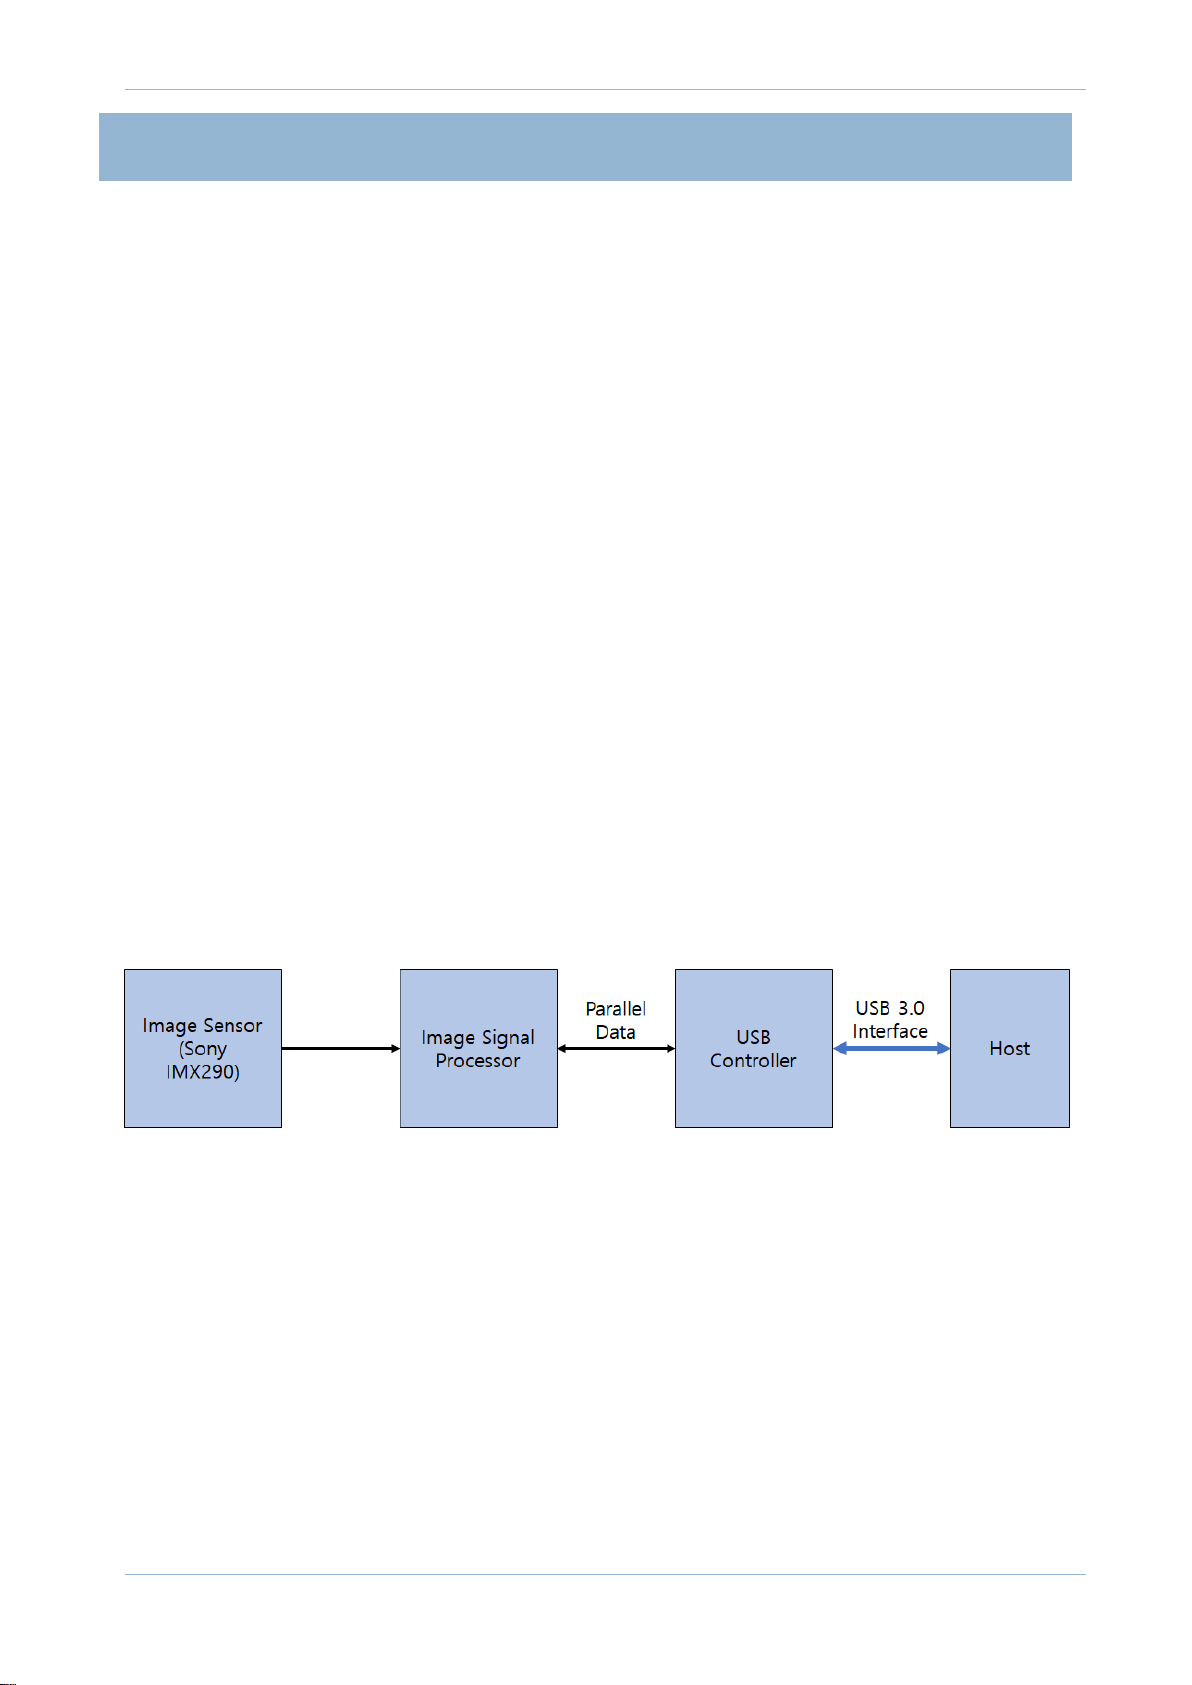
Additional Technical Information 5
2. SPECIFICATIONS ......................................................................................................................6
Camera Specifications 6
Board Dimensions 7
Case Dimensions 7
3. HOW TO USE ON WINDOWS SYSTEM..............................................................................8
Connection to Windows PC 8
Viewing the Camera Image 9
4. HOW TO USE ON LINUX SYSTEM ....................................................................................12
Connection to Linux PC 12
Viewing the Camera Image 12
5. NOTES ......................................................................................................................................17
APPENDIX ....................................................................................................................................18
WDR (Wide Dynamic Range) Sample Images 18
Specifications of the Bundle M12Lens 22
Specifications of the Onboard M12 Lens Holder 23
How to Update the Camera Firmware 24

oCam-2WRS-U User Manual
www.withrobot.com Page 3
1. INTRODUCTION
Features
oCam-2WRS-U is a Full HD color camera using IMX290 image sensor from Sony with the
following features.
WDR(Wide Dynamic Range): It provides clear image for a scene with wide dynamic range
where exist very bright parts and very dark parts at the same time.
Dedicated ISP(Image Signal Processor): It provides excellent color quality and high
sensitivity under low light condition.
Interface: USB3.0 SuperSpeed
Easy Installation: With UVC 1.1 support, no additional driver needs to be installed for
Windows and Linux.
Versatility: Supports wide range of standard M12 lenses with a lens replaceable structure.
Figure 1. Internal Structure

oCam-2WRS-U User Manual
www.withrobot.com Page 4
External View
Figure 2. External View –Front and Back
Figure 3. External View –Bottom View
Protective Case
Replaceable
M12 Lens
Lens Lock Ring
USB 3.0 Connector
Mounting Hole
for Tripod
Tripod (not included)

oCam-2WRS-U User Manual
www.withrobot.com Page 6
2. SPECIFICATIONS
Camera Specifications
Item
Value
Image Sensor
Sony IMX290 CMOS Image Sensor, 1/2.8 inches
Interface
USB 3.0 SuperSpeed
Resolutions
30 fps @1920 x 1080
15 fps @1920 x 1080
Shutter
Rolling Shutter
Camera Control
WDR On/Off
Brightness
Auto Exposure On/Off
Lens
Standard M12, Replaceable
Supported OS
Windows 10 (64 bit), Linux
Power
USB Bus Power, DC 5V / 250mA
Operating Temperature
0°C ~ + 70°C
Field Of View(FOV)
50˚(V) x 92.8˚(H) x 110˚(D) (Default Bundle Lens)
Weight
Approx. 27grams (including protective case)
PCB Size
39mm x 39mm
Case Size
49mm x 51mm x 20mm
Table 1. Camera Specifications

oCam-2WRS-U User Manual
www.withrobot.com Page 7
Board Dimensions
Figure 5. Board Size (unit: mm)
Case Dimensions
Figure 6. Case Size (unit: mm)
49*
* 51mm with tripod mounting adapter
49
49

oCam-2WRS-U User Manual
www.withrobot.com Page 8
3. HOW TO USE ON WINDOWS SYSTEM
Connection to Windows PC
Connect the USB cable to the USB port of the computer. After the camera is detected, the
computer will show a message that the camera is connected. To check if the camera is
connected successfully, open the device manager and check if the oCam-2WRS-U appears
correctly as shown below.
Figure 7. Connection Check on Device Manager (This example is fo Windows 10)

oCam-2WRS-U User Manual
www.withrobot.com Page 9
Viewing the Camera Image
The oCamViewer is camera image viewing program that support all the oCam cameras
from the WITHROBOT Inc.
Full source code of the oCamViewer is available at the following site:
https://github.com/withrobot/oCam/tree/master/Software
On starting the oCamViewer, the main window will appear as shown below.
Figure 8. Main Window of the oCamViewer for Windows
Select the resolution and the fps on the dropdown list.
Figure 9. Resolution Selection on the oCamViewer
Click the [Play] button.
To change the resolution/fps, click the [Stop] button first and then select one on the
dropdown list, and then click the [Play] button.

oCam-2WRS-U User Manual
www.withrobot.com Page 10
To check or change the camera parameters, click the [Cam Ctrl] button while the camera
is being displayed to open the control window. Use the slide bar to change a parameter.
Figure 10. Control Window of the oCamViewer for Windows
Brightness can be changed in the 1 ~ 19 range by controlling the camera exposure time.
Therefor, higher brightness can cause more blurring on the image.
Auto Exposure is turned on by setting the brightness to be 0.
Auto Exposure is turned off when the brightness is higher than 0.
WDR (Wide Dynamic Range) is turned on and off by checking the [Cam Ctrl] button in
the Control Window while the camera image is being displayed (refer the “WDR Sample
Image”in the appendix)
With WDR turned on, brightness control is disabled.
On turning off the WDR, the previous brightness is restored.
On starting the oCamViewer, the previous WDR setting is restored. If WDR was on,
WDR will be automatically turned on when the oCamViewer starts.

oCam-2WRS-U User Manual
www.withrobot.com Page 11
On power resetting the camera, either by disconnect-reconnect the camera or power
resetting the computer, the WDR setting is restored to the default value of “Off”.
To stop viewing the camera image, click the [Stop] button on the main window.
To terminate the oCamViewer, click the [Exit] button on the main window.

oCam-2WRS-U User Manual
www.withrobot.com Page 12
4. HOW TO USE ON LINUX SYSTEM
Connection to Linux PC
Viewing the Camera Image
(1) Viewing the Camera Image with the oCamViewer
The oCamViewer is camera image viewing program that support all the oCam cameras
from the WITHROBOT Inc.
Full source code of the oCamViewer is available at the following site:
https://github.com/withrobot/oCam/tree/master/Software
On starting the oCamViewer, the main window will appear as shown below.
Figure 11. Main Window of the oCamViewer for Linux
Select the oCam-2WRS-U in the “Device”list. On clicking the [Connect] button, the
camera image will appear.

oCam-2WRS-U User Manual
www.withrobot.com Page 13
To change the resolution/fps, select “Format”on the right panel and select one on the
dropdown list, and then click the [Apply] button at the bottom.
Figure 12. Resolution Selection on the oCamViewer

oCam-2WRS-U User Manual
www.withrobot.com Page 14
To turn on and off the WDR (Wide Dynamic Range), select “0”(WDR Off) or “1”(WDR On)
under the “Backlight Compensation”in the “Controls”panel.
Figure 13. Turning Off the WDR: Backlight Compensation = “0”
Figure 14. Turning On the WDR: Backlight Compensation = “1”

oCam-2WRS-U User Manual
www.withrobot.com Page 15
To change the brightness, move the “Brightness”slide bar in the “Controls”panel.
Figure 15. Brightness Control

oCam-2WRS-U User Manual
www.withrobot.com Page 16
(2) Viewing the Camera Image with the Guvcview
Start the Guvcview by entering the “guvcview”command on the terminal window.
Figure 16. Starting the Guvcview
Figure 17. Guvcview Image Window
On the Guvcview camera image window, the current frame rate is shown on the top bar.

oCam-2WRS-U User Manual
www.withrobot.com Page 17
5. NOTES
On the oCam-2WRS-U, you can adjust the focus by rotating the lens by hand. Therefore, in a
vibrating environment, the lens can be loosened by being rotated by itself. To prevent this, it is
recommended to lock the lens by using the supplied lens lock ring after you finish adjusting the
focus.
To change the lens, you need to loosen the lock ring first before you take out the lens from the
holder.

oCam-2WRS-U User Manual
www.withrobot.com Page 18
APPENDIX
WDR (Wide Dynamic Range) Sample Images
Figure 18. Sample Image: WDR Off, Light Off
Figure 19. Sample Image: WDR Off, Light On

oCam-2WRS-U User Manual
www.withrobot.com Page 19
Figure 20. Sample Image: WDR On, Light Off
Figure 21. Sample Image: WDR On, Light On
Table of contents