Wurlitzer OMT K 99 User manual

R
ONE
MORE
TIME CD
K99/F91
20

Warning
Although the beam emitted by the laser diodes is nearly invisible, it may cause damage
to the human eye. When the laser is being operated, the emitting surface must not be
viewed either directly or through a lens, fiber or mirror.
Caution
The CD mechanism and many electronic components are extremly susceptible to
electrostatic discharges.
Careless handling may immediately destroy components or can drastically reduce life
expectancy of these components so that it will lead to failure after several weeks or
even months of use.
Before you touch the player, discharge your hands and tools by touching a grounded
metal part of the jukebox, such as the amplifier or the machine chassis. Do not touch
terminals or electronic components.
CLASS
LASER
PRODUCT
1
3122 110 03420
ESD

OMT CD – Stand: 13.08.2007 1
1 Unpacking . . . . . . . . . . . . . . . . . . . . . . . . . . . . . . . . . . . . . . . . . . . . . . . . . . . . . . . . 3
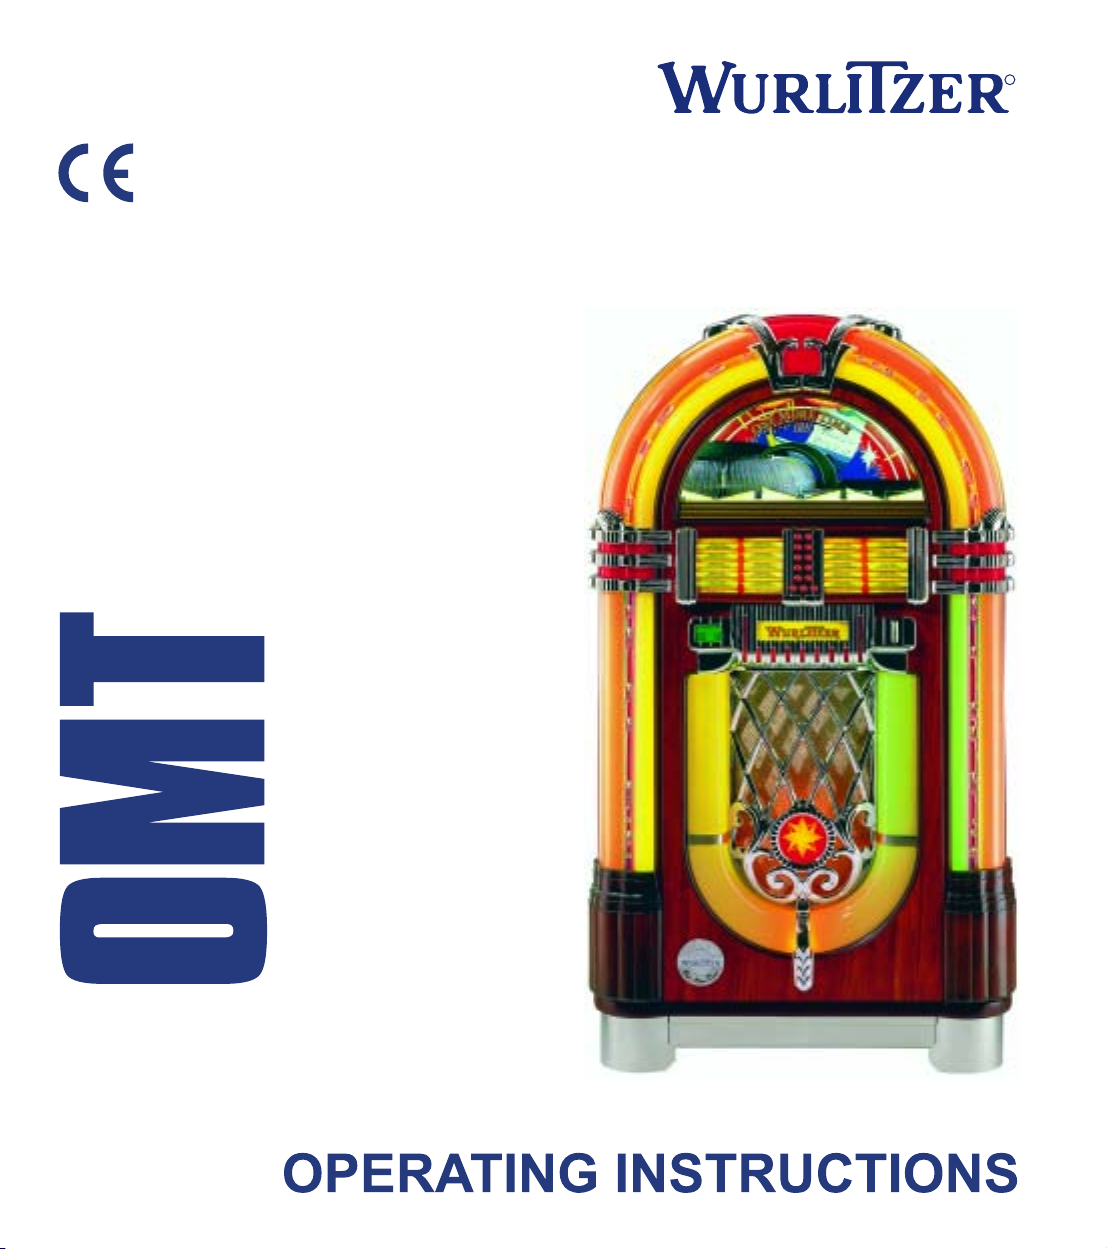
1.1 Unlocking. . . . . . . . . . . . . . . . . . . . . . . . . . . . . . . . . . . . . . . . . . . . . . . . . . . . . . . . . . . . . . . . . . . . . . . . 3
1.2 Removal of mechanism shipping guards. . . . . . . . . . . . . . . . . . . . . . . . . . . . . . . . . . . . . . . . . . . . . . 3
2 Loading compact discs. . . . . . . . . . . . . . . . . . . . . . . . . . . . . . . . . . . . . . . . . . . . . . 4
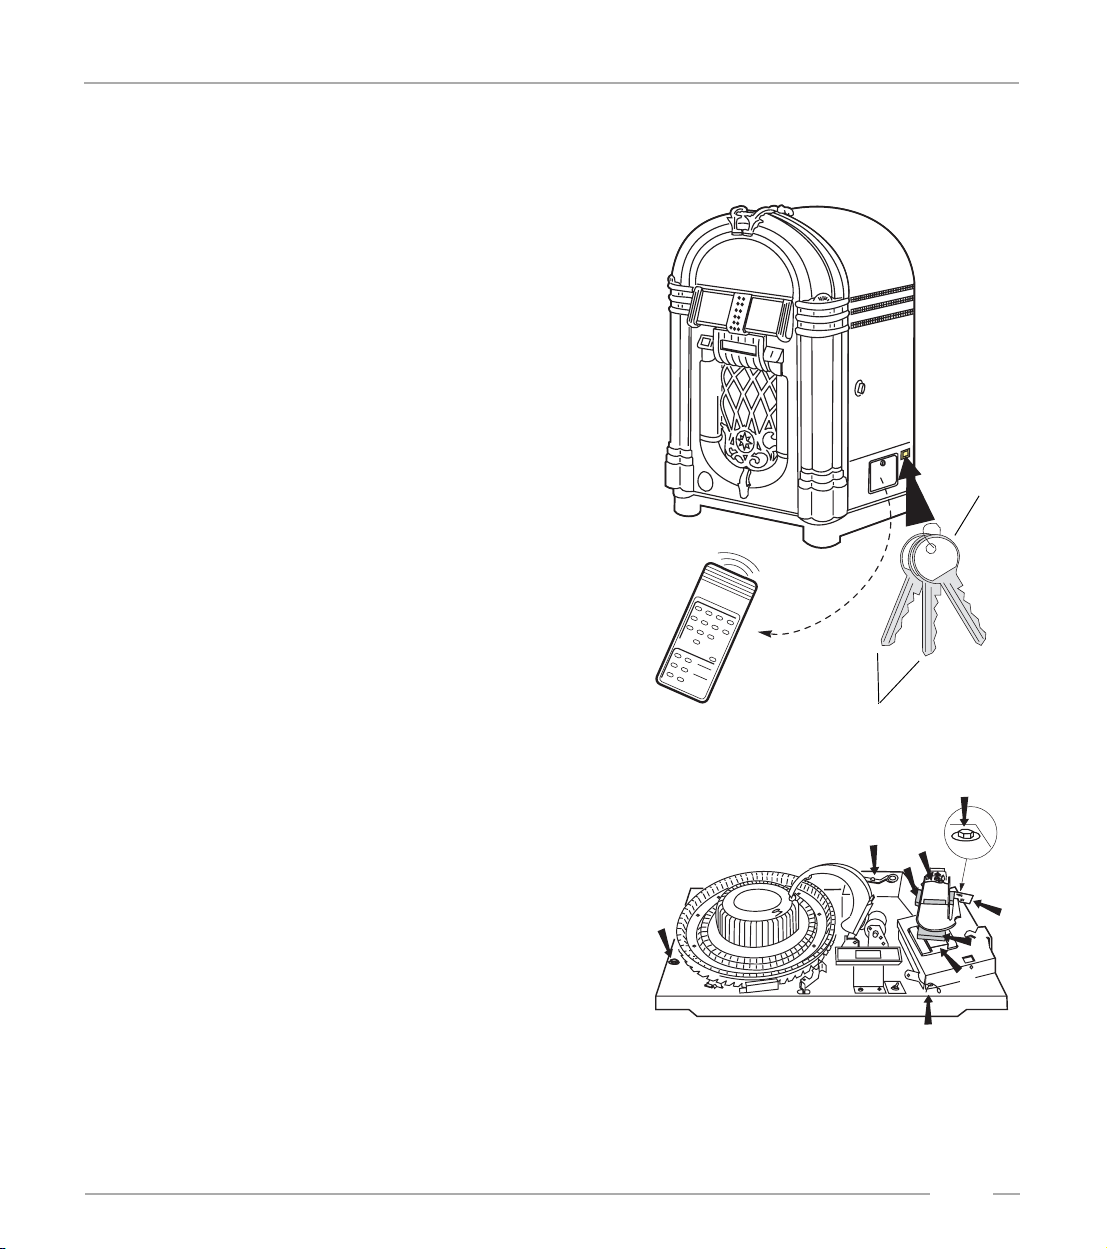
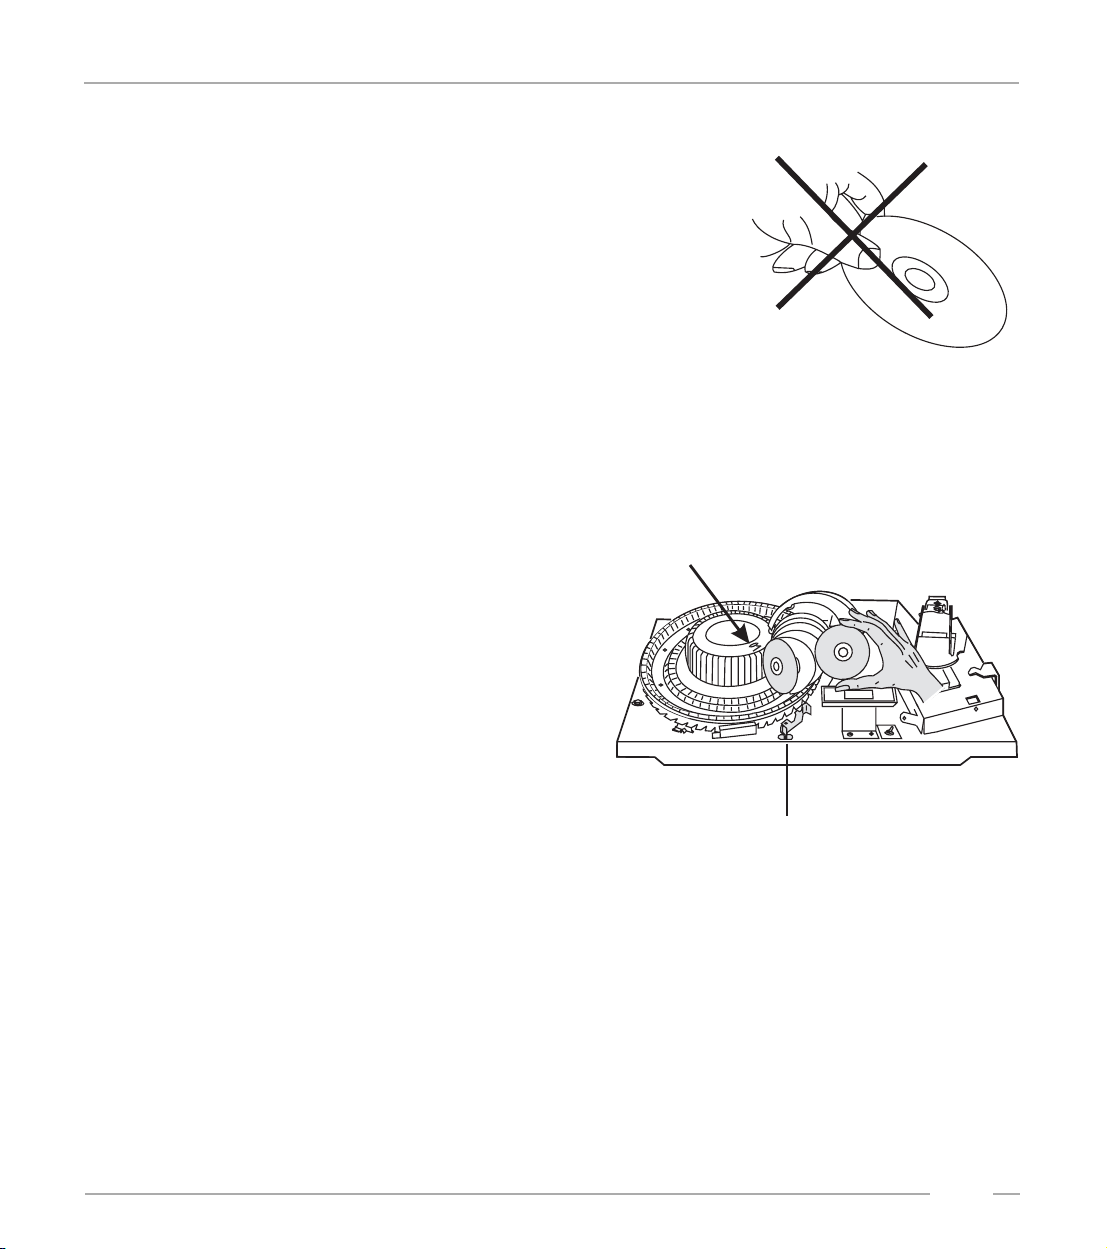
2.1 Removal of motor book shipping guards. . . . . . . . . . . . . . . . . . . . . . . . . . . . . . . . . . . . . . . . . . . . . . 4
2.2 Power on . . . . . . . . . . . . . . . . . . . . . . . . . . . . . . . . . . . . . . . . . . . . . . . . . . . . . . . . . . . . . . . . . . . . . . . . 4
2.3 CD handling precautions . . . . . . . . . . . . . . . . . . . . . . . . . . . . . . . . . . . . . . . . . . . . . . . . . . . . . . . . . . . 5
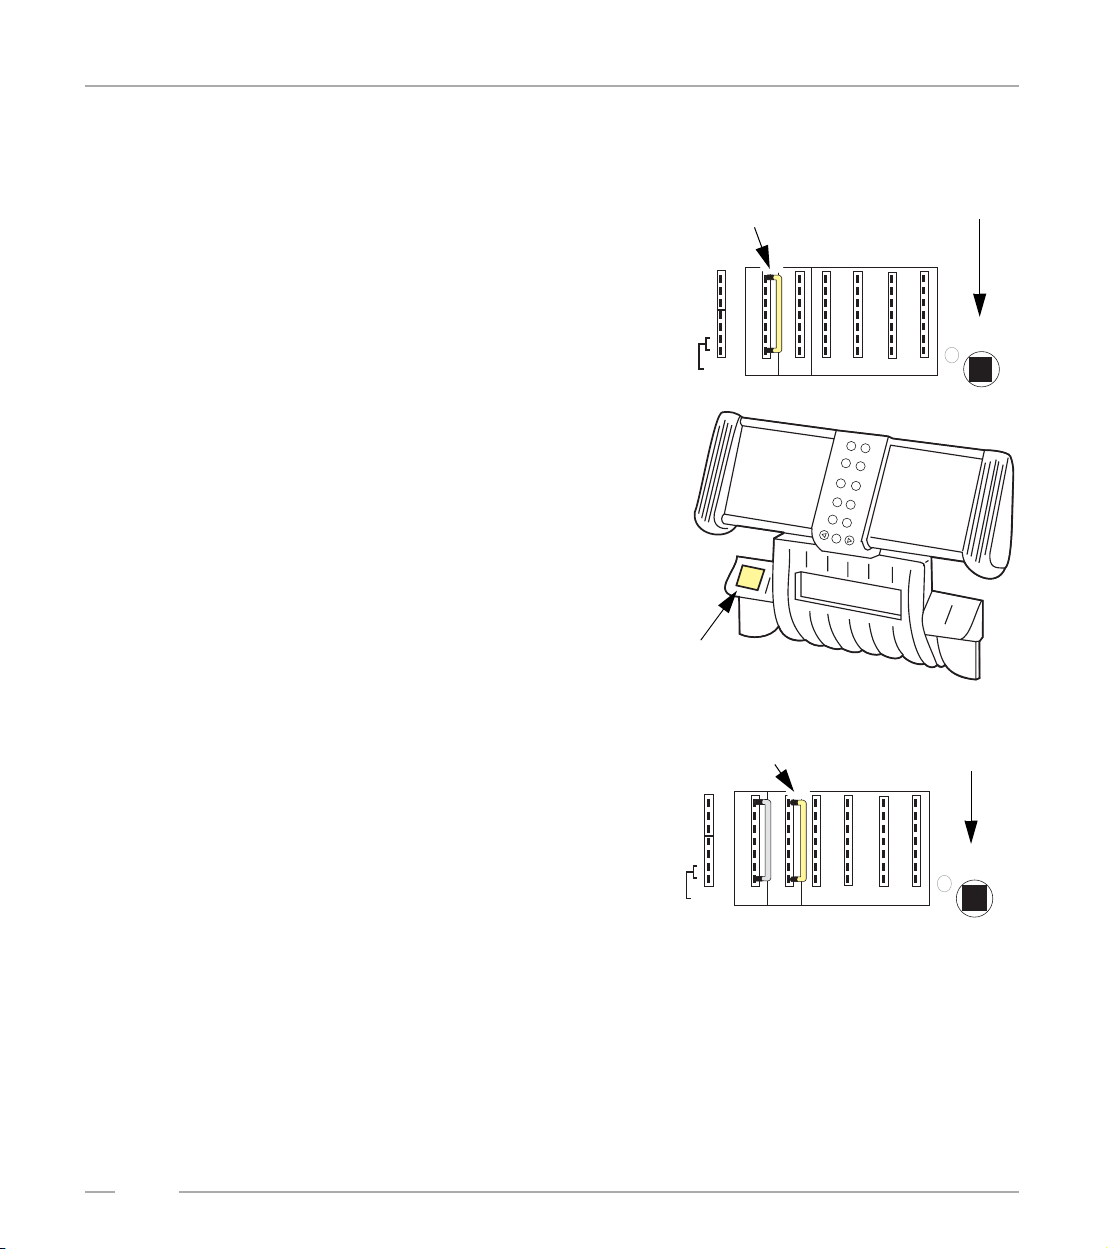
2.4 Inserting CDs. . . . . . . . . . . . . . . . . . . . . . . . . . . . . . . . . . . . . . . . . . . . . . . . . . . . . . . . . . . . . . . . . . . . . 5
2.5 Programming number of CDs in the carrier . . . . . . . . . . . . . . . . . . . . . . . . . . . . . . . . . . . . . . . . . . . . 7
3 Coin operation or free play?. . . . . . . . . . . . . . . . . . . . . . . . . . . . . . . . . . . . . . . . . . 8
3.1 Coin operation. . . . . . . . . . . . . . . . . . . . . . . . . . . . . . . . . . . . . . . . . . . . . . . . . . . . . . . . . . . . . . . . . . . . 8
3.2 Free play. . . . . . . . . . . . . . . . . . . . . . . . . . . . . . . . . . . . . . . . . . . . . . . . . . . . . . . . . . . . . . . . . . . . . . . . . 8
3.3 Test credit . . . . . . . . . . . . . . . . . . . . . . . . . . . . . . . . . . . . . . . . . . . . . . . . . . . . . . . . . . . . . . . . . . . . . . . 9
4 Track selection . . . . . . . . . . . . . . . . . . . . . . . . . . . . . . . . . . . . . . . . . . . . . . . . . . . 10
4.1 How to select a track. . . . . . . . . . . . . . . . . . . . . . . . . . . . . . . . . . . . . . . . . . . . . . . . . . . . . . . . . . . . . . 10
4.2 The button R . . . . . . . . . . . . . . . . . . . . . . . . . . . . . . . . . . . . . . . . . . . . . . . . . . . . . . . . . . . . . . . . . . . . 10
4.3 The display flashes. . . . . . . . . . . . . . . . . . . . . . . . . . . . . . . . . . . . . . . . . . . . . . . . . . . . . . . . . . . . . . . 10
4.4 I do not like this track - the button CANCEL. . . . . . . . . . . . . . . . . . . . . . . . . . . . . . . . . . . . . . . . . . . 11
4.5 Albumplay - playing a whole CD . . . . . . . . . . . . . . . . . . . . . . . . . . . . . . . . . . . . . . . . . . . . . . . . . . . . 11
5 Volume, sound and balance control - amplifier F91 . . . . . . . . . . . . . . . . . . . . . 12
5.1 The control terminal at the rear . . . . . . . . . . . . . . . . . . . . . . . . . . . . . . . . . . . . . . . . . . . . . . . . . . . . . 12
5.2 The infrared remote control . . . . . . . . . . . . . . . . . . . . . . . . . . . . . . . . . . . . . . . . . . . . . . . . . . . . . . . . 13
5.3 Pre-settings for volume . . . . . . . . . . . . . . . . . . . . . . . . . . . . . . . . . . . . . . . . . . . . . . . . . . . . . . . . . . . 14
5.4 Pre-settings for bass and treble . . . . . . . . . . . . . . . . . . . . . . . . . . . . . . . . . . . . . . . . . . . . . . . . . . . . 14
6 Volume, sound and balance control - amplifier K99. . . . . . . . . . . . . . . . . . . . . 15
6.1 Volume control . . . . . . . . . . . . . . . . . . . . . . . . . . . . . . . . . . . . . . . . . . . . . . . . . . . . . . . . . . . . . . . . . . 15
6.2 The infrared remote control . . . . . . . . . . . . . . . . . . . . . . . . . . . . . . . . . . . . . . . . . . . . . . . . . . . . . . . . 16
6.3 Treble and bass control . . . . . . . . . . . . . . . . . . . . . . . . . . . . . . . . . . . . . . . . . . . . . . . . . . . . . . . . . . . 17
6.4 Automatic volume correction. . . . . . . . . . . . . . . . . . . . . . . . . . . . . . . . . . . . . . . . . . . . . . . . . . . . . . . 17

OMT CD – Stand: 13.08.2007
2
6.5 External amplifier connection . . . . . . . . . . . . . . . . . . . . . . . . . . . . . . . . . . . . . . . . . . . . . . . . . . . . . . 18
6.6 Position of fuses and plug connectors on the K99 . . . . . . . . . . . . . . . . . . . . . . . . . . . . . . . . . . . . . 19
6.7 External speaker connection . . . . . . . . . . . . . . . . . . . . . . . . . . . . . . . . . . . . . . . . . . . . . . . . . . . . . . . 20
6.8 Technical data . . . . . . . . . . . . . . . . . . . . . . . . . . . . . . . . . . . . . . . . . . . . . . . . . . . . . . . . . . . . . . . . . . . 22
7 The internal clock . . . . . . . . . . . . . . . . . . . . . . . . . . . . . . . . . . . . . . . . . . . . . . . . . 23
7.1 Clock setting . . . . . . . . . . . . . . . . . . . . . . . . . . . . . . . . . . . . . . . . . . . . . . . . . . . . . . . . . . . . . . . . . . . . 23
7.2 Set date . . . . . . . . . . . . . . . . . . . . . . . . . . . . . . . . . . . . . . . . . . . . . . . . . . . . . . . . . . . . . . . . . . . . . . . . 23
7.3 Set year and weekday. . . . . . . . . . . . . . . . . . . . . . . . . . . . . . . . . . . . . . . . . . . . . . . . . . . . . . . . . . . . . 24
8 Automatic random select (Playstimulator) . . . . . . . . . . . . . . . . . . . . . . . . . . . . . 25
8.1 Programming start and stop time . . . . . . . . . . . . . . . . . . . . . . . . . . . . . . . . . . . . . . . . . . . . . . . . . . . 26
9 Back Ground Music (BGM). . . . . . . . . . . . . . . . . . . . . . . . . . . . . . . . . . . . . . . . . . 28
9.1 Number of BGM CDs and repeat time . . . . . . . . . . . . . . . . . . . . . . . . . . . . . . . . . . . . . . . . . . . . . . . . 29
9.2 Start position for BGM CDs and configuration. . . . . . . . . . . . . . . . . . . . . . . . . . . . . . . . . . . . . . . . . 30
9.3 BGM time zones at different weekdays. . . . . . . . . . . . . . . . . . . . . . . . . . . . . . . . . . . . . . . . . . . . . . . 30
10 Further programming options . . . . . . . . . . . . . . . . . . . . . . . . . . . . . . . . . . . . . . . 33
10.1 Number of tracks played successively on the same disc. . . . . . . . . . . . . . . . . . . . . . . . . . . . . . . . 33
10.2 Selective disabling of tracks . . . . . . . . . . . . . . . . . . . . . . . . . . . . . . . . . . . . . . . . . . . . . . . . . . . . . . . 34
10.3 Selection and credit memory reset by power off . . . . . . . . . . . . . . . . . . . . . . . . . . . . . . . . . . . . . . . 35
11 Player and CD cleaning. . . . . . . . . . . . . . . . . . . . . . . . . . . . . . . . . . . . . . . . . . . . . 36
11.1 Nicotine, dust, fingerprints. . . . . . . . . . . . . . . . . . . . . . . . . . . . . . . . . . . . . . . . . . . . . . . . . . . . . . . . . 36
11.2 Removing scratches. . . . . . . . . . . . . . . . . . . . . . . . . . . . . . . . . . . . . . . . . . . . . . . . . . . . . . . . . . . . . . 36
11.3 Laser lens cleaning. . . . . . . . . . . . . . . . . . . . . . . . . . . . . . . . . . . . . . . . . . . . . . . . . . . . . . . . . . . . . . . 36
12 Technical data . . . . . . . . . . . . . . . . . . . . . . . . . . . . . . . . . . . . . . . . . . . . . . . . . . . . 37
13 Declaration of Conformity . . . . . . . . . . . . . . . . . . . . . . . . . . . . . . . . . . . . . . . . . . 38
14 Index . . . . . . . . . . . . . . . . . . . . . . . . . . . . . . . . . . . . . . . . . . . . . . . . . . . . . . . . . . . . 39

Unlocking
OMT CD – Edition: 13.08.2007 3
1 Unpacking
1.1 Unlocking
The key is stored in the coin return cup in the RH
cabinet wall. The key WUA 1 unlocks the cabinet by
turning the key clockwise. The lock is spring loaded,
press slightly against the door, this allows the key to
turn easily. The two other keys with 5 digit number
codes unlock the cash box at the bottom of the RH
cabinet wall. In this box the hand transmitter is
located if an infrared remote control has been
installed.
1.2 Removal of mechanism shipping guards
1. The mechanism platform is fixed to cabinet
with one bolt in front LH side (1) and one bolt
back RH side (1). Remove both completely
using a 13mm spanner or a large screw driver.
Possibly you can use the tool fixed to the lid of
the gear box (2).
2. Remove plastic string at the pivot point of the
pressure arm (3).
3. Remove plastic holder securing CD player
chassis (4).
4. Remove foam (5), laser cover (6) securing
laser head in CD player and instruction plate
(7).
5. Remove foam between magnetic pressure disc and black plastic cover (8).
WUA 1
WUA 1
456734
WUA 1
WUA 1
RCS-K
No.: 0059745
SELECTION
1
2 3
456
RESET
POWER
OPTION
78 9
0
-
+
-
+
CANCEL MUTE
MUSIC
INTERN
CHANNEL 1
EXTERN
CHANNEL 2
WUA 1
for door
for cash box
1
1
23
4
5
7
8
6

Removal of motor book shipping guards
OMT CD – Edition: 13.08.2007
4
2 Loading compact discs
2.1 Removal of motor book shipping guards
Cut both plastic strings on both sides of the
book (1).
Press push buttons (2) inside and turn down
the book (3).
Remove elastic band from the motor book
systems (4).
IMPORTANT: Save the removed shipping
guards. You may need them if you decide to
move your machine to another location.
2.2 Power on
IMPORTANT: Make sure that wall socket is
grounded properly.
The CD-jukebox operates on normal
household power outlet. Set mains switch at
rear wall of cabinet to on position. If the
selection and credit memory is empty the
basket turns once and the left two digits show
alternatly a "0". After a short time the display
counts up to the carrier size in the two RH
digits (50 or 00 for 100 discs). After this the
basket stops in position "01". The digital
display shows "0 0 0 0", then "0 0 0 1" when a
basket with 100 CDs is used "0 1 0 1" for a 50
CD carrier.
1
1
2
2
3
34
4
?
o.k.
power switch

CD handling precautions
OMT CD – Edition: 13.08.2007 5
2.3 CD handling precautions
Dust, fingerprints or other dirt on the disc
surface can cause skipping, jumping or
sticking problems.
Use only clean and undamaged CDs. Never
touch the surface of a disc.
2.4 Inserting CDs
Insert up to 50 or 100 CDs, depending on the
compartments in the carrier. Start with 01. The
"Label" must show always to the left, towards
the next lower number. To achieve the
optimum position for loading, press in steps
the lever "rotate carrier". If less than 50 (100)
discs are used, the number of discs used has
to be programmed in the service program level
1, button 5 (see chapter "Programming
number of CDs in the carrier", see page 7).
01
lever

Inserting CDs
OMT CD – Edition: 13.08.2007
6
ATTENTION! For carriers with 100 CDs the position ’00’ is the 100th CD.
It is recommended to insert the Compact Disc and
then the title page into the appropriate numerical slot
position of the motor page system. The pages can
be turned manually by hand without any damage to
the motor drive. In some models the transparent dust
cover of the record carrier has to be lifted up at the
front, it will rest in this position.
IMPORTANT: After unpacking or if you turned the
pages manually sometimes it seems that the
motorbook does not turn properly. In this case turn
the whole motorbook once forward and backward
using the buttons.
It is necessary to reprogramme the number of CDs in
the carrier if a number less than 50 or 100 discs are
inserted to avoid the changer mechanism operating
with empty compartments.
If the number of CDs is programmed correctly the
display will flash when you select an empty
compartment. A flashing display always indicates a
wrong selection or not enough credit.
The number of CDs in the carrier has to be pro-
grammed in service level 1, selection button 5,
described as follows.
1
2
3
4
5
6
7
8
9
0
R
buttons
to turn the
motor book

Programming number of CDs in the carrier
OMT CD – Edition: 13.08.2007 7
2.5 Programming number of CDs in the carrier
At the rear wall inside the jukebox cabinet the
Selection & Credit Computer is situated. Some units
are equipped with a metal cover. In this case the
slide switch "SERVICE" and the button "LT" are
accessible through holes.
To programme the number of inserted CDs (service
program, level 1):
1. Set the slide switch ‘service’ at the SCC-unit to
ON.
2. Press ‘LT’ button.
3. Press selection button 5 -hold down- and
press selection button R than release both
buttons.
Enter the number of inserted CDs (without
BGM CDs) with two digits followed by 00,
example: 50 for 50 discs
(exception: 100. CDs = 00).
To check the new settings, press selection button 5
again.
Exit the service program:
1. Set the slide switch ‘service’ at the SCC unit to
OFF.
2. Press ‘LT’ button.
!The changer starts an initialisation run. After
this the jukebox is ready to operate.
Selection &
Credit Computer
CDM12
CDTower
Netzsicherung
MainsFuse
Netzsicherung
Mains Fuse
210-240V -T4A
100-117V -F6A
210-240V - T 4A
100-117V - F 6A
Leuchtstofflampen
Fluorescent Lamps
230V /117V
Leuchtstofflampen
Fluorescent Lamps
230V / 117V
Verstärker
Amplifier
Verstärker
Amplifier
Externer Hauptschalter
External Mainsswitch
Externer Hauptschalter
External Mains switch
Schein-
annehmer
Bill-
acceptor
Schein-
annehmer
Bill-
acceptor
Achtung!
VorAbnahmeder KappedenNetzstecker
ziehen!
Achtung!
VorAbnahme der Kappe den Netzstecker
ziehen!
Warning!
Shock hazard!Do notopen!
Warning!
Shock hazard! Do not open!
Zur Beachtung: Nur Sicherungen mit
gleicher Größe und gleichem Wert
verwenden, um Schäden zu vermeiden.
Caution: To reduce the risk of fire
replace only with same typ and rating fuses.
Zur Beachtung: Nur Sicherungen mit
gleicher Größe und gleichem Wert
verwenden, um Schäden zu vermeiden.
Caution: Toreduce the risk of fire
replace only with same typ and rating fuses.
Netzspannung
50/60 Hz
Mains Voltage
50/60 cps
Netzspannung
50/60 Hz
Mains Voltage
50/60 cps
240
230
220
210
117
100
240
230
220
210
117
100
CAUTION
CAUTION
TOREDUCETHERISK
OFFIREREPLACEONLY
WITHSAMETYPEAND
RATINGFUSE
TOREDUCETHE RISK
OFFIREREPLACE ONLY
WITHSAMETYPE AND
RATINGFUSE
B
ass
B
ass
T
reble
T
reble
BGM
BGM
M
S
ONO
TEREO
M
S
ONO
TEREO
ANALHANNEL
TEREO
2-K /2-C
S
ANAL HANNEL
TEREO
2-K /2-C
S
S
F
ICHERUNG
USE
S
F
ICHERUNG
USE
F1-F4
F1-F4
100-240V
50Hz/60Hz
100-240V
50Hz/60Hz
117V
60Hz
117V
60Hz
3,0AMP
250VAC
SLOWBLOW
3,0AMP
250VAC
SLOWBLOW
T4A
T4A
30V~
AC
30V~
AC
F1
F1
26V~
AC
26V~
AC
F2
F2
26V~
AC
26V~
AC
F3
F3
12V=
DC
12V=
DC
F4
F4
IL
NTERNERAUTSPRECHER
NTERNALPEAKER
IS
IL
IS
NTERNER AUTSPRECHER
NTERNAL PEAKER
O
PTION
O
PTION
O
O
PTION
PTION
RL
EL
ES
8/80W
XTERNERAUTSPRECHER
XTERNALPEAKER
W
R L
EL
ES
8/80W
XTERNERAUTSPRECHER
XTERNAL PEAKER
W
CD-T
CD-T
RAFO
RANSFORMER
CD-T
CD-T
RAFO
RANSFORMER
B -T
UBBLEUBES
B-T
UBBLE UBES
N
T
ETZTRAFO
RANSFORMER
N
T
ETZTRAFO
RANSFORMER
EE
RWEITERUNG
XTENSION
EE
RWEITERUNG
XTENSION
F
RC
ERNREGLER
EMOTE-ONTROL
F
RC
ERNREGLER
EMOTE-ONTROL
RS232
RS232
BGM
BGM
IR
I R
NFRAROT- EGLER
NFRARED-EMOTE
IR
I R
NFRAROT- EGLER
NFRARED-EMOTE
A
O
LR
USGANG
UTPUT
A
O
L R
USGANG
UTPUT
E CD
IC
D
LR
INGANG
NPUT
E CD
ICD
L R
INGANG
NPUT
EE3
00mV
XTRA
XTRA
E 300mV
I
LR
INGANG
NPUT
E E 300mV
E I 300mV
L R
XTRA INGANG
XTRANPUT
M
M
IKROFON
ICROPHONE
M
M
IKROFON
ICROPHONE
M
ECHANIK
M
ECHANISM
M
M
ECHANIK
ECHANISM
DA
RC
ECKELBNEHMEN
EMOVEOVER
DA
RC
ECKEL BNEHMEN
EMOVE OVER
D A
R C
ECKELBNEHMEN
EMOVEOVER
D A
R C
ECKELBNEHMEN
EMOVE OVER
AVC
AVC
RS232
RS232
M
ICRO
M
ICRO
T
APE
T
APE
M
UTE
M
UTE
A /D
NZEIGEISPLAY
A /D
NZEIGE ISPLAY
BGM
BGM
ok.
ok.
S / S
CHALTERWITCHES
S/S
CHALTER WITCHES
A/O
US FF
A/O
US FF
A /O
US FF
A/O
USFF
E/O
IN N
E/O
IN N
E/O
IN N
E/O
IN N
AVC
AVC
MODE
MODE
S
TEREO
S
TEREO
2-K /2C
ANAL HANNEL
2-K/2C
ANAL HANNEL
INPUT
INPUT
CD
CD
T
APE
T
APE
BGM
BGM
1
1
3
5
2
2
4
6
I
C 1
ntern
hannel
I
C 1
ntern
hannel
E
C
xtern
hannel
2
E
C
xtern
hannel
2
Verstärker
Verstärker
K99
99
0056041
0056041
Amplifier
Amplifier
K99
99
C-UL
C-UL
0058484
0058484
0040264
1
2
4
5
T1
10
20
T
+B
M
LT
Memory
ON
OFF
P6
P5
P8
Selection &
Credit Computer
CDM 4I / CDM 12
K
ON
OFF
Service
GP
BS B4 B3 B2 B1
GP+6
BR
00
2
3
4
5
6
2
3
4
5
6
F
2
3
4
5
6
1
0
2
3
4
5
6
1
0
2
3
4
5
6
1
0
7
TT
slide switch
SERVICE
button LT

Coin operation
OMT CD – Edition: 13.08.2007
8
3 Coin operation or free play?
Both coin operation or free play are adjustible at the
“Selection & Credit Computer” unit. It is located at
the rear wall inside the cabinet underneath the CD-
player. Special jumpers (short wires, located in the
accessory pack of the manual ) are used to be set on
the SCC-unit. As long as no jumper is set in row GP
from 0 to F (free play) the jukebox works with coins
only.
3.1 Coin operation
From factory the jukebox is set to coin operation. If
you insert a certain number of coins according to the
denomination label, the jukebox gives the credits or
plays it is adjusted for. If you want to change the play
prices you have to change the jumper settings on the
SCC-unit. See examples in the accessory pack.
3.2 Free play
To set the jukebox to free play:
1. In case there are already jumpers in the rows
GP and BS, notice their position (for later
resetting to coin operation) and remove them.
2. Set a jumper from 0 to F (free play) in the row
GP on the SCC unit.
3. Press ‘LT’ button.
4. Now one track is selectable without coin insertion.
5. In between two to six plays are selectable by setting an additional jumper in the row ‘BS’
(Bonus Step) from 0 to 2 or from 0 to 6.
6. Up to 47 tracks are pre-selectable by setting a jumper in the row ‘BS' from 0 to 7.
M
LT
GP
BS B4 B3 B2 B1
GP+6
BR
00
2
3
4
5
6
2
3
4
5
6
F
2
3
4
5
6
1
0
2
3
4
5
6
1
0
2
3
4
5
6
1
0
7
TT
button LT
jumper from 0 to F
in row GP
1
2
3
4
5
6
7
8
9
0
R
2Spiele 1,- DM
5Spiele 2,- DM
14 Spiele 5,- DM
denomination
label
M
LT
GP
BS B4 B3 B2 B1
GP+6
BR
00
2
3
4
5
6
2
3
4
5
6
F
2
3
4
5
6
1
0
2
3
4
5
6
1
0
2
3
4
5
6
1
0
7
TT
row BS button LT

Test credit
OMT CD – Edition: 13.08.2007 9
3.3 Test credit
For repair and test purposes it is possible to give test credits. By touching the test credit button you
get one credit also shown in the digital display. You can terminate un-used credits by pressing the
LT button.
In jukeboxes with an electronical coin validator you can find
the test credit button on the coin validator interface board.
In jukeboxes with mechanical coin validator the test credit
button is mounted over the return lever inside.

How to select a track
OMT CD – Edition: 13.08.2007
10
4 Track selection
4.1 How to select a track
If credit exists or free play is set you can select tracks by means of the buttons 0 - 9 on the
keyboard. First enter the number of the CD with two digits, then the track with two digits too.
Example: CD 2, track 9: Enter 0 - 2 - 0 - 9 (Exception: CD 100 = 00.)
4.2 The button R
You can delete wrongly entered numbers up to the
third digit by means of the button R (Reset). But after
having entered the fourth digit the jukebox stores
and executes a selection. By pressing the button R
the available credit will be displayed for a few
seconds.
4.3 The display flashes
After entering the fourth digit of a selection the jukebox starts to search
and play the selected CD immediately. If the display flashes the entered
selection was not valid. Check:
"if credit is available or
"if the selection is higher then the programmed number of CDs in the carrier
If you select a higher track number than available on a CD the jukebox overcounts the tracks and
starts at the beginning.
Example: CD 03 contains 17 tracks. But selected track is 0 - 3 - 1 - 9. The jukebox plays track 02 of
CD 03.
A maximum of 25 tracks per CD can be selected!
button R

I do not like this track - the button CANCEL
OMT CD – Edition: 13.08.2007 11
4.4 I do not like this track - the button CANCEL
If you do not like a track you can cancel it by
pressing the button 'CANCEL' at the rear side of the
jukebox or at the remote control. The jukebox stops
playing or plays the next track if a selection has
already been made.
You can terminate all selections only by pressing the
button LT on the SCC unit .
4.5 Albumplay - playing a whole CD
You can select a whole CD by entering the CD
number followed by '00'. Condition is that
'Albumplay' is enabled and the SCC has either
reached the fourth bonus level or free play is set.
How to programme 'Albumplay' (service level 2):
1. Set the slide switch ‘service’ at the SCC-unit to
ON.
2. Press ‘LT’ button.
3. Press selection button 4 - hold it - and
selection button R, release both buttons.
Service program, level 2 is reached.
4. Press selection button 9 -hold down- and
press selection button R. Release both
buttons. Enter 01 to enable (or 00 to disable)
'Albumplay'.
To check, press selection button 9 again.
Exit the service program:
1. Set the slide switch ‘service’ at the SCC unit to
OFF.
2. Press ‘LT’ button.
!The changer starts an initialisation run. After this the jukebox is ready to operate.
CANCEL
MUTE
MIN MAX
MIN MAX
CANCEL
MUTE
0058407
MIN MAX
I
C
NTERN
HANNEL 1
MIN MAX
E
C
XTERN
HANNEL 2
VOLUME
BASS
TREBLE
BALANCE
-+
MODE PRESET
CANCEL MUTE
button
CANCEL
control
terminal F91
control
terminal K99

The control terminal at the rear
OMT CD – Edition: 13.08.2007
12
5 Volume, sound and balance control - amplifier F91
ATTENTION! Depending on adjusted volume of the jukebox noise levels of more than 70 dB
can be reached.
5.1 The control terminal at the rear
With the control terminal at the rear side of the
jukebox the volume, treble, bass and balance can be
controlled individually.
After power up or if no button has been pressed for
approx. 5 sec or after the button PRESET has been
pressed, the terminal stays in the mode "VOLUME".
The LED "VOLUME" lights. In this mode you can
control the volume by means of the buttons '+' and '-'.
One LED corresponds to each mode. All modes are
accessible by pressing the ‘mode’ button. With the
buttons '+' and '-' treble, bass or balance can be
controlled.
The control terminal can be taken out and be used
as a wired remote control.
The meanings of the buttons...
"MODE: Switches to the next operating mode.
After about 5 seconds without operating any
buttons, ‘volume’ mode is resumed.
"PRESET: Volume, bass, treble, and balance are
set to the pre-set according to DIP switch setting.
Actual mode is set to ‘Volume’.
"CANCEL: Rejects a playing track. If album play is
selected the next track will be played.
"MUTE: As long as this button is activated, the
amplifier output is muted.
MODE PRESET
CANCEL MUTE
0039661
VOLUME
BASS
TREBLE
BALANCE
-
+
+/-
+/-
+/-
+/-
VOLUME
BASS
TREBLE
BALANCE
Press button MODE
Press button MODE
Press button MODE
Press button MODE
LED Volume
lights
LED Bass
lights
LED Treble
lights
LED Balance
lights
current
mode

The infrared remote control
OMT CD – Edition: 13.08.2007 13
5.2 The infrared remote control
As desired an infrared remote control will be installed
from factory or can be delivered as conversion kit
(part no. 0040435). If it has been installed the hand
transmitter is located in the cashbox.
If credit is given or free play is programmed a CD
can be selected with the buttons 0 to 9 and R.
Double button functions as required in the service
programs (i.e. press button 5 -hold down- and press
button R), are impossible. For this you can use the
keyboard of the jukebox only.
The meanings of the music control buttons are
according to the buttons on the control terminal on
the rear side of the jukebox (ref. to the prev.
chapter).
The receiver eye of the infrared remote control is
located behind the hole between the design
elements on top of the front door. Beam this point
directly if possible.
The common control terminal can be connected
besides. It can be mounted outside to display the
actual mode.
Batteries will be delivered. To open the battery
compartment move the cover as shown in the
picture.
The required battery type and position of the
batteries in the hand transmitter are shown on the
casing.
Part no. of the hand transmitter: 0040443.
RCS
ART.NR.: 0040443
SELECTION
1
23
456
RESET
789
0
+/-
+/-
+/-
+/-
VOLUME
BASS
TREBLE
BALANCE
MODE
MODE
MODE
MODE
MUSIC
MODE
PRESET
CANCEL
MUTE
-
+
BATTERY:
IEC LR03
(AAA)
+
+
+
+
selection
music control
battery type
LR03 (AAA)
position
of batteries
buttons
buttons

Pre-settings for volume
OMT CD – Edition: 13.08.2007
14
5.3 Pre-settings for volume
After power on of the jukebox or after pressing the
button ‘preset’ the values of volume, bass and treble
reach the values set by the DIP switches.
You can set the basic values for volume in 63 steps
from zero up to maximum volume.
At the amplifier front side, opening “Volume”, there
are 6 DIP-switches for each channel. These switches
have different values (1, 2 ... to 32). If you add all the
values of the switches in position “ON” you will get
the value for the set volume.
Consequently the switches 32 and 16 give a coarse
adjustment whilst the lower numbers may be used
for fine adjustment.
You can find the recommended settings on the
amplifier cover.
IMPORTANT: If all switches are in position OFF no
volume, if all switches are in position ON, the
maximum volume appears at power on !
5.4 Pre-settings for bass and treble
Similarly the values for bass and treble can be set. Both
channels should be adjusted the same.
Three DIP-switches with the values 1, 2, 4 are provided for
each bass and treble. You can choose 7 different steps
from minimum to maximum. Adding all switches set to
"ON" gets the set value.
The recommended factory settings are printed on the
amplifier cover.
If you change the DIP-switch settings while the
jukebox operates remember that the new settings will only take effect after having pressed
the button ‘PRESET’ at the control terminal.
Verstärker-Sicherungen
210V - 240V
Si 1/Si 301
Si 2/Si 302
Si 102/Si 103
Si 100/Si 101
MT 4A T 3,15A
100V - 117V
Si 1/Si 301
Si 2/Si 302
T5A
Si 102/Si 103
Si 100/Si 101
T3A
Zur Beachtung Nur Sicherungen mit gleicher Größe und
gleichem Wert verwenden um Schäden zu vermeiden.
Caution: To reduce the risk of fire replace only with
same type and rating fuses.
Achtung!
Vor Abnahme der Kappe den Netzstecker
ziehen!
Attention!
Pull power plug before opening protective
lid!
Leuchtstofflampen/
Flourescent Lamps
230V / 117V
/ Amplifier Fuses
Netzspannung
50/60 Hz
Mains Voltage
50/60 cps
240
230
210
100
220
117
Low Level
BGM
Mic.-Kit
L
R
Line Out
L
R
Input Tape
L
R
Input CD
Amplifier F91
0039155
BGM Level
R
L
LR
Clipping
P10
Remote
P10
Remote
P4
1
2
4
1
2
4
Tone
off on
Treble
Bass
1
2
4
8
16
32
1
2
4
8
16
32
Volume
off on
R
L
Mode
Input
CD
Stereo
Tape
2-Kanal
R
L
1
2
4
8
16
32
1
2
4
8
16
32
1
2
4
1
2
4
DIP switch
recommended
settings

Volume control
OMT CD – Edition: 13.08.2007 15
6 Volume, sound and balance control - amplifier K99
6.1 Volume control
You can control the volume of the jukebox from
different points at the same time:
1. With the pots Vol.1 and Vol.2 on the amplifier.
2. With an optional connectable IR remote
control.
3. With the pots of the control box at the rear
side of the jukebox.
The device from which the volume is altered last
determines it.
The volume control unit can be taken out and may
be mounted at another place as a remote control. Its cable may be extended as required with any
kind of wire. The voltages of the control wires are 5V DC.
The control box has two volume knobs (Intern / Channel 1 and Extern / Channel 2). In position
”Stereo” the knob “Intern / Channel 1” is effective for the internal speakers. The knob Extern /
Channel 2 is controlling the volume of the RCA outputs for an optional external amplifier. In position
”2 Channel” of the DIP switch the channels1 (RH) and 2 (LH) are controllable separately.
The pots Vol. 1 and Vol. 2 on the amplifier are not effective if the wire control box is
connected.
CAUTION
TO REDUCE THE RISK
OF FIRE REPLACE ONLY
WITH SAME TYPE AND
RATING FUSE Bass Treble BGM
M
S
ONO
TEREO
ANAL HANNEL
TEREO
2-K / 2-C
S
S
FICHERUNG
USE F1 - F4
100-240 V
50Hz/60Hz 117 V
60Hz
3,0 AMP
250 V AC
SLOW BLOW
T 4 A
30V~
AC
F1
26V~
AC
F2
26V~
AC
F3
12V=
DC
F4
IL
NTERNER AUTSPRECHER
NTERNAL PEAKER
IS
O
PTION
O
PTION
R L
EL
ES
8 / 80 W
XTERNER AUTSPRECHER
XTERNAL PEAKER
W
CD-T
CD-TRAFO
RANSFORMER
B-TUBBLE UBES
N
TETZTRAFO
RANSFORMER
EE
RWEITERUNG
XTENSION F
RC
ERNREGLER
EMOTE- ONTROL
RS 232
BGM
IR
IR
NFRAROT- EGLER
NFRARED- EMOTE
A
O
L R
USGANG
UTPUT
ECD
ICD
L R
INGANG
NPUT
EE 300mV
XTRA
XTRA
E 300mV
I
L R
INGANG
NPUT
M
M
IKROFON
ICROPHONE
MECHANIK
MECHANISM
DA
RC
ECKEL BNEHMEN
EMOVE OVER
DA
RC
ECKEL BNEHMEN
EMOVE OVER
I
C1
ntern
hannel E
C2
xtern
hannel
Verstärker K 99
Amplifier K 99 C-UL
AVC
RS232
MICRO
TAPE
MUTE
A/DNZEIGE ISPLAY
BGM
ok.
S/SCHALTER WITCHES
A/OUS FF
A/OUS FF
E/OIN N
E/OIN N
A
A
VC
VC
MODESTEREO 2-K /2CANAL HANNEL
INPUT
CD TAPE
BGM
1
1
3
5
2
2
4
6
SEPARATE
NORMAL
AUTO
VOLUME
RS232
MUTE
HIGH LOW
PARALLEL
SERVICE
AUS/OFF

The infrared remote control
OMT CD – Edition: 13.08.2007
16
6.2 The infrared remote control
As desired an infrared remote control will be installed
from factory or can be delivered as conversion kit
(part no. 0058809). If it has been installed the hand
transmitter is located in the cashbox.
If credit is given or free play is programmed a CD
can be selected with the buttons 0 to 9 and R.
Double button functions as required in the service
programs (i.e. press button 5 -hold down- and press
button R), are impossible. For this you only can use
the keyboard of the jukebox.
You can control the volume by means of the buttons
+ and -. In stereo mode the internal +/- buttons
control the volume of the internal speakers. The
external +/- buttons control the volume of the K99
RCA jacks for an optional external amplifier. In 2-
channel mode you can control the external speakers
by the buttons + and - of the external channel.
Beam the jukebox directly if possible.
You can connect the wire remote control box as well.
The power-on volume level is always set by the
channel 1 and 2 pots on the amplifier or on the
control box (if connected).
Batteries will be delivered. To open the battery
compartment move the cover like shown in the
picture.
Needed battery type and position of the batteries in
the hand transmitter are shown on the casing.
Part no. of the hand transmitter: 0059745.
RCS-K
No.: 0059745
SELECTION
1
23
456
RESET
POWER
OPTION
789
0
-
+
-
+
BATTERY:
IEC LR03
(AAA)
+
+
+
+
CANCEL MUTE
VOLUME
INTERN
CHANNEL 1
EXTERN
CHANNEL 2
selection
music control
battery type
LR03 (AAA)
position
of batteries
buttons
buttons

Treble and bass control
OMT CD – Edition: 13.08.2007 17
6.3 Treble and bass control
You can control the sound with the knobs
bass and treble on the amplifier.
6.4 Automatic volume correction
The AVC sets CDs with different volume
levels to an equal level. The level of CDs with
a high level will be reduced; the level of low-
levelled CDs will be increased. This control
works rather slow to save the dynamic range
of the track.
You can enable the correction with the DIP
switch “AVC” the 3rd swich of the 6 switch
group. Default is AVC disabled.
With the second DIP of the 6 switch group you
can reduce the intensity of volume correction.
CAUTION
TO REDUCE THE RISK
OF FIRE REPLACE ONLY
WITH SAME TYPE AND
RATING FUSE Bass Treble BGM
M
S
ONO
TEREO
ANAL HANNEL
TEREO
2-K / 2-C
S
S
F
ICHERUNG
USE
F1 - F4
100-240 V
50Hz/60Hz 117 V
60Hz
3,0 AMP
250 V AC
SLOW BLOW
T 4 A
30V~
AC
F1
26V~
AC
F2
26V~
AC
F3
12V=
DC
F4
IL
NTERNER AUTSPRECHER
NTERNAL PEAKER
IS
O
PTION
O
PTION
R L
EL
ES
8 / 80 W
XTERNER AUTSPRECHER
XTERNAL PEAKER
W
CD-T
CD-T
RAFO
RANSFORMER
B-T
UBBLE UBES
N
T
ETZTRAFO
RANSFORMER
EE
RWEITERUNG
XTENSION
F
RC
ERNREGLER
EMOTE- ONTROL
RS 232
BGM
IR
IR
NFRAROT- EGLER
NFRARED- EMOTE
A
O
L R
USGANG
UTPUT
ECD
ICD
L R
INGANG
NPUT
EE 300mV
XTRA
XTRA
E 300mV
I
L R
INGANG
NPUT
M
M
IKROFON
ICROPHONE
M
ECHANIK
M
ECHANISM
DA
RC
ECKEL BNEHMEN
EMOVE OVER
DA
RC
ECKEL BNEHMEN
EMOVE OVER
I
C1
ntern
hannel E
C2
xtern
hannel
Verstärker K 99
Amplifier K 99 C-UL
AV C
RS232
M
ICRO
T
APE
M
UTE
A/D
NZEIGE ISPLAY
BGM
ok.
S/S
CHALTER WITCHES
A/OUS FF
A/OUS FF
E/OIN N
E/OIN N
A
A
VC
VC
MODESTEREO 2-K /2CANAL HANNEL
INPUT
CD TAPE
BGM
1
1
3
5
2
2
4
6
SEPARATE
NORMAL
AUTO
VOLUME
RS232
MUTE
HIGH LOW
PARALLEL
SERVICE
AUS/OFF
CAUTION
TO REDUCE THE RISK
OF FIRE REPLACE ONLY
WITH SAME TYPE AND
RATING FUSE Bass Treble BGM
M
S
ONO
TEREO
ANAL HANNEL
TEREO
2-K / 2-C
S
S
FICHERUNG
USE F1 - F4
100-240 V
50Hz/60Hz 117 V
60Hz
3,0 AMP
250 V AC
SLOW BLOW
T 4 A
30V~
AC
F1
26V~
AC
F2
26V~
AC
F3
12V=
DC
F4
IL
NTERNER AUTSPRECHER
NTERNAL PEAKER
IS
O
O
PTION
PTION
R L
EL
ES
8 / 80 W
XTERNER AUTSPRECHER
XTERNAL PEAKER
W
CD-T
CD-TRAFO
RANSFORMER
B-TUBBLE UBES
N
TETZTRAFO
RANSFORMER
EE
RWEITERUNG
XTENSION F
RC
ERNREGLER
EMOTE- ONTROL
RS 232
BGM
IR
IR
NFRAROT- EGLER
NFRARED- EMOTE
A
O
L R
USGANG
UTPUT
ECD
ICD
L R
INGANG
NPUT
EE 300mV
XTRA
XTRA
E 300mV
I
L R
INGANG
NPUT
M
M
IKROFON
ICROPHONE
M
MECHANIK
ECHANISM
DA
RC
ECKEL BNEHMEN
EMOVE OVER
DA
RC
ECKEL BNEHMEN
EMOVE OVER
I
C1
ntern
hannel E
Cxtern
hannel 2
Verstärker K 99
0056041
Amplifier K 99 C-UL
0058484
AV C
RS232
MICRO
TAPE
MUTE
A/DNZEIGE ISPLAY
BGM
ok.
S/SCHALTER WITCHES
A/OUS FF
A/OUS FF
E/OIN N
E/OIN N
A
A
VC
VC
MODESTEREO 2-K /2CANAL HANNEL
INPUT
CD TAPE
BGM
1
1
3
5
2
2
4
6
SEPARATE
NORMAL
AUTO
VOLUME
RS232
MUTE
HIGH LOW
PARALLEL
SERVICE
AUS/OFF

External amplifier connection
OMT CD – Edition: 13.08.2007
18
6.5 External amplifier connection
On the RCA terminals “Ausgang - Output” you
can connect an external amplifier with any
power rate. In Stereo mode the output level is
normally controlled by means of the pot for the
2nd channel. Alternatively you can set the first
DIP switch of the 6 switch group to ON to
couple this output to the normal volume
control knobs (1st channel), so that both
amplifiers can be controlled together.
Connecting an external amplifier in 2-channel
mode is not useful.
To avoid hum- (earth-) loops try to use an
external amplifier with ground insulation; it has
no earth contacts. If it is impossible (e.g. receivers with cable supply) you can separate both amps
by means of the ground isolator part no. 0053300.
The signal of the RCA terminals is also controlled by the settings of bass, treble, BGM, AVC and
Mute.
CAUTION
TO REDUCE THE RISK
OF FIRE REPLACE ONLY
WITH SAME TYPE AND
RATING FUSE Bass Treble BGM
M
S
ONO
TEREO
ANAL HANNEL
TEREO
2-K / 2-C
S
S
FICHERUNG
USE F1 - F4
100-240 V
50Hz/60Hz 117 V
60Hz
3,0 AMP
250 V AC
SLOW BLOW
T 4 A
30V~
AC
F1
26V~
AC
F2
26V~
AC
F3
12V=
DC
F4
IL
NTERNER AUTSPRECHER
NTERNAL PEAKER
IS
O
O
PTION
PTION
R L
EL
ES
8/80W
XTERNER AUTSPRECHER
XTERNAL PEAKER
W
CD-T
CD-TRAFO
RANSFORMER
B-TUBBLE UBES
N
TETZTRAFO
RANSFORMER
EE
RWEITERUNG
XTENSION F
RC
ERNREGLER
EMOTE- ONTROL
RS 232
BGM
IR
IR
NFRAROT- EGLER
NFRARED- EMOTE
A
O
L R
USGANG
UTPUT
ECD
ICD
L R
INGANG
NPUT
EE 300mV
XTRA
XTRA
E 300mV
I
L R
INGANG
NPUT
M
M
IKROFON
ICROPHONE
M
MECHANIK
ECHANISM
DA
RC
ECKEL BNEHMEN
EMOVE OVER
DA
RC
ECKEL BNEHMEN
EMOVE OVER
I
C1
ntern
hannel E
Cxtern
hannel 2
Verstärker K 99 0056041
Amplifier K 99 C-UL 0058484
AVC
RS232
MICRO
TAPE
MUTE
A/DNZEIGE ISPLAY
BGM
ok.
S/SCHALTER WITCHES
A/OUS FF
A/OUS FF
E/OIN N
E/OIN N
A
A
VC
VC
MODESTEREO 2-K /2CANAL HANNEL
INPUT
CD TAPE
BGM
1
1
3
5
2
2
4
6
SEPARATE
NORMAL
AUTO
VOLUME
RS232
MUTE
HIGH LOW
PARALLEL
SERVICE
AUS/OFF
This manual suits for next models
1
Table of contents