30
10
20
10 1
2
3
4
5
6
7
8
9
15
60
30
45
MO
23
10
20
30
10 1
2
3
4
5
6
7
8
9
15
60
30
45
MO
23
10
20
30
10 1
2
3
4
5
6
7
8
9
15
60
30
45
MO
23
10
20
30
10 1
2
3
4
5
6
7
8
9
15
60
30
45
MO
23
10
20
30
10 1
2
3
4
5
6
7
8
9
15
60
30
45
MO
23
10
20
30
10 1
2
3
4
5
6
7
8
9
15
60
30
45
MO
23
10
20
30
10 1
2
3
4
5
6
7
8
9
15
60
30
45
MO
23
10
20
30
10 1
2
3
4
5
6
7
8
9
15
60
30
45
MO
23
III III
10
20
30
10 1
2
3
4
5
6
7
8
9
15
60
30
45
MO
23
III
III III
10
20
30
10 1
2
3
4
5
6
7
8
9
15
60
30
45
MO
23
III
10
20
30
10 1
2
3
4
5
6
7
8
9
15
60
30
45
MO
23
III
10
20
30
10 1
2
3
4
5
6
7
8
9
15
60
30
45
MO
31
I
10
20
30
10 1
2
3
4
5
6
7
8
9
15
60
30
45
MO
1
II III
I
10
20
30
10 1
2
3
4
5
6
7
8
9
15
60
30
45
MO
17
III
10
20
30
10 1
2
3
4
5
6
7
8
9
15
60
30
45
WE
22
III
10
20
30
10 1
2
3
4
5
6
7
8
9
15
60
30
45
TH
23
III III
10
20
30
10 1
2
3
4
5
6
7
8
9
15
60
30
45
TH
23
Description of the display and control buttons
Control buttons
Push-button A
Crown at 3 o’clock
Push-button B
Chronograph: Basic function
(Start / Stop / Reset)
Example:
Start: Press push-button A.
Stop: to stop the timing, press
push-button A once more and read
the chronograph counters:
4 min / 38 sek / 7⁄10 sec
Zero positioning:
Press push-button B.
(The chronograph hands will be reset to
their zero positions.)
Chronograph:
Accumulated timing
Example:
Start: (start timing)
Stop: (e.g. 15 min 5sec following
)
Restart: (timing is resumed)
*Stop: (e.g. 5min 12 sec following
)
= 20 min 17 sec
(The accumulated measured time is shown)
Reset:
The chronograph hands are returned to
their zero positions.
Please note
* Following
, the accumulation of the
timing can be continued by pressing
push-button A
(Restart / Stop, Restart / Stop, …).
Chronograph:
Intermediate or interval timing
Example:
Start: (start timing)
Display interval:
e.g. 20 minutes 17 seconds (timing
continues in the background)
Making up the measured time:
(The chronograph hands are quickly
advanced to the ongoing measured time.)
Stop: (Final time is displayed)
Reset:
The chronograph hands are returned to
their zero position
Please note
* Following
, further intervals or inter-
mediates can be displayed by pressing
push-button B (display interval / make up
measured time, ...).
*
Adjusting the chronograph
hands to zero position
Example:
One or several chronograph hands are not
in their correct zero positions and have to be
adjusted (e.g. following a battery change).
Pull out the crown to position III
(all chronograph hands are in their correct
or incorrect zero position).
Keep push-buttons A and B depressed
simultaneously for at least 2 seconds
(the second counter hand rotates by
360° corrective mode is activated).
Adjusting the second counter hand
Single step
65,5% = 40mm Druchmesser
III
65,5% = 40mm Druchmesser
III
Along
Adjusting the next hand B
65,5% = 40mm Druchmesser
III
Adjusting the
1⁄10 second counter hand (position 6h)
Single step
65,5% = 40mm Druchmesser
III
65,5% = 40mm Druchmesser
III
Along
Adjusting the next hand B
65,5% = 40mm Druchmesser
III
Adjusting the minute counter hand (position 9h)
Single step
65,5% = 40mm Druchmesser
III
65,5% = 40mm Druchmesser
III
Along
Returning the crown to position I
Termination of the chronograph hands
adjustment (can be carried out at any time).
Setting the time
*
Pull out the crown to position III
(the watch stops).
Turn the crown until you reach the correct
time 8:45.
*Push the crown back into position I.
Please note
* In order to set the time to the exact second,
must be pulled out when the second
hand is in position «60».
Once the hour and minute hands have been
set,
must be pushed back into position I
at the exact second.
Setting the date (quick mode)
Pull out the crown to position II (the watch
continues to run).
Turn the crown until the correct date 1
appears.
Push the crown back into position I.
Please note
The date can be changed during the date
changing phase between approx. 9:00 PM
and 12:00 PM; please note that the date must
be set to the date of the following day as in
this case the automatic date changing does
not occur at midnight.
Display elements
Second hand
Minute hand
Weekday
Hour hand
Second counter
Minute counter
1⁄10 second counter
(hour counter after 30 minutes)
Date
Setting the date, weekday and
time
Example:
– Date / time on the watch:
17
/ 01:25/
MO
– Present date / time:
23
/ 20:35 /
TH
Pull out the crown to position III
(the watch stops).
Turn the crown until yesterday’s weekday
WE
appears.
Push the crown to position II.
Turn the crown until yesterday’s date
appears
22
.
* Pull out the crown to position III
(the watch stops).
Turn the crown until the correct date
23
and weekday
TH
appears.
**Continue to turn the crown,until the
correct time 8:35 PM appears.
Push the crown back into position I.
Please note
*To set your watch to the exact second,
please refer to the chapter entitled
«setting the time».
** Please observe the AM/PM clock rh ythm.
06 / 2014
Battery type: 395 (diameter 9.5mm x 2.6mm / SR 927 SW)
Accuracy: +20 / -10 seconds per month
B
In order to operate a push button A or B,
you must unscrew it by turning it
counterclockwise 4-5 times.
Important Note:
Important Note:
In order to operate crown at 3 o’clock, you must
unscrew it by turning it counterclockwise 4-5 times.
In order to operate crown at 10 o’clock for model D45-GS, you must
unscrew it by turning it counterclockwise 3-4 times.
In order to operate crown at 3 o’clock, you must
unscrew it by turning it counterclockwise 4-5 times.
In order to insure that your watch remains water-resistant,
it is important that all push-buttons and the crown at
3 o’clock are always returned to the locked position by
pressing each against the case while turning it clockwise.
For model D45-GS it is important that crown at 10 o’clock is
always returned to the locked position by pressing it
against the case while screwing down the crown.
Operating manual for Air Commando chronograph watch (models D45-S, BU, B, GS)
30
10
20
10 1
2
3
4
5
6
7
8
9
15
60
30
45
MO
23
10
20
30
10 1
2
3
4
5
6
7
8
9
15
60
30
45
MO
23
10
20
30
10 1
2
3
4
5
6
7
8
9
15
60
30
45
MO
23
10
20
30
10 1
2
3
4
5
6
7
8
9
15
60
30
45
MO
23
10
20
30
10 1
2
3
4
5
6
7
8
9
15
60
30
45
MO
23
10
20
30
10 1
2
3
4
5
6
7
8
9
15
60
30
45
MO
23
10
20
30
10 1
2
3
4
5
6
7
8
9
15
60
30
45
MO
23
10
20
30
10 1
2
3
4
5
6
7
8
9
15
60
30
45
MO
23
III III
10
20
30
10 1
2
3
4
5
6
7
8
9
15
60
30
45
MO
23
III
III III
10
20
30
10 1
2
3
4
5
6
7
8
9
15
60
30
45
MO
23
III
10
20
30
10 1
2
3
4
5
6
7
8
9
15
60
30
45
MO
23
III
10
20
30
10 1
2
3
4
5
6
7
8
9
15
60
30
45
MO
31
I
10
20
30
10 1
2
3
4
5
6
7
8
9
15
60
30
45
MO
1
II III
I
10
20
30
10 1
2
3
4
5
6
7
8
9
15
60
30
45
MO
17
III
10
20
30
10 1
2
3
4
5
6
7
8
9
15
60
30
45
WE
22
III
10
20
30
10 1
2
3
4
5
6
7
8
9
15
60
30
45
TH
23
III III
10
20
30
10 1
2
3
4
5
6
7
8
9
15
60
30
45
TH
23
III
III
Description of the display and control buttons
Control buttons
Push-button A
Crown at 3 o’clock
Push-button B
Chronograph: Basic function
(Start / Stop / Reset)
Example:
Start: Press push-button A.
Stop: to stop the timing, press
push-button A once more and read
the chronograph counters:
4 min / 38 sek / 7⁄10 sec
Zero positioning:
Press push-button B.
(The chronograph hands will be reset to
their zero positions.)
Chronograph:
Accumulated timing
Example:
Start: (start timing)
Stop: (e.g. 15 min 5sec following
)
Restart: (timing is resumed)
*Stop: (e.g. 5min 12 sec following
)
= 20 min 17 sec
(The accumulated measured time is shown)
Reset:
The chronograph hands are returned to
their zero positions.
Please note
* Following
, the accumulation of the
timing can be continued by pressing
push-button A
(Restart / Stop, Restart / Stop, …).
Chronograph:
Intermediate or interval timing
Example:
Start: (start timing)
Display interval:
e.g. 20 minutes 17 seconds (timing
continues in the background)
Making up the measured time:
(The chronograph hands are quickly
advanced to the ongoing measured time.)
Stop: (Final time is displayed)
Reset:
The chronograph hands are returned to
their zero position
Please note
* Following
, further intervals or inter-
mediates can be displayed by pressing
push-button B (display interval / make up
measured time, ...).
*
Adjusting the chronograph
hands to zero position
Example:
One or several chronograph hands are not
in their correct zero positions and have to be
adjusted (e.g. following a battery change).
Pull out the crown to position III
(all chronograph hands are in their correct
or incorrect zero position).
Keep push-buttons A and B depressed
simultaneously for at least 2 seconds
(the second counter hand rotates by
360° corrective mode is activated).
Adjusting the second counter hand
Single step
65,5% = 40mm Druchmesser
III
65,5% = 40mm Druchmesser
III
Along
Adjusting the next hand B
65,5% = 40mm Druchmesser
III
Adjusting the
1⁄10 second counter hand (position 6h)
Single step
65,5% = 40mm Druchmesser
III
65,5% = 40mm Druchmesser
III
Along
Adjusting the next hand B
65,5% = 40mm Druchmesser
III
Adjusting the minute counter hand (position 9h)
Single step
65,5% = 40mm Druchmesser
III
65,5% = 40mm Druchmesser
III
Along
Returning the crown to position I
Termination of the chronograph hands
adjustment (can be carried out at any time).
Setting the time
*
Pull out the crown to position III
(the watch stops).
Turn the crown until you reach the correct
time 8:45.
*Push the crown back into position I.
Please note
* In order to set the time to the exact second,
must be pulled out when the second
hand is in position «60».
Once the hour and minute hands have been
set,
must be pushed back into position I
at the exact second.
Setting the date (quick mode)
Pull out the crown to position II (the watch
continues to run).
Turn the crown until the correct date 1
appears.
Push the crown back into position I.
Please note
The date can be changed during the date
changing phase between approx. 9:00 PM
and 12:00 PM; please note that the date must
be set to the date of the following day as in
this case the automatic date changing does
not occur at midnight.
Display elements
Second hand
Minute hand
Weekday
Hour hand
Second counter
Minute counter
1⁄10 second counter
(hour counter after 30 minutes)
Date
A
B
A
B
A
Setting the date, weekday and
time
Example:
– Date / time on the watch:
17
/ 01:25/
MO
– Present date / time:
23
/ 20:35 /
TH
Pull out the crown to position III
(the watch stops).
Turn the crown until yesterday’s weekday
WE
appears.
Push the crown to position II.
Turn the crown until yesterday’s date
appears
22
.
* Pull out the crown to position III
(the watch stops).
Turn the crown until the correct date
23
and weekday
TH
appears.
**Continue to turn the crown,until the
correct time 8:35 PM appears.
Push the crown back into position I.
Please note
*To set your watch to the exact second,
please refer to the chapter entitled
«setting the time».
** Please observe the AM/PM clock rh ythm.
06 / 2014
Battery type: 395 (diameter 9.5mm x 2.6mm / SR 927 SW)
Accuracy: +20 / -10 seconds per month
B
B
B
B
B
B
B
B
B
B
B
B
B
B
B
B
A
A
A
A
A
A
A
A
A
A
A
A
A
A
A
A
01 05
02
06
03
07
04
08
Important Note:
In order to operate a push button A or B,
you must unscrew it by turning it
counterclockwise 4-5 times.
Important Note:
Important Note:
In order to operate crown at 3 o’clock, you must
unscrew it by turning it counterclockwise 4-5 times.
In order to operate crown at 10 o’clock for model D45-GS, you must
unscrew it by turning it counterclockwise 3-4 times.
In order to operate crown at 3 o’clock, you must
unscrew it by turning it counterclockwise 4-5 times.
In order to insure that your watch remains water-resistant,
it is important that all push-buttons and the crown at
3 o’clock are always returned to the locked position by
pressing each against the case while turning it clockwise.
For model D45-GS it is important that crown at 10 o’clock is
always returned to the locked position by pressing it
against the case while screwing down the crown.
30
10
20
10 1
2
3
4
5
6
7
8
9
15
60
30
45
MO
23
10
20
30
10 1
2
3
4
5
6
7
8
9
15
60
30
45
MO
23
10
20
30
10 1
2
3
4
5
6
7
8
9
15
60
30
45
MO
23
10
20
30
10 1
2
3
4
5
6
7
8
9
15
60
30
45
MO
23
10
20
30
10 1
2
3
4
5
6
7
8
9
15
60
30
45
MO
23
10
20
30
10 1
2
3
4
5
6
7
8
9
15
60
30
45
MO
23
10
20
30
10 1
2
3
4
5
6
7
8
9
15
60
30
45
MO
23
10
20
30
10 1
2
3
4
5
6
7
8
9
15
60
30
45
MO
23
III III
10
20
30
10 1
2
3
4
5
6
7
8
9
15
60
30
45
MO
23
III
III III
10
20
30
10 1
2
3
4
5
6
7
8
9
15
60
30
45
MO
23
III
10
20
30
10 1
2
3
4
5
6
7
8
9
15
60
30
45
MO
23
III
10
20
30
10 1
2
3
4
5
6
7
8
9
15
60
30
45
MO
31
I
10
20
30
10 1
2
3
4
5
6
7
8
9
15
60
30
45
MO
1
II III
I
10
20
30
10 1
2
3
4
5
6
7
8
9
15
60
30
45
MO
17
IIIIII
10
20
30
10 1
2
3
4
5
6
7
8
9
15
60
30
45
WE
22
III III
10
20
30
10 1
2
3
4
5
6
7
8
9
15
60
30
45
TH
23
III III
10
20
30
10 1
2
3
4
5
6
7
8
9
15
60
30
45
TH
23
III
III
Description of the display and control buttons
Control buttons
Push-button A
Crown at 3 o’clock
Push-button B
Chronograph: Basic function
(Start / Stop / Reset)
Example:
Start: Press push-button A.
Stop: to stop the timing, press
push-button A once more and read
the chronograph counters:
4 min / 38 sek / 7⁄10 sec
Zero positioning:
Press push-button B.
(The chronograph hands will be reset to
their zero positions.)
Chronograph:
Accumulated timing
Example:
Start: (start timing)
Stop: (e.g. 15 min 5sec following
)
Restart: (timing is resumed)
*Stop: (e.g. 5min 12 sec following
)
= 20 min 17 sec
(The accumulated measured time is shown)
Reset:
The chronograph hands are returned to
their zero positions.
Please note
* Following
, the accumulation of the
timing can be continued by pressing
push-button A
(Restart / Stop, Restart / Stop, …).
Chronograph:
Intermediate or interval timing
Example:
Start: (start timing)
Display interval:
e.g. 20 minutes 17 seconds (timing
continues in the background)
Making up the measured time:
(The chronograph hands are quickly
advanced to the ongoing measured time.)
Stop: (Final time is displayed)
Reset:
The chronograph hands are returned to
their zero position
Please note
* Following
, further intervals or inter-
mediates can be displayed by pressing
push-button B (display interval / make up
measured time, ...).
*
Adjusting the chronograph
hands to zero position
Example:
One or several chronograph hands are not
in their correct zero positions and have to be
adjusted (e.g. following a battery change).
Pull out the crown to position III
(all chronograph hands are in their correct
or incorrect zero position).
Keep push-buttons A and B depressed
simultaneously for at least 2 seconds
(the second counter hand rotates by
360° corrective mode is activated).
Adjusting the second counter hand
Single step
65,5% = 40mm Druchmesser
III
65,5% = 40mm Druchmesser
III
Along
Adjusting the next hand B
65,5% = 40mm Druchmesser
III
Adjusting the
1⁄10 second counter hand (position 6h)
Single step
65,5% = 40mm Druchmesser
III
65,5% = 40mm Druchmesser
III
Along
Adjusting the next hand B
65,5% = 40mm Druchmesser
III
Adjusting the minute counter hand (position 9h)
Single step
65,5% = 40mm Druchmesser
III
65,5% = 40mm Druchmesser
III
Along
Returning the crown to position I
Termination of the chronograph hands
adjustment (can be carried out at any time).
Setting the time
*
Pull out the crown to position III
(the watch stops).
Turn the crown until you reach the correct
time 8:45.
*Push the crown back into position I.
Please note
* In order to set the time to the exact second,
must be pulled out when the second
hand is in position «60».
Once the hour and minute hands have been
set,
must be pushed back into position I
at the exact second.
Setting the date (quick mode)
Pull out the crown to position II (the watch
continues to run).
Turn the crown until the correct date 1
appears.
Push the crown back into position I.
Please note
The date can be changed during the date
changing phase between approx. 9:00 PM
and 12:00 PM; please note that the date must
be set to the date of the following day as in
this case the automatic date changing does
not occur at midnight.
Display elements
Second hand
Minute hand
Weekday
Hour hand
Second counter
Minute counter
1⁄10 second counter
(hour counter after 30 minutes)
Date
A
B
A
B
A
Setting the date, weekday and
time
Example:
– Date / time on the watch:
17
/ 01:25/
MO
– Present date / time:
23
/ 20:35 /
TH
Pull out the crown to position III
(the watch stops).
Turn the crown until yesterday’s weekday
WE
appears.
Push the crown to position II.
Turn the crown until yesterday’s date
appears
22
.
* Pull out the crown to position III
(the watch stops).
Turn the crown until the correct date
23
and weekday
TH
appears.
**Continue to turn the crown,until the
correct time 8:35 PM appears.
Push the crown back into position I.
Please note
*To set your watch to the exact second,
please refer to the chapter entitled
«setting the time».
** Please observe the AM/PM clock rh ythm.
06 / 2014
Battery type: 395 (diameter 9.5mm x 2.6mm / SR 927 SW)
Accuracy: +20 / -10 seconds per month
B
B
B
B
B
B
08
Important Note:
In order to operate a push button A or B,
you must unscrew it by turning it
counterclockwise 4-5 times.
Important Note:
Important Note:
In order to operate crown at 3 o’clock, you must
unscrew it by turning it counterclockwise 4-5 times.
In order to operate crown at 10 o’clock for model D45-GS, you must
unscrew it by turning it counterclockwise 3-4 times.
In order to operate crown at 3 o’clock, you must
unscrew it by turning it counterclockwise 4-5 times.
In order to insure that your watch remains water-resistant,
it is important that all push-buttons and the crown at
3 o’clock are always returned to the locked position by
pressing each against the case while turning it clockwise.
For model D45-GS it is important that crown at 10 o’clock is
always returned to the locked position by pressing it
against the case while screwing down the crown.
30
10
20
10 1
2
3
4
5
6
7
8
9
15
60
30
45
MO
23
10
20
30
10 1
2
3
4
5
6
7
8
9
15
60
30
45
MO
23
10
20
30
10 1
2
3
4
5
6
7
8
9
15
60
30
45
MO
23
10
20
30
10 1
2
3
4
5
6
7
8
9
15
60
30
45
MO
23
10
20
30
10 1
2
3
4
5
6
7
8
9
15
60
30
45
MO
23
10
20
30
10 1
2
3
4
5
6
7
8
9
15
60
30
45
MO
23
10
20
30
10 1
2
3
4
5
6
7
8
9
15
60
30
45
MO
23
10
20
30
10 1
2
3
4
5
6
7
8
9
15
60
30
45
MO
23
III III
10
20
30
10 1
2
3
4
5
6
7
8
9
15
60
30
45
MO
23
III
III III
10
20
30
10 1
2
3
4
5
6
7
8
9
15
60
30
45
MO
23
III
10
20
30
10 1
2
3
4
5
6
7
8
9
15
60
30
45
MO
23
III
10
20
30
10 1
2
3
4
5
6
7
8
9
15
60
30
45
MO
31
I
10
20
30
10 1
2
3
4
5
6
7
8
9
15
60
30
45
MO
1
II III
I
10
20
30
10 1
2
3
4
5
6
7
8
9
15
60
30
45
MO
17
III
10
20
30
10 1
2
3
4
5
6
7
8
9
15
60
30
45
WE
22
III
10
20
30
10 1
2
3
4
5
6
7
8
9
15
60
30
45
TH
23
III III
10
20
30
10 1
2
3
4
5
6
7
8
9
15
60
30
45
TH
23
III
III
Description of the display and control buttons
Control buttons
Push-button A
Crown at 3 o’clock
Push-button B
Chronograph: Basic function
(Start / Stop / Reset)
Example:
Start: Press push-button A.
Stop: to stop the timing, press
push-button A once more and read
the chronograph counters:
4 min / 38 sek / 7⁄10 sec
Zero positioning:
Press push-button B.
(The chronograph hands will be reset to
their zero positions.)
Chronograph:
Accumulated timing
Example:
Start: (start timing)
Stop: (e.g. 15 min 5sec following
)
Restart: (timing is resumed)
*Stop: (e.g. 5min 12 sec following
)
= 20 min 17 sec
(The accumulated measured time is shown)
Reset:
The chronograph hands are returned to
their zero positions.
Please note
* Following
, the accumulation of the
timing can be continued by pressing
push-button A
(Restart / Stop, Restart / Stop, …).
Chronograph:
Intermediate or interval timing
Example:
Start: (start timing)
Display interval:
e.g. 20 minutes 17 seconds (timing
continues in the background)
Making up the measured time:
(The chronograph hands are quickly
advanced to the ongoing measured time.)
Stop: (Final time is displayed)
Reset:
The chronograph hands are returned to
their zero position
Please note
* Following
, further intervals or inter-
mediates can be displayed by pressing
push-button B (display interval / make up
measured time, ...).
*
Adjusting the chronograph
hands to zero position
Example:
One or several chronograph hands are not
in their correct zero positions and have to be
adjusted (e.g. following a battery change).
Pull out the crown to position III
(all chronograph hands are in their correct
or incorrect zero position).
Keep push-buttons A and B depressed
simultaneously for at least 2 seconds
(the second counter hand rotates by
360° corrective mode is activated).
Adjusting the second counter hand
Single step
65,5% = 40mm Druchmesser
III
65,5% = 40mm Druchmesser
III
Along
Adjusting the next hand B
65,5% = 40mm Druchmesser
III
Adjusting the
1⁄10 second counter hand (position 6h)
Single step
65,5% = 40mm Druchmesser
III
65,5% = 40mm Druchmesser
III
Along
Adjusting the next hand B
65,5% = 40mm Druchmesser
III
Adjusting the minute counter hand (position 9h)
Single step
65,5% = 40mm Druchmesser
III
65,5% = 40mm Druchmesser
III
Along
Returning the crown to position I
Termination of the chronograph hands
adjustment (can be carried out at any time).
Setting the time
*
Pull out the crown to position III
(the watch stops).
Turn the crown until you reach the correct
time 8:45.
*Push the crown back into position I.
Please note
* In order to set the time to the exact second,
must be pulled out when the second
hand is in position «60».
Once the hour and minute hands have been
set,
must be pushed back into position I
at the exact second.
Setting the date (quick mode)
Pull out the crown to position II (the watch
continues to run).
Turn the crown until the correct date 1
appears.
Push the crown back into position I.
Please note
The date can be changed during the date
changing phase between approx. 9:00 PM
and 12:00 PM; please note that the date must
be set to the date of the following day as in
this case the automatic date changing does
not occur at midnight.
Display elements
Second hand
Minute hand
Weekday
Hour hand
Second counter
Minute counter
1⁄10 second counter
(hour counter after 30 minutes)
Date
A
B
A
B
A
Setting the date, weekday and
time
Example:
– Date / time on the watch:
17
/ 01:25/
MO
– Present date / time:
23
/ 20:35 /
TH
Pull out the crown to position III
(the watch stops).
Turn the crown until yesterday’s weekday
WE
appears.
Push the crown to position II.
Turn the crown until yesterday’s date
appears
22
.
* Pull out the crown to position III
(the watch stops).
Turn the crown until the correct date
23
and weekday
TH
appears.
**Continue to turn the crown,until the
correct time 8:35 PM appears.
Push the crown back into position I.
Please note
*To set your watch to the exact second,
please refer to the chapter entitled
«setting the time».
** Please observe the AM/PM clock rh ythm.
06 / 2014
Battery type: 395 (diameter 9.5mm x 2.6mm / SR 927 SW)
Accuracy: +20 / -10 seconds per month
B
B
B
B
07
04
08
Important Note:
In order to operate a push button A or B,
you must unscrew it by turning it
counterclockwise 4-5 times.
Important Note:
Important Note:
In order to operate crown at 3 o’clock, you must
unscrew it by turning it counterclockwise 4-5 times.
In order to operate crown at 10 o’clock for model D45-GS, you must
unscrew it by turning it counterclockwise 3-4 times.
In order to operate crown at 3 o’clock, you must
unscrew it by turning it counterclockwise 4-5 times.
In order to insure that your watch remains water-resistant,
it is important that all push-buttons and the crown at
3 o’clock are always returned to the locked position by
pressing each against the case while turning it clockwise.
For model D45-GS it is important that crown at 10 o’clock is
always returned to the locked position by pressing it
against the case while screwing down the crown.
30
10
20
10 1
2
3
4
5
6
7
8
9
15
60
30
45
MO
23
10
20
30
10 1
2
3
4
5
6
7
8
9
15
60
30
45
MO
23
10
20
30
10 1
2
3
4
5
6
7
8
9
15
60
30
45
MO
23
10
20
30
10 1
2
3
4
5
6
7
8
9
15
60
30
45
MO
23
10
20
30
10 1
2
3
4
5
6
7
8
9
15
60
30
45
MO
23
10
20
30
10 1
2
3
4
5
6
7
8
9
15
60
30
45
MO
23
10
20
30
10 1
2
3
4
5
6
7
8
9
15
60
30
45
MO
23
10
20
30
10 1
2
3
4
5
6
7
8
9
15
60
30
45
MO
23
III III
10
20
30
10 1
2
3
4
5
6
7
8
9
15
60
30
45
MO
23
III
III III
10
20
30
10 1
2
3
4
5
6
7
8
9
15
60
30
45
MO
23
III III
10
20
30
10 1
2
3
4
5
6
7
8
9
15
60
30
45
MO
23
III
10
20
30
10 1
2
3
4
5
6
7
8
9
15
60
30
45
MO
31
I
10
20
30
10 1
2
3
4
5
6
7
8
9
15
60
30
45
MO
1
II III
I
10
20
30
10 1
2
3
4
5
6
7
8
9
15
60
30
45
MO
17
III
10
20
30
10 1
2
3
4
5
6
7
8
9
15
60
30
45
WE
22
III
10
20
30
10 1
2
3
4
5
6
7
8
9
15
60
30
45
TH
23
III III
10
20
30
10 1
2
3
4
5
6
7
8
9
15
60
30
45
TH
23
III
III
Description of the display and control buttons
Control buttons
Push-button A
Crown at 3 o’clock
Push-button B
Chronograph: Basic function
(Start / Stop / Reset)
Example:
Start: Press push-button A.
Stop: to stop the timing, press
push-button A once more and read
the chronograph counters:
4 min / 38 sek / 7⁄10 sec
Zero positioning:
Press push-button B.
(The chronograph hands will be reset to
their zero positions.)
Chronograph:
Accumulated timing
Example:
Start: (start timing)
Stop: (e.g. 15 min 5sec following
)
Restart: (timing is resumed)
*Stop: (e.g. 5min 12 sec following
)
= 20 min 17 sec
(The accumulated measured time is shown)
Reset:
The chronograph hands are returned to
their zero positions.
Please note
* Following
, the accumulation of the
timing can be continued by pressing
push-button A
(Restart / Stop, Restart / Stop, …).
Chronograph:
Intermediate or interval timing
Example:
Start: (start timing)
Display interval:
e.g. 20 minutes 17 seconds (timing
continues in the background)
Making up the measured time:
(The chronograph hands are quickly
advanced to the ongoing measured time.)
Stop: (Final time is displayed)
Reset:
The chronograph hands are returned to
their zero position
Please note
* Following
, further intervals or inter-
mediates can be displayed by pressing
push-button B (display interval / make up
measured time, ...).
*
Adjusting the chronograph
hands to zero position
Example:
One or several chronograph hands are not
in their correct zero positions and have to be
adjusted (e.g. following a battery change).
Pull out the crown to position III
(all chronograph hands are in their correct
or incorrect zero position).
Keep push-buttons A and B depressed
simultaneously for at least 2 seconds
(the second counter hand rotates by
360° corrective mode is activated).
Adjusting the second counter hand
Single step
65,5% = 40mm Druchmesser
III
65,5% = 40mm Druchmesser
III
Along
Adjusting the next hand B
65,5% = 40mm Druchmesser
III
Adjusting the
1⁄10 second counter hand (position 6h)
Single step
65,5% = 40mm Druchmesser
III
65,5% = 40mm Druchmesser
III
Along
Adjusting the next hand B
65,5% = 40mm Druchmesser
III
Adjusting the minute counter hand (position 9h)
Single step
65,5% = 40mm Druchmesser
III
65,5% = 40mm Druchmesser
III
Along
Returning the crown to position I
Termination of the chronograph hands
adjustment (can be carried out at any time).
Setting the time
*
Pull out the crown to position III
(the watch stops).
Turn the crown until you reach the correct
time 8:45.
*Push the crown back into position I.
Please note
* In order to set the time to the exact second,
must be pulled out when the second
hand is in position «60».
Once the hour and minute hands have been
set,
must be pushed back into position I
at the exact second.
Setting the date (quick mode)
Pull out the crown to position II (the watch
continues to run).
Turn the crown until the correct date 1
appears.
Push the crown back into position I.
Please note
The date can be changed during the date
changing phase between approx. 9:00 PM
and 12:00 PM; please note that the date must
be set to the date of the following day as in
this case the automatic date changing does
not occur at midnight.
Display elements
Second hand
Minute hand
Weekday
Hour hand
Second counter
Minute counter
1⁄10 second counter
(hour counter after 30 minutes)
Date
A
B
A
B
A
Setting the date, weekday and
time
Example:
– Date / time on the watch:
17
/ 01:25/
MO
– Present date / time:
23
/ 20:35 /
TH
Pull out the crown to position III
(the watch stops).
Turn the crown until yesterday’s weekday
WE
appears.
Push the crown to position II.
Turn the crown until yesterday’s date
appears
22
.
* Pull out the crown to position III
(the watch stops).
Turn the crown until the correct date
23
and weekday
TH
appears.
**Continue to turn the crown,until the
correct time 8:35 PM appears.
Push the crown back into position I.
Please note
*To set your watch to the exact second,
please refer to the chapter entitled
«setting the time».
** Please observe the AM/PM clock rh ythm.
06 / 2014
Battery type: 395 (diameter 9.5mm x 2.6mm / SR 927 SW)
Accuracy: +20 / -10 seconds per month
06
03
07
04
08
Important Note:
In order to operate a push button A or B,
you must unscrew it by turning it
counterclockwise 4-5 times.
Important Note:
Important Note:
In order to operate crown at 3 o’clock, you must
unscrew it by turning it counterclockwise 4-5 times.
In order to operate crown at 10 o’clock for model D45-GS, you must
unscrew it by turning it counterclockwise 3-4 times.
In order to operate crown at 3 o’clock, you must
unscrew it by turning it counterclockwise 4-5 times.
In order to insure that your watch remains water-resistant,
it is important that all push-buttons and the crown at
3 o’clock are always returned to the locked position by
pressing each against the case while turning it clockwise.
For model D45-GS it is important that crown at 10 o’clock is
always returned to the locked position by pressing it
against the case while screwing down the crown.
30
10
20
10 1
2
3
4
5
6
7
8
9
15
60
30
45
MO
23
10
20
30
10 1
2
3
4
5
6
7
8
9
15
60
30
45
MO
23
10
20
30
10 1
2
3
4
5
6
7
8
9
15
60
30
45
MO
23
10
20
30
10 1
2
3
4
5
6
7
8
9
15
60
30
45
MO
23
10
20
30
10 1
2
3
4
5
6
7
8
9
15
60
30
45
MO
23
10
20
30
10 1
2
3
4
5
6
7
8
9
15
60
30
45
MO
23
10
20
30
10 1
2
3
4
5
6
7
8
9
15
60
30
45
MO
23
10
20
30
10 1
2
3
4
5
6
7
8
9
15
60
30
45
MO
23
III III
10
20
30
10 1
2
3
4
5
6
7
8
9
15
60
30
45
MO
23
III
III III
10
20
30
10 1
2
3
4
5
6
7
8
9
15
60
30
45
MO
23
III
10
20
30
10 1
2
3
4
5
6
7
8
9
15
60
30
45
MO
23
III
10
20
30
10 1
2
3
4
5
6
7
8
9
15
60
30
45
MO
31
I
10
20
30
10 1
2
3
4
5
6
7
8
9
15
60
30
45
MO
1
II III
I
10
20
30
10 1
2
3
4
5
6
7
8
9
15
60
30
45
MO
17
III
10
20
30
10 1
2
3
4
5
6
7
8
9
15
60
30
45
WE
22
III
10
20
30
10 1
2
3
4
5
6
7
8
9
15
60
30
45
TH
23
III III
10
20
30
10 1
2
3
4
5
6
7
8
9
15
60
30
45
TH
23
Description of the display and control buttons
Control buttons
Push-button A
Crown at 3 o’clock
Push-button B
Chronograph: Basic function
(Start / Stop / Reset)
Example:
Start: Press push-button A.
Stop: to stop the timing, press
push-button A once more and read
the chronograph counters:
4 min / 38 sek / 7⁄10 sec
Zero positioning:
Press push-button B.
(The chronograph hands will be reset to
their zero positions.)
Chronograph:
Accumulated timing
Example:
Start: (start timing)
Stop: (e.g. 15 min 5sec following
)
Restart: (timing is resumed)
*Stop: (e.g. 5min 12 sec following
)
= 20 min 17 sec
(The accumulated measured time is shown)
Reset:
The chronograph hands are returned to
their zero positions.
Please note
* Following
, the accumulation of the
timing can be continued by pressing
push-button A
(Restart / Stop, Restart / Stop, …).
Chronograph:
Intermediate or interval timing
Example:
Start: (start timing)
Display interval:
e.g. 20 minutes 17 seconds (timing
continues in the background)
Making up the measured time:
(The chronograph hands are quickly
advanced to the ongoing measured time.)
Stop: (Final time is displayed)
Reset:
The chronograph hands are returned to
their zero position
Please note
* Following
, further intervals or inter-
mediates can be displayed by pressing
push-button B (display interval / make up
measured time, ...).
*
Adjusting the chronograph
hands to zero position
Example:
One or several chronograph hands are not
in their correct zero positions and have to be
adjusted (e.g. following a battery change).
Pull out the crown to position III
(all chronograph hands are in their correct
or incorrect zero position).
Keep push-buttons A and B depressed
simultaneously for at least 2 seconds
(the second counter hand rotates by
360° corrective mode is activated).
Adjusting the second counter hand
Single step
65,5% = 40mm Druchmesser
III
65,5% = 40mm Druchmesser
III
Along
Adjusting the next hand B
65,5% = 40mm Druchmesser
III
Adjusting the
1⁄10 second counter hand (position 6h)
Single step
65,5% = 40mm Druchmesser
III
65,5% = 40mm Druchmesser
III
Along
Adjusting the next hand B
65,5% = 40mm Druchmesser
III
Adjusting the minute counter hand (position 9h)
Single step
65,5% = 40mm Druchmesser
III
65,5% = 40mm Druchmesser
III
Along
Returning the crown to position I
Termination of the chronograph hands
adjustment (can be carried out at any time).
Setting the time
*
Pull out the crown to position III
(the watch stops).
Turn the crown until you reach the correct
time 8:45.
*Push the crown back into position I.
Please note
* In order to set the time to the exact second,
must be pulled out when the second
hand is in position «60».
Once the hour and minute hands have been
set,
must be pushed back into position I
at the exact second.
Setting the date (quick mode)
Pull out the crown to position II (the watch
continues to run).
Turn the crown until the correct date 1
appears.
Push the crown back into position I.
Please note
The date can be changed during the date
changing phase between approx. 9:00 PM
and 12:00 PM; please note that the date must
be set to the date of the following day as in
this case the automatic date changing does
not occur at midnight.
Display elements
Second hand
Minute hand
Weekday
Hour hand
Second counter
Minute counter
1⁄10 second counter
(hour counter after 30 minutes)
Date
A
B
A
B
A
Setting the date, weekday and
time
Example:
– Date / time on the watch:
17
/ 01:25/
MO
– Present date / time:
23
/ 20:35 /
TH
Pull out the crown to position III
(the watch stops).
Turn the crown until yesterday’s weekday
WE
appears.
Push the crown to position II.
Turn the crown until yesterday’s date
appears
22
.
* Pull out the crown to position III
(the watch stops).
Turn the crown until the correct date
23
and weekday
TH
appears.
**Continue to turn the crown,until the
correct time 8:35 PM appears.
Push the crown back into position I.
Please note
*To set your watch to the exact second,
please refer to the chapter entitled
«setting the time».
** Please observe the AM/PM clock rh ythm.
06 / 2014
Battery type: 395 (diameter 9.5mm x 2.6mm / SR 927 SW)
Accuracy: +20 / -10 seconds per month
B
B
B
B
B
B
B
B
B
B
B
B
B
B
B
B
A
A
A
A
A
A
A
A
A
A
A
A
A
A
A
A
05
02
06
03
07
04
08
Important Note:
In order to operate a push button A or B,
you must unscrew it by turning it
counterclockwise 4-5 times.
Important Note:
Important Note:
In order to operate crown at 3 o’clock, you must
unscrew it by turning it counterclockwise 4-5 times.
In order to operate crown at 10 o’clock for model D45-GS, you must
unscrew it by turning it counterclockwise 3-4 times.
In order to operate crown at 3 o’clock, you must
unscrew it by turning it counterclockwise 4-5 times.
In order to insure that your watch remains water-resistant,
it is important that all push-buttons and the crown at
3 o’clock are always returned to the locked position by
pressing each against the case while turning it clockwise.
For model D45-GS it is important that crown at 10 o’clock is
always returned to the locked position by pressing it
against the case while screwing down the crown.
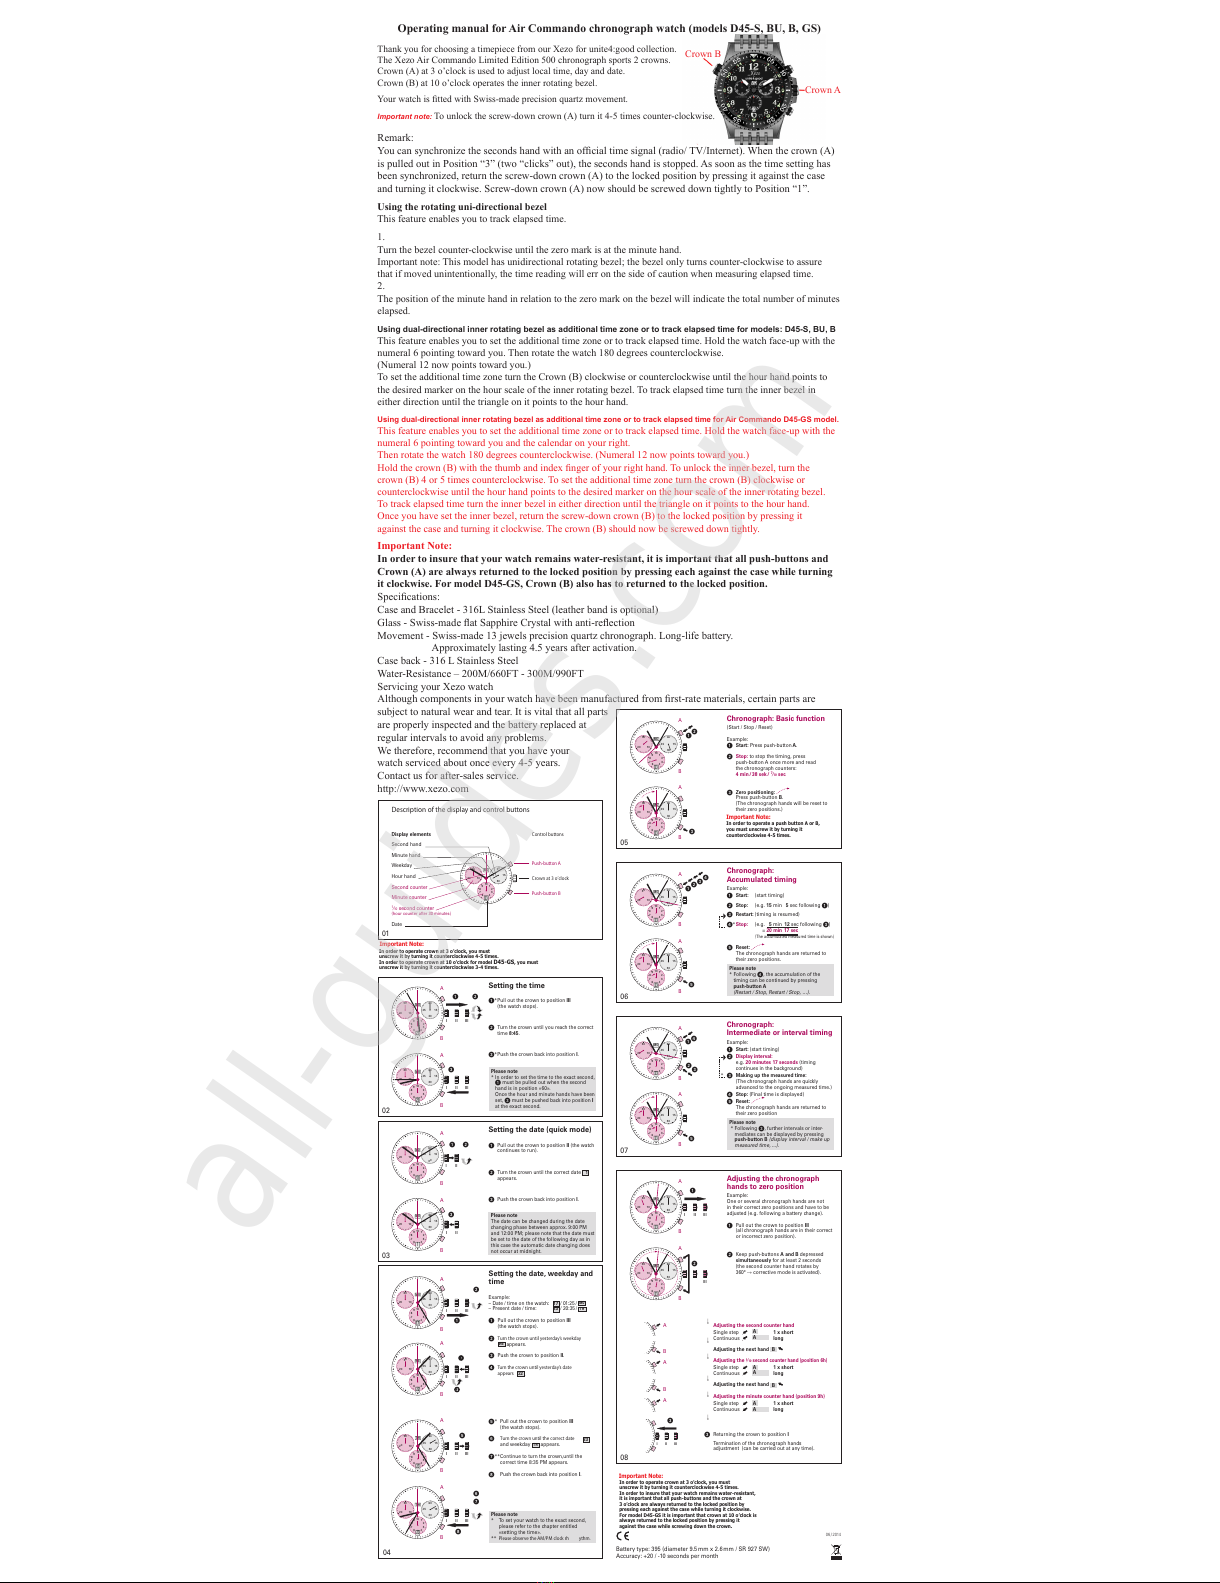
Thank you for choosing a timepiece from our Xezo for unite4:good collection.
The Xezo Air Commando Limited Edition 500 chronograph sports 2 crowns.
Crown (A) at 3 o’clock is used to adjust local time, day and date.
Crown (B) at 10 o’clock operates the inner rotating bezel.
Your watch is tted with Swiss-made precision quartz movement.
Important note: To unlock the screw-down crown (A) turn it 4-5 times counter-clockwise.
Remark:
You can synchronize the seconds hand with an ofcial time signal (radio/ TV/Internet). When the crown (A)
is pulled out in Position “3” (two “clicks” out), the seconds hand is stopped. As soon as the time setting has
been synchronized, return the screw-down crown (A) to the locked position by pressing it against the case
and turning it clockwise. Screw-down crown (A) now should be screwed down tightly to Position “1”.
Using the rotating uni-directional bezel
This feature enables you to track elapsed time.
1.
Turn the bezel counter-clockwise until the zero mark is at the minute hand.
Important note: This model has unidirectional rotating bezel; the bezel only turns counter-clockwise to assure
that if moved unintentionally, the time reading will err on the side of caution when measuring elapsed time.
2.
The position of the minute hand in relation to the zero mark on the bezel will indicate the total number of minutes
elapsed.
Using dual-directional inner rotating bezel as additional time zone or to track elapsed time for models: D45-S, BU, B
This feature enables you to set the additional time zone or to track elapsed time. Hold the watch face-up with the
numeral 6 pointing toward you. Then rotate the watch 180 degrees counterclockwise.
(Numeral 12 now points toward you.)
To set the additional time zone turn the Crown (B) clockwise or counterclockwise until the hour hand points to
the desired marker on the hour scale of the inner rotating bezel. To track elapsed time turn the inner bezel in
either direction until the triangle on it points to the hour hand.
Using dual-directional inner rotating bezel as additional time zone or to track elapsed time for Air Commando D45-GS model.
This feature enables you to set the additional time zone or to track elapsed time. Hold the watch face-up with the
numeral 6 pointing toward you and the calendar on your right.
Then rotate the watch 180 degrees counterclockwise. (Numeral 12 now points toward you.)
Hold the crown (B) with the thumb and index nger of your right hand. To unlock the inner bezel, turn the
crown (B) 4 or 5 times counterclockwise. To set the additional time zone turn the crown (B) clockwise or
counterclockwise until the hour hand points to the desired marker on the hour scale of the inner rotating bezel.
To track elapsed time turn the inner bezel in either direction until the triangle on it points to the hour hand.
Once you have set the inner bezel, return the screw-down crown (B) to the locked position by pressing it
against the case and turning it clockwise. The crown (B) should now be screwed down tightly.
Important Note:
In order to insure that your watch remains water-resistant, it is important that all push-buttons and
Crown (A) are always returned to the locked position by pressing each against the case while turning
it clockwise. For model D45-GS, Crown (B) also has to returned to the locked position.
Specications:
Case and Bracelet - 316L Stainless Steel (leather band is optional)
Glass - Swiss-made at Sapphire Crystal with anti-reection
Movement - Swiss-made 13 jewels precision quartz chronograph. Long-life battery.
Approximately lasting 4.5 years after activation.
Case back - 316 L Stainless Steel
Water-Resistance – 200M/660FT - 300M/990FT
Servicing your Xezo watch
Although components in your watch have been manufactured from rst-rate materials, certain parts are
subject to natural wear and tear. It is vital that all parts
are properly inspected and the battery replaced at
regular intervals to avoid any problems.
We therefore, recommend that you have your
watch serviced about once every 4-5 years.
Contact us for after-sales service.
http://www.xezo.com
All manuals and user guides at all-guides.com
all-guides.com