Xiaomi MI Grooming Kit Pro User manual

User Manual
Grooming Kit Pro

01
●
●
●
●
●
●
●
●
●
●
●
●
●
●
●
●
●
●
Read this manual carefully before use, and retain it for future reference.
Safety Instructions
This appliance can be used by children aged from 8 years and above
and persons with reduced physical, sensory or mental capabilities or
lack of experience and knowledge if they have been given supervision
or instruction concerning use of the appliance in a safe way and
understand the hazards involved.
Children should be supervised to ensure that they do not play with the
appliance.
Cleaning and user maintenance shall not be made by children without
supervision.
Please keep the grooming kit out of reach of children. Do not let
children play with it.
This trimmer is only to be used with the power supply unit supplied with
it.
The handheld part can be cleaned with water only after being
disconnected from the charging cable. When cleaning the handheld
part, cover the charging port first and keep it dry.
When the charging cable is damaged, it must be replaced with a
genuine one purchased from the manufacturer or the after-sales
service team.
Do not use damaged blade head and beard comb. Before use, please
check whether the grooming kit is damaged and whether the sound is
normal.
Before turning off the trimmer, please make sure the blade head is
away from the human body.
Do not charge the trimmer, in humid environments.
Do not disassemble the trimmer to replace the battery. This appliance
contains battery that is non-replaceable.
Do not directly pull the charging cable when plugging in and unplugging
the charging plug.
This appliance contains built-in lithium-ion battery. Do not disassemble,
impact, crush the battery or throw it into fire. If there is severe
swelling, do not continue to use. Do not leave the battery in high
temperature environment.
Do not place or insert any foreign objects into this grooming kit.
Do not modify or repair this grooming kit yourself.
This grooming kit is not suitable for use in the bathtub or shower.
Cutting blades may become hot after prolonged use.
This grooming kit is only for trimming beard, hair, body hair, and
nose/ear hair. Do not use it for other purposes.
Warnings

02
●
●
●
If you come into physical contact with any substance that may leak out
of the battery, please rinse the contact area with plenty of water and
seek medical attention immediately.
This appliance contains batteries that are only replaceable by skilled
persons.
For the purposes of recharging the battery, only use the detachable
supply unit provided with this appliance.
This indicates that the trimmer can be rinsed under
running water.
Use only with <A520-050100U-EU1> supply unit.
Read operator's manual.
●
●
●
●
●
●
●
●
●
Notes
Before charging, please make sure the trimmer and its charging port
are dry.
When charging, make sure to use a charger of 5 V 1 A.
Fully charge the trimmer at least once every six months, if it has not
been used for an extended period of time.
This grooming kit is intended for indoor use only.
This grooming kit is intended for use by a single individual only.
When traveling, make sure the charging port protective cover is closed
and the travel lock is enabled to protect the trimmer.
Only charge, use, and store the trimmer at a temperature between 5°C
and 35°C.
Do not wrap the charging cable around the trimmer to avoid damage to
the cable.
The body of this trimmer meets the IPX7 standard for waterproofing
and can be cleaned with water. However, it should not be immersed in
water for an extended period of time.
Cautions
A520-050100U-EU1

U-Shaped Beard
Trimming Blade
Trimming Length
Indicator
Trimming Length
Adjustment Knob
On/Off Button
Battery Level Indicator
Travel Lock Indicator
Shaver Head
For shaving beard
Precision Blade
For personalized lettering
Nose & Ear Hair Trimming Blade
For trimming nose & ear hair
Body Grooming Blade
For shaving body hair
Trimmer
U-Shaped Beard
Trimming Blade
For trimming beard or hair
Type-C Charging Port
Product Overview
User Manual
Quick Guide

04
Cleaning Brush
Storage Case Travel Pouch
Power Adapter Charging Cable
Beard Combs (can only be used with u-shaped beard trimming blade)
Note: Illustrations of the product, accessories, and user interface in this user
manual are for reference purposes only. The actual product and functions
may vary due to product enhancements.
Beard Comb
0.5–10 mm
Beard Comb
10.5–20 mm
●
●
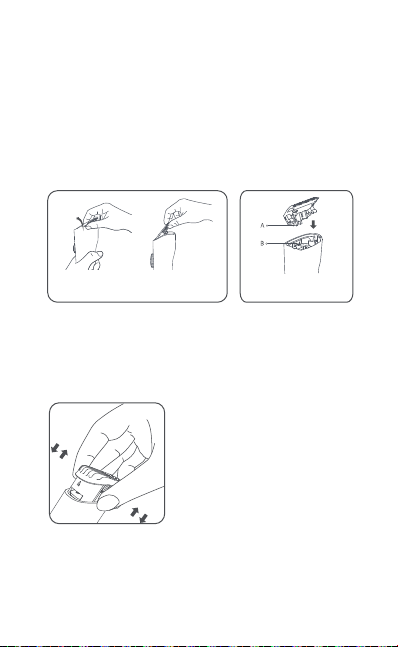
Installing/Removing the Beard Comb
Installing the beard comb: Insert the beard comb into the comb slot.
You will hear a clicking sound when it’s in position.
Remove the beard comb: Pinch both sides of beard comb and pull it
vertically upwards.
●
●
Installing/Removing
Installing/Removing the Blade Head
Removing the blade head: As shown in the figure, use your thumb to
hold the blade head and push up from under the blade head to lift it up
and away from the handle.
Installing the blade head: Align the clip (A) of the blade head to the slot
(B) of the body, and then press down the blade head. You will hear a
clicking sound when it’s in position.
Note:
All blade heads can be removed and installed in the same way.
Removing the
blade head
Installing the
blade head

06
●
●
●
●
●
●
●
●
●
●
●
How to Use
Charging
Turning On/Off
Before charging, make sure the trimmer is turned off.
Open the protective cover of the Type-C charging port, connect the
Type-C end of the charging cable to the Type-C charging port in the
trimmer, connect the other end of the charging cable to the power
adapter, and turn on the power.
Press the on/off button to turn on the trimmer, and it will start to work.
After use, press the on/off button to turn it off.
When the trimmer cannot be turned on due to a low battery, it takes
about 120 minutes to fully charge the trimmer.
It can be used for about 90 minutes when fully charged.
Please fully charge the battery before the first use. For further use, it is
recommended to fully charge the battery after the battery is depleted to
ensure optimum battery performance.
It is recommended to fully discharge and then recharge the battery
twice a year on a regular basis.
The power adapter can automatically adapt to an AC voltage ranging
from 100 V to 240 V.
To extend the life of the rechargeable battery, please unplug the power
adapter in time when the trimmer is fully charged.
Do not connect the power adapter to the power outlet for more than 24
hours, otherwise it may burn the power adapter.
The LED display will show the battery level when the trimmer is
charging or in use.
Notes:
07
●
●
●
●
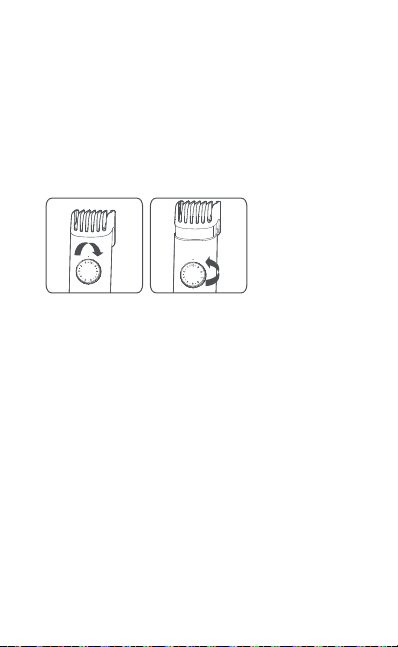
Beard Comb Adjustment
Shaving
Turn the trimming length adjustment knob to adjust the cutting length
of the comb, which is the length of the stubble that will be retained.
The two beard combs of different lengths all feature 20 cutting lengths
with intervals of 0.5 mm. These cutting lengths correspond to the 20
scales of the adjustment knob on the body.
It is normal for the skin to be slightly irritated after the first few shaves.
It is recommended to regularly use the grooming kit for three weeks
(approximately 3 times a week) to allow the skin to adapt as quickly as
possible.
Install the shaver head or u-shaped beard trimming blade. Install the
appropriate beard comb and adjust it to the desired cutting length as
needed. Apply gentle, continuous pressure and move the shaving unit
slowly over your face to trim the beard.
Note:
Improper use of this grooming kit can easily cause damage to blade
meshes and blade heads. Please check whether blade meshes and blade
heads are intact before use. Immediately stop using the grooming kit if
any damage is found.
●
●
Nose/Ear Hair Trimming
After installing the nose & ear hair trimming blade, carefully insert the
tip of the nose & ear hair trimming blade into the nostril/ear canal to
avoid injuring the skin. Gently move the tip in and out of the nostril/ear
canal while turning it around to remove unwanted hairs. When no
shearing sound is heard, the nose/ear hair trimming ends.
After trimming, there may be hair residues in the nostrils/ear canals.
Please use a tissue or similar to clean them up.

08
●
●
●
●
Travel Lock
This trimmer is equipped with a travel lock to prevent it from
accidentally turning on.
Enabling the travel lock: Press and hold the on/off button for three
seconds while the trimmer is turned off. The travel lock indicator blinks
three times, indicating the travel lock is enabled.
When the travel lock is enabled, if you press the on/off button, the travel
lock indicator and the battery level indicator will blink three times
simultaneously, but the trimmer cannot be turned on.
Disabling the travel lock: In the locked state, press and hold the on/off
button for three seconds. The travel lock indicator and the battery level
indicator will blink three times simultaneously, indicating that the travel
lock is disabled and the trimmer is turned on.
Notes:
●
●
●
●
●
Cleaning & Maintenance
Before cleaning the trimmer, make sure it is not being charged and
turned off.
Warning:
To ensure optimal functionality, clean the trimmer after each use.
Do not submerge the trimmer in water or other liquids.
Before cleaning the trimmer, remove it from the power adapter and
charging cable.
Before cleaning the trimmer, remove the beard comb and detachable
blade head.
Notes:
●
●
●
●
●
●
When cleaning the trimmer, please close the protective cover of the
Type-C charging port properly, and do not rinse the charging port and
the bottom of the body.
Lightly remove the hair from the blade head with a cleaning brush.
After brushing off the hair, rinse the body and blade head with water,
but do not soak them in water for an extended period of time.
Dry or wipe with a cloth after rinsing, keep the blade head dry, and
reinstall the blade head.
It is recommended to regularly add lubricating oil (sold separately) to
maintain the blade head. Remove excess oil using a dry cloth.
Clean the body with a soft dry cloth.

09
●
●
●
●
●
Environmental Protection
When the grooming kit reaches the end of its service life, please remove,
dispose of, or recycle the built-in battery in accordance with local laws
and regulations of the country or region where the product is used. If the
battery cannot be removed, take this product to an officially designated
recycling centre.
Do not expose the battery to fire to prevent the battery from exploding
or releasing toxic and hazardous substances.
Do not short-circuit the battery to prevent it from combustion
and causing fire.
Do not disassemble the trimmer unless you want to dispose of it;
otherwise, the trimmer will be damaged. Make sure to follow the basic
safety precautions and unplug the trimmer before removing the battery.
Before removing the battery, make sure the battery is depleted.
To deplete the battery, you can make the trimmer work until it
automatically turns off.
The trimmer cannot be recovered after disassembly.
Warnings
●After cleaning, it can be stored in the travel pouch.

10
Troubleshooting
Issues
The trimmer runs for less
than 90 minutes on a full
charge.
Possible Causes Solutions
The load on the
motor is
increased if the
trimmer hasn't
been cleaned for
a long time.
Clean the
trimmer
thoroughly.
Contact the
after-sales
service team.
Battery error
The battery
level indicator
and travel lock
indicator do
not light up
simultaneous-
ly.
0% battery
level is
displayed.
Contact the
after-sales service
team.
Contact the
after-sales service
team.
Charge the battery
in time.
Charge the battery
in time.
The battery is
depleted.
The circuit
board is
damaged.
The on/off
button does
not function.
The battery
level is too
low.
The motor
does not
work after
pressing the
on/off
button. 0% battery
level is
displayed.
The travel
lock indicator
blinks.
Charge the battery
in time.
Press and hold the
on/off button for
three seconds to
unlock.
The battery
level is too
low.
The travel
lock is
enabled.

11
Specifications
Name: Grooming Kit Pro Charging Port: Type-C
Model: XMGHT2KITLF Rated Input: 5 V 1 A
Working Voltage/Power: 3.7 V /3
IP Rating: IPX7
Charging Time: About 2 hours
The battery
level is not
displayed.
Battery level
display error
The trimmer
does not
charge.
Contact the
after-sales service
team.
Charge the trimmer
at a temperature
between 5°C and
35°C.
Reconnect the
trimmer to a power
supply.
The charging
contact is
poor.
The trimmer is
damaged
internally.
Charging
ambient
temperature
is too low or
too high.
%
%
W
Input AC Frequency 50/60
Output Voltage 5.0
Output Current 1.0
Output Power 5.0
Average Active Eficiency 73.77
Eficiency at Low Load (10%) 64.588
No-load Power Consumption 0.075
W
A
V
Hz
lnput Voltage V~100–240
Power Adapter
lnput: 100–240 V~, 50/60 Hz, 0.2 Output: 5.0 V 1.0 A, 5.0 W
Model ldentifier —
—
A520-050100U-EU1
lnformation Published UnitValue and Precision
Jiangxi Jian Aohai Technology Co., Ltd.
Manufacturer's Name

12
Manufactured for: Xiaomi Communications Co., Ltd.
Manufactured by: Ningbo Lofans Home Appliance Co., Ltd.
(a Mi Ecosystem company)
Address: Room 22-3, Langmu Building, Baisha Road, Cixi City, Zhejiang, China
For further information, please go to www.mi.com
For detailed e-manual, please go to www.mi.com/global/service/userguide
User Manual Version: V1.0
Europe-EU declaration of conformity
Hereby, Ningbo Lofans Home Appliance Co., Ltd., declares that the radio
equipment type XMGHT2KITLF is in compliance with Directive 2014/53/EU.
The full text of the EU declaration of conformity is available at the following
internet address: http://www.mi.com/global/service/support/declara-
tion.html
WEEE Disposal and Recycling
Information
All products bearing this symbol are waste electrical and
electronic equipment (WEEE as in directive 2012/19/EU) which
should not be mixed with unsorted household waste. Instead, you
should protect human health and the environment by handing
over your waste equipment to a designated collection point for the
recycling of waste electrical and electronic equipment, appointed by the
government or local authorities. Correct disposal and recycling will help
prevent potential negative consequences to the environment and human
health. Please contact the installer or local authorities for more information
about the location as well as terms and conditions of such collection points.
22
PAP
Importer:
Beryko s.r.o.
Pod Vinicemi 931/2, 301 00 Plzeň
www.beryko.cz
This manual suits for next models
1
Table of contents


