Xils lab miniSyn'X User manual

miniSyn'X
User Manual
www.xils-lab.com

Table of contents
1 INTRODUCTION..............................................................................................................................................4
2 FEATURES........................................................................................................................................................5
3 INSTALLATION...............................................................................................................................................6
3.1 SERIAL NUMBER..............................................................................................................................................6
3.2 WINDOWS (WINDOWS 7,8,10,11)....................................................................................................................6
3.3 MA (OSX 10.9 AND LATER).........................................................................................................................6
4 QUICK START..................................................................................................................................................7
4.1 LAUN H, PLAY...............................................................................................................................................7
4.2 TOOLBAR........................................................................................................................................................7
5 QUICK VIEW....................................................................................................................................................8
5.1 ADJUSTING THE INSTRUMENTS PARAMETERS (KNOBS, SWIT HES)......................................................................8
6 PRESET MANAGEMENT.............................................................................................................................10
6.1 MAIN TOOLBAR............................................................................................................................................10
6.2 PRESET MENU................................................................................................................................................11
6.3 SORT MENUS : HOW TO FIND THE RIGHT PAT H FOR YOUR TRA K QUI KLY.....................................................12
6.3.1 Sorting Menu: Additional Functions ..................................................................................................14
6.4 A/B OMPARISON SLOTS................................................................................................................................15
7 MINIS N'X GLOBAL PARAMETERS : LA ERS, MODES, STEREO, POL PHON , EFFECTS.15
7.1 LAYER MODES : SINGLE, SPLIT AND DOUBLE................................................................................................16
7.2 GLOBAL PARAMETERS TIED TO LAYERS MODES : STEREO, BALAN E, POLYPHONY.........................................16
7.3 LAYERS MANAGEMENT : OPY, EX HANGE, GANG EDIT MODE....................................................................17
8 EAS SOUND DESIGN WITH THE LA ERS : SMART LOAD, RANDOM LOAD, AND LOAD
LA ER FUNCTIONS..........................................................................................................................................18
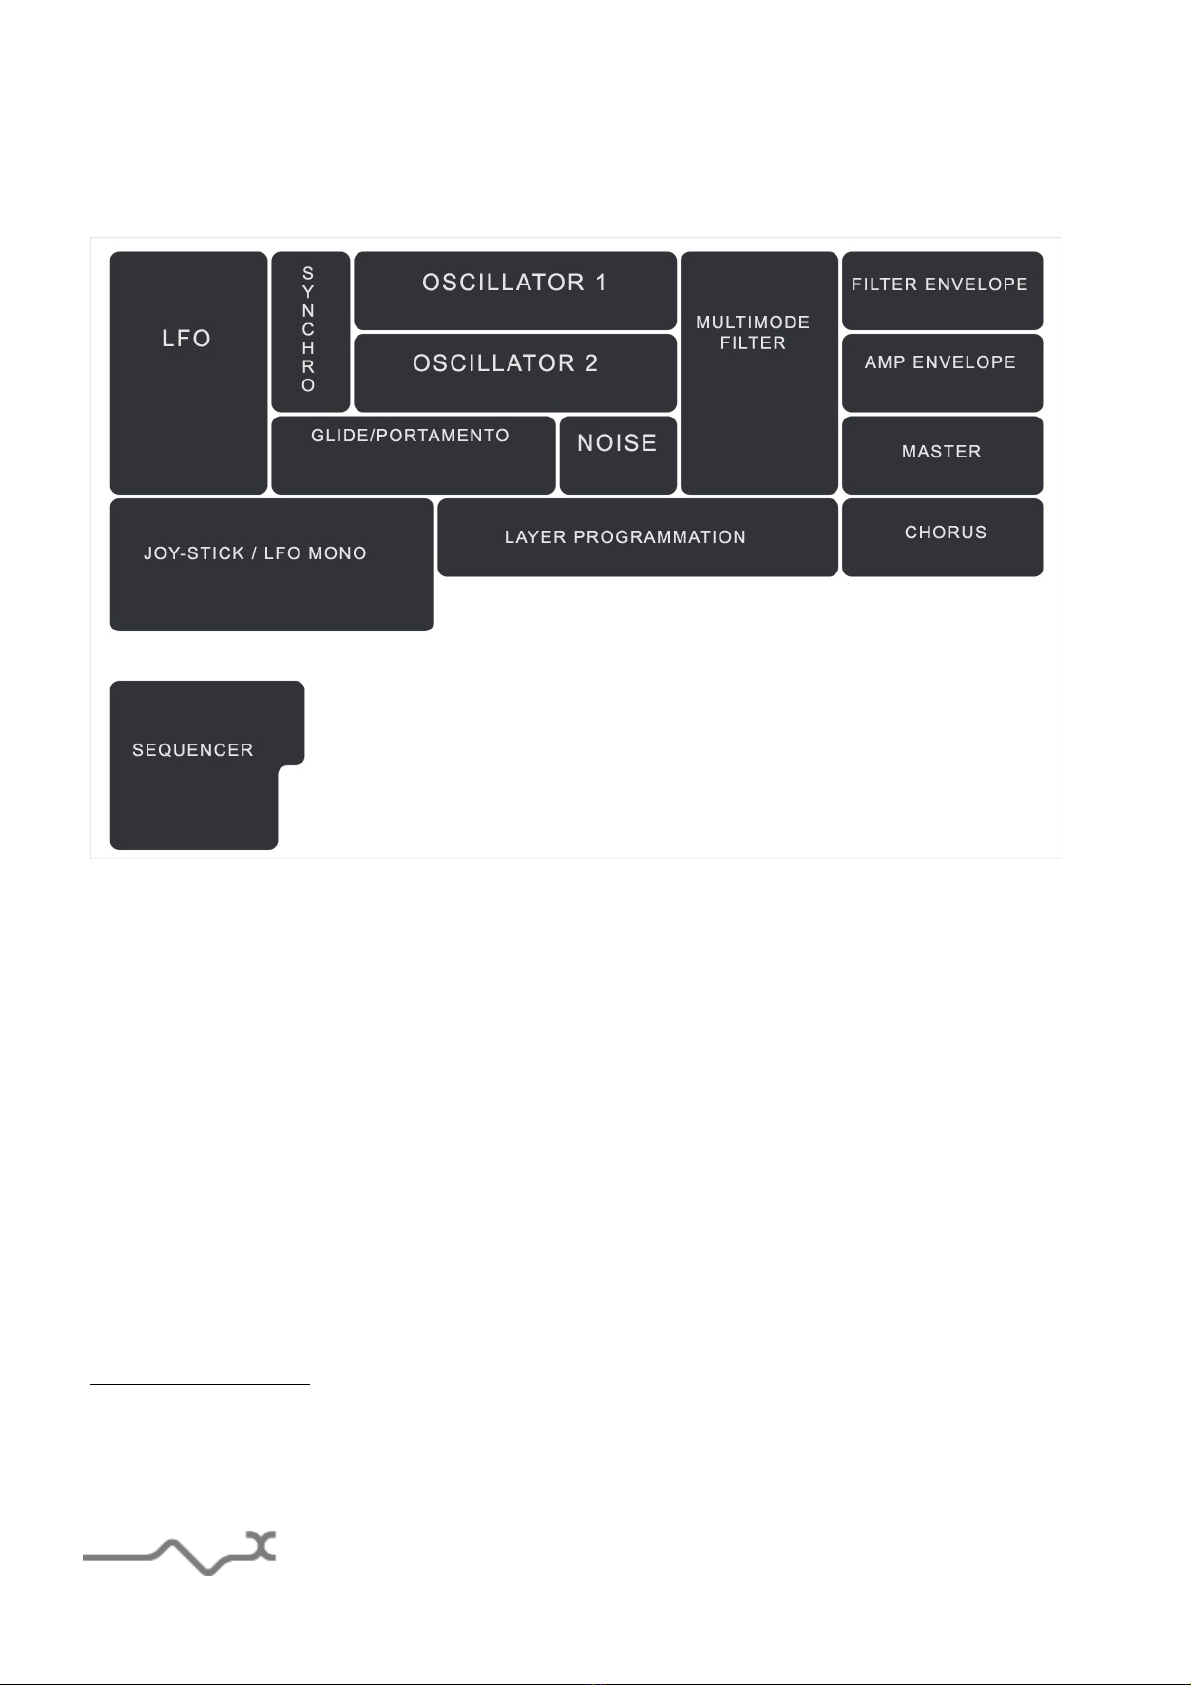
9 MINIS N'X MODULES DESCRIPTION....................................................................................................19
9.1 SYNTHESIS....................................................................................................................................................19
9.1.1 Oscillators...........................................................................................................................................19
9.1.2 Oscillators synchronization.................................................................................................................21
9.1.3 Multimode Filter..................................................................................................................................21
9.1.4 nvelope Generators...........................................................................................................................22
9.1.5 Noise Generator..................................................................................................................................23
9.1.6 LFO......................................................................................................................................................23
9.1.7 Glide/Portamento and Velocity Modulation........................................................................................24
9.1.8 Joystick (Bend/LFO)............................................................................................................................25
9.1.9 Master ...............................................................................................................................................25
9.2 SEQUEN ER...................................................................................................................................................26
9.2.1 Sequencer display module...................................................................................................................27
9.3 VIRTUAL KEYBOARD.....................................................................................................................................28
9.3.1 Chorus.................................................................................................................................................28
10 OPTION MENU.............................................................................................................................................29
10.1 MAIN..........................................................................................................................................................29
10.2 REMOTE ONTROL WITH MIDI ..............................................................................................................29
10.3 DISPLAY OPTIONS.......................................................................................................................................30

10.4 MIS ..........................................................................................................................................................30
11 CREDITS........................................................................................................................................................30

1 Introduction
Thank you for choosing the miniSyn'X !
The miniSyn'X is a virtual instrument based on the architecture of one of the most iconic of all
vintage polyphonic synthesizers. So revered that it is still in use today by some famous
synthesizer masters.
We at ILS-lab do our best to offer you authentic recreations of these great synthesizers and
then take it even further : What can be done with today’s computers allows us to take these
emulations beyond what was feasible when these products were first created. Our goal is to be
true to the original in sound and modulation routings and then add features that were just not
before possible. And often that are not feasible on any other synthesizer, be it hardware or
software.
Ring Modulation, Cross Pulse Width Modulation and Hard Synchronization between the
oscillators and an unique sophisticated glide circuit allow the recreation of some of the patches
that made this synthesizer a must have in the ancient times.
If you not yet developed your skills as a sound designer, we have included more than 200
presets especially designed for the MiniSyn’ by professional sound designers. So you can fuel
your synthesizer dreams as soon as you load the miniSyn'X into your DAW.
Please enjoy this very powerful sound creation tool. We love what we do and we want you to
get the most enjoyment you possibly can from our labors. We also want to hear from you.
So “like” us on Facebook http://www.facebook.com/ ILSLabs and join in the
conversation
- 4 -

2 Features
The miniSyn'X offers:
Oscillators ( Up to 10 oscillators per patch )
•Two aliasing-free oscillators providing saw, triangle, pulse or square wave forms.
•Pulse Width modulation on all oscillators waveforms
•Hard synchronization between the two oscillators
•Ring-Modulation, Pulse Width Cross Modulation between the two oscillators
Filters ( Up to 2 per patch )
•One multi-mode self -oscillating filter, providing 12 and 24 low pass, 6 and 12 band pass
and a 12 high pass filter per synthesizer engine
Miscellaneous
•Advanced Glide/Portamento module
•Two envelope generators (ADSR) ( Up to 4 per patch in split/Double mode )
•One Cumulative Waveform MIDI syncable polyphonic LFO ( 2 per patch in Split/Double
mode )
•One sine monophonic LFO ( Assigned to the Joystick )
•One 128 steps polyphonic sequencer ( 4 Lines )
•Fat and warm 3 modes Chorus
Structure an ergonomy
•2 independent identical synthesizer engines, that can be associated in 3 modes ( Single,
Double, Split )
•Easy Sound Creation Module ( Smart Load )
•Gang Edit Mode ( In Double & Split Modes )
•Adaptative UI design ( YOSWYN : You only see what you need )
•Entirely automatable via Midi Cc Control
•Two GUI sizes: 1024 and 2048 pixels width
The miniSyn'X is available in the following formats:
•Mac OSX 10.9 an later: VST, VST3, Audio Unit, AA
•Win ows 7,8,10,11: VST, VST3, AA
Minimum system requirements: 1 Gigabyte of RAM and a 2 GHz processor.
The miniSyn'X is a plug-in and is not available as a standalone application
Notice: The screen resolution must be set at least to 1024 pixels width.
- 5 -

3 Installation
3.1 Serial number
The miniSyn'X only uses a simple serial number protection.
When you launch the miniSyn'X for the first time, it will ask for this number.
After submitting, you must close the plug in and reload it it once in your host to complete the
registration. This serial number will never be asked for again, even when installing updates.
Tip: It is always a good idea to back up this serial number, or to print it, in case you should
have to reinstall miniSyn'X (i.e. if you encountered a HD crash for example, or have to
reinstall your OS).
3.2 Windows (Windows 7,8,10,11)
To install miniSyn'X on Windows P, Vista or Windows 7, launch miniSyn'X installer file.
Please download the latest version from the ILS-lab website.
http://www.xils-lab.com/pages/miniSyn _Downloads.html
Once you have accepted the license agreement, you will be asked to select the installation directory.
A destination directory is provided as a default. Presets and various files, like this manual, used by
miniSyn'X will be stored in this directory. Please note that this location is different from the VST
install directory, which you will need to specify in the next step of the installer.
Once the installation directory is specified, you will be asked to select the VST plug-in directory, with
a suggested default location. Keep this default directory if you do not use the VST version.
Important notice for Vista or Win ows 7: be sure to use a folder write enable and owned by the
user (do not use “c:/program files” for instance). Otherwise you will have to run your music
application with “administrator rights”.
The RTAS plug-in and its table control management Pro-Tools are directly copied into the following
directory: C:\Program Files\Common Files\Digidesign\DAE\Plug-Ins
3.3 Mac (OSX 10.9 and la er)
To install miniSyn'X on a computer equipped with Mac OS 10.9 or later, download the latest
version from the ILS-lab website to make sure you have the latest version of the software.
http://www.xils-lab.com/pages/miniSyn _Download.html
Then launch the install program, miniSyn .pkg, and follow the instructions.
Warning: the install program will ask you for your system password.
The various files of miniSyn' will be copied into the following directories:
Library/Application Support/Digidesign/Plug-Ins
Library/Audio/Plug-Ins/Components
Library/Audio/Plug-Ins/VST/
Library/Application Support/Documentation/ ILS-lab/miniSyn
..users/username/Library/Preferences/ ILS-lab/miniSyn
- 6 -

4 Quick Start
4.1 Launch, Play
When you open the miniSyn'X in your host, an Init preset is loaded.
It is a simple two-oscillators sound, which can be seen as a basis for your sound design.
You can directly use this preset, a simple, or load one of the more than 250 factory presets
provided.
To browse the factory-preset library, just select a category of instruments, using the bank drop
down menu at the left of the miniSyn'X Tool Bar. (See Picture Below)
You can then use the up and down arrows located at the right of the preset name, or open the
whole bank list by clicking on the triangle located at the left of the preset name (See Picture
Below)
Note: We have also provided different Init Patches, which can be seen as a good basis to begin
to design new presets.
4.2 Toolbar
Note: The toolbar at the top of the interface allows you to load or save presets, make a comparison
between settings A and B, or modify the options. These functions are described in detail later in this
manual.
Click on the PRESET arrow to show the available presets in the current sorted group. Please note
that selecting a new preset without saving your current settings will erase any changes you have
made to those settings.
Click on the sort arrow button to display the current sorted group and to choose the preset within
it.
You can sort presets by: Author, Feeling, Type, Style, Bank or Projects.
Please note that the miniSyn'X will display presets by instruments categories (Type) by default.
Click on the sorting label over the sorted group name, to sort your preset according to your
preferences.
Please note that the miniSyn'X’s powerful Preset management is fully detailed in chapter 6 of this
manual.
- 7 -

5 Quick View
5.1 Adjus ing he ins rumen s parame ers (Knobs, swi ches)
On the miniSyn'X, most sound parameters, like the pitch of an oscillator, or the filter’s Cut-Off
frequency are controlled using Knobs.
To adjust the parameters of the miniSyn'X with the mouse, you have two axes: horizontal and
vertical : Both will give the same results.
•To increase a parameters value, click and drag the knob to the right, or to the top
•To decrease a parameter value, click and drag the knob to the left or, to the bottom.
If you right-click on a parameter, or if you hold shift while clicking, you can adjust the parameter
with fine precision (Tip : the ? button of the toolbar opens an info panel summarizing these
shortcuts).
Keyboar shortcuts
In addition we have provided different soft keys combination to perform several very useful
tasks:
- 8 -

Win ows:
•CTRL+left click: reset parameter to its default value.
•CTRL+right click or CTRL+Shift+left click: initialize the default value of the parameter.
•Win+Alt+CTRL + click: open the MIDI Control panel, with the parameter already selected.
OSX:
•Apple+left click: reset parameter to its default value.
•Apple+Shift+left click: initialise the default value of the parameter
•Apple+Alt+CTRL + click: open the MIDI Control panel, with the parameter already selected.
Note: Other GUI elements and controls, like the LED Switches, or the dropdown
menus, will be described in the following sections of this manual, when you’ll
need to use them.
The switches are simpler: just left click to change their state. A right click will
change the state only while the button is pressed, and return to the previous
state when it is released.
When a parameter is chosen via a drop down menu, just click on the button or
label and select the item.
- 9 -

6 Preset Management
6.1 Main Toolbar
In the toolbar you can find two buttons, displaying the category name (Bank, Author, Type, Style,
Feeling or Project), which open the sort management menus.
The two first text fields show the current sorting group and the third shows the current preset.
Clicking on the arrow on the left of the category or preset names opens the corresponding menus.
Note: When a parameter is modified, the name of the preset is followed by a *, indicating that the
current settings of the miniSyn' no longer matches the stored preset.
When you want to save a modified preset, click on the Save or Save As button.
In order to prevent you from erasing them, the Factory presets cannot be modified. When you edit a
Factory preset, the Save button will be grayed, and you will have to use the Save As function to
save it in another bank.
If you edit any other preset than a Factory one, the Save and Save As function will both be
available.
The main difference is that the Save function will save the preset under its current name, and with its
current tags, overwriting the previous incarnation of the preset, while the Save as function opens a
dialog box where you can modify the name of the preset, the bank in which it will be stored, and all
its tags
The settings of the miniSyn'X are then saved in the currently displayed preset, and the *
disappears. Click on the Save As button to save this preset with another name and/or to other
sorting groups.
- 10 -

6.2 Prese menu
Click the Preset arrow button to open the preset menu. Here you can choose and load another
preset from the current sort groups into the miniSyn'X.
In this menu, other actions are also available:
Delete Preset: use this to delete the current preset (a popup confirmation window appears). This
option is only available if the current preset is not a factory one.
Export Preset: Use this function to export the current preset in an external file (.esyx format). This
file can be imported later as a new bank. It always makes sense to back up your presets on external
media.
Open preset Information (or click on SAVE AS): opens the following preset information window
where the name and all other information related to the current preset can be displayed or changed.
In this window you can modify the Name of the preset, specify the Bank in which the preset will be
saved, and also enter information in the other fields:
•AUTHOR (Your name, mostly used by Sound Designers for factory presets),
•Type (Category of the instrument like Keys, Leads, Basses, also)
•Style (Musical Genre),
•Feeling (Cold, warm, soft) and finally
•Project (My Song, My_Live_Project).
You can also see its creation date and the last update date.
- 11 -

To modify a preset name, click in the NAME field and enter the new preset name this will also save
all the current settings.
To change presets information, click on the display, this will open a list when you can select one
of the existing items, or create a new item for this criteria ( Create a new BANK, or a new
CATEGORY/TYPE of instrument etc ).
Note: You can add a new item in any category, and therefore create custom banks, custom
styles, Projects, categories of instruments etc.
Creating Custom Tags : To add a new item in any filed, select “New….”. Which appears at the
bottom of the list.
( Note : You may have to browse until the end of the list in order to select “new” depending on
its length.) This will open A Pop Up window opens where you can enter the new name. Click Ok
to validate the new name. The current preset will then be associated to this new item.
Note: Please be aware that creating too many categories can also have its drawbacks, making
browsing go from difficult and painful to nearly impossible. Should you create around 200
different custom instrument categories, it would become very difficult to browse the library
using the Style sorting.
Once you have filled all the desired/required fields:
SAVE AS: Will save the current preset in the chosen Bank, with its new (or unchanged) Name,
and tagged with all the fields you filled in.
MOVE TO: Allows saving the current preset in another location ( BANK) . This is handy to
gather a lot of preset into a single location, or User Bank, which you can export in a single file
containing all the presets you created or edited for a given project. You can also use the MOVE
TO function to only change the TYPE/STYLE/FEELING of a preset, even if you don't move it to
another bank
CANCEL: Will cancel all operations and return to the main miniSyn' GUI.
6.3 Sor menus : How o find he righ pa ch for your rack quickly
XILS-lab synthesizer factory libraries contain several hundreds of presets, and you can buy
additional soundsets on our site, or provided by 3rd party vendors, or get free soundets offered by the
Xils community. With our exclusive multitag databased engine and multicriteria display, you’ll be
able to find the right patch for your project much faster than if you browse all your patches in a
random way
- 12 -

The sorting menus are a unique and powerful tool. Allowing you to perform sophisticated tasks,
such as displaying the preset list organized in a variety of different ways, like displaying :
•All the Basses of your Sound Library
•All the Basses tagged with a given musical genre
•All the Pads made by a given Sound Designers
•All instruments for a musical genre like Electronica, or Funk
•All instruments that were recently imported in a bank (like additional sound-sets from
ils-Lab or 3rd party vendors)
There are indeed a lot of possibilities, and we’re confident that you’ll find the best way to
customize it to your personal needs.
In order to perform such selections, all you have to do is to select an item in the first sort
menu. This represents the first and main criteria for the search engine.
•AUTHOR (Your name, or a Sound Designer name for factory presets),
•Type (Category of the instrument like Keys, Leads, Basses, etc)
•Style (Musical Genre),
•Feeling (Cold, warm, soft) and finally
•Project (My Song, My_Live_Project).
•ALL (this item is not used for sorting the preset)
These primary results can then also be filtered according to the second criteria. Which can be
chosen from a similar list in the secondary sort menu.
Sometimes a picture is better than a lot of text, so you’ll find below an example where you can
find out how to select all the basses designed by a given Sound Designer.
- 13 -

Please note that, once you are familiar with this system, you can also perform some operations in a
single click, by using the Sub Groups to choose a preset:
In the picture below the primary sort menu is used to browse the different banks. Then in a factory
bank, the author ils-Lab is selected, and finally the Preset O Bass. In this example the preset is
selected in a single click operation, and the presets available in the preset list will be all the ils-Lab
presets available in the entire Factory Sound Library.
Click on the row of the sorting button to open the menu used to manage this sorting group (or sub
group). Here you can directly select and load any preset from any group or subgroup.
6 3 1 Sorting Menu: Additional Functions
In this menu, other actions are also available:
Delete: deletes all of the presets of the current group that are not factory ones. IMPORTANT: Use
this function with care : If the bank does not contain any factory presets, ALL PRESETS IN THIS
BANK WILL BE PERMANENTLY DELETED.
Rename: modifies the current group name. Selecting this choice will open a window where the new
name will be entered.
- 14 -

Use Factory: enables or disables the display of factory presets.
Sort By: This function sorts the presets according to bank, author, project, or shows all presets
(Bank Name,Author Name,Project Name,All Presets). The preset menu will show presets of
the same category (same author, same project or same bank).
Export Bank: This function exports a bank in the miniSyn'X’s proprietary cross platform format,
(Mac and PC). The selected bank (i.e. the bank which contains the currently active preset) will be
exported to a user specified location on your hard drive.
Import Bank: This Function allows you to browse your hard drives to select a file and imports a
miniSyn' bank.
Note : These last two choices are not available from the second sort menu.
This menu provides also the possibility to change the size of the interface. This feature is the
same that the one provided in the Option menu.
6.4 A/B comparison slo s
You can store two different versions of a patch at the same time and instantly switch from one to the
other to compare them. These two settings are stored in the Aand Bmemory slots.
When you launch the miniSyn'X, the default-activated memory is A. When you load or modify a
preset, this memory –A- is also modified in real time according to your edits. You can switch to B
memory by clicking on the B button.
To copy the current active memory content to the other memory slot, just press the button labeled
-> or <-, according to the current active memory.
With this A/B comparison system, you can easily have two settings and compare them in a
convenient way.
Note: Please note that by default, the B memory slot, until you copy settings into it or until loading a
other preset within the other memory slot, contains the same init patch loaded in the A memory
when you first launch the miniSyn'X.
7 miniSyn'X Global parameters : Layers, Modes, Stereo,
Polyphony, Effects
The miniSyn'X, like its ancestor, provides a simple, yet powerful Dual Layer architecture.
These two layers are called “Lower” and “Upper”.
Each Layer ( Lower and Upper) has its own independent synthesis modules : LFO, Oscillators,
Filter, Envelopes, Glide.
- 15 -

Note : The remaining modules, Joy-Stick, Chorus, Master, are global and affect both layers.
When the Lower or Upper switch is engaged ( Highlighted ), the Graphic Interface accordingly
displays the state of the Lower or the Upper layer.
7.1 Layer Modes : Single, Spli and Double
The two synthesizer engines ( Upper & Lower ) can be combined in three ways : Single, Split
and Double
Single Mo e : In the SINGLE MODE, only the selected layer is active ( Upper or Lower ) and
you will only hear the selected layer. Please note that the SINGLE mode is determined by the
status of the Double and Split button : If none of these two buttons are ON, you’re in the
SINGLE mode.
In the Split and Double modes, both layers ( upper and lower ) are active and can be heard
The editable layer displayed in the Split and Double mode is the one selected. You can easily
switch from the Lower or the Upper sound, by clicking on the Upper or the Lower switch.
Double Mo e : In Double mode, when the Double switch is engaged, the two layers, Upper
and Lower, are played simultaneously. Therefore this mode will be preferred to create fat or
wide layered sounds, with sounds in each Layer that can be identical ( to get a wider stereo
scene ), Similar ( to get thicker sounds ), or completely different ( Like some keys + some
strings, or a pad and some special F )
Split Mo e : In Split mode, when the Split switch is engaged, the lower part of the keyboard
will play the Lower layer while the the upper part of the Keyboard will play the Upper layer. In
this mode, a triangle appears above the keyboard, and you can freely move it with the mouse
to set the most appropriate Split Point. The Split mode should obviously be preferred when
you want two play two completely different tones on each zone of your keyboard ( Like a Bass
+ Keys, or Keys + Lead ) The MiniSyn’ factory library contains a lot of Split patches to get you
started using this mode.
7.2 Global Parame ers ied o Layers Modes : S ereo, Balance,
Polyphony
Polyphony Han ling : Here, you can set how many voices are enable for each layer (Range :
1 to 8). Note : If you select 1 voice polyphony, or Mono Mode, useful for basses for example,
please note that the last priority law is applied.
Note : If you experiment some notes stealing in some patches, please try to increase the
polyphony for the layer(s)
Balance : The Balance knob will only be displayed if you use the Split or Double Mode. You can
use it to balance the relative output level of the two layers. Turning it clockwise will make the
Upper layer louder. Anticlockwise will make the Lower layer louder.
Stereo Knob : The Stereo knob controls the panning of each internal voice. When turned full
left, the miniSyn'X is mono, sending the same signal to the output modules (Master, and
Chorus) . When turned full right, the miniSyn'X stereo is maximum. Please note that The
effect of the Stereo Knob varies according to the selected Mode
- 16 -

In Split and Double mode : The Lower Layer is panned to the left, while the Upper Layer is
panned to the Right. With higher settings or the Stereo knob, the distance between the two
layers gradually increase.
Tip : You can use this setting to hard pan the two layers fullleft and right for Pluck sounds for
example. This is often used in Club and EDM music to get interesting results effortless.
In Normal mode : the sound is randomly assigned to the right or to the left for each note. With
high settings successive notes will appear randomly at the full left or right of the stereo scene.
Advanced Mixing Tip : Sometimes, you’ll want more control over the two layers than what is
provided by the MiniSynx stereo output, like compressing only one of the layers, or apply
different effects ( Delay, Reverb etc ) to each of them. This is very easy to achieve : Just
duplicate the midi part and assign another instance of the MiniSyn’ to the duplicated midi part.
Load the same preset in the second instance of the MiniSyn’ . Then the first instance of the
Minisynx, use the solo function on the Lower Layer, then solo the Upper Layer in the second
MiniSyn instance. You can now add separate effects, Eqing or compressors separately on both
Layers.
Chorus The MiniSyn’ Chorus is fully stereo. This means that the right and left Chorus
channels are independent, and have dedicated internal LFOs. As a consequence, using the
same sound in the DOUBLE mode will increase a lot the chorus effect.
The BBD Chorus effect was also responsible of the distinct sound of the hardware synthesizer.
It has been very closely modeled, and has three different settings.
7.3 Layers Managemen : Copy, Exchange, Gang Edi Mode
Copy an Exchange Functions : To make things easier we added two buttons Copy and
Exchange that allow you to copy and exchange layers : Clicking on the “Exchange” button
exchanges the two layer sounds, clicking on the copy button copies the selected layer to the
other layer engine.
Tip : Exchange Layers can be useful when you want to Switch the two layer in the stereo field.
The GANG E it Mo e : You can edit all the knobs parameters of the Lower and Upper Layers
simultaneously by entering the GANG EDIT mode.( Please note that therefore the GANG MODE
Button is only available when the Split or Double mode are selected )
When engaged, it will allow you to modify the two layers simultaneously, keeping the relative
settings of the parameters.
An example to explain the relative concept : Say you’re editing the Cut Off of the two layers in
GANG MODE. Lower Layer initial level is 100, and Upper Layer value is 50. If you decrease
both cut off by 40, the resulting Lower value will be 60, while the Upper Layer cut off value will
now be 10. This means that the two layers keep their relative cut off difference.
This also means that the GANG EDIT mode is non destructive and reversible : You can always
revert to your original values ( In this example you would now add 40 to the cut off value using
the GANG MODE )
TIP : The Gang Mode is especially useful when editing envelope parameters, to globally shorten
the decay of a preset, adjust a sustain level while maintaining the balance between layers, or
tune the attack stage according to track context. It’s also a powerful experimental sound design
tool, when you tweak filters of different types for example.
- 17 -

And finally its almost mandatory when you edit a Double Layer preset with identical sounds in
each layer. This way each change you make affects both layers, and your two layers remain
identical regardless of your edits. Otherwise you would have to switch and edit layers endlessly,
while having to remember, or note, each parameter new value to match it on the other layer.
Please note however that are excluded of the GANG MODE all the switches like : Oscillators,
Filter Types, etc. Only the parameters controlled by Knobs or sliders are affected.
8 Easy Sound Design with the Layers : Smart Load, Random
Load, and Load Layer functions
Before we present you in detail each parameter of each synthesis module in the next section,
let’s introduce the new exclusive easy patch creation tools we implemented into the MiniSyn’ .
Note : These functions are only valid to create new Double or Split patches.
SMART LOAD LAYER The Smart Load function uses a bit of AI to allow you to create new
interesting complex and rich sounding patches. Opposite to pure random functions that you can
find on some synthesizers, and that we also incorporated in the MiniStn’ , the Smart Load
function will give you a high percentage of valid and inspiring patches by clicking a single
button.
How it works ? In the DOUBLE MODE, just click on the Smart Load button and it will replace the
selected layer with another one taken from your current library, while the replacement layer
will have a high probability of giving you a usable and inspiring patch.
Just try it a few times on any Double Patch you like and you will see that its rare that
something nice doesn’t happen after a few Smart Load attempts. The Smart Load function is
also instantaneous, which adds to its charm, so you can make numerous attempts in a few
seconds.
RANDOM LOAD LAYER Works in an similar way to Smart Load, except it doesn’t use any AI at
all, so it will load a random layer from your library to replace the selected layer. The results are
therefore sometimes very surprising, but surprises will more often be less rewarding than
expected. The Load Random button will be chosen by those who like risks, enjoy extreme
patches collisions, and have a bit of time to loose. Occasionally, it can give identical results to
the Smart Load function. Random Load is also an instantaneous function, which adds to the fun
of using it.
Finally the Loa Layer Function will allow you to browse your entire library of presets and
choose any Layer ( Upper or Lower) of any preset to replace the selected Layer.
Load Layer should be preferred by those who know exactly what they want, and wish to marry
for example This_Keys with This_String_Pad. Due to the fact that you have to browse your
library to select the layer you wish to load, Load Layer isn’t an instantaneous function. But you
have total control on it.
Note : These functions are only valid to create ne Double or Split patches. They are useless
for Single Patches.( But it might be a very good idea to use a Single patch you like, transform it
in a Double patch by clicking on the Double Button, then use Smart Load technology to see
hich rabbits come out of the hat )
- 18 -

9 miniSyn'X modules description
The miniSyn'X contains three main sections: the first one is dedicated to the synthesis part,
and is applied to each voice of polyphony, the second is dedicated to the miniSyn' joystick
with its own LFO, and the third cabinet to voices management and playing modes.
9.1 Syn hesis
9 1 1 Oscillators
16'8'...1': Octave Select Buttons
TRANSP: Transpose Knob (in semi-tones up to +/- 12). Clockwise rotation of this knob
increases the pitch of the oscillator up to 12 semitones; counter clockwise rotation decreases
the pitch. Using the ALT keyboard modifier allows snap to semitone; otherwise, the settings are
continuous and can be very fine, using the right click.
LED TRANSP: When on the keyboard tracking is connected to the oscillator.
Switches: Waveform Select Buttons (Triangle, Sawtooth, Square, Pulse)
- 19 -

PWM: Pulse Width Cross-Modulation (from the other Oscillator) select button. When ON, the
width is controlled by the waveform of the other oscillator. This results in a very rapid change in
harmonics, close to the ring modulation effect. If no other wave form are selected, when ON,
this button let the oscillator to output a width controlled pulse with the same algorithm than the
Synthex.
Note : The MiniSyn’X benefits from the last Xils-lab researches regarding Oscillators PWM
emulation. The new algorithms developed during the two last years improve a lot the punch and
clarity of the PWM compared to the Syn’X v1.0, and other soft synthesizers. Without entering into
too much technical matters, the PWM algorithms are usually confronted to the same kind of
challenge that the problem known as ODF filters in the digital domain. The new Xils-Lab Sync
algorithm, while still not perfect, adds a lot to the overall perception of the PWM in the miniSyn’X.
R.M: Ring Modulation circuit select button. This modulation can be used to produce metallic or
bells sounds, depending on the waveform selected.
WIDTH: Pulse Width Control (for the pulse but also the triangle or the sawtooth wave form
depending on these latter settings). This knob controls the pulse width of the pulse waveform,
but also the triangle leading edge or the double pulse of the sawtooth, depending on which
waveform, triangle or sawtooth you have selected.
LEVEL: Individual Oscillator Volume Control (before the filter)
Sawtooth Label: Select a pulse width sawtooth waveform (a double edge according to the
width is generated)
Triangle Label: Select a pulse width triangle waveform (the leading edge of the triangle is
dependent on the pulse width)
Below is a view of the various available waveforms
Triangle-Triangle using Pulse
Width
Saw- Saw using Pulse Width
- 20 -
Table of contents
Other Xils lab Music Equipment manuals