Yamaha MTS-810B User manual

MTS-810B
MBS-810A
MTS-410A
MSS-810A
マルチタムスタンド
/Multitom Stand/
Stand Multi-Tom/ 组鼓支架
マーチングバスドラムスタンド /Marching Bass Drum Stand/
Stand de grosse caisse de marche/ 行进大鼓支架
マルチタムスタンド
/Multitom Stand/
Stand Multi-Tom/ 组鼓支架
マーチングスネアドラムスタンド /Marching Snare Drum Stand/
Stand de tambour de marche/ 行进小鼓支架
MTS-810B
MSS-810A
MTS-410A
MBS-810A
ご使用の前にこの取扱説明書をお読みいただき、末永くご愛用ください。
Please read this Owner’s Manual throughly before use.
Prenez soin de lire ce mode d’emploi en entier avant d’utiliser le stand.
使用前,请详尽阅读本使用手册。
取扱説明書 / Owner’s Manual / Mode d’emploi / 使用手册

2
安全上のご注意
ご使用の前に、必ずこの「 安全上のご注意」をよくお読みください。
ここに示した注意事項は、製品を安全に正しくご使用いただき、
お客様やほかの方々への危害や財産への損害を未然に防止するためのものです。必ずお守りください。
お子様がご使用になる場合は、保護者の方が以下の内容をお子様にご徹底くださいますようお願いいたします。
お読みになったあとは、使用される方がいつでも見られる所に必ず保管してください。
■ 記号表示について
この製品や取扱説明書に表示されている記号には、下表
のような意味があります。
「ご注意ください」という注意喚起を示し
ます。
~しないでくださいという「禁止」を示し
ます。
「必ず実行」してくださいという強制を示し
ます。
■ 「 警告」と「 注意」について
以下、誤った取り扱いをすると生じることが想定される
内容を、危害や損害の大きさと切迫の程度を明示するた
めに、「 警告」と「 注意」に区分して掲載しています。
警告 この表示の欄は、「死亡する可能性
または重傷を負う可能性が想定され
る」内容です。
注意 この表示の欄は、「傷害を負う可能
性または物的損害が発生する可能性
が想定される」内容です。
設置
設置場所は床面が平らで丈夫な所にしてください。
床が傾いていたり、段差がありますと不安定となり、
転倒するおそれがあります。
組み立て
[MTS-410A] 楽器の取り付け・取り外しの際に、タム
ホルダーフレームだけを持って抜き差しすることは、危
険ですのでおやめください。
楽器の重量バランスを崩さないように、タム本体をお持
ちください。
固定用ネジはしっかり締め付けてください。
転倒、落下等によりけがの原因となります。
高さの調整および角度の調整の際、急にネジを緩めない
でください。
ドラムが落下したり、パイプが滑り落ちて手や指を挟む
等、けがの原因となります。
取り扱い
先端が鋭利な部分には触れないでください。
また遊びの道具として使用しないでください。
お子様がスタンドのまわりで遊ばないようにしてください。
スタンドのまわりで遊びますと、顔や頭をぶつけるおそ
れがあります。
地震の際にはスタンドに近づかないようにしてください。
地震による強い揺れでスタンドが移動したり転倒するおそ
れがあります。
警告 注意
組み立て
組立の手順は、必ず本取扱説明書の組立
手順の通りに行なってください。
誤った手順で組み立てると、けがの原因
となったり、機能が十分に働かない原因
になったりします。
[MTS-410A] 上パイプの上端を曲げて
ありますので、取り付け・取り外しの際は、
パイプの角度に合わせて平行に抜き差し
をおこなってください。
スタンド等の脚を折りたたむ際、指に注
意してください。
指が挟まれてけがをするおそれがあります。
取り扱い
パイプの端面および内面にご注意ください。
バリ等でけがをするおそれがあります。
故意もしくは不必要に指を突っ込まない
でください。
シンナー、ベンジン等は絶対に使わない
でください。
普段のお手入れも、乾いた柔らかい布で
お拭きください。
水に注意
雨天時には極力使用しないでください。
濡れた場合は、すぐに乾いた柔らかい布
でお拭きください。
● 不適切な使用や改造により故障した場合の保証は致しかねます。

3
• Before using the stand, please thoroughly read the following in-
structions and the Owner’s Manual.
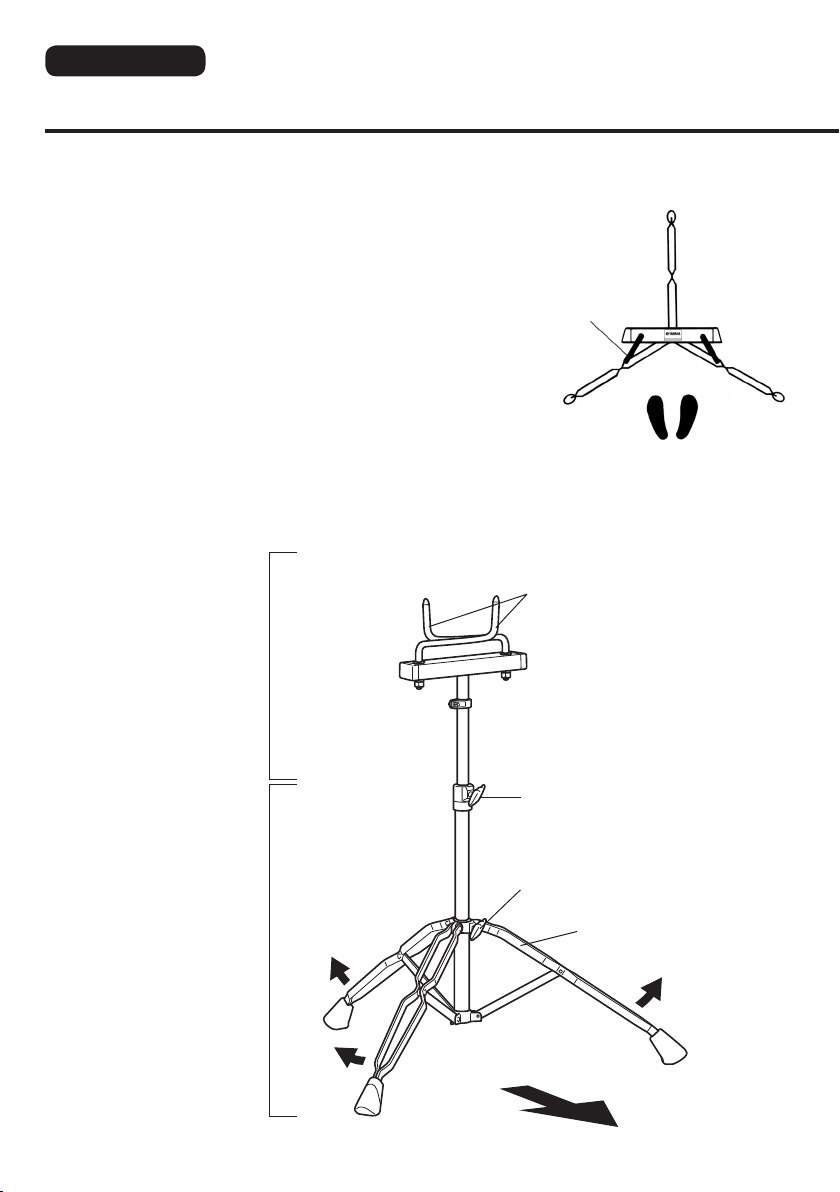
• Always place the stand on a flat, stable surface. Placing the stand
on uneven surfaces such as uneven flooring or stairs may cause
the stand to become unstable or overturn.
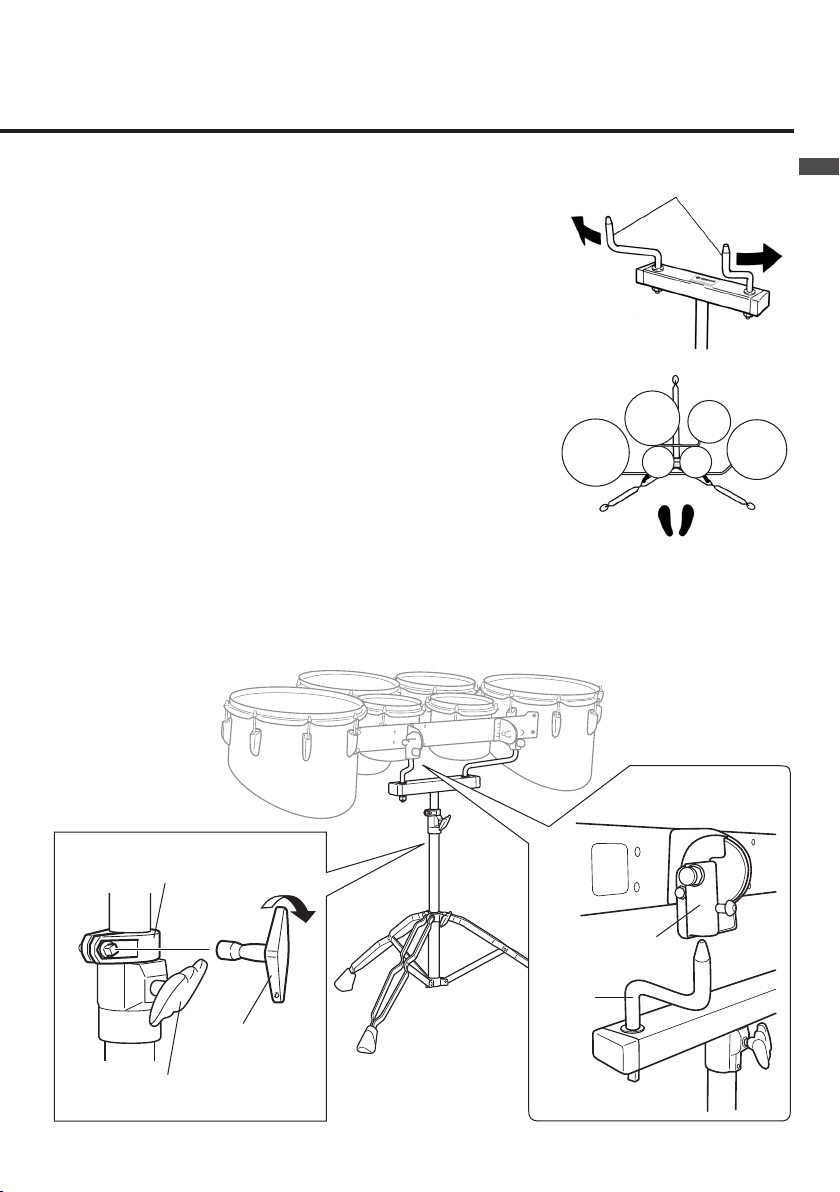
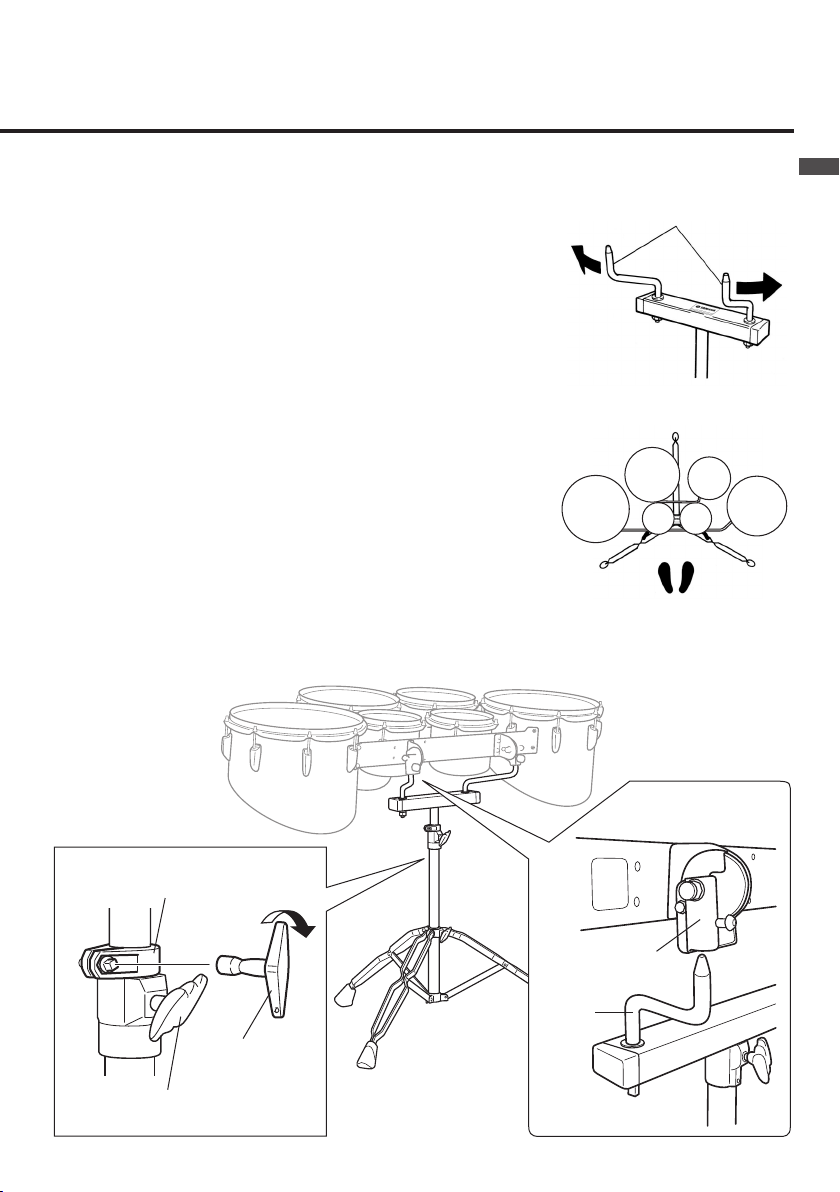
• [MTS-410A] When attaching/removing the instrument, do not push/
pull on the tom holder frame alone (this is dangerous!). Please hold
the tom itself to keep the weight balance of the whole instrument.
•
Always check to make sure that all screws are tightened firmly. The
instrument may also overturn or suddenly drop, etc., resulting in injury.
•
When making adjustments to the height or angle of the stand, do not loos-
en the screws abruptly. The stand or drum may suddenly overturn or drop,
pinching hands or fingers in the stand’s framework, resulting in injury.
• Pipe ends have sharp edges so be careful when handling the stand
around its edges. Never use the stand as a toy, etc..
• Strong earthquakes may cause the stand to move about or over-
turn. Stay away from the stands during earthquakes.
CAUTION
• Do not rough play in the vicinity of the stand. Injury to the face or
head may result by falling onto the stand. Also, keep children from
playing around the stand.
• [MTS-410A] Since the upper pipe is slightly bent, the pushing/
pulling direction should be matched accordingly when attaching/
removing the holder.
• When folding the stand, watch your fingers so they do not become
pinched in the folding supports. Fingers pinched in the framework
may result in injury.
• Be careful around the ends and insides of the pipe. The pipe tubing
has rough edges and slivers that may fall out and cause injury if care
is not taken. Do not purposely put fingers into the ends of the pipe.
• Do not use the stand in the rain. If the stand becomes wet, use a
soft dry cloth to wipe the stand as soon as possible.
• Always use a soft, dry cloth to clean the stand as a part of periodic
maintenance. Never use thinner, benzene, or other similar solvents
to clean the stand.
•
使用支架之前,请仔细阅读下述说明和使用手册。
•请务必在平坦、稳定的表面上放置支架。如
果将支架放置在不平坦的地面或楼梯等不平
坦的表面上,可能会使支架变得不稳或倾翻。
•[MTS-410A] 安装 / 拆卸乐器时,请勿单独推
/ 拉组鼓座框架(这种做法非常危险!)。请握
住组鼓本身以保持整个乐器的重力平衡。
•请务必检查确保所有螺钉已旋紧。乐器也可
能出现倾翻或突然跌落等情况,造成损伤。
•进行支架的高度或角度调整时,请勿突然松开
螺钉。支架或鼓可能会突然倾翻或跌落,使
手部或手指被鼓架框架挤伤,从而造成伤害。
•管的末端有锐利的边缘,因此,在支架的边
缘操作时应小心。切勿将支架用作玩具等。
•强烈的地震可能会使支架四处移动或倾翻。
地震期间应远离支架。
• Avant d’utiliser le stand, lisez attentivement les instructions ci-
après et l’ intégralité de ce mode d’ em-ploi.
• Placez toujours le stand sur une surface plane et stable. Le placer
sur une surface inégale, par exemple un sol instable ou un escalier,
peut entraîner sa chute.
• [MTS-410A] Lorsque vous montez ou démontez l’instrument, ne
poussez ou ne tirez pas uniquement le châssis du support de toms
(ce serait dangereux !). Tenez toujours les toms pour ne pas désé-
quilibrer l’ensemble.
• Vérifiez systématiquement que toutes les vis de l’ensemble sont
bien serrées. Un défaut à ce niveau pourrait également entraîner la
chute de l’instrument et entraîner des dommages corporels.
• Lorsque vous réglez la hauteur ou l’angle du stand, ne desserrez
pas les vis de façon soudaine. Le stand ou les toms pourraient
chuter, vous pourriez vous pincez les mains ou les doigts dans le
châssis, etc.
• Les extrémités des tubes du châssis ont des bords coupants ;
soyez donc prudents lorsque vous vous tenez à proximité d’elles.
N’utilisez en aucun cas le stand comme un jouet, etc.
注意
ATTENTION
•请勿在支架附近做危险的动作。否则,撞上
支架可能导致脸部或头部受伤。此外,不要
让儿童在支架周围玩耍。
•[MTS-410A] 由于上管略弯,因此,安装 / 拆
卸鼓座时的推 / 拉方向应与之相符。
•合拢支架时,请注意不要让合拢的支撑件挤
伤手指。手指可能会被框架夹伤。
•在管的末端附近和内部应多加小心。管道有粗
糙的边缘并可能掉出碎片,如不小心操作,可
能会受到伤害。请勿故意将手指插入管的末端。
•请勿在雨中使用支架。如果支架变湿,应尽
快用柔软、干燥的布擦拭支架。
•作为定期维护的一部分,请务必使用柔软、干
燥的布清洁支架。切勿使用稀释剂、苯或其
他类似的溶剂清洁支架。
• Les tremblements de terre peuvent entraîner le déplacement ou
le renversement du stand. Éloignez-vous de l’instrument lors des
tremblements de terre.
•
Ne laissez pas d’enfants jouer de façon turbulente autour du stand. Une
chute sur celui-ci pourrait entraîner des blessures à la tête ou à au visage.
• [MTS-410A] Étant donné que le tube supérieur est légèrement
courbé, le sens dans lequel vous poussez ou tirez doit épouser
cette courbe lorsque vous montez ou démontez le stand.
• Lorsque vous repliez le stand, faites attention de ne pas mettre vos
doigts entre les tubes. Vous risqueriez de les blesser.
• Méfiez-vous des extrémités et de l’intérieur des tubes. Les tubes
comportent des bords coupants et des copeaux de métal qui pour-
raient s’en échapper et vous blesser si vous n’êtes pas attentif.
N’introduisez pas exprès vos doigts dans les extrémités des tubes.
• N’utilisez pas le stand sous la pluie. Si le stand est mouillé, utilisez
un chiffon doux et sec pour l’essuyer aussi rapidement que possible.
• Utilisez toujours un chiffon doux et sec pour nettoyer le stand dans
le cadre de son entretien régulier. N’utilisez jamais de white spirit, de
benzine ou d’autres solvants du même type pour nettoyer le stand.

4
組立手順 /Assembly Procedure
脚
Leg
ウイングボルト(B)
Wing Bolt (B)
ウイングボルト(A)
Wing Bolt (A)
アーム
Arms
スタンド上部
Sand (Upper)
スタンド下部
Sand (Lower)
奏者
Player
奏者
Player
スタンドの組み立て
1. 脚を開き、ウイングボルト(A)をしっかりと締め付けます。
※脚の向きは、右図のようにしてください。
2.スタンド上部のパイプを下部パイプに差し込み、希望す
る高さでウイングボルト(B)を締め付けます。
Stand Mounting
1. Spread the legs and fasten wing bolt (A) tightly.
* The directions of the legs to be spreaded should be
done according to the diagram on the right.
2. Insert the pipe of the upper stand into the pipe of the
lower stand. Adjust the ideal position and fasten wing
bolt (B) tightly.
アーム
Arms
MTS-810B

5
組立手順 /Assembly Procedure
アーム
Arms
マルチタムの取り付け
1. マルチタムキャリアのピボットの間隔に合わせて、スタンド
のアームを開きます。(右図参照)
2.スタンドのアームにキャリアのピボットを合わせて、しっか
りと奥まで差し込みます。(下図参照)
3. スタンド上部を上下してタムの打面高さを調節したら、ウイ
ングボルト (B) をしっかり締め、さらに位置決めストッパー
のネジをドラムキーを使ってしっかり締めます。(下図参照)
Multi Tom Mounting
1. Adjust the arms of the stand to match the space between
the two pivots of the multi tom carrier. (diag. on the right)
2. Adjust the arms to the pivot positions and insert them
firmly and completely. (see diag. below)
3. Adjust the height of the multi toms by moving the upper stand up and down and fasten
it with wing bolt (B), then fasten the screw of the position clamp with a drum key. (see
diag. below)
位置決めストッパー
Position Clamp
ウイングボルト(B)
Wing Bolt (B)
ドラムキー
Drum Key
アーム
Arms
ピボット
Pivot
MTS-810B

6
Musicien
演奏者
Montage du stand
1. Déployez les pieds et serrez fermement la vis papillon (A).
* Les pieds doivent être déployés selon le schéma de
droite.
2. Introduisez le tube de la partie supérieure du stand dans
celui de la partie inférieure. Trouvez la position idéale et
serrez fermement la vis papillon (B).
安装支架
1.展开支腿并旋紧蝶型螺栓 (A)。
*支腿的展开方向应如右图所示。
2.将上支架的管插入下支架的管内。调整到理想的位置,
然后旋紧蝶型螺栓 (B)。
Bras
支臂
Pied
支腿
Vis papillon (B)
蝶型螺栓(B)
Vis papillon (A)
蝶型螺栓(A)
Bras
支臂
Partie supérieure
du stand
支架(上部)
Partie inférieure
du stand
支架(下部)
Musicien
演奏者
Montage/组装步骤
MTS-810B

7
Bras
支臂
Montage du support multi-tom
1. Réglez les bras du stand de façon à ce que leur écar-
tement corresponde à celui des deux pivots du support
multi-tom. (schéma à droite)
2. Faites correspondre les bras avec les pivots et introdui-
sez-les dedans jusqu’en butée. (voir schéma ci-dessous)
3. Réglez la hauteur du support multi-tom en montant ou en
descendant la partie supérieure du stand et en resserrant
la vis papillon (B), puis serrez la vis du collier de position-
nement avec la clef d’accord. (voir schéma ci-dessous)
安装组鼓
1.调整支架的支臂,使其与组鼓座架的两个枢轴之间的距
离相当。(右图)
2.将支臂调整到枢轴的位置,稳固、彻底地插入支臂。(参
见下图)
3.通过上下移动上支架调整组鼓的高度,并用蝶型螺栓 (B)
固定,然后用鼓钥匙旋紧定位夹的螺钉。(参见下图)
Collier de positionnement
定位夹
Vis papillon (B)
蝶型螺栓(B)
Clef d’accord
鼓钥匙
Bras
支臂
Pivot
枢轴
MTS-810B
Montage/组装步骤

8
脚
Leg
位置決めストッパー
Position Clamp
※ スタンドに取付時、
ホルダーを外しても
かまいません。
※ When the toms
are attached to the
stand, the holder can
be removed.
1. 脚を開き、ウイングボルト(A)をしっ
かりと締め付けます。
1. Spread the legs of the stand and se-
cure them by tightening wing bolt (A).
奏者
Player
ウイングボルト(A)
Wing Bolt (A)
ウイングボルト(B)
Wing Bolt (B)
上パイプ
Upper Pipe
キャッチャー
Catcher
2.ウイングボルト(B)をゆるめ、上パイ
プを適当な高さに調整します。調整後、
ウイングボルト(B)はしっかりと締め
ておいてください。
※脚と上パイプの向きは下図のようにし
てください。(上パイプは上端が曲げ
てあります。向きに注意してください。)
2. Loosen wing bolt (B) to adjust the
height of the upper pipe. After adjust-
ment, re-tighten wing bolt (B).
* Position the feet and the catcher as
shown in the illustration below. (The
upper end of the pipe is bent slightly.
Make sure to set it correctly.)
奏者
Player
・トリオ/Trio
・クオード/Quad
まず、スタンドの上部と下部を組み立てます。(下図参照)
Mount the upper stand on the lower stand. (refer to diagram below)
組立手順 /Assembly Procedure
MTS-410A

9
3. スタンドのキャッチャーにマルチタ
ムホルダーのフレームを合わせて、
しっかりと奥まで差し込みます。
キャッチャー/Catcher
キャッチャー/Catcher
● クオード / Quad ● トリオ / Trio
タムホルダーフレーム
Tom Holder Flame
タムホルダーフレーム
Tom Holder Flame
4. ウイングボルト(B)をゆるめ、上パイプを上下してタムの打面高さを調整します。
調整後、ウイングボルト(B)をしっかりと締め付けておきます。さらに、演奏時
にタムが下がらないように、位置決めストッパーを締付ベースに合わせた後、ドラ
ムキーを使ってネジをしっかりと締め付けておきます。
4. Loosen wing bolt (B) to adjust the height of the drum-heads by raising or lowering
the upper pipe, and re-tighten wing bolt (B) securely after adjustment. Further-
more, to prevent the toms from slipping down during performance, push the posi-
tion clamp against the mounting base and securely tighten its screw using a drum
key.
3. Align the frame of the multi tom hold-
er with the catcher on the stand and
insert the holder until it stops.
ウイングボルト(A)
Wing Bolt (A)
ドラムキー
Drum Key
ウイングボルト(B)
Wing Bolt (B)
締付ベース
Mounting Base
位置決めストッパー
Position Clamp
MTS-410A
組立手順 /Assembly Procedure

10
1. Écartez les pieds du stand et fixez-les
en serrant la vis papillon (A).
1.展开支架的支腿,然后旋紧蝶型螺栓
(A) 将它们固定。
2. Desserrez la vis papillon (B) pour régler
la hauteur du tube supérieur. Suite à ce
réglage, resserrez la vis papillon (B).
* Placez les pieds et le berceau
comme indiqué sur l’illustration ci-
dessous. (La partie supérieure du
tube est légèrement courbée. Veillez
à l’installer correctement.)
2.松开蝶型螺栓 (B) 以调整上管的高度。
调整后,重新旋紧蝶型螺栓 (B)。
*如下图所示定位支脚和收纳器。
(管的上端略弯。请务必正确安置。)
Musicien
演奏者
Montez la partie supérieure du stand sur sa partie inférieure. (voir l’illustration ci-dessous)
将上支架安装到下支架上。(请参照下图)
・Configuration Quad / 四件组
・Configuration Trio / 三件组
Pied
支腿
Collier de
positionnement
定位夹
* Lorsque les toms sont
fixés au stand, le har-
nais peut être retiré.
*组鼓安装在支架上时,
可以取下组鼓座。
Musicien
演奏者
Vis papillon (A)
蝶型螺栓(A)
Vis papillon (B)
蝶型螺栓(B)
Tube supérieur
上管
Berceau
收纳器
Montage/组装步骤
MTS-410A

11
MTS-410A
3. Alignez le châssis du support multi-tom avec le berceau du stand et introduisez-y
le support jusqu’à ce qu’il vienne en butée.
3.使组鼓座的框架对准支架的收纳器,插入组鼓座直至衔接处的底端。
Berceau / 收纳器
Berceau / 收纳器
● Configuration Quad / 四件组 ● Configuration Trio / 三件组
Châssis du support des toms
组鼓座框架
Châssis du support des toms
组鼓座框架
4. Desserrez la vis papillon (B) pour régler la hauteur des toms en montant ou en
descendant le tube supérieur, puis resserrez ensuite la vis papillon (B). De plus,
pour empêcher les toms de glisser pendant le jeu, poussez le collier de position-
nement contre l’étrier de montage et serrez-le fermement à l’aide d’une clé d’accord
de tambour.
4.松开蝶型螺栓 (B),通过升降上管调整鼓面的高度,调整后重新旋紧蝶型螺栓 (B)。
此外,为防止组鼓在演奏期间突然下滑,请将定位夹推到紧靠安装基座的位置,
并使用鼓钥匙旋紧其螺钉。
Clef d’accord
鼓钥匙
Vis papillon (B)
蝶型螺栓(B)
Étrier de montage
安装基座
Collier de positionnement
定位夹
Vis papillon (A)
蝶型螺栓(A)
Montage/组装步骤

12
バスドラムのサイズによりスタンドのセッティングが異なりますので、図をよくご覧になり、
お手持ちのバスドラムに合った取り付け方をしてください。
The proper setting of the stand depends on the size of the bass drum. Please refer to the fol-
lowing illustrations when mounting your bass drum on the stand.
● MB-4000, 400 シリーズ:全サイズの場合
※MB-4000, 400 シリーズ用にお使いになる場合は、アームの取付位置を変更する必
要があります。下図に従ってアームを 4 本共外側から内側へ付け替えてからドラムを
セットしてください。
●For all MB-4000 or 400 series drum sizes
* To mount a MB-4000 or 400 series bass drum, the arm mounting position
needs to be changed. Attach the four arms at the inner holes of the stand, re-
ferring to the illustration below.
奏者
Player
アームベース
Arm Base
アーム
Arm
ドラム取付図 /Drum Mouning Illustrations
MBS-810A

13
● MB-8300, 800, 6300, 600 シリーズ:16" 〜 28" の場合
●For MB-8300, 800, 6300 or 600 series: 16"–28"
● MB-8300, 800 シリーズ:30", 32" の場合
●For MB-8300 or 800 series (30" and 32")
奏者
Player
奏者
Player
MBS-810A
ドラム取付図 /Drum Mouning Illustrations

14
Le bon réglage du stand dépend de la taille de la grosse caisse. Référez-vous aux illustrations
suivantes lorsque vous montez la grosse caisse de défilé sur son stand.
支架的正确安置取决于大鼓的尺寸。在支架上安装大鼓时,请参照以下图示。
●Pour toutes les grosses caisses de la gamme MB-4000 ou 400
* Pour monter une grosse caisse MB-4000 ou 400, il est nécessaire de
changer la position des bras. Fixez les bras sur les quatre orifices inté-
rieurs du stand, en vous référant à l’illustration ci-dessous.
● 对于所有 MB-4000 或 400 系列鼓尺寸
*若要安装 MB-4000 或 400 系列大鼓,需要改变支臂安装位置。请参照
下图在支架内侧的孔上安装四根支臂。
Musicien
演奏者
Base des bras
支臂基座
Bras
支臂
Illustrations relatives au montage
/鼓安装图
MBS-810A

15
●Pour grosses caisses des gammes MB-8300, 800, 6300 ou 600
(16 à 28 pouces)
● 对于 MB-8300, 800, 6300 或 600 系列 : 16"-28"
●Pour grosses caisses de la gamme MB-8300 ou 800 (30 et 32 pouces)
● 对于 MB-8300 或 800 系列(30" 和 32")
Musicien
演奏者
Musicien
演奏者
MBS-810A
Illustrations relatives au montage
/鼓安装图

16
※説明イラストは、MB-8300,800,6300,600 シリーズ
(16" 〜 28")を取り付ける場合です。
* The illustrations show mounting of an MB-8300,
800, 6300 or 600 series bass drum (16"–28").
1
1
2
2
アーム
Arm
アームベース
Arm Base
上パイプ
Upper Pipe
ウイングボルト(B)
Wing Bolt (B)
奏者
Player
脚
Leg
ウイングボルト(A)
Wing Bolt (A)
2
3
組立手順 /Assembly Procedure
MBS-810A

17
1. 脚をいっぱいに開き、ウイングボルト(A)をしっかりと締め付けます。
1. Fully spread the legs of the stand and secure them by tightening wing
bolt (A).
2.ウイングボルト(B)をゆるめ、上パイプを適当な高さに調整します。
調整後、ウイングボルト(B)はしっかりと締めておいてください。
※脚とアームベースの向きは、ドラム取付図(左図)によりご確認ください。
2. Loosen wing bolt (B) to adjust the height of the stand. After adjust-
ment, re-tighten wing bolt (B).
* Position the legs and the arm base as shown in the illustration (left).
3. バスドラムの胴幅に合わせて、4 本のアームを開きます。バスドラムの
サイズによりアームベースの向きおよびアームの取付位置が異なります
ので、ドラム取付図(左図)をよくご覧になりドラムに合ったセッティン
グをしてください。
3. Spread the four arms according to the width of the bass drum. The
proper arm base direction and arm mounting position depend on the
size of the bass drum. Refer to the drum mounting illustrations (left)
for proper setting of the drum stand.
MBS-810A
組立手順 /Assembly Procedure

18
4
アーム
Arm
アームベース
Arm Base
上パイプ
Upper Pipe
ウイングボルト(B)
Wing Bolt (B)
奏者
Player
脚
Leg
ウイングボルト(A)
Wing Bolt (A)
5
組立手順 /Assembly Procedure

19
4. ドラムをスタンドに載せ、アームを閉じて固定します。
4. Place the drum on the stand and position the arms tightly against the
drum.
5. 演奏時にドラムが下がらないように、位置決めストッパーを締付ベース
に合わせた後、ウイングナットをしっかりと締め付けておきます。
ドラムの高さを調整する場合は、ドラムをスタンドからおろしてから、
ウイングボルト(B)をゆるめ、上パイプを上下してください。調整後は、
ウイングボルト(B)および位置決めストッパーのウイングナットをしっ
かりと締め付けておきます。
5. To prevent the upper pipe from sliding down during performance, push
the position clamp tightly against the mounting base and securely
tighten its wing nut.
To adjust the drum height, first remove the bass drum from the stand
and then loosen wing bolt (B). After adjustment, re-tighten wing bolt (B)
and the wing nut of the position clamp.
ウイングナット
Wing Nut
締付ベース
Mounting Base
位置決めストッパー
Position Clamp
ウイングボルト(B)
Wing Bolt (B)
MBS-810A
組立手順 /Assembly Procedure

20
* Les schémas illustrent le montage d’une grosse caisse
MB-8300, 800, 6300 ou 600 (16 à 28 pouces).
*图中所示的是安装 MB-8300,800,6300 或 600 系列大鼓
(16”-28”) 的情况。
1
1
2
2
Bras
支臂
Base des bras
支臂基座
Tube supérieur
上管
Vis papillon (B)
蝶型螺栓(B)
Musicien
演奏者
Pied
支腿
Vis papillon (A)
蝶型螺栓(A)
2
3
Montage/组装步骤
MBS-810A
This manual suits for next models
4
Table of contents
Other Yamaha Drum manuals

Yamaha
Yamaha RX-7 User manual

Yamaha
Yamaha DD-12 User manual

Yamaha
Yamaha DTPK95M User manual

Yamaha
Yamaha DTX-PRO User manual

Yamaha
Yamaha BS-832/836/240 User manual

Yamaha
Yamaha KP128 User manual

Yamaha
Yamaha DTX XP80 User manual

Yamaha
Yamaha KP90 User manual

Yamaha
Yamaha DTX-MULTI User manual

Yamaha
Yamaha RS-65S Installation guide

Yamaha
Yamaha DD-11 User manual

Yamaha
Yamaha DD-7 User manual

Yamaha
Yamaha Drum Set ABD1520T User manual

Yamaha
Yamaha DD-75 User manual

Yamaha
Yamaha DTX950K User manual

Yamaha
Yamaha YDD65 Assembly instructions

Yamaha
Yamaha DTX Drums TP70S User manual

Yamaha
Yamaha DD-6 User manual

Yamaha
Yamaha KP-65 User manual

Yamaha
Yamaha DD-10 User manual