YESKAMO TJ06-3MP User manual

YESKAMO®
Floodlight IP Camera Users’ Manual
PIR Moon Acvated Alarm Camera with Floodlight
www.yeskamo.com


I.Statement
Thank you for purchasing YESKAMO PIR WIFI Camera with
floodlight.
The PIR alarm camera has a built in PIR sensor and floodlights,
when camera catches any suspicious acvies in its detecon
area, you will get an alert message through the phone or siren
alarm from camera side. At night, the floodlight will also
automacally switch on when any suspicious acvies is
detected and colour vision will then be enabled to film any
unexpected movement. The built in microphone and speaker
on camera lets you hear and speak to the people on your
property.
The PIR alarm camera can be used as a standalone wifi
camera and can be also integrated with YEKSMAO wireless NVR
system for any home and business surveillance. No maer you
are looking for a single wifi camera or looking to expand you
wireless security system, YESKAMO PIR Alarm camera will meet
your demand.
YESKAMO Technology Co. Ltd
-1-
Website
Email
Tel
www.yeskamo.com
yeskamoser[email protected]
+44 20 3807 4763 (UK)
yeskamser[email protected]
+1 830 745 5888 (US)

Power Cord
RJ45 Port
PIR Sensor
3.6mm Camera Lens
Floodlight
IR Cut Filter
IP66 Weatherproof Shell
WIFI Antenna
Microphone
Speaker
TF Card Slot
Indicator Light
IR LED*4
Reset Button
PIR Alarm camera with Floodlight
1
2
3
4
II.Product Descripon
-2-
Microphone: Pick up audio
Speaker: transmit sound
IR Cut Filter: auto switch day/night mode
IR LED: IR leds will automacally switch on at darkness for
night vision

5
6
7
8
9
11
13
12
10
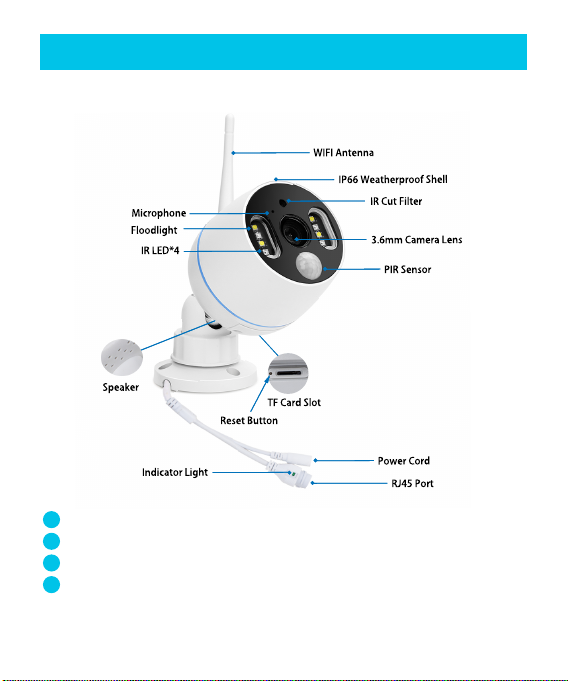
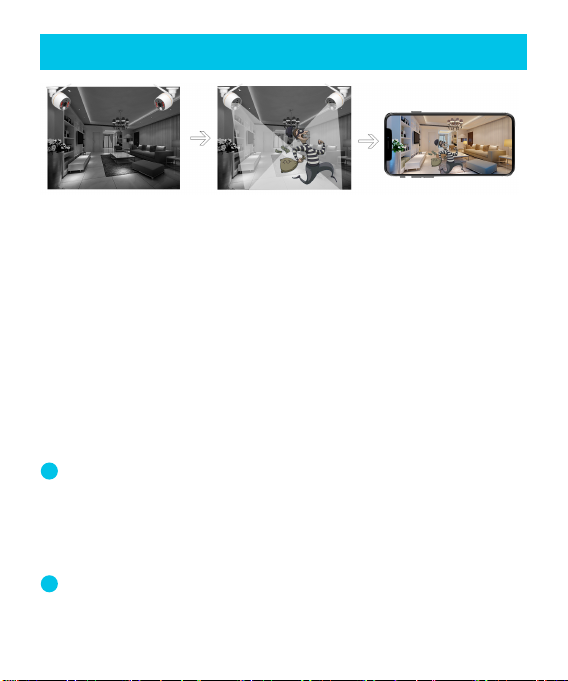
III. Installaon angle for PIR alarm camera
Floodlight: will turn on automacally in the darkness when
PIR sensor was triggered.
PIR (passive infrared) Sensor: detect objects in its view field.
3.6mm Lens: provides wide viewing angle up to 90°;
Weatherproof IP66 Housing: working temperature: -20℃/-4
℉to 60℃/140℉;
2-Axis Mounng Bracket: adjust installaon angle and
vandal-proof inside cable. 360° all-round swiveling and 90°
up-down adjusng;
RJ-45 Ethernet port: A: Add the camera to YESKAMO
NVR recorder as a standard NVR kits if you want
B: Wired connect the camera to internet if you are you
failed to congurate it for wireless connecon
Power-in Port: connect with provided 12V 1A plug for
power supply.
TF Card slot: Insert TF Card for video storage. (Max
support 128G TF Card, TF card must be FAT32 format)
Reset buon: Press and hold reset buon about 5-10
seconds to restore camera to factory seng.
The detect angle for PIR Sensor is about 110 degree, and
detecon distance is within 8 meters. So the recommended
installaon height is Not higher than 3-4 meters, 3m/10
will be beer, and recommended angle is transverse-
ly-mounted with the PIR detecon area. (Make the detecon
area as a sector area like below picture shows)
-3-

Note: A passive infrared sensor (PIR sensor) is an electronic
sensor that measures infrared (IR) light radiang from objects
in its field of view. They work enrely by detecng infrared
radiaon (radiant heat) emied by or reflected from objects.
But somemes, it might be affected by airflow, such as rain or
wind, which may cause same false alarms. So it is suggested to
install the PIR camera is a shaded area, such as eaves, to
prevent accelerated wear and tear the elements might cause
When people transversely
across PIR detecon area as
above picture, the camera will
detect the movement sooner.
When people goes straight to
camera as above picture, the
PIR sensor will not so sensive
-4-

1
2
IV. Descripon about PIR wifi camera with floodlight
This alarm camera has a built in PIR sensor and floodlights,
when camera catches any suspicious acvies in its detecon
area, you will get an alert through the phone or camera. Shine
a light on suspicious acvity with 4 PIR acvated ultra-bright
floodlights and colour vision will then be enabled to film any
unexpected movement at night. Video image is black /white
when there is no any movement in the darkness.
The camera works with or without NVR recorder, PIR alarm
camera can be used as a standalone wifi camera, which you
can view directly on the phone app; Or you can add the PIR
Camera to a yeskamo NVR recorder as would be for a standard
NVR camera kits.
The camera has a built in PIR sensor and moon sensor, you
will get an instant phone app alert and/or siren alarm when
any suspicious acvies is detected.
-5-
Video image is black
/white in darkness when
there is no any suspicious
movement
Shine a light on suspicious
acvity with 4 PIR Acvated
ultra-bright floodlights and
record colored video for that
unexpected movement
Instant phone app alert
will be pushed when any
suspicious movement is
detected

3
V.Configuraon on Phone App:
The camera has a built in IR leds and floodlight leds, IR led
will automacally switch on when ambient light is insufficient
and will create clear black/white videos, the floodlight will
come on automacally (in the darkness) ONLY when any
suspicious acvies is caught on camera and will then allow for
colour video recording for the unexpected acvity. (Floodlight
will NOT turn on at day me)
Connect the camera with supplied 12V 1A adapter, then
plug the adapter to nearby power socket.
Search the APP “IP Pro3” or “EseeCloud3” in App store or
Google play.
If you can’t find it , please scan below QR Code (Please keep
updang the phone app version)
Support Android 4.0 or higher version, iOS 8.0 or higher version
EseeCloud3
1.Power on camera
2.Download phone app
IP Pro3
-6-

1
2
Register an account with your email address /phone number
and password. A verificaon code will be send via text.
Reset camera: Press and hold the reset buon of camera
about 5-10 seconds unl hear a voice prompt “ restore baery
reseng, camera will restart automacally”
Add device on phone app
Enter APP > My Device > tap “+”Icon> WIFI Camera
3.Create an account and login phone app
4.Add device on phone app
-7-

Add device on android phone
-8-
Step1: Choose “ NO” on the interface “ Please check if the
device has a network cable interface” (Default choose “No”
although there is an RJ45 network cable on the camera)
Step2: Choose “yes” on the interface “Does indicator light of
the device blink”when you hear voice prompt “start configura-
on mode”
(default choose “YES” directly, actually the indicator light does
NOT blink)

Step3: Tap the detected camera’s cloud ID
Step4: Input the password of home wifi (Make sure you input
correct password of your wifi)and click “Next” buon at upper
right corner
-9-
2030725912

Step5: Wait for camera connecng to internet with voice
prompt “ wireless seng, please wait”
Step6: Get the voice prompt “the wireless connecon is
successful” and then edit the name of camera and click “done”
to finish the configuraon
-10-

Add device on iOS phone
-11-
Step1: Choose “ NO” on the interface “ Please check if the
device has a network cable interface” (Default choose “No”
although there is an RJ45 network cable on the camera)
Step2: Choose “yes” on the interface “Does indicator light of
the device blink”when you hear voice prompt “start configura-
on mode”
(default choose “YES” directly, actually the indicator light does
NOT blink)

Step3: Go to “Setup > Wifi” on your iPhone
Step4: Connect your iphone to camera’s hotspot with “IPC...”
and input default hotspot password “ 11111111”
-12-

Step5: Back to phone app and input your wifi name and
password (Make sure you input correct password of home wifi)
Step6: Wait for camera connecng to internet with voice
prompt “ wireless seng, please wait”
-13-

1
2
Step7: Get the voice prompt “the wireless connecon is
successful” and then edit the name of camera and click “done”
to finish the configuraon
5.Preview and playback on phone app
-14-
Note:
If you fail to configure the camera on phone app , please
reset the camera and try again. Or please check “Q12: What to
do if I click the “reset buon”, but can NOT add the camera on
phone app?”
The phone app version has been upgraded frequently, if the
phone app interface on your phone is different from above
interface, please scan above QR code or contact us directly to
get the latest user manual.
user manual

Note: Turn on the “speaker” buon on phone app and you can
hear the voice from camera side, push the “microphone”
buon lets you stream your voice from phone to camera to
whoever’s near your camera can hear you.
Click “setup” buon at right boom corner on phone app>
moon detecon manage> customize moon detecon record-
ing, moon detecon alarms and moon detecon sensivity.
6.Device Setup
-15-
6--1 Moon Detecon Management
Customize the preview video definion between
HD (high definion) & SD(standard definion)
Suitable for devices with microphone. Push the
buon and the people near camera can hear you
Definion Switch Buon
Speaker On/Off Buon
Full Screen Buon
Microphone Buon
Screen Switch Buon
Playback/live Video Switch Buon
Time Bar
Screenshot Buon
Recording Buon
Playback Switch Buon
Calendar Buon
Backup Buon Backup and download the recorded video to
phone
Selecng playback date
Switching channel when playback video
Recording the real-me video
Screen shot
Drag the meline to modify the playback me
Switching between playback video
& real-me live video
Switching between mulple screen
Switch between horizontal screen & vercal screen
Whether play the sound captured by camera

Opon
Moon detecon
Moon detecon
alarm
Moon detecon
sensivity
Moon detecon
tone
Funcon
customize moon detecon recording. The camera supports
both moon detecon recording & 24/7 connuous recording.
Disable “moon detecon” opon to disable moon detecon
recording
for siren alarm from camera side and the camera will blare
an alarm once detecon any movement. Disable “moon
detecon tone” and the camera will not blare alarm
anymore
for phone app alert and you will get an instant phone app alert
once detected any movement from camera’s detecon area.
Disable “moon detecon alarm” opon and you will not
receive the phone app alert anymore
customize the PIR sensor’s sensivity to lowest, low,
medium, high and highest
-16-
1
3
2

Click “setup” buon at right boom corner on phone app>
Mode Selecon> to setup device mode
6--2 Mode Selecon
-17-
12
3
Opon
Away mode
At home mode
The camera start to record the video and push alerts
when detect suspicious acvies
there will be no moon detecon recording and alert
when moon is detected.
Funcon

Click “setup” buon at right boom corner on phone app>
Device Storage> check whether the TF Card status is normal or
not
If it is abnormal, please click “ format” opon to format the TF
card again.
Note: When insert the TF card to camera, please unplug the
camera from power source first. The camera max support 128G
TF Card.
The default recording mode is 24/7 connuously recording +
moon detecon recording, but you can customize the
recording plan based on your requirement, such as change it to
me-scheduled recording, or disable me recording ...
-18-
12
6--3 Device Storage
6--4 Time recording management
3
Table of contents
Other YESKAMO Security Camera manuals