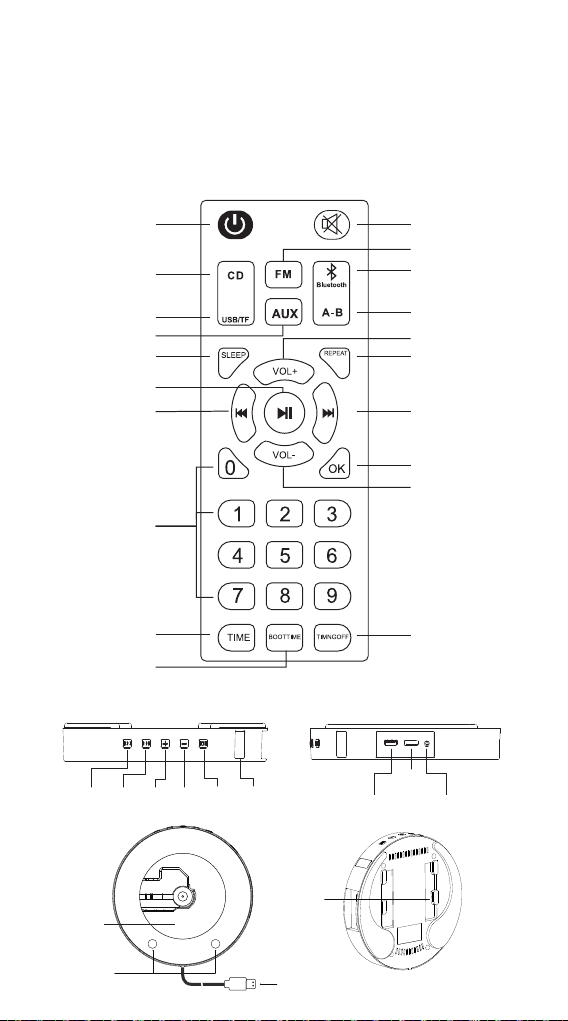
Yirui Youpin Technology YR-Q100 User manual

User Manual
Wall Mountable Bluetooth CD Player
Please read this manual carefully before using
to ensure the product functions to be used correctly.
Please keep this manual for future reference.

Manuel utilisateur - FR
Manual de Usuario - ES
Manuale Utente - IT
Benutzerhandbuch - DE
User Manual - EN 01 - 05
06 - 10
11 - 15
16 - 20
21 - 25
26 - 30日本語取扱説明書

01
CAUTION:
WARNING:
Accessories:
Specifications
Main features
Remote control precautions
1. Please install and operate it in accordance with the manufacturer’s instructions.
2. Place the machine in a position where there is sufficient ventilation around it. The distance
between the front and rear of the machine should be 5cm to 10cm.
3. Do not install or operate near any heat sources such as radiators, stoves or other apparatus
that produce heat.
4. Prevent the power cord from being trampled or crushed, especially where the power head,
power outlet, and device power outlet.
5. Only use accessories specified by the manufacturer.
6. Unplug this apparatus during lightning storms or when unused for long periods of time.
7. Do not cause excessive impact on the player by dropping it. Do not place heavy objects on
top of the player.
8. Do not place the player on damp, dusty or sooty environment, as it could result in fire or
electric shock.
9. Do not place the device in a high temperature environment, direct sunlight, etc...
10. Do not get the player wet or drop it in water (If the player gets wet, do not switch it on).
1. Do not disassemble this player by your own.
2. Do not place the device on top of other electronic items.
3.Do not look directly at the laser beam inside the machine.
4.Any operation or adjustment against the product manual may cause serious laser radiation or
other danger situation.
5. Make sure the insulation sheet is removed from the battery slot of the remote.
Model: YR-Q100
CD format support: CD, CD-R, CD-RM, MP3, WMA, WAV
Power: 8W
Rated Voltage: 5V-2A
Weight: 870g
Dimension: 215 X 42mm
Signal to Noise Ratio: >57dB
Total Harmonic Distortion: <1.5%
MP3 link input: 650v
Material: ABS engineering plastics
Tuning range: FM: 87.5-108MHz
Frequency response: 60Hz-16kHz, ±3dB
1. LED screen display
2. Support USB flash playing
3. Support TF card playing
4. Full-band FM radio
5. Bluetooth V4.2
6. Standard 3.5mm audio input/output port
7. Loop Playback mode: Repeat All
8. Support A-B repeat, Repeat One, Repeat All
9. Support time and alarm clock
1. The sensitivity of remote control can be influenced by light and environment.
2. Please take out the battery inside remote control in case of unused for a long time, to avoid
the battery’s unexpected leakage and corroding the remote control.
Remote Control
Pack of screws
USB adaptor
Wall-mounted plate
Desk stand
User Manual
02 03 04 05
06 07 08 09 10
11 12 13 14 15
16 17 18 19 20
21 22 23 24 25
26 27 28 29 30

01
Remote Control
Illustration
3. Normally, the included battery can last one year’s usage, but it also depend on your using
frequency. In case of remote control not working within a short distance, please replace the
battery.
Power Mute
FM Radio
Bluetooth mode
A-B Repeat
Volume +
Repeat mode
NEXT/FWD
(Long press to fast forward)
OK(confirm)
Volume -
Timing OFF
CD mode
USB/TF Card mode
AUX mode
Sleep function
Pause/Play
PREV/REW
(Long press to rewind)
Number button
Time setting button
Boot time
Previous Next VOL+ VOL- MODE LED display USB Flash
Drive Port
TF Card Slot AUX Port
CD tray
Loudspeaker USB cable
Fixed hook
02 03 04 05
06 07 08 09 10
11 12 13 14 15
16 17 18 19 20
21 22 23 24 25
26 27 28 29 30

01
Installation instructions:
Quick Start
MODE
1. Remove insulation sheet before using.
2. Plug in the USB cable to the adapter.
3. Plug the adapter into power outlet. (110-220V)
4. Insert a disc (format: CD, CD-R, CD-RM, MP3, WMA, WAV) into the CD player and pull the
power cable to power it on.
5. The display shows the status of reading the disc (DISC flashes). It will be played music after
the disc is rotated (5-10S).
6. Press the MODE button or Use the remote control to switch among functions: “CD”,
“USB/TF”, “AUX”, “FM”,and “Bluetooth”
7. Press the standby button of remote control will show the time, and it can be set up.
8. Pull the power cable again to power off the cd player.
There are CD mode, USB/TF mode, FM mode, AUX mode, Bluetooth mode; the display will light
up the corresponding mode symbol when switching modes.
①CD mode
*CD format support: CD, CD-R, CD-RM, MP3, WMA, WAV
Press the mode button or the CD button on the remote to switch to CD mode;
the Compact Disk will run automatically, the CD icon will appear on the screen.
②USB/TF Card Mode Instructions
Plug in a U-disk/TF Card to the CD Player USB port/TF Card slot.
Press the mode button or the USB/TF Card button on remote control to switch to USB/TF mode;
the device would automatically read files from USB flash drive/TF Card.
③FM Mode Instructions:
*FM Radio Range: 87.5MHz-108.0MHz
Press the mode button or the FM button on the remote to switch to the FM mode.
Press the PREV/NEXT button again to enter the automatic search state, and it will automatically
①
②
③
Fix the wall-mounted plate on the wall with the included 3 nails
Or fix it on the wall with the included 4 screws
Hang the CD Player on the wall-mounted pl
02 03 04 05
06 07 08 09 10
11 12 13 14 15
16 17 18 19 20
21 22 23 24 25
26 27 28 29 30

01
A-B Repeat Function
TIME SETTING
Boot time:
Time OFF:
Sleep function
Notice!!!
Repeat Function
save radio programs searched.
Press PREV/NEXT button again to go to previous station or next station.
④AUX mode
*Standard 3.5mm audio input/output port.
Press the mode button or the AUX button on the remote to switch to AUX mode.
Connect the CD Player to other Audio player devices with the included 3.5mm male-to-male
audio cable.
⑤Bluetooth Mode Instructions:
Press the mode button or the Bluetooth button on the remote to switch to Bluetooth mode, then
the Player will be ready to pair other Bluetooth devices such as mobile phones, pads etc., and
you will hear a sound from the speaker, the Bluetooth icon will appear on the screen.
Activate the Bluetooth in your mobile phone and it will automatically search nearby Bluetooth
devices to pair.
Choose the device in your mobile phone Bluetooth device list to pair.
Your mobile phone will be paired / connected to the Player in a few seconds.
Playing music on your mobile phone and the audio will be transmitted to the Player speaker
through Bluetooth.
Press the repeat button on the remote to cycle between playback modes, available playback
modes are: “Repeat One”, “Repeat ALL”. Press the repeat button for the first time, it will appear
“REP”, which means “Repeat One”; press the repeat button again, “ALL” will be on the screen,
which means “Repeat ALL”.
The A-B Repeat function enables playback to a specific section repeatedly by setting the start
point (A) and end point (B) for the section.
1. Press A-B button on the remote to set the start point (A) while playing,and will appear the “A”
on the screen.
2. Press A-B button on the remote to set the end point (B) while playing, and will appear the “B”
on the screen.
3. Then the specified section from A to B will be played back repeatedly.
4. Press A-B button again to exit AB repeat, and will appear the “OFF” on the screen.
5. Note: A-B Repeat function only works on CD, USB/TF mode.
Press the time setting button on the remote, the first 0 at 00:00 on the display will start blinking,
and then choose the time as you like in turn and press OK button to confirm.
For example: set the time 07:30
Press TIMER button on the remote, press number button to choose 0 and press the OK button,
press number button to choose 7 and press the OK button, press number button to choose 3
and press the OK button, press number button to choose 0 and press the OK button, finished.
Alarm setting: Press the Boot time button, LED screen would display 00:00(the original alarm
time will be displayed when resetting). And then choose the time as you like in turn and press
OK button to confirm. After setting, the LED display will display ( ) icon, long press “0” to
cancel. For the detailed operation step, please refer to the relevant paragraph in time setting.
Alarm setting: Press the OFF Timer button, LED screen would display 00:00(the original alarm
time will be displayed when resetting). For the detailed operation step, please refer to the
relevant paragraph in time setting.
After pressing the sleep button, the sleep function is activated, the main display light is off, and
then press again to resume.
Please remove the protect paper from the Player before turning it on, otherwise, you will destroy
the device!!!
02 03 04 05
06 07 08 09 10
11 12 13 14 15
16 17 18 19 20
21 22 23 24 25
26 27 28 29 30

01
Notice!!!
Notice!!!
1. Never use chemicals, such as record sprays, anti-static sprays, benzene or thinners to clean
the CD. These chemicals can damage the disc surface permanently.
2. To avoid serious scratches on CD, keep them in the cases after each use. Scratches can
cause the laser pick-up skip in the future play. Do not place stickers or write anything on the
disc.
3. Never touch the laser of the device. Always use the dust cover to prevent dust from collecting
on the laser.
4. If the device is unable to scan discs properly, use a standard commercially available cleaner
to clean the laser optics. Other cleaning methods may damage the laser optics.
Malfunction Possible reason Solution
Device not
working
Device does not plug fully inserted
into power outlet
Fully insert device plug into power
Unable to play
Disk not properly placed
Keep cover side upwards and place the disk again
Incompatibility issue Replace to other compatible disk
No sound
output
Wrong operation
Follow manual instruction when operating
Low volume
Volume up
Sound stuck
Disk or laser lenses get dirty
Clean disk or laser
Disk got scratched or curved
Replace the disk
Remote does
not work
The insulation sheet is not removed
Check if the insulation sheet is removed from the
battery slot.
The remote is out of power Check if the remote battery is running out
The remote is too far from the CD
player
Make sure the remote is in the range of a reasonable
distance (within 6 meters)
Noisy and
screaming
when it plays
Usage me of the disk may be too
long, so the disk is not smooth
Make sure the disc is not heavily scratched or
damaged; Wipe the disc gently from the center
radically out to the edge with a clean & socloth;
Try another new disc to check if the disc is faulty
If there is a "Jiji" sound inside the
earphone, it may be caused by
scratching of the disc
Please change to another disc, and do not use the
old one again to prevent the player from damage
02 03 04 05
06 07 08 09 10
11 12 13 14 15
16 17 18 19 20
21 22 23 24 25
26 27 28 29 30

Benutzerhandbuch
Wandmontierbarer Bluetooth-CD-Player
Bitte lesen Sie dieses Handbuch vor der Verwendung sorgfältig durch,
um sicherzustellen, dass die Produktfunktionen ordnungsgemäß
verwendet werden.
Bitte bewahren Sie dieses Handbuch zum späteren Nachschlagen auf.

01
VORSICHT:
WARNUNG:
Zubehör:
Spezifikationen
Haupteigenschaften:
1. The sensitivity of remote control can be influenced by light and environment.
2. Please take out the battery inside remote control in case of unused for a long time, to avoid
the battery’s unexpected leakage and corroding the remote control.
1. Bitte installieren und betreiben Sie es gemäß den Anweisungen des Herstellers.
2. Stellen Sie das Gerät an einem Ort auf, an dem eine ausreichende Belüftung gewährleistet
ist. Der Abstand zwischen Vorder- und Rückseite der Maschine sollte 5-10 cm betragen.
3. Stellen Sie das Gerät nicht in der Nähe von Wärmequellen wie Heizkörpern, Öfen oder
anderen Geräten auf, die Wärme erzeugen.
4. Achten Sie darauf, dass das Netzkabel nicht zertreten oder eingeklemmt wird, insbesondere
nicht an den Stellen, an denen sich der Netzkopf, die Steckdose und die Gerätesteckdose
befinden.
5. Bitte verwenden Sie nur vom Hersteller angegebenes Zubehör.
6. Trennen Sie das Gerät bei Gewittern oder bei längerem Nichtgebrauch vom Stromnetz.
7. Setzen Sie den Player keinen übermäßigen Stößen aus, indem Sie ihn fallen lassen. Stellen
Sie keine schweren Gegenstände auf den Player.
8. Stellen Sie den Player nicht in einer feuchten, staubigen oder rußigen Umgebung auf, da dies
zu Bränden oder Stromschlägen führen kann.
9. Stellen Sie das Gerät nicht in Umgebungen mit hohen Temperaturen, direkter Sonnenein-
strahlung usw. auf.
10. Lassen Sie den Player nicht nass werden und lassen Sie ihn nicht ins Wasser fallen (Wenn
der Player nass wird, schalten Sie ihn nicht ein).
11. Zerlegen Sie diesen Player nicht selbst.
12. Stellen Sie das Gerät nicht auf andere elektronische Gegenstände.
13. Schauen Sie nicht direkt auf den Laserstrahl im Inneren der Maschine.
14. Jegliche Bedienung oder Einstellung gegenüber dem Produkthandbuch kann zu
schwerwiegender Laserstrahlung oder anderen Gefahrensituationen führen.
15. Stellen Sie sicher, dass die Isolationsfolie vom Batteriefach der Fernbedienung entfernt
Modell: YR-Q100
Unterstützung der CD-Formate: CD, CD-R, CD-RM, MP3, WMA, WAV
Leistung: 8W
Nennspannung: 5V-2A
Gewicht: 870g
Abmessung: 215 x 42 mm
Signal-Rausch-Verhältnis:> 57 dB
Harmonische Gesamtverzerrung: <1,5%
MP3, Verbindungseingang: 650V
Material: ABS technischer Kunststoff
Abstimmbereich: FM: 87,5-108 MHz
Frequenzgang: 60Hz-16kHz, ±3dB
1. LED-Bildschirmanzeige,
2. USB-Flash lesen / spielen,
3. TF Karte lesen / abspielen,
4. Full-Band-UKW-Radio,
5. Bluetooth V4.2,
6. Standard-3,5-mm-Audioeingang / -ausgang,
7. Loop-Wiedergabemodi: Einen Titel wiederholen, Alle wiederholen,
8. Unterstützung von A-B wiederholen,
9. Unterstützung der Zeit und Wecker
USB-Adapter
Schraubenpaket
Fernbedienung
Benutzerhandbuch
Tischständer
Wandplatte
02 03 04 05
06 07 08 09 10
11 12 13 14 15
16 17 18 19 20
21 22 23 24 25
26 27 28 29 30

01
Vorsichtsmaßnahmen für die Fernbedienung
Fernbedienung
1. Die Empfindlichkeit der Fernbedienung kann durch Licht und Umgebung beeinflusst werden.
2. Bitte nehmen Sie die Batterie in der Fernbedienung heraus, wenn Sie diese längere Zeit nicht
benutzen, um ein unerwartetes Auslaufen der Batterie und eine Korrosion der Fernbedienung
zu vermeiden.
3. Der mitgelieferte Akku hält normalerweise ein Jahr, hängt jedoch auch von Ihrer Nutzung-
shäufigkeit ab. Falls die Fernbedienung nicht in kurzer Entfernung funktioniert, tauschen Sie
bitte die Batterie aus.
Leistung STUMM
FM-Radio
Bluetooth Modus
A-B wiederholen
Lautstärke +
WIEDERHOLEN
NÄCHSTER
OK(bestätigen)
Lautstärke -
Ausschalttimer
CD Modus
USB/TF Karte Modus
AUX Modus
SCHLAFEN
Pause/Play
PREV
Zifferntaste
ZEIT
EIN-Timer
Illustration
Bisherige Nächster VOL+ VOL- MODUS LED USB-Flash-
Laufwerksanschluss
TF-Karten
Steckplatz AUX-Anschluss
CD-Fach
Lautsprecher USB Kabel
Aufhänge
Möglichkeit
02 03 04 05
06 07 08 09 10
11 12 13 14 15
16 17 18 19 20
21 22 23 24 25
26 27 28 29 30

01
Schnellstart
MODE
1. Stecken Sie den mitgelieferten Netzadapter in die Steckdose und schließen Sie das weiße
Netzkabel an den Netzadapter an.(110-220V)
2. Legen Sie eine CD oder ein Speichergerät in den CD-Player ein, ziehen Sie am Netzkabel,
um das Gerät einzuschalten. Die Betriebsanzeige leuchtet auf und die CD dreht sich.
3. Nachdem die CD 5 bis 10 Sekunden lang gedreht wurde, spielte der eingebaute
Lautsprecher die Videodatei ab.
4. Wenn Sie das Audiogerät wechseln möchten, drücken Sie die MODE-Taste auf der
Fernbedienung oder die MODE-Taste auf der Oberseite des Geräts, um den Modus zu
wechseln.
5. Ziehen Sie erneut am Netzkabel, um das Gerät auszuschalten.
Wenn die CD eingeschaltet ist, ist die Standardeinstellung der Disc-Modus (Lesemodus).
Drücken Sie dann die Modustaste, um den Modus zu ändern. Es gibt Disc-Modus (Disc lesen),
USB-Modus/TF Karte Modus, Bluetooth-Modus, FM-Modus, AUX-Modus; Das Display zeigt das
entsprechende Modussymbol an, wenn der Modus gewechselt wird.
①Disc-Modus
Anweisungen zum Einschalten / Ausschalten:
1. Einschalten:
Ziehen Sie das USB-Kabel herunter, um den CD-Player einzuschalten. Der CD-Player spielt die
CD automatisch ab (die CD muss vor dem Einschalten in den CD-Player eingelegt sein).
2. Ausschalten:
Ziehen Sie das USB-Kabel erneut herunter, um den CD-Player auszuschalten. Berühren Sie die
CD nicht, bevor Sie das Gerät ausschalten.
②FM-Modus
1. Drücken Sie die Modustaste auf der Fernbedienung, um in den FM-Modus zu wechseln, oder
schalten Sie die Modustaste (am Gerät) in den FM-Modus.
①
②
Installationsanleitung:
③
Befestigen Sie die Wandplatte mit den beiliegenden 3 Nägeln an der Wand
Oder mit den mitgelieferten 4 Schrauben an
der Wand befestigen
Hängen Sie den CD-Player an die Wandplatte
02 03 04 05
06 07 08 09 10
11 12 13 14 15
16 17 18 19 20
21 22 23 24 25
26 27 28 29 30

01
ZEIT
BOOTTIME:
TIMINGOFF:
LOOP/Repeat Function
A-B Repeat Function
Zeiteinstellung: Drücken Sie die TIME-Taste auf der Fernbedienung. Die erste 0 um 00:00 Uhr
auf dem Display beginnt zu blinken. Wählen Sie dann die gewünschte Zeit und drücken Sie die
OK-Taste zur Bestätigung.
Beispiel: Stellen Sie die Uhrzeit auf 07:30 ein
Drücken Sie die TIMER-Taste auf der Fernbedienung, drücken Sie die Zifferntaste-Taste, um 0
auszuwählen, und drücken Sie die OK-Taste. Drücken Sie die Zifferntaste-Taste, um 7
auszuwählen, und drücken Sie die OK-Taste. Drücken Sie Wählen Sie mit den Ziffernta-
ste-Taste 0 und drücken Sie die OK-Taste, um den Vorgang abzuschließen.
EIN-Timer: Drücken Sie die BOOTTIME-Taste. Auf dem LED-Bildschirm wird 00:00 angezeigt
(die ursprüngliche Alarmzeit wird beim Zurücksetzen angezeigt). Wählen Sie dann die
gewünschte Zeit und drücken Sie zur Bestätigung die OK-Taste. Nach der Einstellung wird auf
dem LED-Display das Symbol (Timer) angezeigt. Halten Sie zum Abbrechen die Taste „0“
gedrückt. Den detaillierten Bedienungsschritt entnehmen Sie bitte dem entsprechenden
Abschnitt unter TIME.
Ausschalttimer: Drücken Sie die TIMINGOFF-Taste. Auf dem LED-Bildschirm wird 00:00
angezeigt (die ursprüngliche Alarmzeit wird beim Zurücksetzen angezeigt). Den detaillierten
Bedienungsschritt entnehmen Sie bitte dem entsprechenden Abschnitt unter TIME.
a) Einzelwiederholung: Drücken Sie einmal die Taste REPEAT.
b) Wiederholung beenden (Repeat ALL): Drücken Sie die REPEAT-Taste zum zweiten Mal, um
die Wiederholung zu beenden.
Die A-B-Wiederholfunktion ermöglicht die wiederholte Wiedergabe eines bestimmten
Abschnitts, indem Startpunkt (A) und Endpunkt (B) für den Abschnitt festgelegt werden.
2. Drücken Sie die Taste PREV / NEXT, um zum vorherigen oder nächsten Sender zu wechseln.
3. Nach Abschluss der Suche wird der erste Sender abgespielt.
4. Drücken Sie die Taste PREV / NEXT erneut, um zum vorherigen oder nächsten Sender zu
wechseln.
③Bluetooth-Modus
1. Drücken Sie die Modustaste auf der Fernbedienung, um in den Bluetooth-Modus zu
wechseln. Der Player ist dann bereit, andere Bluetooth-Geräte wie Mobiltelefone, Pads usw. zu
koppeln. Sie hören einen Ton aus dem Lautsprecher. Das Bluetooth-Symbol wird angezeigt auf
dem Bildschirm.
2. Aktivieren Sie Bluetooth in Ihrem Mobiltelefon. Es sucht automatisch nach Bluetooth-Geräten
in der Nähe, um sie zu koppeln.
3. Wählen Sie das benannte „YR-Q100“ -Gerät in der Bluetooth-Geräteliste Ihres Mobiltelefons
aus, um es zu koppeln.
4. Ihr Mobiltelefon wird in wenigen Sekunden mit dem Player gekoppelt / verbunden.
5. Wenn Sie Musik auf Ihrem Mobiltelefon abspielen, wird der Ton über Bluetooth an den
Player-Lautsprecher übertragen.
④USB-Modus
1. Schließen Sie eine U-Disk/TF-Karten an den USB-Flash-Laufwerksanschluss/TF-Karten
Steckplatz des CD-Players an.
2. Drücken Sie die MODE-Taste auf der Fernbedienung oder die MODE-Taste auf der Oberseite
des Geräts, um in den USB-Modus/TF Karte Modus zu wechseln.
3. Das Gerät liest automatisch Dateien vom USB-Stick/TF- Stick.
⑤AUX-Modus
* Standard 3,5-mm-Audioeingang / -Ausgang.
Drücken Sie die Modustaste oder die AUX-Taste auf der Fernbedienung, um in den AUX-Modus
zu wechseln.
Schließen Sie den CD-Player mit dem mitgelieferten 3,5-mm-Audio-Kabel an andere
Audio-Player-Geräte an.
02 03 04 05
06 07 08 09 10
11 12 13 14 15
16 17 18 19 20
21 22 23 24 25
26 27 28 29 30

01
Problemlösung
Sleep Modus
Beachten!!!
WARNUNG:
* Drücken Sie die A-B-Taste auf der Fernbedienung, um den Startpunkt (A) während der
Wiedergabe festzulegen. Auf dem Bildschirm wird das „A“ angezeigt.
* Drücken Sie die A-B-Taste auf der Fernbedienung, um den Endpunkt (B) während der
Wiedergabe festzulegen. Daraufhin wird das „B“ auf dem Bildschirm angezeigt.
* Dann wird der angegebene Abschnitt von A bis B wiederholt wiedergegeben.
* Drücken Sie die A-B-Taste erneut, um die AB-Wiederholung zu beenden.
Nachdem Sie die Sleep-Taste gedrückt haben, wird die Sleep-Funktion aktiviert, die
Hauptanzeige erlischt und Sie drücken erneut, um fortzufahren.
Bitte entfernen Sie das Schutzpapier vom Player, bevor Sie ihn einschalten, sonst zerstören Sie
das Gerät !!!
1. Verwenden Sie zum Reinigen der CD niemals Chemikalien wie Schallplattensprays,
Antistatiksprays, Benzol oder Verdünner. Diese Chemikalien können die Oberfläche der Disc
dauerhaft beschädigen.
2. Um ernsthafte Kratzer auf der CD zu vermeiden, bewahren Sie diese nach jedem Gebrauch
in den Hüllen auf. Kratzer können dazu führen, dass der Laser in der Zukunft überspringt.
Bringen Sie keine Aufkleber oder Beschriftungen auf der Disc an.
3. Berühren Sie niemals den Laser des Geräts. Verwenden Sie immer die Staubabdeckung, um
zu verhindern, dass sich Staub auf dem Laser ansammelt.
4. Wenn das Gerät Discs nicht richtig scannen kann, verwenden Sie ein handelsübliches
Reinigungsmittel, um die Laseroptik zu reinigen. Andere Reinigungsmethoden können die
Laseroptik beschädigen.
Fehlfunktion
Möglicher Grund
Lösung
Gerät
funktioniert
nicht
Gerätestecker vollständig in die
Steckdose eingesteckt
Stecken Sie den Gerätestecker vollständig in die
Steckdose
Kann nicht
spielen
Die Festplatte ist nicht richtig eingelegt Halten Sie die Abdeckung nach oben und legen Sie
die CD erneut ein
Inkompatibilitätsproblem Ersetzen Sie auf eine andere kompatible Festplatte
Keine
Tonausgabe
Falscher Betrieb
Befolgen Sie beim Betrieb die Anweisungen in der
Bedienungsanleitung
Niedrige Lautstärke Lauter
Ton steckt
fest
Scheiben- oder Laserlinsen
verschmutzen
Scheibe oder Laser reinigen
Die Scheibe wurde zerkratzt oder
gebogen
Ersetzen Sie die Festplae
Remote
funkoniert
nicht
Die Isolaonsfolie wird nicht enernt Überprüfen Sie, ob die Isolaonsfolie vom
Baeriefach enernt wurde
Die Fernbedienung ist ausgeschaltet Überprüfen Sie, ob die Baerie der Fernbedienung
leer ist
Die Fernbedienung ist zu weit vom
CD-Player enernt
Stellen Sie sicher, dass sich die Fernbedienung in
einem angemessenen Abstand (innerhalb von 6
Metern) befindet
Laut und
schreiend,
wenn es spielt
Die Nutzungszeit der Festplae ist
möglicherweise zu lang, sodass die
Festplae nicht glaist
Stellen Sie sicher, dass die Disc nicht stark zerkratzt
oder beschädigt ist. Wischen Sie die Disc vorsichg
von der Mie bis zum Rand mit einem sauberen
und weichen Tuch ab. Versuchen Sie es mit einer
anderen neuen Disc, um zu überprüfen, ob die Disc
fehlerhaist
Wenn im Kopörer ein "Jiji" -Geräusch
zu hören ist, kann dies an einem
Verkratzen der Disc liegen
Bie wechseln Sie zu einer anderen Disc, und
verwenden Sie die alte Disc nicht erneut, um
Schäden am Player zu vermeiden
02 03 04 05
06 07 08 09 10
11 12 13 14 15
16 17 18 19 20
21 22 23 24 25
26 27 28 29 30

Manuel utilisateur
Lecteur CD Bluetooth à fixation murale
Veuillez lire attentivement ce manuel avant utilisation
pour vous assurer que les fonctions du produit sont utilisées
correctement.
S'il vous plaît garder ce manuel pour référence future.

01
MISE EN GARDE:
1. Veuillez l’installer et l’utiliser conformément aux instructions du fabricant.
2. Veuillez placer la machine dans une position suffisamment ventilée. La distance entre l'avant
et l'arrière de la machine doit être comprise entre 5 et 10 cm.
3. Ne pas installer ou utiliser près de sources de chaleur telles que radiateurs, cuisinières ou
autres appareils produisant de la chaleur.
4. Evitez que le cordon d’alimentation ne soit piétiné ou pincé, en particulier à l’intérieur de la
tête d’alimentation, de la prise secteur et de la prise secteur.
5. Utilisez uniquement les accessoires spécifiés par le fabricant.
6. Débranchez cet appareil en cas d'orage ou lorsque vous ne l'utilisez pas pendant une longue
période.
7. Ne causez pas un impact excessif sur le lecteur en le laissant tomber. Ne placez pas d'objets
lourds sur le lecteur.
8. Ne placez pas le lecteur dans un environnement humide, poussiéreux ou couvert de suie,
cela pourrait provoquer un incendie ou un choc électrique.
9. Ne placez pas l'appareil dans un environnement soumis à une température élevée, aux
rayons directs du soleil, etc.
10. Ne mouillez pas le lecteur et ne le laissez pas tomber dans l'eau (si le lecteur est mouillé, ne
l'allumez pas).
ATTENTION:
Accessoires:
11. Ne démontez pas ce lecteur par vous-même.
12. Ne placez pas l'appareil sur d'autres éléments électroniques.
13. Ne regardez pas directement le faisceau laser à l'intérieur de la machine.
14. Toute opération ou tout réglage par rapport au manuel du produit peut provoquer de graves
rayonnements laser ou toute autre situation de danger.
15. Assurez-vous que la feuille d’isolation est retirée de la fente pour pile de la télécommande.
Caractéristiques
Précautions concernant la télécommande
Modèle: YR-Q100
Puissance: 8W
Tension nominale: 5V-2A
Poids: 870g
Dimension: 215 X 42mm
Rapport signal sur bruit:> 57dB
Distorsion harmonique totale: <1,5%
MP3, entrée de liaison: 650v
Matériau: plastiques techniques ABS
Plage de réglage: FM: 87,5-108 MHz
Réponse en fréquence: 60Hz-16kHz, ±3dB
1. La sensibilité de la télécommande peut être influencée par la lumière et l'environnement.
2. Enlevez la pile de la télécommande en cas de non utilisation prolongée, afin d'éviter toute
fuite imprévue de la pile et de corroder la télécommande.
3. Normalement, la batterie fournie peut durer un an, mais elle dépend également de votre
fréquence d'utilisation. Si la télécommande ne fonctionne pas sur une courte distance, veuillez
remplacer la pile.
Adaptateur USB
Pack de vis
Télécommande
Manuel d'utilisation
Support de bureau
Plaque murale
02 03 04 05
06 07 08 09 10
11 12 13 14 15
16 17 18 19 20
21 22 23 24 25
26 27 28 29 30

01
Puissance MUET
FM-Radio
Bluetooth Mode
Répétition A-B
Volume +
RÉPÉTER
SUIVANT
OK(confirmer)
Volume -
Minuterie OFF
CD Mode
USB/TF Carte Mode
AUX Mode
DORMIR
PAUSE/JOUER
PREV
Bouton numérique
TEMPS
Au chronomètre
Télécommande
Illustration
précédent Suivant VOL+ VOL- MODE LED Port lecteur
flash USB
Port de TF
Carte Port de AUX
Fente CD
Haut-parleur Câble USB
crochet fixe
02 03 04 05
06 07 08 09 10
11 12 13 14 15
16 17 18 19 20
21 22 23 24 25
26 27 28 29 30
Table of contents
Languages: