YONO 8720168188489 User manual

2
Dutch 03~~10
English 12~~19
CONTENT

3
Specificaties
Definitie van sleuteliconen
Productnaam : Lichtwekker
Adapteringave : 100-240V~50/60Hz 0.2A
Adapteruitgave : 5V 1A
Lichtwekker ingave : DC5V 1A
Kracht van het licht : 3W
Werkende temperatuur : -10oC - 50oC
Product netto gewicht : 288g
Product afmeting : 106 x 151 mm
Slaaplamp timer
(klik op de timer: doe de lamp uit in 10, 30, 60 minuten.)
Tijd en alarm aanpassingen. Alarm verlangen. Het geluid verlagen
Tijd en alarm aanpassingen. Alarm verhogen. Het geluid verhogen
Klok instellen Alarm instellen

4
Uitleg van de knoppen
Tijd en alarm aanpassingen.
Het alarm verlagen. Het volume
verlagen
Tijd en alarm aanpassingen.
Het alarm verhogen. Het geluid
verhogen.
Alarm klok
instellen.
Alarm klok
aan/uit
Slaaplamp timer
Klok instellen

5
Smart touch: Beheer het licht, alarm klok uit.
Hou de switch lang ingedrukt om de warme
witte tafellamp of kleurige lichtmodus in te schakelen.
Klik op de tafellamp om de felheid aan te passen.
Kies de kleur lamp die u wenst, aan/uit lamp.
Klok weergave
Alarm klok weergave
DC5V
Stroomaansluiting

6
Uitleg display functies
Stroonaansluiting (aan/uit)
12H klok
AM,PM onderscheidend Slaaplamp
Timing status Alarm status
Dit is een machine zonder in-
gebouwde batterijen.
Wanneer u gebruik maakt
van deze machine, gebruik de
standaard stroomaansluit-
ing welke is inbegrepen in de
accessoires. De stroom is aan
wanneer deze is verbonden.

7
Klok instellen
Lichtwekker Alarm instellen
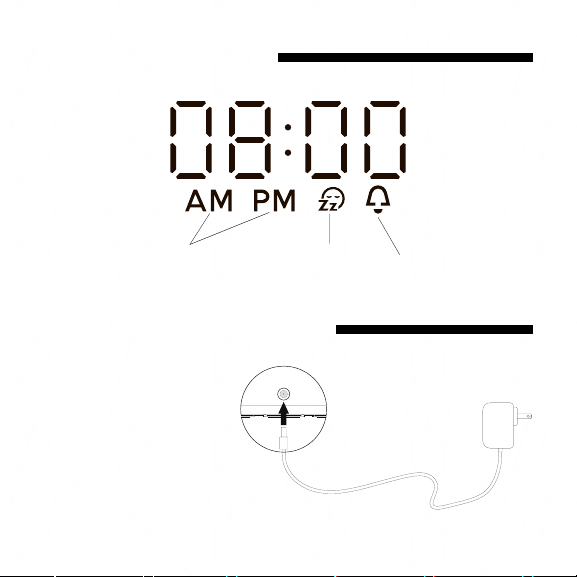
Klik kort op de klok instelling “ ” om de klok instellingen te activeren.
Druk op de “+” en “-“ om 12H of 24H te selecteren. Bevestig de instelling door kort
te drukken op de “ ”
Klik op de “+” en “-“ om de uren instelling te kiezen. Bevestig de instelling door
een kort de duwen op de “ ”. Druk daarna op de “+” en “-“ om de minuten in te
stellen. Bevestig de minuten door kort te drukken op de “ ”. (In de 12H modus, stel
de corresponderende AM en PM tijd in wanneer u de klok instelt.)
Hou de alarm klok knop “ ” ingedrukt om de alarm klok instellingen te activeren.
De uren of minuten zullen knipperen in digitale symbolen. Verander de alarm tijd
door gebruik te maken van de “+” en de “-“ knoppen, druk daarna op de knop “
” om het te bevestigen. Nadat u het alarm heeft ingesteld, geeft het direct de
selectie voor alarm geluid. Het heeft 7 options. Klik op de “+” en de “-“ knop op
uw favoriete optie te kiezen. Opties 1-5 zijn de modi met het alarm geluid en zon-
deropgang stimulatie lichtwekker. Optie 6 heeft alleen een alarm geluid en geen
zonsopgang stimulatie lichtwekker. Optie 7 heeft alleen een zonsopgang stimu-
latie lichtwekker en geen alarm modus. Na het selecteren drukt u op “ ” om de
instelling te voltooien. Het alarm icoon “ ” verschijnt op het scherm en de alarm
instelling is voltooid en klaar. Als u uw alarm klok wilt uitzetten, druk op de knop
van de alarm klok “ ”.
Volume instelling van de alarm klok: Klik of houd houd de “+” of de “-“ knop lang
in om het volume aan te passen van de ringtoon van het alarm onder normale
condities.
Wanneer het alarm afgaat, kunt u op de top touch of elke andere knop klikken om
het alarm stop uit te schakelen.

8
Zonsopgang lichtwekker – het gebruiken van
de alarm klok
Geniet van het wakker worden in de morgen in de ‘zonsopgang’ en natuurgelu-
iden.
Het licht gaat 30 minuten voor de alarm tijd automatisch aan en word geleidelijk
aan lichter. De lichtheid bereikt zijn felste punt wanneer het alarm afgaat en dan
beginnen ook de natuurgeluiden af te gaan. U kunt op de touch bovenop of enige
andere knop drukken om het alarm uit te schakelen. Wanneer het niet handmatig
is uitgeschakeld, gaat het in de snooze modus. Het alarm zal opnieuw in 5 mi-
nuten afgaan. U kunt de touch bovenop of enige andere knop op elk moment
indrukken om het stoppen wanneer het alarm afgaat.
Wanneer u kiest voor optie 7 waar alleen maar de lichtwekker is en geen alarm
geluid, wanneer het alarm afgaat en het licht word niet handmatig uitgeschakeld
door op de touch bovenop te drukken, het licht zal automatisch in 15 minutes uit-
gaan.
Klik op de timer slaapknop “ ” om de modus voor slaaplicht te activeren. Het
icoon voor slaaplicht “ ” zal oplichten op het display. Het slaaplicht heeft drie
tijd opties. 10/30/60 minuten. De timer zal worden weergegeven op het scherm
wanneer het is ingesteld, klik erop om het uit te schakelen. Nadat het slaaplicht is
uitgeschakeld, veranderd het licht van licht naar donker en gaat het langzaam uit
om u te helpen met het in slaap vallen.
Het gebruiken van de slaap lamp

9
Wanneer de machine is verbonden met de stroom, kan de tafellamp met de top
van uw vinger worden aangeraakt, op het metalen paneel. Er zijn 3 niveau’s: licht,
laag, middel, heel fel, uit.
Druk lang op het paneel en het zal overgaan van de tafellamp naar de kleurrijke
lichtmodus. U kunt het aanraken en de kleur veranderen van de lantaarn en het
veranderd langzaam van kleur. Raak het aan om het licht uit te schakelen.
1. Voordat uw dit product met de stroom verbind, controleer of the voltage,
die staat geschreven bij de adapter, overeenkomt met de lokale voltage.
2. Gebruik nooit een adapter met een hogere voltage dan de stroom die staat
aangegeven om de machine te verbinden.
3. Als een abnormale situatie voordoet tijdens het gebruik, stop direct met het
gebruik ervan en schakel de stroom uit.
4. Laat dit product niet met water in aanraking komen, gebruik het niet in een
vochtige omgeving (bijvoorbeeld: badkamer, zwembad....).
5. Gooi en sla niet met dit product om schade aan dit product te voorkomen.
6. Aanbevolen temperatuur om dit product te gebruiken binnen een omgev-
ingstemperatuur van 10˚C tot 50˚C.
7. Wanneer het voor een lange termijn niet word gebruikt, schakel de stroom
dan uit.
Tafel lamp applicaties
Veiligheidsinstructies

10
Dank voor het aankopen van dit fijn ontworpen kwaliteitsproduct van ons.
Onze uiterste zorg en attentie gaat uit naar het u voorzien met een product welke
u jaren van zorgeloze service geeft. Onze producten zijn gedekt door garantie van
defecten in materialen en vakmanschap voor een periode van een jaar. De vol-
gende condities zullen van toepassing zijn. Alle producten die terugkomen door
schade in materiaal of vakmanschap zullen worden gratis worden gerepareerd
of worden vervangen met een unit van gelijke waarde (door ons gekozen) onder
voorbehoud van de volgende bepalingen.
De inspectie van de unit moet onthullen dat alle defecten zijn zoals gespecificeerd
en dat de defecte apparatuur niet verkeerd en, tegen onze instructies, is gebruikt
of gewijzigd . Niet is beschadigd door door het gebruiken van verkeerde voltage of
polariteit, verhoging van zekeringswaarde anders dan is aanbevolen, beschadigd
of op onachtzamen manier is behandeld.
Wij zijn niet verantwoordelijk voor schade aan het product die ontstaat door ver-
keerd gebruik.
Garantie

Wake Up Light
User Guide - English
Dear user, thank you for purchasing this product, please read the
instructions carefully before using this product and keep this manual
for future reference.

12
Specifications
Key Icon Definition
Product name : Wake Up Light
Adapter input : 100-240V~50/60Hz 0.2A
Adapter output : 5V 1A
Wake up light input : DC5V 1A
Lighting power : 3W
Operating temperrature: -10oC - 50oC
Product net weight : 288g
Product size : 106 x 151 mm
Sleeping lamp timer
(Click on the timer: turn off the lamp in 10, 30, 60 minutes.)
Time and alarm adjustments. Desire alarm. Decrease the sound
Time and alarm adjustments. Raise alarm. Increase the sound
Set clock Set alarm

13
Button Explanation
Time and alarm adjustments.
Decrease alarm, decrease volume
Time and alarm adjustments
Increase alarm, increase volume
Set alarm
Alarm clock
on/off
Sleep lamper timer
Set clock

14
Smart touch key: Control light, alarm clock off.
Press long to switch on the warm white
table lamp or colorful light mode.
To adjust the brightness, press on the table lamp.
Choose the colorful light you need, on/off lamp.
Clock display
Alarm clock display
DC5V
Power input

15
Display Funtion Explanation
Power Connection (ON/OFF)
12H clock
AM, PM distinction Sleep lamp
timing status Alarm state
This machine is without built
without batteries.
When using the machine,
please use the standard pow-
er adapter which is included in
the accessoires. The power is
turned on when it is connected.

16
Clock Setting
Wake Up Light Alarm Clock Setting
Short press the clock setting button “ ” to activate clock settings.
Press “+” and “-” keys to select 12H or 24H. Confirm the setting by short press the
key “ ”.
Press “+” and “-” keys to choose the hours setting. Confirm the hours setting by
short press the key “ ”, then press “+” and “-” keys to set the minutes setting.
Confirm the minutes setting by short press the key “ ”. (In 12H mode, match the
corresponding “AM” and “PM” time period when setting the clock)
Hold down the alarm clock key “ ” to activate the alarm clock settings, the dis-
play will flash the hours or minutes digital symbol. Adjust alarm time with use of
“+” and “-” keys, then press the key “ ” to confirm. After setting the alarm time,
it enters the selection for alarm sound directly. It has 7 options. Click the “+” , “-”
button to select the favorite options. Options 1-5 are the mode with the alarm
ring and sunrise simulation wake up light, option 6 only with alarm ring and no
sunrise simulation wake up light mode, option 7 only with sunrise simulation wake
up light and no alarm ring mode, after setting, press “ ” to complete the setting.
The alarm icon “ ” is appeared on the screen and the alarm setting is completed
and ready. If you want to turn off the alarm clock, please press the alarm clock
key “ ”.
Alarm clock volume setting: Click or long press the “+” “-” key to adjust the vol-
ume of the alarm ringtone under normal conditions.
When the alarm sounds, you can touch the top touch key or press any keys to
stop the alarm.

17
Sunrise Wake Up Light Alarm Clock Use
Enjoy the morning waking up in “sunrise” and nature sound. The light will turn
on automatically before 30 minutes of alarm time, and slowly brighten up. The
brightness will reach the max at the alarm time while the nature sound start to
ring. You can touch the top touch key or press any keys to stop the alarm. If it is not
turned off by hands, it will be entered into the snooze mode, and the alarm ring will
sound again after 5 minutes. You can touch the top touch key or press any keys to
stop the alarm at any time after the alarm ring.
If you choose the option 7 only light wake up mode and no alarm ring, when the
alarm time is up, if without close the light by tap the top touch board, the light will
be auto turned off after 15 minutes.
Click the timer sleep button “ ” to activate the sleep light mode. The sleep light
icon “ ” will be light up on the display. The sleep light has three timer options:
10/30/60 minutes timer. The timer will be displayed on the screen when setted,
and the click to turn off.
After the sleep light is turned on, the light changes from bright to dark, and grad-
ually goes out to help you fall sleep.
Sleep Lamp Use

18
When the machine connect the power, the table lamp with the touch of your finger
on the metal panel, there are 3 level light, low, middle, high bright, off.
Long touch the panel will convert between the table lamp and the colorful light, in
the colorful light mode, you can touch and switch the color of the lantern and the
streamer gradient color, and then touch to turn off the light.
1. Before connecting this product to the power supply, please check whether
the voltage marked by the power adapter matches the local supply volt-
age.
2. Never use an adapter that exceeds the voltage and power marked on this
product to connect the machine.
3. If and abnormal situation occurs during use, stop using it immediately and
switch off the power.
4. Do not allow this product to enter into the water, do not use it in a humid
environment (for example: bathroom, swimming pool….).
5. Please do not throw or hit this product to avoid damage to the product.
6. Recommended to use this product within the ambient temperature range:-
10oC – 50oC.
7. When not using for a long time, please turn off the power.
Table Lamp Application
Safety Instructions

19
Thank you for purchasing this finely engineered, quality product from us.
Our utmost care and attention has gone into providing you with a product which
will give you one years of care-free service. Our products are covered by warranty
from defects in materials and workmanship for a period of one year. The following
conditions will apply. All products returned for defects in material or workmanship
shall be repaired or replaced with equal units (at our option) at no charge subject
to the following provisions.
Inspection of the unit must disclose that all defects are as specified and that de-
fective equipment has not been improperly and contrary to our instructions been
altered damaged by improper line voltages or polarity, increase of fuse value
other than recommended, defaced or treated in negligent manner.
We are not responsible for product damage caused by improper use.
Warranty

Table of contents
Languages: