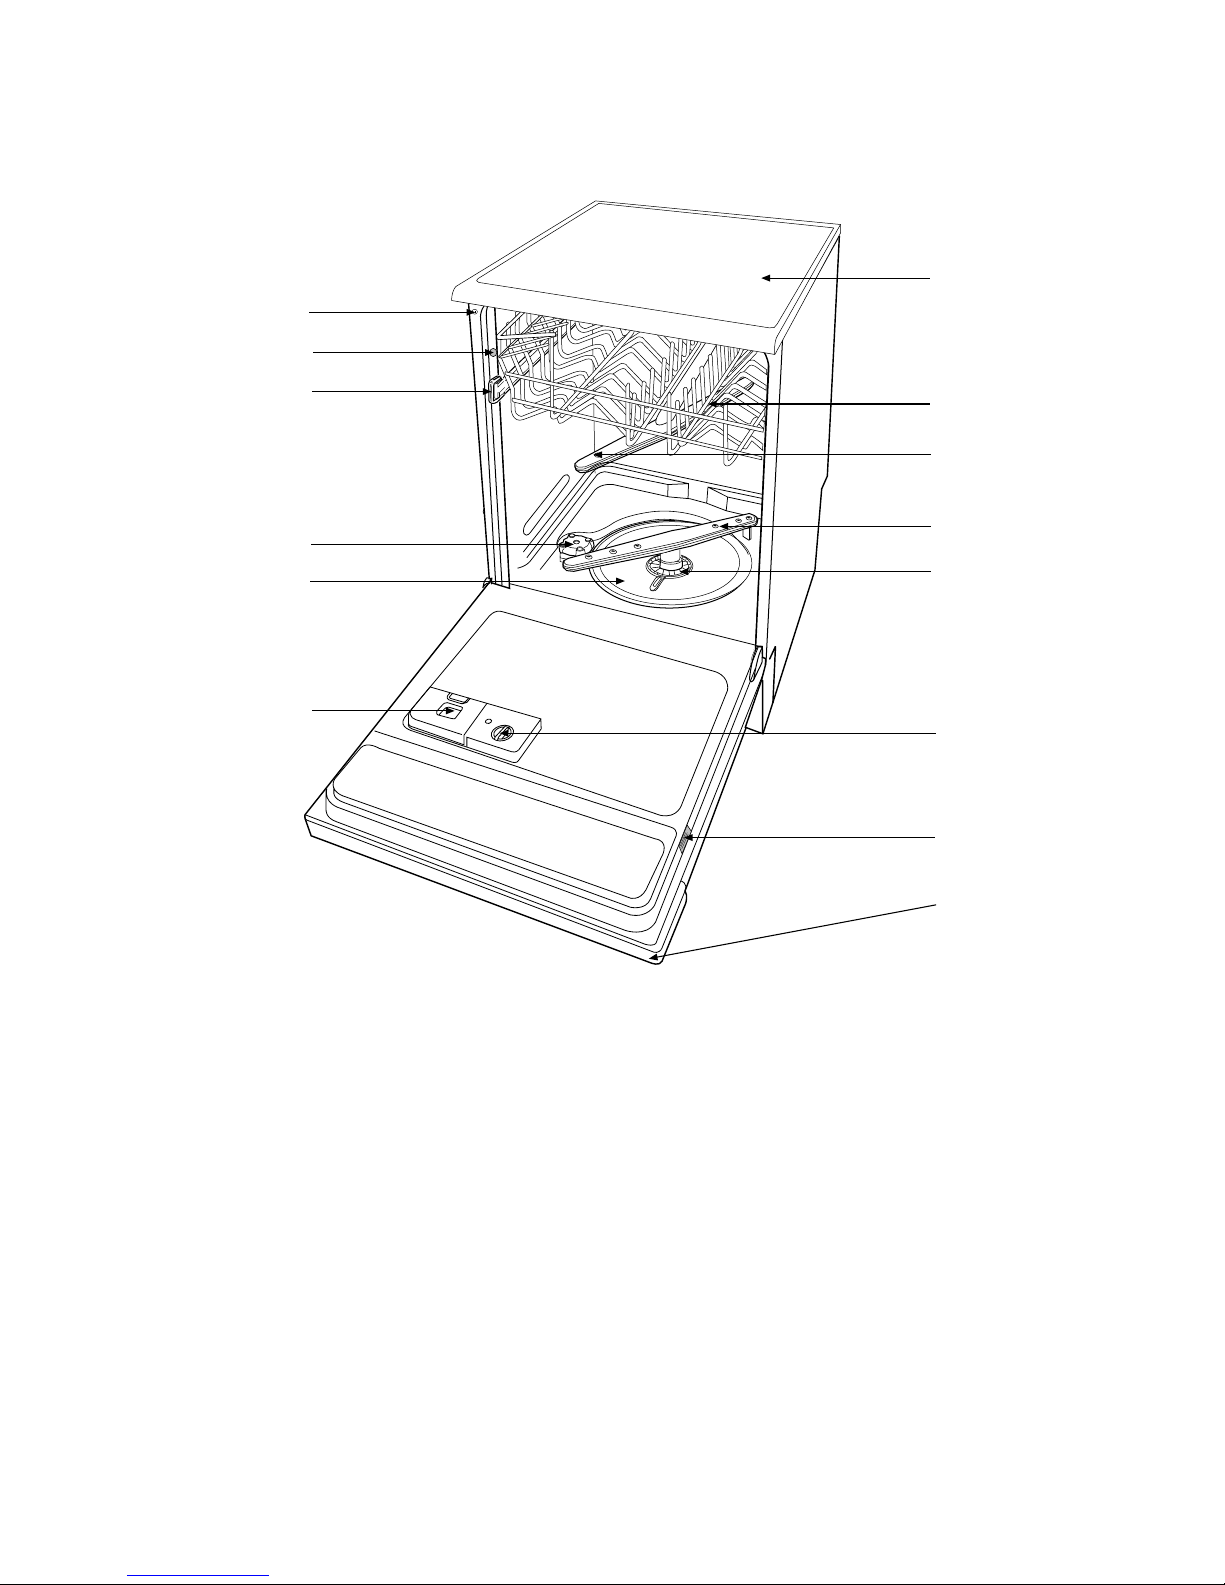
manuals.online logo
Brands
  1. Home
  2. •
  3. Brands
  4. •
  5. Zanussi
  6. •
  7. Dishwasher
  8. •
  9. Zanussi DF 6937 User manual

Zanussi DF 6937 User manual

LAVAVAJILLAS
DISHWASHER
DF 6937
Manual de instrucciones - parte 2 2
Instruction book - part 2 13
E
GB
13
The appliance which you have just bou ht is supplied not only with this instruction manual, but also with a Warranty Card
Certificate, on the back of which are written the relative conditions.
Please fill in the necessary details on the Card Certificate and send it to the Zanussi Centre relative to the area in which
the appliance is to be installed, within twenty days of the date of purchase. (See list of Zanussi network centres).
We con ratulate you on your choice. Carefully read this instruction manual and follow attentively the recommendations it
provides, and thus benefit from years of excellent service.
The appliance which you have just purchased has been very accurately controlled throu hout the entire manufacturin
process. Nevertheless, should any problem arise durin usa e, whether it be durin the warranty period, or when such
period has expired, please directly contact your nearest Zanussi Service Centre.
The address and telephone number of said Centre can be easily found in the enclosed List or by lookin in the telephone
directory, under Zanussi.
Our Zanussi Service Network is at your complete disposal, to serve you with maximum speed and efficiency, all you have
to do is call.
Attention
The products
In order to obtain a ood wash, it is necessary to use deter ents specially desi ned for dishwashers.
To ensure that your dishwasher functions perfectly, Zanussi recommends usin Cal onit System, a unique and complete
product, tested by millions of householders.
Cal onit System includes Cal onit deter ent, rinse aid, salt, machine deter ent and Citro-Fresh.
It is able to fulfil the main requirements for clearin both the crockery and the machine itself.
14
Description of the appliance
1. Water hardness adjustment
2. Levellin spacers
3. Upper basket stop
. Salt container
5. Lar e filter
6. Deter ent dispenser
7. Control panel
8. Ratin plate
9. Rinse aid dispenser
10. Central filter
11. Lower spray arm
12. Upper spray arm
13. Upper basket
1 . Worktop
1
2
3
4
5
6
7
8
9
10
11
12
13
14
IN68
15
The control panel
1. On/Off indicator light
2. On/Off push button
3. Main wash temperature push
buttons (50° - 70°)
. Half load push button
By pressin this push button washin can be
confined to the only lower basket.
This is useful when only a few dishes need
washin (see "Washin pro rammes" chart).
Remember to load all the dishes only in the lower
basket.
5. Door handle
6. Programme marker
7. Programme selector dial
8. Programme sequence indicator
As the pro ramme pro resses, the pro ramme
selector dial turns, to show the phase in the wash
pro ramme the appliance has reached.
Prewash / Rinse and Hold
Wash
Cold rinse
Hot rinse
Dryin
9. Salt indicator light
Illuminates when the salt has run out, to remind you
to refill the salt container.
(See "Settin the water softener" - "Instruction
book" part 1).
10. Programme guide
16
Washing programmes
Programme Degree of soil
and
type of load
Required
push buttons Recommended
quantity of detergent
wash prewash
Starting position
of the
programme
selector
Normal soil.
Crockery and cutlery
Heavy soil.
Crockery, cutlery,
pots and pans
Normal soil.
Crockery and cutlery
Li ht soil.
Crockery and cutlery
Li ht soil.
Crockery and cutlery
Li ht soil.
Crockery and cutlery
Li ht soil.
Crockery and party
crockery
Li ht soil.
Crockery and party
crockery
Any.
Partial load (to be
completed later in
the day).
Cycle description
Main wash up to 65°C
1 cold rinse
1 hot rinse
Active dryin
Main wash up to 50°C
1 cold rinse
1 hot rinse
Active dryin
Cold prewash
Main wash up to 50°C
1 cold rinse
1 hot rinse
Active dryin
Cold prewash
Main wash up to 65°C
1 cold rinse
1 hot rinse
Active dryin
Cold prewash
Main wash up to 70°C
2 cold rinses
1 hot rinse
Active dryin
Main wash up to 50°C
1 cold rinse
1 hot rinse
Main wash up to 50°C
1 cold rinse
1 hot rinse
Active dryin
Main wash up to 50°C
1 cold rinse
1 hot rinse
1 cold rinse
(to avoid food scraps
from stickin
to ether).
*Testin pro ramme for EN 50242. (see "Hints for test centres").
** This is a special pro ramme for quick washin a full load of li htly soiled dishes, lasses and crockery (except pots) so
that you may re-use them promptly.
On/Off
+
50°
On/Off
+
70°
On/Off
+
50°
On/Off
+
50°
On/Off
+
On/Off
+
On/Off
On/Off
On/Off
25 5
20 10
25 5
30 /
30 /
20 /
20 /
30 /
//
A
A
B
B
B
A
C
C
D
*Bio 50°C
with prewash
*Bio 50°C
no prewash
Normal 65°C
with prewash
Intensive 70°C
Half load
(Normal no
prewash)
Normal 65°C
no prewash
** Quick 50°C
Half load
(Quick)
Rinse and Hold
17
1. Check the filters
Ensure that they are clean and properly positioned.
(See "Maintenance and cleaning" - Instruction
book - part 1)
2. Check that there is rinse aid and
salt
(See "Instruction book" - part 1)
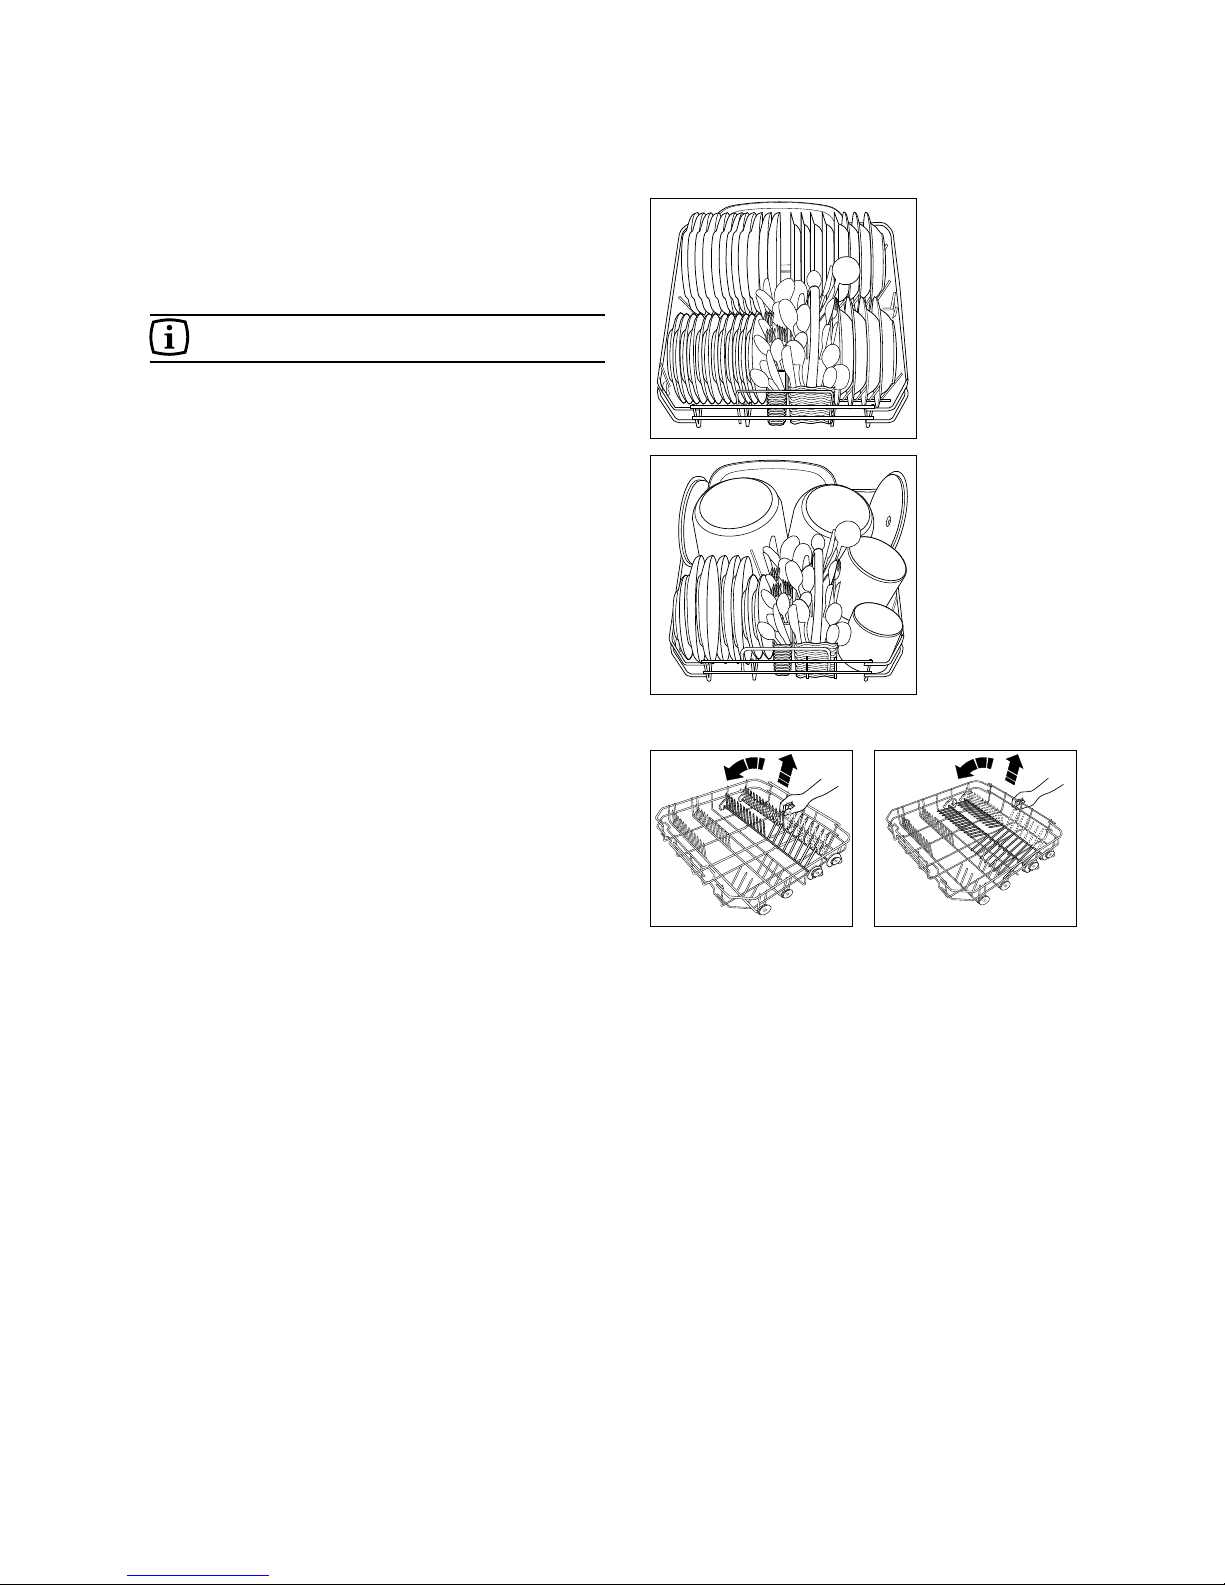
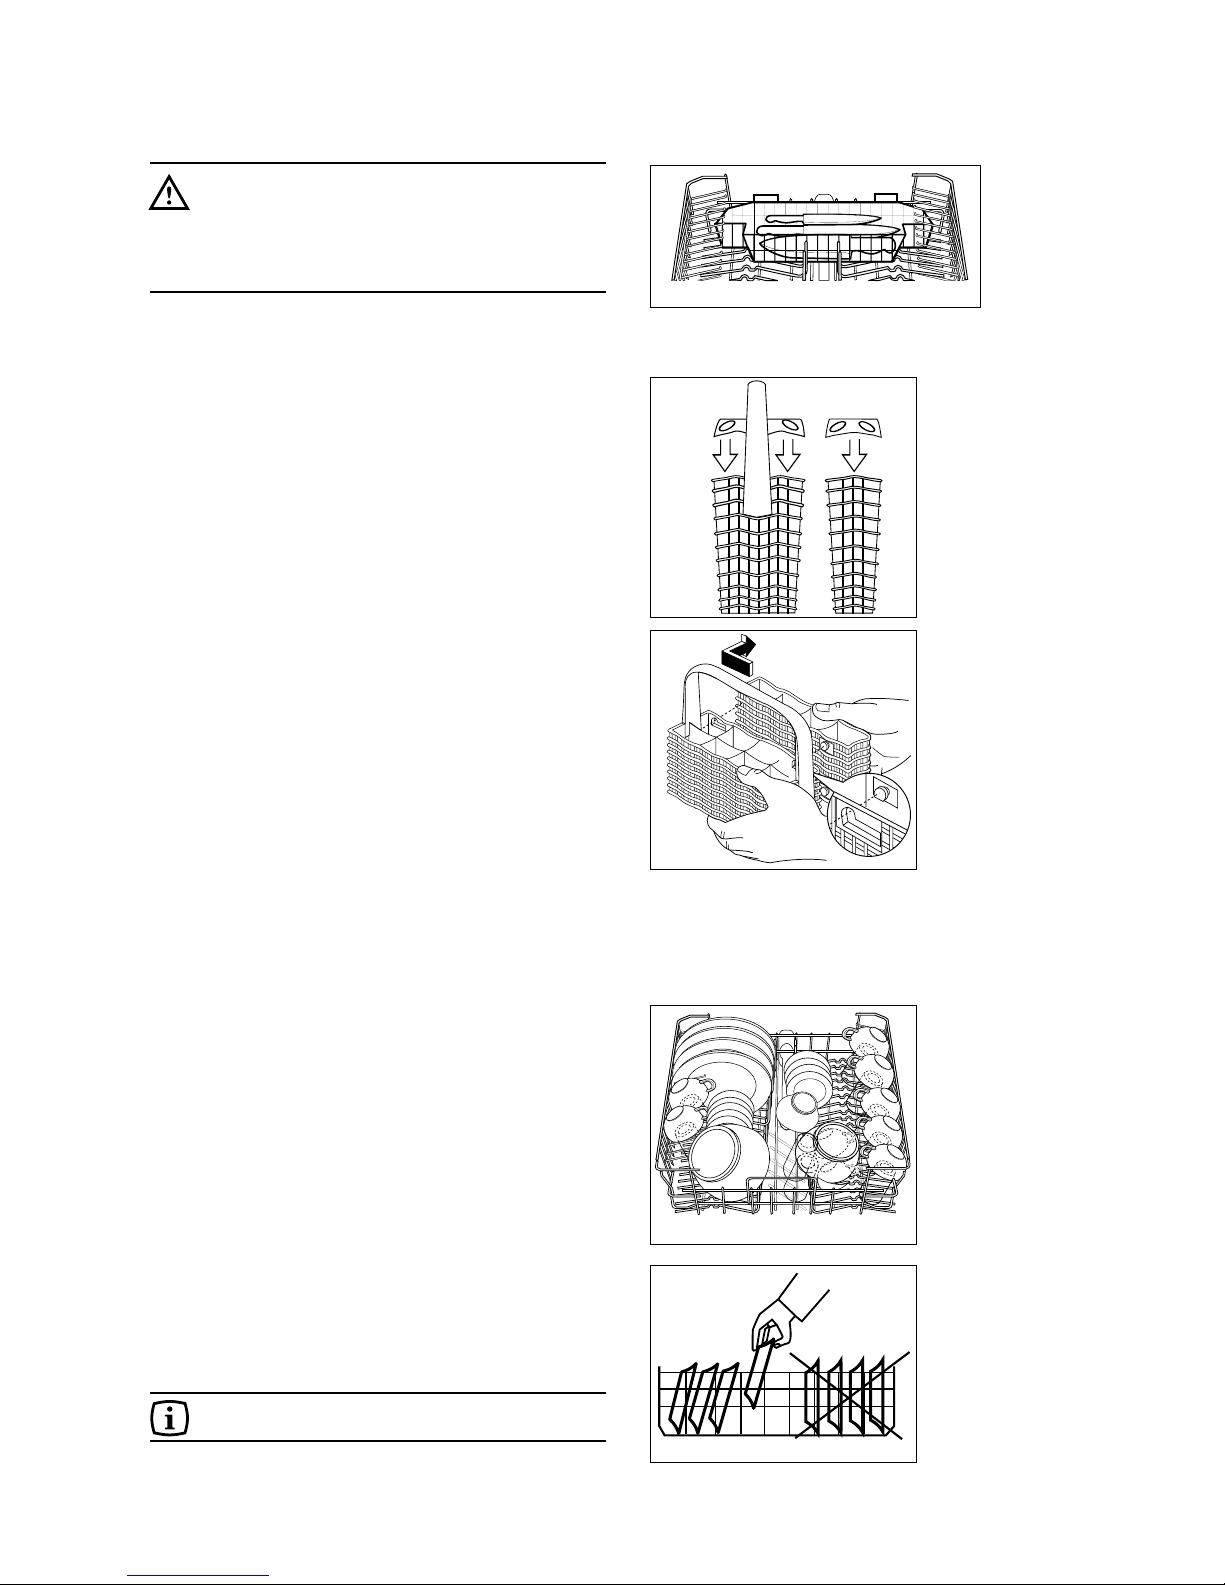
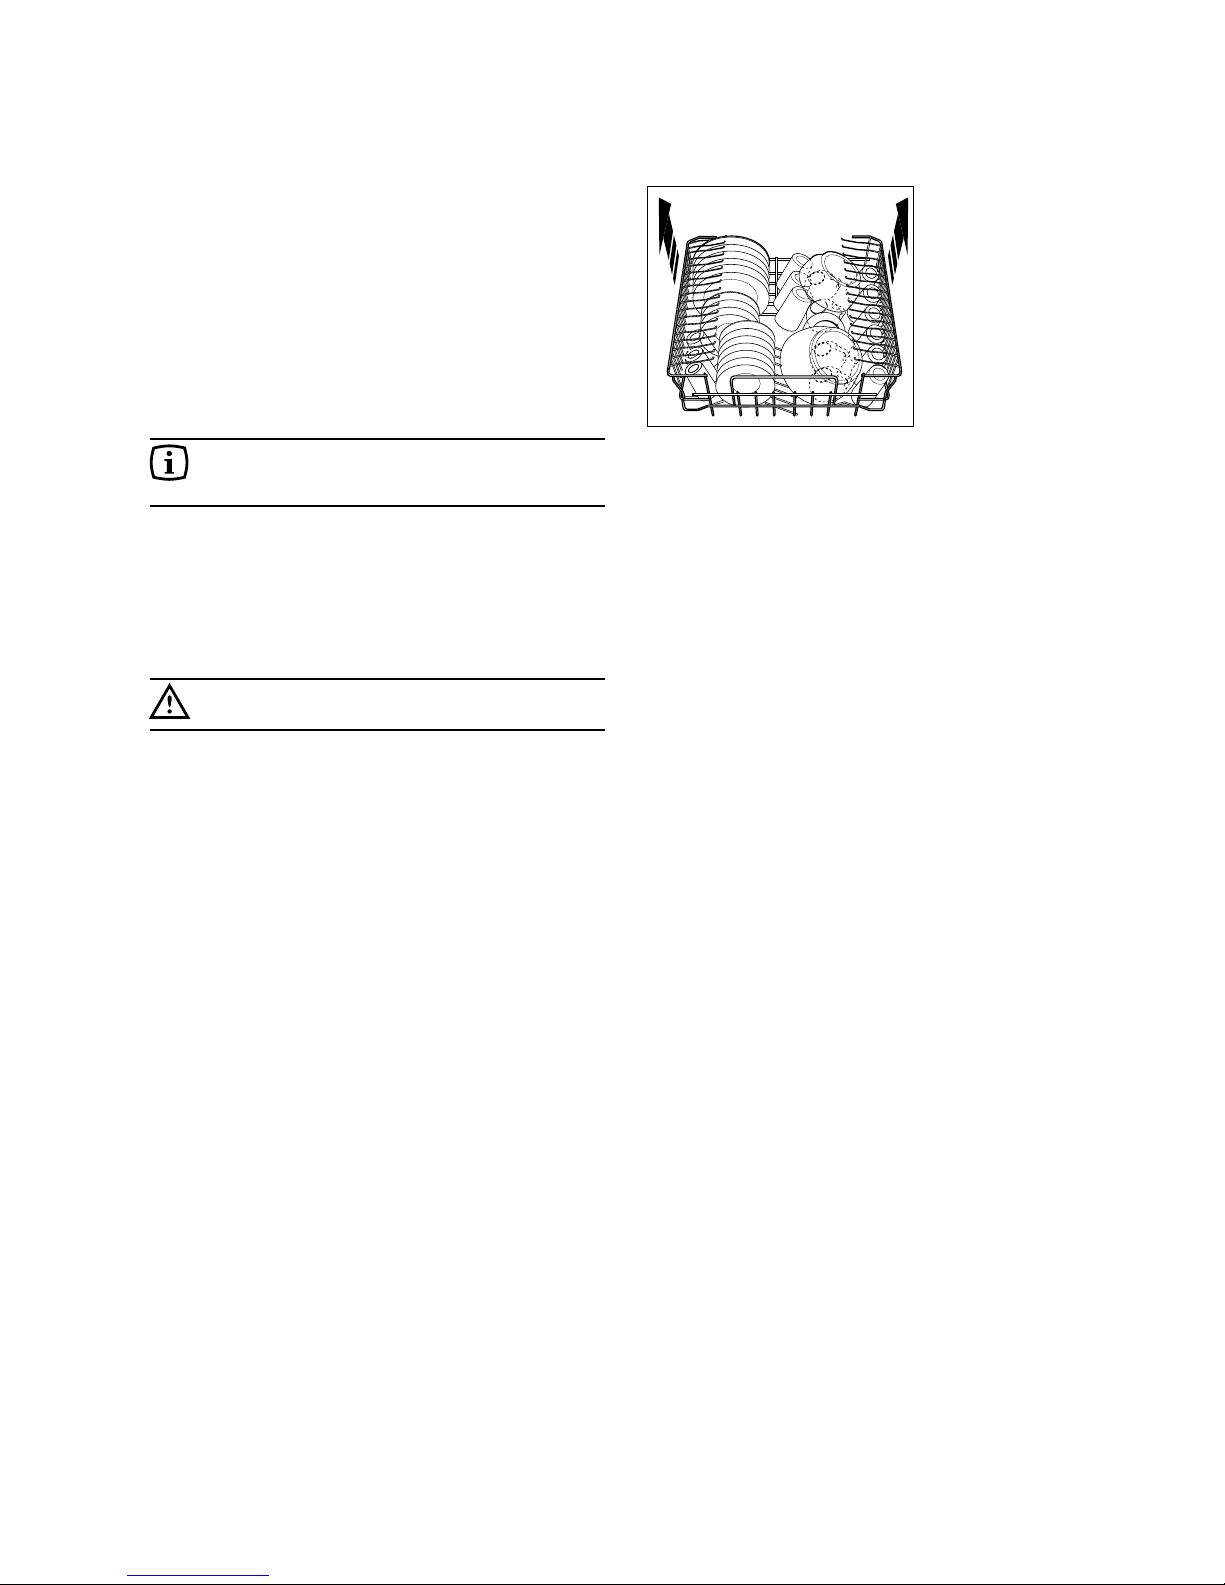
3. Load the dishes
Remove any scraps of food.
Pull the lower basket out and arran e the
saucepans, plates and cutlery in it.
Pull the upper basket out and arran e the plates,
saucers, lasses and cups etc. in it.
Slide the baskets back into the machine.
. Ensure that the spray arms can
rotate freely
5. Measure out detergent
Add the deter ent into the dispenser accordin to
the dosa e quantity iven in the "Washin
pro rammes" chart.
Close the deter ent dispenser lid.
6. Close the dishwasher door
7. Set the programme
Push the pro ramme selector dial to make it pop
out.
Turn the pro ramme selector dial clockwise until
the letter of the pro ramme you wish to select
corresponds with the pro ramme marker on the
control panel.
If necessary select the temperature of the main
wash (or a half load pro ramme) accordin to the
instructions in the "Washin pro rammes" chart
(see "Required push buttons").
8. Start the programme
Depress the On/Off push button.
The On/Off indicator li ht will come on and the
machine will start.
If you wish to interrupt the washin pro ramme at
any time press this button a ain.
9. At the end of the washing
programme
At the end of the pro ramme the dishwasher will
automatically stop.
The On/Off indicator li ht remains on until the On/Off
push button is depressed.
10. Switch off the dishwasher
Switch off the dishwasher by pressin the On/Off
push button.
Wait 15/20 minutes before opening the
dishwasher’s door; in this way you will avoid
burnin yourself when removin the dishes and
avoid also the dama e of the nearby furniture
caused by the escape of steam.
Empty the lower basket first and then the upper one;
this will avoid water drippin from the upper basket
onto the dishes in the lower one.
When the washing programme has finished, it
is recommended that the dishwasher is
unplugged and the water tap turned off.
In general it is not advisable to open the door
while the machine is working; if the door is
opened however, a safety device ensures that
the machine stops.
Important!
Care must be taken if the door is opened during
the hot phase or immediately after a
programme has finished, as steam may escape.
Operating sequence
18
Loading your appliance
Before placin dishes in the machine, remove any scraps of
food, to avoid clo in the filters and consequently reducin
the performance.
Do not load very small items which can fall
through the baskets.
The lower basket
The lower basket is desi ned to take saucepans, lids,
plates, salad bowls, cutlery etc.
Lar e dishes and lids should be arran ed around the ed e
of the basket, ensurin that the upper spray arm can turn
freely.
The two rear rows of pron s on the lower basket can be
easily lowered to allow you to load pots, pans and bowls.
To lower the prongs:
- Sli htly pull them upwards and let them drop down (see
picture).
- To brin them back to the standin position, just pull them
up a ain.
Using your appliance
UI48
UI21
UI85
UI18
19
The cutlery basket
Long bladed knives stored in an upright position
are a potential hazard.
These items should only be placed in the
removable knife basket.
Take care when loading or unloading sharp items
such as knives.
Removable knife basket
Lon and/or sharp items of cutlery such as carvin knives
must be placed horizontally in the removable knife basket,
which is positioned at the rear of the upper basket.
Cutlery should be placed in the removable cutlery basket
with the handles facin downwards.
If the handles protrude from the bottom of the basket,
obstructin the lower spray arm, load the cutlery with the
handles facin upwards.
Mix spoons with other cutlery to prevent them from stickin
to ether.
Silver cutlery tends to o black if mixed with steel cutlery.
Place it in the cutlery basket separate from the others.
For best results we recommend you to use the cutlery rids
provided (if the size and dimensions of cutlery allow it).
The cutlery basket is in two parts which can be separated to
ive reater loadin flexibility. To separate the two parts,
slide them horizontally in opposite directions and pull them
apart.
To reassemble, reverse the procedure.
The upper basket
The upper basket is desi ned for plates (dessert plates,
saucers, dinner plates of up to 25 cm in diameter), salad
bowls, cups and lasses.
Arran e items on and underneath the fold-down cup racks
so that water can reach all surfaces.
Li ht items (plastic bowls etc.) should be loaded in the upper
basket and arran ed so they do not move.
In case that plates are loaded in the upper
basket:
load them starting from the rear posiitons of the basket;
tilting them slightly for ards and avoiding the front positions
near the door.
Before closing the door, ensure that the
spray arms can rotate freely.
UI62
UI63
UI53
US47
US71
20
Adjusting the height of the upper
basket
If washin very lar e plates (over 27 cm and up to 32 cm in
diameter) you can load them in the lower basket after
movin the upper basket to the hi her position.
Attention!
Never lift or lo er the basket on one side only.
To move to the higher position proceed as follows:
1. Pull out the basket until it stops.
2. Carefully lift both sides upwards until the mechanism is
en a ed and the basket is stable.
When the top basket is in the higher position it
will only take plates up to 20 cm in diameter and
you will not be able to use the raised cup racks.
To lower the basket to the original position proceed as
follows:
1. Pull out the basket until it stops.
2. Carefully lift both sides upwards and then allow the
mechanism to drop back down slowly, keepin hold of it.
After loading your machine always close the
door, as an open door can be a hazard.
RC04
Before startin any test it is necessary to fill completely with salt the salt container and with rinse aid the rinse aid
dispenser.
Hints for test centres
Test standard: EN 50242
Reference pro ramme: Bio 50°C with prewash
Load: 12 standard place settin s
Rinse aid selector: position 5
Deter ent dosa e: 25 in the dispenser
5 on the dispenser lid
21
Dimensions Width 60 cm
Hei ht with worktop 85 cm
Hei ht without worktop 82 cm
Max depth 60 cm
Max depth with open door 115.2 cm
Electrical connection Volta e 230 V - 50 Hz
Motor ratin durin wash 200 W
Power of heatin element 2100 W
Overall power 2300 W
Water supply pressure Minimum 50 kPa (0.5 bar)
Maximum 800 kPa (8 bar)
Water supply connection Water cold/hot max. 60°C
Capacity 12 place settin s
Technical specifications
Arran ement upper basket
Arran ement cutlery basket
Arran ement lower basket
22
Fitting under a counter
(kitchen worktop or sink)
By removin the machine’s worktop, you can install it under
a close fittin sink unit or a pre-existin top, providin the
dimensions of the recess correspond to those shown in the
picture.
Proceed as follows:
- Remove the machine’s worktop by unscrewin the
two rear retainin screws, pull from the front and
slide out the rear slots, liftin the worktop.
Insert the machine after adjustin hei ht and levellin with
the adjustable feet. When insertin the machine, ensure that
the water inlet and drain hoses are not kinked or squashed.
Levelling
Good levellin is essential for correct closure and sealin of
the door.
When the appliance is correctly levelled, the door will not
catch on the levellin spacers on either side of the cabinet.
If the door does not close correctly, loosen or ti hten the
adjustable feet until the machine is perfectly level.
Protection against flooding
In order to prevent water floods, the machine has been
provided with two additional devices, havin the followin
characteristics:
1. In the water inlet hose:
the device comes into operation as a result of any
dama e to the water inlet hose and stops the water
inflow. It functions even with the machine off.
To repair the machine call the Service Centre.
The water supply hose is fitted with a safety device,
which prevents water from enterin the machine should
the inner hose split, due to wear.
The problem is si nalled by a red indicator which
appears in the window (B - ➀ ➁).
If this happens, close the water tap and have the hose
replaced.
The retainin rin (A - ➀➁) must be properly fitted so as
to avoid water leaks.
Note:
Only for water supply hoses with Lock-fast safety device
to prevent inadvertent loosenin .
To detach the hose press yellow lever (C - ➁) and turn
the retainin rin anticlockwise ➁.
2. In the bottom of the machine:
the device comes into operation as a result of any water
leaks in the machine and it functions only with the
machine on.
In case of malfunction, turn off the water tap and call the
Service Centre.
820
570 - 600
600
IN05
B
A
B
AC
CA13
12
152976 29/0
From the Electrolux Group. The world’s No.1 choice.
The Electrolux Group is the world’s largest producer of powered appliances for kitchen,
cleaning and outdoor use. More than 55 million Electrolux Group products (such as
refrigerators, cookers, vacuum cleaners, chain saws and lawn mowers) are sold each year
to a value of approx. 14 billion USD in more than 150 countries around the world.
0 08/01

Other Zanussi Dishwasher manuals

Zanussi DS 16 TCR Assembly instructions

Zanussi

Zanussi DS 16 TCR Assembly instructions

Zanussi DS 20 TCR/A Assembly instructions

Zanussi

Zanussi DS 20 TCR/A Assembly instructions

Zanussi DW 65 TCR Operating and safety instructions

Zanussi

Zanussi DW 65 TCR Operating and safety instructions

Zanussi ZDF4014WA User manual

Zanussi

Zanussi ZDF4014WA User manual

Zanussi ZDT26001FA User manual

Zanussi

Zanussi ZDT26001FA User manual

Zanussi ZDF2030 User manual

Zanussi

Zanussi ZDF2030 User manual

Zanussi DS 22 User manual

Zanussi

Zanussi DS 22 User manual

Zanussi ZDLN2621 User manual

Zanussi

Zanussi ZDLN2621 User manual

Zanussi Z 80 Quick reference guide

Zanussi

Zanussi Z 80 Quick reference guide

Zanussi DW 914 User manual

Zanussi

Zanussi DW 914 User manual

Zanussi ZDF22002XA User manual

Zanussi

Zanussi ZDF22002XA User manual

Zanussi Z 30 User manual

Zanussi

Zanussi Z 30 User manual

Zanussi ZDF26011XA User manual

Zanussi

Zanussi ZDF26011XA User manual

Zanussi ZDF3013 User manual

Zanussi

Zanussi ZDF3013 User manual

Zanussi Z50 Assembly instructions

Zanussi

Zanussi Z50 Assembly instructions

Zanussi ZDC 5465 User manual

Zanussi

Zanussi ZDC 5465 User manual

Zanussi DE 6755 User manual

Zanussi

Zanussi DE 6755 User manual

Zanussi DW 906 User manual

Zanussi

Zanussi DW 906 User manual

Zanussi ZDF204 User manual

Zanussi

Zanussi ZDF204 User manual

Zanussi ZDF3023S User manual

Zanussi

Zanussi ZDF3023S User manual

Zanussi DW 907 User manual

Zanussi

Zanussi DW 907 User manual

Zanussi ZDF26020WA User manual

Zanussi

Zanussi ZDF26020WA User manual

Zanussi DS30 User manual

Zanussi

Zanussi DS30 User manual

Zanussi ZDSN653X2 User manual

Zanussi

Zanussi ZDSN653X2 User manual

Popular Dishwasher manuals by other brands

Miele G 1202 SC operating instructions

Miele

Miele G 1202 SC operating instructions

Indesit D2I HD526 UK quick guide

Indesit

Indesit D2I HD526 UK quick guide

Whirlpool WDFS3R4NWESG installation guide

Whirlpool

Whirlpool WDFS3R4NWESG installation guide

GE GSD3400 series owner's manual

GE

GE GSD3400 series owner's manual

Bosch SMU4HTS31E user manual

Bosch

Bosch SMU4HTS31E user manual

Fisher & Paykel DOUBLE DISHDRAWER DD24DDFT9 installation guide

Fisher & Paykel

Fisher & Paykel DOUBLE DISHDRAWER DD24DDFT9 installation guide

Omniwash ST series instruction manual

Omniwash

Omniwash ST series instruction manual

Kuppersbusch EDW 1503 Service manual

Kuppersbusch

Kuppersbusch EDW 1503 Service manual

Samsung DW80R7061US installation manual

Samsung

Samsung DW80R7061US installation manual

Fisher & Paykel DishDrawer DD603 PREFINISHED user guide

Fisher & Paykel

Fisher & Paykel DishDrawer DD603 PREFINISHED user guide

Bauknecht GCI 826 operating instructions

Bauknecht

Bauknecht GCI 826 operating instructions

Whirlpool DU018DWTB - 35" Height 5 Cycle Built Energy guide

Whirlpool

Whirlpool DU018DWTB - 35" Height 5 Cycle Built Energy guide

Amica ZIG 445C quick start guide

Amica

Amica ZIG 445C quick start guide

Whirlpool DU850SWPB0 parts list

Whirlpool

Whirlpool DU850SWPB0 parts list

Siemens IQ300 SE23HI60AG Quick reference guide

Siemens

Siemens IQ300 SE23HI60AG Quick reference guide

Maytag Dishwasher user manual

Maytag

Maytag Dishwasher user manual

Estate TUD6900PQ0 Use & care guide

Estate

Estate TUD6900PQ0 Use & care guide

Electrolux Green&Clean 504228 Specifications

Electrolux

Electrolux Green&Clean 504228 Specifications

manuals.online logo
manuals.online logoBrands
  • About & Mission
  • Contact us
  • Privacy Policy
  • Terms and Conditions

Copyright 2025 Manuals.Online. All Rights Reserved.