V1.2 - last updated 01/07/2006 – © Copyright 2006 C.Day – all rights reserved.
OPERATION
The transceiver can operate in VFO, MR or Channel mode. VFO allows you to directly enter in the frequency you wish to use via the keypad. In channel
mode, up to 99 pre-programmed channels can be selected, only the channel number is displayed. In MR mode, both the channel number and frequency
are displayed. To switch between VFO and Channel modes, turn the transceiver off, hold down Fand turn the transceiver on. If CH-xx (where xx is a
number between 01 & 99) is displayed, it is in channel mode, otherwise it is in frequency mode. MR mode is selected by first entering VFO mode and
then pressing VFO. If at least one channel has been programmed, the channel number will be displayed to the left of the frequency. Various operating
parameters can be set in various modes as per the following table.
Mode
VFO MR CH To adjust or set.. press then
press and then press
or
to select these options..
Squelch F 1 0 (off), 1(min) to 9(max)
TX Power F 2 Lo (1W), Hi (4W)
Scan F 3 to scan down orto scan up
Backlight F 4 Auto, off, on
Key beep F 5 On, off
Key Lock F 6 Manual, auto. You can also press and hold
for 2 seconds to cycle
between locked & unlocked.
Maximum Transmit Time F 7 Off, 10, 20, 30, 40, 50, 60, 70, 80 or 90 (seconds)
Frequency Offset Amount F 8 Key in the desired offset (00.000~99.995 MHz)
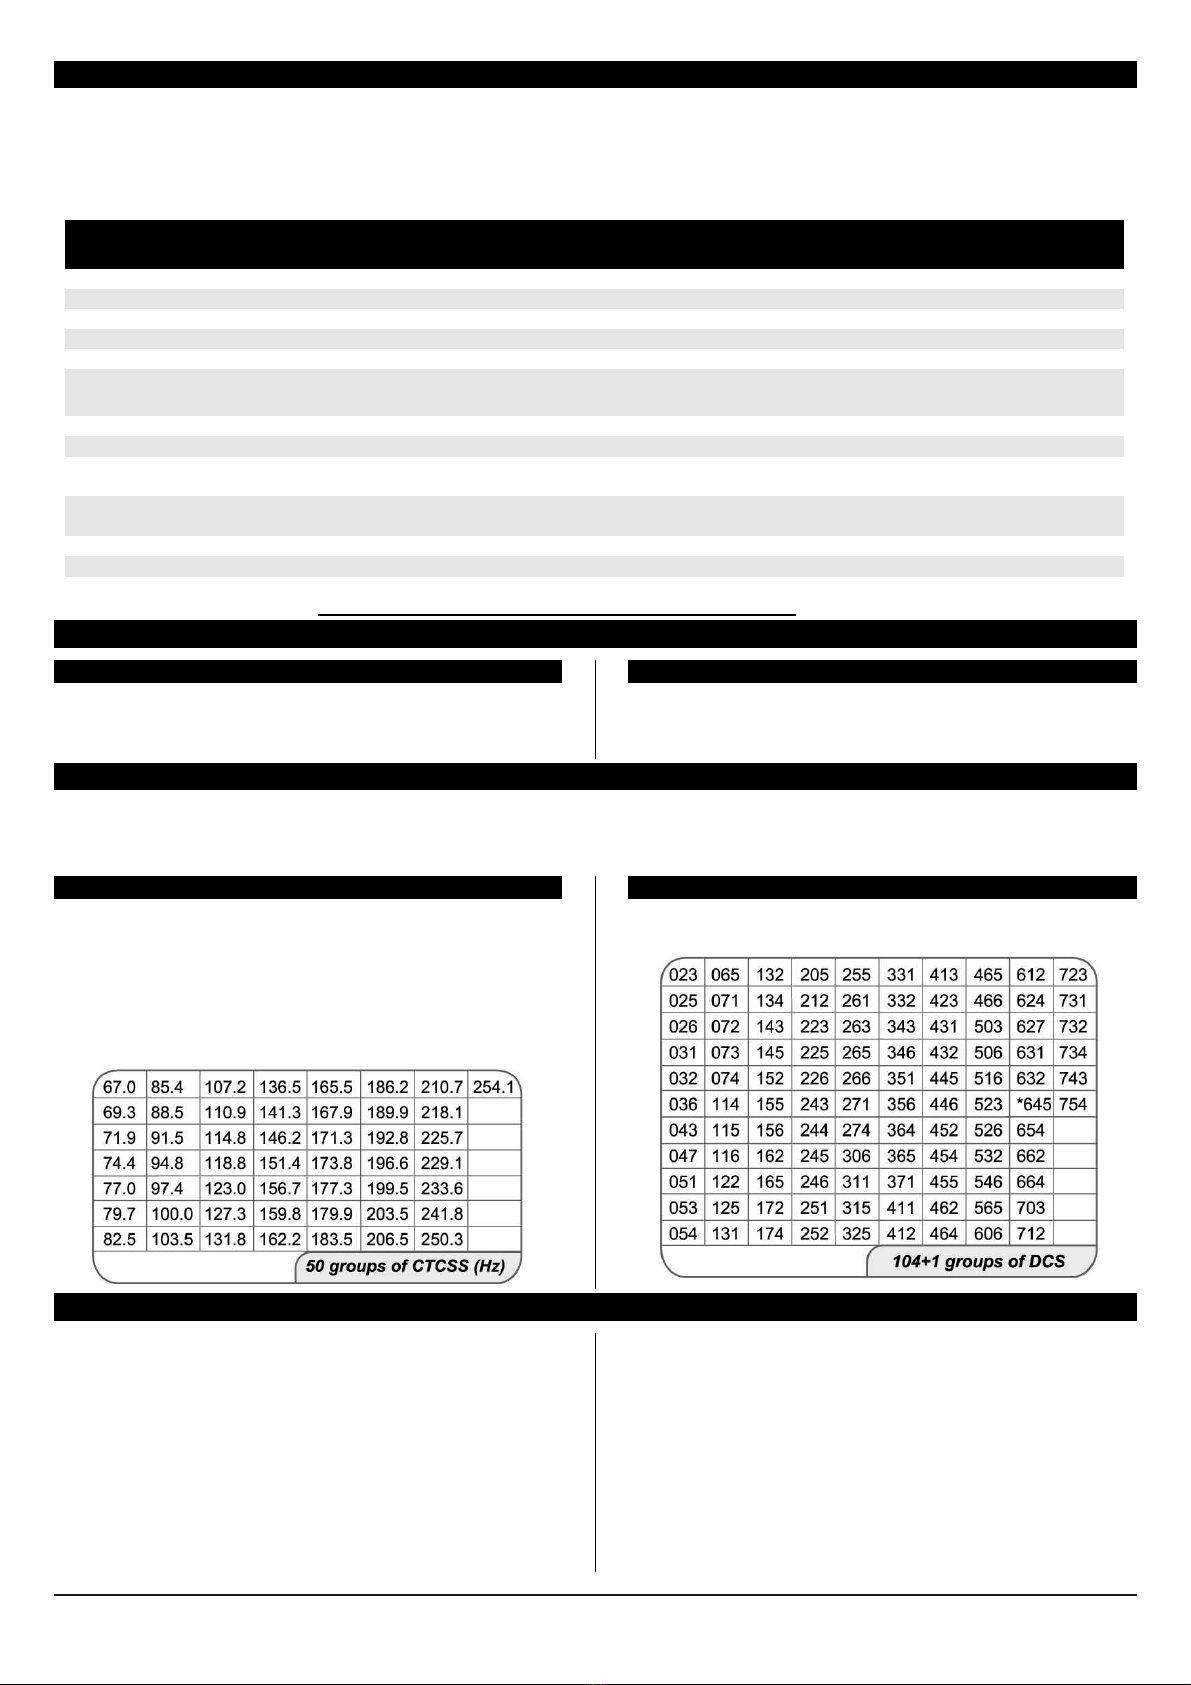
Receive DCS or CTCSS F 9 OFF, CTCSS tone or DCS code (as per forward tables). Pressing F
again cycles between CTCSS or DCS.
Transmit DCS or CTCSS F 0 OFF, CTCSS tone or DCS code (as per forward tables). Pressing F
again cycles between CTCSS or DCS.
Frequency Step F
5.0KHz, 6.25KHz, 10.0KHz, 12.5KHz, 25.0KHz
Frequency Offset F REV S (simplex), +(TX above RX) or –(TX below RX)
Ensure you are in the correct mode, press F, select the indicated key for the function you wish to change, use the or key to change the option (or as
otherwise indicated above) and then press the PTT button to save the option you have just changed.
MEMORY CHANNELS
Adding a channel
•In VFO mode, set up the desired frequency you wish to store
including any CTCSS/DCS tone or code & frequency offset.
•Press Ffollowed by VFO. Then press orto select the desired
channel number. Press PTT to store it.
Deleting a channel
•In MR mode, select the desired channel you wish to delete.
•Turn off the transceiver, hold down VFO and turn on. The display
will show DELxx? Press VFO to confirm delete or any other key
to exit this mode.
CTCSS & DCS
This transceiver is compatible with systems using Continuous Tone Control Squelch (CTCSS) and Digital Coded Squelch (DCS) systems. You can code
each frequency with a specific CTCSS or DCS tone. When enabled and your transceiver receives multiple signals, you will only hear the transmission
with the correct CTCSS or DCS tone you have programmed. If you do not receive the correct tone with the signal, the transceivers squelch remains
"closed" and you hear nothing. The systems are also used with some radio repeater systems.
CTCSS (Continuous Tone Coded Squelch System)
Also known by a number of different trade names such as Private
Line® (PL) by Motorola, Channel Guard® (CG) by General Electric
and generically as Tone Squelch. The system uses sub-audible tones
that are transmitted along with the speech portion of the transmission
to allows more than one agency (or fleet) to use the same radio
frequency without causing undue interference to another agency on
the same frequency. Receivers for agency “A” are set to only open
their audio squelch when the proper sub-audible frequency tone is part
of the transmission.
DCS (Digital Code Squelch
)
This is similar to CTCSS but uses a slow speed binary data stream
passed as sub-audible data along with the transmission. Motorola calls
this Digital Private Line® (DPL).
SPECIFICATIONS
Frequency Coverage: 136.000MHz – 173.995MHz
Frequency Step: 5KHz, 6.25KHz, 10KHz, 12.5KHz, 25KHz
Programmable Channels: 99
TX/RX Split: User programmable from 00.000 to 99.995MHz
Emission Type: F3E (FM)
Antenna Connector: SMA
Antenna Impedance: 50 Ohms
Other Connectors: Speaker, Microphone
Standby Current: 10mA
Approximate Standby Time: 100 hours.
Supply Voltage: 6.0V
Battery: 6.0V 1200mAh Ni-MH
Charger: Drop-in. Requires 12~16V at least 100mA
Receiver Type: Dual conversion superhetrodyne
Receiver Sensitivity (12dB SINAD): 0.16V
Adjacent Channel Selectivity: 70db
Audio Output: 0.5W
Audio Distortion: 5%
Transmit Power: 1W low / 4W high
Frequency Stability: ±2.5PPM
Modulation Type: Variable reactance
Deviation (Max.): ±5KHz
NZ Supplier Code: Z726
Weight: Approx. 250g
Size (WxHxD): 56x106x32
Country of Manufacture: China
Specifications subject to change without notice or obligation.


