Zenit Powertools CD-14 M PROFI Li-ion User manual

InstructIon manual
corDlEss DrIll
cD-14 m ProFI lI-Ion
SEMI-PROFI SERIES


3
General safety precautions
WARNING! When using electric
tools, basic safety precautions should
always be followed to reduce the risk of
re, electric shock and personal injury,
including the following.
Read all these instructions before operating
this product and save these instructions.
For safe operations:
1. Keep work area clean. Cluttered areas
and benches invite injuries.
2. Consider work area environment. Do
not expose power tools to rain. Do not
use power tools in damp or wet locations.
Keep work area well lit. Do not use power
tools where there is risk to cause re or
explosion.
3. Guard against electric shock. Avoid
body contact with earthed or grounded
surfaces. (e.g. pipes, radiators, ranges,
refrigerators).
4. Keep children and inrm persons
away. Do not let visitors touch the tool or
extension cord. All visitors should be kept
away from work area.
5. Store idle tools. When not in use, tools
should be stored in a dry, high or locked
up place, out of reach of children and
inrm persons.
6. Do not force the tool. It will do the job
better and safer at the rate for which it was
intended.
7. Use the right tool. Do not force small
tools or attachments to do the job of a
heavy duty tool. Do not use tools for
purposes not intended.
8. Dress properly. Do not wear loose
clothing or jewelry; they can be caught in
moving parts. Rubber gloves and non-skid
footwear are recommended when working
outdoors. Wear protecting hair covering to
contain long hair.
9. Use eye protection. Also use face or dust
mask if the cutting operation is dusty.
10. Connect dust extraction equipment. If
devices are provided for the connection
of dust extraction and collection facilities
ensure these are connected and properly
used.
11. Do not abuse the cord. Never carry the
tool by the cord or yank it to disconnect it
from the receptacle. Keep the cord away
from heat, oil and sharp edges.
12. Secure work. Use clamps or a vise to
hold the work. It is safer than using your
hand and it frees both hands to operate
tool.
13. Do not overreach. Keep proper footing
and balance at all times.
14. Maintain tools with care. Keep cutting
tools sharp and clean for better and safer
performance. Follow instructions for
lubrication and changing accessories.
Inspect tool cords periodically and if
damaged, have it repaired by authorized
service center. Inspect extension cords
periodically and replace, if damaged.
Keep handles dry, clean, and free from oil
and grease.
15. Disconnect battery charger. When not
in use, before servicing and inspection.
16. Disconnect tool. When not in use,
before servicing and before changing the
accessories.
17. Remove adjusting keys and wrenches.
Form the habit of checking to see that keys
and adjusting wrenches are removed from
the tool before turning it on.
18. Avoid unintentional starting. Do not
carry a plugged in tool with a nger on
the switch. Ensure switch is off when
plugging in.
19. Use outdoor extension leads. When
tool is used outdoors, use only extension

4
cords intended for outdoor use.
20. Stay alert. Watch what you are doing.
Use common sense. Do not operate tool
when you are tired.
21. To avoid possible danger always use
battery charger, specied for this model.
22. When power cord of battery
charger is damaged, have it replaced by
authorized service center. Repair should
be performed only by specialists of
authorized service center. Manufacturer
doesn’t bear responsibility for any failures
or damage resulting from improper use or
unauthorized repair.
23. Do not charge at voltage higher than
indicated on the nameplate.
24. Always charge batteries before use.
25. Never use inappropriate batteries. Do
not connect ordinary dry battery, battery
pack different from designated battery,
or automobile battery to power tool. Do
not use any transformers with additional
devices and rectiers. Do not charge
battery from electric generator or DC
power source. Never charge outdoors.
Keep the battery away from direct sunlight
and use only where there is low humidity
and good ventilation.
26. Check damaged parts. Before further
use of the tool, a guard or other part that
is damaged should be carefully checked to
determine that it will operate properly and
perform its intended function. Check for
alignment of moving parts, free running
of moving parts, breakage of parts,
mounting and any other conditions that
may affect its operation. A guard or other
part that is damaged should be properly
repaired or replaced by an authorized
service center unless otherwise indicated
in this instruction manual. Have defective
switches replaced by an authorized service
center. Do not use the tool if the switch
does not turn it on and off.
27. Warning Use only accessories
or attachments recommended in this
instruction manual or in the catalogue of
ZENIT ТМ.
28. Have your tool repaired by a qualied
person. This electric tool is in accordance
with the relevant safety requirements.
Repairs should only be carried out by
qualied persons using original ZENIT
TM spare parts. Otherwise this may result
in considerable danger to the user.
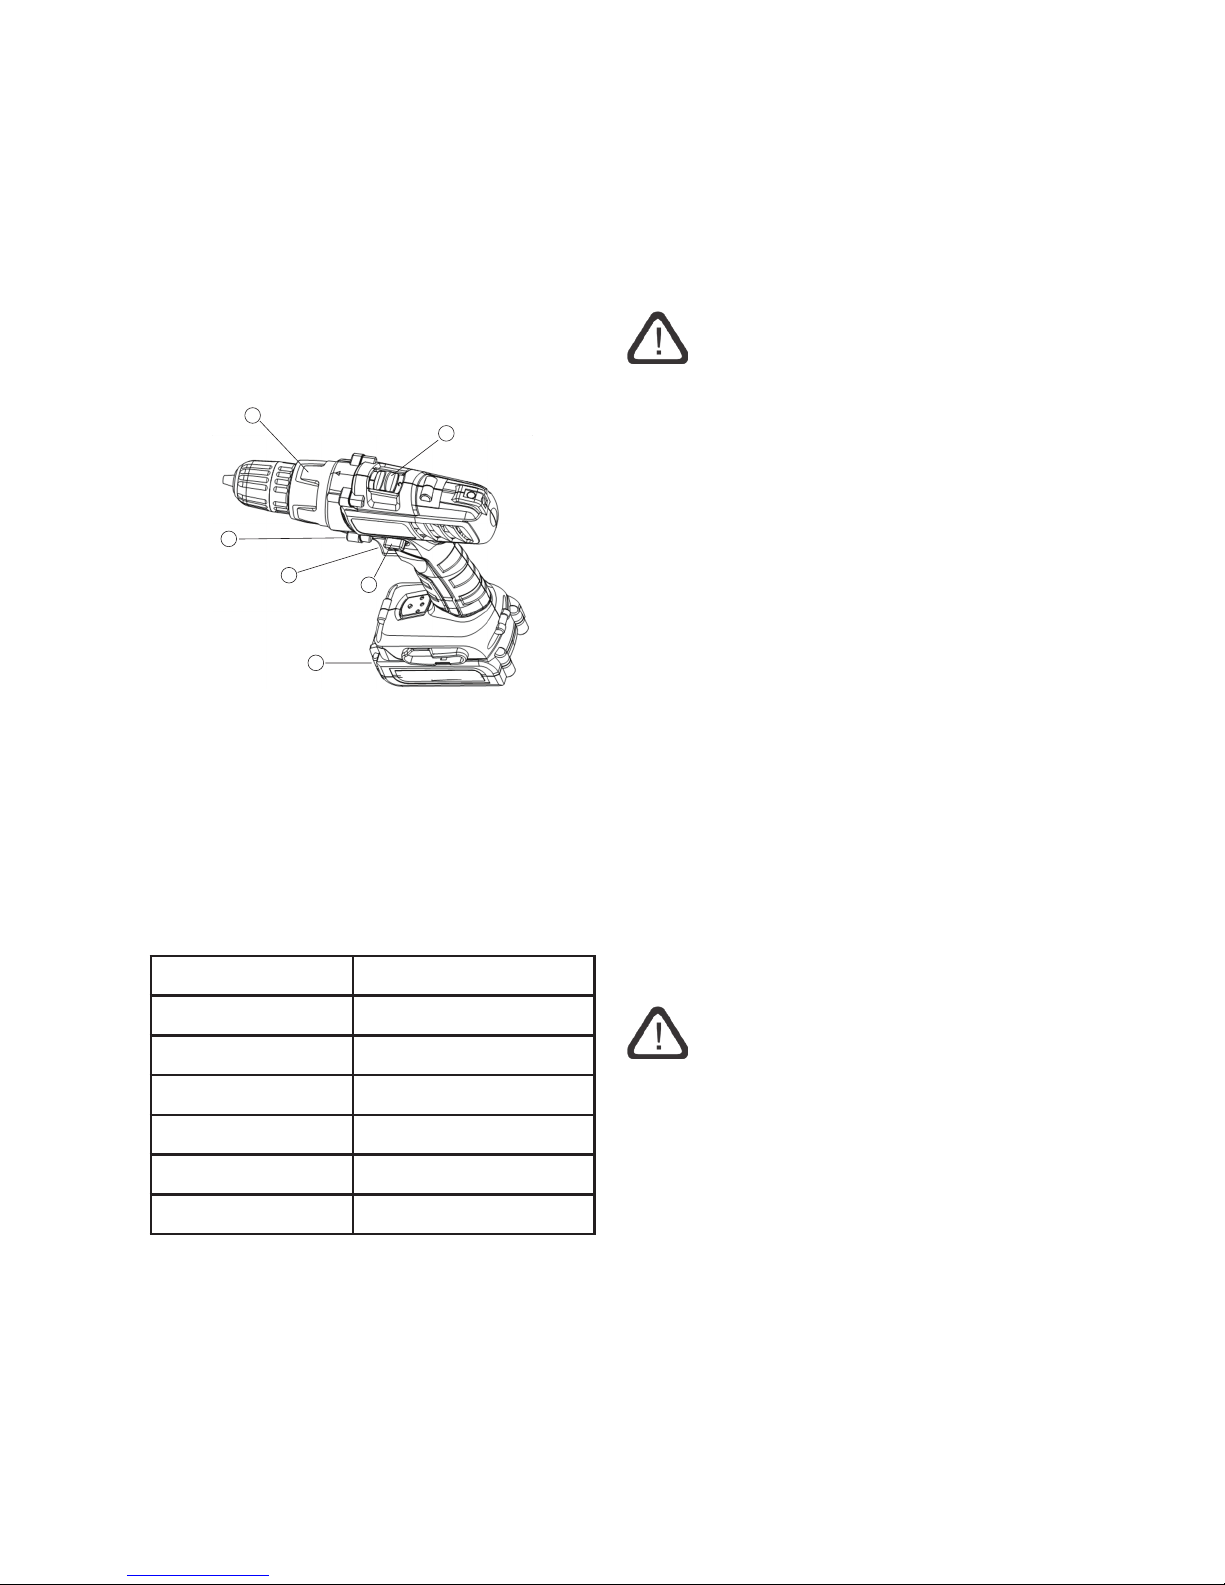
safety precautions on usinG
cordless drill
1. Always charge under temperature 5°C-
40°C. Temperature below 5°C may lead to
overcharge, which is dangerous. Battery
cannot be charged at temperature above
40°C. The most favorable temperature for
charging is 20°C-25°C.
2. Once the charging has been completed,
give 15 minutes rest until the next
charging. Never charge more than two
batteries in a row.
3. Never insert foreign objects into the
hole for the battery or the battery charger.
4. Never disassemble the battery and
battery charger.
5. Never short-circuit the battery. Battery
short circuit may result in the risk of re.
6. Never incinerate the battery. The battery
can explode.
7. Before drilling into walls, ceilings or
oors, ensure that there are no concealed
power cables inside.
8. In case after charging battery life
becomes too short for practical use, take
exhausted batteries to the shop, where
they were purchased, for disposal. Do not
dispose of the exhausted batteries. Using
exhausted battery may lead to battery
charger damage.

5
9. Never insert any objects into the battery
charger’s air vents. Electric shock or
damage to the battery charger may result.
10. When inserting the bit into the keyless
chuck, tighten the sleeve. If the sleeve is
not tightened, the bit may fall and cause
bodily injury.
description
1
5
4
3
2
6
1. Clutch dial
2. On\Off switch
3. Battery
4. Direction selector
5. Shift knob
6. Diode light
technical specifications
Model CD-14 M pro li-ion
Voltage 14,4 V
Battery capacity 1500 mAh
Charging time 1 hour
Speed 0-400/0-1200 rpm
Chuck size 10 mm
Maximum torque 22.0 Nm
applications
Drilling of bricks, screwing and
unscrewing of screws and bolts. Drilling
of various metals and wood.
Battery installation and
removal
1. How to remove the battery
Hold the handle rmly and press the
battery letch for the battery removal.
CAUTION
Never short-circuit the battery.
2. How to install the battery
Install the battery, observing the polarity.
charGinG method
NOTE
After making the purchase you get a
discharge battery. Recharge it before
the rst use. Make sure the voltage on
the charger matches the voltage on the
battery.
Battery charger is designed for Li-ion
batteries only. Do not use other charging
devices.
Li-ion battery doesn’t have a memory
effect and is protected from voltage lose.
CAUTION
Do not switch on the cordless drill if the
battery is discharged.
Do not exhaust the battery completely.
Before using the cordless drill charge the
battery.
1. Connect the charger’s power cord into
a receptacle. When the power cord is
connected, the charger’s pilot lamp will
blink in red. (At 1-second intervals).
2. Insert the battery into the charger. Firmly
insert the battery into the charger until the
line is visible and check the polarity.

6
CAUTION
If the battery is installed incorrectly, not
only the battery will not charge, but also
the battery charger may malfunction, for
example, compression terminals may
become deformed.
3. Charging. When the battery is connected
to the battery charger, charging will
commence and the pilot lamp will light
in red. When the battery is fully charged,
the green and red pilot lamps will light
simultaneously.
NOTE
Charging time may be longer depending
on the surrounding temperature and
battery conditions.
4. Unplug charger from receptacle.
5. Hold the charger rmly and remove the
battery.
How to make batteries perform longer.
1. Recharge the batteries before they
become completely exhausted. When you
feel that the power of the tool becomes
weaker, stop using the tool and recharge
its battery. If you continue to use the
tool and exhaust the electric current, the
battery may be damaged and its life will
become shorter.
2. Avoid recharging at high temperatures.
A rechargeable battery will be hot
immediately after use, its internal chemical
substance will deteriorate, and the battery
life will be shortened. Leave the battery
and recharge it after it has cooled for a
while.
CAUTION
If the battery is recharged when it is warm
due to battery use of exposure to sunlight,
the pilot lamp may light in green. In such a
case, let the battery cool before charging.
When the pilot lamp ickers rapidly in red,
check and take out any foreign objects in
the charger’s battery installation hole. If
there any foreign objects, it is probable that
the battery or charger is malfunctioning.
Take it to the authorized service center.
NOTE
Optimum temperature for use and storage
of the Li-ion battery is 5°C – 40°C. Regular
battery charging after a long period of use
and long period of storage will make the
battery to perform longer.
prior to operation
1. Check the area to make sure that it is
clear of debris and clutter.
Check whether working conditions meet
the safety measure.
2.Tightening torque adjustment
• Tightening torque should correspond in
its intensity to the screw diameter. When
too strong power is used, the screw head
may be broken or be injured. Be sure to
adjust the clutch dial position according to
the screw diameter.
• Tightening torque indication. The
tightening torque differs depending on
the type of screw and the material being
tightened. The unit indicates the tightening
torque with the numbers “1,4,7…16”
on the clutch dial, and black dots. The
tightening torque at position “1” is the
weakest and the torque is the strongest at
the highest number.
• Adjusting the tightening torque. Rotate
the clutch and line up the numbers
“1,4,7…16” on the clutch dial, or the dot,
with the triangle mark on the outer body.
Adjust the clutch dial in the weak or the
strongest torque direction according to the

7
correctly.
5.Check the rotational direction
The bit rotates clockwise (viewed from
the rear side) by pushing the R-side of
the selector button. The L-side of the
selector button is pushed to turn the bit
counterclockwise.
CAUTION
When using the cordless drill follow these
rules:
• continuous use of the drill should not
exceed 15 minutes;
• do not allow mechanical damage (strikes,
falls etc.);
• protect the drill from external sources of
heat and chemically active substances, as
well as liquid and objects penetration;
• before disconnecting the tool from the
power source turn off the On/Off switch;
•check the engine temperature, do not
allow overheating;
•change the rotation direction only after
switching off the tool and complete stop
of rotating parts.
Inobservance of these rules will make
warranty void!
WARNING
Repair, modication and check of ZENIT
power tools should be performed only in
authorized service centers ZENIT. While
use or maintenance of power tools follow
all safety rules and standards.
NOTE
Zenit Power Tools are constantly being
improved and modied to incorporate the
latest technological advancements.
Accordingly, some parts may be changed
without prior notice.
torque you need.
CAUTION
Ratchet sound of the clutch dial for a long
period of time may cause screw breakage
due to excessive tightening.
3. Mounting and dismounting of the bit
• Mounting the bit
Loosen the sleeve by turning it toward the
left (in the counterclockwise direction as
viewed from the front) to open the clip on
the keyless chuck. After inserting a driver
bit, etc., into the keyless drill chuck, and
tighten the sleeve by turning it toward the
right (in the clockwise direction as viewed
from the front).
If the sleeve becomes loose during
operation, tighten it further.
The tightening force becomes stronger
when the sleeve is tightened.
• Dismounting the bit. Loosen the sleeve
by turning it toward the left (in the
counterclockwise direction as viewed
from the front), and then take out the bit
etc.
NOTE
If the sleeve is tightened in a state where
the clip of the keyless chuck is opened
to a maximum limit, a click noise may
occur. This is the noise that occurs when
the loosening of the keyless chuck is
prevented and is not a malfunction.
CAUTION
When it is no longer possible to loosen
the sleeve, use a vise or similar instrument
to secure the bit. Set the clutch mode
between 1 and 7 and then turn the sleeve
to the loose side (left side).
4.Conrm that the battery is mounted

Demix LLC
Head ofce:
14, Shevchenko str., 3rd oor
Dnepropetrovsk, Ukraine, 49044
tel./fax: +38 056 375-43-16
http://www.en.zenit-pro.com
Table of contents
Other Zenit Powertools Drill manuals