Zenza Bronica S2 User manual

2);"x Zh' (6cmX 6cm) Single-lens reflex Ccrrnero
FEATURES
sf the BR@NICr-Sz
www.orphancameras.com

SPECIAL
FEATURES
OF THEZENZABRONICA
MODEL-52 CAMERA
The Zenza Bronica S-2 is the ultimate single lens 6X6 reflex camera, designedto add improvements
1T
the S type and C type. This new camera accepts both standard l20 size film andthe new 22Q size tilm,
The noted Nikkor lensesare equippedwith instant return automatic diaphragms. A full line of accessories
is availablefor this camera.The ZenzaBronica S2 is a supreme
camera
both in name
andrealitv.
IInstant Return Automatic Mirror:
The reflex mirror of Bronica Model S 2 is an ex-
clusive and original mechanism. It is very
dif ferent from that of other single I ens ref I
ex
cameras. Usually mirrors move upward, but the
Bronica instant return automatic mirror moves
forward and down. After the exposure, it instantly
and automatically returns to viewing position.
Thus, it is possible to use wide-angle and large
caliber lenses, and a bright image remains on the
ground glass except while the shutter is in motion.
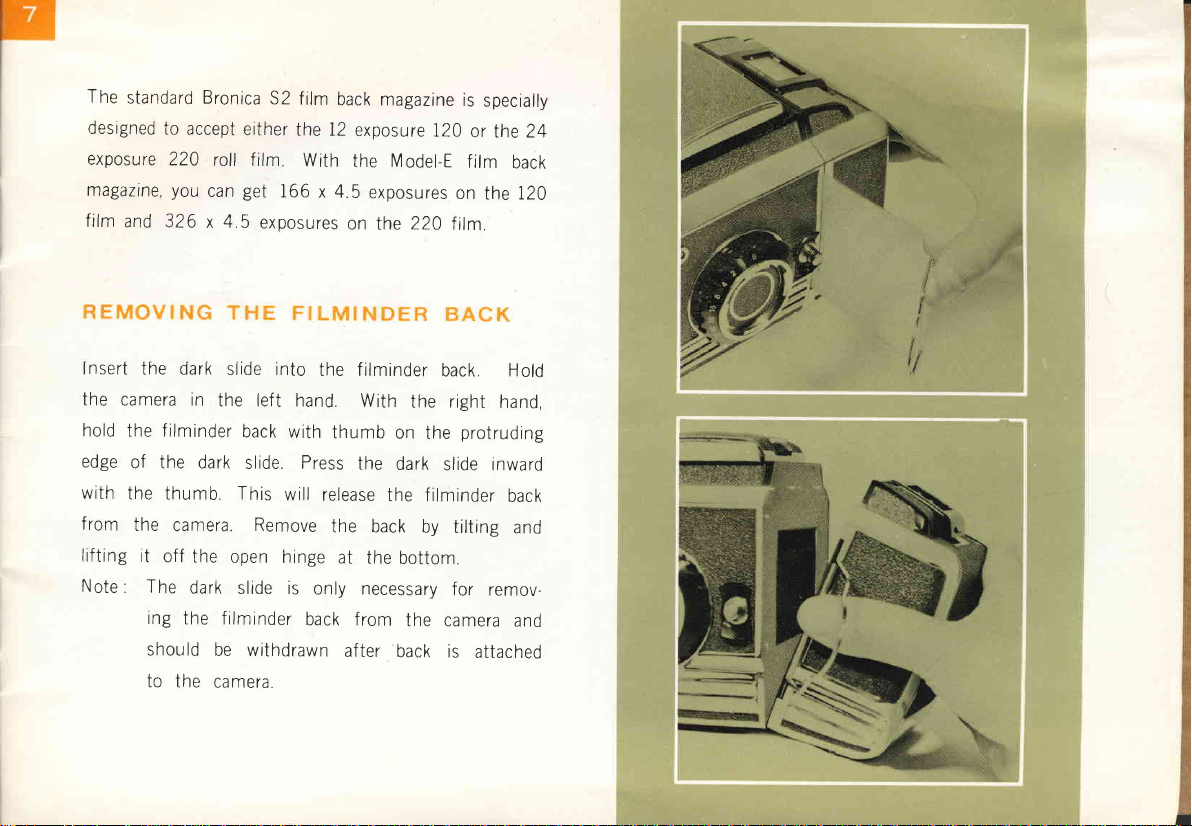
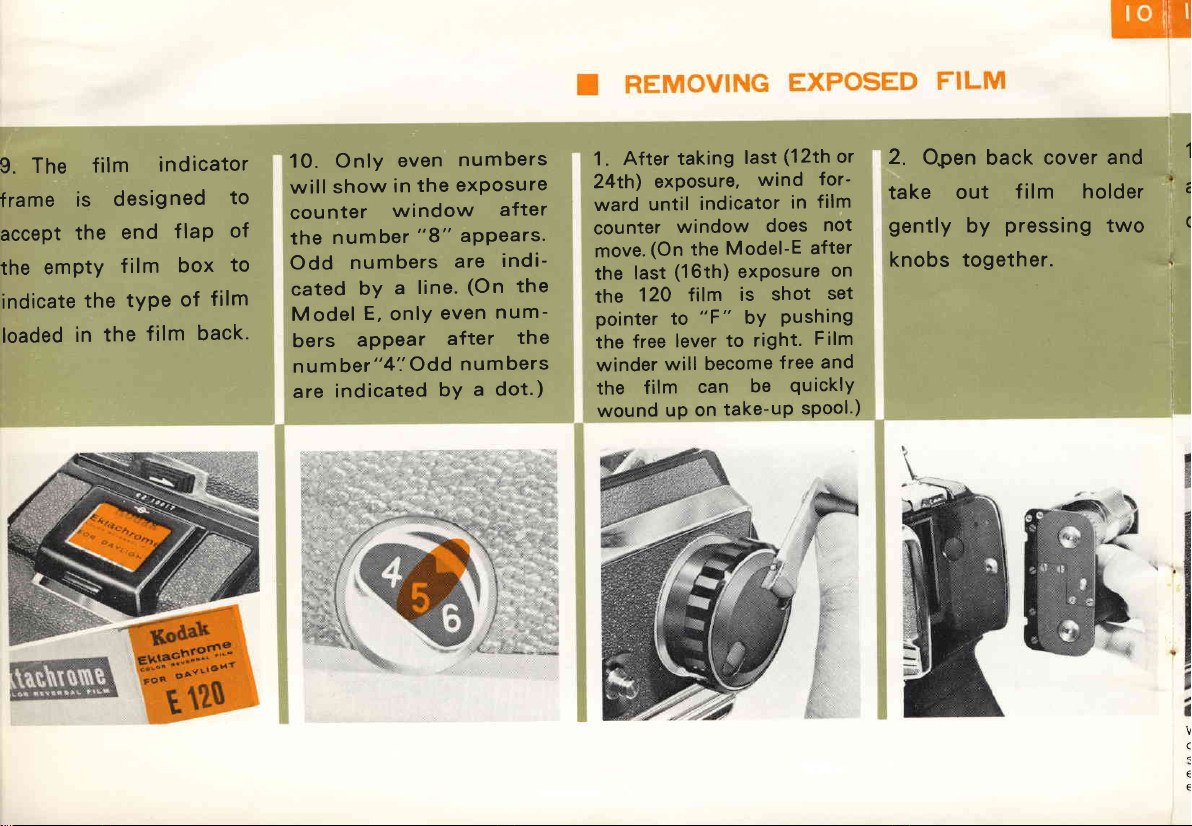
I INTERCHANGEABLE 'FI LM INDER ' BACK
This convenient feature offers many advantages.
It is possible to change film in the middle of a
roll (black-and-white to color,
color to black-and-white,
indoor to daylight,
etc.)
without the loss of a single
exposure. lt permits you to preload several backs and
shoot continuously without stopping for reloads.
The filminder back is fully automatic and foolproof
It is equipped with a metal dark slide to preventthe
film from being exposed whi
le the back is off the
camera. The back cannot be removed until the dark
slide is inserted and while the back is off the
camera,
the dark slide cannot be withdrawn.
When a filminder back i
s attached to the camea,
no attention need be paid as to whether the f ilm
or the shutter has been previously wound.
The film advance crank,which normally winds the
shutter and the film simultaneously, automatically
performs only the required function. For example. if
the shutter is wound and if the film in position has
been exposed, turning the crank will only advance
the film to a fresh unexposed section. Also, wnen
the back is on the camera. the dark slide must De
completel
y wi thdrawn before an exposure can be
maoe.
I Exclusive Nikkor Lenses and Automatic Diaphragm :
Nikkor lenses are especially designed for Bronica cameras
and can be used with C type, and S type. you can speedily
adjust the f
ocus of the bright image; These lenses (
50mm,
75mm, 135mm, 200mm and 400mm) have instant reopening
automatic diaphragms.
I Depth-of -Field Preview Elutton:
B
y pressi ng this depth -of-f
ield preview button, you can
check the depth-of-field before exposing.
lSwitch Lever for 24 Exposures:
Ordinary I2O tilm gives 12 exposures. 24
possible on the new 220 size film.
The Bronica Model - S 2 has an entirely
permitting either length to be used.
exposures are
new system
-'.- ,r-" .".,"*4*,- ,.,, -,.".,ii*d*S&&* ., "i*. *;frihdn&lbt!-d*"*'
www.orphancameras.com

t
L__
Focusinghood
Synchro
terminal
Helicoid
(Focusing
adjusting rinB)
Shutter dial
Film back retainin$
lock gate
Depth
- of
- field Preview
button
Focusinghood lock
Focusing
hood
retaining
lock
Helicoid
retaining
lock
Film winding
knob
_-*_-* Shutter
release
,/ with
cable
release
socket
www.orphancameras.com

Aperture ring
Magnif
ier
Camera
strap stud
Film
type indicator mask
Switch
lever
Ior 24 exposures
Cablerelease
socket
Tripod
screw hole
Filmwinding
crank (
f
olding
)
Stainlesssteel
plate
Film coun
ter
f
e'#
gI
www.orphancameras.com

tr'
ffi
0olor ir
lm <- + Monochrorne
Low spee<1
itlttr
Daylrghi
'f
rlm
Post
tt
ve col
or
Tr
ansParencY
(--) Turgsten filnr
€ Negailve
Coior
www.orphancameras.com

The
standardBronica
S2
film
backmagazine
is
specially
designed
to accept
either
the12
exposure
I20 or the24
exposure
220 roll film With the M
odel-Ef
ilm back
magaztne,
you
can
get 166
x 4.5 exposures
on the120
film
and 326 x 4 5 exposures
on the
220 film
lnsert
the dark
slideinto the filminder
back Hold
the camerain the left hand With the right
hand,
hold
thefilminder
back
with
thumb
on the
protruding
edge
of the darkslide.Press
the dark slideinward
with the thumb This
will
release
the filminder
bacr
from the camera.
Remove
the backby tilting
and
lifting
it off
the openhinge
at the
bottom.
Note: The dark slideis only necessary
for remov-
ing
the filminder
back
from the camera
and
should be withdrawn
after back is attached
to the camera.
t'
I
f
t
f
tf
f
www.orphancameras.com

1. Lift film indicator
frame and Press hood
lock to right. Back will
spring
oPen.
2. Press two
together and
holder
out.
knobs
lift film 3. Insert
empty
take-uP
spool in top and fresh
film spool on bottom.
Spools are inserted
by
pressing out against
spring pressure Plates
on left side.
4. D
raw leader paper
down and across film
pressure plate making
sure
that theleader
paper
is black side
out.
www.orphancameras.com

5. Insert paper
end in
take-up
spool
and
wind
one
turn.
'/t,//': itiTC/n g
6. Press
two knobs
together
and insert film holder into
film back making sure that
the film holder studs snap
f
irmly into place. lf f
ilm
holder
is not yet in position,
turn film winder slightly
and push film holder
again
until it snaps into place.
(Be
sureto turn manual
film
winder
in direction
of arrow.)
7. Advance film with
manual film wind on
film back
until
film start
mark matches red dot
on holder.
8. Close back making
sure hood lock covers
the redmark.
I
www.orphancameras.com

9. The film indicator
frame is designed to
accept
the end flaP of
the empty film box to
indicate
the tyPe of film
loaded
in the film back.
10. Only even numbers
will show in the exPosure
counter window after
the number "8" appears.
Odd numbers are indi-
cated by a line.
(On the
Model E,
only even num-
bers appear after the
num ber"
4'.'
Odd num bers
are indicated by a dot.)
1. After taking last
(12th
or
24th) exposure, wind for-
ward until indicator
in film
counter window does not
move.
(Onthe Model-E
after
the last
(16th)exposure
on
the 120 film is shot set
pointer to "F
" bY Pushing
the freelever
to right. Film
winder
will become
free
and
the film can be quicklY
wound up on take-uP
sPool.)
2. Open back coverand
take out film holder
gently by pressing two
knobs together.
1
C
(
c
€
€
www.orphancameras.com

1. Tocock
shutter and
advancef
ilm,
turn
crank
clockwise
until it stops.
2. Turn
to desired
aper-
ture
("f
-stop")
; align to
white dot. Intermediate
apertures
may be used
between
the
"click"
stops.
when wrnding the shutter, pleerse be sure to keep turning the
crank until it stops, even if you hear a sound half way.- The
sound means the shutter is wound, but the film is not advanc.
ed yet Pressing the shutter button will result in a double
exposure
3. To open focusing
hood,
slidehood
lock
to
right. To close,
press
down sides,then back,
then the cover.
4. M
agnifier
rises
when
coveris pressed
toward
back. Press magnifier
down into place before
closinghood.
I
www.orphancameras.com

5. Focus bY rotating
helicoid
while
observing
image
on ground
glass.
6. Focusing scales f
or
standard
75mm lens
and
200m
m telephoto lens
are shown in white and
scales for 135mm tele-
photo and 50mm wide-
angle are in red. The
four red dots to right of
infinity mark (-) show
the infinity
points
when
using infra-red
film.
7. Depth-of-field scale
for all lenses are also
shown. Line between
f8
and f4 represents
f5.6.
8. W hen the Preview
button is dePressed, the
d
iaph
rag
m is closed
down to the Preselected
aperture. The dePth-of
-
field can be visuallY
checked. (Critical focus-
ing and viewing are
done
with full aPerture.)
www.orphancameras.com

ISHUTTER The
vertical
focal
plane
shutterhas
rubber-coated
curtains.
Speeds
are
set on a singlenon-rotating
dial.
Through
a specialstablizing
device,
there is uniformly balanced
ex-
posure
acrossthe largefilm area
evenat highshutterspeeds.
High
quality
miniature
ball
bearings
areused.
The
shuttercurtaintravels
across
the55m
film
gate
in
15-16
milliseconds.
The X setting for
electronic
flash
(strobe)
represents
1140
second.Intermediate
shutter
speeds
canbe
selectedbetweenthe
following
speeds:
1-1
l4 1
l8-1 130 1
/60-1 /1000
www.orphancameras.com

Y'
"Bo'
stands for "Bulb": press to oPen, release to
close shutter.
" l" is one
second:
"2" is * second;
" I
OOO" is l/ IOOO second, ete.
"X" represents l/ 40 second and is the fastest
shutter speed
with which electronic flash can be
used. Any faster settings will result in partial
non-exposure. (See "Flash,"
page |6)
The shutter dial turns either right or left.
The dial may be set for intermediate shutter
speeds. Settings may be selected either before
or after the shutter is wound.
The red, white, 6lreen
andyellow colors of shutter
dial numbers
are color codes for flash synchro
photography. (See "Flash,'
page I6)
shutter will not work evenit the shutter button
is pressed.
In
this case, withdraw the dark slide'
lf the shutter does not now work,
wind up the
shutter once more and an exposure
can be
made
without any loss of film.
+;+sx@
www.orphancameras.com

CABI-E RELEASE :
H
aving selected the
shutter speed and dia-
phragm aperture, ad-
vance the film by
turning the film wind-
ing knob clockwise to
a firm stop. Focus the
lens and you are now
ready to make an
exposure.
To avoid camera move-
ment, it is desirableto
use
acablereleasewhen
a slow shutter speed is
used. Cable release
sockets are provided
bothon
the body release
button and below the
depth
-of-f
ield preview
button.
TIME EXPOSURE
DEVICE
W hen "T "(T ime)exposu re
is desired, set the shut-
ter speed dial at "8",
depress the body release
button and turn the tip
of the button counter-
clockwise to lock it in
place. This will hold the
shutter open.
To close the shutter,
turn the tip of the
button clockwise.
SAFETY LOCK :
The body releasebutton
has a safety lock. When
the camera is carried
with the shutter cocked,
it is best to set the
safety lock.
To set the safety lock,
rotate the tip of the
release button clockwise.
When the red dot is in
outside position, shutter
is locked.
,,{_
._.".
*,W
!;;
"h.
1S
,/q
:1' *
www.orphancameras.com

IFLASH :
TheBronica flash ter-
minal accepts a stan-
dard connecting cord.
r
German Type P.C. )
I USING NECK STRAP
The shoulder
strap has
coupling
connectors at
each end. Place these
coupling
connectors
over
the camera
strap studs
on each
side of the ca-
mera and
press
in,then
adjust strap length.
To remove,
lift or raise
the metal
win$son
camera
strap stud and simulta-
neously
lift o{{
the
couPl-
inBconnector.
B. | 2 4 B 15 30 60 125250500
1000
x
F Bulb
M Bulb
X (Strobe)
FP Bulb
red I green---l white yellow
www.orphancameras.com

I
WH
\' The
120
roll
filmallows
twelve6 r 6 (2\" x 2)i")
exposures
Twentyfour
exposures
canbe
obtalned
on
. the220 rollfilm
i The upperleft prcture
showslever
posrtion
when
using120
rollfilm Keep
pressing
switchlever
lock
button
and
move
lever
untilindicator
arrow
oointsto
"I2" mark.After
the12th
exposure
thefilm
advance
crank
wrllwind
remaining
film
continuously
ontotake-
uo-soool
wrthno resistance
The lower
left picture
shows
lever
position
when
using
220
rollfilm.
Switch
lever
lock
button
should
be
also
pressed
to movelever
until
arrow
points
to
"24"
mark.
In thisway
the
filnn
winding
crankwill
stop
at everynumber
in exposurecounter
unttl
24
beforebecoming
"free'l
allowing
the remaining
film
to be
wound
up on roll
(When
Model-E
is
used
on
your
Bronica
52,
setthe
film
setting
device
on
"S'l
The
film
winding
crankwill
stopateverynumber
in the
exposure
counter
until
"32'l
When
the
pointer
is
seton
"F"
the
film
winding
crankbecomes
free,
allowing
theremaining
filmto
bewound
continuously
ontothe
take-up
spool.)
Model-S2
Switch
lever
maybe moved
to the 24
exposure
position
atany
tlme
if you
have
forgotten
to do so before
loading
Model-E
lf at any
timeduringa roll
thepointer
hasaccidentally
been
seton
"F'j
push
the
Free
Wind Release
button
uo and the
pointer
willreturn
to "S".
Your BRONICA has a
built-in
protection
against
inadverten
t double expo-
sures.
However
there
are
times when deliberate
double
exposures
may
be
des
i
red.
a. After makin!! one
exposure,
insert the
darkslide
and remove
the film
inder
back.
b. Turn
the
winding
crank
until the shutter is
wound. Replace the
filminder
back
on the
camera
bodyand
with-
draw the dark slide.
You can nowmake
a
Second
exposure.
Turn the
winding
crank
www.orphancameras.com

I INTERCHANGING
LENSES To Remove
Lens.
1.
Extend
lensby turning
heli-
coid
to closest
focus Posi-
tion.
2.P
ress bayonet lock with
thumb,and t
wist to left.
lcounterclockwise),
Remove
lens
by pulling
straightout.
'f
o Mount
Lens
:
1.Line
up red dots on lens
and mount.
Insert
gently
to
full stop.Twist to right
(clockwise) until bayonet
locksnapsclosed.
The interchangeable lens
system
of theZenza
Bronica
Model
52 can
be usedwith
earlier modelbayonettype
Bronicacameras.The
screw
thread (diameter 57mm,
pitch 1mm)
shown
at lower
right is new with Model
52
and permits
extensiontube
sets and
certain very long
telephoto
lenses
to
be
mounted Thread for Telelenses
Extensiontube set. and
www.orphancameras.com

Ittikkor
5Omm
F:3.5
Lens
construction:
6 groups;
6 elements
Minimumaperture:F:22
Angle
of view 77"
AutoDiaphragm
ClosestDistance:
1.0ft
(33cm;
Filter
size:
82
mmscrew
type
Weight:16.102.
(a60g)
I
ItUkkor
75mmF: 2.8
Lensconstruction:
4 groups;
5 elements
Minimumaperture:F: 22
Angle
of view:55"
AutoDiaphragm
Closest
Distance:
1.9ft
(60cm)
Filtersize:
67mm
screw
tYPe
Weight:
8.002
(230g.)
NIKKOR INTERCHANGEABLE LENSES
lNiftor 135mm
F:
3.5
Lens
construction:
3 groups; 4 elements
Minimumaperture:
F:22
Angle
of view:
33"
Auto
Diaphragm
Closest
Distance:
3.
3ft
(1
.6m)
Filtersize
:
67mm
screw
type
Weight:
I
4.3oz.(410g.
)
I Nikkor
200mmF:
4
(
with
hood
and
close.up
lens)
Lens
constructi
on:
5 groups:
5 elements,
MinimumAperture
: F'.22
Angle
of v
iew: 21'
Auto
Diaphragm
Closest
Distance:
10.2ft
(2.8m)
Focussing
range
wit
h close-up
I
ens:
5.4ft-9.6ft(1.7m-
3m)
Filter
size
: \
67mmscrew
type
Weight
: 26.202.(
750g.
)
INikkor
400mm
F:4.5
(with
Hoodandstrp)
Lenscon
struction:
4 groups:
4 elements.
Minimum
Aperture:
F:22
Angle
of view:11"
AutoDiaphragm
ClosestDistance:5m
Filter
size: I22nnscrew
tYPe
Weight: 93.55
oz.
(3.3kg)
www.orphancameras.com

When using the
bellows attachment
for close-up photoglraphs or Long!
focal length interchangeable lenses
(
4OOmm and over
) f
itted with heli-
coid focussing, remove the camera's
helicoid mount and attach the ba-
yonet adapter to the front of bodY
mount as shown
in lower right picture.
(l) Press the Helicoid retaining!
lock buttorr and twist the helicoid
lens mount to the left (counter-
clockwise
). Remove the Helicoid.
\
2) To return the Helicoid, insert
into body mount, lining uP the red
dots on Helicoid mount and bodY
moun
t. Twist the Helicoid mount to
right (clockwrse
) until Helicoid
retaining lock snaps closed.
www.orphancameras.com
This manual suits for next models
1
Table of contents
Other Zenza Bronica Film Camera manuals