ZEPCAM M2 User manual

MOBILE VIDEO BOX
M2 - INSTRUCTION MANUAL

More information and FAQ on: www.zepcam.com 2
Thank you for buying the ZEPCAM Mobile Video Box. We hope you will enjoy our product as much
as we enjoyed creating it.
Before starting please check:
●If the product or the packaging is not visibly damaged.
●Make sure all the packaging content is complete (M2-MVB, power connector with bare-leads and
WIFI Antenna, UTP cable)
●Do not attempt to use the device with missing or damaged parts.
[Note] The information contained in the document are subject to change without notice. For any
question, please check www.zepcam.com

More information and FAQ on: www.zepcam.com 3
Product description
Overview
LEDS behaviour
Power and IO connectors
Accessing the M2 MVB
Network connection
Log into the MVB
Change Time zone
Maintenance mode
Camera settings
Setup
Video stream
Power over ethernet
PTZ camera
Change settings on a connected camera
Network settings
Mobile network
Ethernet
WIFI
Priority mode
Network Watchdog
Video recording and streaming
Pair to server
Video compression
Start/stop streaming
Manage and viewing of video
Storage / GPS / HDMI
Advanced Use
Playing audio files
Event handling
System settings
Backup /restore
Update
Factory reset

More information and FAQ on: www.zepcam.com 5
PRODUCT DESCRIPTION
HOW TO USE YOUR PRODUCT
The Zepcam Mobile Video Box is a flexible and easy to use solution for wireless video surveillance for IP
cameras. The Mobile Video Box comes with integrated back end software. It is an effective way to
wirelessly stream and remotely manage surveillance cameras using 3G/4G or WIFI. The solution is easy
to integrate with 3rd party video management software.
OVERVIEW M2 MOBILE VIDEO BOX HD
Front side
(Fig 1.1)
1. IO: Universal Input Output (IO) connector. Contains 4 Inputs, 2 Outputs, Power Output and
Ground connection.
2. 12-24V: Power input connector. This connector has a “Continuous” input, and a “Switched” input.
The “Continuous” power supply is to power low power background processes if the unit is not
powered by the “Switched” input. Service: If required, connect laptop here for configuring
3. IPCAM port: Connect IP Camera here. Power Over Ethernet support. (Max. 30W)
4. IP SERVICE port: Connect notebook for service, no Power Over Ethernet!
5. MIC IN: Microphone input (Not supported yet)
6. AUDIO OUT: Audio output (Not supported yet)
7. USB1-USB2: 2 USB connectors can be used to connect a Joystick to the M2 Mobile Video Box
Back side

More information and FAQ on: www.zepcam.com 6
(Fig 1.2)
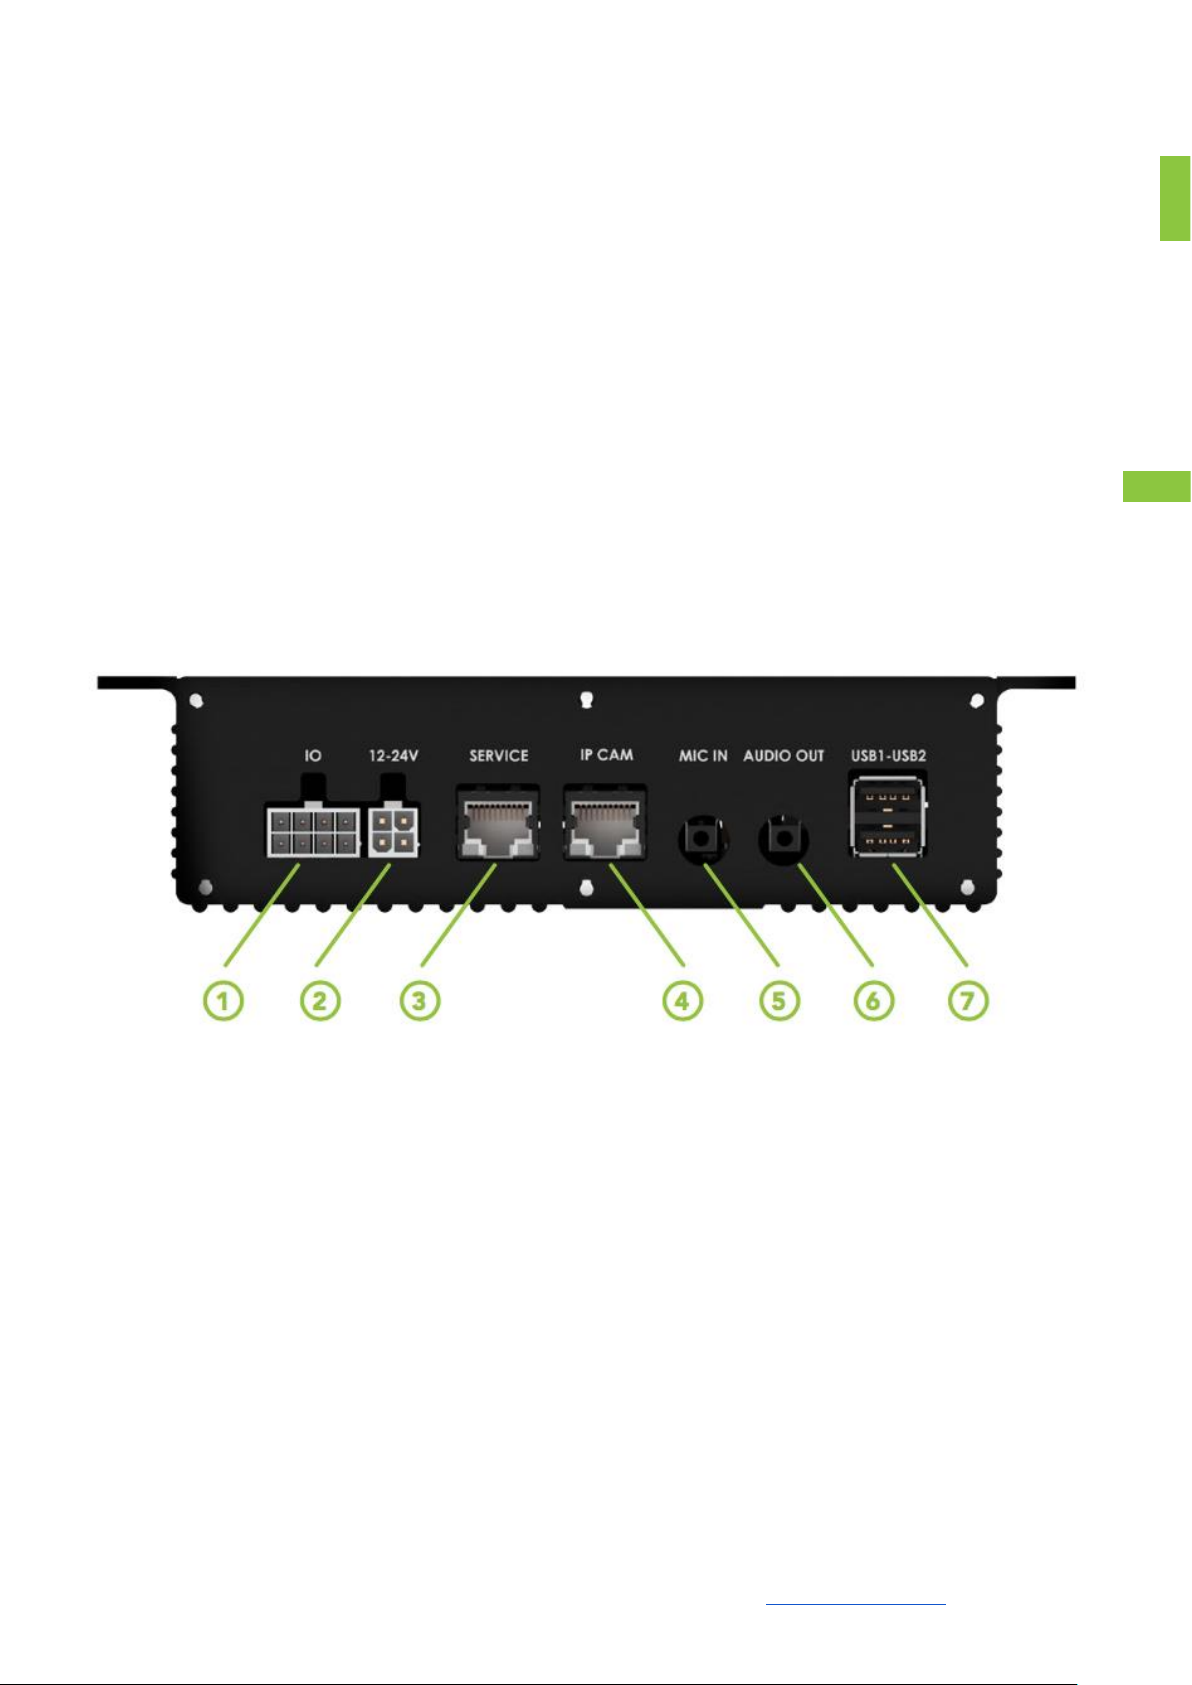
1. 3G/4G: Connect 2G/3G/4G antenna lead here.
2. GPS: Connect GPS lead here. Note: this is a powered input for an active GPS antenna.
3. 4G Aux: For secondary 4G antennas.
4. WIFI: Connect WIFI lead or antenna here
5. USB: (Currently not supported)
6. HDMI out: To connect external monitor to view camera image
7. SD card slot: (SD card is included)
8. SIM card slot: (SIM card is not included)
9. Maintenance button: Push to put MVB into maintenance mode.
10. Reset button. See chapter Reset buttons for explanation
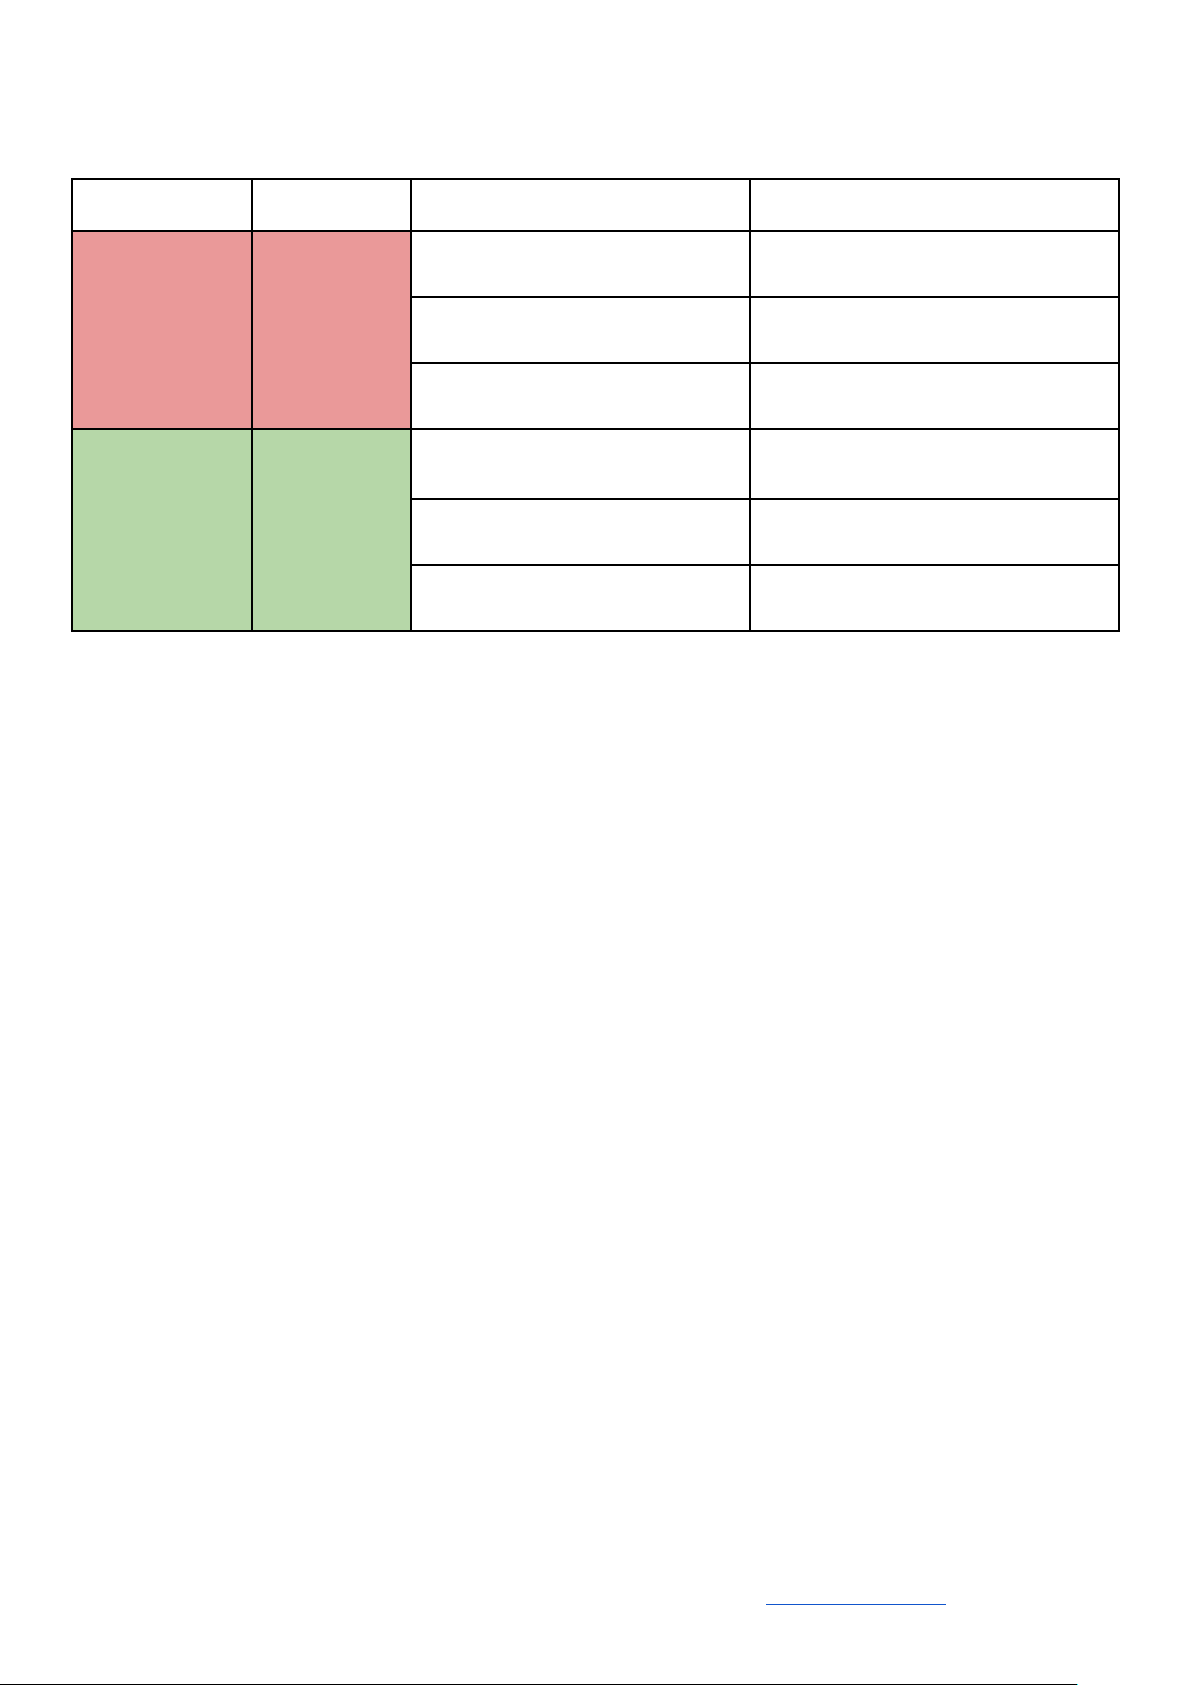
11. Link LED: Indicates Link to Zepcam Video Server. (See table 1.1)
12. Status LED: Indicates power on. (See following table)

More information and FAQ on: www.zepcam.com 7
LEDs behaviour
(table 1.1)
LEDs
Colour
LED pattern
State
Status
Red
Slow blink
Booting
On
Run Mode
Short on / long off
Maintenance mode
Link
Green
Slow blink
Connecting to server
On
Linked to server
Long on / short off
Streaming or data transfer
Buttons
Reset button
• Short Press: Power off the M2-MVB
• Press 4 seconds: Hard reset the M2-MVB
• Press 10 Seconds: Factory Reset the M2-MVB
Maintenance button:
●Short Press (1 beep - status led blinking): switch from run to maintenance mode. Press again to
switch back.
●Press 5 seconds (wait for 2nd beep): Enables the WIFI-Access Point mode in de M2-MVB.

More information and FAQ on: www.zepcam.com 8
Power and IO connectors
Input: “1” = 3 - 24V; “0” =< 0.7V
Output: Sink 0.5A max, weak pull-up to 3V3
(FIG 1.3 Pinout IO and Power connectors)
1. Power connector - The power connector contains a “Continuous” voltage and a “Switched”
voltage as shown in Fig 1.3.
2. IO -The 4 Inputs can be used to start a video stream, video recording or can be used to boot the
M2-MVB (see chapter Power settings fig 5.1). The 2 Outputs are currently not supported. The
Power output is a loop through of the Power input and can be used to power an external device
such as a camera.

More information and FAQ on: www.zepcam.com 9
ACCESSING THE M2 MVB
LOGIN AND NETWORK SETUP
POWER CONNECTION
The First step is to connect the M2-MVB to a power source. By default, your M2-MVB comes with a bare
leads power connector(M2-PC1), as extra options you can have a Power adapter 230v-12V (M2-PC2) power
adapter and a cigarette plug (M2-PC3)
Bare leads power connector
Connect the bare leads to a 12-30 Volt power supply
Power adapter 230V - 12V

More information and FAQ on: www.zepcam.com 11
NETWORK CONNECTION
The M2-MVB on board web page can be approached via ethernet or via WIFI.
You can choose one of the 3 following option to connect and setup your Zepcam MVB
Option 1
Connect over a network using DHCP
●Connect M2-MVB to the same network as you PC is connected to.
●Use the PC-tool “Zepcam Finder” to discover the IP address of your M2-MVB.
(Zepcam Finder can be downloaded from www.zepcam.com)
●On your PC enter the IP address in your web browser to access the onboard webpage.
Option 2
Connect Ethernet service port with Fallback IP
●Connect an Ethernet cable between your PC/laptop and the M2-MVB ethernet service port
●Set the network settings for your PC to:
- IP address computer: 10.150.161.2
- Subnet Mask: 255.255.255.0
●On your PC enter 10.150.161.1 in your web browser to access the onboard webpage.
Option 3
Via WIFI (Your PC/laptop must connect directly to the MVB network)
●Make sure the WIFI antenna is connected to the M2-MVB (see figure 1.2)
●By default, the WIFI Access point mode in the M2-MVB is enabled. When the WIFI Access point
mode is disabled you can press the maintenance button 5 seconds (Beep) - The M2-MVB creates
its own WIFI network with its serial number as SSID.
●On your computer select the WIFI network to connect to the M2-MVB
●On your computer open a browser (Chrome recommended) and enter http://10.150.160.1
●Push Maintenance button again to leave maintenance (+WIFI) mode

More information and FAQ on: www.zepcam.com 12
When entering the onboard webpage, the M2-MVB will ask for a username and password (see fig 2.1).
Fig 2.1: Login screen
The default Username is admin and the default password is admin. after logging in you can change the
password at:
System -> System -> Password
Change time zone
By default, time zone in the M2-MVB is set to Europe/Amsterdam to change this setting go to:
System -> System -> Time zone

More information and FAQ on: www.zepcam.com 13
Run mode / Maintenance Mode
The M2-MVB contains 2 modes: The run mode and the Maintenance mode. In normal conditions the M2-
MVB needs to be in the Run mode.
Maintenance mode is necessary for: Formatting the SD card and updating the M2-MVB
Switching between Run and Maintenance mode can be done by using the Maintenance button or on the
onboard website go to:
System -> Run mode
and
system -> Maintenance mode.

More information and FAQ on: www.zepcam.com 14
CAMERA SETTINGS
SETUP AND SPECIFICITIES
To setup an IP camera on the M2-MVB you need to go to:
System -> Network Cameras (see Fig 3.1 )
Fig 3.1 Camera setting
The most imported setting to make a M2-MVB work with an IP camera is the RTSP URL. Each IP camera
manufacturer uses its own RTSP URL. You can always check the web page or user manual from an IP
camera manufacturer to get the right RTSP URL. For a complete overview of supported cameras check
Appendix A.
Here is a short table with a few example RTSP URLs for a few manufactures:
Manufacturer
RTSP URL
Axis
rtps://[username]:[password]@[ip address]/axis-media/media.amp
Soar
rtps://[username]:[password]@[ip address]
Sony Ipela
rtps://[username]:[password]@[ip address]/media/video1
Panasonic
rtsp://[username]:[password]@[ip address]/Src/MediaInput/h264/stream_1

More information and FAQ on: www.zepcam.com 15
[Note]: The [username], [password] and [IP address] are the username, password and IP address from
the IP camera. Make sure the M2-MVB is able to connect to the IP cameras.
Video Stream
Stream from camera to MVB
Stream from M2-MVB to server
Cams
Resolution
FPS
Resolution
FPS
1
1080P
25
1080P
25
2
720P
25
720P
25
2
1080P
15
720P
25
3
720P
15
720P
25
4
720P
15
720P
25
4
D1
25
720P
25
Power over Ethernet
The IP CAM ethernet connector on the M2-MVB contains a 30Watt Power over Ethernet to power a single
IP POE enabled device.
PTZ Cameras
The M2-MVB can control PTZ (Pan Tilt Zoom) cameras.
To enable this feature, you need to set the PTZ mode
for the Desired camera. As you can see in Fig 3.2.
Fig 3.2 PTZ modes
Change settings on a connected camera
To change settings from a connected IP camera through the MVB you can use Port Forwarding in the M2-
MVB to open the camera’s webpage. To change the Port Forwarding settings you can go on the onboard
webpage to Network ->Advanced See Fig 3.3.
Fig 3.3 Port forwarding's

More information and FAQ on: www.zepcam.com 17
NETWORK SETTINGS
HOW TO CONFIGURE EACH INTERFACE
The M2-MVB contains a Mobile, WIFI and two Ethernet connections. Each network can be used to stream
video to the Zepcam Video Server.
NETWORK CONNECTION
To Change the Mobile Network settings, go on the onboard webpage to:
Network -> Mobile
The steps to setup the M2-MVB to connect to a Mobile network are:
1. Insert a SIM card with data bundle Fig 4.1
Fig 4.1 Insert sim card
2. If the SIM card is PIN locked go to Network -> Mobile -> Advanced. Enter the valid PIN code in the
PIN code input field and press try pin code.
3. The Mobile Status button on the bottom of the screen should stop reporting PIN locked. Enter the
right APN settings. Go to Network -> Mobile -> APN settings. You can use the quick setting
pulldown list.
4. (Optional) You can enter the APN settings (APN server, APN login and APN Password) manually
when your SIM data is not available in the APN quick settings list.
5. There are a few advanced settings available for the Mobile network. These can be found in the page
Network -> Mobile -> Advanced. The advanced settings are:
●Roaming: Enable this setting for using the M2-MVB in a foreign country
●Manual Network selection: Enter here the MMC MNC code for a specific network.
●Networks: Select here to use 2G, 3G and/or 4G networks.

More information and FAQ on: www.zepcam.com 18
ETHERNET SERVICE AND ETHERNET IP CAM
●The M2-MVB contains two Ethernet interfaces. The IP Cam and Service interface.
●The IP Cam interface is set to a default IP address 10.20.30.1.
●The Ethernet Service is set as a DHCP client with a fallback IP address 10.150.161.1.
These interface settings can be changed on the onboard webpage on the pages:
Network → ETH IP CAM and Network → ETH Service
Protocol: Here you can set the ethernet port to DHCP Client, DHCP server and Fixed ip
Address: When the protocol is set to DHCP server or Fixed IP this is used to set the IP address for the
ethernet port. When the protocol is set to DHCP client this option is used as a fallback IP address.
Netmask: Set here the subnet mask for the ethernet port. Only in use when protocol is set to DHCP server
or Fixed IP
Gateway: Set here the default gateway for the ethernet port. Only in use when protocol is set to DHCP
server or Fixed IP.
dns1 and dns2: Here you can setup 2 DNS servers. They are only used when the protocol is set to fixed IP.
[Note]: DNS is necessary when device wants to pair with cloud servers

More information and FAQ on: www.zepcam.com 19
WIFI
The M2-MVB WIFI can be used in 2 modes. The Access Point mode and the Client Mode. By default, the
M2-MVB is set to access point mode.
Access point mode
To change the access point settings, Go on the onboard webpage to:
Network -> WIFI -> Access Point settings
Here you can change the SSID, Encryption and password.
[Note] : When you keep using the access point mode it is recommended to set the encryption to WPA2
Client mode
The WIFI client mode can be used to stream Video data to the Zepcam Video Server
over WIFI. The steps to connect the M2-MVB to a network are:
●Go on the Onboard webpage to Network ->WIFI
●Set the Mode to WIFI Client
●Go to the tab WIFI Networks
●Press Add Network
●Enter the network details
●Press Save And Apply
●The WIFI status button on bottom of the screen should turn green when it’s connected to the WIFI
Network.
To change the access point settings, Go on the onboard webpage to:
Network -> WIFI -> Access Point settings
Here you can change the SSID, Encryption and password.
[Note]: When you keep using the access point mode it is recommended to set the encryption to WPA2

More information and FAQ on: www.zepcam.com 20
●The WIFI client mode can be used to stream Video data to the Zepcam Video Server over WIFI. The
steps to connect the M2-MVB to a network are:
●Go on the Onboard webpage to Network ->WIFI
●Set the Mode to WIFI Client
●Go to the tab WIFI Networks
●Press Add Network
●Enter the network details
●Press Save And Apply
●The WIFI status button on bottom of the screen should turn green when it’s connected to
the WIFI network.
Advanced WIFI settings
Country Codes: Select here in which country you are. The M2-MVB will optimize its settings to your
country’s WIFI agreements.
Table of contents
Popular Adapter manuals by other brands

National Instruments
National Instruments PCI/PXI GIGABIT ETHERNET ADAPTERS installation guide

Airlinkplus
Airlinkplus WLC3010 user manual

NEC
NEC N8104-224 user guide

QWNET
QWNET BT50RTK Quick installation guide

Speaka Professional
Speaka Professional SP-HDA-501 operating instructions

Kramer
Kramer ADC-DPM/HF user manual