Zero ARB Service manual

Single Zone Models: 36L (38qrt), 44L (46qrt), 60L (63qrt), 73L (77qrt), 105L (111qrt)
Dual Zone Models: 69L (73qrt), 96L (101qrt)
OPERATING AND SERVICE GUIDE 1
BEDIENUNGS- UND SERVICEANLEITUNG 25
GUÍA DE USO Y MANTENIMIENTO 49
MANUEL DE L’UTILISATEUR 73
GUIDA ALL’USO E ALLA MANUTENZIONE 97
EN
DE
FR
ES
IT


1| P a g e
Table of Contents
1. INTRODUCTION........................................................................................................................................ 2
2. SUPPLY DETAILS ....................................................................................................................................... 2
3. SAFETY INSTRUCTIONS ............................................................................................................................ 3
4. PRODUCT OVERVIEW............................................................................................................................... 4
5. INSTALLATION .......................................................................................................................................... 5
5.1 General installation.......................................................................................................................... 5
5.2 Permanent and temporary mounting. ............................................................................................ 5
6. OPERATION .............................................................................................................................................. 6
6.1 Before use......................................................................................................................................... 6
6.2 Carrying your fridge freezer ............................................................................................................. 6
6.3 Opening your fridge freezer............................................................................................................. 6
6.4 Connecting your fridge freezer ........................................................................................................ 6
6.4.1 Connecting to 12/24V DC ............................................................................................................. 6
6.4.2 12/24 V DC wiring requirements ................................................................................................. 7
6.4.3 Connecting to an engine driven generator.................................................................................. 7
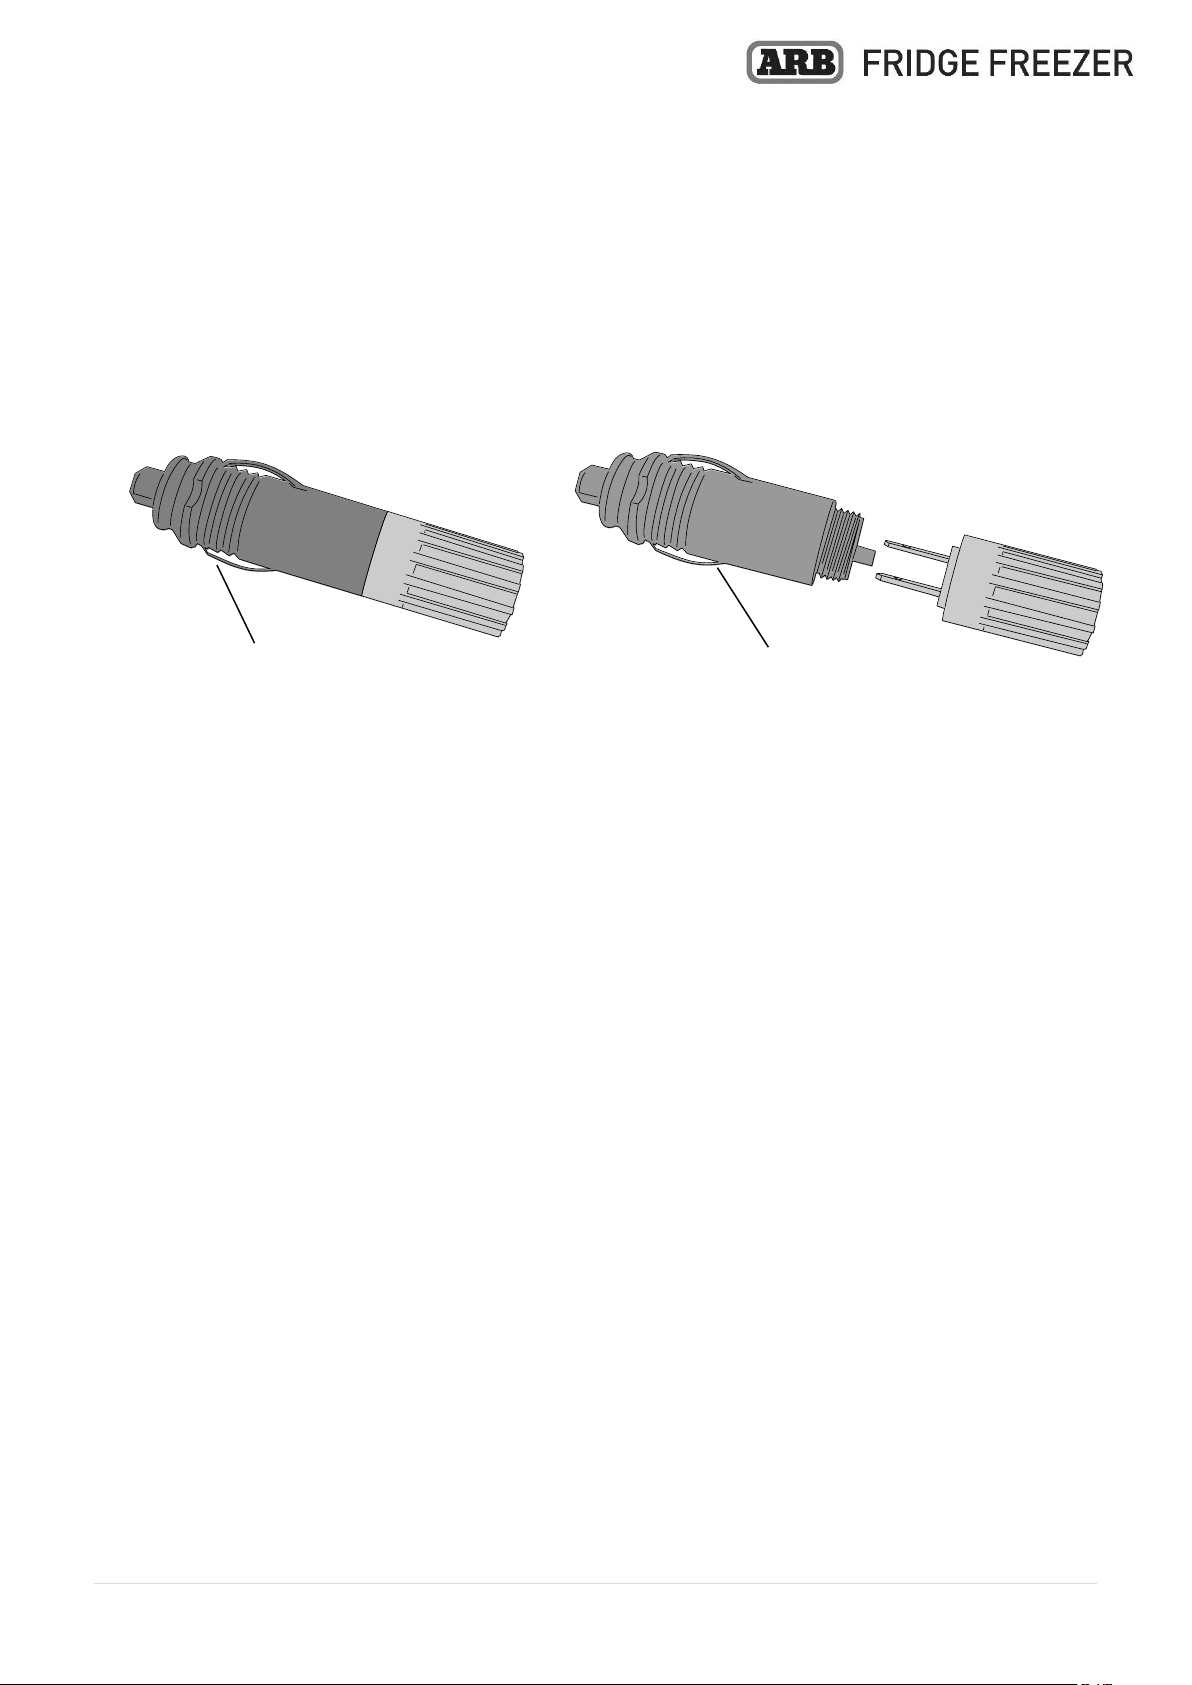
6.4.4 12/24V DC power socket.............................................................................................................. 8
6.4.5 Connecting to 100-240V AC.......................................................................................................... 9
6.5 Two way reversible and removable lid ......................................................................................... 10
6.6 Energy saving advice ...................................................................................................................... 11
6.7 Touchpad controls.......................................................................................................................... 12
6.8 Switching ON or OFF ...................................................................................................................... 13
6.9 Setting the target fridge temperature........................................................................................... 13
6.10 Changing between °C and °F.......................................................................................................... 13
6.11 Using the battery protection feature ............................................................................................ 14
6.12 Switching off cooling compartments (Dual Zone only)................................................................. 15
6.13 Using the Boost mode .................................................................................................................... 15
6.14 Bluetooth communication setting................................................................................................. 16
6.15 Bluetooth connection setting ........................................................................................................ 16
6.16 Emergency Override Switch........................................................................................................... 17
7. SMART PHONE APP................................................................................................................................ 18
8. CLEANING AND MAINTENANCE ............................................................................................................ 19
9. DISPOSAL................................................................................................................................................ 19
10. TROUBLESHOOTING........................................................................................................................... 20
11. TECHNICAL DATA................................................................................................................................ 22
12. WARRANTY......................................................................................................................................... 23

2 | P a g e
1. INTRODUCTION
Congratulations on purchasing the ARB ZERO Fridge Freezer. Your ARB ZERO Fridge
Freezer has been specifically designed for tough off road conditions and its primary
purpose is for cooling down food and beverages. It may also be used as a freezer if
desired. By following the instructions and guidelines listed in this document, you will
ensure that you receive maximum performance and long term reliability out of your
new fridge freezer.
Your ARB Fridge Freezer is designed to operate on a 12V DC or 24V DC supply from a
vehicle, boat or caravan. It can also be operated from a 100-240V AC mains supply
using the inbuilt power inverter.
CAUTION - If you wish to cool medicines, please check if the cooling capacity of the
fridge freezer is adequate for the purpose.
2. SUPPLY DETAILS
Your ARB Fridge Freezer has been delivered with the following items. If any of these
items have not been included with your fridge freezer, please contact your local ARB
Fridge Freezer dealer.
ITEM
QUANTITY
ARB Fridge Freezer
1
Basket system
1
DC socket cover
1
12/24V power cable
1
100-240V power cable
1
ARB Fridge Freezer instruction
1

3| P a g e
3. SAFETY INSTRUCTIONS
For the safety of all people who will use your fridge freezer, ARB recommends that you take
note of the following general safety points.
Do not use if any of the electrical cables or plugs are worn or frayed. Replace with original
manufacturers parts.
Always check cables for mechanical damage, cuts in the insulation and heat / moisture
damage before use. If in any doubt REPLACE.
Do not handle electrical cables with wet hands.
Do not place electrical items in refrigerator.
Always apply the correct voltage to the fridge freezer with the correct polarity.
Do not connect your fridge freezer to a battery charger, AC/DC converter or rectifier.
Disconnect the fridge freezer from the battery before using a high-speed battery charger.
Do not use sharp, abrasive or corrosive materials to clean or defrost the fridge freezer.
Best performance is achieved under ambient temperatures between +10 °C and +32 °C,
beyond 32 °C the performance will drop and power consumption increase.
Do not consume perishable food stored in your fridge freezer if the fridge freezer has been
turned off.
Repairs should only be carried out by a suitably qualified and authorized person. Poor
repair is dangerous.
Do not store dangerous items in the appliance, such as spray cans, explosives, and
flammable liquids / propellants.
Do not operate this appliance in the rain.
Do not allow children to play with the appliance.
This appliance is not intended for use by persons (including children) with reduced
physical, sensory or mental capabilities, or lack of experience and knowledge, unless they
have been given supervision or instruction concerning use of the appliance by a person
responsible for their safety.
Small children must be supervised when around all electrical appliances.
Do not allow children or pets to climb inside the appliance.
Always disconnect before cleaning.
Food must be stored in suitable and appropriate containers.
If your appliance is plugged in to a DC vehicle socket connected with your vehicle start
battery, ensure that you use the inbuilt battery protection feature. Do not come back to a
flat battery.
Do not fill appliance with ICE, WATER or other liquids.
Do not attempt to remove frost with scraper or knife. Serious damage to cooling system
could occur.
Buildup of heat in a vehicle can be extreme. Your fridge freezer may stop cooling in
extreme ambient temperatures.
This appliance is intended to be used in household and similar such applications such as:
oStaff Kitchen areas in shops, offices and other working environments.
oFarm houses and by clients in hotels, motels and other residential type environments.
oBed and breakfast type environments.
oCatering and similar non-retail applications.

4 | P a g e
4. PRODUCT OVERVIEW
The ARB ZERO fridge freezer is complete with various features. Figures 1 & 2 below
highlight the key features included with the fridge freezer.
FIGURE 1
FIGURE 2
ITEM
DESCRIPTION
1
Powered by 12/24 Volt DC compressor
2
Two way removable lid (not 36L or 44L)
3
Stainless steel bracket incl tie down points
4
Robust recessed carry handles
5
Digital control touchpad with display
6
240VAC and 12/24VDC input power
7
USB port with charger to 3000mA
8
Styled impact resistant corners
9
Bottle and wine glass holder
10
LED interior light
11
Basket compartment divider
12
Space for upright standing bottles
13
Drain plug (not shown)
10
11
12
1
2
3
4
5
6
7
8
9

5| P a g e
5. INSTALLATION
5.1 General installation
The following points should be considered when choosing a location to install your
ARB Fridge Freezer.
A minimum clearance of 50mm must be maintained on all sides of the fridge freezer.
Whether the installation is permanent or temporary, the fridge freezer must be
attached to secure anchorage points.
The ideal mounting position for the fridge freezer is on a flat, horizontal surface. If
the fridge freezer is subject to sideways angles (e.g. heal on a boat), it can withstand
a sideways angle of 30°.
Avoid placing the fridge freezer near sharp or hot objects.
Avoid placing the fridge freezer near loose objects that could fall on the cabinet and
obstruct its operation.
Never operate the fridge freezer near flammable liquids or vapours.
Avoid turning or storing your fridge freezer on its side.
5.2 Permanent and temporary mounting.
The recessed stainless steel bracket at each end of your ARB Fridge Freezer has been
engineered as a Tie-down point. ARB recommends that the ARB Tie-down system be
used to securely mount the fridge freezer to solid anchorage points. Figure 3 shows
the ARB Tie-down system installed with the ARB Fridge Slide.
FIGURE 3.

6 | P a g e
6. OPERATION
6.1 Before use
Before starting your fridge freezer for the first time, it should be cleaned inside and out
with a damp cloth. Please refer to the chapter “Cleaning and maintenance” for further
details on maintaining your fridge freezer.
6.2 Carrying your fridge freezer
Your ARB Fridge Freezer is supplied with handles at each end of the cabinet. These
handles should be used to lift and move the fridge freezer.
WARNING - The lid or latch MUST NEVER be used to lift or move the fridge freezer.
CAUTION - The fridge freezer should always be lifted by at least two people.
6.3 Opening your fridge freezer
To open the fridge freezer lid:
Place your hand under the latch.
Push down on lid surface slightly to release pressure on lid latch.
Use fingers to lift and release latch.
While holding latch open, pull lid open and rest lid in vertical position.
To close the fridge freezer lid:
Close lid and apply pressure on lid surface until the latch engages. You will hear
a click as the latch engages.
The lid is now closed with the latch engaged.
6.4 Connecting your fridge freezer
6.4.1Connecting to 12/24V DC
Your ARB Fridge Freezer can be operated on either 12V or 24V DC. Your fridge freezer
is fitted with a control circuit to prevent polarity reversal and possible short-circuiting
when the unit is connected to a battery.
To connect your fridge freezer to a 12 V or 24 V DC supply, plug the 12/24V power
lead into the DC power socket on the back panel of the fridge freezer as shown in
Figure 4. Connect the free end of the power lead to a 12 V or 24 V DC supply.
FIGURE 4.

7| P a g e
6.4.212/24 V DC wiring requirements
To ensure optimum performance of your ARB Fridge Freezer, it is important that your
wiring system is capable of carrying the required load. The accessories wiring system in
many vehicles is not adequate for such a task.
ARB recommends that a dedicated wiring circuit be installed to power the fridge
freezer. This circuit should be as short as possible and be connected directly to the
power supply via a 10 Amp fuse.
For an automotive or marine installation, ARB recommends that the wiring circuit be
connected to an isolated power supply like an auxiliary battery system. This will prevent
discharge of the main starting battery.
For cable lengths up to 6m, ARB recommends a minimum cable diameter of 6 mm
automotive cable (4.6mm2).
For cable lengths greater than 6m, ARB recommends that you consult a qualified
technician for advice on the correct cable diameter.
6.4.3Connecting to an engine driven generator
Please take note of the following points before connecting your ARB Fridge Freezer to
an engine driven generator.
The generator must be fitted with an automatic voltage regulator. It must supply
a standard, pure sine wave AC voltage, without fluctuation in voltage or
frequency (eg 120 VAC~60Hz or 240 VAC~50Hz).
When using the DC output from your generator, a battery of correct voltage (12
or 24V) must be connected between the generator and the fridge freezer.
The fridge freezer should be turned off when starting and stopping your
generator.
CAUTION –Some engine driven generators are not suitable for powering your fridge
freezer.

8 | P a g e
6.4.412/24V DC power socket
The plug on your 12/24V DC power lead has a removable adaptor collar. With the
collar in place as shown in Figure 5, this plug will fit into a conventional vehicle
accessories power socket (cigarette lighter). With the adaptor collar removed as shown
in Figure 6, this plug will fit into an ARB 2 pole auxiliary power socket.
FIGURE 5. FIGURE 6.
ARB highly recommends that this 2 pole connection be used for all 12V DC and 24V
DC connections of a fridge freezer. This will provide a positive and secure connection
between your power source and your fridge freezer.
The following points should be considered when choosing a location for your fridge
freezer auxiliary power socket.
Position the power socket as close to the fridge freezer as is practical.
Position the power socket in a convenient location that will allow the user to easily
connect and disconnect the plug from the socket.
Position the power socket in a protected location away from dust and moisture.
Position the socket high in the vehicle to prevent it from becoming wet should the
vehicle ingest water.
NOTE –If the plug or adaptor collar is removed and the fridge freezer is hard wired
into a 12V or 24V DC circuit, a 10 Amp inline fuse must be included in the circuit.
Adaptor collar
removed
Adaptor collar in
place

9| P a g e
6.4.5Connecting to 100-240V AC
Your ARB Fridge Freezer can be operated on an AC voltage of 100 –240V. The fridge
freezer has a priority circuit which gives priority to mains AC power over DC power. If
the fridge freezer is connected to both AC and DC power, the unit will run on the AC
supply.
To connect your fridge freezer to 100 –240 V AC supply:
Plug the 100-240 V power lead into the AC power socket on the back panel of
the fridge freezer as shown in Figure 7.
Connect the free end of the power lead to a 100 –240 V AC supply.
FIGURE 7.
CAUTION - Never handle the plugs, leads or switches with wet hands or while standing
on a wet surface.
CAUTION - If you are operating your fridge freezer from a 100-240 V AC supply, a
residual current circuit breaker must be installed in the circuit. ARB advises seeking
advice from a trained technician.

10 | P a g e
6.5 Two way reversible and removable lid
The ARB ZERO fridge freezer range comes with a removable lid. The 60L, 69L, 73L, 96L
and 105L come with a removable and reversible lid.
To remove the lid, open the lid fully, then over extend, pushing the lid past it vertical
position to remove. Please see below Figure 8 for the end opening lids, and Figure 9
for side opening lids.
FIGURE 8. FIGURE 9.
To insert the lid, align the lid end sockets with the fridge hinge pins. Push the lid sockets
into the fridge pins and press down firmly. The lid will snap into place. Please see below
Figure 10 for the end opening lids, and Figure 11 for side opening lids.
FIGURE 10. FIGURE 11.

11 | P a g e
The side opening lids are reversible. To reverse the lid, firstly remove the lid. Turn the
lid and locate the lid sockets with the opposing fridge hinge pins. Position the lid
vertically and press down firmly.
See below Figure 12 for the two lid orientations.
FIGURE 12.
6.6 Energy saving advice
To help you achieve the optimum performance from your fridge freezer, ARB makes
the following recommendations.
Place the fridge freezer in a well ventilated area which is protected from direct
sunlight.
Try to minimise the frequency with which the fridge freezer is opened.
Do not leave the lid open for longer than necessary.
Avoid setting the target temperature unnecessarily low.
Defrost the fridge once ice starts to form.

12 | P a g e
6.7 Touchpad controls
Figure 13 includes all features of the Touchpad for the Single Zone ZERO fridge
freezer range.
FIGURE 13.
Figure 14 includes all features of the Touchpad for the Dual Zone ZERO fridge freezer
range.
FIGURE 14.
Power
Button
Check LED
Display
Mode
Button
Temperature
Settings
Boost
Button
Boost LED
Front
Zone
Display
Power
Button
Check LED
Rear
Zone
Display
Mode
Button
Temperature
Settings
Boost LED
Boost
Button

13 | P a g e
6.8 Switching ON or OFF
Press button to turn the unit ON. The LED display on the control panel will turn on and
the interior temperature will be displayed. Press the button for 3 seconds to switch the
unit OFF. The system has a memory which records your last setting before shut down. If the
power supply is cut off or disconnected, the unit will switch off automatically and once the
power supply is restored it will automatically switch back on.
6.9 Setting the target fridge temperature
To set the target cabinet temperature of your ARB Fridge Freezer:
Turn the fridge freezer ON .
Press button once to display current cabinet target temperature. For Dual Zone fridges,
press once for the first zone, and press again for the second zone.
Press button to increase the target temperature by one degree.
Press button to decrease the target temperature by one degree.
Continue pressing or until the desired target cabinet temperature is reached.
After 5 to 6 seconds of inactivity, the target temperature will be set and the display will show
the current cabinet temperature.
NOTE - When the target temperature is reached, the compressor will stop running.
6.10 Changing between °C and °F
Your ARB Fridge Freezer is capable of displaying temperature in either degrees Celsius (°C) or
degrees Fahrenheit (°F.)
To change the display between °C and °F:
Turn the fridge freezer ON.
Press twice (three times for Dual Zone) to display current temperature unit setting.
Press or to change between °C and °F.
After 5 to 6 seconds of inactivity, the temperature units will be set and the display will show
the current cabinet temperature.
NOTE –Changing between °C and °F will NOT convert the target temperature to the new
units °C or °F.Instead, the fridge/freezer will use the previously stored target temperature
setting for the temperature units °C and °F.

14 | P a g e
6.11 Using the battery protection feature
Your ARB Fridge Freezer is fitted with a battery protection system that controls the level
of discharge from your battery. The battery monitor has three setting; HIGH, MEDIUM
and LOW. When set to HIGH, the battery monitor will provide maximum protection for
the battery against excessive discharging. When set to LOW, the battery monitor will
allow maximum use of the energy stored in the battery. Table 1 shows the cut in/cut
out voltages for the three battery monitor settings.
The battery monitor will cause the unit to switch off once the supply voltage falls below
the set level. The unit will automatically restart once the restart voltage is reached.
NOTE - When the battery monitor is active, the cooling unit (including compressor) will
not run. The control panel CHECK LED will flash ORANGE and the display will show
“ER1”. The cooling unit will not restart until the voltage level of the battery reaches the
restart voltage listed in Table 1.
BATTERY MONITOR MODE
LOW (Lo)
MEDIUM (nE)
HIGH (HI)
Switch off voltage –12V DC
10.1 ± 0.3 V
11.4 ± 0.3 V
11.8 ± 0.3 V
Restart voltage –12V DC
11.1 ± 0.3 V
12.2 ± 0.3 V
12.6 ± 0.3 V
Switch off voltage –24V DC
21.5 ± 0.3 V
22.5 ± 0.3 V
23.0 ± 0.3 V
Restart voltage –24V DC
23.0± 0.3 V
24.0 ± 0.3 V
24.5 ± 0.3 V
TABLE 1.
If your fridge freezer is connected to the starting battery on a 12/24V DC system, ARB
recommends that the battery monitor level be set to HIGH or MEDIUM.
If your fridge freezer is connected to an auxiliary battery on a 12/24V DC system, ARB
recommends that the battery monitor level be set to LOW.
NOTE - ARB recommends that the battery be charged once the battery monitor has
been triggered. ARB also recommends that all non-essential electrical equipment that
draws power from the same source as the fridge freezer be turned off until the battery
is fully charged.
To change the battery protection level:
Turn the fridge freezer ON.
Press three times (four times for Dual Zone) to display current battery
protection setting.
Press or to change the battery protection voltage between High (HI),
Medium (nE) and Low (Lo).
After 5 to 6 seconds of inactivity, the battery protection voltage will be set and
the display will show the current cabinet temperature.

15 | P a g e
6.12 Switching off cooling compartments (Dual Zone only)
For Dual Zone models, your ARB Fridge Freezer is capable of switching the fridge
compartments ON and OFF. When switched OFF, the compressor will not cool the
fridge compartment.
To switch OFF the front compartment (displayed on the left):
Press and hold the button for three seconds.
To switch ON, press and hold the for three seconds.
To switch OFF the rear compartment (displayed on the right):
Press and hold the button for three seconds.
To switch ON, press and hold the for three seconds.
When switched OFF, the displayed temperature for the OFF compartment will go
blank.
6.13 Using the Boost mode
Your ARB Fridge Freezer has a Boost mode. When activated, the Boost feature will
increase the speed of the compressor and will cool the fridge compartment faster.
To activate the Boost feature:
Turn the fridge freezer ON.
Press the button to activate the Boost mode.
The Boost LED will illuminate Blue to indicate the Boost mode is active.
To deactivate the Boost and return to normal mode, press the button again.
NOTE - Boost mode is less efficient and uses more energy to cool the fridge
compartment than normal operating mode.

16 | P a g e
6.14 Bluetooth communication setting
The Bluetooth communication of your ARB fridge freezer can be switched ON or OFF.
When switched OFF, the fridge will not communicate with the smart phone APP.
To change the Bluetooth communication setting:
Turn the fridge freezer ON.
Press four times (five times for Dual Zone) to display current Bluetooth
setting.
Press or to change the Bluetooth communication setting between
ON and OFF.
After 5 to 6 seconds of inactivity, the Bluetooth communication setting will be set
and the display will show the current cabinet temperature.
6.15 Bluetooth connection setting
The Bluetooth connection setting can be changed to Open or Closed.
When set to Open (OPE), the phone APP will connect by scanning the QR barcode or
connect directly using the phone APP. In the latter case, the ARB Fridge Freezer will be
listed as an available device in the phone APP. The name of the device will be “ARB
ZERO XXXX” where XXXX is the last 4 digits of the QR barcode.
When set to Closed (CLO), the phone APP will only connect to the ARB Fridge Freezer
by scanning the QR barcode. The QR barcode is located on the rear of the fridge. In
this case, the ARB Fridge Freezer will not be listed as an available device in the phone
APP.
To change the Bluetooth connection setting:
Turn the fridge freezer ON.
Press , then and hold both buttons at the same time for 3 seconds to
enter the Bluetooth connection setting.
Press or to change the Bluetooth connection setting between Open
(OPE) and Closed (CLO).
After 5 to 6 seconds of inactivity, the Bluetooth connection setting will be set and
the display will show the current cabinet temperature.

17 | P a g e
6.16 Emergency Override Switch
Your ARB Fridge Freeze is equipped with an Emergency Override switch. If the
electronic circuit boards fail, this switch will override the electronic controls and operates
the compressor independently of these controls.
The Emergency Override Switch will run the compressor at full capacity and continue
to cool the fridge compartment causing the fridge contents to freeze.
The electronic controls, including the battery protection feature, will not operate. For
this reason, the Emergency Override should only be used when an electronic failure
has occurred.
To activate the Emergency Override feature:
Slide the Emergency Override switch from NORMAL USE to EMERGENCY
OVERRIDE (see Figure 15).
FIGURE 15.

18 | P a g e
7. SMART PHONE APP
Activate the Bluetooth function on your smart phone. Search for the ARB ZERO
Fridge Freezer APP in the Google Play or Apple APP Store. Download and install the
APP.
When you open the APP you will see Figure 16. Click the “+”to search for your ARB
ZERO Fridge Freezer and you will see the available ARB ZERO Fridge Freezers as
shown in Figure 17.
To connect with your ARB ZERO Fridge Freezer, click your fridge named “ARB ZERO
XXXX” where XXXX is the last 4 digits of the QR barcode. You will see Figure 18 which
shows successful connection.
Alternatively, scan the individual QR barcode affixed to the rear of your fridge for
connecting to the ARB ZERO Fridge Freezer. Press the QR Scan button on the APP,
Figure 17, and scan the QR barcode on the rear of the fridge. The APP will directly
connect to the fridge.
FIGURE 16 FIGURE 17 FIGURE 18
Once connected to your ARB ZERO Fridge Freezer, the following features are accessible
via the phone APP:
Turning the fridge freezer ON or OFF.
Changing between °C and °F.
Changing the battery protection setting.
Turning the Boost mode ON or OFF.
Monitoring the current fridge temperature.
Recognise any fault immediately.
Personalise your fridge name.
Setting the target fridge temperature between +10 °C and –22 °C.
Monitor the current battery voltage (12VDC systems only).
Create various temperature preset modes.
Monitor the compressor status.
Click to scan
QR barcode
for connection
Other manuals for ARB
1
Table of contents
Languages:
Other Zero Freezer manuals