Zeus 10811 User manual

Treadmill 10811 Instructions for Use
Please read and retain these instructions for future reference v004: 04/09/20
TECHNICAL DETAILS:
POWER DETAILS: 220-240V a.c.
POWER FREQUENCY: 50-60Hz
WATTAGE: 500W
Max Load: 110kg
Complies with EN 957-6:2010+A1:2014 Stationary training equipment. Treadmills, additional
specific safety requirements and test methods.
ACCESSORIES:
This treadmill is supplied flat-packed, so some minor home assembly is required.
Assembly instructions are provided. Please see the following details. Folds down for easy storage.
Note: The running board and running belt have been treated with anti-static lubricants. It is
recommended users use an anti-static silicon lubricant (not included) at least every 3 months.
FOR DOMESTIC USE ONLY
Emergency Stop Switch
Handrails
Running belt
Control Panel
1 x M6 inner hex spanner
1x M16 inner hex screw = adjustment screw
1x M12 inner hex screw = security knob
1x Emergency stop switch
Adjustment Screw
Side Rails
Securing knob
Handrail support

Treadmill 10811 Instructions for Use
Please read and retain these instructions for future reference v004: 04/09/20
ASSEMBLY:
Open the package and take out the treadmill.
Pull the adjustment screw from the upper handrail support(photo 2), fold up the handrail support
(photo3), insert the screw into the hole to secure(photo 4).
Photo 1

Treadmill 10811 Instructions for Use
Please read and retain these instructions for future reference v004: 04/09/20
Photo 5a
Photo 5b
The control panel is fitted with a screw which can be losened or tightened with the hexagonal
wrench provided. (photo 5 a and b)
Put the emergency switch onto the control panel with
the magnet(photo 6).
Attach the handrail as shown.

Treadmill 10811 Instructions for Use
Please read and retain these instructions for future reference v004: 04/09/20
Control Panel
Instructions:
1. Plug into the power supply to enter Standby. The buzzer will sound and display will show
“===”. Click the “On/Off” button (run/stop) to switch machine on or off.
2. In Standby mode, click the Mode button “----“, the speed can be adjusted by the Speed+ key
as follows:
=== for conventional mode
P1 for auto mode1
P2 for auto mode2
P3 for auto mode3
When the current mode shows P1, P2, P3, click the MODE button to enter the automatic
mode to set the time between 5 and 30 minutes. Default time is 10 minutes.
3. In standby mode, if automatic mode (P1, P2, P3) is selected, or running time, the time shown
will be counting down the minutes.
In conventional mode (====) running time is 30 minutes with clock counting forward.
4. In either conventional mode (====) or automatic mode (P1, P2, P3), after 3 seconds for
initial stage of preparation speed display mode is entered. This can be switched to display
“speed time-calories scan” with the mode button.
5. In conventional mode (===) the initial speed rate is 1. You can speed this up with Speed-
/Speed+ button from 1 to 10 (1km/h to 10km/h). In automatic mode the Speed buttons
cannot be used.
6. In automatic mode, the buzzer will sound for 3 seconds before speed is switched.
7. In working state click On/Off button to slow motor down to stop. LED display will flash.
8. Emergency Stop Switch. When taking off the Emergency stop switch the display will show
“Safe” and machine will stop working quickly.
OPERATION:
Familiarise yourself with the control panel.
Ensure you know where to find the Emergency stop switch. Attach the Emergency stop
switch with the magnet side to the control panel, unravel the cord and clip it to your clothes.
Stand on the treadmill with your feet on the side rails (not the running belt) before starting
the machine. Once used to the functions, you can stand on the running belt and start
walking slowly, holding onto the handles.
Walk at a slow, comfortable pace holding onto the handrails or, when more confident,

Treadmill 10811 Instructions for Use
Please read and retain these instructions for future reference v004: 04/09/20
letting go of them.
To stop the treadmill:
- using the control panel decrease the speed until it stops
- hit the emergency stop switch.
- hold on, step onto the side rails and turn off treadmill.
Keep a 2m area around and behind the treadmill clear of objects.
MAINTENANCE:
Turn off the power and unplug before daily maintenance.
Do not use formaldehyde or organic solvent to clean to avoid damage to the fittings.
Use a clean, dry cloth to remove any sweat you have left behind on the treadmill's deck or
handrails to prevent corrosion of the equipment.
To remove stubborn stains, oil or dirt, wipe off with a cotton cloth with cleanser and wipe
dry.
Around the power switch and control panel, please use a soft and dry cloth to clean. Do not
use a damp cloth.
Do not use the treadmill in a moist or dust intensive environment which may lead to
mechanical failure.
Place on a flat surface.
Regularly clean to remove dust in order to keep components clean. Clean both sides of the
exposed part of the running belt to reduce accumulation of debris.
Wear clean sports shoes to avoid transferring debris onto the running belt.
Use soap and a cleaning cloth to clean the running belt. Do not use cleaner.
Wipe sweat off the handrail and the running belt after using the treadmill.
The running board and running belt have been treated with anti-static lubricants. It is
recommended users use an anti-static silicon lubricant (not included) on a regular basis, at
least every 3 months.
How to Lubricate Your Treadmill Belt
Pull the treadmill belt away from the deck with one hand and with the other hand, insert the
silicone spray nozzle underneath the belt and spray the silicone towards the centre of the
belt.
Follow this procedure spraying up and down both sides of the running belt, applying a total
of 1-oz of anti-static lubricant.
Rotate the belt by hand one-half a revolution so that you reach the portion of the running
belt that was not lubricated, then repeat the treadmill lubrication process.
When complete, run the treadmill for approximately 3 minutes at 3 mph, distributing the
silicone across the running belt and deck.
Note: When lubricating the treadmill belt, make sure the treadmill is located on a surface
that can be easily cleaned.
After treadmill lubrication, clean any excess silicone off the belt and frame.
We recommended you wipe the treadmill down after each use to keep the treadmill clean
and dry.
A mild detergent may be used at times to help remove all dirt and salt from the belt, painted
parts, and the console.
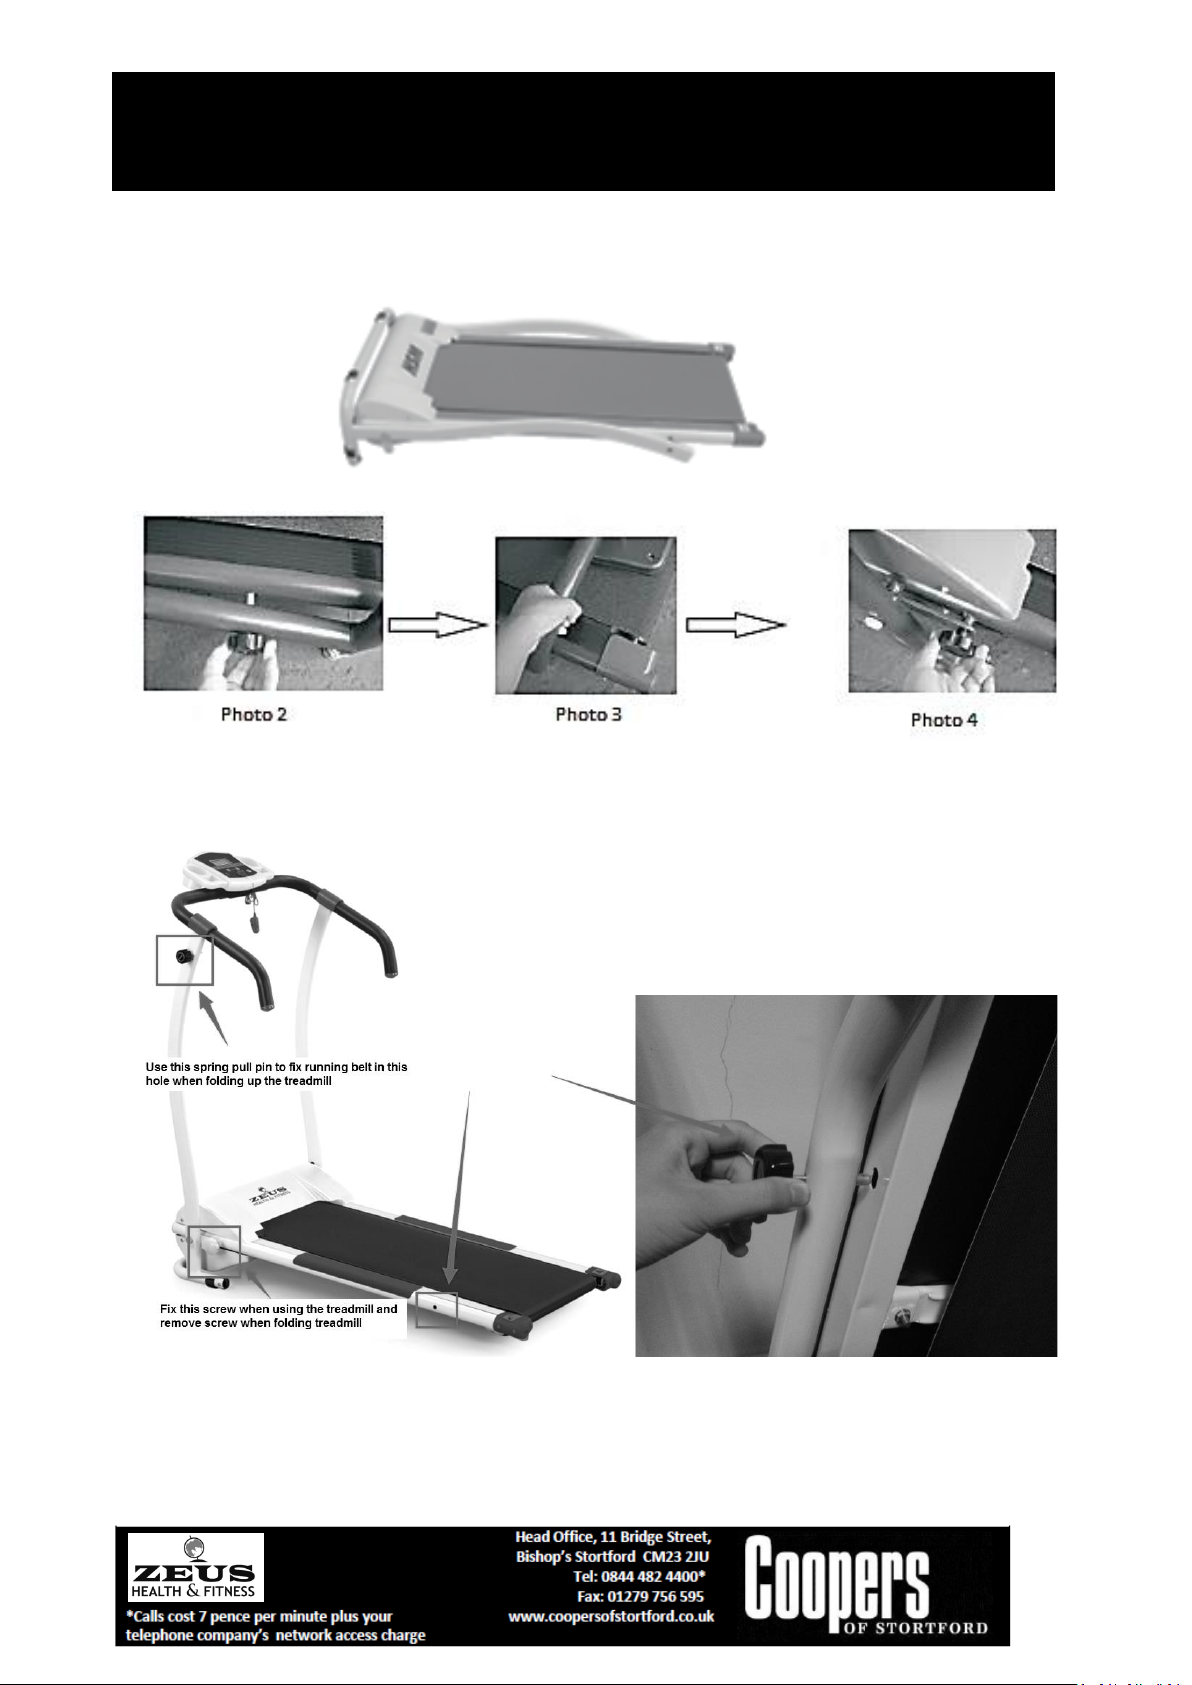
Adjusting the running belt
The treadmill might need adjustment to work best as sometimes there may be deviation in

Treadmill 10811 Instructions for Use
Please read and retain these instructions for future reference v004: 04/09/20
the way we run. For adjusting the running belt with a right bias, turn the bolt in a clockwise
direction to ½ laps, and then the left side of the adjustment bolt along counter-clockwise
rotating ½ laps. If running with left bias, do the opposite.
Do not touch the socket or pull out the plug if your hands are wet. When you pull out the
plug, please hold the head by the plastic parts.
SAFETY NOTICE:
DO NOT WEAR TOO LONG OR TOO LOOSE CLOTHING. ALWAYS WEAR APPROPRIATE
FOOTWEAR/TRAINERS.
WHEN USING ELECTRICAL APPLIANCES, BASIC SAFETY PRECAUTIONS SHOULD ALWAYS BE
FOLLOWED:
READ ALL INSTRUCTIONS BEFORE USE.
ENSURE THE TREADMILL IS STABLE ON A LEVEL SURFACE BEFORE TURNING THE POWER ON.
TO PROTECT AGAINST ELECTRIC SHOCK, DO NOT IMMERSE CORD, PLUG OR APPLIANCE, IN
WATER OR ANY OTHER LIQUID.
UNPLUG FROM OUTLET WHEN NOT IN USE AND BEFORE CLEANING.
DO NOT OPERATE ANY APPLIANCE WITH A DAMAGED CORD OR PLUG OR AFTER THE
APPLIANCE MALFUNCTIONS, OR HAS BEEN DAMAGED IN ANY MANNER. WE RECOMMEND
THAT THE POWER CORD IS NOT KINKED OR STORED IN A TWISTED MANNER, AND THAT YOU
REGULARLY CHECK ITS CONDITION.
THE USE OF ANY ACCESSORY ATTACHMENTS NOT RECOMMENDED BY COOPERS OF
STORTFORD MAY CAUSE INJURIES AND INVALIDATE ANY WARRANTY YOU MAY HAVE.
DO NOT USE OUTDOORS.
DO NOT USE THIS APPLIANCE FOR ANY OTHER USE THAN THE INTENDED USE IT IS DESIGNED
FOR.
BEFORE USE, CHECK THOROUGHLY FOR ANY DEFECTS AND DO NOT USE IF DEFECTS ARE
FOUND. TAKE CARE NOT TO DROP THE APPLIANCE AS HEAVY IMPACTS MAY CAUSE
INTERNAL DAMAGE.
WARNING
CHECK THE APPLIANCE CAREFULLY FOR DAMAGE BEFORE EACH USE.
DO NOT USE IF THE POWER CORD OR PLUG IS DAMAGED. TO BE REPAIRED BY A QUALIFIED
ELECTRICIAN OR TO BE REPLACED BY THE MANUFACTURER, SERVICE AGENT OR SIMILARLY
QUALIFIED PERSON, IN ORDER TO AVOID A HAZARD.
KEEP THE APPLIANCE AWAY FROM CHILDREN.
BEFORE CONNECTING THE APPLIANCE, CHECK IF THE VOLTAGE INDICATED ON THE BOTTOM
OF THE APPLIANCE IS IN ACCORDANCE WITH THE MAINS VOLTAGE IN YOUR HOME.
THIS APPLIANCE CAN BE USED BY CHILDREN AGED FROM 8 YEARS AND ABOVE AND
PERSONS WITH REDUCED PHYSICAL, SENSORY OR MENTAL CAPABILITIES OR LACK OF
EXPERIENCE AND KNOWLEDGE IF THEY HAVE BEEN GIVEN SUPERVISION OR INSTRUCTION
CONCERNING USE OF THE APPLIANCE IN A SAFE WAY AND UNDERSTAND THE HAZARDS
INVOLVED. CHILDREN SHALL NOT PLAY WITH THE APPLIANCE. CLEANING AND USER
MAINTENANCE SHALL NOT BE MADE BY CHILDREN WITHOUT SUPERVISION.
NOT SUITABLE FOR CHILDREN UNDER 8 YEARS OF AGE.

Treadmill 10811 Instructions for Use
Please read and retain these instructions for future reference v004: 04/09/20
TROUBLESHOOTING:
Fault
Cause
Solution
Does not Function
Lack of Power.
Check fuse in plug. Replace fuse if blown.
Check plug is connected to mains socket
and power is switched ON.
Working speed is slow or
not constant.
Voltage is low.
Check power connections.
Check power supply is correct voltage.
Switch off and restart when voltage is
correct (220-240V a.c.)
PLUG WIRING (UK & IRELAND)
This appliance is fitted with a BS 1363 13-amp plug. If you have to replace the fuse, only those that
are ASTA or BSI approved to BS1362 and with a rated current of 13-amps should be used. If there is a
fuse cover fitted, this cover must be re-fitted after changing the fuse.
If the fuse cover is lost or damaged the plug must not be used. Spare fuse holders and fuses are
available from electrical outlets. If the socket outlets in your home or office are not suitable for this
product’s plug, the plug must be removed and disposed of safely. Attempts to insert the plug into
the wrong socket is likely to cause electric hazard. A replacement plug should be wired according to
the following instructions:
The cable
A mains electricity cable contains two or three inner wires. Each has a core of copper and an outer
layer of flexible plastic. This product is earthed; the wires in the cord set are colour coded in the
following way:
The diagram shows the key features of a
correctly wired three-pin mains plug.
BLUE NEUTRAL
BROWN LIVE
GREEN & YELLOW EARTH
DISPOSAL
•Coopers of Stortford use recyclable or recycled packaging where possible.
•Please dispose of all packaging, paper, cartons, packaging in accordance with your
local recycling regulations.
•Plastics, polybags –Contains the following recyclable plastic.

Treadmill 10811 Instructions for Use
Please read and retain these instructions for future reference v004: 04/09/20
Code & Symbol
Type of Plastic
Polypropylene
ABS
Commonly used for
Microwaveable food containers,
yoghurt pots, butter tubs,
disposable plates and cups
CD’s, crisp packets, various flexible
packaging, baby bottles, sunglass
lenses
Notes
Commonly recycled and collected
from household recycling bins
(packaging tape itself not
recyclable but does not interfere
with cardboard)
Not often or widely recycled
•At the end of the product’s lifespan please check with your local council authorised household
waste recycling centre for disposal.
Table of contents