1010music nanobox lemondrop User manual

Copyright 1010music LLC 2022
nanobox | lemondrop
User Guide
V 1.0.10

Page 2 of 58 Copyright 1010music LLC 2022
nanobox | lemondrop User Guide v 1.0.10 Feb 4, 2022
WELCOME 4
FIRMWARE VERSION................................................................................................. 4
QUICK START GUIDE 5
GET SET UP ....................................................................................................................5
FIND YOUR WAY AROUND ...................................................................................... 6
ACCESS THE DASHBOARD AND PERFORMANCE CONTROLS.................... 7
NAVIGATE THE STACKS ............................................................................................ 7
SET THE CONTROLS................................................................................................... 8
ACCESS HIGH LEVEL CONFIGURATION OPTIONS ........................................... 8
EXPLORE THE SOUNDS ............................................................................................ 9
ADJUST THE VOLUME AND BRIGHTNESS.......................................................... 9
THE DASHBOARD 10
MAKE SOME MUSIC 13
GRID KEYBOARD ....................................................................................................... 13
XY MODULATOR PAD...............................................................................................16
CONFIGURE THE SOUND GENERATION 18
GRANULAR OSCILLATORS......................................................................................18
WAV FILE SELECTION SCREEN............................................................................24
WAVEFORM OSCILLATORS ................................................................................... 26
TWEAK THE SOUND 29
SIGNAL PATH.............................................................................................................. 29
FILTERS......................................................................................................................... 30
ENVELOPES ................................................................................................................34
LOW FREQUENCY OSCILLATORS........................................................................ 36
BAR SEQUENCE MODULATOR............................................................................. 38
EFFECTS.......................................................................................................................42

Copyright 1010music LLC 2021 Page 3 of 58
nanobox | lemondrop User Guide v 1.0.10Feb 4, 2022
PARAMETER MODULATION ..................................................................................48
MIDI CONTROLLERS 50
SET UP MIDI................................................................................................................50
MIDI CLOCK SYNCHRONIZATION........................................................................50
PARAMETER MODULATION VIA MIDI................................................................. 51
CONTROL THE X AND Y MODULATORS VIA MIDI........................................... 51
SYNCHRONIZING WITH THE CLOCK IN 51
UPDATING FIRMWARE 52
NANOBOX CONFIGURATION 53
PRESET CONFIGURATION 56
EXPERIMENTING WITH GRANULAR 57
FIND OUT MORE 58

Page 4 of 58 Copyright 1010music LLC 2022
nanobox | lemondrop User Guide v 1.0.10 Feb 4, 2022
WELCOME
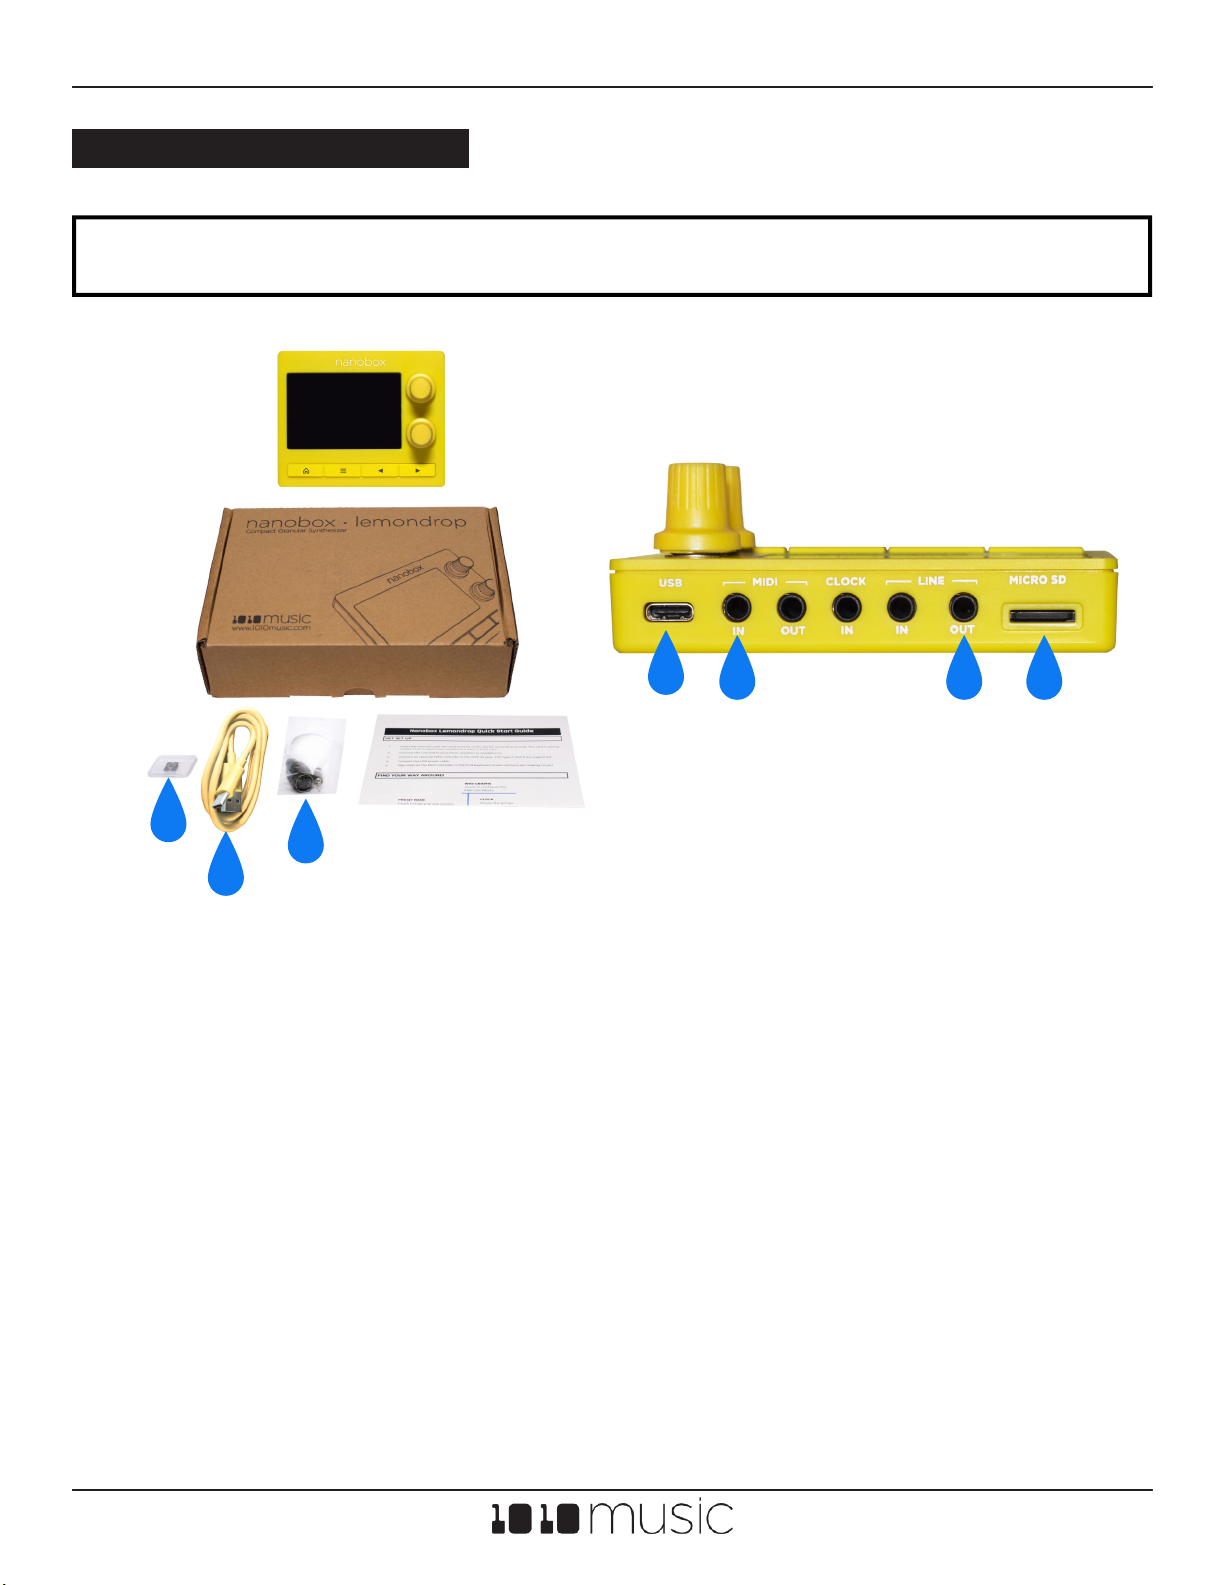
Explore a freshly squeezed approach to granular synthesis with nanobox | lemondrop, a
polyphonic granular mini synthesizer with intuitive touchscreen control. Four voice
polyphony, two granulators and an oscillator provide a wide sonic palette—from lush
environmental pads to rugged and glitched-out textures. Instantly morph and shape
sounds with the swipe of a nger using touchscreen X/Y control. Choose from hundreds
of professionally designed presets and wav les, or quickly create your own patches with
deep parameter control via the 2” touchscreen. Integrate lemondrop seamlessly with your
existing tabletop gear—or create on-the-go thanks to a compact design that ts in the
palm of your hand.
FIRMWARE VERSION
This User Guide is based on Version 1.0.10
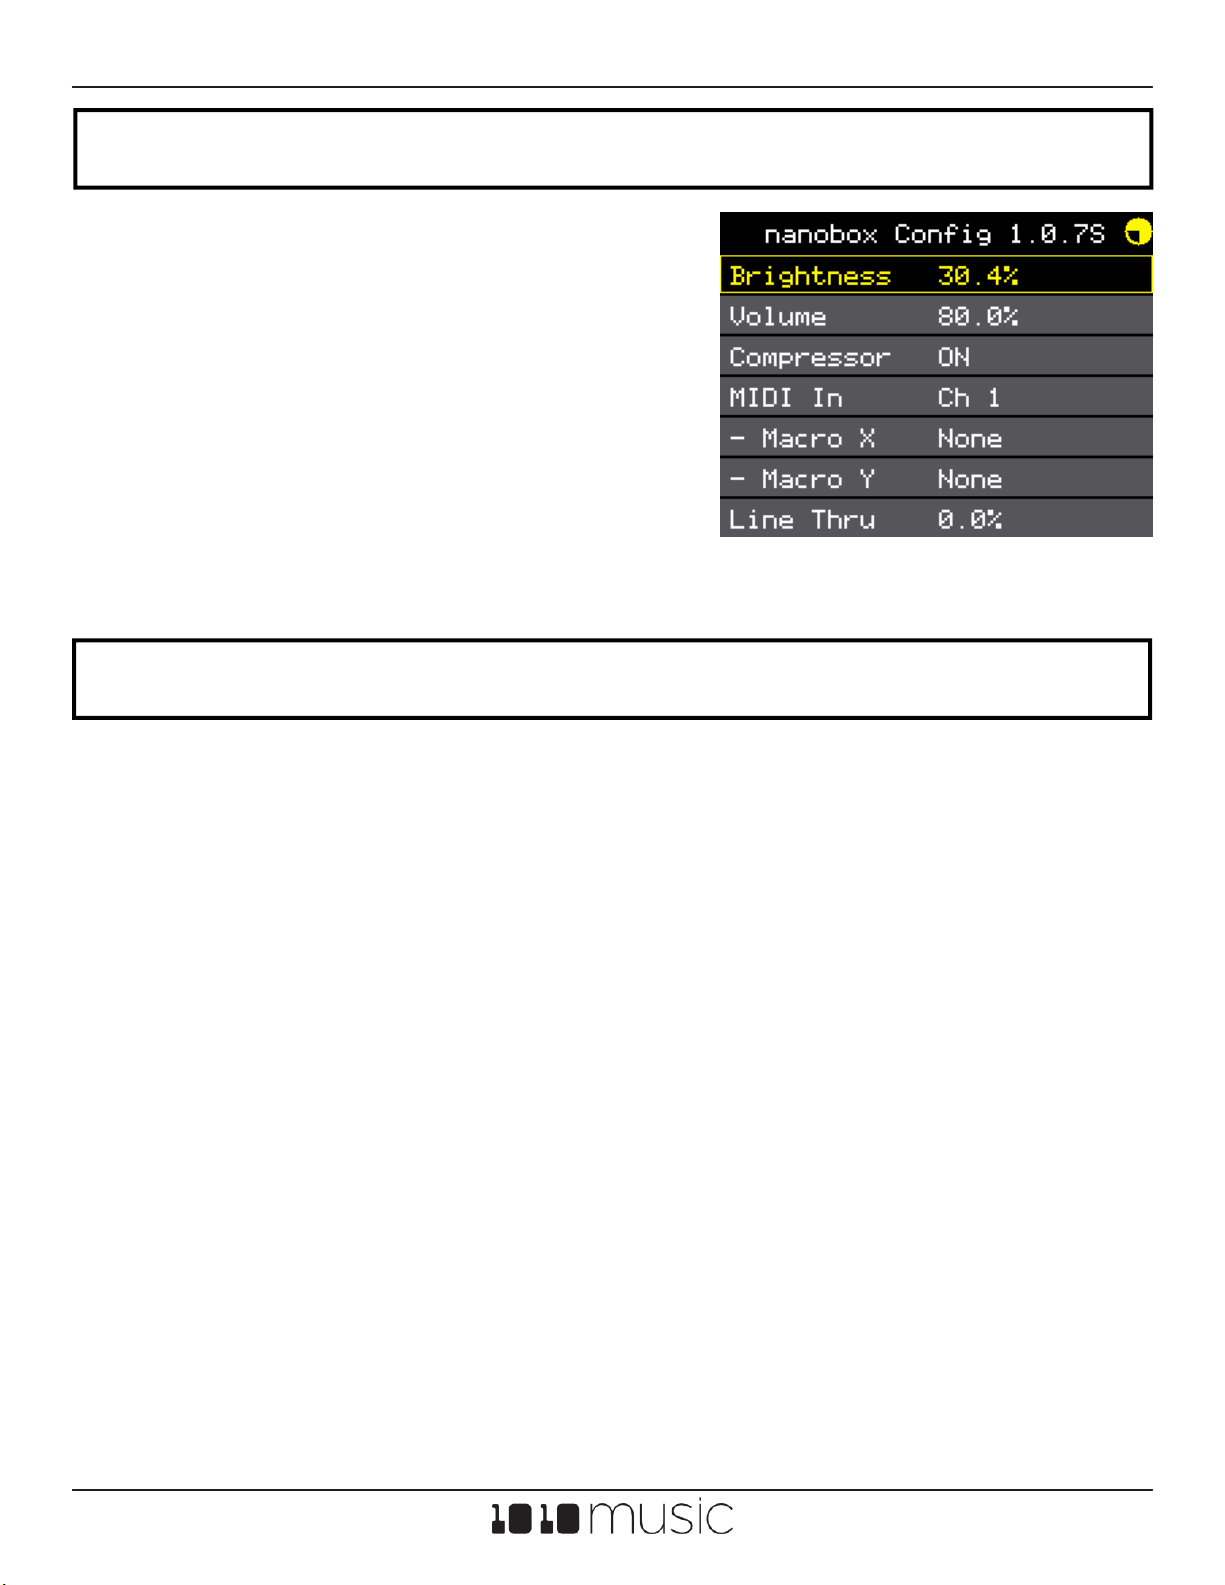
of the nanobox | lemondrop rmware. To
see which version is on your product, push
the Home button to go to the main
dashboard, then push the Left Arrow
button to go to the nanobox Cong
screen. The loaded rmware version is
displayed at the top of the screen, just to
the left of the rotating tempo icon. Version
1.0.10 is available for download for free at
https://forum.1010music.com, after you
register for the forum. The instructions for
downloading and installing the rmware
are included near the end of this
document, and are in the downloads
section of the forum.
Firmware Version

Feb 4, 2022 nanobox | lemondrop User Guide v 1.0.10
Page 5 of 58Copyright 1010music LLC 2021
1. Insert the microSD card if it’s not already inserted. The card must be in the slot
for lemondrop to load. The card is spring-loaded. Push to eject when needed,
but leave it in for now.
2. Connect the stereo Line Out to your mixer, speakers or headphones. Be sure to
use a TRS cable to hear both channels.
3. Connect an optional MIDI controller to the MIDI IN jack. TRS Type A and B are
supported. Use the included adapter to connect to controllers that use MIDI 5
Pin DIN.
4. Connect the USB power cable. Lemondrop can be powered by a standard 5V,
500 mA USB power adapter or USB battery. Lemondrop will start up as soon as
it receives power.
5. Play notes on the MIDI controller or the Grid Keyboard screen and you are
making music!
QUICK START GUIDE
GET SET UP
1
123
3
4
4

Feb 4, 2022nanobox | lemondrop User Guide v 1.0.10
Copyright 1010music LLC 2022Page 6 of 58
HOME BUTTON
Access the
Dashboard and
the Performance
Stack. LAYER BUTTON
Cycle between the
layers in the current
feature stack.
CONTROL PANEL
Gauges show the
real time state of
each control.
Touch to access
the related
settings.
LEFT ARROW BUTTON
Go back to the previous screen.
RIGHT ARROW BUTTON
Access more detail about the current selection.
KNOBS
Control X and Y
modulators, scroll
through a list and
choose settings.
X/Y GAUGES
Values of the X and
Y modulators.
CLOCK
Shows the tempo.
PRESET NAME
Touch to load and save presets.
WAV GRAPHS
Touch to congure the Main Oscillators.
Watch the Grain Progression.
FIND YOUR WAY AROUND

Feb 4, 2022 nanobox | lemondrop User Guide v 1.0.10
Page 7 of 58Copyright 1010music LLC 2021
Performance
Stack
X/Y Modulator
Grid Keyboard
Main Oscillator
Stack
Grain Osc 1
Grain Osc 2
Oscillator
Filter
Stack
Filter 1
Filter 2
Envelope
Stack
Envelope 1
Envelope 2
Modulation
Stack
LFO 1
LFO 2
Sequencer
FX
Stack
FX 1
FX 2
Push the Layer Button to cycle
through a feature stack.
Touch the graphs or buttons on the
Dashboard to access feature stacks.
DASHBOARD
Watch the oscillators and controls
react to Note Triggers. Touch the
waves or a button to congure
the related parameters . Turn the
knobs to control the Macro X and
Macro Y Modulators.
X/Y MODULATOR
Touch the screen
and turn the knobs
to adjust the sound
in real time.
Performance Stack
GRID KEYBOARD
Trigger notes by
touching the grid.
Touch the Hold
button to use note
toggle mode. Touch
<< or >> to change
octaves. Push the
Right Arrow to
select the scale.
ACCESS THE DASHBOARD AND PERFORMANCE CONTROLS
NAVIGATE THE STACKS

Feb 4, 2022nanobox | lemondrop User Guide v 1.0.10
Copyright 1010music LLC 2022Page 8 of 58
nanobox
Conguration Preset
Conguration
Preset Name
Touch to load
and save presets.
Push the Left Arrow and Right Arrow buttons from the Dashboard
to congure settings at the nanobox level and at the preset level.
Graph
Drag the handle to
adjust the settings.
Parameter List
Use the top knob
to scroll through
the list. Use the
bottom knob to
select a value.
Modulation Slots
Push the Right Arrow while
row is selected to apply MIDI
and Internal modulation.
Stack Position
See where you are
in a stack.
SET THE CONTROLS
ACCESS HIGH LEVEL CONFIGURATION OPTIONS

Feb 4, 2022 nanobox | lemondrop User Guide v 1.0.10
Page 9 of 58Copyright 1010music LLC 2021
EXPLORE THE SOUNDS
ADJUST THE VOLUME AND BRIGHTNESS
■ Try the Modulation Wheel on your MIDI Controller with different presets to add
sometimes subtle, sometimes surprising effects.
■ Turn the knobs on the dashboard and drag your nger on the X/Y Modulation
Pad to explore how each preset uses the Macro X and Macro Y modulators.
■ Set the Line Thru amount on the nanobox Conguration screen to control how
much of the Line Input signal is sent to the FX engine.
■ Set the Play Mode for a Grain Oscillator to Fixed and manually adjust the Play Pos
parameter to nd the sweet spots in your le.
■ Use the Grid Keyboard to Hold the notes and hear the changes over time. Trigger
multiple notes to hear how they interplay.
To adjust the volume and screen brightness:
1. Push Home to go to the Dashboard if
not already there.
2. Push the Left Arrow button to go to
the nanobox Cong screen.
3. Use the knobs to adjust the values of
the Brightness and Volume
parameters.

Feb 4, 2022nanobox | lemondrop User Guide v 1.0.10
Copyright 1010music LLC 2022Page 10 of 58
THE DASHBOARD
The dashboard is your window into what nanobox | lemondrop is doing. Here you can see
the waveform congured for each of the two granulators, monitor the state of each of the
audio control features, and access all of the features available.
You can get to the dashboard by pushing the Home button from any other screen.
SEE AND TOUCH
Grain
Oscillator One
Control Panel for Two Filters,
Two Envelopes, Two LFOs,
One Bar Modulation
Sequencer, and Two Effects
Grain
Oscillator Two
Y Gauge
X GAUGE
CLOCK
PRESET NAME
Preset Name
Displays the currently selected preset. Touch to choose a different preset or save your
settings to the current preset or a new preset. Load a preset without saving to go back to
the last saved settings.
Clock
Icon rotates one quarter turn for each beat in a 4/4 measure. Push the Right Arrow while
on the Dashboard to see the Preset Cong Screen where you can change the tempo.

Feb 4, 2022 nanobox | lemondrop User Guide v 1.0.10
Page 11 of 58Copyright 1010music LLC 2021
Grain Oscillator One and Two
The graph represents the rst 30 seconds of the WAV le for the grain oscillator, or the full
le if shorter. The graph is animated to show the behavior of the earliest triggered note
that is still playing. The white vertical bars represent the playback position of each
currently playing grain. Touch a graph to open the Granulator Settings screen for the
graph. From the Granulator Settings screen, you can navigate through the stack to access
the third oscillator.
X and Y Gauges
X and Y are two manually controlled modulation sources. These gauges show their current values,
with zero in the middle. From the dashboard, turn the top knob to control X and the bottom knob to
control Y. You can also control X and Y from the XY Modulator Screen and via MIDI. Go to the
modulation settings for a parameter to congure X or Y to control that parameter.
Control Panel - FILT
The top and bottom gauges display the Cutoff (for Low Pass and High Pass lters) or
Center Frequency (for Notch and Band Pass lters) for FILT1 and FILT2. If the gauges are
moving, this value is being controlled by a modulation source. Touch the panel to access
the Filter Settings stack.
Control Panel - ENV
The top and bottom gauges displays the level of the signal as controlled by the envelope
for ENV1 and ENV2. The gauges move to show how the envelope is applied over time.
Touch the panel to access the Envelope Settings stack.
Control Panel - LFO/SEQ
The top two gauges display the current value being output by LFO1 and LFO2. The
bottom gauge displays the current value being output by the SEQ. Touch the panel to
access the LFO + SEQ Modulation stack.

Feb 4, 2022nanobox | lemondrop User Guide v 1.0.10
Copyright 1010music LLC 2022Page 12 of 58
Control Panel - FX
The top and bottom gauges display the value of the primary parameter for each effect:
Flanger+Dist: Rate
Chorus: Depth
Phaser: Depth
Delay: Wet Amount
Reverb: Wet Amount
If the gauges are moving, this value is being controlled by a modulation source. Touch the
panel to access the FX Settings stack.
TWIST
Top Knob
Control the value of the X Modulator.
Bottom Knob
Control the value of the Y Modulator
PUSH
Home
Cycle between the X/Y Modulator Screen and the Dashboard.
Layer
Access the Grid Keyboard, and then cycle between the Grid Keyboard and the XY
Modulator Screen.
Left Arrow
Open the nanobox Cong screen, where you can control settings that apply across
presets, such as brightness, volume and MIDI channel.
Right Arrow
Open the Preset Cong screen, where you can control high level preset settings, such as
BPM an Bend Range.

Feb 4, 2022 nanobox | lemondrop User Guide v 1.0.10
Page 13 of 58Copyright 1010music LLC 2021
Note Grid
Touch a cell in the note grid to trigger that note. If Hold is enabled, the note will play until
you touch it again. Otherwise, the note will end when you stop touching it. The number
of notes in the grid will vary based on the selected scale.
Playing Note
Currently playing notes are highlighted yellow. Touch a playing note to clear it.
MAKE SOME MUSIC
To make sound with nanobox, you trigger notes via the Grid Keyboard screen or a MIDI
controller. You can tweak the sound in real time by adjusting parameters and by
controlling the X & Y Modulators from either the Dashboard or the X/Y Modulator screen.
All sound is sent to the Line Out jack.
The Grid Keyboard allows you to play notes that are always on key. Each row in the grid
corresponds to one octave. You can choose which scale to use.
Push the Layer button from the Dashboard or the XY Modulator Screen to access the Grid
Keyboard. Push the Right Arrow button from here to get to the Keyboard Cong screen
where you can select a scale.
SEE AND TOUCH
Note Grid
Playing
Note
Octave
Label
Octave Selectors
and Hold Button
GRID KEYBOARD

Feb 4, 2022nanobox | lemondrop User Guide v 1.0.10
Copyright 1010music LLC 2022Page 14 of 58
TWIST
Octave Label
The rst and last cell in each is labeled with the octave mapped to that row.
Octave Selectors
Touch the left and right chevrons to scroll the grid one octave.
Hold Button
Touch the Hold button to toggle it’s state. When inactive (gray), notes only play while you
are touching them. When active (black with yellow outline), notes continue to play until
you touch them a second time.
Keyboard Cong Screen
Push the Right Arrow button to access the Keyboard Cong Screen where you can set the
scale.
Parameter Description Modulation
Target?
Scale The scale imposed by the keyboard grid.
Chromatic, Major, Major Pent, Minor, Minor
Pent, Minor Blues, Raga Bhairav, Raga Todi,
Gypsy, Arabian, Egyptian, Miyakobushi,
Ryukyu, Wholetone, Diminish, Harmonic
Minor, Mel Minor, Dorian, Phrygian, Lydian,
Mixolydian, Aeolian, Locrian
No
Root Note A, A#, B, C, C#, D, D#, E, F, F#, G, G# No
Top Knob
Not used on the Grid Keyboard screen. On the Keyboard Cong screen, select a
parameter to edit.
Bottom Knob
Not used on the Grid Keyboard screen. On the Keyboard Cong screen, select a value for
the currently selected parameter.

Feb 4, 2022 nanobox | lemondrop User Guide v 1.0.10
Page 15 of 58Copyright 1010music LLC 2021
Home
Go back to the Dashboard.
Layer
Toggle to the XY Modulator Pad.
Left Arrow
Go back to the Dashboard.
Right Arrow
Go to the Keyboard Cong screen to select a scale.
Nanobox is designed to work with your MIDI controller to trigger notes and control the
sound. Keyboard and pad controllers can trigger notes, while knobs and sliders can be
mapped to control parameters. The standard MIDI modulators like velocity, after touch
and mod wheel are supported.
Hardware Connection
Connect your MIDI controller to the TRS MIDI In jack. The system will automatically
recognize if the MIDI controller uses Type A or Type B TRS MIDI connections and use the
correct one. Use the included adapter to connect to a MIDI 5 Pin DIN device. Nanobox
does not support USB MIDI.
MIDI Channel
You can control which MIDI channel nanobox will listen to. From the Dashboard, push
the Left Arrow button to access the nanobox Cong screen. Set the value of the MIDI In
Parameter to be the channel used by your MIDI controller to send note and CC
information. We will dive into MIDI CC control of parameters later.
Play Some Notes
You can now use your MIDI controller to play notes on Nanobox.
NOTE: The Hold button on the Grid Keyboard does not impact notes received via MIDI.
The Grid Keyboard does not show notes that have been triggered by MIDI.
PUSH
MIDI CONTROLLER

Feb 4, 2022nanobox | lemondrop User Guide v 1.0.10
Copyright 1010music LLC 2022Page 16 of 58
XY Pad
Fallback
Position
Current
Position
0,0
Point
The XY Modulator Pad allows you to use touch gestures and knobs to control the X and Y
modulation sources. Each factory preset is congured to map the X and Y modulators to
one or more parameters that will add interesting dimension to the sound. The XY pad
only affects sounds that are currently playing. Trigger a note with the Hold function on
the Grid Keyboard screen, and then push the Layer button to jump over to the XY
Modulator Pad to perform live audio modulations. These are the same XY modulators
shown and controlled on the Dashboard.
From the Dashboard, push the Home button to toggle to the XY Modulator Pad. From
the Grid Keyboard, push the Layer button to toggle to the XY Modulator Pad.
To hear the XY Modulators in action, load the preset 006InniteBells. In this preset, the X
modulator is mapped to Grain Size and Grain Play Pos. The Y modulator is mapped to
Grain Density, Filter 2 Cutoff, and Reverb Wet Amount. Use the Hold button and trigger
some notes on the Grid Keyboard, then push the Layer button to go to the XY Pad. Drag
your nger slowly in one direction at a time and hear how the sound evolves.
SEE AND TOUCH
XY Pad
Touch the screen to move the X and Y modulator values. You can tap to make a
momentary change, or hold and drag for longer, sweeping changes. Drag left and right
to control the X modulator, up and down to control the Y modulator.
XY MODULATOR PAD

Feb 4, 2022 nanobox | lemondrop User Guide v 1.0.10
Page 17 of 58Copyright 1010music LLC 2021
Fallback Position
When you release your nger from a drag motion, the X and Y values will jump to the
Fallback position, indicated by the white +icon. Turn the knobs to adjust the fallback
position.
Current Position
The yellow ball indicates the current position of the X and Y modulators. If you turn the
knobs to move this, it will move with the Fallback Position. When you drag, the Current
Position will be different from the Fallback Position.
0,0 Point
The gray +icon does not move. It represents the point where X and Y are both zero.
Home
Go back to the Dashboard.
Layer
Toggle to the Grid Keyboard.
Left Arrow
Go back to the Dashboard.
Right Arrow
Not used.
Top Knob
Control the value of the X Modulator and set the fallback position.
Bottom Knob
Control the value of the Y Modulator and set the fallback position.
TWIST
PUSH

Feb 4, 2022nanobox | lemondrop User Guide v 1.0.10
Copyright 1010music LLC 2022Page 18 of 58
CONFIGURE THE SOUND GENERATION
Lemondrop uses granular synthesis to generate a wide variety of creative sounds. At the
heart of the sound engine are two grain oscillators and one waveform oscillator. Each
preset uses a different combination of WAV les, oscillators and audio settings to
generate a unique sound. Customize each grain oscillator by choosing a WAV le from
the microSD card, choosing a setting for the Live audio input option, and by adjusting the
grain and other settings. Change the shape of the waveform oscillator to further hone the
sound: choose from a saw, triangle, square, sine or noise waveform. Control how much
each oscillator contributes to the sound by adjusting its level. You can further customize
the sound via the 2 lters, 2 envelopes, 2 LFOs, 1 modulation sequencer and 2 effects
engines accessed from the Dashboard. You can then save these settings as a new preset
for later use. All of your settings are saved on the microSD card.
Lemondrop can apply granular synthesis to a live audio stream. Connect the audio signal
to the Line In and then set the Live Input parameter for one of the Granular Oscillators to
On. The granular settings will now be applied to the most recent 20 seconds of audio
input.
This section describes how to congure the grain oscillators and waveform oscillator that
generate the sound.
GRANULAR OSCILLATORS
Two of the three oscillators used to generate sound are granulator oscillators. Each
granulator oscillator selects small pieces, or grains, of sound from either a WAV le or live
input. With the lemondrop granular engine, you can manipulate the sound by adjusting
the size and position of the grains, the frequency at which new grains are triggered, and
the range of the sound source from which grains are selected. You can also add some
randomness to the timing of the grain triggers and the stereo position of each grain.
Touch a grain oscillator graph on the Dashboard to access this screen. Push Layer to cycle
through the Oscillators.

Feb 4, 2022 nanobox | lemondrop User Guide v 1.0.10
Page 19 of 58Copyright 1010music LLC 2021
SEE AND TOUCH
WAV File
Graph
Parameter
List
Grain Playback
Position
Modulation
Slots
Stack Layer File Name
Stack Layer
The identier of the current stack layer: GR1 and GR2 for grain oscillators 1 and 2, and OSC
for the waveform oscillator.
File Name
The name of the WAV le used for this grain oscillator. It may be truncated.
WAV File Graph
The yellow lines in the graph are a representation of the audio signal in the WAV le.
Touch the graph to choose a different WAV le.
Grain Playback Position
The vertical white lines indicate the playback position of currently playing grains. The
number of lines reect the number of currently playing grains. The lines move as the play
position for the grain advances.
Modulation Slots
The three yellow boxes on the right side of a parameter row indicate that the parameter
may be modulated. Filled boxes are lled slots. Push the Right Arrow button to access
the Modulation Parameters screen for the selected parameter.
Parameter List
Turn the top knob to select a parameter, bottom knob to select a value. The parameters
are dened below. Later in the document we will discuss working with these parameters
in more depth.

Feb 4, 2022nanobox | lemondrop User Guide v 1.0.10
Copyright 1010music LLC 2022Page 20 of 58
Parameter Description and Range Modulation
Target?
Pitch How many semitones up or down you want
to shift the pitch.
-24.00 to +24.00 semitones
Yes
Level The relative audio level of this waveform.
0% - 100%
Yes
Beat Sync When ON, the Rate parameter is used to
control how frequently grains are chosen in
a way that is synced to musical intervals.
When OFF, the Density parameter is used
to select how frequently grains are chosen
and how many are chosen.
ON, OFF
No
Rate When Beat Sync is On, the musical interval
between selection of new grains.
1/64, 1/32T, 1/32, 1/16T, 1/16, 1/8T,
1/8, 1/4T, 1/4, 1/2T, 1/2, 1 bar, 2 bars, 4 bars, 8
bars
T = Triplet
Yes
Density When Beat Sync is OFF, the density
Controls the number of grains played per
second. At the lowest end, you will get
about 1 grain every few seconds. At 100%
you will get maximum overlap of the grains.
0% - 100%
Yes
Grain Size The length of the small segments of the
WAV le that will be played, ranging from
about 20 ms to about 1 second.
0% - 100%
Yes
Window The length of le on either side of the
current playback position from which the
grains are selected. When set to 0%, the
grains are always pulled from the same
place in the WAV le. When set to 100%, the
grains are pulled from a window of about a
few seconds around the current playback
position.
0% - 100%
Yes
Table of contents
Other 1010music Synthesizer manuals