Stagg SSP-830 User manual

SSP-830
ACCOMPANIMENT CONTROL
VOLUME
SEQUENCER
BRIGHTNESS
ACCOMP VOLUME
TEMPO
START / STOP
ACCOMP
MELLOW BRIGHT
MELODY 1MELODY 2MELODY 3
MELODY4MELODY3MELODY2MELODY1
ACCOMPPLAY
SONG2SONG1
RECORD HELP A.B.C
DEMO
DSP
S.M.C
LOAD
UTILITY SAVE
NEXT
BACK
HARMONY
LOWER
DSP
A.B.C
DUAL
DUAL
1
4
7 8
0
9
5 6
2 3
FUNCTION
LOWER VOICE
VOICE
STYLE
ALBUM
SUSTAIN
TOUCH
PLAY
SYNC START
SYNC STOP
INTRO
MIN MAX
FILL-IN AFILL-IN BENDING
ONE TOUCH SETTING
FREEZE
O.T.S SUSTAIN HARMONY
TRANSPOSER SYNTH TOUCH BANK STORE
M1M2M3M4M5M6
USER’S MANUAL
STAGE PIANO
SSP-830

2 3 User’s manUalUser’s manUal ssP-830
2 3 User’s manUalUser’s manUal
CONTENTS
GENERAL GUIDE --------------------------------------------------4
POWER ------------------------------------------------------------------------------ 7
CONNECTORS ---------------------------------------------------------------- 8
The headphone jack 8
The AUX.OUT jack 8
The AUX.IN jack 8
The sustain jack 9
The volume jack 9
The MIDI IN/OUT ports 9
BASIC OPERATION ---------------------------------------------------- 10
1. Power on key combination 10
2. Master volume control 10
3. Brilliance 10
4. Demo 10
VOICE EFFECTS ---------------------------------------------------- 11-15
1. Voice select 11
2. Dual 12
3. Lower voice 12
4. Sustain effect 13
5. DSP effect 14
6. Harmony effect 14
7. Touch response 15
8. Transpose 15
9. Pitch bend / Modulation joystick 15
RHYTHM STYLE ---------------------------------------------------- 15-20
1. Style select 15
2. Style start 16
3. Fill in A/B 17
4. Style stop 18
5. Accomp volume 19
6. Auto bass chord 19
7. Tempo 21
FUNCTIONS ------------------------------------------------------------ 21-22
1. Metronome 23
2. Digital effect 23
3. Utility 25
4. MIDI 27
5. Mixer 28
6. Language 29
MEMORY ----------------------------------------------------------------- 30-31
1. Bank 30
2. Store and load 30
3. Data store in memory 31
FREEZE -------------------------------------------------------------------------- 31
ONE TOUCH SETTING ----------------------------------------------- 31

2 3 User’s manUalUser’s manUal
2 3 User’s manUalUser’s manUal ssP-830
PEDAL ---------------------------------------------------------------------- 32-33
1. Foot switch 32
2. Sustain pedal 32
3. Soft pedal 33
4. Start/ stop pedal 33
5. Tempo/ Tap pedal 33
6. Memory select pedal 33
7. Volume pedal 33
SYNTH---------------------------------------------------------------------- 34-35
ALBUM --------------------------------------------------------------------------- 36
RECORD------------------------------------------------------------------- 37-39
1. Record start 37
2. Record stop 38
3. Record play 39
SMC -------------------------------------------------------------------------- 40-46
1. Load file 40
2. Save file 43
3. Utility 45
MIDI --------------------------------------------------------------------------------- 47
HELP ------------------------------------------------------------------------- 48-49
SPECIFICATIONS -------------------------------------------------------- 50
Appendix 1 - Voice list 51
Appendix 2 - Rhythm style list 52
Appendix 3 - Chord list 53
Appendix 4 - Demo list 54
Appendix 5 - Album list 54
Appendix 6 - Midi implementation chart 55

4 5 User’s manUalUser’s manUal ssP-830
4 5 User’s manUalUser’s manUal
VOLUME
MAXMIN
ALBUM
98
5
12
3
4
6
7
10 11 12 13 15 20 21 27 29
2214 28 30 4243
16 23 3118 25 32 33 35 37 39 40 41
17 2419 26 34 36 38
GENERAL GUIDE
1 MASTER VOLUME
2ACCOMP
3BRILLIANCE HANDSPIKE
4MELODY TRACKS 1-4
5RECORD
6PLAY
7ACCOMP VOLUME
8START / STOP
9INTRO
10 FILL-IN A
11 FILL-IN B
12 ENDING
13 SYNC START
14 SYNC STOP
15 TEMPO
16 HELP
17 SMC LOAD
18 ABC
19 BACK
20 UTILITY
21 NEXT
22 SAVE
23 ALBUM
24 STYLE
25 DEMO
26 DSP
27 VOICE
28 LOWER VOICE
29 DUAL
30 FUNCTION
31 DIAL
32 NUMERIC KEYPAD
33 OTS
34 FREEZE
35 SUSTAIN
36 TRANSPOSE
37 HARMONY
38 SYNTH
39 TOUCH
40 BANK
41 STORE
42 M1-M6
43 LCD DISPLAY
1. FRONT PANEL

4 5 User’s manUalUser’s manUal
4 5 User’s manUalUser’s manUal ssP-830
8 9
321
7654
15
26
37
4
20
19 8 9 10 11 12 13
1516
21 22
17
18
14
23
2. LEFT PANEL 3. LCD DISPLAY
4. REAR PANEL 5. TOP CABINET
1 DC 12V POWER JACK
2POWER
3MIDI IN / MIDI OUT
4SUSTAIN PEDAL
5VOLUME PEDAL
6AUX. IN
7AUX. OUT L/MONO
8AUX. OUT RIGHT
9PHONES 1/ PHONES 2
1 ABC
2HARMONY
3LOWER
4DSP
5TOUCH
6DUAL
7SUSTAIN
8 METRONOME
9 TEMPO VELOCITY
10 MEASURE
11 BEAT
12 MEMORY/ OTS / TICK
13 STEP/ REC
14 MELODY 1-4
15 ACCOMP
16 PLAY
17 RECORD SONG 1 / 2
18 SYNTH / NOR / VAR / SMC / DISK
19 CHORD
20 VOICE / STYLE / SONG / DEMO /
ALBUM / PHRASE
21 BAS CLEF
22 TREBLE CLEF
23 FILL-IN A / FILL-IN B
3.3V CARD
3.3V CARD
3.3 SMC Faucet Pitch bend
Modulation joystick

6 7 User’s manUalUser’s manUal ssP-830
6 7 User’s manUalUser’s manUal
INTRODUCTION
Thank you for purchasing this Digital Piano. This piano is user friendly and portable. It has powerful
melody control functions and 48 memories, making it convenient for live performances. The SYNTH
mode can be used to create an abundance of musical programs, while other features include a multi-
task pedal and a built-in multi-track recorder.
Before using the piano, we recommend that you read through this instruction manual carefully and keep
it aside for future reference.
PRECAUTIONS
•Do not expose the piano to high temperatures, direct sunlight, or any excessively dusty environment.
•Do not place the piano in too close proximity to other electrical appliances such as radio or television
sets, as this may cause interference.
•Do not expose the piano to excessive humidity. Avoid placing any receptacles containing liquid (e.g
coffee mug etc) on top of the piano, as any spillage may result in damage to internal parts.
•ACAdaptershouldbeunpluggedbygrippingtheplugrmly.Donotpullonthecable.
•Do not apply excessive force to the switches and buttons.
•The piano must be disconnected from the power supply when not in use, or in the event of a thun
derstorm.
•To guard against any eventual damage to auditory senses, we recommend that the volume level be
limited to +/- 70% of maximum output.
•Always unplug the power cable before cleaning the piano. Do not connect or disconnect the power
cable with a wet hand.
•Check and clean the power plug periodically.
•To avoid damaging the piano, or other devices to which it may be connected, turn the power switches
of any related devices off prior to connecting or disconnecting cables.
•Remove any surface dust with a dry soft cloth or a slightly damp cloth.
•Never use cleaning agents such as thinner or alcohol. To prevent any surface damage when cleaning
the LED display, please use a lens cleaning tissue.
•Pleasedonotusethepianoifthepowercableisdamaged,astodosocouldbeanelectricalre
hazard.
•In the event of any malfunction caused by improper handling of the piano, please switch off and on
again after 30 seconds.
•Do not attempt any disassembly or repair by yourself. If the piano does not work properly, please
contactaqualiedrepairengineer.
•The piano should not be exposed to any dripping or splashing.
MAIN FEATURES
•Keyboard: 88 hammer action keys.
•Operation: Use DIAL & the + (Y)/- (N) buttons or numeric keypad to select Menu & Parameters.
•Program (voice): There are 341 pre-programmed voices available, with the possibility of storing up
to nine additional voices created by the user (User Voices).
•Synth: The synth mode may be used to edit User Voices.
•Demo: There are three different demo modes available.
•Rhythm Style: 130 different rhythms available.
•Chinese: The larger LCD can display Chinese characters.
•The piano has a user friendly menu interface: You may use « BACK/NEXT/+/-/DIAL » to operate.
•Chords: ABC mode is an automated accompaniment mode, playing the corresponding bass & chords
to the lead chords that the user plays on the piano. In addition, the user may select the Single Finger
Detect Option, which allows whole chords to be played by just pressing the root note.
INTRODUCTION

6 7 User’s manUalUser’s manUal
6 7 User’s manUalUser’s manUal ssP-830
•Record: With Record mode, this device can record and store two songs, each containing up to four
melody tracks and one accompanying track.
•Read & Write SM Card:ThispianocanplayaStandardMIDIlestoredinanSMcard,aswellas
saving songs and other data onto an SM card. It can support 16, 32, 64 or 128MB SM cards, but not
8 MB cards.
•Memory: There are 8 memory banks with 6 memory setups each
•Joystick: Parallel swinging of the joystick controls the Pitch Bend effect. Pushing or pulling the
joystick controls Modulation.
•Album: The Album function provides a set of default parameters for 100 different songs for optimal
performance effects.
•Other Functions: Include DSP (« Digital Signal Processor »), OTS (« One Touch Setting ») among
others.
•MIDI In /Out: This piano can be connected to other MIDI instruments via these MIDI ports.
•Online HELP button: Provides help whenever you need it.
THE POWER JACK
ThispianocanbepoweredfromastandardhouseholdwallsocketbyusingthespeciedACadaptor.
The power jack is located on the left panel of the piano body.
Pleasebesuretousetheexacttypeofadapterasspeciedforthisappliance,namely12VDCoutput,
centre positive type. Always ensure that the piano is switched off before connecting the adaptor into the
power socket and the adaptor cable into the unit.
Caution:
• Usingthewrongtypeofadaptorcancreatedangerofreand/orelectricshock.
• For safety’s sake, always unplug the AC adaptor from the wall socket in the event of a thunderstorm or
if leaving the piano unattended for any extended period of time.
DC 12V
POWER

8 9 User’s manUalUser’s manUal ssP-830
8 9 User’s manUalUser’s manUal
CONNECTORS
the headphone jack
There are two phone jacks. One phone jack will shut off the speakers when in use, while the other
phone jack allows the speakers to carry on playing simultaneously. Speakers are shut off when both
headphone jacks are being used.
Caution:
• Never use the headphones at excessive volume levels, as this entails a high risk of impaired hearing.
• To avoid damaging the speakers, ensure that the volume is set to the minimum level before connecting
to the power supply.
the aux.out jack
Shouldyouwishtoplaythispianothroughanexternalamplier,thesemaybeconnectedviatheAUX
OUT L/MONO and R jacks on the left panel. Volume is adjusted via the « VOLUME » button (for mono
playback, use the L/MONO jack. For stereo playback, connect both L/MONO and R jacks).
the aux.in jack
The audio output from a HiFi/CD player can be mixed with the sound of the piano by connecting the
audio appliance to the piano via the AUX.IN jack. This function is convenient for playing along to pre-
recorded music. The volume of the external signal is adjusted via the « MASTER VOLUME » button.
CD Player
CONNECTORS

8 9 User’s manUalUser’s manUal
8 9 User’s manUalUser’s manUal ssP-830
the sustain jack
An optional footswitch can be plugged into the SUSTAIN jack to enable sustain control. This footswitch
functions as per the sustain pedal on an acoustic piano. Press for added sustain.
the volume jack
An optional foot controller can be plugged into the VOLUME jack for adjusting the volume of sound.
the midi in/out ports
MIDI stands for Musical Instrument Digital Interface.
MIDI is a worldwide standard communications protocol that makes it possible for various electronic
musical instruments and other devices to interact with each other.
MIDI IN : Data transmitted from other MIDI instrument via MIDI is received via this terminal.
MIDI OUT : Data produced by the SSP-830 Electronic Piano is transmitted to other MIDI instruments
via MIDI from this terminal.
CONNECTORS

10 11 User’s manUalUser’s manUal ssP-830
10 11 User’s manUalUser’s manUal
BASIC OPERATION
power on key combination
1. To reset all settings to default value (including Memory data,
Record data, Language set, Synth data etc), press the (+)/(-)
buttons simultaneously while powering on the unit.
2. To clear the record data, press the « RECORD & PLAY» buttons
simultaneously while powering on the unit.
3. To reset all the memory data to default value, press the
« STORE & M1» buttons simultaneously while powering on the
unit.
4. To reset all the SYNTH parameters, press the « STORE &
SYNTH » buttons simultaneously while powering on the unit.
master volume control
MASTER VOLUME is adjusted by turning the « VOLUME » knob.
brillance
To brighten the sound of the piano, push the « BRILLIANCE »
handspike to the right.
To darken the sound, push the « BRILLIANCE » handspike to the left.
demo
1. There are three different demos available.
2.Whenyoupressthe«DEMO»button;the«DEMO»agontheLCDlightsup.Itwilldisplaythe
nameoftherstdemo(«World»)andplayallthreedemosinrotation.ToexitDEMOmode,pressthe
« DEMO » button again or the « START / STOP » button.
3. Press and hold the « DEMO » button for 3 seconds to have the current demo played on rotation.
BASIC OPERATION
1 2 3
4 5 6
7 8 9
- 0 +
RECORD
PLAY
1 2 3
4 5 6
7 8 9
- 0 +
RECORD
PLAY
STORE
STORE
M 1
SYNTH
STORE
STORE
M 1
SYNTH
VOLUME
MELLOW BRIGHTI I I I I I I I I I I
MAXMIN
BRILLIANCE
VOLUME
MELLOW BRIGHTI I I I I I I I I I I
MAXMIN
BRILLIANCE
DEMO
START/STOP
DEMO
START/STOP
DEMO
START/STOP

10 11 User’s manUalUser’s manUal
10 11 User’s manUalUser’s manUal ssP-830
4. To switch between the 3 demos, press the (+) & (-) buttons or rotate the DIAL. After the demo
nameashesfor3secondsontheLCD,itwillplay.
5. When demo is playing, the tempo can be adjusted by pressing the « TEMPO +» & « TEMPO – »
buttons or by stepping on the « TEMPO/TAP » pedal.
Note:
If the language setting is Chinese, the DEMO name will be displayed in Chinese ideographs on the LCD.
VOICE EFFECT
voice select
1. There are 350 voice programs available on this piano, including 293 GM voices, 35 Chinese voices,
13 percussion voices and 9 user voices. (see « Appendix 1: VOICE LIST »)
2. Whenthepianoispoweredon,the«VOICER1»aglightsupontheLCDwhilethecurrentvoice
mode appears on the upper line « 001 Piano 1 ». The selected rhythm style is displayed on the lower
line « 001 8 Beat 1 ». Voice can be selected by using the (+) & (-) buttons or the numeric keypad.
Note:
• When numeric keypad is used to select the voice, the keyboard will check the validity of the number
you enter.
•WhenthelanguagesettingisChinese,the«VOICER1»agontheLCDisdisplayedinChineseideo-
graphs. (see « Appendix 1: VOICE LIST »)
1 2 3
4 5 6
7 8 9
- 0 +
ACCOMP VOLUME
TEMPO
VOICE EFFECT
VOICE
1 2 3
4 5 6
7 8 9
- 0 +
1 2 3
4 5 6
7 8 9
- 0 +
1 2 3
4 5 6
7 8 9
- 0 +
12 13 User’s manUalUser’s manUal ssP-830
12 13 User’s manUalUser’s manUal
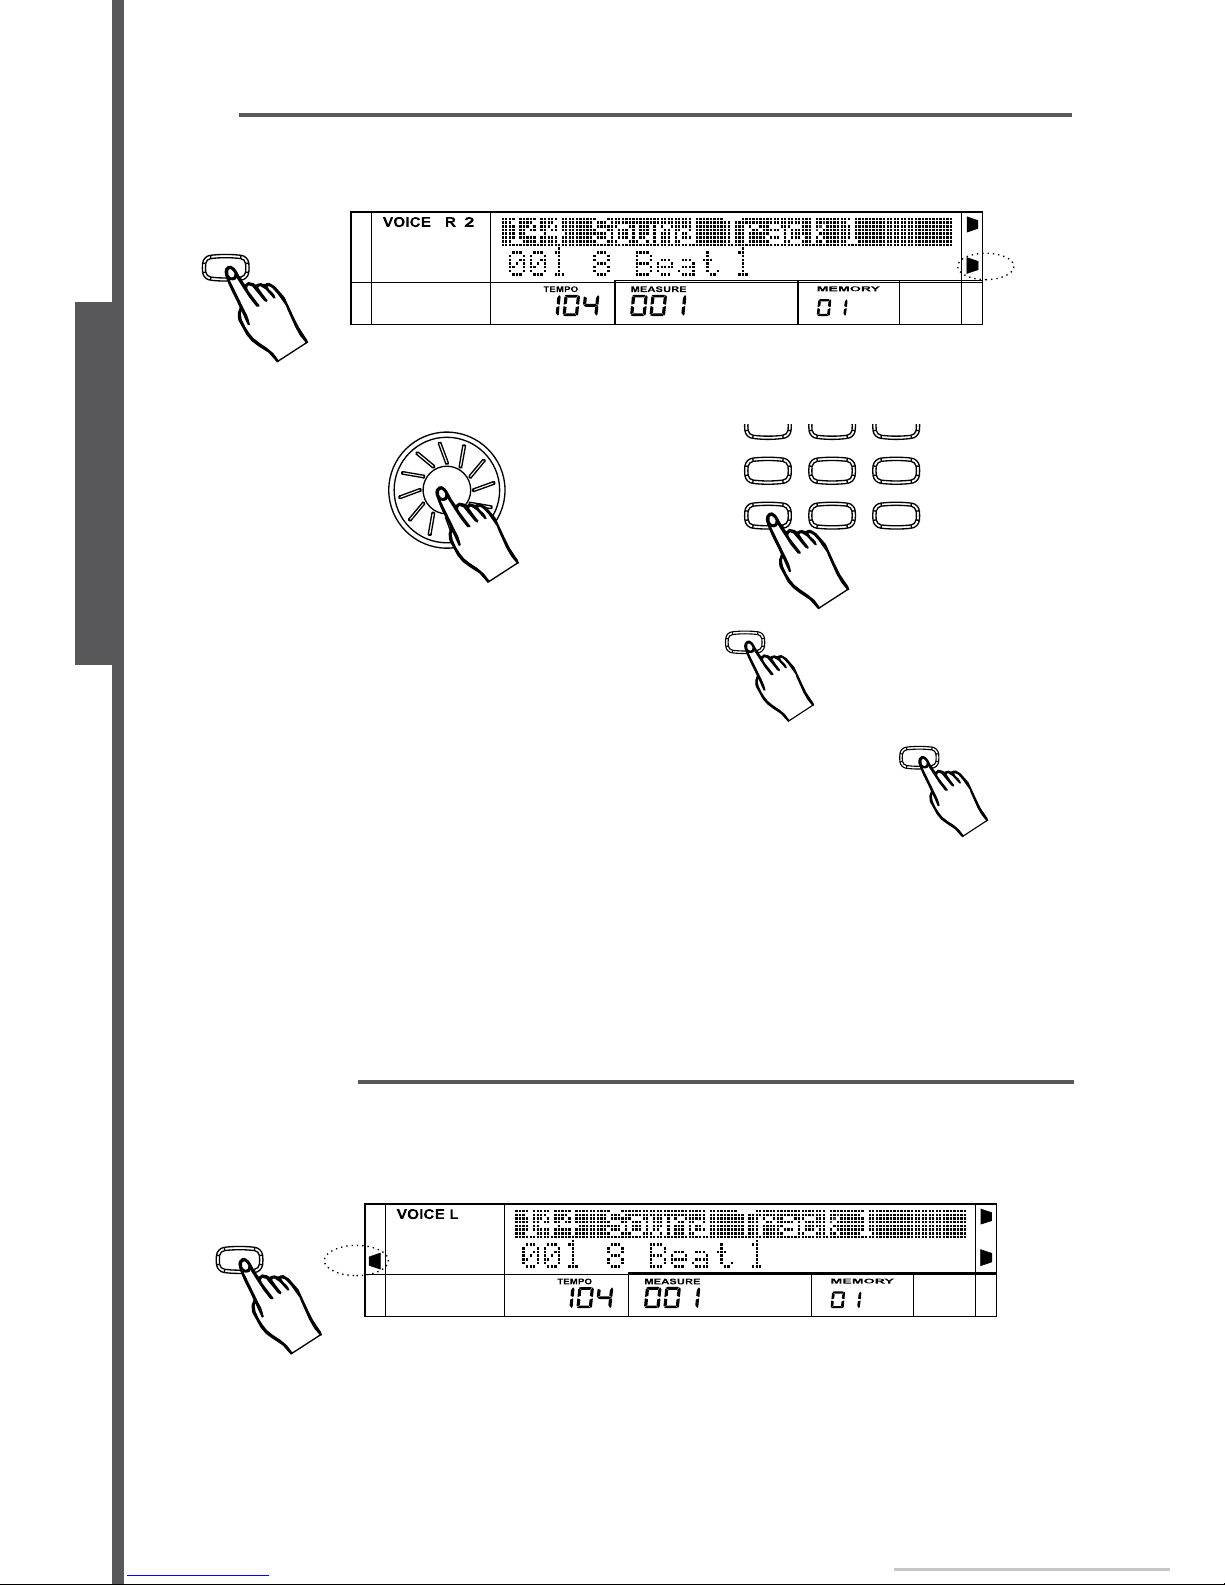
dual
1. To select DUAL VOICE option, press the « DUAL » button. « VOICE R2 » will light up on the LCD,
while the selected 2nd Voice name is highlighted on the upper line «144 Sound Track1» (see « Appendix
1: VOICE LIST »).
2. DUAL VOICE can be selected via the (+) & (-) buttons, the DIAL or the numeric keypad.
3. Press the « DUAL » button again to exit DUAL mode.
4. When in DUAL mode, press the « VOICE » button to switch to
other voice modes (VOICE R1/ LOWER)
Note:
• When ABC & LOWER VOICE modes are off, the whole keyboard will be set as per « VOICE R2 ».
Otherwise, only the right hand part of the keyboard will be set as « VOICE R2 ».
• When numeric keypad is used to select the voice, the keyboard will check the validity of the number
you enter.
•WhenthelanguagesettingisChinese,the«VOICER2»agontheLCDisdisplayedinChineseideo-
graphs. (see « Appendix 1: VOICE LIST »)
lower voice
1. To select LOWER VOICE option, press the « LOWER VOICE » button. « VOICE L » will light up on the
LCD, while the selected LOWER VOICE name is highlighted on the upper line « 144 Sound Track1 »
(see « Appendix 1: VOICE LIST »)
VOICE EFFECT
DUAL
DUAL
DUAL VOICE
DUAL VOICE
LOWER VOICE
LOWER
1 2 3
4 5 6
7 8 9
- 0 +
1 2 3
4 5 6
7 8 9
- 0 +
12 13 User’s manUalUser’s manUal
12 13 User’s manUalUser’s manUal ssP-830
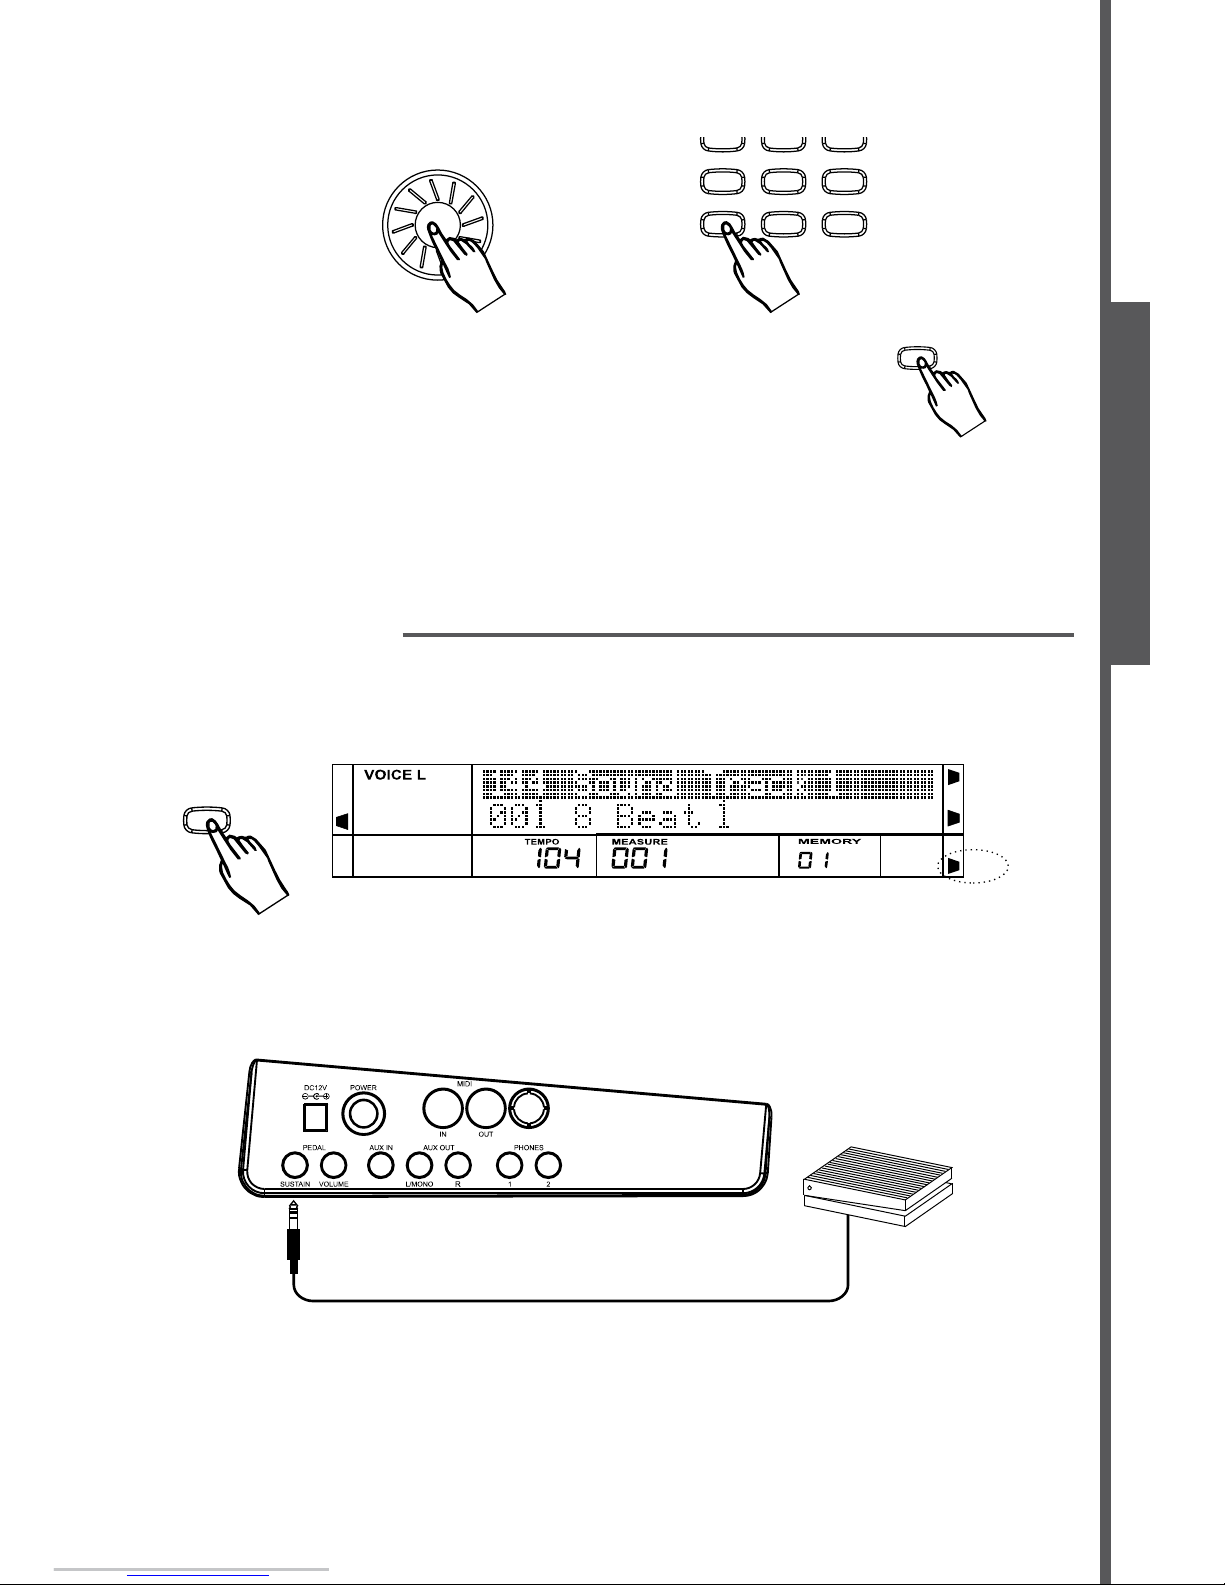
2. LOWER VOICE can be selected via the (+) & (-) buttons, the DIAL or the numeric keypad.
3. When in LOWER VOICE mode, press the « VOICE » button to
switch to other voice modes (VOICE R1/ DUAL).
Note:
• When numeric keypad is used to select the voice, the keyboard will check the validity of the number
you enter
•WhenthelanguagesettingisChinese,the«VOICEL»agontheLCDisdisplayedinChinese
ideographs. (see « Appendix 1: VOICE LIST »)
sustain effect
1. The SUSTAIN effect is always off when you switch the power on. Press the button marked
«SUSTAIN»toactivatetheSUSTAINeffect.The«SUSTAIN»agwilllightupontheLCD.Thiseffect
will apply added sustain to the tone of the keyboard while playing. Press the « SUSTAIN » button again
to deactivate the SUSTAIN effect.
2. When the pedal is assigned as SUSTAIN PEDAL (see FUNCTION menu for details), pressing the
« SUSTAIN » button while simultaneously stepping on the SUSTAIN PEDAL can cancel out their
respective SUSTAIN effects.
Note:
The SUSTAIN effect is stronger when administered via the pedal than by pressing the « SUSTAIN »
button.
VOICE EFFECT
SUSTAIN
SUSTAIN
1 2 3
4 5 6
7 8 9
- 0 +
1 2 3
4 5 6
7 8 9
- 0 +
DUAL VOICE
14 15 User’s manUalUser’s manUal ssP-830
14 15 User’s manUalUser’s manUal
VOICE EFFECT
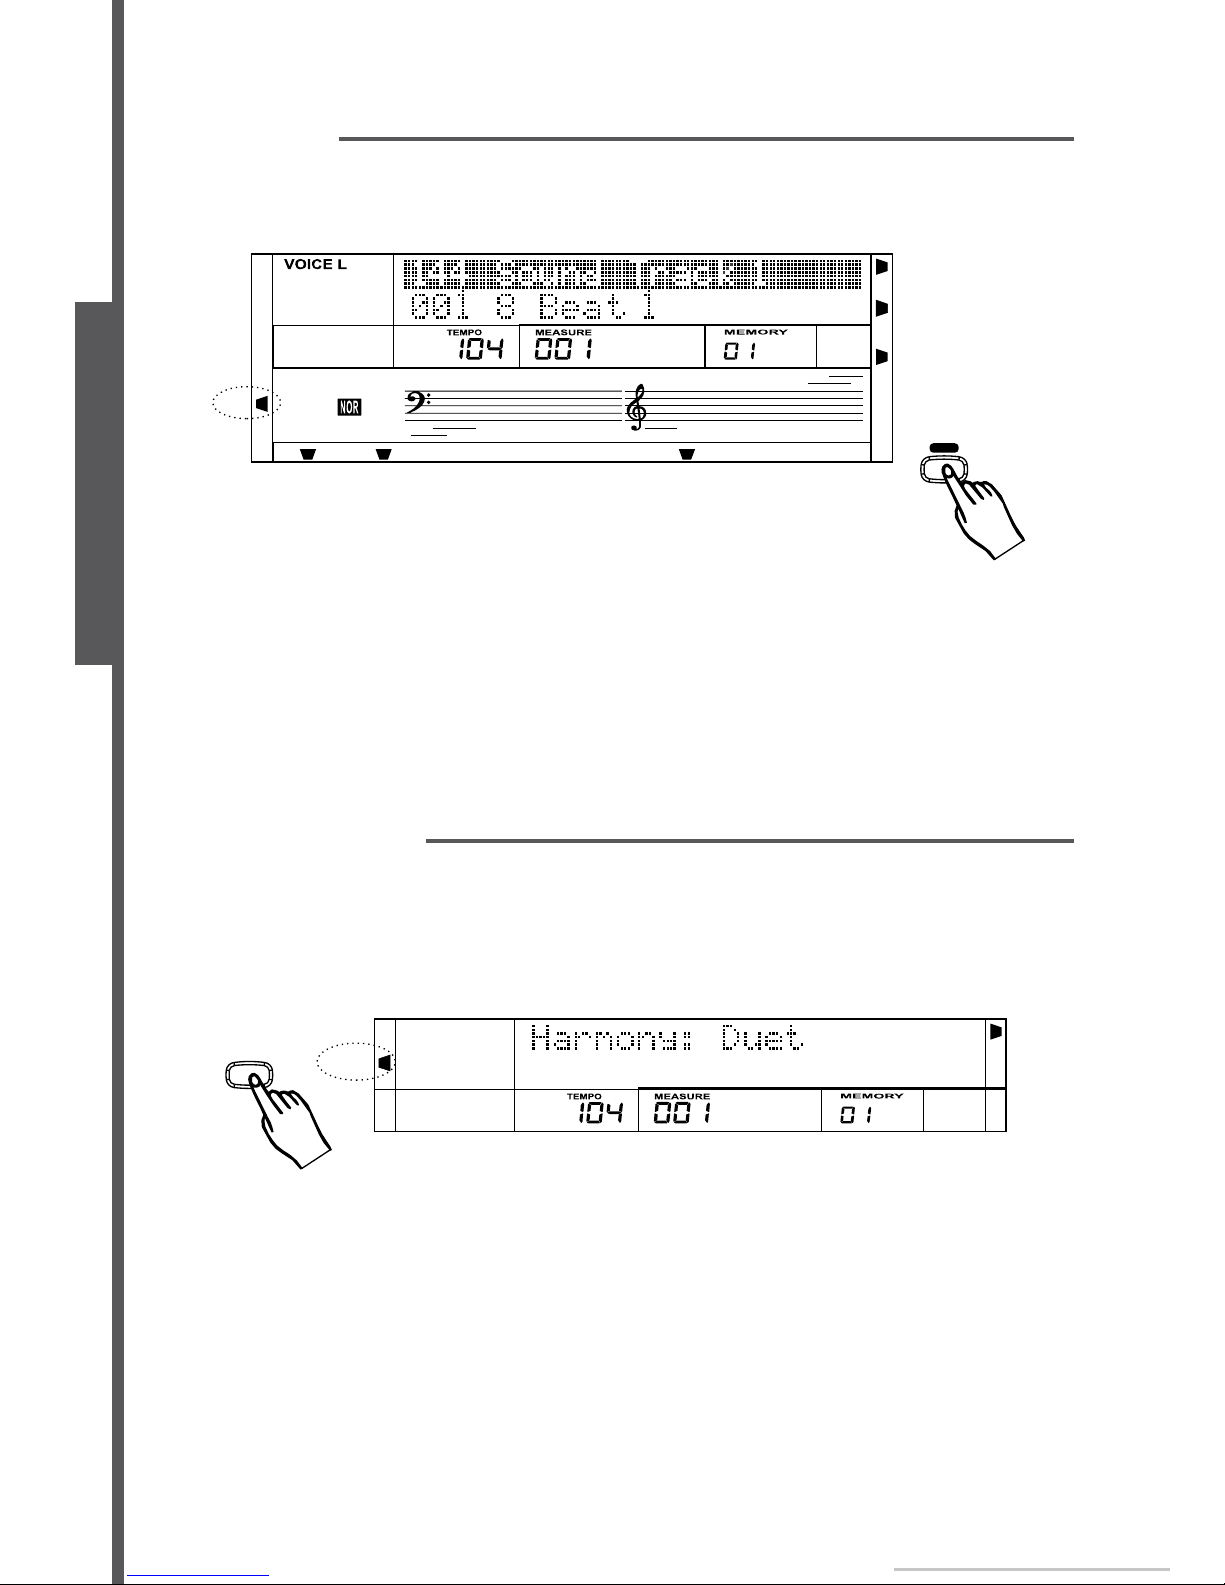
dsp effect
The DSP effect will give added headroom to the tone of the keyboard, making it sound fuller & wider.
1. TheDSPdefaultsettingisON.The«DSP»agwillbelitupontheLCDwhenthekeyboardis
switched on. Press the « DSP » button to turn on/off the DSP effect.
2. The DSP effect is determined by parameters : REVERB TYPE, REVERB LEVEL, CHORUS TYPE &
CHORUS LEVEL (see FUNCTION menu for details).
3. The DSP effect offers 8 different REVERB & CHORUS types. Their levels can be adjusted from 0-127.
The default REVERB type & level is HALL2 and 92. The default CHORUS TYPE and LEVEL is CHORUS3
and 0.
Note:
Switching the DSP on/off while playing will interfere with the signal.
harmony effect
1. There are 8 HARMONY types available in total (see FUNCTION menu for details).
2. The default HARMONY setting is OFF. Press the « HARMONY » button to activate the HARMONY
effect(«HARMONY»agwilllightupontheLCD).«HarmonyDuet»willbedisplayedtemporarily.By
playing valid chord on left hand side of the keyboard before playing the notes on the right hand side, the
HARMONY DUET effect will be activated.
Note:
The HARMONY only takes effect when ABC mode is on.
MELODY4
MELODY3MELODY2MELODY1
ACCOMPPLAY
SONG2SONG1
HARMONY
LOWER
DSP
A.B.C
DUAL
SUSTAIN
TOUCH
DSP
HARMONY
HARMONY

14 15 User’s manUalUser’s manUal
14 15 User’s manUalUser’s manUal ssP-830
touch response
1. There are 3 types of TOUCH RESPONSE (see FUNCTION menu for details).
2.ThedefaultTOUCHsettingisMEDIUM.The«TOUCH»agwillbelitupontheLCD.Pressthe
« TOUCH » button. LCD will display the current TOUCH RESPONSE type. Press the « TOUCH » button
again to turn off the TOUCH RESPONSE (LCD will display « Touch Mode: Off »).
transpose
1. Press the « TRANSPOSE » button. LCD will display « Transpose=000 ». Use the (+) & (-) button or
the DIAL to adjust the transpose value. This will cause the octave to be changed.
2. In TRANSPOSE mode, pressing the (+) & (-) buttons simultaneously will reset the Transpose value
to 0.
pitch bend / modulation joystick
1. Turn the JOYSTICK left & right to activate the PITCH BEND
effect. This will adjust the pitch to –2 semitones or + 2 semitones in
default range. The range can also be set from –12 semitones to +12
semitones (see FUNCTION menu for details).
2. Pushing & pulling the JOYSTICK up & down will activate the
MODULATION effect.
RHYTHM STYLE
style select
1. There are 130 RHYTHM STYLES available in total (see « Appendix 2: RHYTHM STYLE LIST »)
2. When power is on, LCD will display the style name « 001 8 Beat 1 » on the lower line.
TOUCH
TOUCH
TRANSPOSE
VOICE EFFECT

16 17 User’s manUalUser’s manUal ssP-830
16 17 User’s manUalUser’s manUal
3.Pressingthe«STYLE»buttonwilllightupthe«STYLE»ag.STYLEname«0018Beat1»will
appear on the upper line.
4. The RHYTHM STYLE can be selected by using the (+) & (-) buttons, the numeric keypad, or the
DIAL.
Note:
• When numeric keypad is used to select the style, the keyboard will check the validity of the number
you enter.
•WhenthelanguagesettingisChinese,the«STYLE»agontheLCDisdisplayedinChinese
ideographs. (see « Appendix 2: RHYTHM STYLE LIST »)
style start
1. Start directly: Press the « START/ STOP » button to start playing the RHYTHM STYLE.
2. Start after intro: When STYLE function is not playing, press the « INTRO » button & then the
« START/ STOP » button to start the intro. The NORMAL style will follow the INTRO section.
RHYTHM STYLE
STYLE
ACCOMPANIMENT CONTROL
START / STOP
SYNC START
SYNC STOP
INTRO FILL-IN AFILL-IN BENDING
INTRO
When the « NOR » sign is
flashing, the INTRO style
is set to « Normal »
1 2 3
4 5 6
7 8 9
- 0 +
1 2 3
4 5 6
7 8 9
- 0 +

16 17 User’s manUalUser’s manUal
16 17 User’s manUalUser’s manUal ssP-830
3. Start after ending: When STYLE function is not activated, press the « ENDING » button & then the
« START/ STOP » button to start the intro. The NORMAL style will follow the ENDING section.
4. SYNC Start:Pressthe«SYNCSTART»button.LCDwillash4beatsofthecurrenttempo.Press
the « INTRO » or the « ENDING ». In this mode, playing the keyboard will start the STYLE automatically.
Note:
If ABC mode is off, you will activate the STYLE by playing any key on the keyboard.
If ABC mode is on, you will activate the STYLE by playing the keys on chord area only.
fill in a/b
1. WheninNORMALmode,pressthe«FILL-INA»buttontoinsertasinglemeasurell.LCDwillash
the«NOR»agandthenNORMALstylerhythmwillresume.
2. WheninVARIATIONmode,pressthe«FILL-INB»buttontoinsertasinglemeasurell.LCDwill
ashthe«NOR»agandthenVARIATIONstylerhythmwillresume.
3.WheninNORMALmode,pressthe«FILL-INB»buttontoinsertasinglemeasurell.LCDwillash
the«VAR»agandthenrhythmwillchangetoVARIATIONstyle.
ACCOMPANIMENT CONTROL
START / STOP
SYNC START
SYNC STOP
INTRO FILL-IN AFILL-IN BENDING
SYNC START
SYNC STOP
Flash
FILL-IN A
RHYTHM STYLE

18 19 User’s manUalUser’s manUal ssP-830
18 19 User’s manUalUser’s manUal
4.WheninVARIATIONmode,pressthe«FILL-INA»buttontoinsertasinglemeasurell.LCDwill
ashthe«NOR»agandthenrhythmwillchangetoNORMALstyle.
Note:
• If you pressthe«FILL-INA»orthe«FILL-INB»buttonduringthelastbeatofameasure,allis
insertedafterthecurrentmeasurenishes.
•Ifyoupressandholdthe«FILL-INA»orthe«FILL-INB»button,theselectedllwillplayrepeate-
dly until the button is released.
• If you press the « ENDING » button when style is playing, the rhythm will stop after the ENDING
plays, unless you press the « FILL-IN A » or the « FILL-IN B » button before it finishes.
style stop
1. Stop directly: Press the « START/ STOP » button to stop the RHYTHM STYLE directly.
2. Stop after ending: Press the « ENDING » button. The RHYTHM STYLE will stop after ENDING is
over.
FILL-IN B
ACCOMPANIMENT CONTROL
START / STOP
SYNC START
SYNC STOP
INTRO FILL-IN AFILL-IN BENDING
ACCOMPANIMENT CONTROL
START / STOP
SYNC START
SYNC STOP
INTRO FILL-IN AFILL-IN BENDING
ACCOMPANIMENT CONTROL
START / STOP
SYNC START
SYNC STOP
INTRO FILL-IN AFILL-IN BENDING
ACCOMPANIMENT CONTROL
START / STOP
SYNC START
SYNC STOP
INTRO FILL-IN AFILL-IN BENDING
RHYTHM STYLE

18 19 User’s manUalUser’s manUal
18 19 User’s manUalUser’s manUal ssP-830
3. SYNC Stop:
- When ABC mode is on and STYLE is playing, press the « SYNC STOP » button. The « SYNC STOP » &
«SYNCSTART»agswilllightupontheLED,while4beatsofthecurrenttempoashbeforethe
rhythm stops playing. In this mode, RHYTHM STYLE can be activated by pressing on the keyboard and
stopped by releasing it.
- Pressing the « DEMO » or « RECORD » buttons will make the keyboard quit SYNC STOP mode.
Note:
If ABC mode is not activated, you cannot turn on SYNC STOP mode.
accomp volume
1. Press the « ACCOMP VOLUME+ » or the « ACCOMP VOLUME- » button. LCD will display « Accomp
Volume 021 ». The Accompaniment volume can be adjusted from 0 to 31 using the DIAL, the (+) & (-)
buttons, or the « ACCOMP VOLUME+ » & the « ACCOMP VOLUME- » buttons.
2. To mute the accompaniment, press the « ACCOMP VOLUME+ » & the « ACCOMP VOLUME- »
buttons, or (+) & (-) buttons simultaneously. LCD will display « Accomp Volume=off ».
auto bass chord
1. Pressthe«ABC»buttontoturnontheAUTOBASSCHORDmode.«ABC»agwilllightuponthe
LCD. In this mode, the keys below split point are known as the AUTO ACCOMPANIMENT section (left
hand side of keyboard, ie chord area).
SYNC START
SYNC STOP
Flash
ACCOMP VOLUME
TEMPO
ACCOMP VOLUME
TEMPO
A.B.C
A.B.C
RHYTHM STYLE

20 21 User’s manUalUser’s manUal ssP-830
20 21 User’s manUalUser’s manUal
2. To quit ABC mode, simply press the « ABC » button again.
3. There are two ways to detect the chord: Single Finger Detect and Fingers Detect. If the chord
playing corresponds with Fingers Detect, it is recognized as the Fingers Chord. If not, Single Finger
Chord will be recognised.
4. Single Finger Chord:Thechordtypesthatcanbeproducedinsinglengeroperationaremajor,
minor, seventh and minor seventh. The diagram shows how to play the four chord types.
- To play a major chord, press the root note of the chord.
- To play a seventh chord, simultaneously press the root key & the white key to it’s left.
- To play a minor chord, simultaneously press the root key & the black key to it’s left.
- To play a minor seventh chord, simultaneously press the root key and both the white and black keys to
its left.
5. The Fingers Chord: TheFingersChorddetectmodeletsyoungeryourownchordsontheAUTO
ACCOMPANIMENT section of the keyboard. The piano supplies appropriately orchestrated rhythm, bass
and chord accompaniment to the selected style. The Fingers Chord Detect mode can recognise the
following chords as shown in the diagram.
F G
Split Point
RHYTHM STYLE
Table of contents


