2besmart Cadillock Mounting instructions

THE ORIGINAL THE ORIGINAL
www.cadillock.com
The ultimate anti-theft protection
www.2besmart.com
2
smart
b

Installation instructions and user guidelines
www.cadillock.com

THE ULTIMATE ANTI-THEFT DEVICE
2
PLEASE OBSERVE THE SAFETY NOTICES MARKED IN BOLD
RED LETTERS. THESE ARE INTENDED FOR YOUR SAFETY.
Cadillock®is a product of 2besmart technologies gmbh
User manual for the Cadillock®
Version 1.0
Copyright © 2007 2besmart technologies gmbh
Printed in May 2007
In vehicles that have an electronic immobilizer, the instal-
lation of the Cadillock may in some rare cases lead to data
losses or error indications in the fault recorder of the control
unit. This does not affect the security of the vehicle. If you
have any questions in this respect, please contact: tech-uk@
cadillock.com

THE ULTIMATE ANTI-THEFT DEVICE
3
Dear customer,
Thank you for buying the Cadillock®and for your trust in our pro-
duct.
Please read these operating instructions carefully, since they contain
important information about the installation and application and are
especially intended for your safety.
Please pay particular attention to the explanations of the
enclosed security screw and the enclosed Allen key (step 6 in
the installation instructions) as well as our recommendation
to register this product (Chapter E.).
TABLE OF CONTENTS
A. Functionality 4
B. Installation instructions 4
C. Operating instructions for the remote control 10
D. Functional test of the Cadillock®11
E. Registration notice/customer card 13
F. Changing the battery of the remote control 13
G. Cadillock®removal 14
H. Important addresses and phone numbers 15
I. Technical data 16
Package contents
● Cadillock®adapter
● 2radioremotecontrols
● 1securityscrew
● 1securityAllenkey
● 1customercard
● 4warningstickers
● Adhesivematerials

THE ULTIMATE ANTI-THEFT DEVICE
4
A. Functionality of the Cadillock®
The Cadillock®reectsatechnologicalbreakthroughinthearea
of anti-theft devices. With this patent-protected technical product,
thetheftprotectionofyourcarwillbesignicantlyimproved.
Throughitspatentedcircuitconguration,theCadillock®cuts off the
powersupplythatstartsthevehicletoprotectitfrombeingstolen.
However,thiswillnotdeleteanystoreddata,suchasthepre-setra-
dio channels, stored addresses in your navigation system, etc.
Itisn’tnecessarytointerferewiththeelectricalsystemofthecarand
no additional cables are required to install the Cadillock®.
The operation of the Cadillock®is very simple: to activate the anti-
theft device, just press the button on your remote control and to
deactivate it, the button. During the activation a long acoustic
signalatthelevelof110dBwillsoundandtwoshortacousticsignals
willsoundduringthedeactivation.
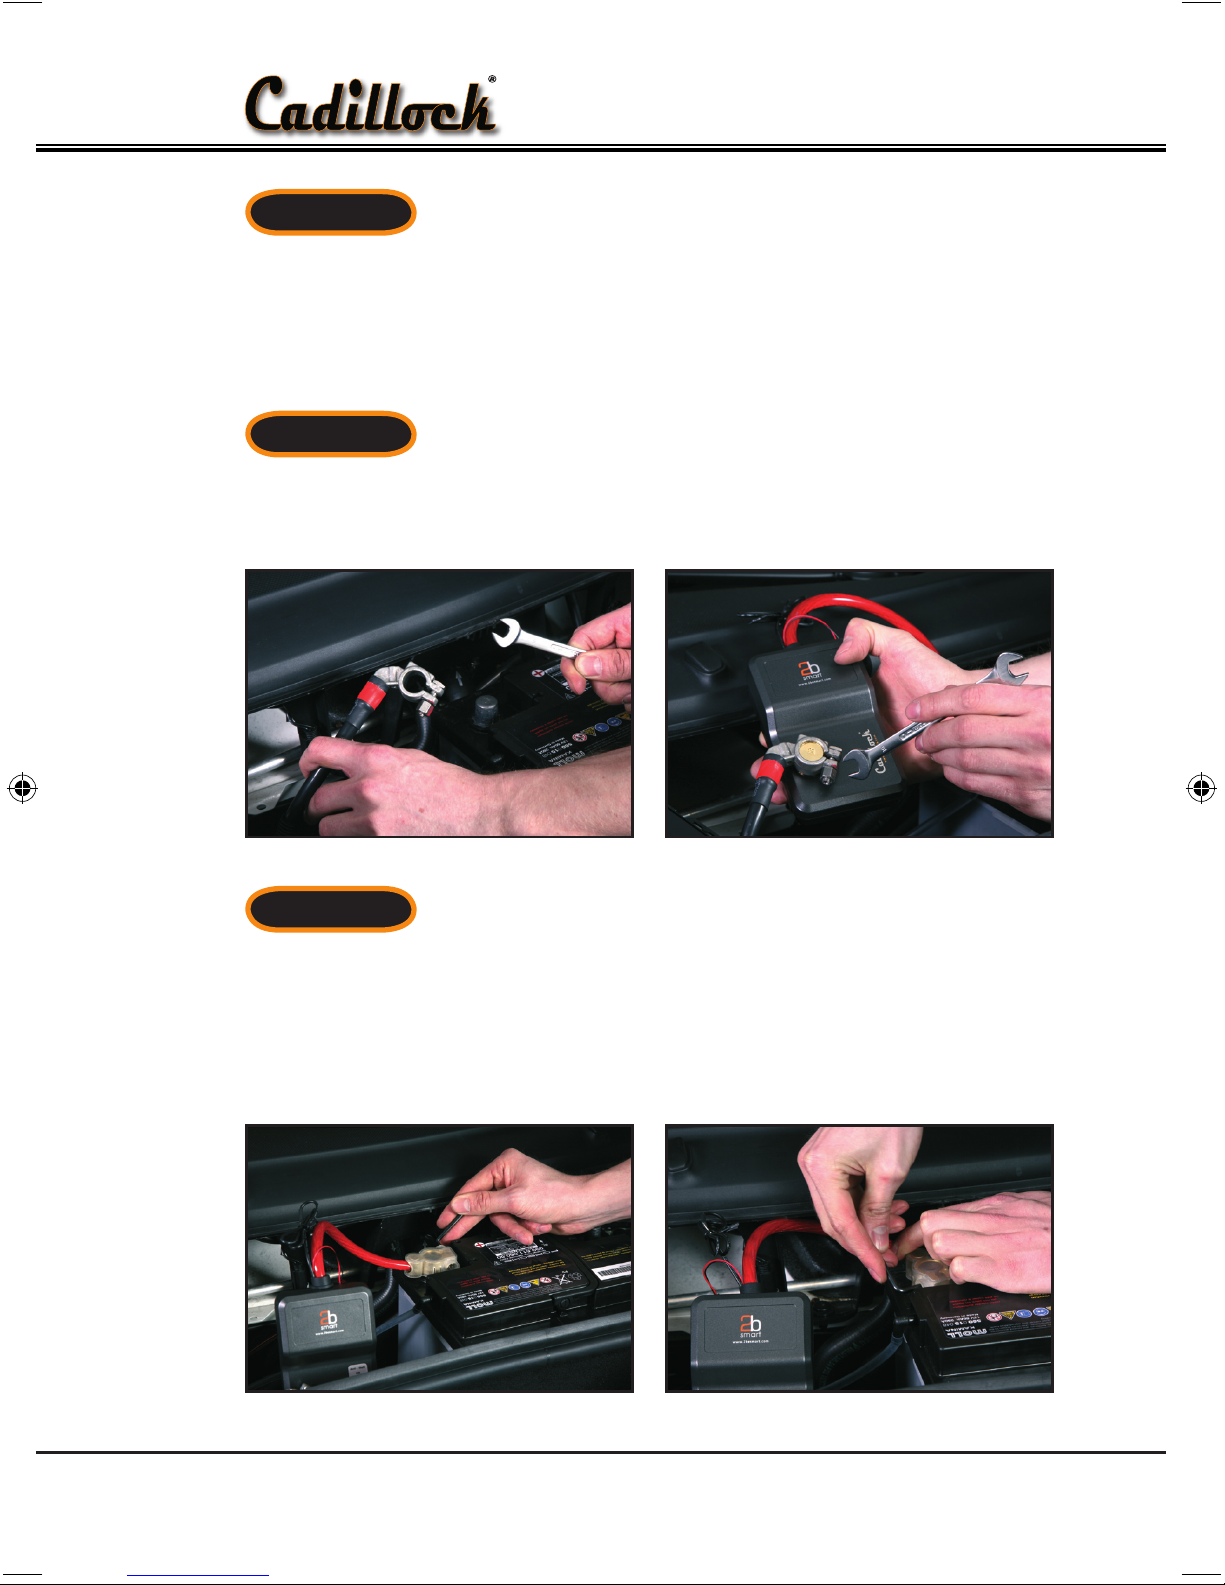
B. Installation instructions for the Cadillock®
Toensurethecorrectinstallation,thefollowinginstructionshaveto
befollowedexactly.Alsoseeourlmthatexplainstheindividual
installationstepsunderwww.cadillock.com.
All that is required for the installation in addition to the enclosed Allen
keyisasize10wrench.
Ifthecarbatteryhasacover,openitandthenfollowtheinstallation
instructions.
SAFETY NOTICE:
Ifanyelectric cable connectionsareattachedto the car battery, were-
commend the installation of the Cadillock®by a specialized shop.

THE ULTIMATE ANTI-THEFT DEVICE
5
Turn off the engine and open
the radiator hood (or any other
access to the car battery). Make
sure that the ignition is turned off
– any other equipment, such as
an alarm system, also has to be
turned off.
The Cadillock®canprincipallybemountedontoorevennexttothe
car battery. Ensure that the location you select for the installation of
the Cadillock®fulllsthefollowingconditions:
•thelengthofthecablefromtheCadillock®issufcienttoreachthe
positive pole of the car battery,
•thepositivecableofthevehiclereachesthepoleoftheCadillock®and
•theblacknegativeconnectioncableoftheCadillock®reaches the
negative pole of the car battery.
Step 1
After you have determined the
best installation position for your
vehicle model, rst remove the
negative cable of your car batte-
ry. This is intended for your sa-
fety, to prevent any sparks from
shooting out during the installati-
on of the Cadillock®.
Step 2
Step 3
PLEASE NOTE:
The removal of the negative cable can lead to data losses in electronic
devices (e.g. in radios, CD players, electrical seat adjusters, car com-
puter, etc.)

THE ULTIMATE ANTI-THEFT DEVICE
6
NowpleasecleanthesurfacewhereyouplantoinstalltheCadillock®
and attach the four enclosed, double-sided strips of tape to the back
of the Cadillock®. Please don’t remove the top layer of the tape yet.
Removethepositivecable(redormarkedwith+)ofthevehiclefrom
the battery connection and attach it to the pole of the Cadillock®.
Place the positive cable of the Cadillock®onto the positive pole
ofthecarbatteryandfirmlyattachitwiththesecurityscrewand
the enclosed Allen key. Please be sure to tighten the security
screw.
Step 4
Step 5
Step 6

THE ULTIMATE ANTI-THEFT DEVICE
7
SAFETY NOTICE:
Werecommendthatthesecurityscrewistightenedduringevery
inspection, but at least 1-2 times per year, since strong tremors
mayresultinalooseningofthesecurityscrewinextremecases.
PLEASE NOTE:
ThesecurityscrewisanessentialsecurityelementoftheCadil-
lock®. To prevent the Cadillock®from being uninstalled during an
attempted theft, the cable of the Cadillock®isfastenedwiththe
enclosedsecurityscrew.ItisnearlyimpossibletoremovetheCa-
dillock®withouttheenclosedAllenkey.Thesecurityscrewaswell
astheAllenkeyaremanufacturedexclusivelyfortheCadillock®
in various issues. Therefore please be sure to store the Allen key in
a safe location at all times.
Ifyouandyourvehiclearefrequentlyawayfromyourpermanent
residence, we recommend that you carry your Allen key in your
luggage so that the Cadillock®may be removed in the event of a
technical disruption of your car battery.
In the event that you lose the Allen key, you have the option of
ordering a replacement copy. For this, please take notice of the
registration information.

THE ULTIMATE ANTI-THEFT DEVICE
8
Now return the negative con-
nection cable of the car battery,
whichhadbeenremovedinStep
1, to the negative pole. Place the
black negative grounding connec-
tion of the Cadillock®– as pic-
tured–betweenthettingsand
then securely tighten the negati-
ve connection cable again.
Pull off the top layer of the dou-
ble-sidedstripsoftapethatwere
attached earlier so that the adhe-
sivesurfaceisexposed,thenstick
the Cadillock®to the previously
cleaned surface, thereby securely
stabilizing it.
Now attach the buzzer. For this,
pull off the top layer of the dou-
ble-sided tape adhering to the
bottom of the buzzer and attach
the buzzer in an appropriate lo-
cation.
Step 7
Step 8
Step 9

THE ULTIMATE ANTI-THEFT DEVICE
9
The Cadillock®is tremor-proof
and generally secured sufci-
ently by the double-sided tapes.
But you also have the additional
option of wrappingthe enclosed
cable tie or another means of at-
tachment around the Cadillock®
and the car battery in a location
of your choice on the Cadillock®
and then tightening it.
The installation of the Cadillock® is now complete. Now please
close the engine hood before you check the functioning of the
Cadillock®.
SAFETY NOTICE:
The Cadillock®isequippedwithabuzzerthatindicatestheactiva-
tion and deactivation of the Cadillock®withanacousticsignal.This
acoustic signal has a high volume level of 110 dB, in order to signal
the activation or deactivation to you even in a noisy environment. The
soundlevelisstronglymufedbytheclosedenginehood.Iftheengi-
nehoodisopen,however,thenoiselevelmaybeunpleasant.
RECOMMENDATION:
We recommend to all our customers that they do not store the remote
control of the Cadillock®in the same place as the car key but keep
them separated (for example, by attaching it to another key ring).
Thisisforyourownsecurity,sinceagreatdealofcartheftsarecar-
riedoutwiththeaidofstolencarkeys.
Step 10

THE ULTIMATE ANTI-THEFT DEVICE
10
C. Operating instructions for the remote control
Activating the Cadillock®
1.
Ifyourvehicleisnotequippedwithanalarmsystemoracentral
lock, press the button on the remote control in order to ac-
tivate the anti-theft function.
2.
Ifyourcarisalreadyequippedwitharemotelycontrolledanti-
theft alarm or a central lock, these functions need to be brought
intooperationrst.Afterwardspressthe button on the remote con-
trol of the Cadillock®in order to activate the anti-theft function.
3.
When you press the button,alongacoustic110dbsignalwill
soundandtheredLEDindicatoroftheremotecontrolwilllight
upinordertoshowthatthetransferofthesignalhasbeencomple-
ted.
Deactivating the Cadillock®
1.
Ifyourvehicleisnotequippedwithanalreadyinstalledcaralarm
system or a central lock, press the button on the remote con-
trol in order to deactivate the anti-theft function.
2.
Ifyourcarisequippedwithanalreadyinstalledalarmsystemor
acentrallock,rstpressthe button on the remote control of
the Cadillock®in order to deactivate the anti-theft function. Then
deactivatethealarmsystemoropenthedoorswiththecentrallock.
3.When you press the button,twoshortacoustic110dbsignals
will sound and the red LED indicator of the remote control of
the Cadillock®willlightupinordertoshowthatthetransferofthe
signal has been completed.

THE ULTIMATE ANTI-THEFT DEVICE
11
D. Functional test of the anti-theft function
Please check the anti-theft function of the Cadillock®by means of
the central lock, on-board computer, radio, and the time indicated
by the clock.
Please note the settings on your on-board computer, the stored radio
stations and the time indicated by the clock in the vehicle before car-
ryingoutthenextsteps.
Ifyourvehicleisequippedwithacentrallock,pleaseuseittolock
the doors.
Press the button on the remote control of the Cadillock®.
Nowtrytoopenthecentrallock.Ifitisnotpossibletoopenthecen-
tral lock, the anti-theft function of the Cadillock®has been activa-
ted, since the Cadillock®hasalreadyinterruptedthebatterypower
to prevent a break-in theft.
Ifyourvehicleisnotequippedwithacentrallock,checkthefunction-
ality of the Cadillock®by trying to start your vehicle. If this does not
work,theanti-theftfunctionoftheCadillock®has been activated.
Step 1
Step 2
Step 3
Step 4

THE ULTIMATE ANTI-THEFT DEVICE
12
PLEASE NOTE:
Please only attempt to start your car in this one instance in order to
test the functionality of the Cadillock®.Otherwisewedon’trecom-
mend this procedure, since it may lead to data losses in your on-board
computer.
Press the button on the remote control of your Cadillock®in or-
der to turn the anti-theft function off again.
Open the central lock.
Nowcheck thesettings of the on-board computer,thestored radio
stations and the time indicated by the clock in your vehicle that you
had recorded earlier. If the settings of the on-board computer and the
radiostationscoincidewiththerecordedsettingsandtheappropria-
telycontinuoustimeofdayisindicatedcorrectly(showingthatthere
has been no interruption), the Cadillock®is functioning correctly.
After you have successfully completed the functional test of the
Cadillock®, the Cadillock® is now ready to protect your vehicle
from a break-in theft.
Step 5
Step 6
Step 7

THE ULTIMATE ANTI-THEFT DEVICE
13
E. Registration notice
PLEASE NOTE:
Your customer card is included in the package. The device number of
your Cadillock®is recorded on this card. In the event that you lose
a remote control or your Allen key, you can order a replacement by
referring to the device number. But this requires that you register your
customerdatawithinoneweekafterpurchaseonthewebsitewww.
cadillock.com. Please store your customer card in a safe location.
F. Changing the battery in the remote control
Step 1
Step 2
Nowchangethebattery.Youwill
needonebatterywiththeA27Al-
kaline12Vspecication.
Step 3
Asanalstep,reattachthebackpartoftheremotecontrolwiththe
threescrews.
Pleaseopenthethreescrewsin
the back of the remote control
and remove the back part of the
remote control.

THE ULTIMATE ANTI-THEFT DEVICE
14
Finally, attach the negative cable of your vehicle to the negative pole
of the car battery again.
The Cadillock®hasnowbeenremoved.Pleasestorethemainde-
vice,thesecurityscrew,theAllenkey,theremotecontrolsandyour
customer card in one location.
Step 5
Step 1
Step 2
Then remove the red positive cable of the Cadillock®from the posi-
tive pole of your battery by using the enclosed Allen key.
Step 3
Nowremovethepositivebatterycableofthevehiclefromthepoleof
the Cadillock®.
Step 4
Reattach the positive battery cable of the vehicle to the positive pole
of the car battery.
G. Removal of the Cadillock®
First please remove the negative cable of your vehicle from the negati-
ve pole and separate the negative connection cable of the Cadillock®
fromthettings.

THE ULTIMATE ANTI-THEFT DEVICE
15
24 Month Warranty
ThewarrantyoftheCadillock®to cover defects or faulty functio-
ning is in effect for 24 months starting on the date of purchase.
However, the warranty does not apply to faulty functioning due to
damages caused by an accident, misusage, or damage caused by
non-compliancewiththeinstallationinstructions.IftheCadillock®is
opened,thewarrantyisterminated.
Cadillock®is a product by 2besmart technologies gmbh.
Phone+49–7851–89999–0
Fax+49–7851–89999–29
www.2besmart.com
For technical support:
For questions about the registration:
For complaints about the product, operating instructions or service:
For other questions and comments:
2
smart
b2besmart technologies gmbh
Am Alten Bahnhof 4
D-77694Kehl

THE ULTIMATE ANTI-THEFT DEVICE
16
I. Technical data
Housing:
Battery Post
Red cable:
Battery connector:
Battery connector cap:
Latching Relay:
Remote control
Main Device
•Injection-moldedthermoplastic-
ABS+PCV0housing
Fireproof (UL approved material) and
Recycle material
•136mmLx86mmWx40mmH
•BrasswithGoldcoating;
•Goldencoatingthickness:0.15μinch
4AWG;MaxTemperature105°C
•BrasswithGoldcoating;
•Goldencoatingthickness:0.15μinch
•Pullingresistanceto:100kgf.cm
•Designwithpatent
MaterialPCreproof(ULapprovedmaterial)
Max.SwitchingPower:20,000VA(continue);
ContactResistance:<=2mΩ
Operation Life :1Million times
2Channels,SAW,morethan2Million
rolling code.
Audible Alarm Pressure : 110dB
•Nyloncabletie
1pc–914mmLx4.8mmW
•Doublesidedtape:
4pcsx3Mtapes(No.Y-4229PAcrylic
foam tape)
•Allenkey:toolforsecurityscrewon
battery connector.
Buzzer
Accessories
Table of contents
Popular Car Alarm manuals by other brands

Audiovox
Audiovox Car Security System APS-610 owner's manual

Bulldog Security
Bulldog Security 5002PRO installation guide

Mobile Devices
Mobile Devices C4evo installation guide

Black Widow Security
Black Widow Security BW2900R2 installation instructions

jablotron
jablotron CA-2103 Athos user manual

Viper
Viper 310V owner's guide