3NOD AUDIO&VIDEO Boom Boom User manual


1

2

3
TECHNICAL SPECIFICATIONS
Screen size: 8 inches 800*600 4:3 ratio
Speaker Output: 8W (2W*2+4W)RMS
Supported file format: JPEG/BMP/JPEG Progressive/EXIF/MP3/WMA/AAC/WAV/M-Jpeg/Mpeg4/H.264(D1)
Acceptable photo cards: MS, MS Pro, MMC, SD, XD
USB ports: USB 1.1 and USB 2.0
Internal memory storage: 1GB
Power supply: AC 110V-240V~60/50Hz (DC 9V2A)
Max power consumption: 15 W
Dimensions (with frame): 260(L) x 230(W) x 244(H) mm
Weight: 1016 g
FEATURES
Thank you for purchasing this Multifunctional DigitalPhoto Frame. This deluxe Multifunctional Digital Photo
Framewill bring more happiness to your colorful life.
1. Playing photos by slide show with music background.
2. Playing Music
3. Playing Movies
4. Calendar function
5. Files management
6. 2.1 channel stereo Speaker stand (can be used as speaker of other Audio device connected to the set
using supplied audio cable).
7. Other memory storage compatibility (connecting to the set using supplied USB cable).
8. Memory cards compatibility
9. PC Sync Display Function
10.Deluxe easy-to-use remote control included.
CHECKING ACCESSORIES
After unpacking, make sure the following accessories
are supplied with your unit. If you find something missing
or broken, contact the local dealer in your area.
1. Digital photo frame with speaker stand
2.AC adaptor
3. Remote control
4. USB cable
5. 1 set of audio cable with 3.5mm plug
6. Installation CD
7. Operating Instructions

4
LOCATION OF CONTROLS
4.Left button-For menu selection.
5.Down button-For menu selection and reducing the volume.
6.Right button-For menu selection.
7.Enter/play button- Press to confirm the selection.
1.ESC button-Press to
return to upper menu.
2.Menu button-Press to
show the edit menu.
3.Up button- For menu
selection and raising
the volume.
Front view of screen
1.LCD screen
2.Remote sensor
Rear view of screen
1.Power button-press to switch the set on or off.
2.Bulit-in speakers- For audio out put.
3.Aux in jack-Connecting to the component audio out put.
4.DC in jack-Connecting to the attached AC/DC adaptor.
5.USB port-Connecting to other storage using USB cable.
6.Mini USB jack-Connecting to PC using USB cable.
7.SD/MMC/MS card slot-For inserting memory cards.
Speaker stand
1
3 4 5 6 7
2 2 2
1
2
4
5
67
3
Speaker stand
Screen
1
2

5
10. Homebutton-Returntohomemenu.
11. ESC-Return to theuppermenu.
12. Music-Press to entermusicmode.
13. Photo-Press to enterphotomode.
14. Musicrepeatplaybutton.
15. AUX-Press to selectaudiosource.
16. Menu-Press to showeditmenu.
17. Video-Press to entervideomode
18. Musicshuffleplaybutton.
•
21 4
5
6
7
8
9
10
11
12
13
14
15
16
17
18
1. IR diode-Sendssingle
to theset.
2. PowerON/OFFbutton-
Switchset on or off.
3. Calendarbutton-Press to
entercalendarmode.
4. Mutebutton-Press to turn
offthevolume.Press
again to restore.
5. Volume + and UP button
6. Leftbutton
7. Enter/Playbutton-Enter
or playyourselection.
8. Rightbutton
9. Volume-anddownbutton
Remotecontrol
3
To usetheremotecontrolforthefirsttime,pleasepull out thetab on theremotecontrol.
REMOTECONTROLOPERATION
Replacingtheremotecontrolbattery
Openthebatterydoorasperillustration1andinsert oneCR2025sizebattery(3V)into it according to the +
marking as perillustration 2.
batterywith
PLUS in up
position
illustration 2
illustration 1
ESC
AUX
MENU
PHOTO

6
OPERATION
Preparation
For the first time you use this digital photo frame, youneed to store some files (music, photo, video) into the
internal memory or insert a card with music, photo filesinto the card slot.
1. Connect your set to AC power using the attached AC adaptor.
2. Press the POWER button on the speaker to turn on the set.
3. Connect the set and your compute by USB cord.
4. Store some picture, music, video files you like into the internal memory.
5. You can also insert the card into the card slot if youwant to play the files on your card.
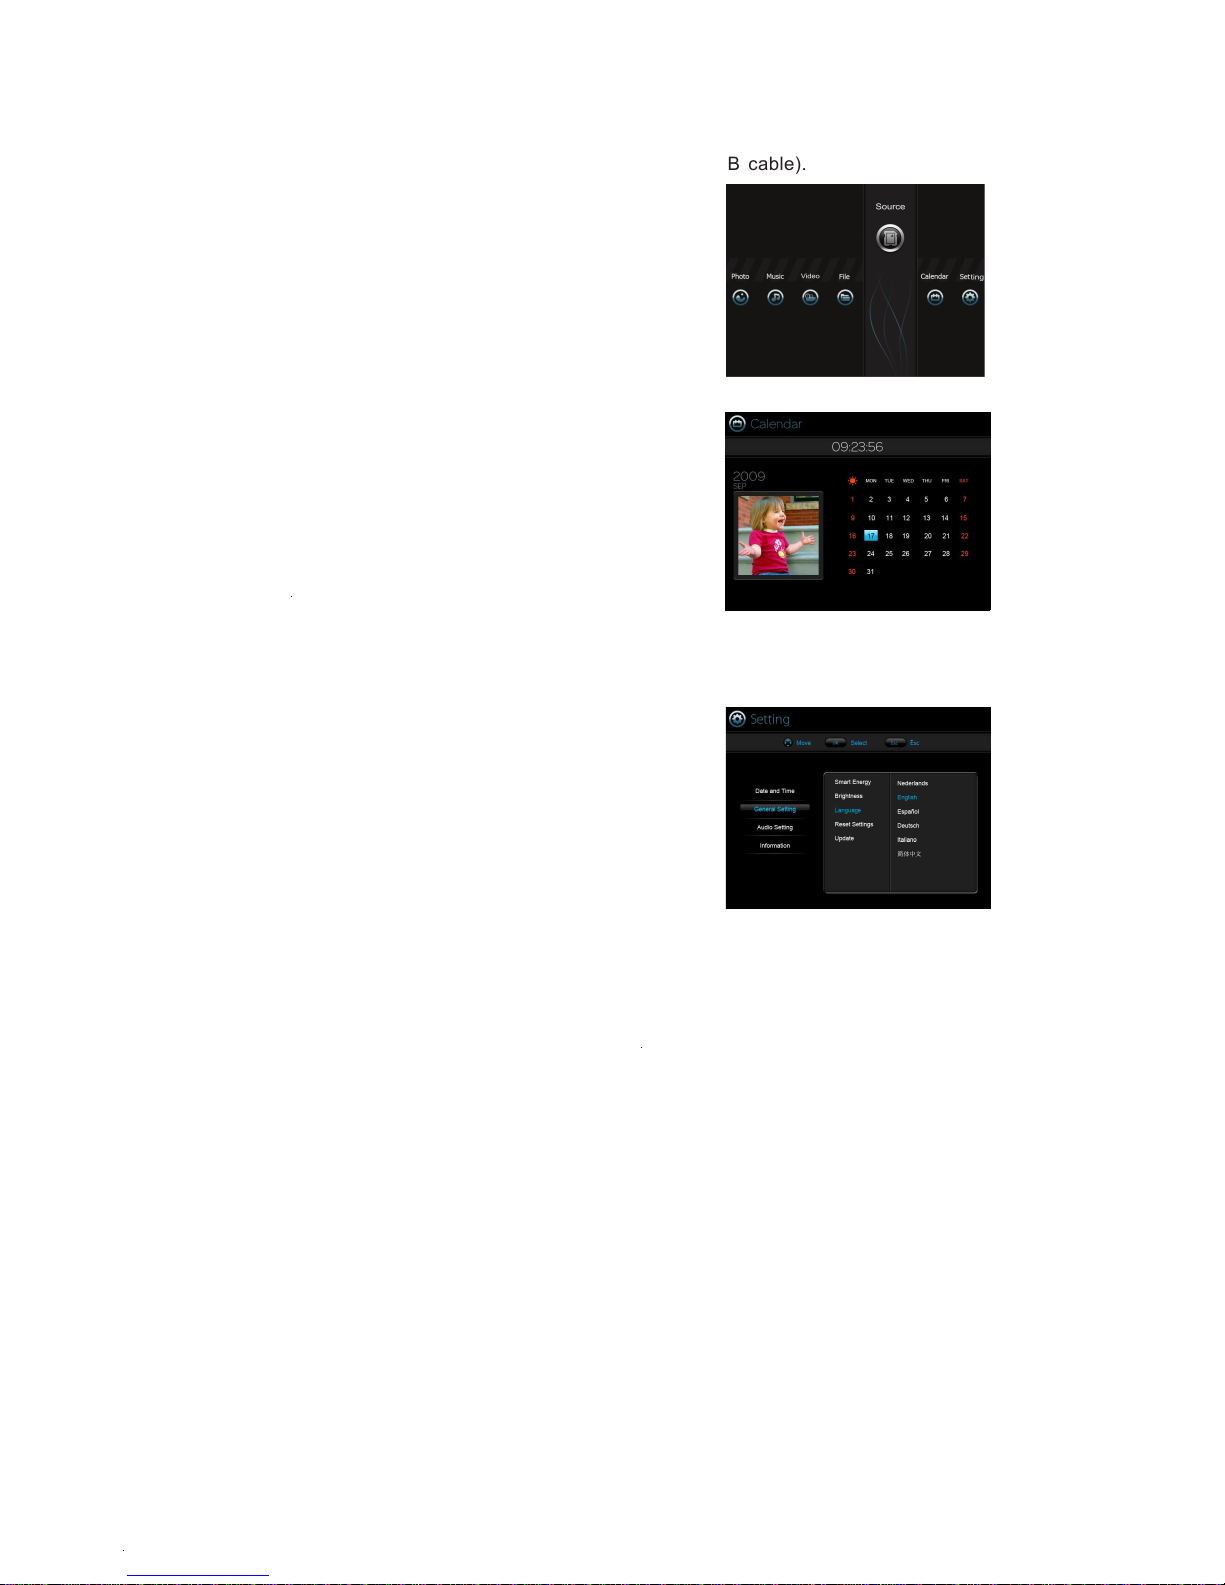
Complete above steps, right
picture will show on the screen,
and you are ready to enjoy this
multifunctional digital photo
frame. You can adjust to your
favorite watching angle by press
or pull the screen.
The home menu includes 7 selections, you can selectthe functions by pressing left or right buttons, then
press ENTER/PLAY button to confirm or directly pressthe function buttons (PHOTO, MUSIC, VIDEO, Calen-
dar) on the remote control to complete your operation.Press ESC button to return to upper menu. Press home
button to return to home menu directly. Press up anddown buttons to adjust the volume during play.
Begin to use
Playing photos
1. Viewing the thumbnails
Enter the photo menu. The thumbnails of first 12 pho-tos show on the screen. You can press left and right
buttons to select the photo. Press ENTER/PLAY buttonto start the slide show play.
In thumbnail screen, you can press MENU button on theremote to show the edit menus, then use left and right
and ENTER/PLAY buttons to edit the photos.Copy: Copy selected photo to the memory storage you like.
Delete: Delete selected photo.
Rotate: Rotate selected photo.
Photo effect: Adjust the hue of the photo.
Select: Select the photos you like to play, press enter
again to abstain the selection.
2. Slide show playing
During pictures play by slide show, the music youstored in the memory will play together. You can press
up or down button to adjust the volume, press ENTER/PLAY button to pause or return the play.
Thumbnail Thumbnail menu

7
Press up or downbutton to
adjustthevolume.
PressRepeatbutton to play the
musicrepeatedly.
Pressshufflebutton to play the
music in randomorder.
Press menu to switch to Playing
list,musicdetail or lyricmode
(onlywhenlyricfileexists).
During play, press MENU button
to showslideshowmenu.Press
directionandEnter/playbuttons
to adjustthescreen’s hue,
brightness,contrast,slideshow
speed, slide show display mode,
fullscreen or normalscreen,
backgroundmusic on or off.
PlayingMusic
Enterthemusicmenu.Selectthemusicyouwant to
start to playbyleftorrightbutton,presstheENTER/
PLAY button to playorpausetheplayback.
PlayingMovie
Enterthemoviemenu.Selectthemovieyouwant to
playbyleftorrightbutton,presstheENTER/PLAY
button to play. Press up or downbutton to adjust the
volume.
FileManagement
Enterthefilemenu.Thedetail of thefiles in thecurrent
sourceshows on thescreen. You canpressleftorright
button to selectthefile,pressMENUbutton to toggle
fromCOPY, DELETE, or return to thefile,press EN-
TER/PLAY buttontoconfirm.
Playinglist
Now Playing
Lyric
Slideshow menu

8
ViewingClockandCalendar(youshouldset the
correctdate in advance.Pleaseseenextsection)
Enterthecalendarscreen.Dateandtimeshow on the
screen.Greenframehighlightintradaydate.Thepho-
tosplay on theleftsmallwindowasslideshow. You can
presstheleftorrightbuttontocheckthedate on the
previousornextmonth.PressENTERbutton to toggle
fromcalendarandclock.
Source(Selectingtheplaysource,internalmemory storage,memorycard,ordeviceconnected to the
setbyUSBcable)
Whenyoursethasseveralfilesources. You need to chooseonesourceyouliketoplay(internalmemory
storage,memorycard, or deviceconnected to the set by theUSBcable).
EntertheSourcescreen, and
selectthesourceyouwant to
playbydirectionbuttons,
pressENTER/PLAY button to
confirm.Then,whenyou use
thePhoto,Music, or Video
function,allthefilesarefrom
thestorageyouselected.
ChangingSetting
Enterthesettingscreen.Press
up or downbutton to select the
itemyouwant to set.Press
ENTER/PLAY button to confirm.
PressESC to return to upper se-
lection.
A. DateandTime
Settingthecalendardateandclock.
B. Generalsetting
Settingthesmartenergy, brightness,language,default
andsoftwareupdating.
C. Audiosetting
Settingthemusicplayingmode,shuffleonoroff. Repeatonemusic,repeatallmusic or no repeat.
D. Information
Showthisset’s version,memorytotalstorage and freestorage.
Forsmartenergyfunction:
Whenyouselect OFF, thisunitwilloperate at fullpower mode,can’t savepower.
WhenyouselectScheduler50%orScheduler100%, it willautomaticallyworkaspowersaving50% or 100%
duringnighttime(21:00~7:00),andwillresumenormal powermodeduringdaytime(7:00~21:00).
WhenyouselectSave20%orSave50%,itwilloperate at thatindicatedpowerconsumptionrate in thefull day.

9
PC Sync Display Function
We have aPC sync display software in the driver discof this set. File name: EZ display.
You can install the software to your computer as theway you install any software. After installation, the
computer may remind you to restart the computer, do as the instruction. Then connect the DPF set and your
computer by USB cable, run the software, below soft-ware surface will show on you computer.
Click DISPLAY DEVICE, the display on your computerwill also show on the screen of DPF set. Using this
function, two people can watch photos or movies on your computer and DPF set together. But no sound
come out from the DPF set.Select the selections under Mirror Display and Exten-
sion Display to adjust the display of the DPF screen.Select STORAGE DEVICE, computer screen will disap-
pear from the DPF screen, the DPF set will restore to aremovable device for you to transfer files.
Trouble shooting
In case you meet some problems when you use this set, please read below informations before you call for technical
assistance or return the set.
SymptomRemedy
The set
doesn’t work.
1. Verify that there are correct files in the internal storage or you have
inserted amemory card or othercomponent device into the proper slot.
Only JPEG/BMP/JPEG Progressive/EXIF/MP3/WMA/AAC/WAV/M-Jpeg/
Mpeg4/H.264(D1) files can be played.
2. Enter to Source menu to select source.
The remote
control does
not work.
1. The distance is too long or the angleexceeds 30 degrees.
2. The battery of the remote control is no power.
3. The remote sensor is perturbed by another luminous source
No power.
1. Please only use the attached AC adaptor. 2. Please check if the AC
adaptor firmly plugged into the poweroutlet. Make sure your out let has power.
3. Please remember to press the power button on the speaker to turn on the set.
4. One of the safety mechanisms maybe operating. In this event, unplug the
set from power outlet and plug it again.
1. Please turn on the set when connect it to PC. 2. Please reconnect the set
and your PC. 3. Please try to plug the big plug of the USB cable to another
USB port of your PC.
This may be caused by an electrostatic environment. Please disconnect the set
from the power and reconnectit.
Your set dies or
goes back to its
welcome screen.
It can’ t b e
detected when
connect the set
to PC.

10
Regulation & Compliance
Federal Communications Commission (FCC) Notice
This device complies with Part 15 of the FCC Rules.Operation is subject to the following two conditions: (1)
This device may not cause harmful interference, and (2) This device must accept any interference received, in-
cluding interference that may cause undesirable operation.
Warning:
Changes or modifications to this unit not expresslyapproved by the party responsible for compliance could
void the users authority to operate the equipment.
NOTE:This equipment has been tested and found to comply with the limits for a Class B digital device, pursuant
to Part 15 of the FCC Rules. These limits are designed to provide reasonable protection against harmful interference
in a residential installation. This equipment generates, uses, and can radiate radio frequency energy and, if not installed
and used in accordance with the instructions, may cause harmful interference to radio communications. However,
there is no guarantee that interference will not occur in a particular installation. If this equipment does cause harmful
interference to radio or television reception, which can be determined by turning the equipment off and on, the user
is encouraged to try to correct the interference by one or more of the following measures:
-Reorient or relocate the receiving antenna.
-Increase the separation between the equipment andreceiver.
-Connect the equipment into an outlet on a circuit differentfrom that to which the receiver is connected.
-Consult the dealer or an experienced radio/TV technicianfor help.
Limited Warranty
Please read this Limited Warranty carefully. The limitedwarranty set forth below is given by GiiNii, the maker
of your new digital picture frame, when purchased in the United States of America through an authorized
retailer and used for non-commercial purposes. We warranty this product against manufacturing and
material defects for a period of 90 days from the dateof purchase. Do not return your product to the retailer
for warranty claims.
1. Please maintain the Warranty Statement in a safeplace along with your dated sales receipt. Please retain
the original box in the event you need to make a warranty claim. Returning your product for a warranty
claim in best done in the original box or an alternativepackage that ensure its safe return to GiiNii. Please
contact our Customer Service team about theappropriate return-shipping package.
2. GiiNii Customer Service and Technical Support: 1- 866-909-3550. Or, on line at: www.giinii.com.
3.Parts and Labor Coverage. During the first 90 daysof ownership, GiiNii will repair or replace the product,
at its option, at no charge if the product is found to be defective due to material or manufacturing defects.
GiiNii will provide a new product of similar or greatervalue at its discretion. Or, provide new or rebuilt
replacement parts at its sole discretion. Replacementor repair of one part of the product does not constitute
replacement or repair of other parts of the product.The customer bears the responsibility to ship the
product back to GiiNii, at their cost. Pending review
of the product, that shipping cost will be refunded to thecustomer. To make a warranty claim, you must first
contact Customer Service and receive a ReturnAuthorization Code. No repairs or replacements can be
made without a Return Authorization Code. After thefirst 90 days of ownership, repair costs are the
responsibility of the owner.
4. Excluded Items Not Covered by the Warranty:
aCosmetic damage or damages due to accident,misuse, abuse or negligence;
bCommercial use of the product;
cDamage due to improper operation, impropermaintenance, improper power supply;
dCustomer inability to read, understand the providedinstructions on how to properly use the product;

11
eModifications of any part of the product in any way;fDamage resulting from unauthorized attempted
repair of the product;
gDamage resulting from acts of nature or God.
To make a Warranty Claim please have the followingitems:
a Your original dated proof of purchase from an authorized retailer in the United States;
b Your original package that your product was sold in.Your warranty claim will not be honored without the
original purchase receipt. If you do not have theoriginal package, please consult with our Customer
Service team to determine the best way to returnyour product to us. GiiNii cannot be responsible for
damages incurred during return shipping; insuranceis highly recommended.
cPlease provide written statement (typed or printedin block letters) that describes why your product is
defective. On this document, you will need to includethe Return Authorization Code provided by Customer
Service, as well as your Name, return address, anda daytime phone number. Return shipments to GiiNii
should be insured and sent via Registered Mail withproof of delivery.
Warranty Disclaimers
GiiNii and its parent company, affiliates or subsidiariesshall not be liable for any incidental or consequential
damages for breach of any expressed or impliedwarranty on this product. Except to the extent
prohibited by applicable law, any implied warranty of merchantability or fitness for a particular purpose on
this product is limited in duration to the duration of this warranty. Application of this warranty may vary
by state; this warranty gives you specific legal rightsand you may have others based on the state you live in.
Replacement Parts
If you need a replacement part for your GiiNii DigitalPicture Frame, call us at 1-866-909-3550 or write to us at:
Warning
Changes or modifications to this unit not expressly
approved by GiiNii voids this warranty and may result
in personal injury and/or property.
This manual suits for next models
1
Table of contents