3Pod ORBIT User manual

SUPPORTING THE ART
OF PHOTOGRAPHY
ORBIT TRIPOD
The Orbit tripod is a full service photo and video tripod,
featuring fully adjustable legs and shaft, as well as the
Orbit overhead shot system, which allows the shaft to
rotate outwards from the legs, for low angle, overhead,
and other specialty shots.
Leg Angle Lock
Foot Spikes
ORBIT TRIPOD
Thanks for choosing 3POD’s Orbit tripod !

Elevation Knob
Shaft Angle Knob
Rotation Knob
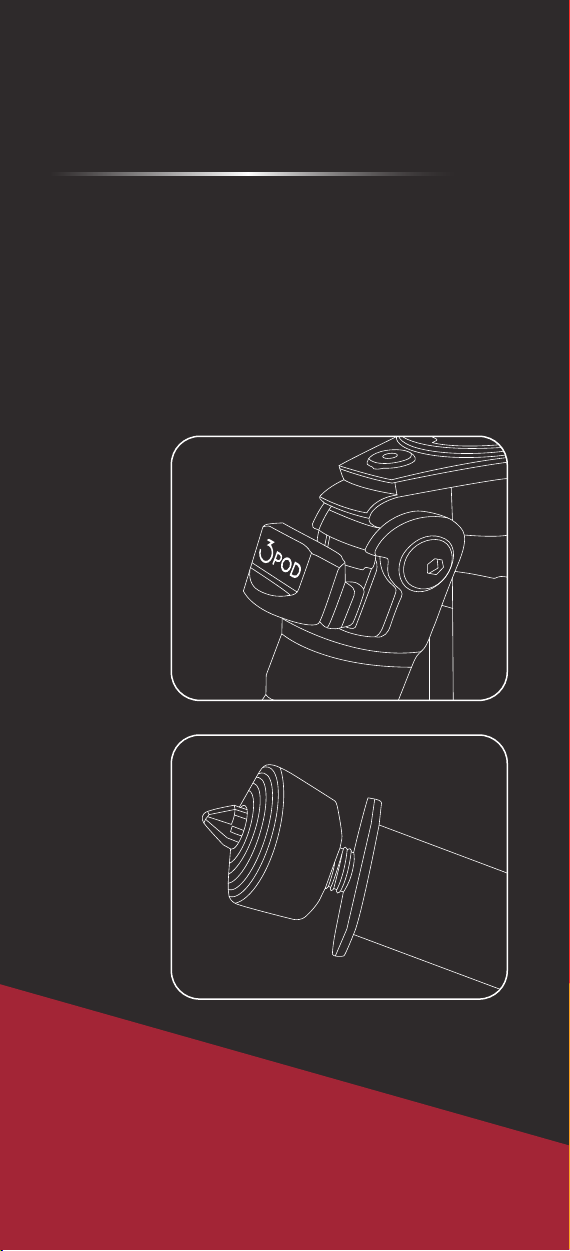
After mounting
a tripod head,
tighten these
screws using an
Allen Wrench so the
head wont come
loose during pans.
Leg Grip
Shaft
Release
Button
1/4-20 thread
3/8 thread
Reversable

The head mount can be removed and ipped over
to mount either a ¼ -20 or 3/8-16 head.
Once the head is mounted, tighten the screws
underneath to insure the head doesn’t come loose,
even when torqued in the counter- clockwise direction.
When used indoors, unscrew the foot covers so
that the spikes are covered by the rubber feet.
These will ensure a better grip on smooth ooring,
and prevent damage.
For outdoor use or rocky ground, screw the rubber
feet down to expose the spikes. These will provide
better grip on soft or impressionable surfaces.
Remember to apply the rubber protectors as
needed before spreading the legs.
To extend or retract the leg sections, open the ip lock
at the end of each section, apply rm force in the
direction you wish.
To secure the leg in that position, close the ip lock.
Test the lock by placing pressure on the leg BEFORE
attaching the camera, if the leg sections collapse into
each other while the leg lock is closed, use an Allen
Wrench to tighten the leg locks. Open all legs to a
uniform height for maximum stability.
Once all of the legs are extended to a uniform height,
spread the legs apart until they are stopped by the leg
angle lock. For normal use the lock should be set to
the lowest step.
For low angle and wider leg spread, pull the leg angle
lock out to allow it to engage with a higher step, for a
wider leg spread. There are three leg angle positions:
85°, 60° and 35°.
For uneven terrain, steps, or other leveling
challenges, you can either extend the legs
to different heights to accommodate for
differences, or spread one of the legs wider
than another, or usually, a combination
of these options.
There is a bubble level on the top plate to
assist in leveling the tripod.
USING THE TRIPOD
ADDING AND ADJUSTING A TRIPOD HEAD
EXTENDING THE LEGS
ADJUSTING THE FEET

One of the legs has a soft grip surface on it. In cold
weather handle the tripod by this surface to avoid
touching the colder sections.
There are 3 knobs in the shaft control section:
the rotation knob, the elevation knob, and the shaft
angle knob. Each of these knobs controls a range of
the shaft’s motion. At the bottom of the shaft is the
shaft release button. All of these play a role in using
the Tripod’s Orbit Overhead System.
In regular use, the elevation knob will be the most
commonly adjusted. Use it to raise and lower the shaft
during normal photography and videography. If for
some reason during a shoot you want to turn the
camera by rotating the shaft (rather than adjusting
the tripod head), you can use the rotation knob to
allow that. For best stability, the rotation knob and
elevation knob should be kept tightened otherwise.
To use the Orbit Overhead System, loosen the
elevation knob and the shaft angle knob. It might be
easier to loosen the rotation knob at this point as well.
Raise the shaft. When the shaft stops because of the
safety lock, press upwards on the shaft release button
to allow the shaft to travel up past the rst collar.
DO NOT ALLOW THE SHAFT TO PASS THE SECOND COLLAR.
When the shaft has cleared the rst collar, tilt the shaft in
the direction of shaft angle knob, and use the shaft angle
knob to lock the shaft angle into the desired vector.
Adjust the shaft’s protrusion and lock the elevation knob.
If you want to rotate the shaft around the tripod axis, use
the rotation knob to control movement. Before mounting
the camera, account for the off-center weight of the
camera, and add counterbalance or adjust the legs as
needed. Never release the setup until you are sure that
the tripod is stable and will not shift.
For more stability, consider spreading the legs more,
especially when mounting a longer lens or for more uid
control. The shaft can be rotated to any desired angle, or
even inverted to shoot close up overhead shots.
MAKE SURE THERE IS NOTHING
MOUNTED ON TOP OF THE TRIPOD
THE LEG GRIP
ADJUSTING THE SHAFT

This durable tool will provide you with years of solid
performance. We have unshakable faith in our
products, and offer a 5 year Limited Warranty to
repair or replace your 3POD products.
The Standard Limited Warranty does not cover
damages due to personal mishandling, third-party
repair, or inappropriate disassembly of the products.
If you have any questions about this or any other
3POD product, please contact us at
Brands@ Adorama.com
Parts of the tripod are electrically conductive.
Do not use in unsafe areas on during thunderstorms.
Always check all joints and locks before mounting
a camera on the tripod.
The legs should always be spread when mounting
a camera.
Always make sure the legs are spread before sliding
the shaft, to prevent damage and chafng.
Use the rubber protectors to avoid unintended damage.
Don’t use selective color.
Do not use the tripod in unsafe ways; it is intended for
photographic use only. Never use the tripod to support
something hazardous such as electrical, caustic or
ammable items. Put your menorah someplace else.
Do not exceed the maximum suggested load.
No means no.
Avoid over-balancing and tipping the tripod when used
with the shaft extended.
For additional stability, you can attach a weight to the
mounting ring on the top plate.
WARNINGS
•
•
•
•
•
•
•
•
•
•
•
Table of contents
Other 3Pod Camera Accessories manuals

Popular Camera Accessories manuals by other brands

Viltrox
Viltrox EF-NEX Mount instructions

Calumet
Calumet 7100 Series CK7114 operating instructions

Ropox
Ropox 4Single Series User manual and installation instructions

Cambo
Cambo Wide DS Digital Series Main operating instructions

Samsung
Samsung SHG-120 Specification sheet

Ryobi
Ryobi BPL-1820 Owner's operating manual


