Ropox 4Single Series User manual

4Single Battery
User manual
Installation instructions
This manual must always accompany the product
PDF 6065 / 12.03.2019

Page 2
Table of Contents
Table of Contents ................................................................................................................................... 2
1 Introduction ........................................................................................................................................ 3
2Technical data ................................................................................................................................ 4
3List of components.......................................................................................................................... 5
3.1 Optional extras ......................................................................................... Fejl! Bogmærke er ikke defineret.
4Replacement instructions................................................................................................................ 6
4.1 Installing the control.................................................................................................................................. 8
5Replacement instructions................................................................................................................ 9
5.1 Function test.............................................................................................................................................. 9
6Safety........................................................................................................................................... 10
7 Maintenance..................................................................................................................................... 11
7.1 Service forms, operation and maintenance...............................................................................................12
7.2 Waste disposal................................................................................................................................................13
8 CE declaration ................................................................................................................................... 14
8.1 EU Declaration of Conformity ...................................................................................................................14
8.2 Directives and Standards ..........................................................................................................................14
9Complaints ................................................................................................................................... 15

Page 3
1 Introduction
Product: 4Single Battery Pack
Manufacturer: Ropox, DK-4700 Næstved, Tel. +45 55 75 05 00
Area of application: The 4Single Battery Pack is an extra pack for the 4Single
electric multifunction table. This replacement kit allows the
table to be made even more flexible and easy to transport.
The battery pack is available in two versions, so that the
table’s height adjustment function is just right for the desired
purpose. One provides the facility for rapid movement, while
the other allows for a far heavier loading of the table during
lifting.
The unit must be used indoors in temperature and humidity
conditions in the home as described in section 2. The 4Single
table and the battery pack are not designed for use in damp
rooms.
Users of this product are obliged to observe these instructions. It is extremely
important that the instructions have been read and understood before the product
is used, as correct use, operation and inspection are crucial for effective, safe
functionality.
It is important that you read this manual before using this
product.
The control box has an IP32/ll tightness class and must always be
located in accordance with heavy current regulations or
equivalent national or international standards.
This product is electrically height-adjustable and therefore poses
a risk of crushing. Any operation must be carried out by or under
the supervision of an adult who has read and understood the
importance of section 9 “Safe operation”

Page 4
2 Technical data
Product number 4Single Battery Pack (rapid) 50-47013
4Single Battery Pack (heavy load) 50-47014
Materials Steel and misc. plastic parts
Surface treatment Powder coating: st. CWS 81283 RAL 7021 mat
Power supply 230V AC/2.5A/50Hz
Battery Output voltage: 24V DC; Output current limit: Max. 15A
Intermittence Max. 10% = 1 min. active/9 min. pause
Operational capacity Number of lifts when fully loaded: min. 100 times.
Max. load 40-47013: 130 kg evenly distributed over whole frame
Speed/time of lift Approx. 32 mm/s –approx. 10 seconds.
Heavy load 40-47014: 250 kg evenly distributed over whole frame
(optional extra)
Speed/time of lift Approx. 12 mm/s –approx. 25 seconds.
Temperature 5-45°C
Humidity 5-85% (non-condensing)

Page 5
3 List of components
96000588
Control box
1
including:
98002014
98002013
Y-lead to safety shutout End
connectors with resistor
1 2
96000578
Battery (incl. charger)
1 set
97701-731
Mount for control box and
battery
1 set
95091012
Screw ø4.8 x 13
12
30-67840
Control, small surface (6 x 3 cm)
1
96000629
Split cable for control Used if
more than one control required
1
30-67840
Extra control Used if
more than one control required
1
3.1 Optional extras

Page 6
4 Replacement instructions
Before you start replacing the old control with the battery pack, refer to the list of
components to make sure that all parts have been included. See list of components,
section 3.
Detach all cables leading to and from the control box before replacing the control.
Picture 1-4: Removing the old control box
1
2
3
4
Installation must always be carried out by competent personnel.

Page 7
Picture 5-8: Mounting the battery pack.
Attach the cables supplied and the existing cables (to motors, anti-crushing strips
and controls) as shown in the diagram below.
BATTERY
CONTROL BOX
Charger
Anti-crushing
strip
Motor 1
Motor 2
5
6
7
8

Page 8
4.1 Installing the control

Page 9
5 Replacement instructions
5.1 Function test
Once the control has been replaced and before the unit is used, you must always
perform a full test of all of the table’s functions. The same function test must then
always be performed at least once a year by competent personnel:
5.1.1 Before testing the battery:
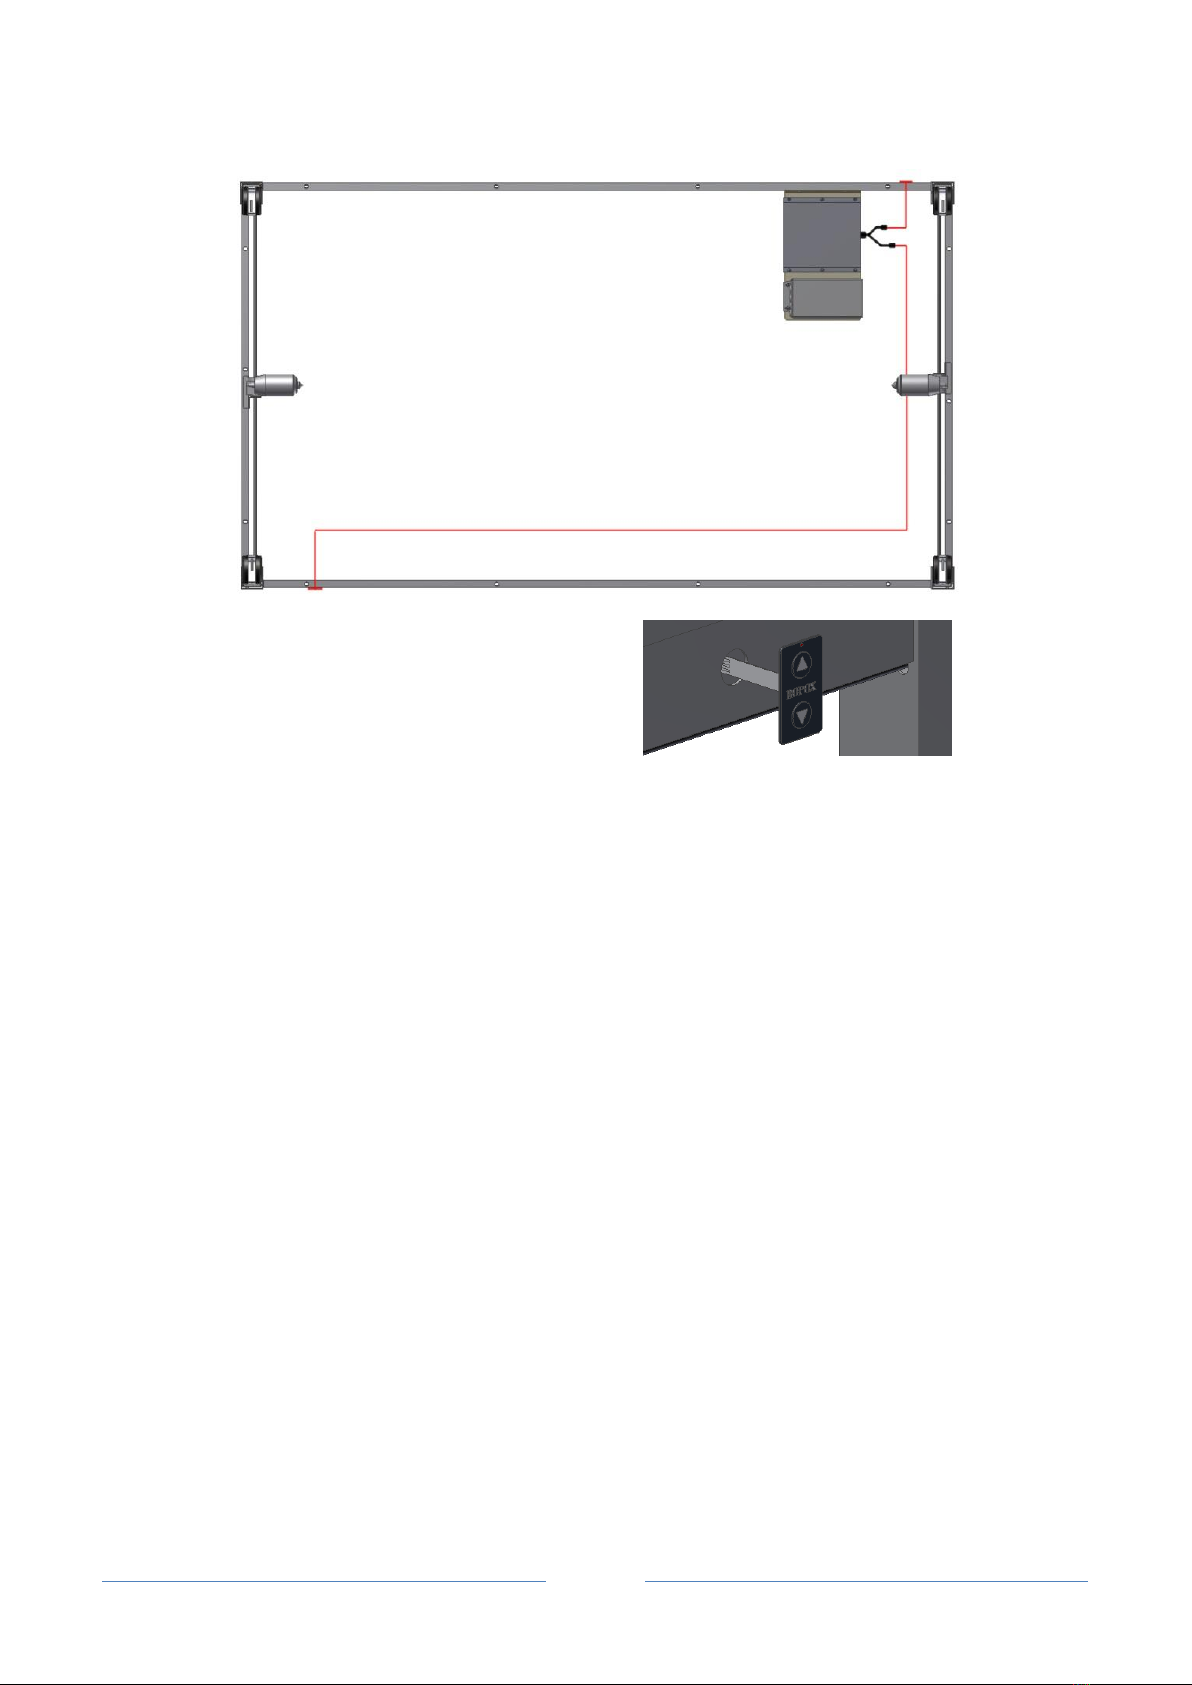
1. Check that the installation instructions have been followed.
2. Check that all bolt connections are securely tightened.
3. Check that all cables have been connected correctly and that the plugs have
been pushed in completely.
4. There must be no load on the table.
5. There must not be any objects or the like that might prevent the table from
moving within the height setting range.
5.1.2 Now switch on the battery:
6. Press the DOWN button and lower the table to the lowest position. Press the
DOWN button once more and hold it down for an additional 5 seconds to
reset the control box. Check that the movement takes place in an even,
controlled way.
7. Now press the UP button and raise the table to the highest position, and
make sure that this takes place in an even, controlled way.
8. If anti-crushing strips are attached beneath the table top, these must be
tested.
Press the DOWN button and allow the table to move 2-5 cm while enabling
the anti-crushing strip at the same time. The table will now stop its downward
movement, move 1-2 cm upwards and stop.
Once all the above items have been checked, you can use the table.
See section 9, “Safe operation”.
The battery has no standby consumption. This means that in order
to operate the table, the button needs to be pressed twice, the first
time in order to activate the battery.

Page 10
6 Safety
•The 4Single Battery Pack may only be used by people who have read and
understood these instructions.
•The table must not be operated if any fault or damage has occurred.
•Do not overload the table and make sure that the load distribution is correct.
•Tables with a battery pack may not be used in an explosive environment.
•The frame must be free of any load in connection with inspections, service or
repairs.
•When installing electricity and water, the national authorities’ guidelines must
be observed.
•Any modification that might affect the function or structure of the table and
the battery pack is not permitted.
•Installation, service and repairs may only be performed by personnel with the
appropriate competence.
•If the battery pack is not installed in accordance with the installation
instructions, any right to make a claim under warranty may be revoked.
•Only Ropox’s original spare parts may be used when replacing parts. If other
spare parts are used, any right to make a claim under warranty may be
revoked.
•The aforementioned operating time/intermittence may not be exceeded.
For optimal use of the battery pack’s functions and to avoid accidents,
it is important to act in accordance with these basic recommendations.

Page 11
7 Maintenance
For safety and operational reasons, we recommend an annual inspection of the
frame:
•Check that all bolt connections are securely tightened.
•Check that the table can move freely and without restriction from the lowest
position to the highest position without any problems.
•Resetting the frame: Press the DOWN button and lower the frame to the
lowest position. Press the DOWN button once more and hold it down for an
additional 5 seconds to reset the control box. Check that the movement takes
place in an even, controlled way.
•Check that all leads are correctly fitted and are undamaged.
Fill in the service form after each inspection. See section 7.1.
Only Ropox’s original spare parts may be used when replacing parts. If other spare
parts are used, any right to make a claim under warranty may be lost.
CAUTION
Under no circumstances must the battery be connected to mains
power (i.e. for recharging) while the table is being cleaned and
electrical components must not be washed with water.

Page 12
7.1 Service forms, operation and maintenance
Service and maintenance Serial no.
Date:
Signature:
Comments:
Service and maintenance Serial no.
Date:
Signature:
Comments:
Service and maintenance Serial no.
Date:
Signature:
Comments:
Service and maintenance Serial no.
Date:
Signature:
Comments:
Service and maintenance Serial no.
Date:
Signature:
Comments:
Service and maintenance Serial no.
Date:
Signature:
Comments:

Page 13
Faults
Possible solutions
The height of the frame
cannot be adjusted (feels
difficult to adjust)
•Check that the battery is charged. If the battery
level is so low that it is recommended that you
recharge it, a warning sound will beep for 3
seconds.
•Check leads and plug connections between the
control box and motors.
•Check leads and plug connections between the
control box and control button.
•Check that the anti-crushing strip is connected. (If
no anti-crushing strip is connected, a shorting plug
must be connected to the safety shutout lead.
•If anti-crushing strips are connected, check that
they are not enabled.
The frame does not
move smoothly
•If the frame does not move smoothly, you must
reset it. See section 7, “Maintenance”.
The table does not move
when I press the control.
•Please note that you must press the same button
twice to make the table move. The first time is to
enable the battery; the second time you hold down
the button for the actual operation.
7.2 Waste disposal
Used equipment must be disposed of in accordance with national legislation. We
recommend that the product be dismantled as far as possible so that as much as
possible can be reused. Examples of groups into which this product can be sorted:
metals, plastic, electrical components, batteries and parts for destruction.

Page 14
8 CE declaration
8.1 EU Declaration of Conformity
Ropox hereby declares that the following products
50-47013 4Single Battery Pack (rapid)
50-47014 4Single Battery Pack (heavy load)
are classified as class I and conform to the following directives and standards:
8.2 Directives and Standards
For standards and directives with which conformance is achieved, please refer to
LogicData, the supplier of the battery pack.
Date: 13-03-2012

Page 15
9 Complaints
All inquiries concerning complaints must be directed to the distributor representing
Ropox on the market in question.
Cf. Ropox General Terms of Sale and Delivery.
Ropox A/S
Ringstedgade 221
DK –4700 Naestved
Tel.: +45 55 75 05 00 Fax.: +45 55 78 05 50
E-mail: [email protected]
www.ropox.dk
Other manuals for 4Single Series
1
This manual suits for next models
2
Table of contents
Other Ropox Camera Accessories manuals
Popular Camera Accessories manuals by other brands

CamOne
CamOne COIN90 manual

Visceral Psyche Films
Visceral Psyche Films Leeming LUT Pro Setup guide

Square Jellyfish
Square Jellyfish JELLY-GRIP PRO TRIPOD MOUNT user manual

Kilews
Kilews SKC-LB1025M Operation manual

National Instruments
National Instruments Power and I/O Accessory user guide

Regal Electro
Regal Electro BA BATEQ4 Operation manual