3R Technologies Brans200 User manual

3R Technologies, Inc.
B
B
r
r
a
a
n
n
s
s
2
2
0
0
0
0
/
/
2
2
0
0
0
0
E
E
N
Ne
et
tw
wo
or
rk
k
V
Vi
id
de
eo
o
S
Se
er
rv
ve
er
r
A
An
nd
d
I
In
nt
te
er
ra
ac
ct
ti
iv
ve
e
R
Re
em
mo
ot
te
e
M
Mo
on
ni
it
to
or
ri
in
ng
g
S
Sy
ys
st
te
em
m
U
Us
se
er
r
M
Ma
an
nu
ua
al
l
v
v1
1.
.0
0
3R Technologies, Inc. 2003
Brans200/200E rev. 1A - 1 - Jan 2003
P
Pr
re
el
li
im
mi
in
na
ar
ry
y

A
A
b
b
o
o
u
u
t
t
t
t
h
h
e
e
U
U
n
n
i
i
t
t
This manual is to provide the information and procedures on how to install and operate the Brans200
network video server for system administrators and users. Users should familiarize themselves with this
manual before installing the server. This manual should be kept for future reference.
All information including the specifications in this manual is subject to change without prior notice. 3R
Technologies shall not imply or guarantee that any information included in this manual is proper for the
purpose of the user’s exclusive use. 3R Technologies shall not be responsible for any adverse
consequences caused by use of the information in this manual.
Safety Warnings
This product and/or user manual includes warnings and/or cautions that can affect the product, its
performance and the user. Users shall fully understand and comply with the warnings.
Electromagnetic Compatibility – EMC
Use of this product is limited to commercial use.
Technical Support
Contact your dealer if technical support or after-sales service is required. For technical requirements or
inquiries, manuals or software updates, visit us at http://www.3rtechnologies.com or call 1-866-
3RTECHS (866-378-3247).
W
W
a
a
r
r
n
n
i
i
n
n
g
g
s
s
Do not open the cover at your own discretion. Doing so can cause system damage or
electric shock. Contact a qualified technician or your dealer for repair of this product.
3R Technologies is not responsible for any damage or injury sustained by opening
and/or assembling/disassembling the unit at the owner’s discretion.
Electric shock or fire may result when foreign liquids or substances are introduced
into the unit. If this occurs, discontinue use, power down the unit and contact your
dealer immediately.
This equipment is susceptible to electric surge damage. Use of a conditioned power
supply is recommended.
Avoid installing the unit in locations where severe vibration, high humidity or direct
sunlight exist.
Brans200/200E rev. 1A - 2 - Jan 2003
Do not place a heavy load on top of this unit.

T
T
a
a
b
b
l
l
e
e
o
o
f
f
C
C
o
o
n
n
t
t
e
e
n
n
t
t
s
s
About the Unit
.......................................................................................................................... 2About the Unit
Safety Warnings ..................................................................................................................................................................2
Electromagnetic Compatibility – EMC ...............................................................................................................................2
Technical Support................................................................................................................................................................2
Warnings
................................................................................................................................... 2Warnings
Table of Contents
..................................................................................................................... 3Table of Contents
1. Introduction
.......................................................................................................................... 61. Introduction
1.1 Network Video Server ...................................................................................................................................................6
1.2 Brans200........................................................................................................................................................................6
1.3 Main Features ................................................................................................................................................................6
1.4 Suggested Applications .................................................................................................................................................7
2. Hardware
...............................................................................................................................82. Hardware
2.1 Hardware Inventory .......................................................................................................................................................8
2.2 Chassis Descriptions......................................................................................................................................................8
2.2.1 Front........................................................................................................................................................................8
Brans 200.....................................................................................................................................................................8
Brans 200E .................................................................................................................................................................. 8
(1) Power Status LED..................................................................................................................................................8
(2) Ready LED.............................................................................................................................................................8
(3) On Air LED............................................................................................................................................................ 8
2.2.2 Rear.........................................................................................................................................................................9
(1) Power switch..........................................................................................................................................................9
(2) 75ΩDIP switch......................................................................................................................................................9
(3) Sensor Input connector (Dl) ...................................................................................................................................9
(4) Data Output (DO) connector..................................................................................................................................9
(5) Data Output type selection switch.......................................................................................................................... 9
(6) Video Input Connectors .........................................................................................................................................9
(7) Power input connector..........................................................................................................................................10
(8) Ethernet connector (10/100 Base- T Ethernet).....................................................................................................10
(9) COM (RS-232) port .............................................................................................................................................10
(10) PTZ (R8-232) port .............................................................................................................................................10
(11) Audio Output connector.....................................................................................................................................10
(12) Audio input connector 1.....................................................................................................................................10
(13) Audio input connector 2.....................................................................................................................................10
3. Installation
.......................................................................................................................... 113. Installation
3.1 Overview .....................................................................................................................................................................11
3.2 Check that you have received all parts ........................................................................................................................11
3.3 Initial configuration of the Brans200...........................................................................................................................11
3.3.1 Prepare a PC or laptop for configuring the Brans200 ...........................................................................................11
3.3.2 Connect the Brans200 to a configuration PC........................................................................................................11
3.3.3 Assign an IP address to the Brans200...................................................................................................................12
3.3.3.1 From a PC with Windows using the Brans IPSetup Program........................................................................12
3.3.3.1.1. Static IP.................................................................................................................................................13
3.3.3.1.2 Dynamic IP .........................................................................................................................................14
3.4 Setup of the Brans200.................................................................................................................................................. 14
3.4.1 Access the Brans200 homepage to set the Brans200 operational configurations .................................................14
3.4.2 Place the Brans200 at its final location.................................................................................................................15
4. Real-time Video Monitoring
............................................................................................... 164. Real-time Video Monitoring
4.1 Access the Brans200 Server ........................................................................................................................................16
4.1.1 Auto-installation of the Client Viewer Program ...................................................................................................16
4.1.2 User Login ............................................................................................................................................................16
4.2.1. Image Display Panel ............................................................................................................................................ 17
4.2.1.1. Title Bar........................................................................................................................................................17
4.2.1.2. Status Display Bar ........................................................................................................................................17
4.2.2. Video Control Panel ............................................................................................................................................18
Brans200/200E rev. 1A - 3 - Jan 2003
4.2.2.1. Camera Selection ..........................................................................................................................................18

4.2.2.2. View Selection..............................................................................................................................................18
Single channel display ...........................................................................................................................................18
Quad channel display.............................................................................................................................................18
Full screen display .................................................................................................................................................18
Sequence channels .................................................................................................................................................18
4.2.2.3. Pause/Play Button.........................................................................................................................................18
4.2.3. PTZ Control Panel ...............................................................................................................................................19
4.2.3.1. PTZ Control Layout......................................................................................................................................19
4.2.2.4. Mode Buttons....................................................................................................................................................19
Admin Button ............................................................................................................................................................19
Audio Button .............................................................................................................................................................19
Call Button.................................................................................................................................................................19
5. Setup
................................................................................................................................... 205. Setup
5.1 Connect to Administration Page......................................................................................................................................20
5.2 Modify and Manage the System Setup ............................................................................................................................21
5.2.1 General System Setup........................................................................................................................................... 21
5.2.1.1 Setting Date and Time ...................................................................................................................................21
5.2.1.2. User Management.........................................................................................................................................21
5.2.1.2.1. Administrator.........................................................................................................................................21
5.2.1.2.2. Add Users ..............................................................................................................................................22
5.2.1.2.3. User List.................................................................................................................................................22
5.2.1.2.4. Skip LogOn............................................................................................................................................22
5.2.2 Video Setup ..........................................................................................................................................................23
5.2.2.1. Video Channel Control .....................................................................................................................................23
5.2.2.1.1. Enable ........................................................................................................................................................23
5.2.2.1.2. Quality .......................................................................................................................................................23
5.2.2.1.3. Resolution .................................................................................................................................................. 23
5.2.2.1.4. Title............................................................................................................................................................ 23
5.2.2.2. Color Control ....................................................................................................................................................23
5.2.2.3. Encoding Frame Rate........................................................................................................................................23
5.2.2.4. SAVE................................................................................................................................................................24
5.2.3 Audio Setup ..........................................................................................................................................................24
5.2.3.1 Audio (Server -> Client) ................................................................................................................................24
5.2.3.1.1 Enable .........................................................................................................................................................24
5.2.3.1.2. Input Source...............................................................................................................................................24
5.2.3.1.3. Related Video Channels.............................................................................................................................24
5.2.3.2. Interactive audio (Serve <-> Client) .............................................................................................................24
5.2.3.2.1. Enable ........................................................................................................................................................24
5.2.3.2.2 Mode...........................................................................................................................................................24
5.2.4 Network Setup ......................................................................................................................................................26
5.2.4.1. IP Settings.....................................................................................................................................................26
5.2.4.2. DNS Settings ................................................................................................................................................27
5.2.4.3. PSTN Settings...............................................................................................................................................27
5.2.4.4. Web Server Port Settings..............................................................................................................................27
5.2.4.5. Streaming Port Settings ................................................................................................................................27
5.2.4.6. Save and Restart............................................................................................................................................27
5.2.5 Pan/Tilt/Zoom (PTZ) Setup .................................................................................................................................. 28
Pan/Tilt/Zoom Settings.................................................................................................................................................. 28
5.2.5.1. Channel Selection .........................................................................................................................................28
5.2.5.2. Pan/Tilt/Zoom Device Settings.....................................................................................................................28
5.2.5.2.1. Enable ........................................................................................................................................................29
5.2.5.2.2. Manufacturer (Model)................................................................................................................................29
5.2.5.2.3. Device ID...................................................................................................................................................29
5.2.5.2.4. UART Settings...........................................................................................................................................29
5.2.5.2.4.1. Default Settings: .................................................................................................................................29
5.2.5.2.4.2. User-Defined:......................................................................................................................................29
Baud Rate: .........................................................................................................................................................29
Data Bits: ...........................................................................................................................................................29
Stop Bit:.............................................................................................................................................................29
Brans200/200E rev. 1A - 4 - Jan 2003
Parity:.................................................................................................................................................................29

5.2.5.2.5. Pan Speed...................................................................................................................................................29
5.2.5.2.6. Tilt Speed...................................................................................................................................................29
5.2.5.2.7. Halt Speed..................................................................................................................................................29
5.2.5.2.8. Save ...........................................................................................................................................................29
5.2.5.3. Auto Pan / Preset Settings.................................................................................................................................30
5.2.5.3.1. Auto Pan ....................................................................................................................................................30
5.2.5.3.2. Preset .........................................................................................................................................................30
5.2.6 Sensor and Alarm Setup .......................................................................................................................................31
5.2.6.1. Sensors..........................................................................................................................................................32
5.2.6.1.1. Sensor No...............................................................................................................................................32
5.2.6.1.2. Type .......................................................................................................................................................32
5.2.6.2. Motion Detection ..........................................................................................................................................32
5.2.6.3. Alarms ..........................................................................................................................................................33
5.2.6.3.1. Event ......................................................................................................................................................33
5.2.6.3.2. Condition ...............................................................................................................................................33
5.2.6.3.3. Alarm Number .......................................................................................................................................33
5.2.6.3.4. Duration .................................................................................................................................................33
5.2.6.4. Post Alarm Image Sending Function ............................................................................................................33
5.2.6.4.1. Event ......................................................................................................................................................33
5.2.6.4.2. Video Channel(s) to Send ......................................................................................................................33
5.2.6.4.3. Time to Record ......................................................................................................................................33
5.2.6.5. E-mail and FTP Address...............................................................................................................................33
5.2.6.5.1. About Events…......................................................................................................................................34
5.2.6.5.2. E-mail Address ......................................................................................................................................34
5.2.6.5.3. FTP ........................................................................................................................................................34
Server Address................................................................................................................................................... 34
Directory............................................................................................................................................................34
User ID ..............................................................................................................................................................34
Password............................................................................................................................................................34
5.2.6.5.4. Event Server IP Address ........................................................................................................................34
5.2.6.6. Save ..............................................................................................................................................................34
5.2.7 How to Upgrade Server Software.........................................................................................................................35
Software Update ............................................................................................................................................................35
5.2.7.1. Current Software Version .............................................................................................................................35
5.2.7.2. Upload Update File....................................................................................................................................... 35
5.2.8 Registration....................................................................................................................................................36
Appendix 1. Technical Specifications of the Brans200
...................................................... 38Appendix 1. Technical Specifications of the Brans200
Appendix 2. Troubleshooting
................................................................................................ 39Appendix 2. Troubleshooting
Brans200 does not operate normally .................................................................................................................................39
Image is not displayed .......................................................................................................................................................39
PTZ camera cannot be controlled ......................................................................................................................................39
No audio is heard even if microphone is installed .............................................................................................................39
Bi-directional communications is not made even if interphone is installed.......................................................................39
Image does not move.........................................................................................................................................................39
Frame speed lowers or does not work when selecting full screen mode ...........................................................................39
Appendix 3. Connecting video transmission channel to a specific w eb site.
.................. 40Appendix 3. Connecting video transmission channel to a specific w eb site.
Appendix 4. BMPSX Active-X API Sets
................................................................................ 41Appendix 4. BMPSX Active-X API Sets
1. Parameters .....................................................................................................................................................................41
2. Method and event provided by BMSPX as follows:......................................................................................................41
3. Detailed description of functions...................................................................................................................................41
Brans200/200E rev. 1A - 5 - Jan 2003

1
1
.
.
I
I
n
n
t
t
r
r
o
o
d
d
u
u
c
c
t
t
i
i
o
o
n
n
1.1 Network Video Server
The Brans200 Network Video Server is a device that transmits video motion pictures and audio
data via a network in real-time. The server converts the analog video and audio signals to digital
data and compresses them for on-line transmission.
Since the server has a built-in web server and network interface it does not require additional
hardware, software or programming (beyond inserting the initial IP address) to view live video
transmissions. Insert the IP address, connect the camera(s) and network cable and you are
completely ready for remote monitoring.
You can now monitor real-time video and audio by accessing your Brans200 server via the Internet
browser anytime and anywhere network access is available.
1.2 Brans200
Brans200 is a four (4) channel network video server that transmits motion pictures and audio data
in high resolution with bi-directional audio in real-time via the network. Brans200 supports various
network environments such as high-speed Internet, cable, xDSL, LAN or WAN.
Brans200 compresses video in MPEG4, which is 3 to 4 times better than still image compression
algorithms such as JPEG or Wavelet. This makes real-time monitoring available through low
bandwidth networks such as xDSL, ISDN, and public phone networks (PSTN).
Brans200 provides the perfect interactive audio transmission capability using MPEG4 speech
CODEC developed by 3R. In addition to sending live audio from the remote location, the Brans200
can transmit audio to the Brans200 location using a microphone or PC headset. Using an optional
interphone device, the Brans200 can call a person at the server location using the ‘CALL’ function
button on the browser interface.
While not a recording device, 3R supplies the Brans BRS-I software package that allows the remote
PC to record video from a Brans200 unit. Users can use BRS-I to record remote video to their PC’s
hard drive, then search and playback the recorded video files.
1.3 Main Features
Brans200 is designed to meet various user needs and uses, such as IT related applications, remote
monitoring and Internet broadcasting with an easy to use interface.
Highly Efficient MPEG4 Video Compression
Brans200 is 3 - 4 times more efficient compared to similar products as based on the existing still
image compression methods (JPEG and wavelet). Under the same conditions, if the size of
motion pictures and audio by still image compression method is 7.0 - 8.0 Kbytes, Brans200
based on MPEG4 compresses images up to 1.5 – 2.0 Kbytes (320 x 240) per frame to transmit
15 - 20 frames per second via 256Kbps bandwidth and 30 frames per second in 512K bps
bandwidth or better; however, image sizes can increase depending on the objects viewed and
the amount of motion.
Interactive Audio
Brans200/200E rev. 1A - 6 - Jan 2003
In addition to the real-time motion picture and audio transmission, Brans200 provides an
interactive audio transmission function. It allows users to simultaneously hear audio and watch
images of a remote location where the Brans200 server is installed, providing more precise
information of the situation. Furthermore, interactive one to one communication with the

exclusive interphone with 'CALL' function that Brans200 offers enables users to experience one
to one multimedia communications.
Interface to External Equipment
Brans200 supports pan/tilt/zoom camera devices, sensor and alarm, and various interfaces with
other security equipment for your customized monitoring system.
Maximum 16MB Pre/Post Alarm Storage and E-mail Notification/ftp transmission
Brans200 starts recording video of up to 16MB or 120 total seconds before and after an event,
such as a signal from sensors and motion detection, and sends it to the specified e-mail account
or FTP server. The user is informed of an event at the time of occurrence, with an image file and
the event information, via e-mail and can connect to the FTP server to verify and confirm motion
pictures and audio data that have been transmitted.
Various Network Environments
Brans200 supports networks of various bandwidths such as LAN, WAN, Internet and xDSL, etc.
using static IP addressing for each Brans200 unit. Dynamic IP addressing will be supported in
future releases.
Remote Recording Function
Security or franchise vendor business operators may need to record motion pictures and audio
for evidence retention of events occurring at a remote location and other purposes. Therefore,
Brans200 supplies the BRS-I (for Individual) software package to meet the need for image
recording. BRS-I provides basic functions that record, search and playback real-time motion
pictures and audio from the server onto the hard disk of the user’s PC. It allows you to
conveniently search recorded data indexed by date and time, saving mode and plays-back in
various modes such as frame-by-frame, fast play, etc.
Convenience
Brans200 is easy to install even for beginners and setup functions are convenient to access
through a standard web browser. Brans200 detects and sets NTSC and PAL signals
automatically without user' s additional configuration. Administrator's menus are presented in a
very user-friendly interface.
1.4 Suggested Applications
Remote monitoring of construction sites, factories and office
Security control of buildings, garages and convenience stores
Remote monitoring and control of facilities at unmanned base stations, water supply and
drainage
Real-time traffic conditions and image information of tourist resorts
Monitoring of infants and children at home or at child care centers
Online and web promotion of Internet broadcasting stations
Brans200/200E rev. 1A - 7 - Jan 2003

2
2
.
.
H
H
a
a
r
r
d
d
w
w
a
a
r
r
e
e
2.1 Hardware Inventory
Each Brans200 is shipped with the following components:
Brans200 Server Network Video Server Chassis
Power Adapter 90-270VAC, 47-63Hz
LAN Cable 6 foot crossover cable for installation
User Manual Brans200 User Manual
CD-ROM BRS-I software and user manual
2.2 Chassis Descriptions
2.2.1 Front
1 2 3
Brans 200
1 2 3
Brans 200E
(1) Power Status LED
Indicates power is ON when lit
(2) Ready LED
Indicates the unit has completed initialization and is ready to access.
(3) On Air LED
Indicates that one or more users are connected to the unit
Brans200/200E rev. 1A - 8 - Jan 2003

2.2.2 Rear
1 2 3 4 5
6
8
7 9 10 11 12 13
Brans 200
9
1 3 8 6
7
10 4 5 12 11
Brans 200E
(1) Power switch
(2) 75ΩDIP switch
These switches are used to terminate the video input signal and
are used when CCTV cameras are simultaneously connected to
both the Brans200 and other video equipment (CCTV monitor,
etc,). In that case, just carry out termination on either of two
imaging devices. Termination of Brans200 is basically set 'ON' at
the time of shipment from the factory.
(3) Sensor Input connector (Dl)
This connects up to four (4) dry contact input sensors, etc. to
Brans200. Each port is composed of 2 contacted connectors,
sensor input on the left side and ground on the right side.
(4) Data Output (DO) connector
It enables you to connect alarm lights, alarms, door cutoffs and
lighting system, up to 4 ports. Left side of each port is Output
connector contact point and right side is ground contact point.
(5) Data Output type selection switch
It allows you to select Output type of alarm connected to
Brans200. Check if desired alarm is normally open (NC) or
normally closed (NO) type for setting. You must set type of sensor
input on Admin page.
(6) Video Input Connectors
Connect up to 4 cameras to the BNC connectors. The server recognizes camera
signal type (NTSC or PAL) automatically.
Brans200/200E rev. 1A - 9 - Jan 2003

(7) Power input connector
(8) Ethernet connector (10/100 Base- T Ethernet)
Using an Ethernet cable, connect the server to network equipment
such as a hub or router.
(9) COM (RS-232) port
Connect server to modem for PSTN or ISDN dial-up access, or
connect a control PC or external equipment on the basis of RS-
232C interface.
(10) PTZ (R8-232) port
This is a serial port for pan/tilt/zoom drives. Connect
RS232/RS485 converter to serial port in order to use pan/tilt
system on the basis of RS-485.
(11) Audio Output connector
Connect audio Output to the input connector of a speaker.
(12) Audio input connector 1
‘IN 1’ is an audio input port for 'line in'. It allows you to connect
audio input device with audio input level of 0.2-2V.
(13) Audio input connector 2
Brans200/200E rev. 1A - 10 - Jan 2003
As a complementary audio input connector, ‘IN 2’ is used together
with audio Output connector when connecting the optional
interphone device.

3
3
.
.
I
I
n
n
s
s
t
t
a
a
l
l
l
l
a
a
t
t
i
i
o
o
n
n
3.1 Overview
• Check that you have received all parts
• Initial configuration of the Brans200
• Prepare a PC or laptop for configuring the Brans200
• Connect the Brans200 to a configuration PC
• Assign an IP address to the Brans200 using IP Setup program
• Setup of the Brans200
• Access the Brans200 homepage to set the Brans200 operational configurations
• Place the Brans200 at its final location
• Hook up cameras, alarms, etc. and confirm operation of the system.
3.2 Check that you have received all parts
Check the items received in the box against the parts list located in Chapter 2 of this manual.
Any missing parts should be reported immediately to your dealer for replacement.
3.3 Initial configuration of the Brans200
3.3.1 Prepare a PC or laptop for configuring the Brans200
Select a PC or laptop running any Microsoft Windows OS, with
• A 10baseT Ethernet adapter or PCMCIA card, and
• A crossover LAN cable with RJ45 connectors (for direct connect to the
Brans200), or
2 straight LAN cables with RJ45 connectors (for connection via a HUB), and
• Microsoft Internet Explorer 4.0 or higher with Active-X Control plug-in.
3.3.2 Connect the Brans200 to a configuration PC
• Connect the crossover cable between the PC/laptop and the Brans200, or
Brans200/200E rev. 1A - 11 - Jan 2003
• Connect the straight cables to the PC/laptop and the Brans200, connecting each
to the HUB

3.3.3 Assign an IP address to the Brans200
3.3.3.1 From a PC with Windows using the Brans IPSetup Program
1. Run ‘IPSetup.exe’ on the CD from the installing PC on the same subnet.
2. Click ‘Search’ button for IPSetup to detect Brans200s on the same subnet.
Brans200/200E rev. 1A - 12 - Jan 2003
3. The Brans200 that needs to be installed will be shown with its Mac address
and factory default IP address (192.168.0.2).

3.3.3.1.1. Static IP
1. Select the Brans200 to be installed and set the IP address, subnet mask,
default gateway and administrator’s password, which is ‘pass’ by default.
2. Clicking the ‘Set’ button to save the IP configuration to the Brans unit.
3. To confirm communication, click the “Ping” button.
4. Confirmation of communication should look something like this:
Communication failure would look like this:
If some, or all, of the packets are lost, repeat the ‘ping’ command again. If you keep
getting the ‘timed-out’’ message, check the following:
• Brans200 is connected to power and turned on
• Cable connections (between Brans200 and PC, or Brans200, PC and HUB).
• IP addresses assigned to the Brans200 and PC are in the same subnet mask
If these items check out OK, then rerun IP Setup and reassign the IP to the Brans200.
Brans200/200E rev. 1A - 13 - Jan 2003
Reply from 208.230.202.134: byte=32 time=2ms TTL=225
Reply from 208.230.202.134: byte=32 time=2ms TTL=225
Reply from 208.230.202.134: byte=32 time=2ms TTL=225
Reply from 208.230.202.134: byte=32 time=2ms TTL=225
Ping statistics for 208.230.202.134:
Packets: Sent=4, Received=4, Lost=0 (0%)
Approximate round trip times in milli-seconds
Request timed ‘OUT’
Request timed ‘OUT’
Request timed ‘OUT’
Request timed ‘OUT’
Ping statistics for 208.230.202.134:
Packets: Sent=4, Received=0, Lost=0 (100% loss)
App
roximate round tri
p
times in milli-seconds
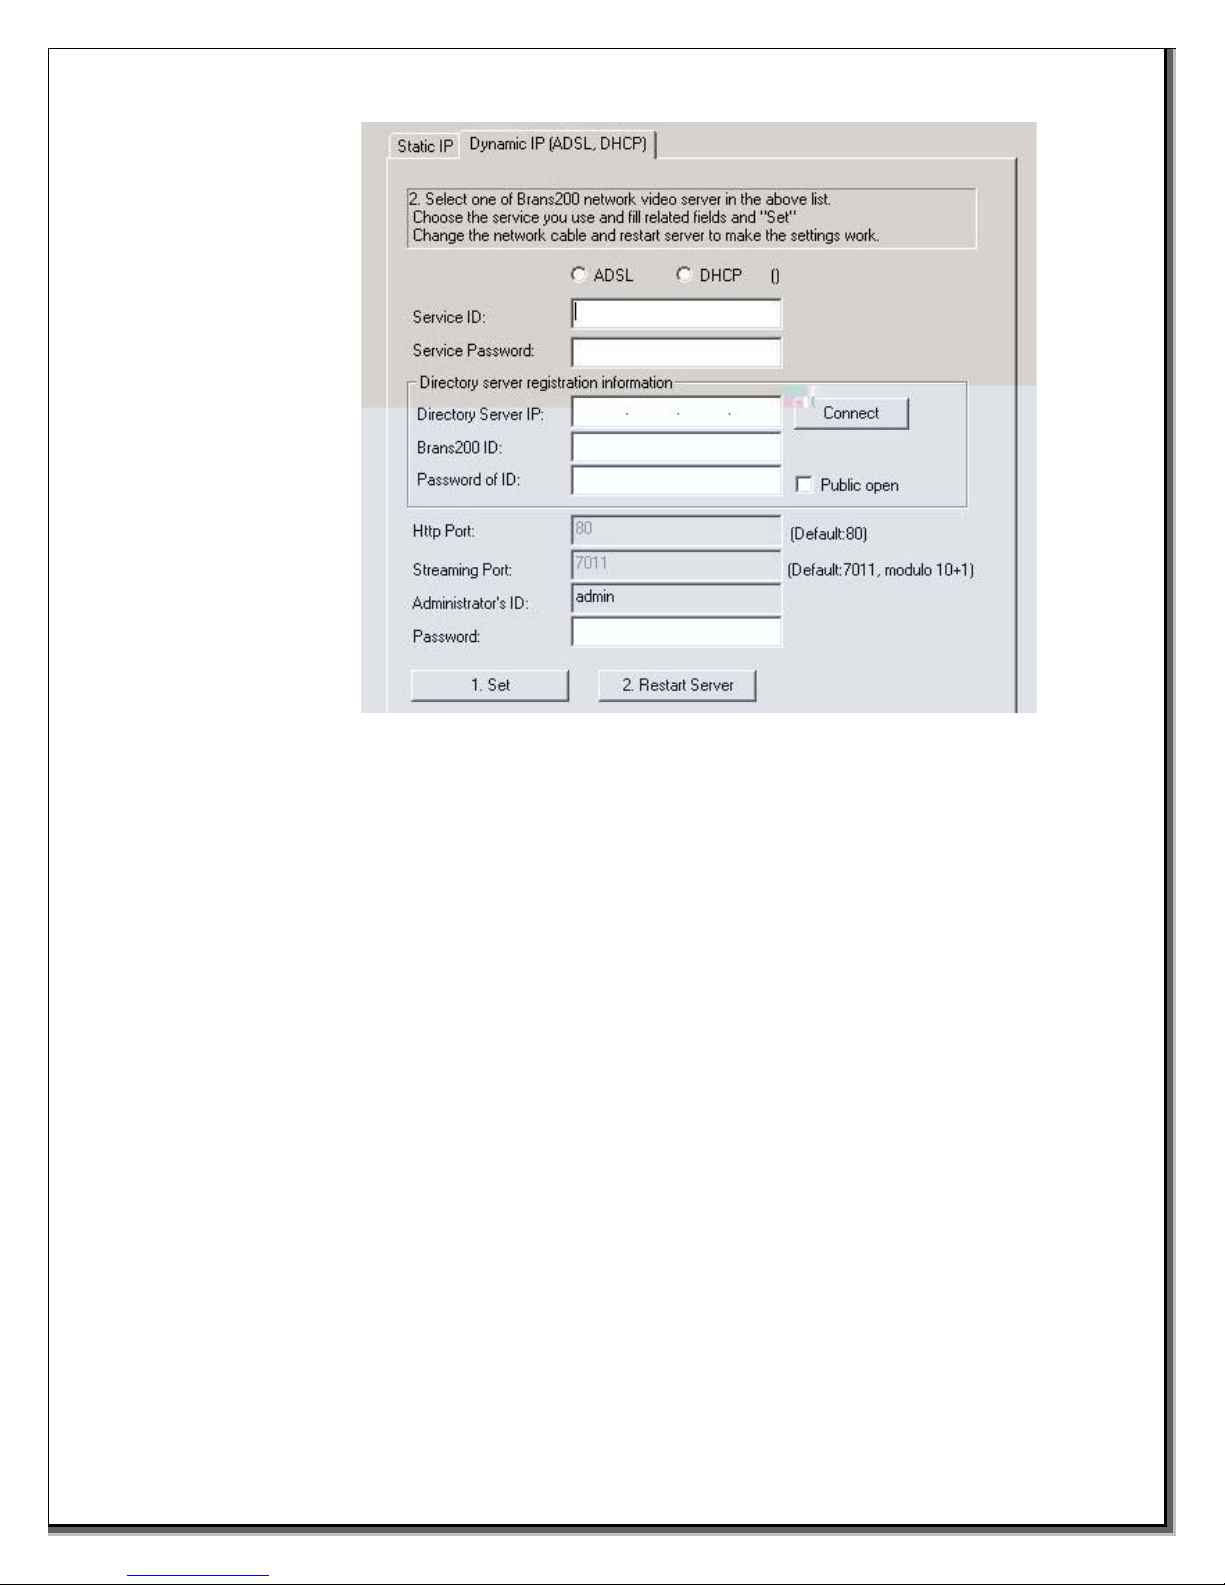
3.3.3.1.2 Dynamic IP
1. Choose ADSL (for DSL modems) or DHCP.
2. Enter the Service ID provided by your Internet Service Provider (ISP).
3. Enter your ISP service password.
4. Enter the IP address of the Brans Directory server (the Brans Directory server
registers all Brans200 units so that they can be found by their ID in the
Dynamic environment instead of their IP address).
5. Enter the Brans ID name.
6. Enter the password for the Brans ID.
7. Indicate if the site is Public Open (if checked, the site will be listed on the
Brans website).
8. Enter the password for the adminisrator’s ID.
3.4 Setup of the Brans200
3.4.1 Access the Brans200 homepage to set the Brans200 operational configurations
• In the IP Setup program, enter the ‘admin’ default Password “pass” and click the
Launch Admin Page button
or
• Open your web browser
• Enter the IP address in the URL box in the browser as below:
http://(IP address)/cgi-bin/admin.cgi
Example:
http://208.230.202.134/cgi-bin/admin.cgi
To access the administrator’s page, an ID and Password are required.
Brans200/200E rev. 1A - 14 - Jan 2003
Defaults are: ID=”admin”, Password=”pass”. Thereafter, for effective system security, the
adminstrator’s ID and Password should be changed. For further information, see
Chapter 5.

3.4.2 Place the Brans200 at its final location
1. Hook up cameras, alarms, etc. and confirm operation of the system:
a. Attach power cable
b. Attach camera inputs
c. Attach any video Outputs, if desired, for local viewing
d. Attach alarm sensor inputs, if required
e. Attach RS232/422 converter to COM port for PTZ control, if required
f. Attach microphone input device, if required
g. Attach LAN cable
h. Power up Brans200
2. After power-up, the POWER and READY lights should be lit.
3. Connect to the Brans200 via the browser and the On-Air light should be lit.
a. Open your web browser.
b. Enter the IP address in the URL box in the browser as shown below:
http://(IP address)
Example:
http://208.230.202.134
The Brans200 user’s log in page will be displayed. Default Guest Account ID and
Password are both ”guest”.
NOTE: The Brans200 browser interface requires the Active-X Control plug-in for Internet
Explorer. If the Active-X Control plug-in is not installed, you will be prompted to install the
plug-in before the Brans200 interface launches. Answer “YES” to the question about
installing the plug-in. After installation the Brans200 browser interface should be
displayed.
If video is not displayed, check that the camera and network cables are properly installed
on the Brans200 unit. If trouble persists, please refer to the Trouble Shooting appendix.
Brans200/200E rev. 1A - 15 - Jan 2003

4
4
.
.
R
R
e
e
a
a
l
l
-
-
t
t
i
i
m
m
e
e
V
V
i
i
d
d
e
e
o
o
M
M
o
o
n
n
i
i
t
t
o
o
r
r
i
i
n
n
g
g
4.1 Access the Brans200 Server
Run Internet Explorer 4.0 or higher on the user’s PC, enter the Brans200 IP address you want to
connect to and press the ENTER key.
4.1.1 Auto-installation of the Client Viewer Program
The first time you access the Brans200 home page the client viewer software is automatically
downloaded and installed to allow you to view the MPEG4 video images. As noted in Chapter
3, you must have the Active-X Control plug-in installed in your browser. If it is not already
installed you will be prompted to do so at this time.
4.1.2 User Login
The user must login in through the login page. The default login for users is ’guest’ for both ID
and Password. The system administrator can change or remove the default ID and Password,
assigning individual IDs and Passwords to each user.
The login page allows the user to choose a viewer appropriate for the bandwidth of their network or
Internet access. Simple Viewer is for bandwidth less than 256KB/sec. Normal Viewer is for bandwidth
256KB/sec or greater. Normal Viewer can be chosen for smaller bandwidths, realizing that screen write
and refresh rates will be slower and take more time.
Brans200/200E rev. 1A - 16 - Jan 2003

4.2 Main Viewer
When the installation of the client program is complete and your log in is accepted, the Main Viewer of
the Brans200 server is automatically connected and begins displaying video.
4.2.1. Image Display Panel
The image display panel can display up to 4 channels, each channel 320x240 resolution. The
display panel has the following components:
4.2.1.1. Title Bar
Displays the title of the channel as entered in Administration.
4.2.1.2. Status Display Bar
Displays the current time and date at the server site, and the number of clients
connected
Title Bar
Status Display Ba r
Brans200/200E rev. 1A - 17 - Jan 2003

4.2.2. Video Control Panel
The control panel allows the user control over camera display in the
Main Viewer.
4.2.2.1. Camera Selection
Allows selection of a single channel for view/display
4.2.2.2. View Selection
View selection allows the user to configure the channel display(s).
Single channel display
Displays the selected channel. Double-clicking zooms in the image.
Quad channel display
Displays 4 channels simultaneously
Full screen display
Zooms in the single channel to fill the display area
Sequence channels
Channels will sequence every 5 seconds
4.2.2.3. Pause/Play Button
Pause - Stops transmitting video images. Button then changes to the Play
button.
Play - Pressing the Play button resumes transmission of the video images.
Brans200/200E rev. 1A - 18 - Jan 2003

4.2.3. PTZ Control Panel
The PTZ control panel allows the user to control most functions supported by a particular PTZ
camera, including pan, tilt, zoom, auto pan, focus, auto focus and location presets. PTZ
control is available to those users whose ID authorizes them to control PTZ cameras.
4.2.3.1. PTZ Control Layout
4.2.2.4. Mode Buttons
Mode buttons allow you access to additional features
Admin Button
The Admin button brings you to the log in screen for the Administration page
for the Brans200 setup.
Audio Button
The Audio button will enable or mute audio sound. The default
button display is ON.
ON MUTE
Call Button
The Call button initiates and ends two-way audio transmission.
Going OFF HOOK rings the optional interphone device at the
server end or opens the microphone in a speaker/microphone
ON HOOK OFF HOOK device.
Brans200/200E rev. 1A - 19 - Jan 2003
Left, Right, Up, Down
(Center Button) - Starts Auto Pan
Zoom In and Out
Focus In and Out
(Center Button) - Auto Focus camera (if it is a supported function)
“Preset” button moves the camera to the selected preset position
Preset Selection Drop-down box
Relay Output Control button activates the selected output relay.

5
5
.
.
S
S
e
e
t
t
u
u
p
p
5.1 Connect to Administration Page
Connect to the Administration page to modify any of the Brans200 settings. All settings are done within
the web browser interface and can be done from any PC with Internet access.
You can connect to the Administration Page one of two ways:
Press the Admin button from the User interface and enter the proper ID and Password.
-or-
Enter the direct page address into the browser URL box, e.g. http://(IP address)/cgi-bin/admin.cgi.
You are then presented with the Administrator Login page:
Default ID is “admin” and default Password is “pass” when shipped from the factory. It is recommended
that you change the ID and Password after first login to maintain your system security and integrity.
Brans200/200E rev. 1A - 20 - Jan 2003
This manual suits for next models
1
Table of contents
Popular Network Hardware manuals by other brands


TRENDnet
TRENDnet TV-NVR216D4 user guide

Aerohive
Aerohive HIVEMANAGER CLOUD Evaluation guide

Swissvoice
Swissvoice Voice Bridge Quick user guide

PCB Piezotronics
PCB Piezotronics 498A-0040 Installation and operating manual

3Com
3Com 486 Getting started guide

Munters
Munters Comm-Box Manual for use and maintenance


