Ableconn USB3HDMIS User manual

1
USB 3.0 to HDMI Slim Display
Adapter
User’s Manual

2
ABOUT THIS MANUAL
This manual is designed for use with the USB 3.0 to HDMI Slim Display Adapter.
Information in this document has been carefully checked for accuracy; however, no
guarantee is given to the correctness of the contents. The information in this
document is subject to change without notice. The manufacturer does not make any
representations or warranties (implied or otherwise) regarding the accuracy and
completeness of this document and shall in no event be liable for any loss of profit or
any commercial damage, including but not limited to special, incidental,
consequential, or other damage.
Before attempting to connect, operate or adjust this product, please save and read
the User's Manual completely. The style of the product shown in this User's Manual
may be different from the actual unit due to various models.
SAFETY INSTRUCTIONS
Always read the safety instructions carefully:
Keep this User’s Manual for future reference
Keep this equipment away from humidity
If any of the following situation arises, get the equipment checked by a service
technician:
•The equipment has been exposed to moisture.
•The equipment has been dropped and damaged.
•The equipment has obvious sign of breakage.
•The equipment has not been working well or you cannot get it to work
according to the User’s Manual.
COPYRIGHT
This document contains proprietary information protected by copyright. All right are
reserved. No part of this manual may be reproduced by any mechanical, electronic
or other means, in any form, without prior written permission of the manufacturer.
TRADEMARKS
All trademarks and registered trademarks are the property of their respective owners
or companies.

3
Table of Contents
1. Introduction........................................................................................5
Features.......................................................................................................5
Package Contents........................................................................................6
System Requirements..................................................................................7
2. Installation..........................................................................................9
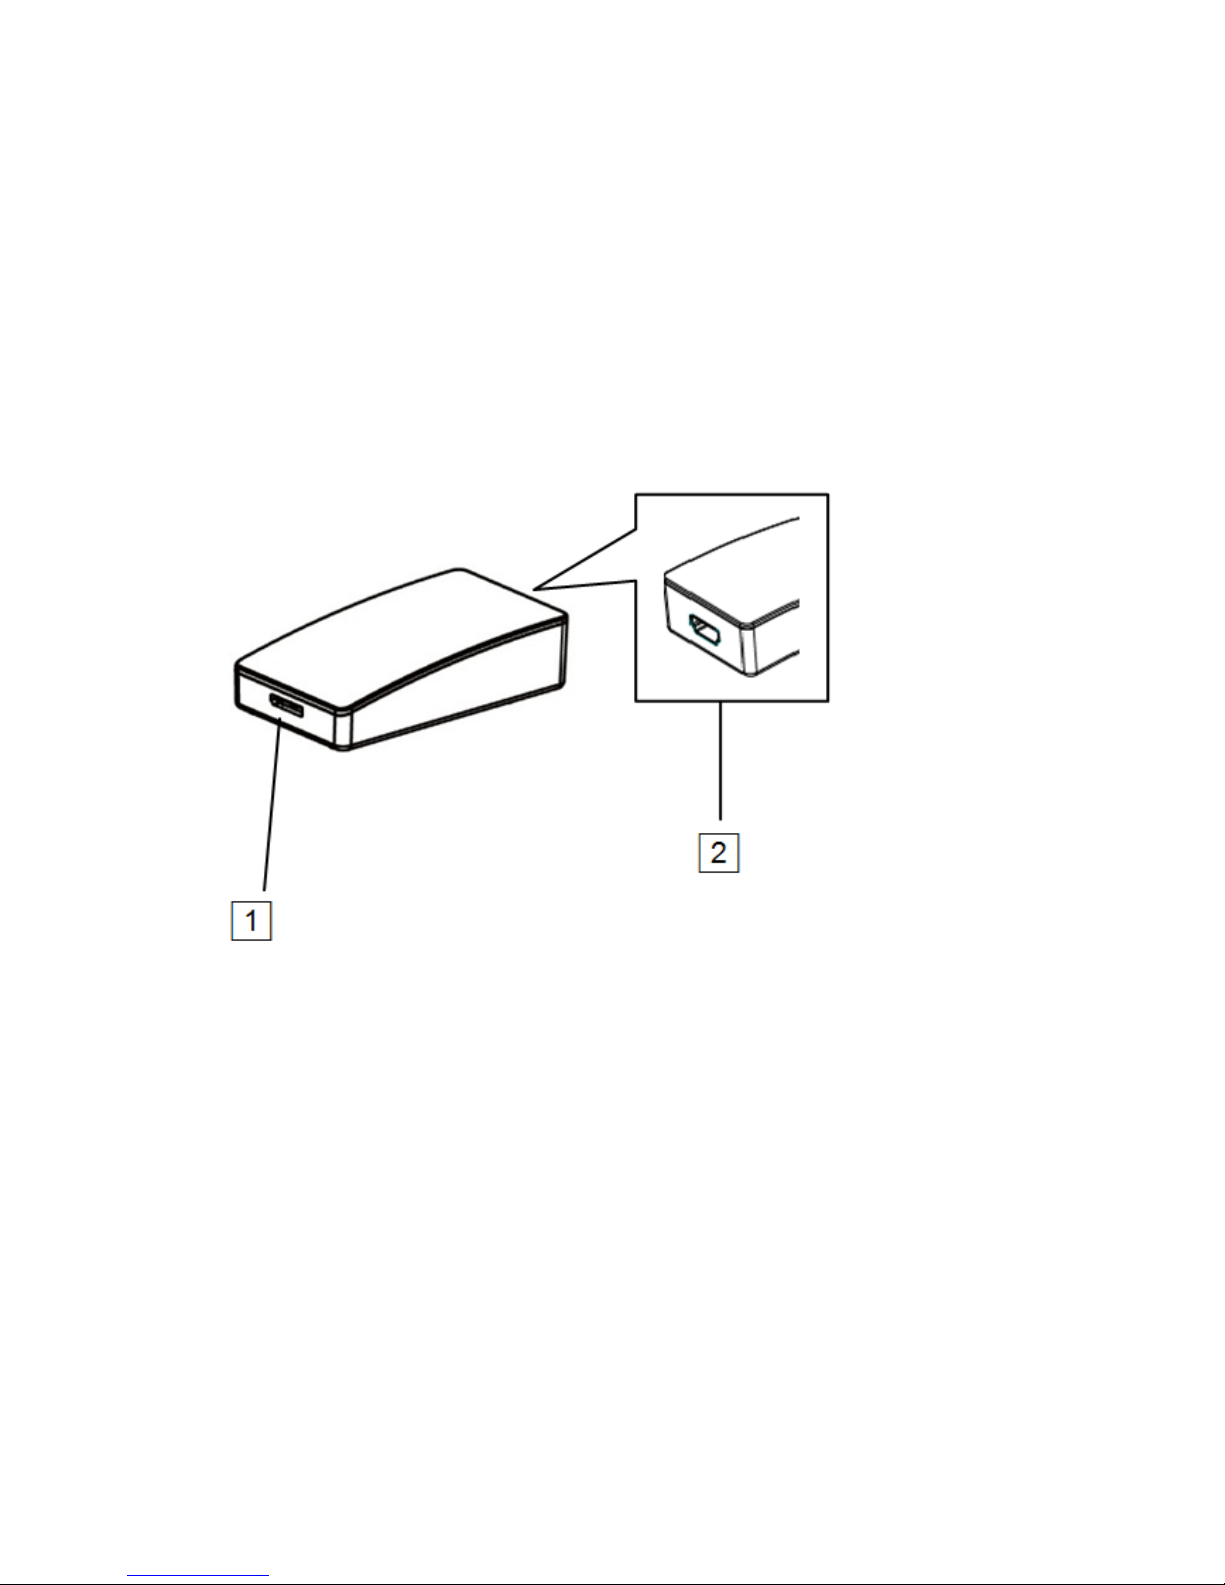
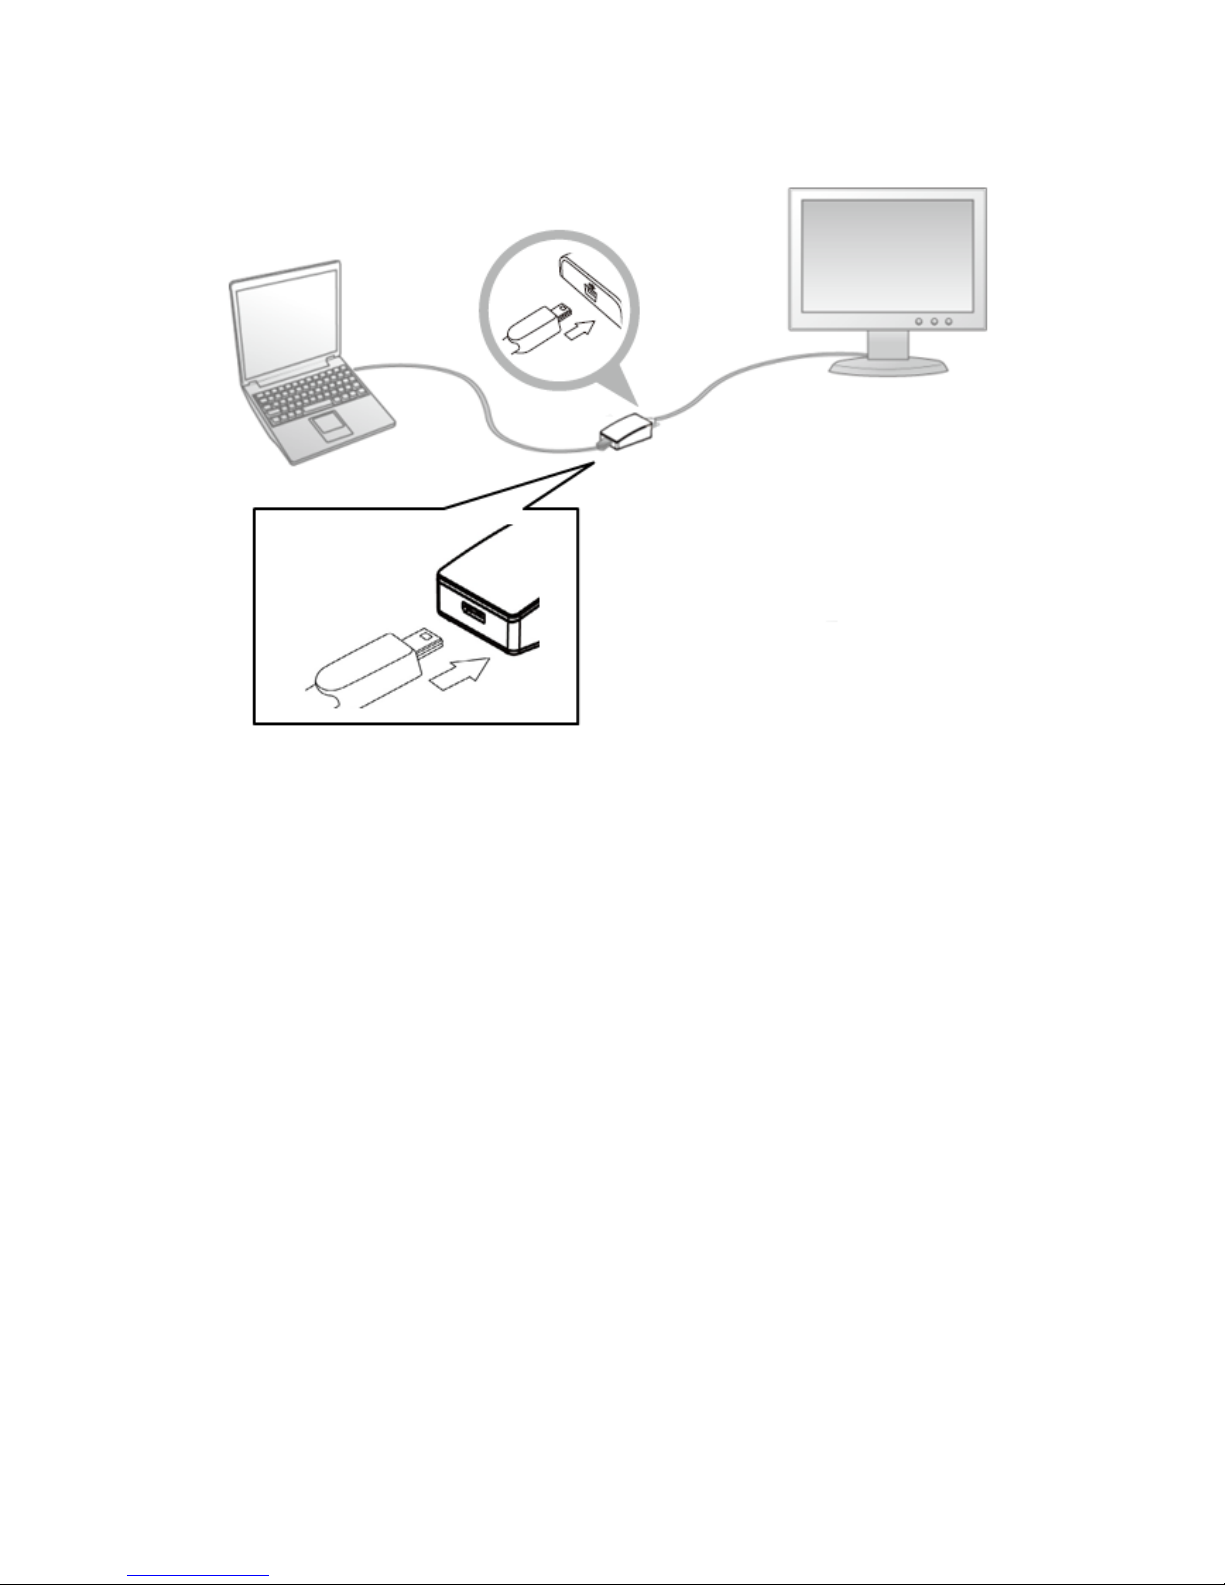
Parts and connection ...................................................................................9
Driver Installation.....................................................................................11
On Windows®XP/ Windows®Vista/ Windows®7/ Windows®8 .........11
On Windows®XP/ Windows®Vista/ Windows®7 / Windows®8............14
Using the adapter ......................................................................................15
Utility settings...........................................................................................16
Description of the settings ........................................................................17
Windows system configuration.................................................................18
Extend mode .............................................................................................19
Mirror mode..............................................................................................20
Be the primary monitor.............................................................................21
Windows shortcut .....................................................................................21
3. Advanced operations.......................................................................22
Advanced settings.....................................................................................22
Adjust the resolution.................................................................................22
Extended monitor......................................................................................22
Mirror monitor..........................................................................................22
Supported resolution.................................................................................23
Using multiple adapters ............................................................................24
Disconnect the adapter..............................................................................24
4. Uninstall the adapter and driver .....................................................25
5. Troubleshooting...............................................................................26
6. Specifications...................................................................................29
7. Regulatory Compliance...................................................................31

4
FCC Conditions ........................................................................................31
CE .............................................................................................................31
WEEE Information ...................................................................................31

5
1. Introduction
The USB 3.0 DisplayAdapter is a device which enables connection to
second display device to a computer using USB 3.0 port. With this
convenient design, it can connect up to 6 display devices to a computer
without installing extra video cards. Once the driver has been installed,
the USB attached monitor will be enabled immediately. No function key
on the adapter and there is no need to reboot the operating system after
unplugging the USB adapter. System performance is an important issue
when using multiple monitors.Another benefit of this adapter is that it
occupies little computer resource; ensuring users get quality display
without comprising computer performance.
Features
Add-on monitor, LCD or projector through a single USB 3.0 port
hot-plug; add or remove monitor without system reboot
Small in size, works with all HDMI®displays.
Supports High Resolution up to 2048x1152
Video streaming is supported up to 1080p
Extend and Mirror mode support.
Resumes from hibernation and suspend modes
Supports up to 6 USB display adapters to work simultaneously

6
Package Contents
USB 3.0 to HDMI Slim DisplayAdapter x1
USB cable
CD (Driver & User’s Manual)
x1
x1
Quick Installation Guide
x1

7
System Requirements
Hardware
The minimum requirements for the PC are:
With Single Core CPU at 1.2GHz or higher processor clock.
Intel®Pentium®/ Celeron®family, or AMD®K6®Athlon®/
Duron®family, or compatible processor
512MB memory
At least one USB3.0 port (*)
30Mb of available disk space
Super VGA (800 x 600) or higher resolution monitor
*Note: Although this adapter supports a USB 2.0 connection,
the quality might be poor under high resolution display
condition. In addition, this adapter does not support USB
1.0/1.1.
To play DVD on the adapter-attached monitor, except the
requirements above, the following requirements should also be
met:
With dual core CPU at 2.0 GHz processor clock
The adapter screen resolution be set to 800x600 with 32bit
color. It is recommended to close all other unnecessary
applications if the video playback is not smooth.

8
For 1-2 monitors, business usage, productivity target. This may
not provide full frame rate DVD playback at full screen.
1.2GHz Single Core CPU
512MB memory
For 3 monitors, where 1 could run DVD video while also targeting
productivity and business apps. Will support only 1 video of DVD
resolution at full screen\
1.6GHz CPU
1GB memory
For 6 screen where 1 screen can run full screen DVD video
1.8GHz Core Duo
1GB memory
Software
Windows®XP Home or Professional (Including Table edition)
SP2 or SP3
*Note: The adapter does not support Windows®XP 64bit
Windows®Vista SP1/SP2 (32-bit or 64-bit)
Windows®7 (32-bit or 64-bit)
Windows®8 (32-bit or 64-bit)

9
2. Installation
Parts and connection
Parts
HDMI®connector: Connect to a desired HDMI®monitor. To connect
different types of monitor, you may need a converter.
Micro USB connector: Connect to an available USB connector on a
computer.

10
Connection
Plug one end of HDMI cable into the adapter's HDMI connector, and the
other end of HDMI cable into a HDMI connector of monitor.
Plug the micro USB connector into the adapter's micro USB connector
and the other end into a PC.

11
Driver Installation
On Windows®XP/ Windows®Vista/ Windows®7/
Windows®8
Caution: DO NOT connect the Ethernet adapter to your computer before
you install the provided driver. You will be instructed to do so later.
1. Insert the provided CD into your disc drive. Then locate and
double-click the setup.exe file under x:\Driver\Windows where x is
your disc drive letter.
2. When you click setup.exe, you could see the screen as below

12
3. The DisplayLink Core Software screen below appears. Be patient
with the installation procedure, it may take a while.
4. The DisplayLink Graphics screen below appears
5. Be patient with the installation procedure, it may take a while.
6. Connect the USB 3.0 to HDMI®Slim DisplayAdapter to a computer
after the driver installation is completed. For connection details,
refer to the chapter of Parts and Connection.
7. When the operating system detects the adapter, the reminder
message will appear on the system tray as below.

13
8. To change the status of display mode, position the mouse
anywhere on the Windows desktop, and then right-click to select
<Properties>.
9. Click <Settings> tab to enter the configuration page.

14
Verifying the Driver Installation
On Windows®XP/ Windows®Vista/ Windows®7 /
Windows®8
To verify the driver of the adapter, follow the step below to open the
Device Manager on Windows operating system.
Following the path as below to open the device manager
Windows®8: My Computer\Computer (right click)\
Properties\Device Manager
Windows®7: Control Panel\System and
Security\System\Device Manager.
Windows®Vista: Control Panel\System Maintenance\Device
Manager
Windows®XP: Control Panel\System\Hardware\Device
Manager
A string similar to USB.. Adapter device should be listed.

15
The screen shot above is demonstrated by Windows®7 and might be varied
slightly for each operating system.
Note: If there is a (question) or (exclamation) mark next to
that item,
then the driver is not properly installed. Please delete the item, unplug
the adapter and repeat the installation steps.
Using the adapter
There are several ways to utilize the monitor attached on the adapter.
The add-on monitor can be configured to use either “mirror mode”,
“extended mode” or be the primary display as described in this section.
1. Mirror mode: Duplicate the primary display and mirror to the
add-on monitor(s).
2. Extended mode: The Windows Desktop will be spread to the
add-on monitor(s).
3. Primary mode: Assign the add-on monitor to the primary display.
Note that the following screen shots in this section are using
Windows®7 operating system. It may not match your operating
system but the definitions of buttons, tabs and menus are the same.

16
Utility settings
The supplied utility allows you to configure the display mode, screen
rotation, screen resolution, and physical arrangement of your
monitors.
1. Click < (utility icon) > in the Windows System Tray.
Note: The may be hided in the Windows System Tray. Click
< (arrow icon) > to bring up more icons if it happens.
2. Select a preferred option, and then click it using mouse.

17
Description of the settings
Options Description
DisplayLink
Manager
Enable the Windows screen resolution page.
Check for Updates Check the latest driver and download if available.
USB 3.0 to HDMI®Slim Display Adapter
Screen
Resolution
Click to select an available resolution. Note that this function is
invalid in mirror mode, as the resolution is defined as the
resolution of the primary monitor.
Screen
Rotation
Rotate the screen according to the desired orientation.
Extend To Extend the screen according to the desired orientation.
Set as Main Monitor Set this screen to the main screen
Notebook Monitor Off Switch the add-on monitor to the main display and turn off the
screen of the laptop.
Note: This function works only when one add-on monitor is
connected. This option will also only appear on laptop.
Mirror Duplicate the primary monitor to the monitor which connects with
the adapter.
Off Turn off the monitor.
Optimize for
Video
Optimize the video quality when playing back. Text may appear
less clear when enabling.
USB 3.0 to HDMI®Slim Display Adapter
Fit to TV Adjust the size of Windows Desktop on the TV.
Note: This function works only when one add-on monitor is
connected. Besides, this option will also only work in extended
mode. The add-on monitor will change to the extended mode if
selecting this option while in mirror mode
Audio Setup Enable the Windows audio configuration page.
This function works only in specific models.
Video Setup Enable the Windows screen resolution page

18
Windows system configuration
Position the mouse anywhere on your computer desktop, right-click and select
<Screen Resolution> on Windows®7/ Windows®8, Personalize > Display
Settings on Windows®Vista or Properties > Settings on Windows®XP.
Alternatively, click < (utility icon) > in the Windows System Tray,
and then select DisplayLink Manager or Video Setup.

19
Extend mode
1. Refer to the Windows system configuration section to open the
configuration page.
2. In the Display drop-down menu, select the option with the string
similar to “DisplayLink Graphics Adapter”.
3. Check the Multiple Displays > Extend these displays on
Windows®7/ Windows®8, Extend the desktop onto this
monitor box on Windows®Vista or Extend my Windows
desktop onto this monitor box on Windows®XP
4. Click <OK> to confirm and close the settings screen.
5. Once the setting is completed, simply drag and drop the
application icons or the opened windows to the add-on monitor.
However, some applications may not support to display on the
extended desktop.

20
Cursor disappeared
If the status remains in the extended mode but the adapter is
disconnected, the desktop will still be panned to the add-on monitor.
The cursor may not be found on the primary monitor in such a case. If
it happens, connect the add-on monitor through the adapter again or
keep moving the mouse.
Video playback in extended mode
If the video or DVD playback quality is poor or low performance in the
extended mode, please playback it on the primary monitor instead of
the add-on monitor.
Mirror mode
1. Refer to the Windows system configuration section to open the
configuration page.
2. In the Display drop-down menu, select the option with the string
similar to “DisplayLink Graphics Adapter”.
3. Check the Multiple Displays > Duplicate these displays on
Windows®7/ Windows®8, uncheck the Extend the desktop onto
this monitor box on Windows® Vista or Extend my Windows
desktop onto this monitor box on Windows®XP
4. Click <OK> to confirm and close the settings screen.
This manual suits for next models
1
Table of contents
Popular Video Card manuals by other brands

EVGA
EVGA GeForce GTX Series installation guide

Nvidia
Nvidia 9500GT - GeForce 9500 GT 550MHz 128-bit DDR2 1GB PCI-Express Pcie x16 Video... user manual

Crestron
Crestron TPS-VIDL Operating & installation guide

Gigabyte
Gigabyte GV-RX16P128P-RH user manual

Nvidia
Nvidia GEFORCE GTX 460 installation guide

Elitegroup Computer Systems
Elitegroup Computer Systems 3DVision-985 user manual