ACKERMANN 16-2090 User manual

USER MANUAL 16-2090
FUSION CAMERA

USER MANUAL 16-2090 Rev. 09/2017
Page 2of 27
Contents
1Preface____________________________________________________________3
2About the device ____________________________________________________4
3Safety instructions___________________________________________________4
4Regulatory advice___________________________________________________ 6
5Installing the device__________________________________________________7
6Operating guidelines________________________________________________ 10
7Description of the front and back panels_________________________________ 16
8Suggested decontamination procedures_________________________________ 17
9After-sales service and maintenance____________________________________19
10 Troubleshooting ____________________________________________________19
11 Technical characteristics_____________________________________________ 21
12 Electromagnetic compatibility__________________________________________22
13 Symbols__________________________________________________________ 26

USER MANUAL 16-2090 Rev. 09/2017
Page 3of 27
1 Preface
Thank you for the confidence you have demonstrated by purchasing the Ackermann Fusion Camera
System.
In order to make the best use of this Fusion device, it is essential for you to become acquainted
with this manual.
Symbol corresponds to points requiring special attention.
Symbol provides advice.
To facilitate installation and use of the device, we have attempted to make the device manual more
practical. Consequently, references to the product presentation on the last page (like C1 for example)
will be provided for easier viewing of the relevant product parts.
This user manual is an integral part of the device. It must be made available to the user.
For the proper use and correct handling of the device, please follow the instructions herein.
The user alone shall be responsible for any damage that may result from improper use.

USER MANUAL 16-2090 Rev. 09/2017
Page 4of 27
2 About the device
Ackermann Fusion Camera is a Cmos FULL HD medical camera.
Its ergonomically designed sensor, automatic shutter, good sensitivity, excellent resolution and faithful
color-rendering makes it ideal as a medical tool for rigid or flexible endoscopy.
This camera comes with:
•A control unit,
•A camera head with integrated 15-35 mm HD optional zoom lens,
•Video cables,
•A power cable,
•A peripheral cable,
•Two communication cables,
•A set of 6 Fusion Cards,
•A user manual,
•A Quickstart guide.
Optional accessories:
•Ackermann Premium USB stick for archiving.
For the United States and Canada, use the “hospital grade” power cord. This must
be connected to a “hospital grade” mains socket.
This equipment has been delivered to you in packaging which is to be retained for use if
transporting the device.
3 Safety instructions
Read the user manual.
This user manual is an integral part of the device. It must be made available to the user.
For the proper use and correct handling of this device, pleas follow these instructions.
The user alone shall be responsible for any damage that may result from improper use.
•Comply with the conditions of use and storage.
•Do not expose the device to dust.

USER MANUAL 16-2090 Rev. 09/2017
Page 5of 27
•The device must be opened only by a competent technician authorized by the manufacturer.
•Do not insert metal objects into the device. This is to avoid any risk of electrical shock, fire, short-
circuit or hazardous emissions.
•Do not expose the device to splashed water or to humidity.
•Use only the accessories supplied with the device or as recommended by the manufacturer.
•This camera is not a flame-proof device. It must not be used in the presence of flammable
anaesthetics.
•This device was not designed to be used in an ionising environment.
•This device is not sterile.
•The surface temperature of the camera can reach 41°C (after a few minutes’ use). Avoid any
contact with this area.
•The camera is intended for use by qualified, trained professionals, in an operating theatre.
•Prior to plugging in the device, check that the mains voltage and mains frequency indicated on
the device corresponds to the power system values.
•Prior to activation, ensure that neither the device nor the power cable is damaged. Damaged
cables and/or connectors must be replaced immediately.
•Do not drop the device. If the device falls, do not reconnect the device but send it back to your
authorized distributor.
•No additional multiple-socket outlets or extension cords must be connected to the EM system.
To avoid any risk of electrical shock, this device must be connected only to a power system
equipped with protective grounding.
Devices connecting to the input/output ports must comply with the IEC 60950-1 standard.
Any modification of this device without authorization of the manufacturer is prohibited. If the
medical device is modified, an inspection and a test must be carried out to ensure that the medical
device complies with the safety regulations.
Check with the distributor for the compatibility of your endoscope and your light source, prior to
use.
It is advisable to have a second surgical camera in the operating theatre so that action can be
taken if the device fails to perform or if deterioration in performance is noticed.
This device is to be used on individuals (patients) fit to undergo an endoscopic procedure.
The potential equalization plug located at the back of the Fusion unit can be used to equalize the
grounding potential of the medical device with that of all the devices plugged into the main power in the
environment. Use the shared grounding system in the hospital or the building.
Third party cables and accessories may negatively affect EMC performance.
Stacking and locating the device close to other equipment may negatively affect EMC
performance.

USER MANUAL 16-2090 Rev. 09/2017
Page 6of 27
4 Regulatory advice
4.1 Compliance
This product is designed and manufactured by Ackermann proven to have a certified quality system.
It meets the requirements of European directive 93/42/CEE, on medical devices.
Consequently, it particularly meets the standards of electrical safety (IEC) and electromagnetic
compatibility (EMC) ad hoc.
4.2 Electromagnetic interferences and electrostatic discharge
Although this product complies with EMC standards, it may in very special circumstances interfere
with other devices, or itself be the object of interference from other devicees or an unfavorable
electromagnetic environment.
This medical electrical equipment needs special precautions regarding EMC and needs to be installed
according to EMC information.
Mobile RF communications equipment can affect this medical electrical equipment.
Image transfers from the camera to a monitor may be susceptible to electromagnetic disturbances
and electric system disturbances.
In order to avoid these situations, it is advisable to:
•Ensure of the quality of the electric power system (especially the grounding of all devicees and
medical carts).
•Keep the device away from electromagnetic sources (e.g. compressors, motors, transformers,
HF generators, etc.).
4.3 Medical device vigilance
Like any medical device, this device is subjectto the stipulations governing medical device vigilance,
and therefore any serious malfunction must be reported to the manufacturer as quickly and as
accurately as possible. For manufacturer contact details, refer to the first page of the manual.
4.4 End of lifecycle
This device carries the recycling symbol in compliance with European directive 2002/96 CEE onWaste
Electrical and Electronic Equipment (DEEE or WEEE). By correctly disposing of this device you are
helping to prevent harmful effects on the environment and on human health.

USER MANUAL 16-2090 Rev. 09/2017
Page 7of 27
The symbol displayed on the device and on the accompanying documentation indicates that this
product cannot under any circumstances be treated as household waste. It must therefore be
delivered to a waste collection center for the recycling of electrical and electronic equipment. In
disposing of, please comply with the waste elimination norms in effect in the country where it is
installed.
For further details on the treatment, recovery and recycling of this device, kindly contact your nearest
distributor who will advise you on the procedure to follow.
5 Installing the device
This medical device is intended for use by a qualified surgeon for endoscopic applications. No special
training is required to install the device. Kindly refer to the instructions in this manual.
Place the control unit on its base and have on hand the various accessories required to operate it.
5.1 Connections
•Connect the power cord to the mains socket of the camera C2 and a video cable to one of the
video output ports: we recommend selecting the DVI output C6 for connecting the main surgical
monitor.
•Connect the second end of the video cable to the video input port on the monitor.
•If you wish to control certain functionalities of the insufflator or the light source, connect these to
the communication socket on the camera’s control unit C9 intended for this purpose, using the two
cables provided.
Connecting the endoscope to the sensor:
•Turn the ring on the endoscope-holder on the camera head clockwise.
•Once the endoscope is inserted, release the ring.
•If the sensor has to be locked into position on the endoscope, the ring should be turned in the
opposite direction.
•Connect the potential equalization cable to the equipotential plug C13 at the back of the device.
5.2 Activation
To optimize the quality of the image, always make be sure to connect the camera head before turning
on the control unit.
•Connect the power cable to the plug C2 at the back of the camera.
•Connect the DVI-D cable to the corresponding output port C6 at the back of the product and to
the corresponding input port on the monitor.

USER MANUAL 16-2090 Rev. 09/2017
Page 8of 27
The DVI-D output produces a progressive 1080 signal.
•If needed, connect other monitors or peripherals, preferably using the HDSDI & 3GSDI output
ports C8 .
HDSDI, 3GSDI output ports produce an interleaved 1080 signal. HDSDI, GSDI output ports are
preferred when a very long cable is necessary.
•Turn the activation switch S2 to position “1”.
The camera takes about 30 seconds to boot. The Ackermann logo is displayed on the screen during
this interval.
The flashing LED Standby button, and the appearance of “Standby” on the screen indicate that the
camera is properly activated.
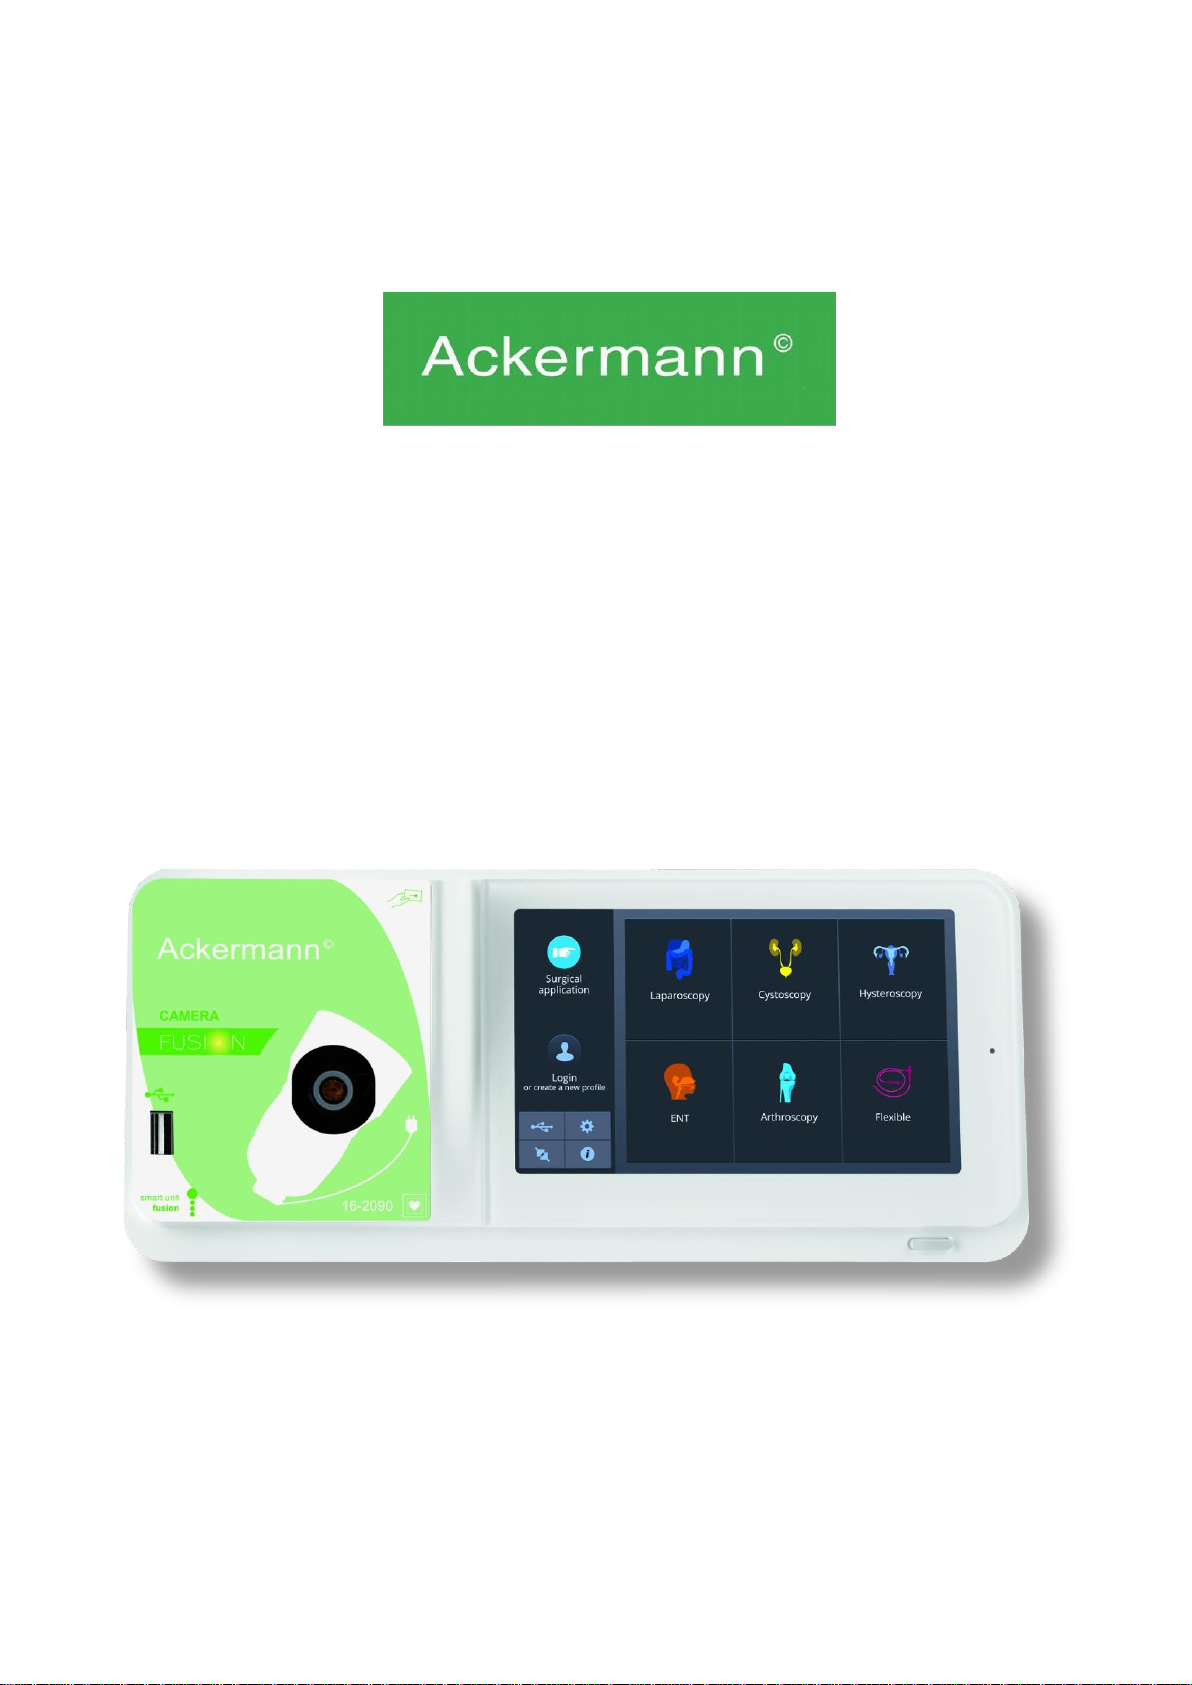
•Connect the camera head to the control unit via the dedicated connector C1 .
•Touch the screen, show the unit the NFC Fusion Card, OR press the standby button to access the
main menu.
•Select a surgical specialty from Laparoscopy, Hysteroscopy, Cystoscopy, ENT, Arthroscopy and
Flexible Endoscopy, by tapping the associated symbol.
Once the selection is made, the camera is in surgery mode.
•After connecting the light cable and the endoscope, face the endoscope to a completely white
surface and launch the White Balance by pressing the dedicated button on the touch screen
interface, or the camera head’s pre-programmed button.
•When the surgical monitor indicates “AWB OK” and the chronometer starts, this signals that the
white balance has successfully been set.
•The chronometer shows the operating time by default (the starting point being when the white
balance is set). However, this chronometer can be set beforehand if necessary, independently of
the white balance.
•The video settings have been defined for each surgical specialty. However, they can be modified,
if necessary, during surgery.
•Brightness, Sharpness and Red Gain) can be directly accessed from the main screen. All the
others (Gamma, Blue Gain, Color, Red Phase, Gain, Noise Reduction, and Aperture) can be
accessed by clicking the “More Settings” button. This is a drop-down list. To scroll through the
parameters, touch the left section (the parameter headings) with your finger.
•Press “Close settings” to exit and return to the main screen.

USER MANUAL 16-2090 Rev. 09/2017
Page 9of 27
•You can at any time during surgery to return to the factory settings for the surgical specialty by
clicking the “Specialities presets” button.
•Press the “STOP” button at the end of the surgery.
You can at this stage:
Return to the main menu by tapping the “Completed” button;
OR
Create a user profile from the settings used during the operation;
OR
Log in if you wish to add this set of settings to your profile.
Before connecting an endoscope (or fibroscopes) to the camera lens, check the condition of the
endoscope (clean distal lens, setup if necessary).
5.3 Activating the device from a Fusion Card
•Scan a Fusion Card on the read area provided on the lexan housing (the Ackermann logo).
•Scanning a standard Fusion Card:
This activates the camera directly on the surgical screen, the device automatically enters the
surgical application corresponding to the Fusion Card scanned.
•Scanning a personal Fusion Card:
This activates the camera directly on the surgical screen, to the surgical preset corresponding to the
Fusion Card scanned. If the user profile associated with the Fusion Card scanned shows more than
one preset, then an intermediate stage for selecting the desired preset will be necessary.
•Scanning an administrator Fusion Card:
This activates the camera in the administrator menu.

USER MANUAL 16-2090 Rev. 09/2017
Page 10 of 27
6 Operating guidelines
6.1 Selecting the surgical specialty
This camera can be used in various mini-invasive surgical operations.
Select the specialty from the pre-entered list. This loads the video parameters for the
application accordingly:
LAPAROSCOPY
HYSTEROSCOPY
CYSTOSCOPY
ENT
ARTHROSCOPY
FLEXIBLE ENDOSCOPY
Note 1: Each of these specialties can be accessed by scanning the Fusion Card on its
dedicated area Z1 on the control unit. This can be done at any time. If the Fusion Card is
scanned while a surgical operation is in progress, then confirmation will be requested.
Note 2: If you have entered customized parameters into a user profile beforehand, then you
can select this user profile either by using the “Log in” button, or by scanning your personal
Fusion Card on the dedicated area Z1 of the control unit if the control unit is linked to your
personal profile.
6.2 Configuring the functions of the camera head buttons
This operation is performed on the corresponding page of the menu interface, which can be
accessed from the dedicated “Camera head” button:
Click the button you wish to configure (B1, B2 or B3).
Select the type of press (short press or long press) and the corresponding function desired,
and confirm.
Repeat this procedure for each of the three buttons.
The configuration selected for each of the three buttons will be entered into the user’s personal
profile.
Below is the comprehensive list of the configurable functions:

USER MANUAL 16-2090 Rev. 09/2017
Page 11 of 27
Type of press
Short press
Long press
No action
No action
Brightness +
Brightness +
Brightness -
Brightness -
Light source - Intensity +
Light source - Intensity -
Peripheral 1
Peripheral 1
Peripheral 2
Peripheral 2
Mirror
Mirror
Freeze frame
Freeze frame
Recording images on the camera
(if equipped with an integrated recorder)
AWB
Record / Stop video recording on the camera
(if equipped with an integrated recorder)
Insufflator (RUN / High Flow Rate / STOP)
Light source (ON / OFF)
(a) Recording images on the PC
Recording images on the camera
(if equipped with an integrated recorder)
(b) Record / Stop video recording on the PC
Record / Stop video recording on the camera
(if equipped with an integrated recorder)
(a) Recording images on the PC
(b) Record / Stop video recording on the PC
By default, the following configuration is applied (factory setting):
B1 (short press / long press): Brightness - / Light source.
B2 (short press / long press): Brightness - / Insufflator.
B3 (short press / long press): No action / AWB.
Mirror mode: an “M” is displayed on the monitor to indicate that the mirror mode (inverted
image) is active, and disappears when it is deactivated.
Freeze mode: an “F” is displayed on the monitor to indicate that the freeze mode is active,
and disappears with it is deactivated.
6.3 White balance
The white balance can be set in 2 ways:
•From the touch screen interface, click the white balance button.
•From one of the camera head buttons, depending on your programming (only possible
with long press).

USER MANUAL 16-2090 Rev. 09/2017
Page 12 of 27
You should proceed as following:
•Pair the camera to the endoscope, activate the ligt source, reduce ambient light and film
a white surface
•Set the white balance; the “BALANCING IN PROGRESS” message is displayed on the
screen.
•Continue to film the white surface until the “BALANCE OK” message is displayed on the
screen.
Note 1: Setting the white balance causes the chronometer to be activated, signaling the start
of the surgery and therefore the availability of additional functionalities, particularly those
linked to the image quality settings.
Note 2: If the light source is connected to the camera by the communication cable supplied,
then setting the white balance will cause the LED to light up if it was previously off.
In the event that the white balance is set during an operation, i.e. inside the patient, the
endoscope must be pulled out of the trocar and the white balance must be set again using
gauze.
6.4 Focusing
Once the endoscope is connected and the light source is activated, slowly turn the lens focus
ring to sharpen observation area.
Focusing on a fairly distant point helps obtain adequate field depth for the operation and
therefore avoids having to do retouching too regularly.
6.5 Functionalities
6.5.1 Video settings
Once the white balance is set, or the “Start” button has been pressed, access to the video
settings is authorized.
In this way, it is possible to work directly on brightness, sharpness and red gain.
Additional settings are available by clicking the “More settings” button.
The following parameters can be modified:

USER MANUAL 16-2090 Rev. 09/2017
Page 13 of 27
BRIGHTNESS
This parameter varies the general brightness of the image
BLUE GAIN
Colorimetry shift from white to blue
RED GAIN
Colorimetry shift from white to red
COLOR
Modifies color saturation
NOISE
REDUCTION
Reduces the noise in an image
WINDOW
Shutter window analysis:
Surface of the image on which the camera analyses the quantity of light received, in
order to adjust the speed of the shutter to obtain a right exposure time.
Use the automatic mode or change it according to the scope size.
GAMMA
Modifies the dynamics of the dark areas:
+1 reduces the difference between the light portions and the dark portions,
therefore making these dark areas appear clearer.
-1 does the opposite: the dark portions are made even darker.
SHARPNESS
Modifies the sharpness of the image to obtain a 3D effect or on the other
hand, softens the image with the “anti-moiré” filter for flexible endoscopes
GAIN
Modifies the brightness level in cases of low lighting conditions
RED PHASE
Colorimetry phase shift from Orange to Magenta
Click the “Close settings” button to return to the previous menu.
6.5.2 Other parameters
HD Recording:
You can set HD image/video recording from the interface menu using the corresponding
buttons or from the buttons on the camera head if these have been programmed accordingly.
Insufflator:
If your camera is connected to the Ackermann Fusion insufflator via the communication cable
provided, you can select from the parameters menu whether or not to display information
about the operating status of the insufflator on the surgical monitor’s OSD.
In particular:
Feedback on instantaneous pressure in the pneumoperitoneum; Feedback on warning
messages from the insufflator.
In addition, one of the buttons on the camera head can be configured (long press only) to
control the Ackermann Fusion insufflator according to the following sequence:
Start insufflation in low flow / Change to high flow / Stop insufflation.

USER MANUAL 16-2090 Rev. 09/2017
Page 14 of 27
6.6 Completion
Once the operation is completed, press the “STOP” button. You will be given the option:
-To create a user profile;
-To log in, if you have not already done so;
-To save any modifications to the settings in your personal profile, if you have not
already done so;
- To exit.
Note: If you are already logged in, you can opt to save the modifications to your personal
profile.
In particular you will be able to save:
-Modifications to the video settings;
-Modifications to the light source intensity setting (last setting used);
-Modifications to the insufflator pressure setpoint (last setting used, with 15 mmHg
limitation, and mode);
-Modifications to the settings on the surgical monitor-supported models only);
Once the selection has been made, you can overwrite the existing preset, or create another
one.
6.7 General settings menu
The general settings menu is used to:
-Set the light intensity on the touch screen.
-Select the display messages and the display of the instantaneous pressure in the
pneumoperitoneum, from the insufflator.
-Select the language.
-Pause the live video when a photo is taken to verify its quality.
6.8 Information menu
The information menu is used to access a rapid start-up product guide.
6.9 Connections menu
The connections menu is used to obtain the connection status of all of the system’s devices.
In particular, the camera head, the light source, the insufflator, the PC Panel and the
Surgical Monitor.
Note: The icon for this menu changes to orange when at least one of the products on the
system is disconnected.

USER MANUAL 16-2090 Rev. 09/2017
Page 15 of 27
6.10 Creating a user profile
•Tap the “Log in or create a profile” button.
•Tap the “Create a profile” button.
Activating the camera with a blank Fusion Card gives direct access to the following stage.
•Tap the text field and enter the desired profile name.
•Tap the “Return” button.
•Select a surgical specialty. This will form the basis for the video parameters.
•Tap the “Create a profile” button OR scan a blank Fusion Card on the area provided for
this purpose on the lexan housing (the Ackermann logo).
•A message is displayed for a few seconds indicating that the device supports the
creation of a profile.
•You can then:
Rename the profile and/or the preset by clicking the “Manage” button.
Delete one (of the) profile preset(s) by tapping “Manage”.
Use the preset created by clicking on it. Log out by tapping the “Log out” button.
Notes: If a blank Fusion Card has been scanned at least once (during activation and/or while
saving a created profile), then the profile (and the presets) created will be automatically linked
to this Fusion Card. A padlock icon will be displayed on this profile.
This means that:
The presets locked in this profile cannot be modified without the corresponding Fusion Card.
The names of the presets and the profile name cannot be modified without the corresponding
Fusion Card.
7 Description of the front and back panels
7.1 Mains socket
The camera receives electrical power by means of the mains plug located on the back panel
C2 , which must be connected to the mains power supply by the cable supplied with the
camera. This slot carries a fuse trap as well as a master switch for turning on the device.
The camera uses T1AL - 250V fuses.
When replacing a fuse, the camera must be unplugged and the same type of fuse must be
used. The “T” in “T1A” means “time-delay”. Only use fuses marked UL/CSA.

USER MANUAL 16-2090 Rev. 09/2017
Page 16 of 27
7.2 Video output ports
The following video output ports are available on this camera: DVI C6 , HD-SDI, 3G-SDI C8
, RGBS C5 , Y/C C10 and composite C11 .
The DVI output port provides the best image quality in 1080p format over
short distances. HD-SDI, 3G-SDI output ports are used to transport the
video signal over long distances (screen at a distance of up to 50 m).
7.3 Peripheral output ports
Two (2) peripheral output ports are available C12 and these are used with a 3.5 mm jack
lead for managing two peripherals (for example: a printer and a video recorder) from the
buttons on the camera head.
The devices connecting to the “VIDEO OUT” and “PERIPHERAL” ports must
be compliant with standard IEC 60950.
7.4 Keys and symbols on the front and back panels
The keys and symbols on the back panel are for identifying the camera in accordance with
international standards IEC 60601-1, IEC 60601-2-18, IEC 60417 and EN 980.
The table below describes the back and front components:

USER MANUAL 16-2090 Rev. 09/2017
Page 17 of 27
C1
Connector for the Camera head
C2
Main power socket
C3
RS232 output port (connection to Ackermann 16-2033HD-26 and 16-2033HD-32)
C4
Service line
C5
RGBS video output port
C6
DVI-D video output port
C7
Ethernet output port (connection to Master Panel PC)
C8
SDI output port
C9
Connections to Ackermann Fusion devices (light source and insufflator)
C10
Y / C video output port
C11
Composite video output port
C12
Peripheral connections
C13
Equipotential plug
C14
USB storage device port
L1
Touch screen –7“ (± 0.1)
S1
Standby button
S2
Power button
Z1
Read area for Fusion Card
8 Suggested decontamination procedures
Disinfecting the camera control unit
The camera control unit is a non-heat-resistant medical device and does not withstand
immersion; consequently, it should be disinfected using a non-woven medium saturated with
a disinfectant detergent.
This device is not drip-proof. Do not splash liquid on this product.
Decontamination, methods and/or tools used, is the sole responsibility of the staff
concerned.
The device must always be disconnected before any cleaning procedure is carried out.
This device is not autoclavable.
Existing alkaline solutions for the disinfection of certain medical devices are NOT
RECOMMENDED for disinfecting this device.

USER MANUAL 16-2090 Rev. 09/2017
Page 18 of 27
Disinfecting the camera head
Pre-disinfection
cleaning
Disinfection
Immersion in an
enzymatic cleaning
solution (Aniosyme
DD1, Hexanios G +
R or surface
cleaning ((Anios
wipes)).
Immersion in a
glutaraldehyde
solution (Anios
Laboratory -
Steranios 2%)
Sterilisation using
the
STERRAD process
Sterilisation with
ethylene oxide
Any other disinfection methods are prohibited, and the manufacturer accepts no liability
for any damage caused by using methods, other than the specified.
Regardless of the sterilization method used and throughout surgical operation, it is
advisable to use a disposable, sterile, protective cover on the camera.
The camera is not autoclavable.
The camera is not compatible with automatic washer-disinfectors.
Existing alkaline solutions for the pre-disinfection of certain medical devices are NOT
RECOMMENDED for pre-disinfecting our Ackermann Fusion cameras.
It is essential for the parts coming into contact with the disinfectant to be thoroughly
rinsed.
Use soft non-woven cloths for wiping the lenses dry to prevent any scratches.
The procedures described in this section are provided as guidance, and cannot under
any circumstances be substituted for official recommendations or directives.
The connector on the camera equipped with its sealing cap can be immersed. Traces of
water are visible just as the connector seal is removed (runoff and condensation). It is
therefore essential to dry the inside of the cap well before reusing it.
Disinfecting the lens surfaces
A dirty lens surface can interfere with observation. The lens surface must not have any marks
or smudges. To avoid scratching the lens surface, never use abrasive cloths or sponges to
clean it.

USER MANUAL 16-2090 Rev. 09/2017
Page 19 of 27
To remove dust, dirt and other impurities not originating from the patient, wipe clean with a
soft, lint-free cloth moistened with ethanol or 70 % isopropyl alcohol. When cleaning, wear
gloves for protection from chemical products.
Ensure that the equipment is completely dry before use.
Use soft non-woven cloths to clean the lenses so as to avoid scratching them.
9 After-sales service and maintenance
This device does not require any special maintenance operations.
Note: Misuse of the device is not covered by the warranty.
If a fault persists and the device has to be returned to the distributor, ensure that it is shipped
in its original packaging.
Similarly, it is advisable to return the device in its entirety (control unit and power cables).
Kindly attach to the shipping order a short explanatory note about the fault detected.
The equipment must be disinfected before it is returned for repair. When returning the
equipment, check its condition and note any exceptions on the shipping order if necessary,
and confirm these with the shipper by registered mail as soon as possible.
Please contact your distributor who will guide you through the return process.
10 Troubleshooting
10.1 The indicator light on the standby switch S1 does not light up on
start-up
•Check that the mains socket at the back of the camera is properly connected to the power
supply and that the general switch at the back of the camera is in the operating position
(“I”).
•Check that thefuses are in good condition (only use thefuses specified on the back panel).

USER MANUAL 16-2090 Rev. 09/2017
Page 20 of 27
10.2 The indicator light on the standby button S1 comes on but no
image appears on the screen
•Check that the sensor is properly connected to the control unit (if not, a color bar will be
displayed).
•Check that the control unit on the camera is correctly connected to the monitor (cable in
good condition and plugs correctly when pushed in).
•If the video channel has several components, connect the camera directly to the monitor
to verify that the problem is not with one of the peripherals.
•Check that the monitor is in fact switched on, wired to the correct video input and that the
image settings are at the mid-point position (color, light and contrast).
•Check the light source, the light cable and the endoscope.
10.3 The image is blurred and white all over
•Check that there is no condensation on the lens.
•Check that the sensor is not aimed at an object that is too bright.
•Check the lens setup.
If there is no image or if the image is not displayed, unplug and re-plug your device or
reset the camera to the factory settings.
10.4 The image is extremely light or dark
•Check that the BRIGHTNESS parameter is not at the maximum or minimum setting.
•Check that the APERTURE used is not too wide or too narrow.
•Check that the camera head is correctly connected to the control unit.
•Check that the light intensity from the light source is not too low or too high.
•Turn off and turn back on the control unit.
If the fault persists and it becomes necessary to return the camera to your distributor, be sure
to ship it in its original packaging after disinfecting it.
Similarly, it is advisable to return the camera in its entirety (control unit, sensor, lens, cables).
Kindly attach to the shipping order an explanation concerning the fault detected.
The equipment must be disinfected before it is returned for repair.
Please contact your distributor who will guide you through the return process.
Table of contents