manuals.online logo
Brands
  1. Home
  2. •
  3. Brands
  4. •
  5. Vectra Fitness
  6. •
  7. Digital Camera
  8. •
  9. Vectra Fitness H1 User manual

Vectra Fitness H1 User manual

VECTRA H1 Tethered Capture QUICK REFERENCE GUIDE 1
QUICK REFERENCE GUIDE
Capturing Images with H1 Tethered to Computer
(VECTRA H1 camera connected to the computer)
1. START THE VECTRA SYSTEM & SOFTWARE
1 Turn on the computer.
2 Double-click the VECTRA icon on the Windows
desktop to open the software.
3 Connect the VECTRA H1 camera to the computer
with the supplied USB cable.
4Rotate the power switch
(top of the camera) to ON.
5The mode dial should
be set to Mwhen the
camera is on.
The first time you use the VECTRA software, check to
make sure H1 is selected as the capture system:
1 Click the set up button in the lower right corner
of the screen.
2Select the Capture tab and make sure VECTRA H1 is
displayed.
3Click close.
Capturing Images with H1 Tethered to Computer
2VECTRA H1 Tethered Capture QUICK REFERENCE GUIDE
2. FIND OR CREATE A PATIENT CHART
(see VECTRA H1 User Guide Chapter 2 for more details)
1Click the look up patient button in the upper
right corner of the VECTRA home screen.
2Enter search criteria such as the patient’s name, date
of birth, and/or ID number.
3Click show matches (or press the “Enter” key)
to display matching records.
4Click new capture. (If more than one matching
record is displayed, first click to select the correct
patient, then click new capture.)
If the correct chart is not found, click new patient
to create a new patient chart.
creating a new
VECTRA patient chart
1Click the new patient button in the upper right
corner of the VECTRA home screen.
2Enter patient information.
3Click new capture.
new capture button If the new capture
button is not available
(upper right corner of the
screen), make sure
• the H1 camera is on
• a patient chart has been selected (or opened)
• the USB cable is firmly connected to both the
computer and the H1 camera
• VECTRA H1 is selected as the capture system in
setup (see previous page).
VECTRA H1 Tethered Capture QUICK REFERENCE GUIDE 3
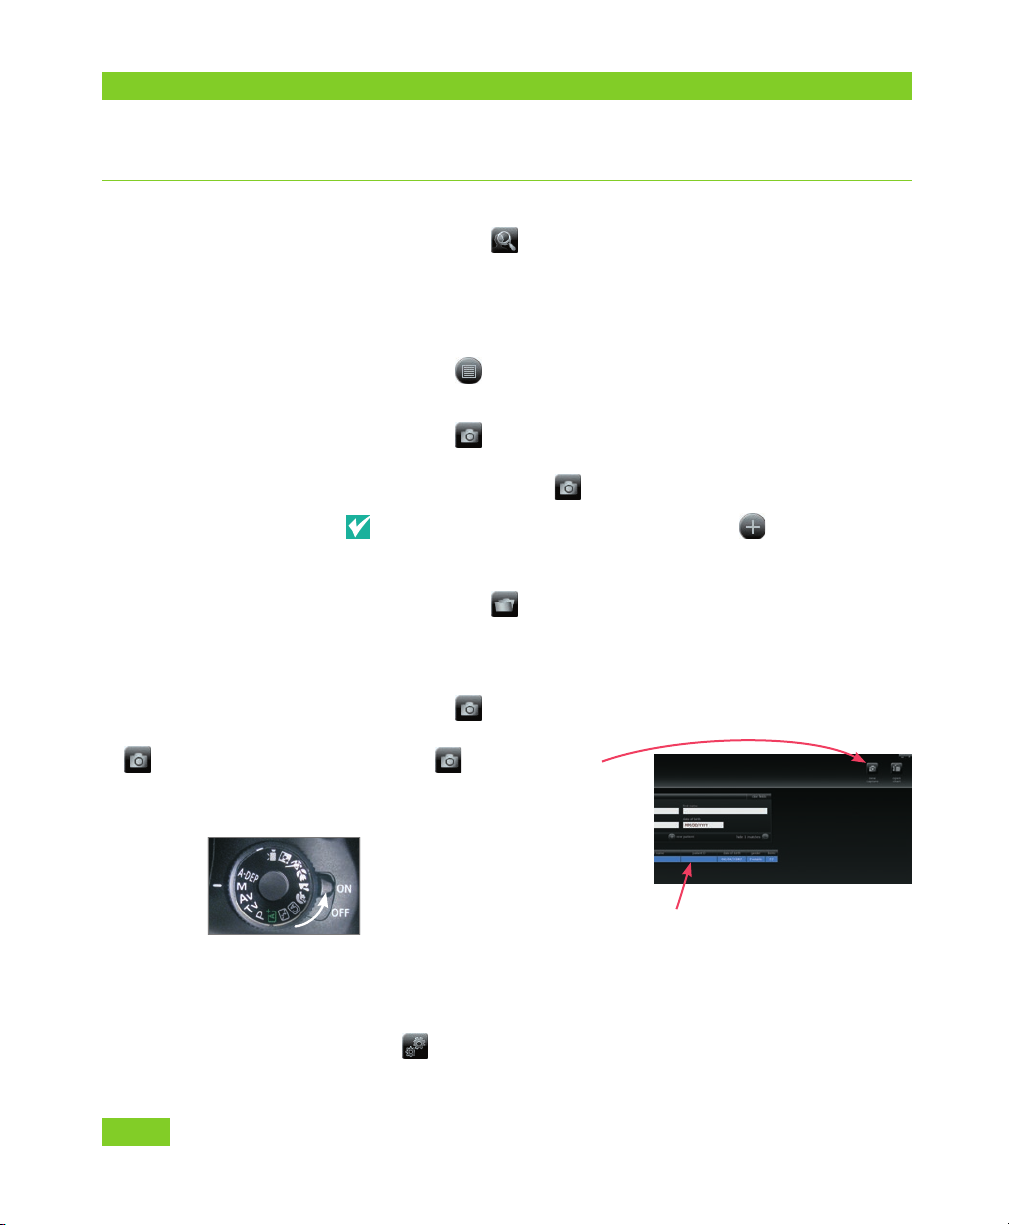
2. Find or Create a Patient Chart
Turn the H1 camera off, then on.
If new capture is still unavailable, restart the
VECTRA software and try again.
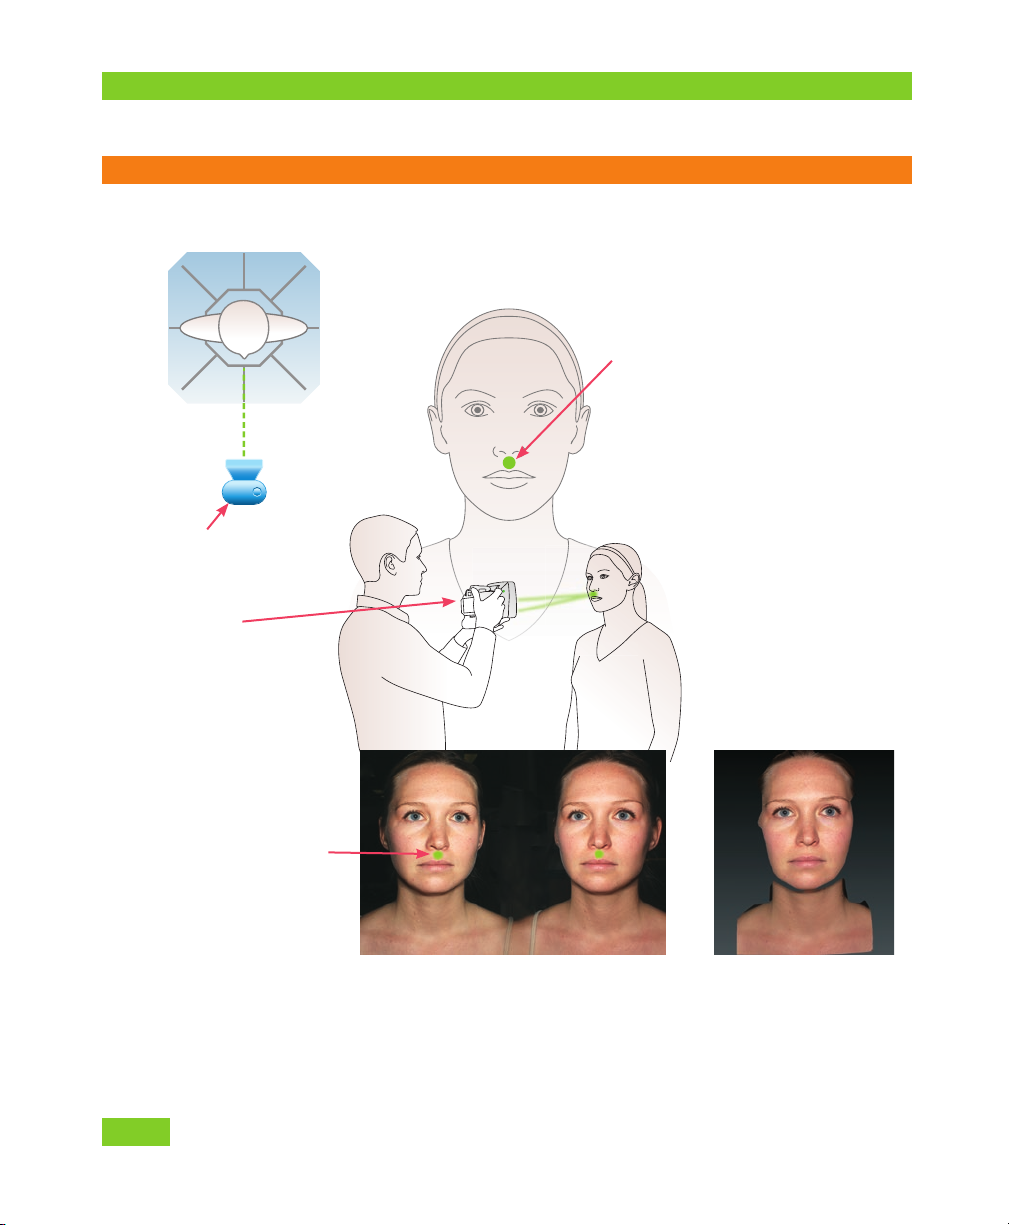
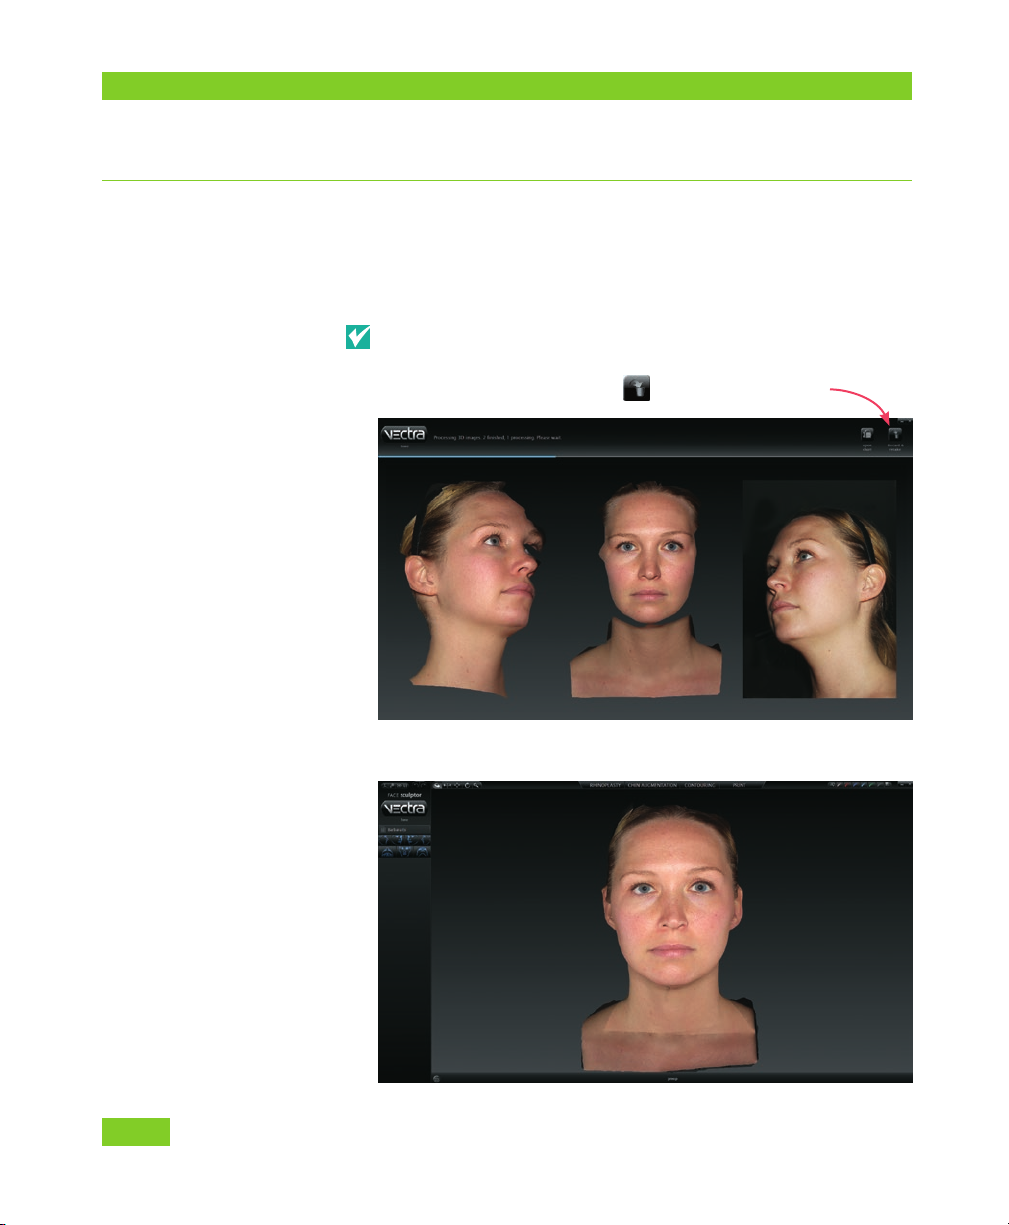
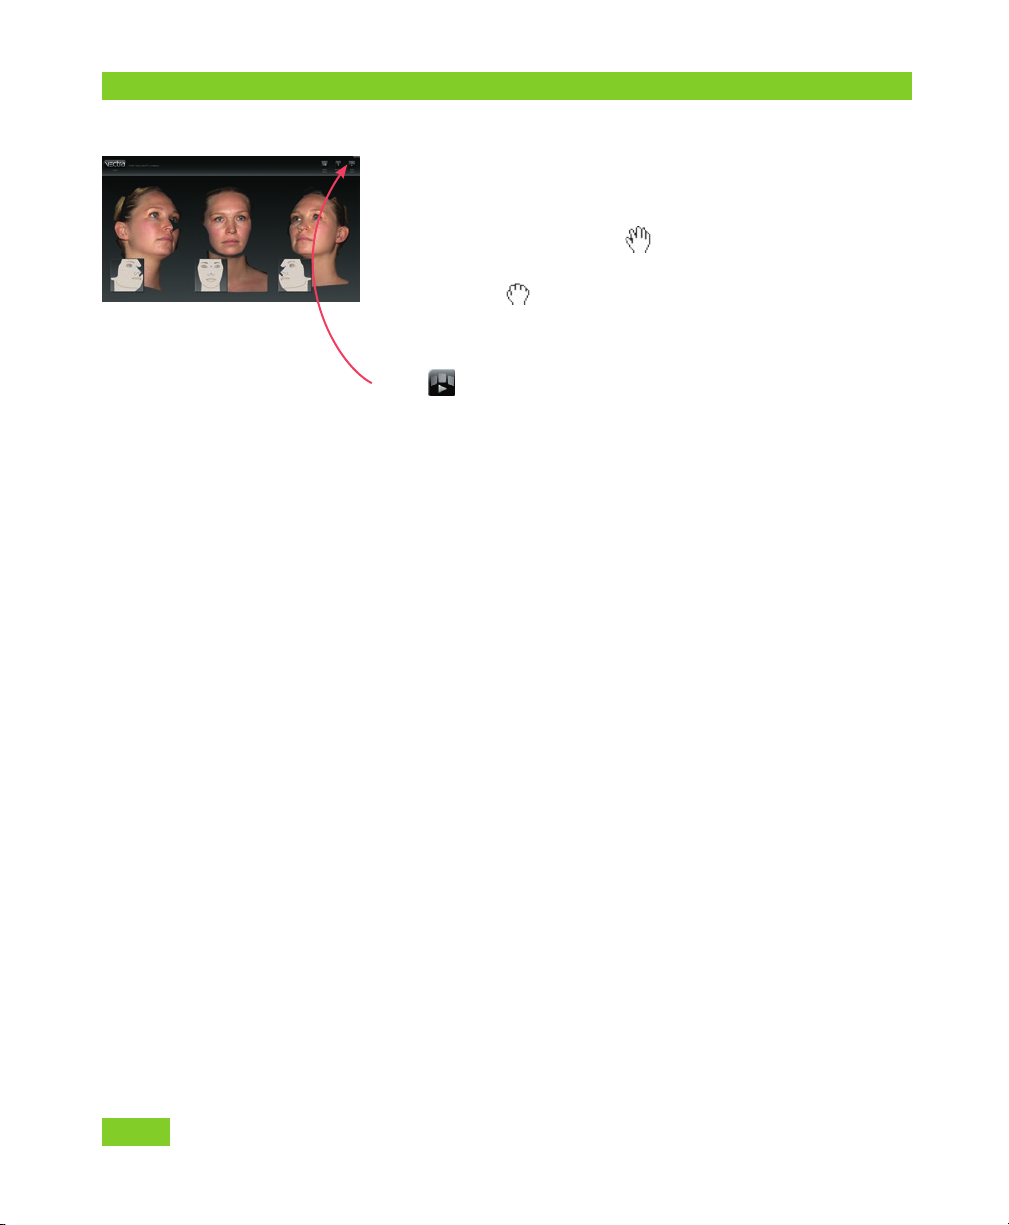
3. CAPTURE 3D IMAGES FOR STITCHING
Consistent patient positioning is the most important
aspect of capturing medical images. Follow consistent
methods to ensure consistent patient positioning.
The patient should remain completely still throughout
the 3 image captures.
before positioning the
patient in front of
the VECTRA
• Make sure the tab is selected.
• Remove all jewelry near the area of interest.
• Remove sweat, oils, or anything shiny from the skin.
• Remove all make-up for facial imaging.
• Make sure the patient’s hair and clothing is secured
away from the face, ears and neck.
for best results • For facial images, the patient’s eyes should be open,
gaze fixed straight ahead, not looking up or down,
mouth closed, relaxed facial expression.
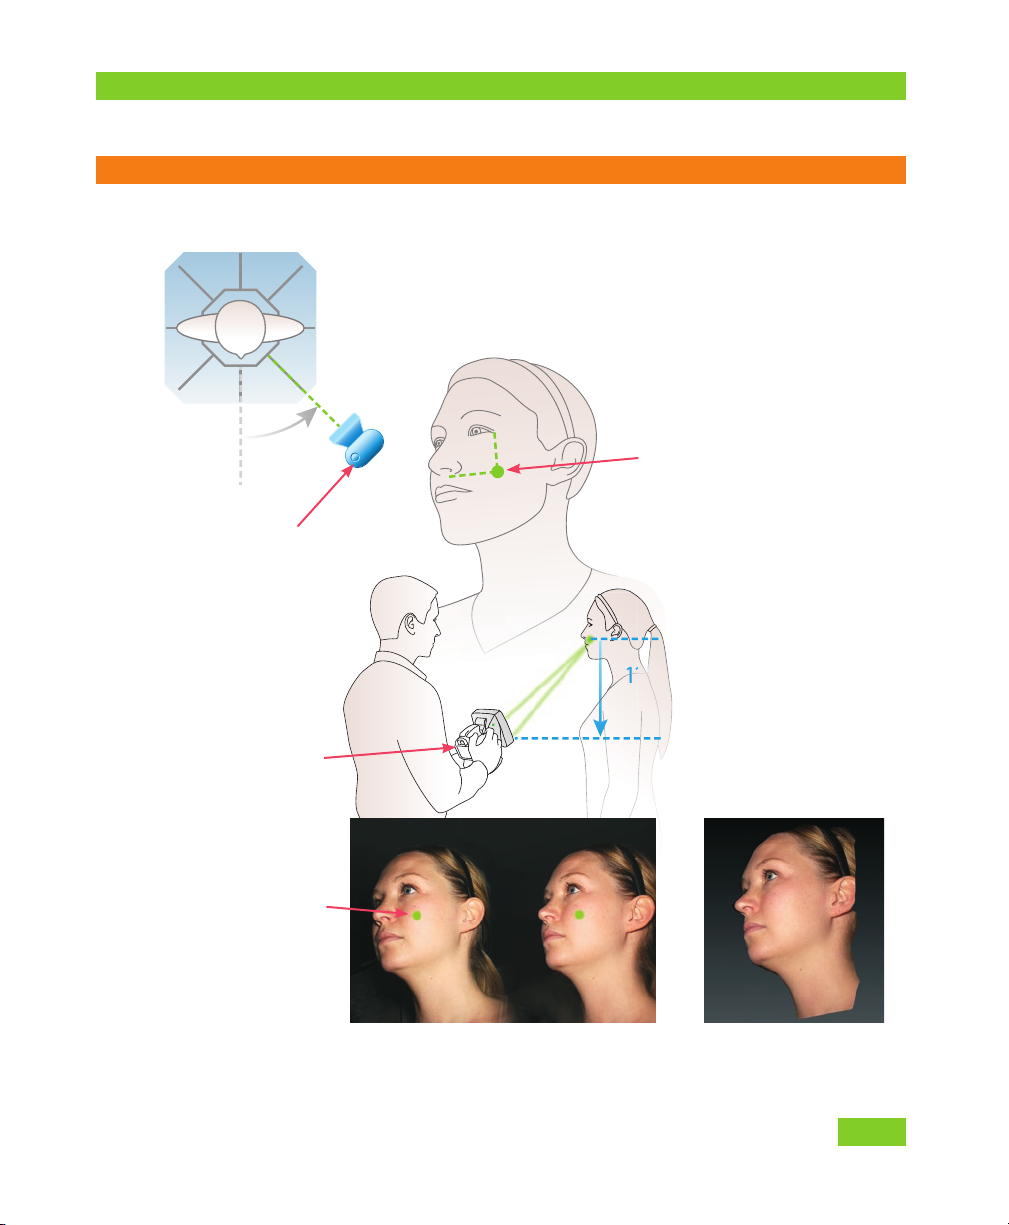
• For the right and left views of the face, the camera
should be angled upward toward the patient’s head
to optimize chin and neck detail.
• Capture the images in the specified order: right side,
front, left side.
Capturing Images with H1 Tethered to Computer
4VECTRA H1 Tethered Capture QUICK REFERENCE GUIDE
• Center the target area in the left side of the split
screen in the LCD. Aim the ranging lights toward
the middle of the field of interest at a representative
area of focus (i.e., not at the tip of the nose, since it’s
closer than the rest of the face). The ranging lights
converge into a single green dot when the camera is
at the correct shooting distance (approximately
14 inches/35cm).
• The flashes should recharge as you move into place
for the next capture.
For follow-up images: Review the baseline image
before initiating image capture, to assist in positioning
the patient correctly.
using the H1 camera 1Turn on the ranging lights by pressing the button on
the right of the lens housing (ON glows green).
The ranging lights will automatically turn off after
1 minute of inactivity. Press the button again to restart.
2When the ranging lights
are converged and the
target area is centered in
the left side of the split
screen preview, press the
shutter release to capture
the image.
VECTRA H1 Tethered Capture QUICK REFERENCE GUIDE 5
3. Capture 3D Images for Stitching
THE PATIENT SHOULD REMAIN COMPLETELY STILL THROUGHOUT THE 3 IMAGE CAPTURES.
capture 1: RIGHT side 1Stand at 45 degrees from the direction the patient is
facing (photographer moves left of patient).
2Hold the camera level with the patient’s chest (about
12 inches below the middle of the patient’s face).
3Aim the green dots at the
middle of the patient’s cheek
(intersection of imaginary lines
from the lateral canthus and
the upper lip).
4Converge the green
dots to a single point by
adjusting camera distance
from the patient.
5Capture image.
45°
12"
(30cm)
2
2
2
2
"
45°
12"
(30cm)
2
2
2
2
"
Position camera at a 45° angle
from the front toward the
RIGHT side of the face.
Camera at patient’s chest level,
about 12 inches (30cm) below
mid-face, and angled upward.
captured 3D image
live preview during right view capture
ranging lights at
mid face
Capturing Images with H1 Tethered to Computer
6VECTRA H1 Tethered Capture QUICK REFERENCE GUIDE
THE PATIENT SHOULD REMAIN COMPLETELY STILL THROUGHOUT THE 3 IMAGE CAPTURES.
capture 2: FRONT 1Stand directly in front of the patient.
2Hold the camera level with the patient’s nose.
3Aim the green dots between
the upper lip and nose, at the
mid-line of the patient’s face.
4Converge the green
dots to a single point by
adjusting camera distance
from the patient.
5Capture image.
captured 3D image
Position camera directly
in FRONT of the face.
Camera level with
patient’s nose.
live preview during front view capture
ranging lights at
center of upper lip,
just below nose
VECTRA H1 Tethered Capture QUICK REFERENCE GUIDE 7
3. Capture 3D Images for Stitching
THE PATIENT SHOULD REMAIN COMPLETELY STILL THROUGHOUT THE 3 IMAGE CAPTURES.
capture 3: LEFT side 1Stand at 45 degrees from the direction the patient is
facing (photographer moves right of patient).
2Hold the camera level with the patient’s chest (about
12 inches below the middle of the patient’s face).
3Aim the green dots at
the middle of the patient’s
cheek (intersection of
imaginary lines from the
lateral canthus and the
upper lip).
4Converge the green
dots to a single point
by adjusting camera
distance from the
patient.
5Capture image.
45°
12"
(30cm)
1
1
2
2
2
2
2
45°
12"
(30cm)
1
1
2
2
2
2
2
live preview during left view capture captured 3D image
ranging lights at
mid face
Position camera at a 45° angle
from the front toward the
LEFT side of the face.
Camera at patient’s chest level,
about 12 inches (30cm) below
mid-face, and angled upward.
Capturing Images with H1 Tethered to Computer
8VECTRA H1 Tethered Capture QUICK REFERENCE GUIDE
4. STITCHING
After the third image is captured, VECTRA software
automatically processes the images and stitches
them together into a single 3D image. The individual
captures are displayed while they are being processed.
If you wish to interrupt the processing and retake the
images (if, for example, the subject blinked or was in
the wrong position) click discard & retake.
The completed image is displayed in Face Sculptor.
VECTRA H1 Tethered Capture QUICK REFERENCE GUIDE 9
4. Stitching
if auto-stitch fails If VECTRA software is unable to locate the required
facial features, it will display an error message over the
captured images.
First check to see whether all three images were taken
in the specified order: right, front, left. If not, click
discard & retake and capture the images in the
correct order.
If the order is correct, check to see whether the poses
are correct, eyes are open and mouth is closed for all
three images. If not, click discard & retake and
recapture the images.
If images appear to be properly captured, click OK in
the error message to manually identify the landmarks.
1 The location for the first landmark is displayed in
the icon below the first image. Position the tip of the
cursor arrow over the appropriate anatomical location
in the first image as shown, and click once to place the
landmark. As each location is clicked, the icon updates
to highlight the next landmark to be placed. Each of
the 3 captures requires its own set of landmarks.
Capturing Images with H1 Tethered to Computer
10 VECTRA H1 Tethered Capture QUICK REFERENCE GUIDE
2 Repeat until each of the requested landmarks has
been placed. If you wish to change the position of a
landmark, position the tip of the cursor arrow over it.
The cursor changes to an open hand when it’s close
enough to the landmark. Click and drag (the cursor
changes to a grabbing hand). Release the mouse
button when the landmark is in the correct position.
3When you are satisfied with the manual landmarks,
click retry stitch. VECTRA software completes the
automatic stitching process and displays the completed
image in Face Sculptor.
253 Passaic Avenue, Fairfield, NJ 07004-2524 USA • fax +1.973.276.0339 • www.canfieldsci.com
3D SOLUTIONS • FACIAL IMAGING & ANALYSIS • IMAGING SOFTWARE • PHOTOGRAPHY • RESEARCH SYSTEMS & SERVICES • TRAINING
VECTRA and Mirror are registered trademarks of Canfield Scientific, Inc.
technical support
phone (USA): 1.800.815.4330
phone: +1.973.276.0336
techsupport@canfieldsci.com
Copyright © 2014 Canfield Scientific, Inc.
1402-19

Popular Digital Camera manuals by other brands

GE KTC-XP1 user manual

GE

GE KTC-XP1 user manual

THine THSCU101 quick start guide

THine

THine THSCU101 quick start guide

IKEA KNAPPA manual

IKEA

IKEA KNAPPA manual

LEXIBOOK DJ023 Series instruction manual

LEXIBOOK

LEXIBOOK DJ023 Series instruction manual

Datalogic AV500 Product reference guide

Datalogic

Datalogic AV500 Product reference guide

Hitachi Kokusai Electric HV-F203SCL Operation manual

Hitachi Kokusai Electric

Hitachi Kokusai Electric HV-F203SCL Operation manual

Olympus X-560WP - Digital Camera - Compact Manual de instrucciones

Olympus

Olympus X-560WP - Digital Camera - Compact Manual de instrucciones

Celestron VistaPix 72204 user guide

Celestron

Celestron VistaPix 72204 user guide

Argus QC-3185 Specification sheet

Argus

Argus QC-3185 Specification sheet

CIS DCC-4K2 Product specification & operational manual

CIS

CIS DCC-4K2 Product specification & operational manual

Olympus E-PM1 1442 Specifications

Olympus

Olympus E-PM1 1442 Specifications

Polaroid Spectra/Image One Board Repair manual

Polaroid

Polaroid Spectra/Image One Board Repair manual

HP R717 quick start guide

HP

HP R717 quick start guide

Leica M11 quick start guide

Leica

Leica M11 quick start guide

Canon PowerShot G5X Getting started

Canon

Canon PowerShot G5X Getting started

Federal Signal Corporation CAMCCD-SCNTSC Installation instructions manual

Federal Signal Corporation

Federal Signal Corporation CAMCCD-SCNTSC Installation instructions manual

Bell and Howell MicroTrack operating instructions

Bell and Howell

Bell and Howell MicroTrack operating instructions

Sony Cyber-shot DSC-W100 operating instructions

Sony

Sony Cyber-shot DSC-W100 operating instructions

manuals.online logo
manuals.online logoBrands
  • About & Mission
  • Contact us
  • Privacy Policy
  • Terms and Conditions

Copyright 2025 Manuals.Online. All Rights Reserved.