Aclam Guitars Cinnamon Drive Operator's manual

Welcome to a new level of
tube-like overdriven tones
USER MANUAL & SAFETY INSTRUCTIONS

Overview
Features
Specs & material Included
Powering Requirements
Operating Diagram
Controls
Advanced Internal Controls
Setting examples
Setting up on a pedalboard
Trouble Shooting
Security Instructions
Warranty Terms
5
6
7
8
10
11
14
16
18
21
22
23
Index
www.aclamproductsforguitars.com
C/ Consell de Cent, 201 - local
08011 Barcelona. Spain
Llevinac S.L.
CIF: B64412406

5
The Cinnamon Drive pedal is a new kind of dual stage
overdrive pedal featuring a combination of soft and hard
clipping circuits.
It has been designed to cover a wide range of sounds,
from a clean boost to a lightly crunched rhythm guitar
plenty of gain and rock tone.
The goal in its creation process was to capture the
essence of the 60’s and 70’s tube amps when pushed
to max volume, which creates naturally open and super
dynamic overdriven tones. Some of the greatest players
from that era, such as Clapton, Page and Hendrix, relied on
this technique to get their distinctive sound.
Overview
Disponible en otros idiomas en:
www.aclamproductsforguitars.com
Available in other languages at:
www.aclamproductsforguitars.com

6 7
DUAL STAGE CLIPPING CIRCUITS:
to cover clean to mid-gain overdrive with independent gain
and volume knobs.
a hard-clipping circuit to add gain and tightness. It also
features an independent volume control and a hard-
clipping gain control named “Boost”.
HIGHEST VERSATILITY WITH THE FEWEST
CONTROLS POSSIBLE:
This design allows you to dial in two totally different
overdrive tones with independent volume controls. For
example, you could set a light preamp as the main sound
and add gain and volume when hitting the boost switch.
A LOT OF DYNAMICS AND A NATURAL TONE:
Both stages share the same passive tone control, which
retains the bottom end and mid-range and softens the
high frequencies.
All this with the highest headroom and dynamic range
possible due to its specially designed power supply circuit
to increase internal voltage.
TRUE BYPASS RELAY SWITCHING:
We’ve designed an intelligent true bypass relay switching
system which constantly monitors voltage supply (both
battery or DC jack input) and switches itself to true bypass
when it detects a drastic drop in voltage.
This way you’ll never get any signal interruption even if
your power supply or battery fails.
It also tells you when the battery is close to completely
draining by making both the Boost and Bypass LED’s
(depending on your current setting) blink. So, you have
at least 2-3 hours to replace the battery before the pedal
goes into self-bypass.
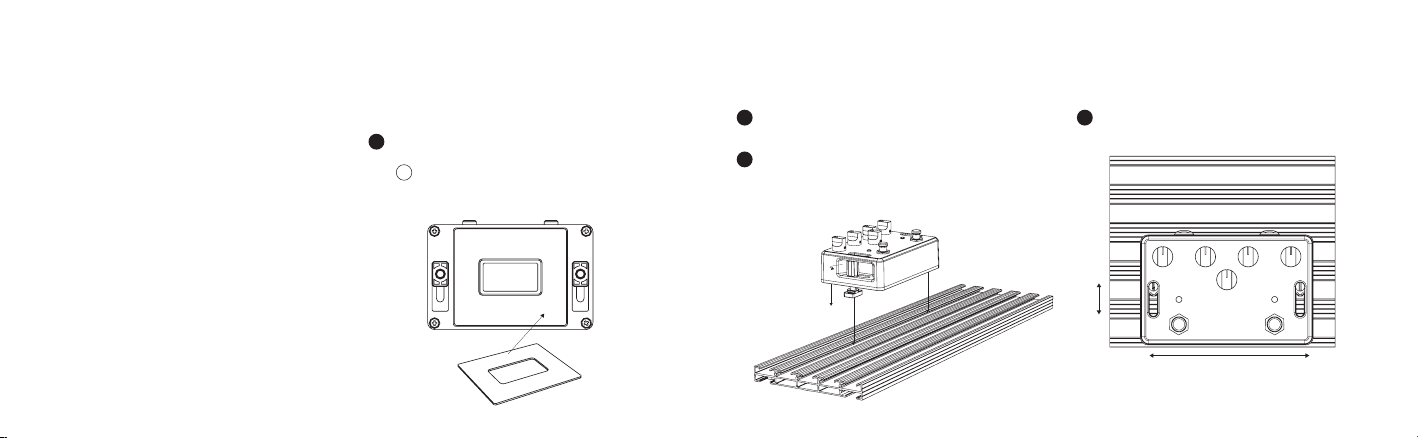
SMART TRACK FASTENING SYSTEM:
All our pedals use a custom enclosure designed to match
perfectly our Smart Track pedalboards. Using the side
thumb screws you’ll be able to lock safely the stompbox
into one of our pedalboards.
It also was designed with the other pedalboard options in
the market in mind. (see page 18)
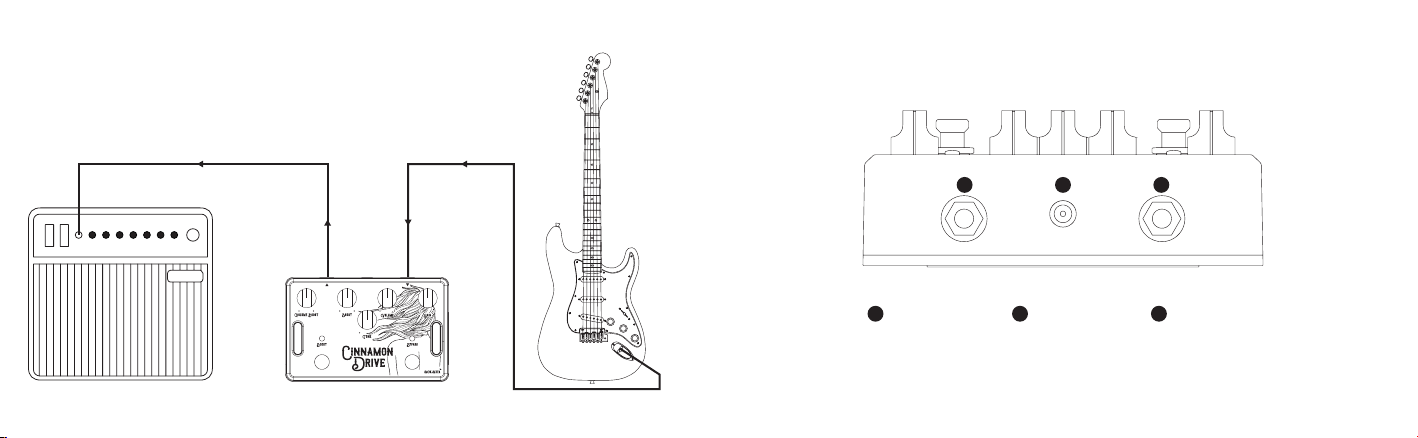
Features
DIMENSIONS: 13,6 x 8,7 x 5,5cm (5.4” x 3.4” x 2.2”) with knobs
WEIGHT: 415g. (0.91 lbs)
BYPASS: Relay True Bypass
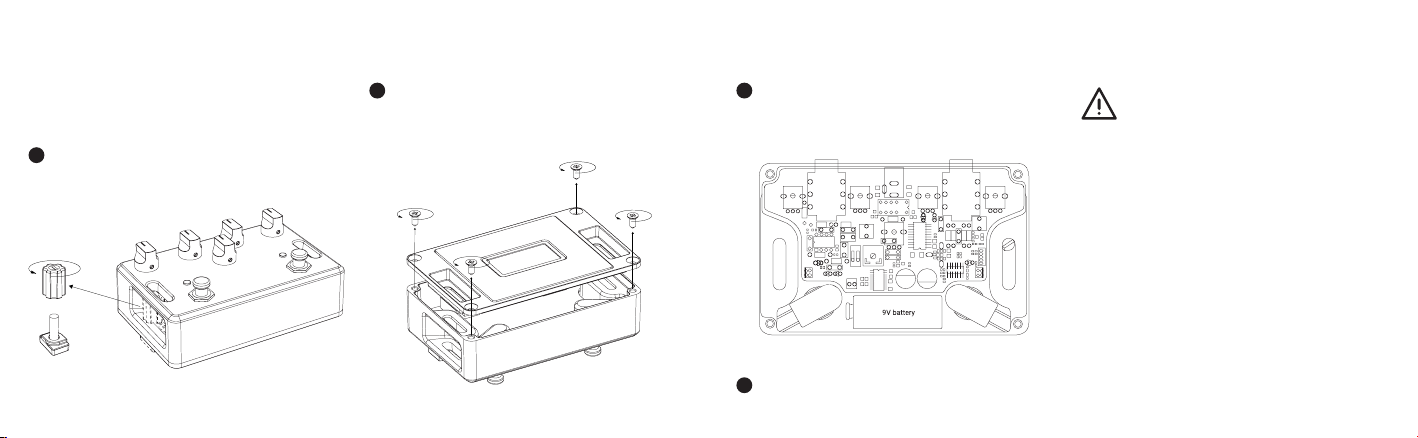
POWER REQUIREMENTS: 9V DC Center Negative 100mA
minimum or a 9V battery
DECLARATION OF CONFORMITY:
This product complies with the requirements of
MADE IN SPAIN
MATERIAL INCLUDED
1 x Cinnamon Drive pedal
1 x Anti-sliding rubber pad
1 x Velcro
®
pad
Specs &
Material included

8 9
Loosen the side thumb screws and disassemble the
Smart Track system of both sides of the pedal.
Unscrew the four bolts of the baseplate using a
pozidriv screwdriver to access the inside of the pedal.
Power requeriments
9V BATTERY
To operate the Cinnamon Drive with a 9V battery you’ll
have to follow the next steps:
1
2
POWER SUPPLY
This unit can be powered with a 9VDC negative tip power
supply with the standard Boss type 2.1mm connector.
Current supply should be a minimum of 100 mA just to
leave a safety margin for the DC adapter.
Make sure you use a good quality power supply and avoid
using generic SMPS type adapter which can induce high
pitched noise to the audio.
CAUTION:
If used improperly, batteries may explode or leak
and cause damage or injury.
- The use of an incorrect type of battery can void the
safeguard mechanisms of the device (for example, in the
case of some lithium battery types)
- Batteries must never be recharged, heated, taken apart,
- Do not expose the unit to extremely high temperatures,
direct sunlight or other devices that radiate heat, as it may
Put the 9V battery in the position showed in the
diagram. Make sure to use a good quality alkaline
battery to ensure the longest time of operation.
Tight back the lid with the 4 screws and reassembly
the Smart Track system.
3
4

10 11
Operating Diagram
GUITAR AMP
INPUT/EFFECT RETURN: OUTPUT INPUT
Controls
INPUT JACK POWER JACK OUTPUT JACK
1
1 2 3
1 32

12 13
4
5
68
10
79
REMEMBER: The Cinnamon Drive is not a dual, independent channel overdrive pedal. The Boost section is not a clean
boost - even though it can serve as one - it’s a second gain stage that gets stacked with the main overdrive circuit.
Even though there are independent volume controls for each stage, the “Gain” knob will always affect the “Boost” setting.
BYPASS FOOTSWITCH: Engages the unit and lets
circuit. It also light up the LED above it.
BOOST FOOTSWITCH: Activates the second gain
stage (Hard Clipping) and will light up the LED above it.
GAIN:
stage (Soft Clipping). In the counterclockwise
position it acts as a clean preamp, and as it is
producing a rich and dynamic overdrive.
VOL: Sets the volume of the soft clipping section.
Tip: set the Gain knob at minimum and adjust the
Volume knob to get a fat and nicely colored boost.
This is really useful if you want to add some character
into its sweet spot. Be careful! This pedal can be
EXTREMELY LOUD.
BOOST: Set the amount of signal boost before
reaching the hard-clipping circuit. This way the guitar
signal is affected by the two circuits (Soft and Hard
Clipping) at the same time and you can control how
much of each type of saturation you want.
stage, but as you increase the knob it starts to add
compression and distortion, a desirable effect when
riffs or solos.
VOL BOOST: Sets the volume of the Boost section.
Its purpose is to have separate levels for each gain
section so for example, you can pre-set a rhythm tone
a volume increase for solo work or parts where your
guitar needs a bit more of presence.
TONE: A simple but super effective passive treble cut
control affecting both sections. Turn it clockwise to
soften treble frequencies.
4
9
10
5
6
7
8

14 15
Advanced Internal
Controls
These controls are intended to help adequate you
Cinnamon Drive to your playing requirements and/or
your particular rig.
HOW TO ACCESS THE INTERNAL CONTROLS:
Just follow the same steps described on the 9V battery
replacement instructions. To adjust the internal controls
BASS DIP SWITCHES:
These switches can increase or reduce the amount
of bass content passing through the Cinnamon
Drive saturation engine. This feature is useful to
adjust the pedal to amps with a lack or excess of
low frequencies. They also change the overdrive's
character and gain structure as follows:
TREBLE TRIM POT:
Unlike the external Tone control, the Treble Trim
drive. Settings can vary from super dark dialed
counterclockwise to sparkly bright and mid scooped
tone in the clockwise setting.
Factory setting is at 12 o’clock.
Both switches down: You’ll notice a drop in
the low frequencies. This is especially useful
when playing with small-sized amps or
guitars with a lot of low end. The tone will be
more focused on the midrange.
Both switches up: This option increases bass
content, ideal for a single guitar player band.
With both Gain and Boost engaged all the way
up the pedal will turn into a high gain fuzz type
distortion. We encourage you to experiment
with it!
Switch 1 in the up position: The Bass content
is almost the same as the bypassed tone. The
factory default setting.
BASS
BASS
BASS
BASS TREBLE
BASS DIP SWITCHES
1
1 2
TREBLE TRIM POT
2
1

16 17
Setting
Examples
MID GAIN OVERDRIVE + VOLUME BOOST CREAMY SOLO TONE
To show you the immense potential of the Cinnamon Drive,
we recommend you to try the following setting examples.
You can hear them at www.aclamproductsforguitars.com
DUAL CHANNEL CLEAN BOOST BRIGHT SOFT OVERDRIVE + EXTRA GAIN STAGE WITH
INDEPENDENT VOLUME
ON
OFF
ON
OFF

18 19
Setting up on
a pedalboard
All our effect pedals use a custom light aluminum
pedalboards. We incorporated a proprietary locking
system which allows the user to fasten the pedal without
the need of using the typical hook and loop method.
This custom fastening system follows the same
philosophy behind the Smart Track fasteners but
integrated in the enclosure reducing the space occupied
by each pedal.
That translates into more pedal density for the same
space, and who doesn’t want that?
We strongly recommend you to take a look at our line of
pedalboards, which are the best complement to our pedals!
Add the anti-sliding rubber pad at the bottom of your
pedal, specially shaped for this unit.
Surface must be clean and dry before applying
adhesive pad.
1
HOW TO MOUNT IT ON A SMART TRACK PEDALBOARD:
!
Loosen the 2 thumb screws to unlock the bottom
pieces out of the pedal.
Place the pedal, inserting the bottom pieces inside
the grooves.
2
3
4

20 21
Tighten the two thumb screws with your hands or
with a screwdriver.
5
Hook and Loop: Take the included super strong Velcro®
pad and stick it on the base plate.
Again, make sure the base is clean of dirt and dust.
Pre-drilled pedalboard: Fix it with a bolt and a nut you
zip tie over the pedal you can take advantage of the Smart
Track enclosure and put the zip ties over the holes.
DIY woodboard: You can screw the pedal directly with
wood bolts through the enclosure side holes.
No board: If you use the pedals standalone make sure
you place the included anti-sliding rubber pad on the
baseplate.
USING OTHER PEDALBOARDS:
Trouble
Shooting
SIGNAL PASSES THROUGH IN BYPASS BUT NOT
WHEN ENGAGED:
Make sure you´ve connected the input and output jacks
correctly.
PEDAL DOES NOT WORK WITH THE POWER SUPPLY:
Take a look at your power supply output voltage and
polarity. Make sure it’s 9V DC negative tip with a minimum
output of 200 mA.
PEDAL WON’T ENGAGE WITH BOTH THE POWER
SUPPLY AND BATTERY:
Check there’s a plug inserted into the Input Jack.
THE LEDS ARE BLINKING:
If you’re powering your Cinnamon Drive with a battery
replace it with a fresh one. See page 9 for more info.
EVEN WITH GAIN AT MINIMUM, THE SOUND
IS DISTORTED:
First of all, check that there aren´t any pedals such as
boosters, preamps or compressors before the Cinnamon
Drive that could increase the volume of your guitar signal.
When you put a Booster before an overdrive pedal and
engage it you increase the amplitude of your guitar signal.
This will hit the saturation section of the overdrive pedal
harder, resulting in more distortion instead of increasing
volume.
increased on your Cinnamon Drive; the next pedal in the
chain or your amp might not have enough headroom for
the incoming signal and it’ll clip.
So, in this case check the output volume and reduce if
necessary.

22 23
Security
Instructions
Warranty
Terms
- Read these instructions carefully.
- Keep them for future reference.
- Heed all warnings.
- Aclam Guitars shall not be held liable for any damage
to persons or property caused by incorrect operation or
installation.
- Use the product in accordance with the assembly
instructions. Do not modify or operate the product
incorrectly.
- Incorrect installation could result in serious damage to
persons and property.
- Open the package and check that the assembly
instructions and all the parts of the product are there.
Check that none of the parts are defective.
- Keep out of reach of children. This product contains
small parts that represent a choking hazard if swallowed.
- If you do not understand these safety instructions,
or if you have any queries regarding the safety of the
installation, please contact Aclam Guitars:
- If you wish to contact Customer Services at Aclam
This product is covered by a two-year warranty from
the purchase date, under the conditions and supporting
evidence regulated by current Spanish Legislation.
The product warranty will only be applicable by presenting
the proof of purchase (which is the invoice or the receipt)
and serial number.
A product is covered under warranty if it presents lack of
product characteristics, is defective which prevents its
normal use according to its purpose, or does not function
as described. The purchaser has the right to have the
article repaired or replaced (either the product or the faulty
component, at the discretion of the manufacturer.)
The warranty is not transferable and won’t cover the
following issues:
service center.
· Unsuitable use
· Incorrect storage
· Explosions or burns caused by incorrect power supplies.
· Other causes not attributable to the manufacturer
To make a claim, the purchaser must return the product to
the store where it was purchased within one month from
discovering the fault, and report the nature of the problem,
the time and the circumstances under which it occurred.
If the product was purchased through our website, the
purchaser must refer to www.aclamproductsforguitars.com
and complete a RMA (Return to Manufacturer Authorization)
form before returning the unit.
We strongly recommend looking at the “Troubleshooting”
section of the manual before panicking!!

Table of contents