Acorn Safety S0650-LH Manual

WWW.ACORNSAFETY.COM
INSTALLATION, OPERATION AND MAINTENANCE INSTRUCTIONS
EYEWASH/FACEWASH
TECHNICAL ASSISTANCE TOLL FREE TELEPHONE NUMBER
1.800.591.9360
TECHNICAL ASSISTANCE FAX: 1.626.855.4894
ACORN SAFETY
P.O. BOX 3527
CITY OF INDUSTRY, CA 91744-0527
UNITED STATES OF AMERICA
Manual #7109-400-001
MODELS S0650-LH / S0650-RH / S0660-LH / S0660-RH / S0850-LH / S0850-RH / S0860-LH / S0860-RH
S0650-LH-AS / S0650-RH-AS / S0660-LH-AS / S0660-RH-AS / S0850-LH-AS / S0850-RH-AS
S0850-LH-AS-SSE / SO850-RH-AS-SSE / SO860-LH-AS / S0860-RH-AS
NOTES TO THE INSTALLER:
1. Please leave this documentation with the owner of the fixture when finished.
2. Please read this entire booklet before beginning the installation.
3. Check your installation for compliance with plumbing, electrical, ANSI Z358.1 and
other applicable codes.
LIMITED WARRANTY
UNITED STATES AND CANADA
Acorn Safety warrants that its products are free from defects in material or workmanship under normal use and
service for a period of one year from date of shipment or 18 months after the date of shipment from factory ,
whichever comes first. Acorn's liability under this warranty shall be discharged solely by replacement of repair of
defective material, provided Acorn is notified in writing within one year from date of shipment, F.O.B. Industry,
California.
This warranty does not cover installation or labor charges and does not apply to materials, which have been
damaged by other causes such as mishandling or improper care or abnormal use. The repair or replacement of the
defective materials shall constitute the sole remedy of the Buyer and the sole remedy of Acorn under this warranty.
Acorn shall not be liable under any circumstances for incidental, consequential or direct charges caused by defects in
materials, or any delay in the repair or replacement thereof. This warranty is in lieu of all other warranties expressed
or implied. Product maintenance instructions are issued with each unit and disregard or non-compliance with these
instructions will constitute an abnormal use condition and void the warranty. Stainless steel must be protected on job
sites during construction and must be properly maintained after the water has been introduced into the safety product
or Acorn's warranty is void.
Revised: 01/07/2013
Acorn Safety a division of Acorn Engineering Company™

1. Read the installation instructions prior to beginning the installation.
2. Separate parts from packaging and verify all necessary parts are accounted for and undamaged. Obtain missing or
damaged parts from Acorn Safety prior to beginning installation. See page 4.
3. Flush water supply line prior to installation. This will remove unwanted debris from the lines and prevent unwanted
blockages in the safety equipment.
4. In order to comply with ANSI Z358.1, the safety equipment must be inspected periodically. An inspection tag is
provided for documentation purposes.
5. All employees at risk of eye contamination should be informed and trained in the use of this and any other safety
equipment. The signage provided should be posted appropriately in close proximity as required by ANSI and
OSHA.
Installation & Operation Manual
PRELIMINARY STEPS
Manual #7109-400-001
ROUGH-IN
55
8"
(143)
21
2"
(64)
47
8"
(124)
21
2"
(63)
SUPPLY
Ø2"
(51)
4X Ø1/4"-20
(6)
TAPPPED
HOLE
Ø1
2"
(13)
NPT SUPPLY
31
8"
(79)
MOUNTING DETAIL
100°"
161
4"
(413) 201
8"
(511)
5"
(127)
31
2"
(89)
2"
(51)
SUPPLY
1/2" NPT
SUPPLY
Page 2 of 5 Revised: 01/07/2013
Acorn Safety a division of Acorn Engineering Company™

Installation & Operation Manual
INSTALLATION INSTRUCTIONS:
Supplies required: (not provided by Acorn)
1. Wall/deck mounting hardware to install assembly.
2. Wall fasteners for sign mounting.
3. Pipe sealant or Teflon tape for sealing water connections.
IMPORTANT: FLUSH SUPPLY LINES PRIOR TO
CONNECTING TO SAFETY EQUIPMENT.
NOTES:
Top of spray nozzles must be between 33" - 45" from
finished floor in order to meet ANSI Z358.1. See page 2.
Refer to Rough-in for location of supply and drain lines.
Fragments of Teflon tape or pipe sealant residue can
interfere with the proper operation of this unit. Ensure pipe
sealant methods do not cause contamination in the
system.
STEP ONE: MOUNTING
A. Remove (2) #8 screws and mounting cover.
B. Position assembly on deck allowing clearance for spray
heads when unit is in up position (Models: S0660-LH,
S0660-RH, S0850-LH & S0850-RH). Alternatively, position
assembly on wall allowing clearance for arm when unit is
in down in the down position (Models: S0650-LH, S0650-
RH, S0660-LH & S0660-RH).
C. While holding bracket in appropriate location and
alignment, mark 4 mounting hole locations.
D. Make appropriate preparations for mounting hardware.
E. Re-position assembly and install using hardware
(supplied by others).
STEP TWO: SUPPLY LINE
F. Install water line (supplied by others) in a position to align
with 1/2" strainer.
G. Open water supply.
H. Test for leaks, proper operation and flow.
I. Make appropriate preparations for mounting hardware.
STEP THREE: FINAL ASSEMBLY
J. Re-position mounting cover onto assembly.
K. Secure cover using (2) #8 screws removed above.
STEP FOUR: SIGNAGE & INSPECTION
L. Position sign with clear visibility, in close proximity to
safety equipment and mark mounting hole locations.
M. Select appropriate 1/4" anchors, screws and washers
(supplied by others) to install signage.
N. Attach inspection tag supplied with plastic zip tie. ANSI
Manual #7109-400-001
#8 SCREWS
MOUNTING COVER
SUPPLY LINE
(SUPPLIED BY OTHERS)
SUPPLY LINE
(SUPPLIED
BY OTHERS)
DETAIL "A"
Page 3 of 5 Revised: 01/07/2013
Acorn Safety a division of Acorn Engineering Company™

OPERATION INSTRUCTIONS:
become familiar with the location and operation of the
nearest emergency plumbing fixture. Emergency
plumbing fixtures stations are simple to use and require
hands free operation once the station is activated.
Regular instruction regarding proper care and use will
increase confidence that the units are accessible and
function properly.
The route and area surrounding the Eye Wash should
be clear and unobstructed; the sooner eyes are flushed,
the less likelihood of damage. Eye Wash stations should
be located in close proximity to the hazard and take no
more than 10 seconds to reach. In the case of sever eye
contamination the victim may require assistance to the
Eye Wash station and help flushing their eyes.
Safety plumbing fixture equipment should be operated
weekly for a period long enough to verify operation,
clear the supply line of any sediment build-up and
minimize microbial contamination due to sitting water.
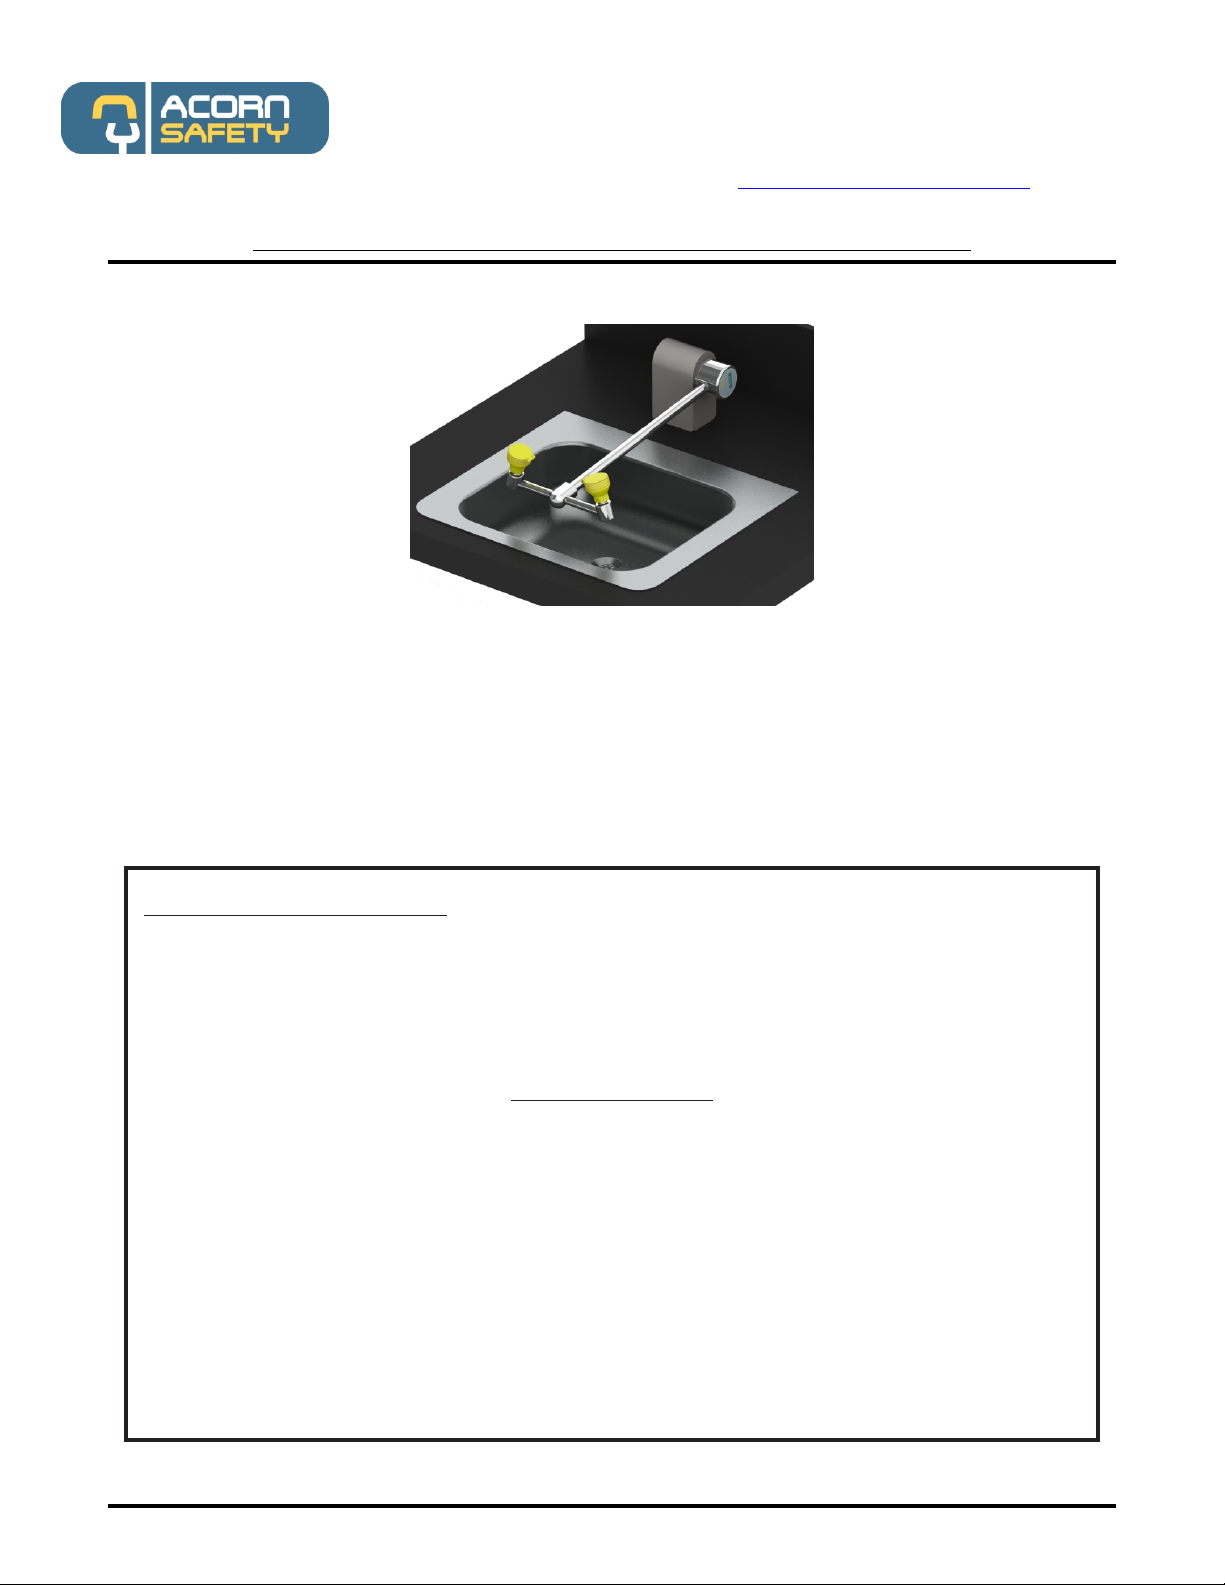
1. To start the Eye Wash, swing spray nozzle assembly
down horizontally over the basin or fully “ON” position.
Flushing should start, popping the spray nozzle caps
open.
2. Lower both eyes into flow. Both eyes should be
flushed to prevent contamination from one eye from
being delivered to unaffected eye. Personnel who
wear contact lenses should remove them immediately
prior to or during the flush to prevent the
contamination from remaining against the cornea
possibly causing unnecessary damage or pain.
3. Using thumb and forefingers, fully open eyelids and
flush eyes thoroughly for approximately 15 minutes or
until medical personnel arrive. Be prepared to let the
doctor know what type of contamination has entered
the eye.
4. When finished swing spray nozzle assembly up or
fully “OFF” position. Flushing fluid should stop. Once
flushing fluid has stopped flowing, return spray nozzle
lids to the closed position to protect from airborne
contaminates.
MAINTENANCE GUIDE:
Maintain and inspect in accordance with ANSI Z358.1-
2009
1. Check for obvious signs of wear, broken or defective
equipment. Re-paint if necessary. Replace missing or
defective equipment such as broken push paddles,
missing signs and inspection tags.
2. Remove strainer and washout any debris collected
–replace as required.
3. Operate Eye Wash nozzles swinging the spray nozzle
assembly down to place ball valve in the fully “ON”
position checking for smooth operation of valve push
paddle mechanism at the same time ensuring that the
Eye Wash spray nozzle caps pop off immediately
when actuated. If the ball valve does not operate
smoothly check the actuating assembly for binding or
missing parts. If the
Employees who work with hazardous materials should
Eye Wash spray nozzle caps do not pop off immediately
when actuated check for correct supply inlet
pressure.
4. While in operation, inspect spray nozzles for clogs or
debris correct or replace as required.
5. Swing spray nozzle assembly up to fully “OFF”
position and swing back to stand by position. To
prevent Eye Wash spray nozzles from becoming
contaminated, always close nozzle lids after each
use.
Revised: 01/07/2013
Page 4 of 5
Installation & Operation Manual
Manual #7109-400-001
Acorn Safety a division of Acorn Engineering Company™

ITEM # PART NUMBER DESCRIPTION
1 7104-317-001 COVER
2 7104-319-000 #8 SCREW
3 7100-140-001 STRAINER
7101-075-001 STRAINER, STAINLESS
STEEL
4 1932-010-000 3/8" NPT NIPPLE
5 7104-048-001 SEAL RING KIT
6 7104-047-001
VALVE, RIGHT HAND,
(INCLUDES ITEMS NO. 5, 7 &
8)
7104-055-001 VALVE, RIGHT HAND,
STAINLESS STEEL
7104-040-001 VALVE, LEFT HAND,
(INCLUDES ITEMS NO. 5, 7 &
7104-060-001 VALVE, LEFT HAND,
STAINLESS STEEL
7 7104-043-000 SHOULDER BOLT
7104-058-199 SHOULDER BOLT,
STAINLESS STEEL
8 7104-045-199 LABEL DISC
9 7100-407-000 LABEL, RIGHT HAND
7100-406-000 LABEL, LEFT HAND
10 7104-304-001 MOUNTING BRACKET, LEFT
HAND
7104-302-001 MOUNTING BRACKET,
RIGHT HAND
11 7101-100-001 EYEWASH NOZZLE
7101-104-001 FACEWASH NOZZLE
7101-112-001 EYEWASH NOZZLE,
STAINLESS STEEL
12 7104-306-001 YOKE
7104-306-002 YOKE, STAINLESS STEEL
13 7104-207-199 RETAINING NUT
Installation & Operation Manual
Manual #7109-400-001
PARTS LIST
1
2
3
13
10
11
12
6
9
8
7
5
4
Page 5 of 5 Revised: 01/07/2013
Acorn Safety a division of Acorn Engineering Company™
This manual suits for next models
17
Table of contents
Other Acorn Safety Washer manuals