Acoustic Research UA1 User manual

1
user manual
Acoustic Research UA1
It is important to read this user manual prior to using your nre product for the rst time

2
Getting Started
Dear Acoustic Research customer
Thank you for purchasing the Acoustic Research UA1 High Fidelity HD USB DAC with headphone amplier. This product will enable genuine high denition music
playback with high delity on your Windows or Mac computer system. You can also manage your music contents on your computer with the JRiver Media Center
included with this product.
To start using your High Fidelity HD USB DAC with headphone amplier, please follow the setup instructions in the following pages.
1. Content of the box
• UA1 High Fidelity HD USB DAC with headphone amplier
• USB cable
• Software CD (Acoustic Research UA1 Installation CD)
• Quick Start Guide
2. System requirements
Windows Operating Requirements
• Intel Core i3 or better
• Windows 7 or Windows 8 (32-bit or 64-bit)
• An available USB 2.0 port
• Internet Connection
Mac Operating Requirements
• Mac with Intel processor
• Mac OS X 10.6.8 (Snow Leopard) or above (10.9 or above required for integer mode playback)
• An available USB 2.0 port
• Internet Connection

3
3. General controls
6.3mm Headphone
Output
LED Status Display
Headphone
Volume Control
RCA (Right) Output
RCA (Left) Output USB to Computer
Optical Output*
LED Status Display
White 44.1kHz Blue 88.2 kHz Red 176.4 kHz
Cyan 48 kHz Purple 96 kHz Yellow 192 kHz
* Optical output supports up to 96 kHz

4
4. Driver installation for Windows 7 or Windows 8 (32-bit or 64-bit)
1. Connect the High Fidelity HD USB DAC with headphone amplier to an available USB 2.0/3.0 port with supplied USB cable
The following installation message and error message will appear on screen. These is the normal behavior during the installation process.
2A. Installation through CD
• Insert Acoustic Research UA1 Installation CD into CD/DVD/BD Drive
• Browse CD content with Windows Explorer
• Double-click the folder Windows to browse the content
• Run XMOS-Stereo-USB-Audio-Class2-Driver-300C(v2.19.0).exe
2B. Installation through Internet Download
• Visit Acoustic Research web site http://www.acoustic-research.com
• Enter UA1 in the search bar to nd the UA1 product information
• Under the product information, click Downloads
• Click Driver for Windows 7/Windows 8 (32-bit or 64-bit) to download the driver
• Run the downloaded driver
3. After running the installation program, you will see the User Account Control
Click Yes to continue the installation process

5
4. Click Next
5. The installation program will detect the existence of the USB sound module. Click Next. If the program fails to detect the hardware
6. The license agreement will appear. Please read through the content carefully. To continue, please check “I accept...” and click Next

6
7. Choose the installation path if you would like to change it. Click Install to continue
8. Click Finish to complete the installation
5. Driver Installation for Mac OS X 10.6.8 or above
1. Connect the High Fidelity HD USB DAC with headphone amplier to an available USB 2.0/3.0 port with supplied USB cable
2. Driver software for High Fidelity HD USB DAC with headphone amplier has been built into the Mac OS X Operating System (10.6.8 or above). The Installation has
completed.

7
6. Default audio device for Windows and Mac
By default, UA1 High Fidelity HD USB DAC with headphone amplier is an auxiliary audio device in Windows. While music applications are typically set to output
sound through the primary audio device, you will not hear any sound from the High Fidelity HD USB DAC with headphone amplier. Please expect it as the normal
behavior.
We recommend keeping UA1 as the auxiliary device the following reasons:
• Audiophile music software requires exclusive access to the audio device
• Sound notications will still be available through system audio device when UA1 is occupied by audiophile music software

8
7 Software Installation and Congurations for Windows
• Installation through CD (CD/BD/DVD drive required)
1.Insert Acoustic Research UA1 Installation CD into CD/DVD/BD Drive
2.Browse CD content with Windows Explorer
3.Double-click the folder Windows to browse the content
4.Run MediaCenter190117.exe
5.Follow instructions on screen to complete the installation
• Installation through internet download (Internet connection required)
1.Visit JRiver web site http://www.jriver.com/download.html
2.Download the latest Windows version of JRiver Media Center
3.Run the downloaded le
4.Follow instructions on screen to complete the installation
• Activating the software (Internet connection required)
The required license key can be found on the envelope of the CD
• Conguring JRiver Media Center to utilize the USB audio module in Windows
1.Make sure UA1 is connected and driver has been installed. Run JRiver Media Center
2.Click Tools and select Options...
3.Under Audio Device, select XMOS USB Audio [WASAPI] or XMOS USB Audio ST 300C [ASIO]

9
4.Under Settings..., click DSP & output format...
5.In Output Format, select 192,000 Hz Output for Input Greater than 192,000 Hz
6.Close the DSP Studio window and click OK to save the congurations

10
8 Software Installation and Congurations for Mac OS X
• Installation through CD (CD/BD/DVD drive required)
1.Insert Acoustic Research UA1 Installation CD into CD/DVD/BD Drive
2.Browse CD content with Finder
3.Double-click the folder Mac to browse the content
4.Double-click the le MediaCenter190118.dmg
5.In Media Center 19 window, drag the Media Center 19 icon to Applications folder to install the software
• Installation through internet download (Internet connection required)
1.Visit JRiver web site http://www.jriver.com/download.html
2.Download the latest Mac version of JRiver Media Center
3.Run the downloaded le
4.In Media Center 19 window, drag the Media Center 19 icon to Applications folder to install the software
• Activating the software (Internet connection required)
The required license key can be found on the envelope of the CD
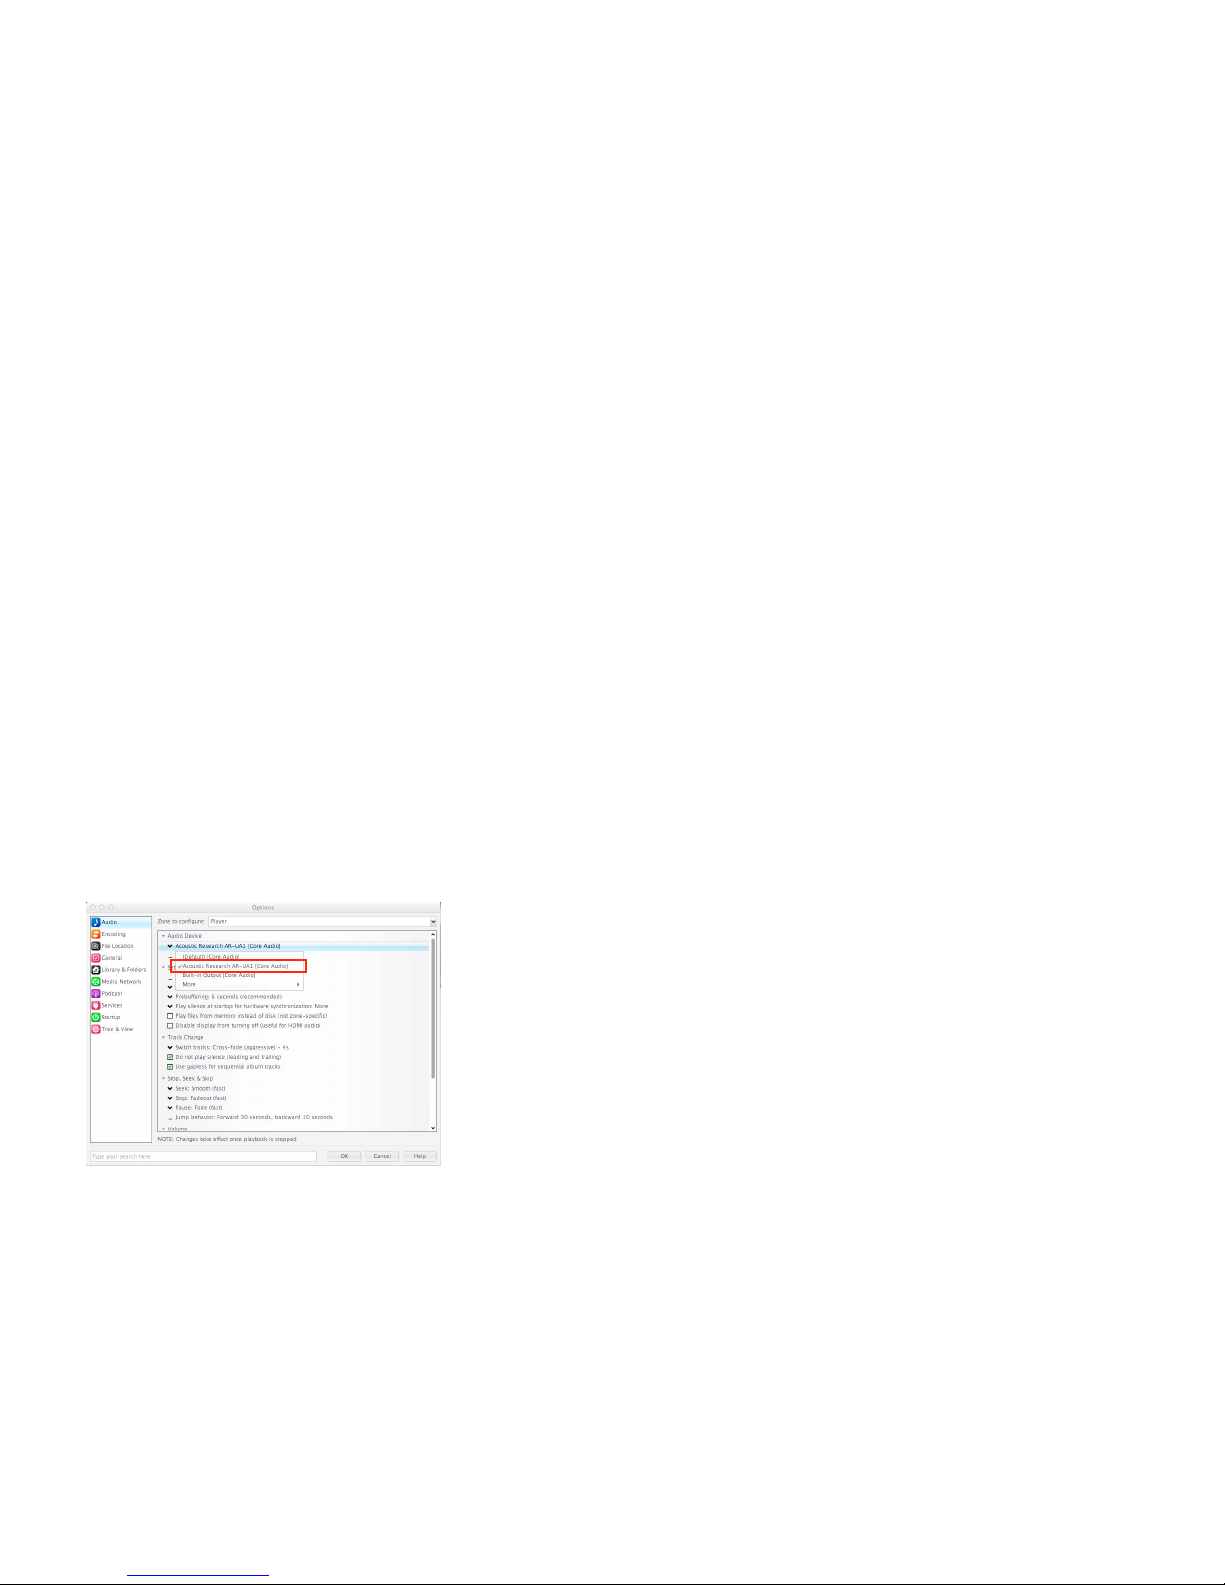
• Conguring JRiver Media Center to utilize the USB audio module in Mac OS X
1.Make sure UA1 is connected and driver has been installed. Run JRiver Media Center
2.Click Tools and select Options...
3.Under Audio Device, select Acoustic Research AR-UA1 [Core Audio]

11
4.Under Settings..., click DSP & output format...
5.In Output Format, select 192,000 Hz Output for Input Greater than 192,000 Hz
6.Close the DSP Studio window and click OK to save the congurations

12
9. Technical Specications
Product
• Acoustic Research UA1 High Fidelity HD USB DAC with headphone amplier
Digital-to-Analogue Converter
• Burr-Brown PCM1794a
Current-Voltage Converter
• Dual Burr-Brown OPA2134
Headphone Amplier
• Texas Instrument TPA6120A2
Input
• USB 2.0 (host powered)
USB Audio Specications
• USB Audio Class 2.0 (Asynchronous mode)
Output
• Headphone Output (6.3 mm type)
• Gold Plated Brass Made RCA (Right)
• Gold Plated Brass Made RCA (Left)
• Optical (TOSLINK)
Supported Formats
• 44.1 kHz
• 48 kHz
• 88.2 kHz
• 96 kHz
• 176.4 kHz
• 192 kHz (Analogue output only)
• Higher than 192 kHz (Supported through high precision conversion in JRiver Media Center)
• DSD64/DSD128 (Supported through high precision conversion in JRiver Media Center)

13
For warranty information, please contact the local distributor. The contact information of the local distributors is available on http://www.acoustic-research.com.
Warranty information
©2014 VOXX Accessories Corporation
A wholly-owned subsidiary of VOXX International Corporation
Indianapolis, IN
Trademark(s) ® Registered
v1.1 (1.0.1.0)
Table of contents