ACP MCS10TS User manual

Refer to Product Safety Manual for Safety Statements
Complete Owner’s Manual available online
Manual Operation
To cook food using a specic entered time and power level:
1. Open oven door and place food in oven. Close door.
2. Press TIME ENTRY pad and enter cooking time.
3. Press a power level pad to change power level if desired (some
models).
• COOK LEVEL displays with the power setting.
4. If stage cooking is desired, press TIME ENTRY pad and repeat steps
2 through 4.
5. Press START pad.
6. At end of cooking cycle oven beeps and shuts off.
Programming Items
1. Open oven door.
2. Press and hold pad 1 for approximately 5 seconds.
3. Press pad to be reprogrammed.
4. Enter cooking time by using the number pads.
5. Press a power level pad to change power level if desired.
6. If stage cooking is desired, press TIME ENTRY pad.
• Display briey shows the stage number.
• Display changes to cook time and power level for the next stage.
7. Enter cook time and power level as in steps 4 and 5 (some models).
• To enter another cooking stage for that pad, press TIME ENTRY pad
again.
• Up to four different stages can be programmed (some models).
8. Press START pad to set new programming changes to the pad.
NOTE: To discard changes, press STOP/RESET pad or close oven door.
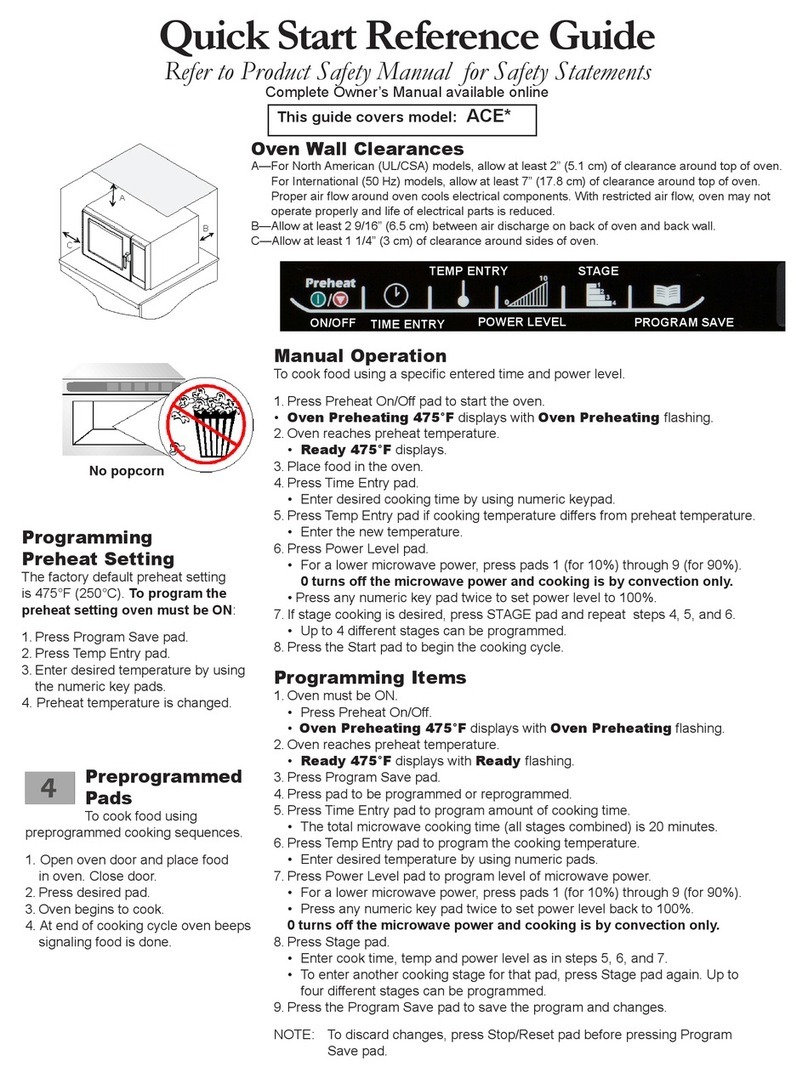
Quick Start Reference Guide
So...how do I use it? (Electronic Control)
X2 Programming
To change the cooking factor:
1. Open oven door.
2. Press and hold pad 1 for
approximately 5 seconds.
3. Press pad to be reprogrammed.
4. Press the X2 pad.
5. Press a numbered pad to
change the cooking factor.
• Cooking factor can be set from
10% to 100%.
• Default is 80%.
• Pad 5 would change the
cooking factor to 50%.
6. Press START pad to save
changes.
X2 Pad
1. Open oven door and place food in oven. Close door.
2. Press X2 pad.
3. Press desired preprogrammed pad or pad sequence.
4. Oven begins cooking. Displayed cooking time is the total of original
cooking time and added X2 time.
Preprogrammed
Pads
To cook food using
preprogrammed cooking
sequences:
1. Open oven door and place food
in oven. Close door.
2. Press desired pad.
3. Oven begins to cook.
4. At end of cooking cycle oven
beeps and shuts off.
The switching operation of this microwave oven can cause voltage uctuations on the supply line. The operation of this oven under
unfavorable voltage supply conditions can have adverse effects. This device is intended for the connection to a power supply system
with a maximum permissible system impedance Zmax of 0.2 Ohms at the interface point of the user’s supply. The user has to
ensure that this device is connected only to a power supply system which fullls the requirement above. If necessary, the user
can ask the public power supply company for the system impedance at the interface point.
Oven Wall Clearances
A—For North American (UL/CSA) models, allow at least
2” (5.1 cm) of clearance around top of oven. For
International (50 Hz) models, allow at least 12” (30
cm) of clearance around top of oven. Proper air
ow around oven cools electrical components. With
restricted air ow, oven may not operate properly and
life of electrical parts is reduced.
B—Allow at least 2” (5.1 cm) between air discharge on
back of oven and back wall.
C—Allow at least 2” (5.1 cm) of clearance around sides
of oven.
C
A
B
Accelerated Cooking Products

2012 ACP , Inc.
Cedar Rapids, Iowa 52404
Part No.20120202
Revised 7/12
For full product documentation visit:
www.acpsolutions.com
Quick Start Reference Guide
Refer to Product Safety Manual for Safety Statements
Complete Owner’s Manual available online
Can I change an option?
Options such as single or double pad programming, beep volume, and
maximum cooking time can be changed to suit individual preferences.
To change options:
1. Open oven door.
• If door is closed or STOP/RESET pad is pressed before programming is
complete, changes are discarded and microwave exits programming mode.
2. Press and hold pad 2 for approximately 5 seconds.
• This begins options mode.
• Microwave will beep and 0P: displays.
3. Press number pad that controls option to be changed.
• See table below for options.
• Current option will display.
4. Press number pad again to change the option.
• Each time pad is pressed, option will change.
• Match code displayed with code for desired option.
5. Press START pad to save changes.
• To change additional options, repeat steps 3 and 4.
• Changes appear after door is closed or STOP/RESET pad is
pressed.
No metal pans
DO NOT power spray
Numbered Pads Display Options (Factory Settings in Bold)
1
End of Cycle Beep
OP:10
OP:11
OP:12
3 second beep.
Continuous beep until door is opened.
5 beep bursts until door is opened.
2
Key Beep Volume
OP:20
OP:21
OP:22
OP:23
Eliminates beep.
Sets volume to low.
Sets volume to medium.
Sets volume to high.
3
Key Beep
OP:30
OP:31
Prevents beep when pad is pressed.
Allows beep when pad is pressed.
4
Active Display
OP:40
OP:41
OP:42
OP:43
15 seconds after oven door is opened, keyboard disabled.
30 seconds after oven door is opened, keyboard disabled.
1 minute after oven door is opened, keyboard disabled.
2 minutes after oven door is opened, keyboard disabled.
5
On-the Fly Cooking
OP:50
OP:51
Prevents dierent pre-programmed pads to be activated during cooking.
6
Resetto Ready Mode
OP:60
OP:61
Opening oven door does not reset oven back to ready mode.
7
(some models)
Maximum Heating Time
OP:70
OP:71
Allows 60 minutes of heating time (some models).
Allows 10 minutes of heating time.
8
Manual Operation
OP:80
OP:81
Allows use of preprogrammed pads only.
Allows use of manual time entry and preprogrammed pads.
9
(some models)
Double Digit Operation
OP:90
OP:91
Allows 10 (0-9) preprogrammed pads.
Allows 100 (00-99) preprogrammed pads.
0
Clean Filter Message
OP:00
OP:01
OP:02
OP:03
Do not display message.
Display message for 24 hours every 7 days.
Display message for 24 hours every 30 days.
Display message for 24 hours every 90 days.
Allows different pre-programmed pads to be activated during cooking.
Opening oven door resets oven back to ready mode.

Consulte las Normas de Seguridad en el Manual de Seguridad del Producto
Manual del Propietario completo disponible en línea
Manual de Funcionamiento
Para cocinar alimentos en un tiempo y a un nivel de potencia especícos de su elección:
1. Abra la puerta del horno e introduzca los alimentos. Cierre la puerta.
2. Oprima la tecla TIME ENTRY (INGRESAR TIEMPO) e ingrese el tiempo de cocción.
3. Si lo desea, oprima una tecla de nivel de potencia para modicar el nivel de potencia
(algunos modelos).
• Junto con el valor de potencia seleccionado aparece el mensaje COOK LEVEL
(NIVEL DE COCCIÓN).
4. Si desea cocinar por etapas, oprima la tecla TIME ENTRY y repita los pasos 2 al 4.
5. Oprima la tecla START .
6. Al terminar el ciclo de cocción, el horno emite un pitido y se apaga.
Programación
1. Abra la puerta del horno.
2. Oprima la tecla 1 durante aproximadamente 5 segundos.
3. Oprima la tecla que desea reprogramar.
4. Ingrese el tiempo de cocción mediante las teclas numéricas.
5. Si lo desea, oprima una tecla de nivel de potencia para modicar el nivel de potencia.
6. Si desea cocinar por etapas, oprima la tecla TIME ENTRY .
• La pantalla muestra brevemente el número de etapa.
• La pantalla cambia para mostrar el tiempo de cocción y el nivel de potencia de la
siguiente etapa.
7. Ingrese el tiempo de cocción y el nivel de potencia como lo hizo en los pasos 4 y 5
(algunos modelos).
• Para programar otra etapa de cocción en esa tecla, oprima de nuevo la tecla TIME ENTRY.
• Se pueden programar hasta cuatro etapas distintas (algunos modelos).
8. Oprima la tecla START para jar los cambios de programación hechos a la tecla.
NOTA: Para cancelar los cambios, oprima la tecla STOP/RESET (PARAR/RESTAURAR)
o cierre la puerta del horno.
Tecla QTY X2
1. Abra la puerta del horno e introduzca los alimentos. Cierre la puerta.
2. Oprima la tecla QTY X2.
3. Oprima la tecla o secuencia de teclas preprogramadas deseadas.
4. El horno empieza a cocinar los alimentos. El tiempo de cocción indicado en pantalla es la
suma del tiempo de cocción original y el tiempo X2 añadido.
Guía de Consulta Rápida para el Arranque
Y entonces... ¿cómo lo uso? (Control Electrónico)
Teclas
Preprogramadas
Para cocinar alimentos
mediante secuencias de cocción
preprogramadas:
1. Abra la puerta del horno e introduzca
los alimentos. Cierre la puerta.
2. Oprima la tecla deseada.
3. El horno empieza a cocinar los
alimentos.
4. Al terminar el ciclo de cocción, el
horno emite un pitido y se apaga.
Programación QTY
X2
Para modicar el factor de
cocción:
1. Abra la puerta del horno.
2. Oprima la tecla 1 durante aproxi-
madamente 5 segundos.
3. Oprima la tecla que desea
reprogramar.
4. Oprima la tecla QTY X2.
5. Oprima una tecla numérica para
modicar el factor de cocción.
• El factor de cocción se puede jar
en un valor entre 10% y 100%.
• El valor por omisión es 80%.
• La tecla 5 ja el factor de cocción
en 50%.
6. Oprima la tecla START
(ARRANCAR) para grabar los
cambios.
El funcionamiento intermitente de este horno microondas puede ocasionar uctuaciones de voltaje en la línea de alimentación. Si la tensión de
alimentación es inadecuada, el funcionamiento de este horno microondas puede tener efectos perjudiciales. Este aparato ha sido diseñado para
conectarse a un sistema de alimentación cuya impedancia admisible máxima Zmax sea de 0,2 ohmios en el punto de interconexión de la fuente
del usuario. El usuario debe garantizar que este dispositivo se conecte sólo a un sistema de alimentación que cumpla con este requisito. Si es
necesario, el usuario puede pedirle a la empresa de energía eléctrica información sobre la impedancia del sistema en el punto de interconexión.
Espacio Libre Alrededor de las
Paredes del Horno
A—Para los modelos de América del Norte (UL/CSA), deje
al menos 5,1 cm (2 pulg.) de espacio libre alrededor
de la parte superior del horno. Para modelos Interna-
cionales (50 Hz), deje al menos 30 cm (12 pulg.) de
espacio libre alrededor de la parte superior del horno.
La circulación de aire adecuada alrededor del horno
enfría sus componentes eléctricos. Si se restringe
la circulación de aire, posiblemente no funcione
correctamente el horno y se reduzca la duración
de las piezas eléctricas.
B—Deje al menos 5,1 cm (2 pulg.) entre la salida de aire,
en la parte posterior del horno, y la pared de fondo.
C—Deje al menos 5,1 cm (2 pulg.) de espacio libre por los
lados del horno.
C
A
B
Accelerated Cooking Products
2012 ACP, Inc.
Cedar Rapids, Iowa 52404
No. de pieza 20120202
Revisado 07/12
Para la documentación completa del producto, visite:
www.acpsolutions.com
Guía de Consulta Rápida para el Arranque
Consulte las Normas de Seguridad en el Manual de Seguridad del Producto
Manual del Propietario completo disponible en línea
¿Puedo modicar una opción?
Las opciones de programación de tecla simple o doble, volumen del pitido y
tiempo de cocción máximo se pueden modicar para ajustarlas
a preferencias personales.
Para modicar las opciones:
1. Abra la puerta del horno.
• Si se cierra la puerta o se oprime la tecla STOP/RESET antes de nalizar
la programación, se cancelan los cambios y el microondas sale del modo de
programación.
2. Oprima la tecla 2 durante aproximadamente 5 segundos.
• Esto activa el modo de opciones.
• El microondas emite un pitido y en pantalla aparece 0P:
3. Oprima la tecla numérica que controla la opción que desea modicar.
• Consulte las opciones en el cuadro a continuación.
• Aparece en pantalla la opción actual.
4. Oprima de nuevo la tecla numérica para modicar la opción.
• Cada vez que oprima la tecla, cambiará la opción.
• Haga corresponder el código en pantalla con el código correspondiente a la
opción deseada.
5. Oprima la tecla START (ARRANCAR) para grabar los cambios.
• Para modicar otras opciones, repita los pasos 3 y 4.
• Los cambios aparecen una vez que se cierra la puerta o se oprime la tecla
STOP/RESET .
No use cacerolas metálicas
NO rocíe con pistola
Teclas Numéricas Pantalla Opciones (Ajustes de Fábrica en Negritas)
1
Pitido de Fin de Ciclo
OP:10
OP:11
OP:12
Pitido de 3 segundos.
Pitido continuo hasta que se abra la puerta.
5 pitidos individuales hasta que se abra la puerta.
2
Volumen del Altavoz
OP:20
OP:21
OP:22
OP:23
Eliminar pitido.
Seleccionar volumen bajo.
Seleccionar volumen intermedio.
Seleccionar volumen alto.
3
Pitido de las Teclas
OP:30
OP:31
Desactivar el pitido al oprimir teclas.
Activar el pitido al oprimir teclas.
4
Ventana de Activación
del Teclado
OP:40
OP:41
OP:42
OP:43
El teclado se desactiva 15 segundos después de abierta la puerta del horno.
El teclado se desactiva 30 segundos después de abierta la puerta del horno.
El teclado se desactiva 1 minuto después de abierta la puerta del horno.
El teclado se desactiva 2 minutos después de abierta la puerta del horno.
5
Aumentar Tiempo Durante
la Cocción
OP:50
OP:51
Impide aumentar el tiempo de cocción con el horno en funcionamiento.
Permite modicar el tiempo de cocción con el horno en funcionamiento
al oprimir una tecla de memoria.
6
Restaurar Puerta Abierta
OP:60
OP:61
Permite al horno reanudar la cuenta regresiva del tiempo de cocción
después de abierta la puerta durante el ciclo.
Cancela la cuenta regresiva del tiempo de cocción después de abierta
la puerta durante el ciclo.
7
(algunos modelos)
Tiempo de Cocción Máximo
OP:70
OP:71
Permite un tiempo de cocción de 60 minutos (algunos modelos).
Permite un tiempo de cocción de 10 minutos.
8
Funcionamiento Manual
OP:80
OP:81
Permite usar sólo teclas preprogramadas.
Permite usar teclas de ingreso de tiempo manual y teclas preprogramadas.
9
(algunos modelos)
Funcionamiento de
Dos Dígitos
OP:90
OP:91
Permite 10 teclas preprogramadas (0-9).
Permite 100 teclas preprogramadas (00-99).
0
Mensaje de Limpiar Filtro
OP:00
OP:01
OP:02
OP:03
No mostrar el mensaje.
Mostrar el mensaje durante 24 horas cada 7 días.
Mostrar el mensaje durante 24 horas cada 30 días.
Mostrar el mensaje durante 24 horas cada 90 días.

Consultez le Manuel sur la sécurité des produits pour les énoncés de sécurité
L’intégralité du manuel est disponible en ligne
Utilisation manuelle
Pour cuire des aliments en programmant un temps et un niveau de puissance spéciques :
1. Ouvrez la porte du four et placez la nourriture dans le four. Fermez la porte.
2. Appuyez sur la touche TIME ENTRY pour entrer un temps de cuisson.
3. Appuyez sur une touche de niveau de puissance pour modier cette dernière au besoin.
• Le niveau de cuisson COOK LEVEL est afché avec le réglage de puissance.
4. Pour effectuer une cuisson par étapes, appuyez sur la touche TIME ENTRY et répétez
les étapes 2 à 4.
5. Appuyez sur la touche START .
6. À la n du cycle de cuisson, le four émet des bips sonores et s’éteint.
Programmation de cuisson
1. Ouvrez la porte du four.
2. Maintenez enfoncée la touche 1 pendant environ cinq (5) secondes.
3. Appuyez sur la touche à reprogrammer.
4. Entrez un temps de cuisson en utilisant les touches numériques.
5. Appuyez sur une touche de niveau de puissance pour modier ce dernier au besoin.
6. Pour effectuer une cuisson par étapes, appuyez sur la touche TIME ENTRY .
• L’afcheur indique brièvement le numéro d’étape.
• L’afcheur indique les modications du temps de cuisson et du niveau de puissance
pour l’étape suivante.
7. Entrez un temps de cuisson et un niveau de puissance, comme pour les étapes 4 et 5 (sur
certains modèles).
• Si vous voulez entrer un autre temps de cuisson pour cette touche, appuyez encore une fois
sur TIME ENTRY .
• Vous pouvez programmer jusqu’à quatre étapes différentes (sur certains modèles).
8. Appuyez sur la touche START pour programmer d’autres modications de la touche.
REMARQUE : Pour supprimer les modications, appuyez sur la touche STOP/RESET ou
fermez la porte du four.
Touche QTY X2
1. Ouvrez la porte du four et placez la nourriture dans le four. Fermez la porte.
2. Appuyez sur la touche QTY X2.
3. Appuyez sur la touche préprogrammée ou sur la séquence de touche voulue.
4. Le four commence la cuisson. Le temps de cuisson afché est le total du temps de
cuisson d’origine auquel est ajouté le temps X2.
Guide de démarrage rapide
Alors…comment utiliser l’appareil ? (Commande
électronique)
Touches
préprogrammées
Pour cuire des aliments en
utilisant
des séquences de cuisson
préprogrammées :
1. Ouvrez la porte du four et placez la
nourriture dans le four. Fermez la
porte.
2. Appuyez sur la touche voulue.
3. Le four commence la cuisson.
4. À la n du cycle de cuisson, le four
Programmation
QTY X2
Pour modier le facteur de
cuisson :
1. Ouvrez la porte du four.
2. Maintenez enfoncée la touche 1
pendant environ cinq (5) secondes.
3. Appuyez sur la touche à
reprogrammer.
4. Appuyez sur la touche QTY 2X.
5. Appuyez sur une touche numérique
pour modier le facteur de cuisson.
• Le facteur de cuisson peut être
réglé de 10 % à 100 %.
• La valeur par défaut est de 80 %.
• La touche 5 fait passer le facteur
de cuisson à 50 %.
6. Appuyez sur la touche START
pour sauvegarder les modications.
L’opération de commutation de ce four à micro-ondes peut produire des variations de tension au niveau de la ligne d’alimentation. L’utilisation
de ce four dans des conditions d’alimentation de tension défavorables peut entraîner des effets indésirables. Cet appareil est conçu pour être
branché à un système d’alimentation électrique d’impédance minimale Zmax de 0,2 ohm au point d’interface de l’alimentation de l’utilisateur.
L’utilisateur doit s’assurer que cet appareil est branché à un système de source d’alimentation conforme aux exigences indiquées ci-dessus. Le
cas échéant, l’utilisateur peut s’informer auprès du fournisseur public d’électricité pour connaître l’impédance du système au point d’interface.
Dégagement du four par rapport
au mur
A—Pour les modèles d’Amérique du Nord (UL/CSA),
laissez au moins 5,1 cm (2 po) de dégagement sur
le dessus du four. Pour les modèles internationaux de
50 Hz, laissez au moins 30 cm (12 po) sur le dessus
du four. Une circulation d’air adéquate autour du four
permet de refroidir les composants électriques. Si
la circulation d’air est restreinte, le four pourrait mal
fonctionner et réduire ainsi la durée de vie utile des
composants électriques.
B—Laissez au moins 5,1 cm (2 po) entre le mur arrière et
l’évacuation d’air à l’arrière du four.
C—Laissez un dégagement d’au moins 5,1 cm (2 po) sur
les côtés du four.
C
A
B
Accelerated Cooking Products
Touches numériques Acheur Options (Les réglages usine sont en gras)
1
Bip de n de cycle
OP:10
OP:11
OP:12
Bip de trois (3) secondes.
Bip continu jusqu'à ce que la porte soit ouverte.
Cinq (5) bips soudains jusqu'à ce que la porte soit ouverte.
2
Volume du haut-parleur
OP:20
OP:21
OP:22
OP:23
Élimine le bip.
Règle le volume à bas.
Règle le volume à moyen.
Règle le volume à élevé.
3
Touche de bip
OP:30
OP:31
Coupe le bip lorsque la touche est enfoncée.
Active le bip lorsque la touche est enfoncée.
4
Fenêtre d'activation du clavier
OP:40
OP:41
OP:42
OP:43
15 secondes après l'ouverture de la porte du four, le clavier est désactivé.
30 secondes après l'ouverture de la porte du four, le clavier est désactivé.
1 minute après l'ouverture de la porte du four, le clavier est désactivé.
2 minutes après l'ouverture de la porte du four, le clavier est désactivé.
5
Ajout de temps pendant
la cuisson
OP:50
OP:51
Empêche l'ajout de temps de cuisson pendant la cuisson.
Permet la modication du temps de cuisson pendant la cuisson
lorsque qu'une touche de mémoire est enfoncée.
6
Réinitialisation par
ouverture de porte
OP:60
OP:61
Permet au four de reprendre le compte à rebours du temps de
cuisson après l'ouverture de la porte pendant le cycle.
Annule le compte à rebours du temps de cuisson après l'ouverture de
la porte pendant le cycle.
7
(sur certains modèles)
Temps de cuisson maximum
OP:70
OP:71
Permet 60 minutes de temps de cuisson (sur certains modèles).
Permet 10 minutes de temps de cuisson.
8
Utilisation manuelle
OP:80
OP:81
Permet seulement l'utilisation des touches préprogrammées.
Permet l'utilisation de l'entrée manuelle du temps et des touches
préprogrammées.
9
(sur certains modèles)
Utilisation à deux chires
OP:90
OP:91
Permet 10 (0 à 9) touches préprogrammées.
Permet 100 (00 à 99) touches préprogrammées.
0
Message de nettoyage du ltre
OP:00
OP:01
OP:02
OP:03
N'ache aucun message.
Ache un message pendant 24 heures à tous les 7 jours.
Ache un message pendant 24 heures à tous les 30 jours.
Ache un message pendant 24 heures à tous les 90 jours.
2012 ACP, Inc.
Cedar Rapids, Iowa 52404
N° de pièce 20120202
Révisé 07/12 Pour obtenir la documentation complète sur le produit visitez :
www.acpsolutions.com
Guide de démarrage rapide
Consultez le Manuel sur la sécurité des produits pour les énoncés de sécurité
L’intégralité du manuel est disponible en ligne
Puis-je modier une option ?
Vous pouvez modier les options de programmation à une ou deux touches,
le volume du bip sonore et le temps maximum de cuisson, pour les adapter
à vos préférences personnelles.
Pour modier ces options :
1. Ouvrez la porte du four.
• Si la porte est fermée ou que vous avez appuyé sur la touche STOP/RESET
avant de terminer la programmation, les modications sont annulées et le four micro-
ondes quitte le mode de programmation.
2. Maintenez enfoncée la touche 2 pendant environ cinq (5) secondes.
• Ceci lance le mode des options.
• Le four micro-ondes émet un bip sonore et 0P: est afché.
3. Appuyez sur la touche numérique qui commande les options à modier.
• Voir le tableau ci-dessous pour connaître les options.
• L’option en cours est afchée.
4. Appuyez encore une fois sur une touche numérique pour modier l’option.
• Chaque nouvelle pression sur la touche de temps modie l’option.
• Faites correspondre le code afché avec le code de l’option désirée.
5. Appuyez sur la touche START pour sauvegarder les modications.
• Pour modier des options supplémentaires, répétez les étapes 3 à 4.
• Les modications apparaissent lorsque la porte est refermée ou que la touche
STOP/RESET est enfoncée.
Pas de plats en métal
NE PAS nettoyer avec un
pulvérisateur à moteur

Sicherheitshinweise dem Produktsicherheits-Handbuch entnehmen
Die komplette Bedienungsanleitung ist online verfügbar.
Manueller Betrieb
So kochen Sie mit einer eingegebenen Einschaltdauer und Leistungsstufe:
1. Die Gerätetür öffnen und das Essen in den Herd stellen. Die Tür schließen.
2. Die Taste TIME ENTRY (Zeiteinstellung) drücken und die Einschaltdauer eingeben.
3. Zum Ändern der Leistungsstufe eine der Stufentasten drücken (bestimmte Modelle).
• AufdemDisplayerscheintCOOK LEVEL (Leistungsstufe) und die entsprechende
Einstellung.
4. WenneinmehrstugesVerfahrenerforderlichist,dieTasteTIMEENTRY drücken und
Schritte 2 bis 4 wiederholen (bestimmte Modelle).
5. DieTasteSTART drücken.
6. NachAblaufdesCountdownsertönteinSignalunddasGerätwirdabgeschaltet.
Programmieroptionen
1. Die Gerätetür öffnen.
2. Die Zifferntaste 1 ca. 5 Sekunden lang drücken.
3. Die neu zu programmierende Taste drücken.
4. Die Einschaltdauer mit Hilfe der Zifferntasten eingeben.
5. Zum Ändern der Leistungsstufe eine der Stufentasten drücken.
6. WenneinmehrstugesVerfahrenerforderlichist,dieTasteTIMEENTRY drücken.
• AufdemDisplayerscheintkurzdieStufe.
• AnschließendwirddieEinschaltdauerundLeistungdernächstenStufeangezeigt.
7. Einschaltdauer und Leistungsstufe entsprechend der Beschreibung in Schritten 4 und 5
oben eingeben (bestimmte Modelle).
• ZumEingebeneineranderenLeistungsstufefürdieseTastedieTasteTIMEENTRY
erneut drücken.
• ProTastekönnenbiszuvierStufenprogrammiertwerden(bestimmteModelle).
8. DieTasteSTART drücken,umdieneuprogrammiertenEinstellungenderTastezu
speichern.
HINWEIS: ZumVerwerfenderÄnderungendieTasteSTOP/RESET drücken oder die
Gerätetür schließen.
QTY X2 Taste
1. Die Gerätetür öffnen und das Essen in den Herd stellen. Die Tür schließen.
2. Die Taste QTY X2 drücken.
3. Die gewünschte vorprogrammierte Taste oder Tastensequenz drücken.
4. Das Gerät wird eingeschaltet. Die angezeigte Einschaltdauer umfasst die gesamte
originale Kochzeit zzgl. der X2 Zeit.
Kurzanleitung
Verwendung des Geräts
(Elektronische Steuerung)
Vorprogrammierte
Tasten
So wärmen Sie Essen
mit vorprogrammierten
Einstellungen auf:
1. Die Gerätetür öffnen und das Essen
in den Herd stellen. Die
Tür schließen.
2. Die gewünschte Taste drücken.
3. Das Gerät wird eingeschaltet.
4. NachAblaufdesCountdowns
ertönt ein Signal und das Gerät
QTY X2
Programmierung
So ändern Sie den
Leistungsfaktor:
1. Die Gerätetür öffnen.
2. Die Zifferntaste 1 ca. 5 Sekunden
lang drücken.
3. Die neu zu programmierende Taste
drücken.
4. Die Taste QTY X2 drücken.
5. EineZifferntastedrücken,umden
Leistungsfaktor zu ändern.
• DerLeistungsfaktorkann
zwischen 10 % und 100 %
eingestellt werden.
• DieStandardeinstellungist
80 %.
• BeiAuswahlderZifferntaste5
wird der Leistungsfaktor z. B. auf
50 % eingestellt.
6. DieTasteSTART drücken,um
die Einstellung zu speichern.
DerSchaltvorgangdiesesMikrowellengerätskannaufderSpeiseleitungSpannungsschwankungenverursachen.UnerwünschteVersorgungsspannungs-
bedingungenkönnendenBetriebdiesesGerätsbeeinträchtigen.DiesesGerätistfürdenAnschlussaneinStromversorgungssystemmiteinermaximalzulässigen
Systemimpedanz(Zmax)von0,2 OhmamAnschlusspunktderStromversorgungdesAnwendersvorgesehen.DerAnwendermusssicherstellen,dassdiesesGerät
nuraneinStromversorgungssystemangeschlossenwird,dasdieseAnforderungerfüllt.HierfürmussderAnwenderggf.dasörtlicheStromversorgungsun-
ternehmenbzgl.derSystemimpedanzamAnschlusspunktkonsultieren.
Einbauabstände zur Wand
A—BeiModellenfürdennordamerikanischenMarkt(UL/
CSA)anderOberseitedesGerätsmindestens5,1cm
(2”)Abstandeinhalten.BeiinternationalenModellen(50
Hz)anderOberseitedesGerätsmindestens
30cm(12”)Abstandeinhalten,umausreichende
Luftzirkulation um das Gerät zur Kühlung der
elektrischenBauteilezugewährleisten.Andernfalls
kann die Funktion des Geräts bzw. die Lebensdauer
der elektrischen Bauteile beeinträchtigt werden.
B—AnderRückseitedesGerätsmindestens5,1cm(2”)
AbstandzwischendemLuftaustrittundderRückwand
einhalten.
C—AndenSeitendesGerätsmindestens5,1cm(2”)
Abstandeinhalten.
C
A
B
Accelerated Cooking Products
2012 ACP,Inc.
CedarRapids,Iowa52404
Best.-Nr.20120202
Überarbeitet07/12
KompletteProduktdokumentationunter:
www.acpsolutions.com
Kurzanleitung
Sicherheitshinweise dem Produktsicherheits-Handbuch entnehmen
Die komplette Bedienungsanleitung ist online verfügbar.
Optionen ändern
Optionenwieein-oderzweistelligeTastenprogrammierung,Signalton-
LautstärkeundmaximaleEinschaltdauerkönnenindividuelleingestellt
werden.
SoändernSieOptionen:
1. Die Gerätetür öffnen.
• WennvorAbschlussderProgrammierungdieTürgeschlossenoderdieTaste
STOP/RESET gedrücktwird,werdendieÄnderungenverworfenundder
Programmiermoduswirdverlassen.
2. Die Zifferntaste 2 ca. 5 Sekunden lang drücken.
• DadurchwirdderOptionsmodusaufgerufen.
• EinakustischesSignalertöntundaufdemDisplayerscheint„0P:”.
3. DieZifferntastederzuänderndenOptiondrücken.
• DieeinzelnenOptionensindinderfolgendenTabelleaufgeführt.
• DieaktuelleOptionwirdangezeigt.
4. DieZifferntasteerneutdrücken,umdieOptionzuändern.
• DieEinstellungderOptionwirdmitjedemTastendruckgeändert.
• FürjedegewünschteOptionwirdeinentsprechenderCodeangezeigt.
5. DieTasteSTART drücken,umdieEinstellungzuspeichern.
• ZumÄndernweitererOptionendieSchritte3und4wiederholen.
• DiegeändertenEinstellungenerscheinen,nachdemdieTürgeschlossenoder
dieTasteSTOP/RESET gedrückt wurde.
Keine Metallbehälter
verwenden
KEINEN Hochdruckreiniger
verwenden
Zierntasten Display-Anzeige Optionen (werkseitige Einstellungen sind fett gedruckt)
1
Ton am Zyklusende
OP:10
OP:11
OP:12
3-Sekunden-Ton.
Dauerton bis zum Önen der Tür.
5-Ton-Zyklen bis zum Önen der Tür.
2
Lautsprecherlautstärke
OP:20
OP:21
OP:22
OP:23
Signalton deaktivieren.
Niedrige Lautstärke einstellen.
Mittlere Lautstärke einstellen.
Hohe Lautstärke einstellen.
3
Tastenton
OP:30
OP:31
Tastendruck-Signalton deaktivieren.
Tastendruck-Signalton aktivieren.
4
Tastenfeld
aktivieren/deaktivieren
OP:40
OP:41
OP:42
OP:43
Tastenfeld 15 Sekunden nach Önen der Gerätetür deaktivieren.
Tastenfeld 30 Sekunden nach Önen der Gerätetür deaktivieren.
Tastenfeld 1 Minute nach Önen der Gerätetür deaktivieren.
Tastenfeld 2 Minuten nach Önen der Gerätetür deaktivieren.
5
Zeit beim Aufwärmen
hinzufügen
OP:50
OP:51
Hinzufügen von Aufwärmzeit während des Aufwärmzyklus deaktivieren.
Ändern der Aufwärmzeit während des Aufwärmzyklus durch
Drücken einer Speichertaste ermöglichen.
6
Reset bei Türönung
OP:60
OP:61
Wiederaufnehmen des Aufwärmzeit-Countdowns nach Önen der
Tür während des Aufwärmzyklus ermöglichen.
Aufwärmzeit-Countdown nach Önen der Tür während des
Aufwärmzyklus abbrechen.
7
(bestimmte Modelle)
Maximale
Einschaltdauer
OP:70
OP:71
Aufwärmzeit von 60 Minuten ermöglichen (bestimmte Modelle).
Aufwärmzeit auf maximal 10 Minuten begrenzen.
8
Manueller Betrieb
OP:80
OP:81
Ausschließliche Verwendung der vorprogrammierten Tasten.
Verwendung manueller Zeiteingabetasten und vorprogrammierter Tasten.
9
(bestimmte Modelle)
Zweistellige Ziern
OP:90
OP:91
10 vorprogrammierte Tasten (0-9).
100 vorprogrammierte Tasten (00-99).
0
Filterreinigungs-
Meldung
OP:00
OP:01
OP:02
OP:03
Meldung nicht anzeigen.
Meldung alle 7 Tage für 24 Stunden anzeigen.
Meldung alle 30 Tage für 24 Stunden anzeigen.
Meldung alle 90 Tage für 24 Stunden anzeigen.

Commercial Microwave Oven
Keep these instructions for future reference.
If the oven changes ownership, this manual
must accompany oven.
Owner’s Manual
Contents
!"#$%&"#'()*+,()!' ........................... 2
PRECAUTIONS TO AVOID POSSIBLE
EXPOSURE TO EXCESSIVE
MICROWAVE ENERGY ...................3
IMPORTANT SAFETY INSTRUCTIONS ... 3
-,.(/)'0%&'1(.2+()!'1 ......................... 5
&'1(,$$,()!' ......................................... 5
3)14$,5%,'"%6#,(2.#1 ........................ 6
71)'0%(/#%89#'%:!'(.!$%
;-$#+(.!')+% !"#$1< ........................ 8
=.!0.,>>)'0%(/#%89#'%:!'(.!$%
;-$#+(.!')+% !"#$1< ........................ 9
71#.%84()!'1%
;-$#+(.!')+% !"#$1< ...................... 10
3)0)(,$%3),$%84#.,()!' .......................11
3),$%84#.,()!' ................................. 12
:,.#%,'"%:$#,')'0 .......................... 13
?#@!.#%:,$$)'0%@!.%A#.9)+# ............... 14

2
B,..,'(5%1#.9)+#%>21(%C#%4#.@!.>#"%C5%,'%,2(/!.)D#"%
E:=%1#.9)+#.F%E:=%,$1!%.#+!>>#'"1%+!'(,+()'0%,'%
,2(/!.)D#"%E:=%1#.9)+#.%)@%1#.9)+#%)1%.#G2).#"%,@(#.%
H,..,'(5%#I4).#1F
!"#$%&"#'()*+,()!'
B/#'%+!'(,+()'0%E:=J%4.!9)"#%4.!"2+(%)'@!.>,()!'F%=.!"2+(%)'@!.>,()!'%)1%$!+,(#"%!'%!9#'%1#.),$%4$,(#%H/)+/%)1%
$!+,(#"%!'%(/#%C,+K%1)"#%!@%(/#%!9#'F%L#+!."%(/#%
@!$$!H)'0%)'@!.>,()!'M
!"#$%N2>C#.M _____________________________
,'2@,+(2.)'0%N2>C#.M _______________________
A#.),$%!.%AON%N2>C#.M ________________________
3,(#%!@%42.+/,1#M ___________________________
3#,$#.P1%',>#%,'"%,"".#11M ___________________
__________________________________________
__________________________________________
__________________________________________
E'5%G2#1()!'1%!.%(!%$!+,(#%,'%,2(/!.)D#"%E:=%1#.9)+#.J%
+,$$%(!$$%@.##%QRSTTRUVTRVTVQ%)'1)"#%(/#%7FAFE%!.%:,',",J%
!.%QRWQXRWTSRSQVY%!2(1)"#%(/#%7FAFE%!.%:,',",F%

3
SAVE THESE INSTRUCTIONS
PRECAUTIONS TO AVOID POSSIBLE
EXPOSURE TO EXCESSIVE MICROWAVE
ENERGY
A. DO NOT%,((#>4(%(!%!4#.,(#%(/)1%!9#'%H)(/%(/#%"!!.%!4#'%1)'+#%!4#'%"!!.%!4#.,()!'%+,'%.#12$(%)'%/,.>@2$%
#I4!12.#%(!%>)+.!H,9#%#'#.05F%&(%)1%)>4!.(,'(%'!(%(!%"#@#,(%!.%(,>4#.%H)(/%(/#%1,@#(5%)'(#.$!+K1F
B. DO NOT%4$,+#%,'5%!CZ#+(%C#(H##'%(/#%!9#'%@.!'(%@,+#%,'"%(/#%"!!.%!.%,$$!H%1!)$%!.%+$#,'#.%.#1)"2#%(!%
,++2>2$,(#%!'%1#,$)'0%12.@,+#1F
:F% DO NOT%!4#.,(#%(/#%!9#'%)@%)(%)1%",>,0#"F%&(%)1%4,.()+2$,.$5%)>4!.(,'(%(/,(%(/#%!9#'%"!!.%+$!1#%4.!4#.$5%,'"%
(/,(%(/#.#%)1%'!%",>,0#%(!%(/#M
QF% "!!.%;C#'(<
VF% /)'0#1%,'"%$,(+/#1%;C.!K#'%!.%$!!1#'#"<
QF%%%L-E3%,$$%)'1(.2+()!'1%C#@!.#%21)'0%#G2)4>#'(F
VF%%%L-E3%EN3%68[[8B%(/#%14#+)*+%
\=L-:E7]&8NA%]8%E^8&3%=8AA&?[-%
-_=8A7L-%]8%-_:-AA&^-% &:L8BE^-%
-N-L`ab%!'%(/)1%4,0#F
WF%%%]/)1%#G2)4>#'(% 7A]%?-%-EL]c-3F%:!''#+(%
!'$5%(!%4.!4#.$5%-EL]c-3%!2($#(F%A##%
\-EL]c&N`%&NA]L7:]&8NAb%!'%4,0#%%dF
UF% &'1(,$$%!.%$!+,(#%(/)1%#G2)4>#'(%8N[a%)'%
,++!.",'+#%H)(/%(/#%)'1(,$$,()!'%)'1(.2+()!'1%)'%
(/)1%>,'2,$F
dF% A!>#%4.!"2+(1%12+/%,1%H/!$#%#001%,'"%1#,$#"%%
+!'(,)'#.1e@!.%#I,>4$#J%+$!1#"%0$,11%Z,.1e,.#%
,C$#%(!%#I4$!"#%,'"%Ac87[3%N8]%C#%c-E]-3%
)'%(/)1%!9#'F
TF% 71#%(/)1%#G2)4>#'(%8N[a%@!.%)(1%)'(#'"#"%21#%,1%
"#1+.)C#"%)'%(/)1%>,'2,$F%3!%'!(%21#%+!..!1)9#%
+/#>)+,$1%!.%9,4!.1%)'%(/)1%#G2)4>#'(F%]/)1%(54#%
!@%!9#'%)1%14#+)*+,$$5%"#1)0'#"%(!%/#,(J%+!!KJ%
!.%".5%@!!"F%&(%)1%'!(%"#1)0'#"%@!.%)'"21(.),$%!.%
$,C!.,(!.5%21#F
fF%% E1%H)(/%,'5%#G2)4>#'(J%:[8A-%A7=-L^&A&8N%
)1%'#+#11,.5%H/#'%21#"%C5%:c&[3L-NF
SF% A##%"!!.%+$#,')'0%)'1(.2+()!'1%!'%4,0#%QW%!@%
(/)1%4.!"2+(%1,@#(5%>,'2,$F
XF% 38%N8]%/#,(%C,C5%C!(($#1%)'%!9#'F
QYF% ?,C5%@!!"%Z,.1%1/,$$%C#%!4#'%H/#'%/#,(#"%,'"%
+!'(#'(1%1()..#"%!.%1/,K#'%C#@!.#%+!'12>4()!'J%)'%
!."#.%(!%,9!)"%C2.'1F
QQF% 38%N8]%!4#.,(#%(/)1%#G2)4>#'(%)@%)(%/,1%,%
",>,0#"%+!."%!.%4$20J%)@%)(%)1%'!(%H!.K)'0%4.!4#.$5J%
!.%)@%)(%/,1%C##'%",>,0#"%!.%".!44#"F
QVF% ]/)1%#G2)4>#'(J%)'+$2")'0%4!H#.%+!."J%>21(%C#%
1#.9)+#"%8N[a%C5%G2,$)*#"%1#.9)+#%4#.1!''#$F%
A4#+),$%(!!$1%,.#%.#G2).#"%(!%1#.9)+#%#G2)4>#'(F%
:!'(,+(%'#,.#1(%,2(/!.)D#"%1#.9)+#%@,+)$)(5%@!.%
#I,>)',()!'J%.#4,).J%!.%,"Z21(>#'(F
QWF% 38%N8]%+!9#.%!.%C$!+K%*$(#.%!.%!(/#.%!4#')'01%!'%
#G2)4>#'(F
QUF% 38%N8]%1(!.#%(/)1%#G2)4>#'(%!2("!!.1F%38%N8]%
21#%(/)1%4.!"2+(%'#,.%H,(#.%g%@!.%#I,>4$#J%'#,.%,%
K)(+/#'%1)'KJ%)'%,%H#(%C,1#>#'(J%,%1H)>>)'0%4!!$J%
!.%,%1)>)$,.%$!+,()!'F
QdF% 38%N8]%)>>#.1#%+!."%!.%4$20%)'%H,(#.F
QTF% h##4%+!."%EBEa%@.!>%c-E]-3%12.@,+#1F
QfF% 38%N8]%$#(%+!."%/,'0%!9#.%#"0#%!@%(,C$#%!.%
+!2'(#.F
QSF% 6!.%+!>>#.+),$%21#%!'$5F
!
WARNING
B/#'%21)'0%#$#+(.)+,$%#G2)4>#'(J%C,1)+%1,@#(5%4.#+,2()!'1%1/!2$"%C#%@!$$!H#"%(!%.#"2+#%(/#%.)1K%!@%C2.'1J%
#$#+(.)+,$%1/!+KJ%*.#J%!.%)'Z2.5%(!%4#.1!'1F%%
IMPORTANT SAFETY INSTRUCTIONS
Recognize this symbol as a SAFETY message

4
SAVE THESE INSTRUCTIONS
,F% 38%N8]%!9#.+!!K%@!!"F%:,.#@2$$5%,((#'"%!9#'%
H/#'%4,4#.J%4$,1()+J%!.%!(/#.%+!>C21()C$#%
>,(#.),$1%,.#%4$,+#"%)'1)"#%(/#%!9#'%(!%@,+)$)(,(#%
+!!K)'0F
CF% L#>!9#%H).#%(H)1(R()#1%@.!>%4,4#.%!.%4$,1()+%
C,01%C#@!.#%4$,+)'0%C,0%)'%!9#'F
+F I@%>,(#.),$1%)'1)"#%(/#%!9#'%)0')(#J%K##4%!9#'%
"!!.%:[8A-3J%(2.'%!9#'%!@@%,'"%")1+!''#+(%
(/#%4!H#.%+!."J%!.%1/2(%!@@%4!H#.%,(%(/#%@21#%!.%
+).+2)(%C.#,K#.%4,'#$F
"F% 38%N8]%21#%(/#%+,9)(5%@!.%1(!.,0#F%38%N8]%
$#,9#%4,4#.%4.!"2+(1J%+!!K)'0%2(#'1)$1J%!.%@!!"%
)'%(/#%+,9)(5%H/#'%'!(%)'%21#F
WARNING
]!%,9!)"%.)1K%!@%*.#%)'%(/#%!9#'%+,9)(5M
WARNING
[)G2)"1%12+/%,1%H,(#.J%+!@@##J%!.%(#,%,.#%,C$#%(!%
C#%!9#./#,(#"%C#5!'"%(/#%C!)$)'0%4!)'(%H)(/!2(%
,44#,.)'0%(!%C#%C!)$)'0%"2#%(!%12.@,+#%(#'1)!'%!@%(/#%
$)G2)"F%^)1)C$#%C2CC$)'0%!.%C!)$)'0%H/#'%(/#%+!'(,)'#.%
)1%.#>!9#"%@.!>%(/#%>)+.!H,9#%!9#'%)1%'!(%,$H,51%
4.#1#'(F%]c&A%:87[3%L-A7[]%&N%^-La%c8]%
[&i7&3A%A733-N[a%?8&[&N`%8^-L%Bc-N%E%
A=88N%8L%8]c-L%7]-NA&[%&A%&NA-L]-3%&N]8%
]c-%[&i7&3F%]!%.#"2+#%(/#%.)1K%!@%)'Z2.5%(!%4#.1!'1M
)<%% 3!%'!(%!9#./#,(%(/#%$)G2)"F
))<%% A().%(/#%$)G2)"%C!(/%C#@!.#%,'"%/,$@H,5%(/.!20/%
/#,()'0%)(F
)))<%% 3!%'!(%21#%1(.,)0/(R1)"#"%+!'(,)'#.1%H)(/%',..!H%
'#+K1F
)9<%% E@(#.%/#,()'0J%,$$!H%(/#%+!'(,)'#.%(!%1(,'"%)'%(/#%
>)+.!H,9#%!9#'%@!.%,%1/!.(%()>#%C#@!.#%.#>!9)'0%
(/#%+!'(,)'#.F
9<%% 71#%#I(.#>#%+,.#%H/#'%)'1#.()'0%,%14!!'%!.%
!(/#.%2(#'1)$%)'(!%(/#%+!'(,)'#.F
QF% 3!%'!(%"##4%@,(%@.5%)'%!9#'F%6,(%+!2$"%!9#./#,(%
,'"%C#%/,D,."!21%(!%/,'"$#F
VF% 3!%'!(%+!!K%!.%.#/#,(%#001%)'%1/#$$%!.%H)(/%
,'%2'C.!K#'%5!$K%21)'0%>)+.!H,9#%#'#.05F%
=.#112.#%>,5%C2)$"%24%,'"%#.24(F%=)#.+#%5!$K%
H)(/%@!.K%!.%K')@#%C#@!.#%+!!K)'0F
WF% =)#.+#%1K)'%!@%4!(,(!#1J%(!>,(!#1J%,'"%1)>)$,.%
@!!"1%C#@!.#%+!!K)'0%H)(/%>)+.!H,9#%#'#.05F%
B/#'%1K)'%)1%4)#.+#"J%1(#,>%#1+,4#1%#9#'$5F%
UF% 3!%'!(%!4#.,(#%#G2)4>#'(%H)(/!2(%$!,"%!.%@!!"%
)'%!9#'%+,9)(5F%
5. 71#%!'$5%4!4+!.'%)'%4,+K,0#1%"#1)0'#"%,'"%
$,C#$#"%@!.%>)+.!H,9#%21#F%Popping time
varies depending on oven wattage. Do not
+!'()'2#%(!%/#,(%,@(#.%4!44)'0%/,1%1(!44#"F%
=!4+!.'%H)$$%1+!.+/%!.%C2.'F%3!%'!(%$#,9#%!9#'%
2',((#'"#"F
TF% 3!%'!(%21#%.#02$,.%+!!K)'0%(/#.>!>#(#.1%)'%
!9#'F% !1(%+!!K)'0%(/#.>!>#(#.1%+!'(,)'%
>#.+2.5%,'"%>,5%+,21#%,'%#$#+(.)+,$%,.+J%
>,$@2'+()!'J%!.%",>,0#%(!%!9#'F
fF% 3!%'!(%21#%>#(,$%2(#'1)$1%)'%!9#'F
SF% N#9#.%21#%4,4#.J%4$,1()+J%!.%!(/#.%+!>C21()C$#%
>,(#.),$1%(/,(%,.#%'!(%)'(#'"#"%@!.%+!!K)'0F%
XF% B/#'%+!!K)'0%H)(/%4,4#.J%4$,1()+J%!.%!(/#.%
+!>C21()C$#%>,(#.),$1J%@!$$!H%>,'2@,+(2.#.P1%
.#+!>>#'",()!'1%!'%4.!"2+(%21#F
QYF%%3!%'!(%21#%4,4#.%(!H#$1%H/)+/%+!'(,)'%'5$!'%!.%
!(/#.%15'(/#()+%*C#.1F%c#,(#"%15'(/#()+1%+!2$"%
>#$(%,'"%+,21#%4,4#.%(!%)0')(#F
QQF%%3!%'!(%/#,(%1#,$#"%+!'(,)'#.1%!.%4$,1()+%C,01%)'%
!9#'F%6!!"%!.%$)G2)"%+!2$"%#I4,'"%G2)+K$5%,'"%
+,21#%+!'(,)'#.%!.%C,0%(!%C.#,KF%=)#.+#%!.%!4#'%
+!'(,)'#.%!.%C,0%C#@!.#%/#,()'0F%
QVF% ]!%,9!)"%4,+#>,K#.%>,$@2'+()!'J%+!'12$(%
4/51)+),'%!.%4,+#>,K#.%>,'2@,+(2.#.%,C!2(%
#@@#+(1%!@%>)+.!H,9#%#'#.05%!'%4,+#>,K#.F%
QWF% E'%,2(/!.)D#"%1#.9)+#.% 7A]%)'14#+(%#G2)4>#'(%
,''2,$$5F%L#+!."%,$$%)'14#+()!'1%,'"%.#4,).1%@!.%
@2(2.#%21#F
QUF%:$#,'%!9#'%.#02$,.$5%,'"%.#>!9#%,'5%@!!"%
"#4!1)(1F
QdF%]!%,9!)"%12.@,+#%"#(#.)!.,()!'J%K##4%(/#%!9#'%
)'%,%+$#,'%+!'")()!'F%&'@.#G2#'(%+$#,')'0%+!2$"%
,"9#.1#$5%,@@#+(%(/#%$)@#%!@%(/#%,44$),'+#%,'"%
4!11)C$5%.#12$(%)'%,%/,D,"!21%1)(2,()!'F
CAUTION
!
]!%,9!)"%4#.1!',$%)'Z2.5%!.%4.!4#.(5%",>,0#J%!C1#.9#%(/#%@!$$!H)'0M
IMPORTANT SAFETY INSTRUCTIONS

5
Installation
Unpacking Oven
j% &'14#+(%!9#'%@!.%",>,0#%12+/%,1%"#'(1%)'%"!!.%!.%)'1)"#%!9#'%+,9)(5F%
j% L#4!.(%,'5%"#'(1%!.%C.#,K,0#%(!%1!2.+#%!@%42.+/,1#%)>>#"),(#$5F%
Do not attempt to use oven if damaged.
j% L#>!9#%,$$%>,(#.),$1%@.!>%!9#'%)'(#.)!.F
j% &@%!9#'%/,1%C##'%1(!.#"%)'%#I(.#>#$5%+!$"%,.#,J%H,)(%,%@#H%/!2.1%C#@!.#%
+!''#+()'0%4!H#.F%
Radio Interference
)+.!H,9#%!4#.,()!'%>,5%+,21#%)'(#.@#.#'+#%(!%.,")!J%(#$#9)1)!'J%!.%,%1)>)$,.%
!9#'F%L#"2+#%!.%#$)>)',(#%)'(#.@#.#'+#%C5%"!)'0%(/#%@!$$!H)'0M
j% :$#,'%"!!.%,'"%1#,$)'0%12.@,+#1%!@%!9#'%,++!.")'0%(!%)'1(.2+()!'1%)'%
Care and Cleaning%1#+()!'F
j% =$,+#%.,")!J%(#$#9)1)!'J%#(+F%,1%@,.%,1%4!11)C$#%@.!>%!9#'F
j% 71#%,%4.!4#.$5%)'1(,$$#"%,'(#'',%!'%.,")!J%(#$#9)1)!'J%#(+F%(!%!C(,)'%
1(.!'0#.%1)0',$%.#+#4()!'F
Oven Placement
j% 3!%'!(%)'1(,$$%!9#'%'#I(%(!%!.%,C!9#%1!2.+#%!@%/#,(J%12+/%,1%4)DD,%
!9#'%!.%"##4%@,(%@.5#.F%]/)1%+!2$"%+,21#%>)+.!H,9#%!9#'%(!%!4#.,(#%
)>4.!4#.$5%,'"%+!2$"%1/!.(#'%$)@#%!@%#$#+(.)+,$%4,.(1F%
j% 3!%'!(%C$!+K%!.%!C1(.2+(%!9#'%*$(#.F%E$$!H%,++#11%@!.%+$#,')'0F%%
j% &'1(,$$%!9#'%!'%$#9#$%+!2'(#.(!4%12.@,+#F
j% =$,+#%H,.')'0%$,C#$%)'%,%+!'14)+2!21%4$,+#%+$!1#%(!%>)+.!H,9#%!9#'F
j% 82($#(%1/!2$"%C#%$!+,(#"%1!%(/,(%4$20%)1%,++#11)C$#%H/#'%!9#'%)1%)'%4$,+#F
Ee6!.%N!.(/%E>#.)+,'%;7[O:AE<%>!"#$1J%,$$!H%,(%$#,1(%Vb%;dFQ%+><%!@%+$#,.,'+#%,.!2'"%
(!4%!@%!9#'F%6!.%&'(#.',()!',$%;dY%cD<%>!"#$1J%,$$!H%,(%$#,1(%QVb%;WY%+><%!@%+$#,.,'+#%
,.!2'"%(!4%!@%!9#'F%=.!4#.%,).%k!H%,.!2'"%!9#'%+!!$1%#$#+(.)+,$%+!>4!'#'(1F%
B)(/%.#1(.)+(#"%,).%k!HJ%!9#'%>,5%'!(%!4#.,(#%4.!4#.$5%,'"%$)@#%!@%#$#+(.)+,$%4,.(1%)1%
.#"2+#"F
?eE$$!H%,(%$#,1(%Vb%;dFQ%+><%C#(H##'%,).%")1+/,.0#%!'%C,+K%!@%!9#'%,'"%C,+K%H,$$F
:eE$$!H%,(%$#,1(%Vb%;dFQ%+><%!@%+$#,.,'+#%,.!2'"%1)"#1%!@%!9#'F%
Oven Clearances
WARNING
]!%,9!)"%.)1K%!@%#$#+(.)+,$%1/!+K%
!.%"#,(/J%(/)1%!9#'%>21(%C#%
#,.(/#"F
WARNING
]!%,9!)"%.)1K%!@%#$#+(.)+,$%1/!+K%
!.%"#,(/J%"!%'!(%,$(#.%(/#%4$20F%
Grounding/Earthing
Instructions
Oven MUST be grounded.
`.!2'")'0%.#"2+#1%.)1K%!@%#$#+(.)+%
1/!+K%C5%4.!9)")'0%,'%#1+,4#%H).#%
@!.%(/#%#$#+(.)+%+2..#'(J%)@%,'%#$#+(.)+,$%
1/!.(%!++2.1F%]/)1%!9#'%)1%#G2)44#"%
H)(/%,%+!."%/,9)'0%,%0.!2'"%H).#%
H)(/%,%0.!2'")'0%4$20F%]/#%4$20%
>21(%C#%4$200#"%)'(!%,'%!2($#(%(/,(%)1%
4.!4#.$5%)'1(,$$#"%,'"%0.!2'"#"F%
:!'12$(%,%G2,$)*#"%#$#+(.)+),'%!.%
1#.9)+#.%)@%0.!2'")'0%)'1(.2+()!'1%
,.#%'!(%+!>4$#(#$5%2'"#.1(!!"J%!.%)@%
"!2C(%#I)1(1%,1%(!%H/#(/#.%(/#%!9#'%
)1%4.!4#.$5%0.!2'"#"F
Do not use an extension cord.
&@%(/#%4.!"2+(%4!H#.%+!."%)1%(!!%
1/!.(J%/,9#%,%G2,$)*#"%#$#+(.)+),'%
)'1(,$$%,%(/.##R1$!(%.#+#4(,+$#F%
]/)1%!9#'%1/!2$"%C#%4$200#"%
)'(!%,%1#4,.,(#%+).+2)(%H)(/%(/#%
#$#+(.)+,$%.,()'0%,1%4.!9)"#"%)'%
4.!"2+(%14#+)*+,()!'1%;,9,)$,C$#%,(%
HHHF,+41!$2()!'1F+!><F%B/#'%,%
>)+.!H,9#%!9#'%)1%!'%,%+).+2)(%H)(/%
!(/#.%#G2)4>#'(J%,'%)'+.#,1#%)'%
+!!K)'0%()>#1%>,5%C#%.#G2).#"%,'"%
@21#1%+,'%C#%C$!H'F
External Equipotential
Earthing Terminal (export only)
-G2)4>#'(%/,1%1#+!'",.5%#,.(/)'0%
(#.>)',$F%]#.>)',$%4.!9)"#1%#I(#.',$%
#,.(/)'0%+!''#+()!'%21#"%)'%,"")()!'%
(!%#,.(/)'0%4.!'0%!'%4$20F%[!+,(#"%
!'%!2(1)"#%!@%!9#'%C,+KJ%(#.>)',$%)1%
>,.K#"%H)(/%15>C!$%1/!H'%C#$!HF
A
BC
Oven Stacking
j% % 89#'%1(,+K)'0%)1%,$$!H#"%21)'0%1(,+K)'0%C.,+K#(%$!+,(#"%!'%!9#'%%
% C,+K%4,'#$%(!4%/)'0#%1)"#%+!.'#.F
j% % 71)'0%1(,+K)'0%C.,+K#(1%!'%C,+K%4,'#$%!@%!9#'1%.#>!9#%1+.#H1%% %
%%% @.!>%1(,+K)'0%C.,+K#(1%,'"%.#,((,+/%(/#>%(!%C,+K%4,'#$%C#(H##'%%
% C!(/%!9#'1%1#+2.)'0%(/#>%(!0#(/#.%21)'0%C,+K%4,'#$%1+.#H1F

6
START Key
%%%%%%%%%%%%%%]/#%A]EL]%K#5%)1%21#"%(!%%%%%%
C#0)'%,%>,'2,$%()>#%#'(.5%+!!K)'0%
+5+$#F%&(%)1%,$1!%21#"%(!%1,9#%,'5%
+/,'0#1%(!%4.!0.,>>)'0%1#G2#'+#1%
!.%21#.%!4()!'1F
Display and Features (some models)
STOP/RESET Key
%%%%%%%%%%%%%%%%]/#%A]8=OL-A-]%
K#5%1(!41%,%+!!K)'0%1#G2#'+#%)'%
4.!0.#11J%+$#,.1%!2(%,'5%.#>,)')'0%
()>#J%,'"%,$1!%#'"1%,%4.!0.,>>)'0%
!.%21#.%!4()!'%+5+$#F%B/#'%(/#%
A]8=OL-A-]%K#5%)1%21#"%(!%#'"%,%
4.!0.,>>)'0%!.%!4()!'%+/,'0#J%(/#%
+/,'0#1%,.#%")1+,."#"F
Single Key Programming
(example of key 1 shown)
]/)1%@#,(2.#%#',C$#1%#,+/%'2>C#.#"%K#5%(!%C#%4.!0.,>>#"%@!.%,%14#+)*+%
+!!K)'0%4.!+#"2.#O21#F%]!%21#%(/)1%@#,(2.#J%1)>4$5%4.!0.,>%(/#%K#5%(!%(/#%
"#1).#"%$#'0(/%!@%()>#%,'"%4!H#.%$#9#$F%]!%21#%(/)1%@#,(2.#J%4.#11%(/#%K#5%
!'+#%,'"%(/#%>)+.!H,9#%H)$$%C#0)'%+!!K)'0F
Double Key Programming
(some models)
]/)1%@#,(2.#%#',C$#1%QYY%4.!0.,>>#"%#'(.)#1%(!%C#%>,"#F%-,+/%#'(.5%H)$$%
C#%,11)0'#"%,%"!2C$#%")0)(%'2>C#.J%@!.%#I,>4$#%Yf%,1%1/!H'F%B/#'%21)'0%
(/#%"!2C$#%K#5%4.!0.,>>)'0J%(H!%K#51%>21(%C#%4.#11#"%(!%1(,.(%(/#%+!!K)'0%
+5+$#F
Manual Time Entry
%%%%%%%%%%%%%%%&'%,"")()!'%(!%4.!0.,>>,C$#%K#51J%(/)1%>)+.!H,9#%,$1!%,++#4(1%
14#+)*+%()>#%#'(.5%C5%21)'0%(/#%]& -%-N]La%K#5F%71)'0%>,'2,$%()>#%#'(.5%
"!#1%'!(%,@@#+(%(/#%4.!0.,>>#"%C2((!'1F
QTY X2 Key
%%%%%%%%%%%%%%%%]/#%i]a%_V%K#5%)'+.#,1#1%,%4.#1#(%+!!K)'0%()>#%C5%,%4#.+#'(,0#%
!@%(/#%!.)0)',$%+!!K)'0%()>#%;+!!K)'0%@,+(!.<F%]/#%21#.%>,5%14#+)@5%(/#%
4#.+#'(,0#%,'"%)(%+,'%C#%+/,'0#"%@!.%)'")9)"2,$%+!!K)'0%1#G2#'+#1F%]/)1%
@#,(2.#%)1%9#.5%21#@2$%@!.%+!!K)'0%>2$()4$#%1#.9)'01%!@%@!!"1F%]/#%i]a%_V%K#5%
+,'%C#%21#"%H)(/%#)(/#.%1)'0$#%!.%"!2C$#%K#5%4.!0.,>>)'0F%]!%+/,'0#%(/#%
+!!K)'0%@,+(!.J%1##%Programming the Oven Control.
Stage Cooking
%A(,0#%+!!K)'0%)1%,%+!!K)'0%1#G2#'+#%H)(/%14#+)*+%4!H#.%1(,0#%
+/,'0#1F%]/#%21#.%+,'%4.!0.,>%24%(!%@!2.%")@@#.#'(%4!H#.%$#9#$%
+/,'0#1%,'"%(/#%14#+)*+%,>!2'(%!@%+!!K)'0%()>#%,(%#,+/%4!H#.%
$#9#$F%-,+/%4!H#.%$#9#$O+!!K)'0%()>#%+!>C)',()!'%)1%K'!H'%,1%,%1(,0#F%74%(!%
@!2.%1(,0#1%+,'%C#%4.!0.,>>#"F%
User Options
]/)1%>)+.!H,9#%+,'%C#%1#(%@!.%14#+)*+%21#.%4.#@#.#'+#1F%
84()!'1%12+/%,1%C##4%9!$2>#J%>,I)>2>%+!!K)'0%()>#J%,'"%
(/#%'2>C#.%!@%4.!0.,>>,C$#%K#51%+,'%C#%+/,'0#"F%]!%+/,'0#%
")@@#.#'(%!4()!'1J%1##%User Options%)'%(/)1%>,'2,$F
Hold
20% Power
Defrost
50% Power
70% Power
Time Entry
Stop
Start / Go
Multi Portions
10 Programmable
Keys
Braille Touch Keys
]/#%1H)(+/)'0%!4#.,()!'%!@%(/)1%>)+.!H,9#%!9#'%+,'%+,21#%9!$(,0#%k2+(2,()!'1%!'%(/#%1244$5%$)'#F%]/#%!4#.,()!'%!@%(/)1%!9#'%2'"#.%2'@,9!.,C$#%
9!$(,0#%1244$5%+!'")()!'1%+,'%/,9#%,"9#.1#%#@@#+(1F%]/)1%"#9)+#%)1%)'(#'"#"%@!.%(/#%+!''#+()!'%(!%,%4!H#.%1244$5%151(#>%H)(/%,%>,I)>2>%
4#.>)11)C$#%151(#>%)>4#",'+#%l>,I%!@%0.10 Ohms%,(%(/#%)'(#.@,+#%4!)'(%!@%(/#%21#.P1%1244$5F%]/#%21#.%/,1%(!%#'12.#%(/,(%(/)1%"#9)+#%)1%
+!''#+(#"%!'$5%(!%,%4!H#.%1244$5%151(#>%H/)+/%@2$*$$1%(/#%.#G2).#>#'(%,C!9#F%&@%'#+#11,.5J%(/#%21#.%+,'%,1K%(/#%42C$)+%4!H#.%1244$5%+!>4,'5%
@!.%(/#%151(#>%)>4#",'+#%,(%(/#%)'(#.@,+#%4!)'(F

7
Display and Features (some models)
Display
Some items in the display can be seen
but are not available depending on
model.
Ready
Ready displays when an oven control
will accept entries.
Cooking Displays
33:33 displays total cooking time.
When more than one cooking stage is
programmed, total time for all stages
displays. COOK displays when oven
is operating. DEFROST 20%, MEDIUM
50%, or MED-HI 70% will display to
indicate microwave power level being
used. HOLD 0% does not display COOK.
If oven power level is set to 0%, oven
does not heat for programmed time.
If no power level is displayed, the
microwave is operating at 100% power.
Cooking Display
DISPLAYS
DESCRIPTION
READY
READY displays when oven control will accept
entries.
00:00
Displays cooking time. If stage cooking is
programmed, total cooking time is displayed.
DEFR
MED
MED HI
These settings display the current power level used
for the microwave. If no display is shown,
microwave is running at full power (100%).
POWER
POWER is displayed while the oven is generating
microwave energy during a cooking cycle.
Programming Display
DISPLAYS
DESCRIPTION
P:0
Displays when oven is in programming mode for
single key memory only.
P:
Displays when oven is in programming mode for
double key memory.
OP: --
Displays when oven is in user option mode. User
options can then be set or specified.
CF:
Displays with a numerical cooking factor when the
X2 key is pressed.
P:--1
Displays briefly when programming a specific
cooking stage. Number (1 through 4) indicates
the stage that is being programmed.
20%
50%
70%
HOLD 0%
Oven Control
Keys
Oven
Display
Oven Door Window
and Interior Light

8
Using the Oven Control (Electronic Control)
Manual Time Entry
!"#!!$"%!!&"'()*+","(-.#)/#".*0.1.&"0)2.",*&"-!3.1"4.5.46
76" 8-.*"!5.*"&!!1",*&"-4,#."%!!&")*"!5.*6"94!(."&!!16
:" READY &)(-4,;(6"<,*",*&"4)+=0"3)44"0'1*"!*6
>6" ?1.((" @AB"BC DE"$.;6
:" READY ,*&"0000 &)(-4,;6
:" @%"-,&"&!.("*!0"3!1$F"!-.*",*&"#4!(."!5.*"&!!1",*&"01;",+,)*6
G6" B*0.1"#!!$)*+"0)2."H;"'()*+"0=."*'2H.1.&"$.;(6
I6" ?1.((","-!3.1"4.5.4"$.;"0!"#=,*+."-!3.1"4.5.4")%"&.()1.&6
:" POWER LEVEL"&)(-4,;("3)0="0=."-!3.1"(.00)*+6"
" J" 00")*&)#,0.("KL"2)#1!3,5."-!3.1F"20")*&)#,0.(">KLF"50
)*&)#,0.("MKL",*&"70")*&)#,0.("NKL"2)#1!3,5."-!3.16"@%","
*'2H.1")("*!0"&)(-4,;.&"3)0="?8OBD"PBQBP"0=."2)#1!3,5.")("(.0"
0!"%'44"-!3.16
M6" @%"(0,+."#!!$)*+")("&.()1.&F"-1.((" @AB"BC DE"$.;",*&"1.-.,0"(0.-("G"
0=1!'+="I6
:" R)(-4,;"#=,*+.("0!"#!!$"0)2.",*&"-!3.1"4.5.4"%!1"0=."*.S0"(0,+.6
T6" B*0.1"#!!$"0)2.",*&"-!3.1"4.5.4",(")*"(0.-("G",*&"I6
:" !",&&",*!0=.1"#!!$)*+"(0,+."-1.((" @AB"BC DE"$.;",+,)*6
:" U-"0!"%!'1"&)%%.1.*0"(0,+.("#,*"H."-1!+1,22.&6
N6" ?1.(("V WD "$.;6
:" 85.*"!-.1,0.(",*&"0)2."#!'*0("&!3*6
:" POWER, COOK LEVEL",*&"#!!$)*+"0)2."&)(-4,;6
X6" W0".*&"!%"#!!$)*+"#;#4."!5.*"H..-(",*&"(='0("!%%6
Programmed Keys
!"#!!$"%!!&"'()*+"$.;("-1.-1!+1,22.&"3)0="#!!$)*+"(.Y'.*#.(6
76" 8-.*"!5.*"&!!1",*&"-4,#."%!!&")*"!5.*6"94!(."&!!16
:" READY &)(-4,;(6"<,*",*&"4)+=0"3)44"0'1*"!*6
>6" ?1.(("&.()1.&"$.;6
:" <!1"()*+4."$.;".*01;F"-1.(("!*4;"!*."$.;6
:" <!1"&!'H4."$.;".*01;F"-1.(("0=."03!"$.;(F")*"!1&.1F"!%"0=."&!'H4."&)+)0"
*'2H.1"%!1"0=."&.()1.&"#!!$)*+"(.Y'.*#.6
:" !"#=,*+."()*+4."!1"&!'H4."$.;".*01;"!-0)!*""
(.."User Options"(.#0)!*")*"0=)("2,*',46
G6" 85.*"H.+)*("0!"#!!$6
:" POWERF"-!3.1"4.5.4",*&"0!0,4"#!!$)*+"0)2."&)(-4,;6"@%"-!3.1"4.5.4"&!.("
*!0"&)(-4,;F"2)#1!3,5.")("#!!$)*+",0"%'44"-!3.16
:" <!1",&&)0)!*,4"#!!$)*+"0)2.F"-1.(("-1.-1!+1,22.&"$.;",+,)*"
0!"H.+)*"#!!$)*+"(.Y'.*#.",+,)*6
I6" W0".*&"!%"#!!$)*+"#;#4."!5.*"H..-(",*&"(='0("!%%6
Factory Settings
Pad Time Pad Time
1 10 sec. 6 1:30 min.
2 20 sec. 7 2 min.
3 30 sec. 8 3 min.
4 45 sec. 9 4 min.
5 1 min. 0 5 min.
QTY X2 Key
"""""""""""""" !")*#1.,(."#!!$)*+"0)2."
H;","(-.#)/#"#!!$)*+"%,#0!1"3=.*"
#!!$)*+"2!1."0=,*"!*."(.15)*+6"
=."#!!$)*+"%,#0!1")(","-.1#.*0,+."
!%"0=."!1)+)*,4"#!!$)*+"0)2."Z%1!2"
7K"0!"7KKL[6
76" 8-.*"!5.*"&!!1",*&"-4,#."%!!&"
)*"!5.*6"94!(."&!!16
:" READY &)(-4,;(6"<,*",*&"
4)+=0"3)44"0'1*"!*6
>6" ?1.(("\>"$.;6
:" W2!'*0"!%"0)2.",&&.&")(","
-.1#.*0,+."!%"0=."!1)+)*,4"
-1.-1!+1,22.&"#!!$)*+"0)2.6
:" =."-.1#.*0,+."#,*"H."
#=,*+.&6"V.."Programming
the Oven Control (.#0)!*")*"
0=)("2,*',46
G6" ?1.(("&.()1.&"-1.-1!+1,22.&"
$.;"!1"$.;"(.Y'.*#.6
I6" 85.*"H.+)*("#!!$)*+6"
R)(-4,;.&"#!!$)*+"0)2.")("0=."
0!0,4"!%"!1)+)*,4"#!!$)*+"0)2."
-4'("0=.",&&.&"\>"0)2.6
Interrupting
Operation
8-.*"!5.*"&!!1"!1"-1.(("V 8?]
DBVB "$.;"0!")*0.11'-0"!-.1,0)!*6"
R)(-4,;"#!*0)*'.("0!"(=!3"
#!'*0&!3*"0)2.6"94!(."&!!1",*&"
-1.(("V WD "$.;"0!"1.('2."!5.*"
!-.1,0)!*6

9
Programming Keys
85.*")("(=)--.&"%1!2"0=."%,#0!1;"%!1"()*+4."$.;"-1!+1,22)*+6" !"#=,*+."
0=."!5.*"&.%,'40"0!",44!3"&!'H4."$.;"-1!+1,22)*+F"(.."User Option
(.#0)!*6" !"#=,*+."0=.",2!'*0"!%"0)2."!1"0=."-!3.1"4.5.4"%!1","-1.(.0"$.;^
76" 8-.*"!5.*"&!!16
:" READY &)(-4,;(6
:" @%"&!!1")("#4!(.&"!1"V 8?"$.;")("-1.((.&"H.%!1."-1!+1,22)*+")("#!2-4.0.F"
#=,*+.(",1."&)(#,1&.&",*&"2)#1!3,5.".S)0("-1!+1,22)*+"2!&.6
>6" ?1.((",*&"=!4&"$.;"7"%!1",--1!S)2,0.4;"M"(.#!*&(6
:" =)("H.+)*("-1!+1,22)*+"2!&.6
:" A)#1!3,5."3)44"H..-",*&"PROGRAM"&)(-4,;(6"85.*")(")*"
-1!+1,22)*+"2!&.6
G6" ?1.(("$.;"0!"H."1.-1!+1,22.&6
:" ?1.(("03!"$.;(")%"1.-1!+1,22)*+","&!'H4."-,&"-1!+1,26
:" ?!3.1"4.5.4",*&"#!!$)*+"0)2."&)(-4,;6"
:" @%"-!3.1"4.5.4"&!.("*!0"&)(-4,;F"2)#1!3,5.")("(.0"0!"%'44"-!3.16
I6" B*0.1"#!!$)*+"0)2."H;"'()*+"0=."*'2H.1"$.;(6
M6" ?1.((","-!3.1"4.5.4"$.;"0!"#=,*+."-!3.1"4.5.4")%"&.()1.&6
T6" ?1.(("V WD "$.;"0!"(,5."*.3"-1!+1,22)*+"#=,*+.("0!"0=."$.;6
:PROGRAM"&)(-4,;(6
:" @%"V WD ")("*!0"-1.((.&F"#=,*+.("3)44"*!0"H."(,5.&6
N6" ?1.(("V 8?]DBVB "$.;"!1"#4!(."!5.*"&!!1"0!".S)0
"-1!+1,22)*+"2!&.6
Programming the Oven Control (Electronic Control)
Programming Multiple Stages
V0,+."#!!$)*+",44!3("#!*(.#'0)5."#!!$)*+"#;#4.("3)0=!'0")*0.11'-0)!*6"
U-"0!"%!'1"&)%%.1.*0"#!!$)*+"#;#4.("#,*"H."-1!+1,22.&")*0!","2.2!1;"$.;6
!"'(."(0,+."#!!$)*+^
76" <!44!3"(0.-("7"0=1!'+="M",H!5.6
T6" ?1.((" @AB"BC DE"$.;6
:" R)(-4,;"H1)._;"(=!3("0=."$.;"*'2H.1"0=,0")("H.)*+"-1!+1,22.&",*&"
0=."(0,+."*'2H.1"0!"0=."'--.1"1)+=06
:" R)(-4,;"#=,*+.("0!"#!!$"0)2.",*&"-!3.1"4.5.4"%!1"0=."*.S0"(0,+.6
N6" B*0.1"#!!$"0)2.",*&"-!3.1"4.5.4",(")*"(0.-("I",*&"M6
:" !".*0.1",*!0=.1"#!!$)*+"(0,+."%!1"0=,0"$.;F"-1.(("
@AB"BC DE"$.;",+,)*6
:" U-"0!"%!'1"&)%%.1.*0"(0,+.("#,*"H."-1!+1,22.&6
X6" ?1.(("V WD "$.;"0!"(,5."*.3"-1!+1,22)*+"#=,*+.("0!"0=."$.;6
`6" ?1.(("V 8?]DBVB "$.;"!1"#4!(."!5.*"&!!1"0!".S)0"-1!+1,22)*+"
"""""""2!&.6
The display shows
PROGRAM.
O=.*"(.0"0!"()*+4."$.;"!1"
&!'H4."$.;"-1!+1,22)*+F"
0=."&)(-4,;"3)44"(=!3"PROGRAM
3=.*"-1!+1,22)*+"$.;("%!1"()*+4."
!1"&!'H4."&)+)0"#!!$)*+"(.Y'.*(.(6"
!"#=,*+."0=."!5.*a("&.%,'40"0!"
,44!3".)0=.1"()*+4."$.;"!1"&!'H4."$.;"
-1!+1,22)*+F"(.."0=."User Option
(.#0)!*6
QTY X2
Programming
=)("%.,0'1.",44!3(","-1.(.0"
-.1#.*0,+."!%"!1)+)*,4"#!!$"
0)2.F"#,44.&","#!!$)*+"%,#0!1F"0!"
H.",&&.&"0!","#!!$"(.Y'.*#.6
!"#=,*+."0=."#!!$)*+"%,#0!1^
76" 8-.*"!5.*"&!!16
>6" ?1.((",*&"=!4&"$.;"7"%!1"
,--1!S)2,0.4;"M"(.#!*&(6
G6" ?1.(("$.;"0!"H."1.-1!+1,22.&6
I6" ?1.(("0=."b E"\>"$.;6
M6" ?1.((","*'2H.1.&"$.;"0!"
#=,*+."0=."#!!$)*+"%,#0!16
:" 9!!$)*+"%,#0!1"#,*"H."(.0"
%1!2"7KL"0!"7KKL6
:" R.%,'40")("XKL6
:" c.;"M"3!'4&"#=,*+."0=."
#!!$)*+"%,#0!1"0!"MKL6
:" c.;"G"3!'4&"#=,*+."0=."
#!!$)*+"%,#0!1"0!"GKL6
T6" ?1.(("V WD "$.;"0!"(,5."
#=,*+.(6
Canceling Mistakes
@%"!5.*")("*!0"#!!$)*+F"-1.(("
V 8?]DBVB "$.;"0!"#4.,1"
&)(-4,;6"@%"!5.*")("#!!$)*+F"
-1.(("V 8?]DBVB "$.;"!*#."0!"(0!-"
!5.*F"0=.*",+,)*"0!"#4.,1"&)(-4,;6"@%"
!5.*"&!!1")("!-.*",*&"0)2."(=!3(")*"
&)(-4,;F"#4!(."!5.*"&!!1",*&"-1.(("
V 8?]DBVB "$.;"0!"#4.,1"&)(-4,;6

10
User Options (Electronic Control)
Changing user options
8-0)!*("('#=",("()*+4."!1"&!'H4."$.;"-1!+1,22)*+F"H..-"5!4'2.F",*&"
2,S)2'2"#!!$)*+"0)2."#,*"H."#=,*+.&"0!"(')0")*&)5)&',4"-1.%.1.*#.(6
!"#=,*+."!-0)!*(^
76" 8-.*"!5.*"&!!16
:" @%"&!!1")("#4!(.&"!1"V 8?]DBVB "$.;")("-1.((.&"H.%!1."-1!+1,22)*+")("
#!2-4.0.F"#=,*+.(",1."&)(#,1&.&",*&"2)#1!3,5.".S)0("-1!+1,22)*+"
2!&.6
>6" ?1.((",*&"=!4&"$.;">"%!1",--1!S)2,0.4;"M"(.#!*&(6
:" =)("H.+)*("!-0)!*("2!&.6
:" A)#1!3,5."3)44"H..-",*&"0P: -- &)(-4,;(6"A)#1!3,5.")("*!3")*"
-1!+1,22)*+"2!&.6
G6" ?1.(("*'2H.1"$.;"0=,0"#!*01!4("!-0)!*"0!"H."#=,*+.&6
:" V.."0,H4."H.4!3"%!1"!-0)!*(6
:" 9'11.*0"!-0)!*"3)44"&)(-4,;6
I6" ?1.(("*'2H.1"$.;",+,)*"0!"#=,*+."0=."!-0)!*6
:" B,#="0)2."$.;")("-1.((.&F"!-0)!*"3)44"#=,*+.6
:" A,0#="*'2H.1"#!&."&)(-4,;.&"3)0="&.(#1)-0)!*("%!1"&.()1.&"!-0)!*6
M6" ?1.(("V WD "$.;"0!"(,5."#=,*+.(6
:" 0P: -- (=!3(")*"&)(-4,;6
:" !"#=,*+.",&&)0)!*,4"!-0)!*(F"1.-.,0"(0.-("G",*&"I6
:" 9=,*+.(",--.,1",%0.1"&!!1")("#4!(.&"!1"V 8?]DBVB "-,&")("-1.((.&6
Didn’t like an option?
<,#0!1;"(.00)*+(",1."2,1$.&")*"H!4&6"
!"#=,*+."0=."!5.*"H,#$"0!"0=."
%,#0!1;"(.00)*+F"()2-4;"(.4.#0"0=."
!-0)!*"0=,0")("2,1$.&")*"H!4&6"
My changes weren’t
saved.
@*"!1&.1"%!1",*;"#=,*+.("0!"
H."(,5.&F"0=."V WD "$.;"
2'(0"H."-1.((.&",%0.1"(.4.#0)*+",*"
!-0)!*6"V='00)*+"0=."!5.*"&!!1"!1"
-1.(()*+"0=."V 8?]DBVB "$.;"3)44"
*!0"(,5."#=,*+.(6
Numbered Keys Display Options (Factory Settings in Bold)
1
End of Cycle Beep
OP:10
OP:11
OP:12
3 second continuous beep.
Continuous beep until door is opened.
5 beeps bursts until door is opened.
2
Key Beep Volume
OP:20
OP:21
OP:22
OP:23
Eliminates beep.
Sets volume to low.
Sets volume to medium.
Sets volume to high.
3
Key Beep
OP:30
OP:31
Prevents beep when key is pressed.
Allows beep when key is pressed.
4
Active Display
OP:40
OP:41
OP:42
OP:43
15 seconds after oven door is opened, keyboard disabled.
30 seconds after oven door is opened, keyboard disabled.
1 minute after oven door is opened, keyboard disabled.
2 minutes after oven door is opened, keyboard disabled.
5
On-the-Fly Cooking
OP:50
OP:51
Prevents different pre-programmed keys to be activated during cooking.
6
Reset to Ready Mode OP:60
OP:61
Opening oven door does not reset oven back to ready mode.
7
Maximum Heating Time
OP:70
OP:71
Allows 60 minutes of heating time.
Allows 10 minutes of heating time.
8
Manual Operation
OP:80
OP:81
Allows use of preprogrammed keys only.
Allows use of manual time entry and preprogrammed keys.
9
Double Digit Operation
OP:90
OP:91
Allows 10 (0-9) preprogrammed keys.
Allows 100 (00-99) preprogrammed keys.
Allows different pre-programmed keys to be activated during cooking.
Opening oven door resets oven back to ready mode.
0
Clean Filter Message
OP:00
OP:01
OP:02
OP:03
Oven will not display Clean Filter
Oven will display Clean Filter every seven (7) days
Oven will display Clean Filter every thirty (30) days
Oven will display Clean Filter every ninety (90) days

11
Digital Dial Operation
Dial option is available on some models only.
!"#$%&'(!&)*#+,"-.'&+)#+/#'!&$#
0&(-+%.1"#+1")#(.)#(.2$"#1+3'.*"#
42('2.'&+)$#+)#'!"#$2,,35#3&)"6#
!"#+,"-.'&+)#+/#'!&$#+1")#2)7"-#
2)/.1+-.83"#1+3'.*"#$2,,35#(+)7&'&+)$#
(.)#!.1"#.71"-$"#"//"('$6# !&$#7"1&("#
&$#&)'")7"7#/+-#'!"#(+))"('&+)#'+#.#
,+%"-#$2,,35#$5$'"0#%&'!#.#0.9&020#
,"-0&$$&83"#$5$'"0#&0,"7.)("#:0.9#
of 0.2 Ohms#.'#'!"#&)'"-/.("#,+&)'#+/#
'!"#2$"-;$#$2,,356# !"#2$"-#!.$#'+#
")$2-"#'!.'#'!&$#7"1&("#&$#(+))"('"7#
+)35#'+#.#,+%"-#$2,,35#$5$'"0#
%!&(!#/23<33$#'!"#-"=2&-"0")'#.8+1"6#
>/#)"("$$.-5?#'!"#2$"-#(.)#.$@#'!"#
,283&(#,+%"-#$2,,35#(+0,.)5#/+-#'!"#
$5$'"0#&0,"7.)("#.'#'!"#&)'"-/.("#
,+&)'6
Oven Wall Clearances
ABC+-#D+-'!#A0"-&(.)#EFGHIJAK#0+7"3$?#
.33+%#.'#3".$'#LM#EN6O#(0K#+/#(3".-.)("#
.-+2)7#'+,#+/#+1")6#C+-#>)'"-).'&+).3#ENP#
QRK#0+7"3$?#.33+%#.'#3".$'#OLM#ESP#(0K#+/#
(3".-.)("#.-+2)7#'+,#+/#+1")6#T-+,"-#.&-#4+%#
.-+2)7#+1")#(++3$#"3"('-&(.3#(+0,+)")'$6#
U&'!#-"$'-&('"7#.&-#4+%?#+1")#0.5#)+'#
+,"-.'"#,-+,"-35#.)7#3&/"#+/#"3"('-&(.3#,.-'$#&$#
-"72("76
VBA33+%#.'#3".$'#LM#EN6O#(0K#8"'%"")#.&-#
7&$(!.-*"#+)#8.(@#+/#+1")#.)7#8.(@#%.336
IBA33+%#.'#3".$'#LM#EN6O#(0K#+/#(3".-.)("#
.-+2)7#$&7"$#+/#+1")6#
No metal pans
DO NOT power spray
So...how do I use it? (Digital Dial)
Heating
O6# W,")#+1")#7++-?#,3.("#/++7#&)#+1")?#.)7#(3+$"#+1")#7++-6#
L6# 2-)#'&0"#")'-5#@)+8#(3+(@%&$"#'+#7"$&-"7#'&0"6
X# I++@&)*#'&0"#(.)#8"#$"'#2,#'+#Y#0&)2'"$6
X# W1")#8"*&)$#+,"-.'&+)#.)7#'&0"#(+2)'$#7+%)6
S6# U!")#(++@&)*#'&0"#!.$#"3.,$"7?#0&(-+%.1"#")"-*5#$'+,$#.)7#+1")#
$&*).3#$+2)7$6
Interrupting Operation
W,")#+1")#7++-#'+#&)'"--2,'#+,"-.'&+)#+-#'2-)#'&0"#")'-5#@)+8#
(+2)'"-(3+(@%&$"#'+#ZPM6# +#-"$20"#0&(-+%.1"#+1")#+,"-.'&+)?#(3+$"#+1")#
7++-6#
>/#'&0"#%.$#(!.)*"7#'+#ZPM?#'&0"#%&33#)""7#'+#8"#-"$"'6
Changing Time and Canceling Mistakes
Q".'&)*#'&0"#(.)#8"#(!.)*"7#.'#.)5#'&0"#%!&3"#'!"#+1")#&$#+,"-.'&)*6#
2-)#@)+8#'+#7"$&-"7#)"%#$"''&)*6# +#$"'#(++@&)*#'&0"#'+#R"-+?#'2-)#@)+8#
(+2)'"-(3+(@%&$"#'+#ZPM6
B
A
C

12
Dial Operation
Dial option is available on some models only.
Oven Wall Clearances
ABC+-#D+-'!#A0"-&(.)#EFGHIJAK#0+7"3$?#.33+%#
.'#3".$'#LM#EN6O#(0K#+/#(3".-.)("#.-+2)7#'+,#
+/#+1")6#C+-#>)'"-).'&+).3#ENP#QRK#0+7"3$?#
.33+%#.'#3".$'#OLM#ESP#(0K#+/#(3".-.)("#
.-+2)7#'+,#+/#+1")6#T-+,"-#.&-#4+%#.-+2)7#
+1")#(++3$#"3"('-&(.3#(+0,+)")'$6#U&'!#
-"$'-&('"7#.&-#4+%?#+1")#0.5#)+'#+,"-.'"#
,-+,"-35#.)7#3&/"#+/#"3"('-&(.3#,.-'$#&$#
-"72("76
VBA33+%#.'#3".$'#LM#EN6O#(0K#8"'%"")#.&-#
7&$(!.-*"#+)#8.(@#+/#+1")#.)7#8.(@#%.336
IBA33+%#.'#3".$'#LM#EN6O#(0K#+/#(3".-.)("#.-+2)7#
$&7"$#+/#+1")6#
B
A
C
!"#$%&'(!&)*#+,"-.'&+)#+/#'!&$#
0&(-+%.1"#+1")#(.)#(.2$"#1+3'.*"#
42('2.'&+)$#+)#'!"#$2,,35#3&)"6#
!"#+,"-.'&+)#+/#'!&$#+1")#2)7"-#
2)/.1+-.83"#1+3'.*"#$2,,35#(+)7&'&+)$#
(.)#!.1"#.71"-$"#"//"('$6# !&$#7"1&("#
&$#&)'")7"7#/+-#'!"#(+))"('&+)#'+#.#
,+%"-#$2,,35#$5$'"0#%&'!#.#0.9&020#
,"-0&$$&83"#$5$'"0#&0,"7.)("#:0.9#
of 0.2 Ohms#.'#'!"#&)'"-/.("#,+&)'#+/#
'!"#2$"-;$#$2,,356# !"#2$"-#!.$#'+#
")$2-"#'!.'#'!&$#7"1&("#&$#(+))"('"7#
+)35#'+#.#,+%"-#$2,,35#$5$'"0#
%!&(!#/23<33$#'!"#-"=2&-"0")'#.8+1"6#
>/#)"("$$.-5?#'!"#2$"-#(.)#.$@#'!"#
,283&(#,+%"-#$2,,35#(+0,.)5#/+-#'!"#
$5$'"0#&0,"7.)("#.'#'!"#&)'"-/.("#
,+&)'6
No metal pans
DO NOT power spray
So...how do I use it? (Dial)
100%15%
30% 75%
Heating
O6# W,")#+1")#7++-?#,3.("#/++7#&)#+1")?#.)7#(3+$"#+1")#7++-6#
L6#### 2-)#'!"#,+%"-#3"1"3#@)+8#'+#7"$&-"7#,+%"-#3"1"36#
X# T+%"-#3"1"3#(.)#8"#$"'#.'##Q+37#EON[K#\"/-+$'#ESP[K?#]"7&20#ENP[K?#
]"76#Q&*!#E^P[K?#+-#Q&*!#,+%"-#EOPP[K6
S6# 2-)#'&0"#")'-5#@)+8#(3+(@%&$"#2)'&3#7"$&-"7#'&0"#7&$,3.5$6
X# I++@&)*#'&0"#(.)#8"#$"'#2,#'+#OP#0&)2'"$6
X# >/#'2-)&)*#'!"#'&0"-#@)+8#/+-#3"$$#'!.)#L#0&)2'"$?#'2-)#&'#,.$'#L#0&)2'"$#
.)7#'!")#8.(@#'+#'!"#7"$&-"7#'&0"6
_6# W1")#8"*&)$#+,"-.'&+)#.)7#'&0"#(+2)'$#7+%)6
N6# U!")#(++@&)*#'&0"#"3.,$"$?#0&(-+%.1"#")"-*5#$'+,$#.)7#+1")#$&*).3#
$+2)7$6
Interrupting Operation
W,")#+1")#7++-#'+#&)'"--2,'#+,"-.'&+)#+-#'2-)#'&0"#")'-5#@)+8#
(+2)'"-(3+(@%&$"#'+#ZPM6# +#-"$20"#0&(-+%.1"#+1")#+,"-.'&+)?#(3+$"#+1")#
7++-6#
>/#'&0"#%.$#(!.)*"7#'+#ZPM?#'&0"#%&33#)""7#'+#8"#-"$"'6
Changing Time and Power/Canceling
Mistakes
I++@&)*#'&0"#.)7#,+%"-#3"1"3#(.)#8"#(!.)*"7#.'#.)5#'&0"#%!&3"#'!"#+1")#&$#
+,"-.'&)*6# 2-)#@)+8E$K#'+#7"$&-"7#)"%#$"''&)*6# +#$"'#(++@&)*#'&0"#'+#R"-+?#
'2-)#'&0"#")'-5#@)+8#(+2)'"-(3+(@%&$"#'+#ZPM6
Table of contents
Languages:
Other ACP Microwave Oven manuals