ACP MOC24 User manual

Service Manual
Commercial Microwave Oven
MOC24 P2004801M AOC24 P2004802M
OC24BK P2004803M MOC24RB P2004804M
MOC24B P2004817M OC24BKB P2004818M
OC24BKSA P2004819M MOC24TR P2004842M
MOC24LH P2004843M
September 2019 16400043
©ACP,Inc.

TABLE OF CONTENTS
IMPORTANT INFORMATION ....................................................................................................1
IMPORTANT SAFETY INFORMATION ..................................................................................2-5
Oven Specifications ..............................................................................................................6
Oven Construction ...........................................................................................................7-11
Oven Performance Test...................................................................................................................12
Component Test Procedures..........................................................................................13-16
Troubleshooting Chart....................................................................................................17-18
Service Test Mode..............................................................................................................19
Schematics & Diagrams……………………………………………………………………….20-24
Quick Start Reference Guide (Programming & User Options)…………………………….25-26
- ii -

1
IMPORTANT INFORMATION
Important Notices for Servicers and Consumers
ACP will not be responsible for personal injury or property damage from improper service procedures. Pride and
workmanshipgointoeveryproducttoprovideourcustomerswithqualityproducts. Itispossible,however,thatduring
itslifetimeaproductmayrequireservice. Productsshouldbeservicedonlybyaqualifiedservicetechnicianwhois
familiarwiththesafetyproceduresrequiredintherepairandwhoisequippedwiththepropertools,parts,testing
instruments and the appropriate service information.
IT IS THE TECHNICIANS RESPONSIBLITY TO REVIEW ALL
APPROPRIATESERVICEINFORMATIONBEFOREBEGINNING REPAIRS.
To locate an authorized servicer please contact:
ComServ Support Center
Web Site WW.ACPSOLUTIONS.COM
.
Recognize Safety Symbols, Words, and Labels
DANGER—Immediate hazards which WILL result in severe persona linjury or death.
WARNING—Hazards or unsafe practices which COULD result in severe personal injury or death.
CAUTION—
Hazards or unsafe practices which
COULD
result in personal injury, product or property
damage.
electrical shock.
!
!

2
Important Safety Information
!
WARNING
Read the following information to avoid possible exposure to microwave radiation:
The basic design of the Microwave Oven makes it an inherently safe device to both use and service.
However,therearesomeprecautionswhichshouldbefollowedwhenservicingthemicrowavetomaintainthis
safety. These are asfollows:
1.
Always operate the unit from an adequately
groundedoutlet. Donotoperateonatwo-wire
extensioncord.
2.
Beforeservicingtheunit(ifunitisoperable)perform
themicrowaveleakagetest.
3.
Theovenshouldneverbeoperatedifthedoordoes
notfitproperlyagainsttheseal,thehingesorhinge
bearings are damaged or broken; the choke is
damaged, (pieces missing, etc.); or any other
visible damage can be noted. Check the choke
areatoensurethatthisareaiscleanandfreeofall
foreignmatter.
4.
If the oven operates with the door open and
producesmicrowaveenergy,takethefollowing
steps:
A.
Telltheusernottooperatetheoven.
B.
ContactACPComServimmediately.
5.
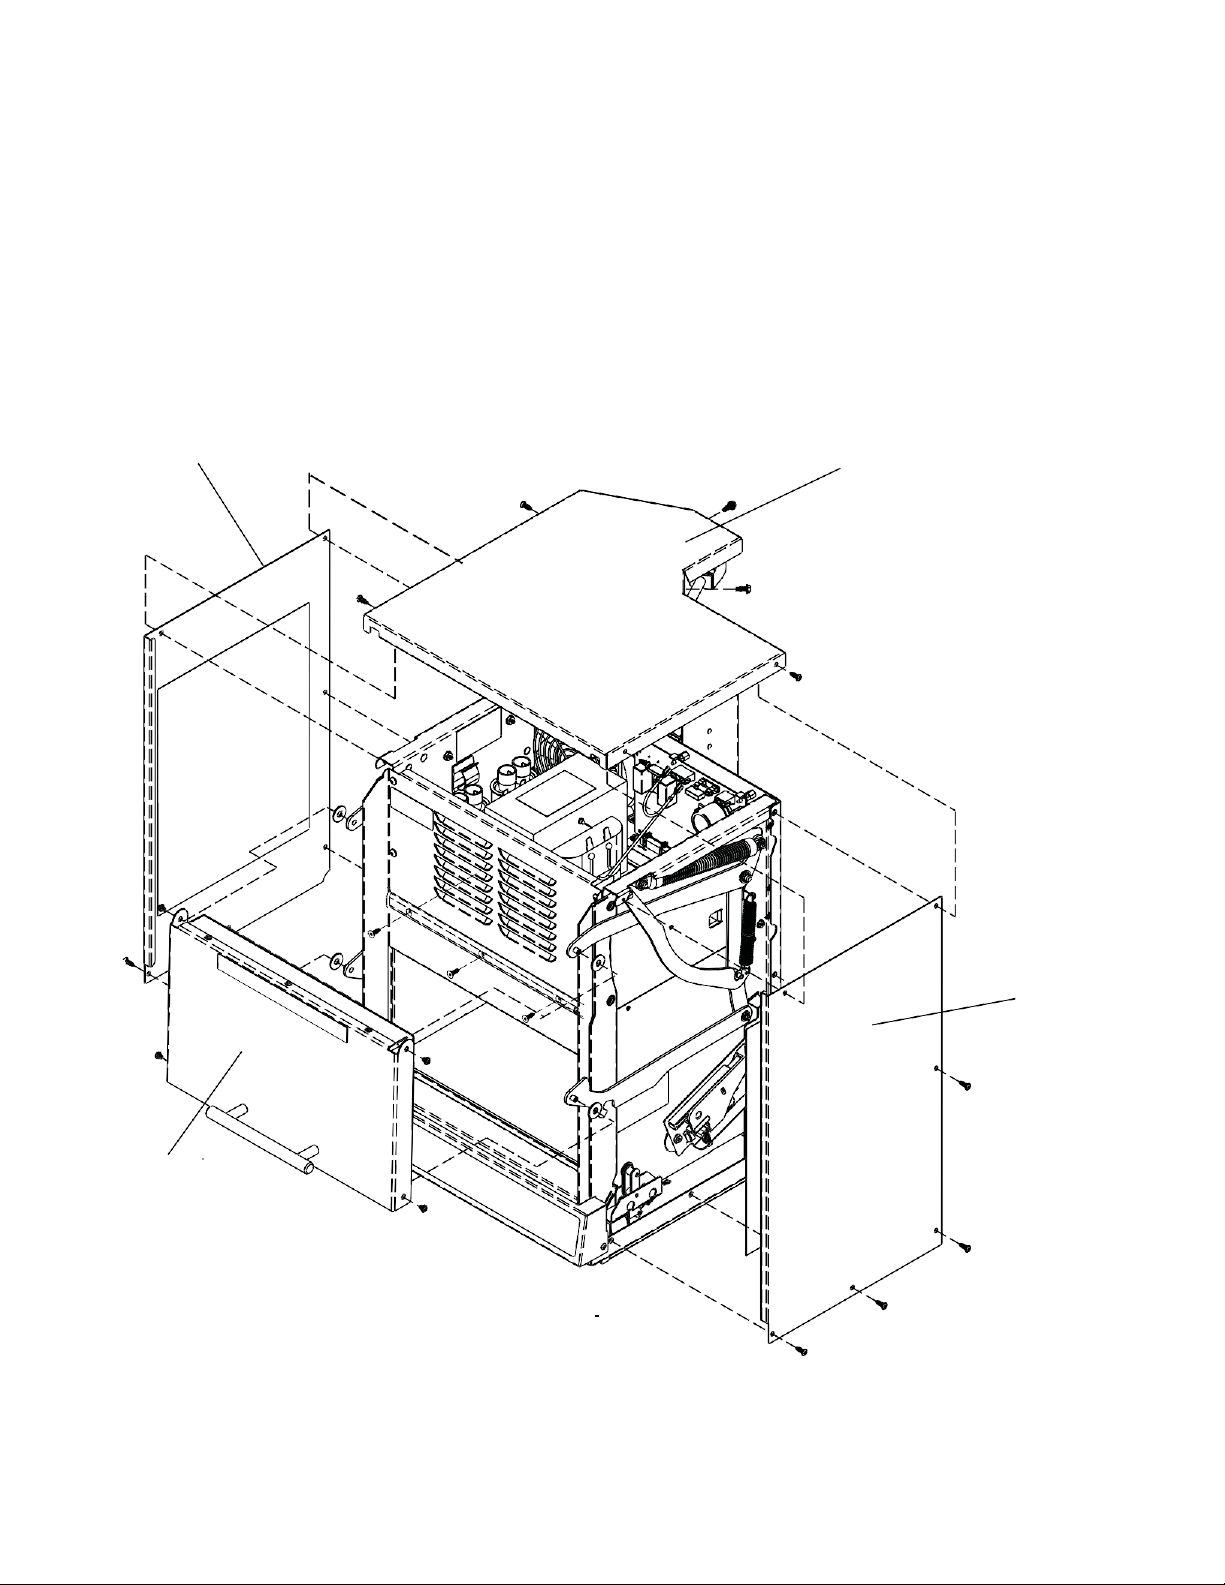
Alwayshavetheovendisconnectedwhentheouter
case is removed except when making the "live"
tests called for in the Service Manual. Do not
reach into the equipment area while the unit is
energized. Makeallconnectionsforthetestand
checkthemfortightnessbeforepluggingthecord
into theoutlet.
6.
Alwaysgroundthecapacitorsonthemagnetron
filter box with an insulated-handle screwdriver
before working in the high voltage area of the
equipmentcompartment. Sometypesoffailures
will leave a charge in these capacitors and the
dischargecouldcauseareflexactionwhichcould
makeyouinjure yourself.
7.
Always remember that in the area of the
transformer there is HIGH VOLTAGE. When the
unitisoperatingkeepthisareaclearandfreeof
anythingwhichcouldpossiblycauseanarcor
ground,etc.
8.
Do not for any reason defeat the interlock
switchesthereisnotvalidreasonforthisaction
atanytime;norwillitbecondonedbyACP.
9.
IMPORTANT: Before returning a unit to a
customer,besuretocheckforproperswitch
interlockaction.
10.
The MicrowaveOvenshouldneverbe
operatedwithanycomponentsremovedand/or
bypassedorwhenanyofthesafetyinterlocksare
found to be defective, or when any of the seal
surfacesaredefective,missing,ordamaged.
11.
All microwaveovensmeetallrequirements
oftheradiationcontrolforHealthandSafetyActof
1968. Due to measurement uncertainties, the
maximumleakageforthefieldwillbe4mw/cm2.
12.
Toensure that the unit does not emit excessive
microwaveleakageandtomeettheDepartment
ofHealthandHumanServicesguidelines,check
theovenformicrowaveleakageusingamicrowave
oven leakage meter that complies with US
GovernmentCDRH/FDA/DHHSrequirements
andoranyotherlocalgovernmentrequirements.
The maximum leakage level allowed by ACP
is 4mw/cm 2.
13.
Ifservicerencountersanemissionreadingover
4mw/cm2,theserviceristoceaserepairand
contact the ACP ComServ Department
immediatelyforfurtherdirection. ACP
will contact the proper Government
Agencyuponverificationofthetestresults.

3
Recognize this symbol as a SAFETY message
!
WARNING
When using electrical equipment, basic safety precautions should be followed to reduce the risk of burns,
electrical shock, fire, or injury to persons including the following.
1. READ all instructions before usingequipment.
2. READ AND FOLLOW the specific
“PRECAUTIONS TO AVOID POSSIBLE
EXPOSURE TO EXCESSIVE MICROWAVE
ENERGY” on this page.
3. This equipment MUST BE GROUNDED. Connect
only to properlyGROUNDED outlet. See “
GROUNDING / EARTHING INSTRUCTIONS” on
page5.
4. Install or locate this equipment ONLY in
accordance with the installation instructionsin
this manual.
5. Some products such as whole eggs and sealed
containers—for example, closed glass jars—are
able to explode and SHOULD NOT be HEATED
in this oven.
6. Use this equipment ONLY for its intended useas
described in this manual. Do not use corrosive
chemicals or vapors in this equipment. This type
of oven is specifically designed to heat, cook,
or dry food. It is not designed for industrial or
laboratory use.
7. As with any equipment, CLOSESUPERVISION
is necessary when used by CHILDREN.
8. See door cleaning instructions on page A-4of
this owners manual.
9. DO NOT heat baby bottles in oven.
10. Baby food jars shall be open when heated and
contents stirred or shaken before consumption, in
order to avoid burns.
11 DO NOT operate this equipment if it has a
damaged cord or plug, if it is not working properly,
or if it has been damaged or dropped.
12. This equipment, including power cord, must be
serviced ONLY by qualified service personnel.
Special tools are required to service equipment.
Contact nearest authorized service facility for
examination, repair, or adjustment.
13. DO NOT cover or block louvers or otheropenings
on equipment.
14. DO NOT store this equipment outdoors. DO NOT
use this product near water –for example, near a
kitchen sink, in a wet basement, a swimmingpool,
or a similar location.
15. DO NOT immerse cord or plug in water.
16. Keep cord AWAYfrom HEATED surfaces.
17. DO NOT let cord hang over edge of tableor
counter.
18. For commercial use only.
SAVE THESE INSTRUCTIONS
PRECAUTIONS TO AVOID POSSIBLE
EXPOSURE TO EXCESSIVE MICROWAVE
ENERGY
A. DO NOT attempt to operate this oven with the door open since open door operation can result in harmful
exposure to microwave energy. It is important not to defeat or tamper with the safetyinterlocks.
B. DO NOT place any object between the oven front face and the door too allow soil or cleaner residue to
accumulate on sealing surfaces.
C. DO NOT operate the oven if it is damaged. It is particularly important that the oven door close properly and
that there is no damage to the:
1. door (bent)
2. hinges and latches (broken or loosened)
3. door seals and sealing surfaces.
D. The oven should not be adjusted or repaired by anyone except properly qualified servicepersonnel.

4
IMPORTANT SAFETY INSTRUCTIONS
To avoid personal injury or property damage, observe the following:
1. Do not deep fat fry in oven. Fat couldoverheat
and be hazardous to handle.
2. Do not cook or reheat eggs in shell or with
an unbroken yolk using microwave energy.
Pressure may build up and erupt. Pierce yolk
with fork or knife before cooking.
3. Pierce skin of potatoes, tomatoes, and similar
foods before cooking with microwave energy.
When skin is pierced, steam escapes evenly.
4. Do not operate equipment without load orfood
in oven cavity.
5. Microwave popcorn should not be popped in
oven.
6. Do not use regular cooking thermometers in
oven. Most cooking thermometers contain
mercury and may cause an electrical arc,
malfunction, or damage to oven.
7. Do not use metal utensils in oven.
8. Do not use aluminum foil in oven
9. Never use paper, plastic, or other combustible
materials that are not intended for cooking.
10. When cooking with paper, plastic, or other
combustible materials, follow manufacturer’s
recommendations on product use.
11. Do not use paper towels which contain nylonor
other synthetic fibers. Heated synthetics could
melt and cause paper to ignite.
12. Do not heat sealed containers or plastic bags in
oven. Food or liquid could expand quickly and
cause container or bag to break. Pierce or open
container or bag before heating.
13. Toavoid pacemaker malfunction, consult
physician or pacemaker manufacturerabout
effects of microwave energy onpacemaker.
14. An authorized servicer MUST inspectequipment
annually. Record all inspections and repairs for
future use.
SAVE THESE INSTRUCTIONS
To avoid risk of fire in the oven cavity:
a. DO NOT overcook food. Carefully attend oven
when paper, plastic, or other combustible
materials are placed inside the oven to facilitate
cooking.
b. Remove wire twist-ties from paper or plastic
bags before placing bag in oven.
c. If materials inside the oven ignite, keep oven
door CLOSED, turn oven off and disconnect
the power cord, or shut off power at the fuseor
circuit breaker panel.
d. DO NOT use the cavity for storage. DO NOT
leave paper products, cooking utensils, orfood
in the cavity when not in use.
WARNING
Liquids such as water, coffee, or tea are able to
be overheated beyond the boiling point without
appearing to be boiling due to surface tension of the
liquid. Visible bubbling or boiling when the container
is removed from the microwave oven is not always
present. THIS COULD RESULT IN VERY HOT
LIQUIDS SUDDENLY BOILING OVER WHEN A
SPOON OR OTHER UTENSIL IS INSERTEDINTO
THE LIQUID. Toreduce the risk of injury to persons:
i) Do not overheat the liquid.
ii) Stir the liquid both before and halfwaythrough
heating it.
iii) Do not use straight-sided containers withnarrow
necks.
iv) After heating, allow the container to stand in the
microwave oven for a short time before removing
the container.
v) Use extreme care when inserting a spoonor
other utensil into the container.
WARNING
!
CAUTION

5
Important Safety Information
Grounding Instructions
This equipment
MUST
begrounded.Intheeventofan
electricalshortcircuit,groundingreducestheriskof
electric shock by providing an escape wire for the
electriccurrent.Thisovenisequippedwithacord
havingagroundingwirewithagroundingplug.Theplug
mustbepluggedintoanoutletthatisproperlyinstalled
andgrounded.
Consultaqualifiedelectricianorservicerifgrounding
instructionsarenotcompletelyunderstood,orifdoubt
existsastowhethertheequipmentisproperly
grounded.
Do not use an extension cord. If the product power cord
is too short, have a qualified electrician install an appropriate
receptacle. This oven should be plugged into a
separate50or60hertzcircuitwiththeelectricalratingas
shownintheappropriatedrawing.Modelsoperatewitha
208or230supplyvoltage.Whenanovenisona
circuitwithotherequipment,anincreaseincooking
timesmayberequiredandfusescanbeblown.
•
Donotoperateorallowoventobeoperatedwith
door open.
•
Makethefollowingsafetychecksonallovenstobe
servicedbeforeactivatingthemagnetronorother
microwave source,and make repairs asnecessary:
•
Interlock operation
•
Proper doorclosing
•
Seal and sealing surfaces (arcing, wear,and
other damage)
•
Damagetoorlooseningofhingesandlatches
•
Evidenceofdroppingorabuse
•
Before turning on microwave power for any service
test or inspection within the microwave generating
compartments,checkthemagnetron,waveguideor
transmission line, and cavity for proper alignment,
integrity, andconnections.
•
Any failed or misadjusted components in the
interlock, monitor, door seal, and microwave
generation and transmission systems shall be
repaired,replacedoradjustedbyprocedures
described in this manual before oven isreleased to
the consumer.
•
Check microwave leakage to verify compliance
with the federal performance standard should be
performedoneachovenpriortoreleasetothe
consumer.

6
SPECIFICATIONS
Model
AOC/MOC/OC24*
Configuration
Countertop or shelf
Control System
Touch, angled for easy viewing
Programmable Control Pads
10
Total Programmable Settings
100
Max. Cooking Time
10:00
Power Levels
11
Defrost
Yes
Time Entry Option
Yes
Microwave Distribution
Rotating antennas, top and bottom
Magnetrons
2
Display
LED
Stackable
Yes
Stage Cooking
Yes, 4
Door Opening
Automatic opening
Signal
Door opens automatically
Temp. Display
N/A
Exterior Dimensions
D**18 ⅝” (473) W 13 ⅝” (346) H 17 ¾” (451)
Cavity Dimensions
D 8 ¾” (222) W 11 ¾” (298) H 5 ⅜” (136)
Usable Cavity Space
.319 cubic ft. (.009m3)
Exterior Finish
Stainless steel
Interior Finish
Stainless steel
Power Consumption
3100 W
Power Output*
2400 W* Microwave
Power Source
208/230V, 60 Hz, 20 A single phase
Frequency
2450 MHz
Product Weight
70 lbs. (32 kg.)
Ship weight (approx.)
73 lbs. (33 kg.)
Shipping Carton Size
H 20 ⅝” (524) W 17” (432) H 22” (559)
UPS Shippable
ISTA 3A approved small parcel
Measurements in ( ) and not
specified are millimeters
* IEC 705 Tested
** Includes handle

OVEN CONSTRUCTION
7
Left Outer Panel
Top Outer Panel
Right Outer Panel
Door
Left
Outer
Panel
Top Outer
Panel
10 Right
Outer
Panel
Door

OVEN CONSTRUCTION
8
Touch Panel Assembly
Escutcheon Control
Display Board
Retainer Clip
Touch
Panel
Assembly
Display
Board
Retaine
r
Clip
Escutcheon
Control
Main Control Board
2.5 Amp Fuse
Fan Motor
Fan Guard
40 pin Header Bracket
2.5 Amp
Fuse
Main Control
Board
40 Pin
Header Bracket
Fan Motor Fan Guard

OVEN CONSTRUCTION
9
Magnetron
Antenna
Antenna Motor
Interlock Switch
Solenoid Assy
Interlock
Switch
(Right Side)
Diode
Capacitor
Magnetron
Magnetron Gasket
Magnetron TCO
PC Board Harness
Antenna
(Top)
Antenna Motor
(Bottom)
Solenoid Assembly
(Right Side)
Capacitors
Magnetron

OVEN CONSTRUCTION
10
HV Transformer
Triac 40A
Control
Transformer
Antenna
Shield
Glide
Strip
Antenna (Bottom)
Antenna Shield
Ceramic Tray
Tray Support
Glide Strip
20 Amp Fuse
HV Transformer
Triac 40A
Control Transformer
20 Amp
Fuse
Ceramic
Tray
Antenna
(Bottom)
Tray Support

OVEN CONSTRUCTION
11
Lower Back Panel
Cavity Exhaust Gasket
Cavity Exhaust Fan Motor
Cavity TCO
Cavity Fan Hood
Cavity Exhaust
Motor Gasket
Lower Back
Panel
Cavity Exhaust
Fan Motor
Cavity Fan
Hood
Cavity TCO
Hinge Assembly
Hinge Spring
Hinge
Spring
Hinge
Assembly

12
OVEN PERFORMANCE TEST
All Amana and Menumaster microwave oven power outputs are rated using the IEC705 standards. Using the
IEC705 test method requires precision measurements and equipment that is not practical to be performed in the
field. Using the test shown below will indicate if the oven performance is satisfactory.
Test equipment required:
1000 ml test container and thermometer.
Digital watch / watch with a second hand for use on ovens with electromechanical timers.
Important Notes:
Low line voltage will cause low temperature rise / power output.
Ovens must be on a dedicated circuit, properly grounded, and polarized. Other equipment on the same
circuit may cause a low temperature rise / power output.
This test and results are not a true IEC705 test procedures and are only intended to provide servicers with
an easy means of determining if the microwave oven cooking output is correct.
Procedure
1. Fill the test container to the 1000 ml line with cool tap water.
NOTE: Water temperature should be approximately 60F / 16C
2. Using the thermometer, stir water for five to ten seconds; measure, and record the temperature (T1).
3. Place test container of water in the center of oven cavity and close door.
4. Heat the water for a 33-second full power cycle.
NOTE: Burger King uses a similar test using a bowl and lid, heating time is 30 seconds.
NOTE: Use a digital watch or a watch with a second hand for ovens with electromechanical timers.
5. At end of the cycle, remove test container. Using the thermometer, stir water for five to ten seconds and record
temperature (T2).
6. Subtract the starting water temperature (T1) from the ending water temperature (T2) to obtain the temperature
rise (∆T).
7. If the temperature rise (∆T) meets or exceeds the minimum, the test is complete. If the temperature rise (∆T)
fails to meet the minimum temperature rise, test the line voltage to verify it is correct. Then repeat steps 1 - 6
making sure to change the water. If the temperature rise (∆T) fails to meet the minimum temperature rise again
the oven will require service.
Minimum Temperature Rise at Thirty (30) Seconds Run Time
∆T Cooking
(°F) Power Output
∆T Cooking
(°F) Power Output
∆T Cooking
(°C) Power Output
∆T Cooking
(°C) Power Output
10..................1000
20..................2000
5 ...............1000
11 ............2000
11..................1100
21..................2100
5.5 .............1100
11.5 .........2100
12..................1200
22..................2200
6.5 .............1200
12 ............2200
14..................1400
24..................2400
7.5 .............1400
13 ............2400
17..................1700
25..................2500
9.5 .............1700
13.5 .........2500
18..................1800
27..................2700
10 ..............1800
15 ............2700
19..................1900
30..................3000
10.5 ...........1900
16.5 .........3000

COMPONENT TESTING PROCEDURES
13
Illustration
Component
Testing
Results
Magnetron TCO
Disconnect all wires from TCO.
Measure resistance across terminals.
Magnetron TCO.....................................
Closed at 257ºF (125ºC) and
Opens at 300ºF (149ºC)
Cavity TCO
Disconnect all wires from TCO.
Measure resistance across terminals.
Cavity TCO............................................
Opens at 219ºF (104ºC)
Diode
Discharge Capacitor
Remove diode lead from capacitor and
connect ohmmeter.
Reverse leads for second test.
Infinite resistance should be
measured in one direction and 50K
or less in the opposite direction.
NOTE:
Ohmmeter must contain a
battery of 6 volts minimum.
Triac
Resistance Check
Disconnect wires to triac
Measure resistance from:
MT1 to MT2
MT1 to Gate
MT2 to Gate
All terminals to ground
Caution –Do not operate oven with
wire to terminal MT2 removed
.
Infinite
Approximately 60Ω
Infinite
Infinite
Voltage Check
Measure voltage from:
MT1 to Gate
MT1 to MT2
0.8 VAC when energized.
0 volts when gate energized or closed.
Line volts when gate not energized or
open.
Capacitor
Discharge Capacitor
Remove wires from capacitor terminals
and connect ohmmeter, set on highest
resistance scale to terminals.
Also check between each terminal and
capacitor case.
Between Terminals: Meter should
momentarily deflect towards zero then
return to over 5 M
. If no deflection
occurs, or if continuous deflection
occurs, replace capacitor.
Terminal to Case: Infinite resistance
Magnetron
Discharge Capacitor
Remove wires from magnetron and
connect ohmmeter to terminals. Also
check between each terminal and
ground.
Between Terminals: Less than 1
Each terminal to ground measures
Infinite resistance.
Note:
This test is not conclusive. If
oven does not heat and all other
components test good replace the
magnetron and retest.
Solenoid (Left, Right)
Disconnect connector from solenoid
Measure resistance across coil.................
Approximately 6-11
Stirrer motor
Remove all wires from motor.
Measure resistance across terminals ....
Approximately 12K

14
COMPONENT TESTING PROCEDURES
!
WARNING
To avoid risk of electrical shock, personal injury or death; disconnect power to oven and discharge capacitor
before servicing, unless testing requires power.
Illustration
Component
Testing
Results
Transformer, HV
Discharge Capacitor
Remove all wires from terminals.
Measure resistance from:
230 to COM..........................................
208 to COM..........................................
230 to Ground
208 toGround----------------------------------
Terminal 5 to 6---------------------------------
Terminal 7 to 8---------------------------------
Terminal 4 to Ground-------------------------
Less than 1
Less than 1
Infinite
Infinite
Less than 1
Less than 1
Approximately 27
Main board
See Main Board page 5
Left interlock switch assembly
Disconnect wires to switch.
(Mechanical)
With door open measure resistance from:
Monitor –Terminals Rd- Bk..............
Primary –Terminals Bk - Brn ...........
With door closed measure resistance from:
Monitor –Terminals RD - BK ...........
Primary –Terminals BK - BN ...........
After verifying or replacing the
assembly, re-connect wires to switch
and check operation of monitor circuit
before operating the oven.
Indicates continuity
Infinite
Infinite
Indicates continuity
Right interlock switch
assembly
(Mechanical)
Disconnect wires to switch.
With door open measure resistance from:
Monitor –Terminals RD- BK ............
Secondary –Terminals GY -RD.......
With door closed measure resistance from:
Monitor –Terminals RD - BK ...........
Secondary –Terminals GY - RD......
After verifying or replacing the
assembly, re-connect wires to switch
and check operation of monitor circuit
before operating the oven.
Indicates continuity
Infinite
Infinite
Indicates continuity
Transformer, control
(1) BU to (5) BR ----------------------------- --
Approximately 40 or Line Voltage
(6) YL to (10) WH-------------------------------
Approximately 1 or 28 VAC
Fan, cooling
Disconnect connector from fan.
Measure voltage at incoming leads ...........
Approximately 24VDC
Fan, exhaust
Disconnect connector from fan.
Measure voltage at incoming leads.......
Approximately 24VDC

COMPONENT TESTING PROCEDURES
!
WARNING
To avoid risk of electrical shock, personal injury or death; disconnect power to oven and discharge capacitor
before servicing, unless testing requires power.
15
Main. Board
Function
Test Set-Up
Meter
Setting
Probe Placement
Results
Input to main board
Left, Right Switch
Assembly
Main Board
(Door Closed)
Volts
Main Board T-1
(Black wire)
Triac (Red wire)
Line voltage
J4 Input from
Control
Transformer
Main Board
Volts
J4-1 & J4-2
28 VAC

COMPONENT TESTING PROCEDURES
!
WARNING
To avoid risk of electrical shock, personal injury or death; disconnect power to oven and discharge capacitor
before servicing, unless testing requires power.
16
Function
Test Set-Up
Meter Setting
Probe Placement
Results
2.5 amp fuse
Remove fuse from
Ohms
Measure resistance
Continuity
Note: If Fuse is blown
holder
across fuse
unit is non operational
Fuse is field
replaceable.
208/230 Volt Relay
230 Volt Output
T4 to Blue wire at J1
Triac connection
Volts
T4 to Blue wire at
Triac Connection
230 voltswhen
230 volts line
voltagepresent
208/230 Volt Relay
208 Volt Output
T3 to Blue wire at J1
Triac connection
Volts
T3 to Blue wire at
Triac Connection
208 voltswhen
208 volts line
voltagepresent
J1 Triac Output
Connection
Orange wire to Red
wire
Volts
Orange wire at Traic
Connection. Red wire
at Triac Connection
0.8 VAC when
Triac energized
Power Relay
T3 to Blue wire at J1
Triac connection
Volts
T3 to Blue wire at
Triac Connection
208 voltswhen
208 volts line
voltagepresent
T4 to Blue wire at J1
Triac Connection
Volts
T4 to Blue wire at
Triac Connection
230 voltswhen
230 volts line
voltagepresent
Illustration
Component
Test
Pad
Results
Keypad
Removal of touch panel is required to
Trace
Measurement
perform test.
1
8 & 10
Continuity
Continuity is indicated as 100 and
below.
2
3
4
7 & 10
6 & 10
5 & 10
Continuity
Continuity
Continuity
5
6
7
8
9
0
Start
4 & 10
3 & 10
8 & 9
7 & 9
6 & 9
5 & 9
4 & 9
Continuity
Continuity
Continuity
Continuity
Continuity
Continuity
Continuity
Stop
4 & 8
Continuity
Power Level
5 & 8
Continuity
Time Entry
7 & 8
Continuity

TROUBLESHOOTING CHART
17
Initial Power-Up
(Door Open)
No
No
Connect Power Cord
Close Door Then Open Door
Operation Normal
Open Door
Yes
1. Check interlock switches.
2. Check T1 connection.
3. Check J1-1 connection.
1. No power applied to power cord.
2. Oven fuse open.
3. Main board control fuse.
4. Inoperative magnetron TCO.
5. Inoperative cavity TCO.
6. Broken or loose wire.
7. Inoperative control transformer.
8. Ribbon connector.
9. Inoperative display board.

18
Cook Condition
No
Yes
No
Yes
No
Yes No
Yes
No
Yes
Oven is operating properly
Placecupofwaterinoven
and close door
Door opens at end of cycle
Water is heated
Display starts counting down
Press Pad 1
Fans Run
Heats very slowly.
Note: Verify by performing power test.
1. Inoperative high voltagetransformer.
2. Inoperative capacitor.
3. Inoperative magnetron.
4. Inoperative diode.
5. Broken or loose wire connection.
No heat.
1. Inoperative triac.
2.Inoperative high voltage board.
3. Inoperative high voltagetransformer.
4. Broken or loose wire connection.
1. Inoperative door latch.
2. Broken or loose wireconnection.
1. Inoperative touch panel.
2. Bad ribbon cable.
1. Bad fan.
2. Broken or loose wireconnection.
1. Door not closed.
2. Inoperative switch assembly.
3. Broken or loose wire connection.
This manual suits for next models
17
Table of contents
Other ACP Microwave Oven manuals

ACP
ACP RC22S2 User manual

ACP
ACP RFS12MPSB User manual

ACP
ACP XpressChef JET514 Manual

ACP
ACP RCS511TS Manual

ACP
ACP AXP20 User manual

ACP
ACP ACE series User manual

ACP
ACP HDC182 User manual

ACP
ACP Microwave Oven User manual

ACP
ACP Amana HDC18SD2 User manual

ACP
ACP MenuMaster RFS Subway Series Installation guide