ACR STOVES Bravo User manual

So much more than just a pizza oven
Thank you for purchasing an ACR Stoves Outdoor Oven
USER MANUAL
OUTDOOR
OVEN
RANGE
ACR pizza ovens x3 user manual 2021 0321-7 27/04/2021 16:23 Page 1

The boring but very necessary important stuff
PLEASE RETAIN THIS MANUAL FOR FUTURE REFERENCE
WARNING: Before installation, please ensure that the correct model
has been supplied.
Incorrect installation, adjustment, alteration, service or use of this
appliance may cause injury or damage to persons and property, so
please read the following manual for the correct installation and the
best experience from your ACR outdoor oven.
IGNORE
FAIL
READ
SUCCEED
ABOVE ALL
HAVE FUN & ENJOY
ACR pizza ovens x3 user manual 2021 0321-7 27/04/2021 16:23 Page 2
When alight, the external surfaces and flue of the oven may get very hot! Therefore
please be aware of children, the elderly, the infirm and of course our furry friends
Always use appropriate protection against excessive heat when this oven is alight,
only use heat resistant tools and utensils and always use a heat resistant glove!!
Never move or lift the oven when it’s in use or hot
The oven must be sited on a flat, level surface, able to bear the weight and heat of
the appliance
Never store, use or put flammable liquids in or near the oven
Never use plastic utensils or containers in the oven, these will MELT!
Never block the flue of the oven, you will suffocate the fire
Never extinguish the flames with water, this will cause a steam explosion! Exciting
but very dangerous and your pizza oven will never forgive you!
This oven is hot stuff!
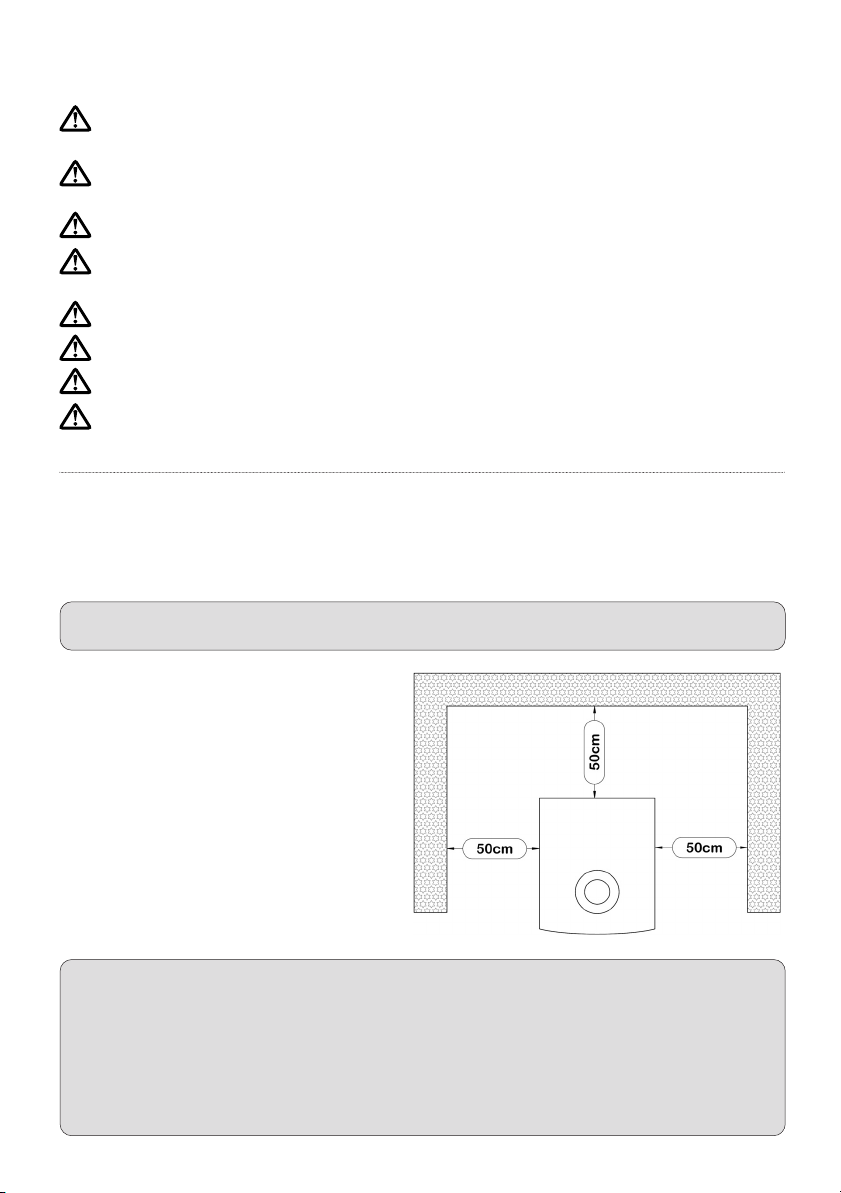
Where to place me in my new home
Caution!
When in use, place the oven a safe
distance from any combustible
materials or any materials that may be
damaged by heat, use the above
diagram to find me a safe home.
Your new pizza oven is an outdoor beastie and should never be used indoors or in an
enclosed area.
Always allow at least 50cm clearance all around the oven and 1m in front.
When in use always place the oven in a
sheltered spot, away from strong winds
and bear in mind the effects of
nuisance smoke to your neighbours,
your home and yourself.
Always place me on a flat, stable
surface that’s able to bear my weight, I
know I’m Italian, but you wouldn’t want
me to be the leaning tower of Pizza!
If I’m a Bravo and you want me to live
on a table, please make sure that the
table top is non-combustible and heat
resistant. Even with all of my insulation
my bottom can get above 50°C and
you wouldn’t want me to leave scorch
marks!
ACR pizza ovens x3 user manual 2021 0321-7 27/04/2021 16:23 Page 3
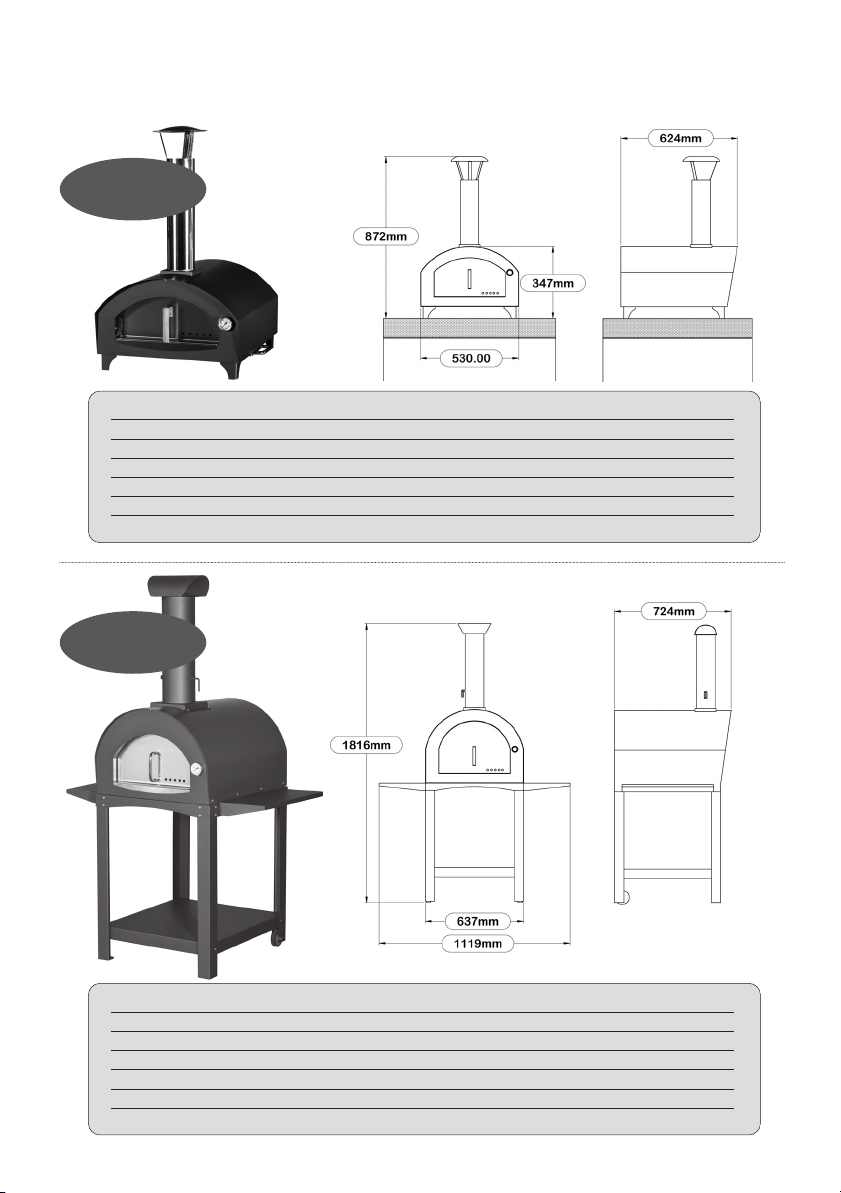
Fuel: Wood Logs less than 15% moisture
Cooking area dimensions: 450mm x 500mm
Working temperature: 250°C
Heat up time: 20 minutes
Number of pizzas in 15 minutes: 4 (12” Pizzas)
Weight: 27 Kg
Opening dimensions: 165mm height 390mm width
Fuel Wood Logs less than 15% moisture
Cooking area dimensions 600mm x 530mm
Working temperature 350°C
Heat up time 30 minutes
Number of pizzas in 15 minutes 6 (12” Pizzas)
Weight 74 Kg
Opening dimensions 195mm height 400mm width
Bravo
Specifications and dimensions
Vita la Madre
il Bambino
ACR pizza ovens x3 user manual 2021 0321-7 27/04/2021 16:23 Page 4
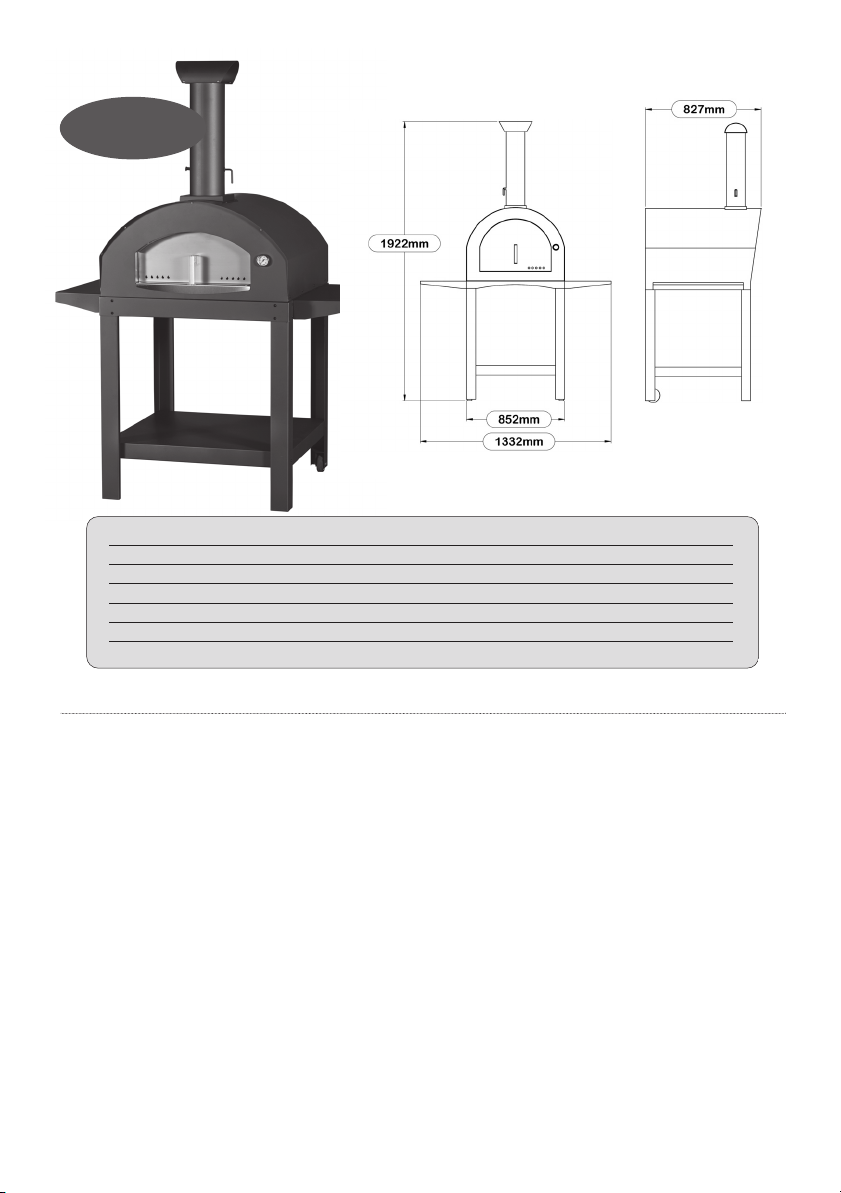
Fuel Wood Logs less than 15% moisture
Cooking area dimensions 750mm x 700mm
Working temperature 350°C
Heat up time 30 minutes
Number of pizzas in 15 minutes 8 (12” Pizzas)
Weight 120 Kg
Opening dimensions 220mm height 470mm width
What do I get?
VitaMax
■ The pre-insulated pizza oven dome
■ The pizza dome door
■ Insulating bottom firebricks
(the lightweight ones)
■ Chamotte firebricks (the heavy ones)
■ The chimney base starter section
(Vita and Vita max only)
■ The chimney top
■ Two handles (Bravo only)
■ Two preparation shelves (Vita and Vita
max only)
■ Two front legs, no wheels (Vita and
Vita max only)
■ Two back legs, with wheels (Vita and
Vita max only)
■ Storage shelf (Vita and Vita max only)
■ A bag of screws and nuts, to put the
beastie together
■ The beautifully written and informative
manual
il Padre
ACR pizza ovens x3 user manual 2021 0321-7 27/04/2021 16:23 Page 5

Assembly and unboxing
il Bambino
Great news, you’ve received your new pizza oven and you can almost taste the stone
baked, flame grilled, melting mozzarella, just a few more steps to culinary heaven.
Carefully unpack the oven and it’s components from the crate, a word of warning some
of the parts, and the pizza dome itself, will be heavy and may be sharp!
Always wear protective gloves and ask a friend to help.
■ Remove all of the parts from the crate
and all of the parts that are contained
within the pizza oven dome.
■ Attach the two handles to the sides of
the body of the pizza dome using the
screws provided, each handle uses two
of the M5 x 12mm screws. It may be
easier to put the pizza dome on it’s back
for this part, place a blanket down first,
just make sure that the dome is nice and
stable and that you aren’t damaging any
of the nice paintwork.
■ Align the handle against the bracket
and insert the correct screws from under
the base of the pizza dome and tighten.
Repeat for the opposite side.
■ Sit the pizza oven dome on it’s legs.
■ Attach the chimney top section to the
corresponding flue hole on the top of
the pizza dome, secure the square base
plate to the dome using the four M5 x
12mm screws provided.
■ Replace the insulating firebricks
(the lightweight ones) either side
of the middle metal strut,
as shown below:
■ Replace the chamotte firebricks
(the heavy ones) on top of the
insulating firebricks, as shown
below:
■ Place your Bravo oven onto a suitable,
non-combustible surface, a sufficient
distance away form anything flammable,
as detailed above.
■ Place the pizza dome door onto the
front shelf.
■ Let’s get cooking!!
Bravo
Vermiculite insulating
firebricks
• 4 x (25 x 145 x
245mm) No1
Chamotte
firebricks
• 2 x (30 x 220 x
190mm) No2
• 2 x (30 x 220 x
300mm) No3
ACR pizza ovens x3 user manual 2021 0321-7 27/04/2021 16:23 Page 6

la Madre
■ Remove all of the parts from the crate
and all of the parts that are contained
within the pizza oven dome.
■ It may be easier to put the pizza dome
on it’s back for this part, place a blanket
down first, just make sure that the dome
is nice and stable and that you aren’t
damaging any of the nice paintwork.
■ Locate the rear leg, it’s the one with the
wheel attached, there are two rear legs
make sure that the correct leg is fitted
to the correct side! The wheel should be
on the inside of the leg, facing towards
the front of the oven.
■ Align the rear leg on the inside of the
metal pizza dome frame, line up the
holes and connect using four M5 x
12mm screws and the four M5 nuts,
tighten using a suitable screwdriver and
an 8mm spanner.
■ Next connect the other rear leg in the
same manner as above.
■ Position the storage shelf between the
two rear legs, line up the holes and
attach using one M5 x 12mm screw per
leg.
■ Position the front leg on the inside of
the metal pizza dome frame, line up the
holes and connect using four M5 x
12mm screws and the four M5 nuts,
tighten using a suitable screwdriver and
an 8mm spanner.
■ Next connect the other front leg in the
same manner as above.
■ Line up the holes in the storage shelf
and attach using one M5 x 12mm screw
per leg.
■ Sit the pizza oven dome on it’s legs, be
careful it’s heavy! Don’t forget to use a
friend.
■ Check that the legs are square to the
pizza dome, check and retighten any of
the screws and nuts as necessary.
■ Slide the preparation shelves onto the
two hooks located on the left and right
of the pizza dome body and firmly push
into place.
■ Attach the chimney base starter section
to the corresponding flue hole on the
top of the pizza dome, secure the
square base plate to the dome using
the four M5 x 12mm screws provided.
■ Slip the chimney top section over the
starter section and make sure that it’s
fully located down.
■ Replace the insulating firebricks (the
lightweight ones) as shown below:
■ Replace the chamotte firebricks (the
heavy ones) on top of the insulating
firebricks, as shown below:
■ Place your Vita oven onto a suitable,
level surface, a sufficient distance away
from anything flammable, as detailed
above.
■ Place the pizza dome door onto the
front shelf.
■ Let’s get cooking!!
Vita
Vermiculite insulating firebricks
• 1 x (25 x 150 x 520mm) No1
• 1 x (25 x 120 x 520mm) No2
• 1 x (25 x 108 x 520mm) No3
Chamotte firebricks
• 4 x (30 x 200 x 266mm) No1
• 2 x (30 x 191 x 266mm) No2
ACR pizza ovens x3 user manual 2021 0321-7 27/04/2021 16:23 Page 7

■ Remove all of the parts from the crate
and all of the parts that are contained
within the pizza oven dome.
■ It may be easier to put the pizza dome
on it’s back for this part, place a blanket
down first, just make sure that the dome
is nice and stable and that you aren’t
damaging any of the nice paintwork.
■ Locate the rear leg, it’s the one with the
wheel attached, there are two rear legs
make sure that the correct leg is fitted
to the correct side! The wheel should be
on the inside of the leg, facing towards
the front of the oven.
■ Align the rear leg on the inside of the
metal pizza dome frame, line up the
holes and connect using four M5 x
12mm screws and the four M5 nuts,
tighten using a suitable screwdriver and
an 8mm spanner.
■ Next connect the other rear leg in the
same manner as above.
■ Position the storage shelf between the
two rear legs, line up the holes and
attach using one M5 x 12mm screw per
leg.
■ Position the front leg on the inside of
the metal pizza dome frame, line up the
holes and connect using four M5 x
12mm screws and the four M5 nuts,
tighten using a suitable screwdriver and
an 8mm spanner.
■ Next connect the other front leg in the
same manner as above.
■ Line up the holes in the storage shelf
and attach using one M5 x 12mm screw
per leg.
■ Sit the pizza oven dome on it’s legs, be
careful it’s heavy! Don’t forget to use a
friend.
■ Check that the legs are square to the
pizza dome, check and retighten any of
the screws and nuts as necessary.
■ Slide the preparation shelves onto the
two hooks located on the left and right
of the pizza dome body and firmly push
into place.
■ Attach the chimney base starter section
to the corresponding flue hole on the
top of the pizza dome, secure the
square base plate to the dome using
the four M5 x 12mm screws provided.
■ Slip the chimney top section over the
starter section and make sure that it’s
fully located down.
■ Replace the insulating firebricks (the
lightweight ones) as shown below:
■ Replace the chamotte firebricks (the
heavy ones) on top of the insulating
firebricks, as shown below:
■ Place your VitaMax oven onto a
suitable, level surface, a sufficient
distance away from anything flammable,
as detailed above.
■ Place the pizza dome door onto the
front shelf.
■ Let’s get cooking!!
VitaMax
Vermiculite insulating firebricks
• 4 x (25 x 108 x 570mm) No1
Chamotte firebricks
• 4 x (30 x 220 x 300mm) No1
• 2 x (30 x 92 x 220mm) No2
• 2 x (30 x 240 x 300mm) No3
• 1 x (30 x 214 x 300mm) No4
il Padre
ACR pizza ovens x3 user manual 2021 0321-7 27/04/2021 16:23 Page 8

Fire is a living, breathing entity and the
requires a good source of fuel, air to
breathe and a source of ignition.
Fuel - use only good quality, dry wood
logs on your oven. The drier the log, the
less soot and smoke that’s created during
the burning process. Try to use smaller
logs about 9”(230mm) long and about
3”(75mm) in diameter, always try to use
split logs for a greater surface area. When
first lighting, use small logs and kindling
until the fire is established, then add more
logs to bring the temperature of the oven
up and maintain the desired heat. Good
quality logs, we would recommend kiln
dried, at less than 15% moisture, are
essential for reaching and maintaining the
heat needed for the perfect pizza.
Air - you can control the amount of air
that fire breathes by using the door and
the flue damper (Vita and Vita Max only).
When first starting the fire it’s a greedy
beastie, so more air is necessary, fully
open the flue damper (vertical position)
and either remove the pizza dome door or
angle it open as much as possible. For less
air, once the fire is established, push the
door inwards and regulate the flue
damper to a 45° angle. This will help to
stabilise the oven temperature and help to
prevent rapid increases in temperature.
Ignition - A spark, a source of life,
sometimes easier said than done, we like
natural, waxed, odourless, wood shaving
firelighter, not one of those smelly paraffin
types. Nobody wants to eat a paraffin
flavoured pizza!!
Let’s get all fired up - the art of fire
“Gie me a spark o' Nature's fire, that's a' the learning I desire.”
Warning:
■ Do not use flammable liquids or other fuels to light the oven
■ Make sure that the area around the oven is free from flammable materials before
lighting and that the minimum safety distances are maintained
■ Do not exceed the maximum temperature of 500°C/1000°F
■ Never leave the oven unattended when under fire
■ Be mindful of small children, the elderly, the infirm and our furry friends when the
oven is alight
(Robert Burns)
Prohibited Fuels and bad
wood
• Never use house or smokeless coal
on your oven
• The oven is not an incinerator
please don’t treat it as one
• Treated, painted, scrap wood is
prohibited, you wouldn’t want a
gloss flavoured pizza
• Wet or damp wood will be very
difficult to start, the increased
volume of water will produce a lot
of smoke, soot and very little heat,
you’ll never get a crispy bottom!
ACR pizza ovens x3 user manual 2021 0321-7 27/04/2021 16:23 Page 9
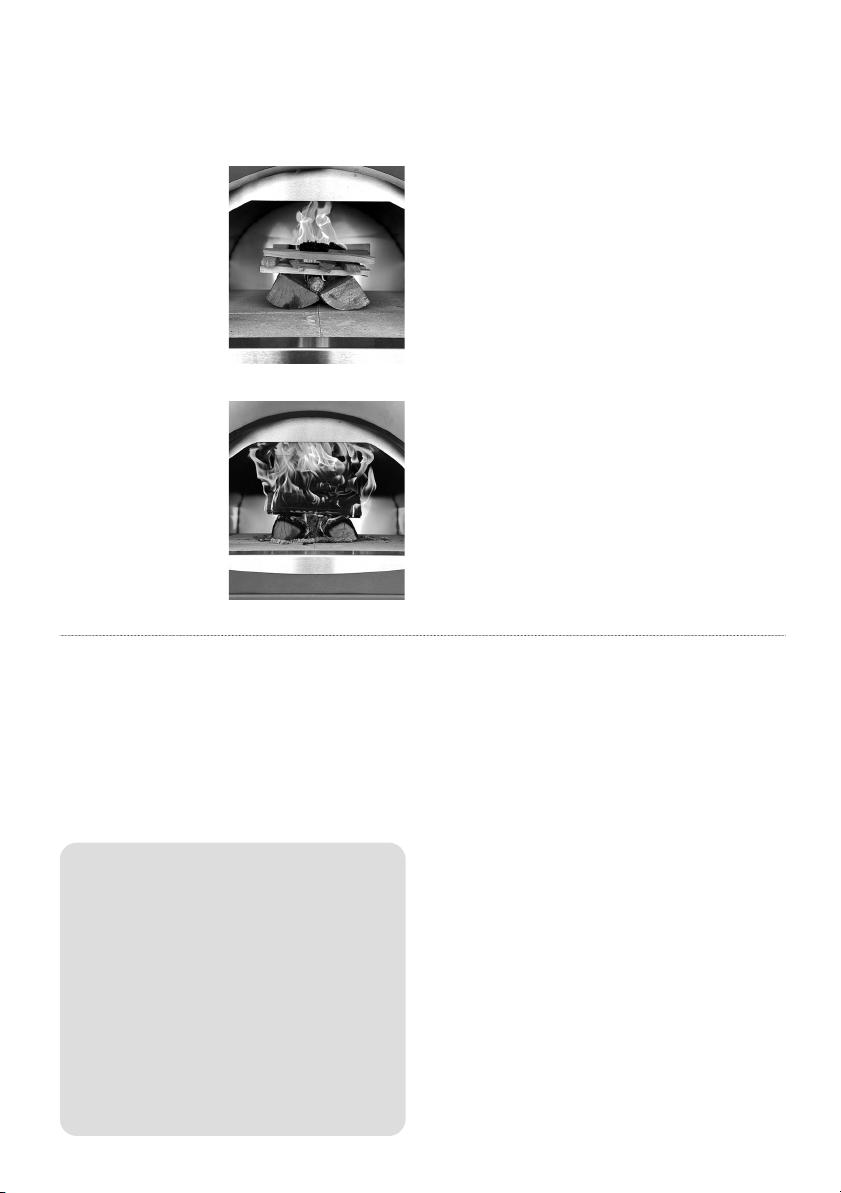
Lighting the oven
Hurrah!! You’re three steps away from
edible perfection:
Step 1 - make a
cross hatch tower
of kindling and a
couple of small
logs in the centre
of the oven
chamber directly
on top of the
firebricks, place a
firelighter on the
top, and maybe
one in the middle,
make sure the flue
damper in in the
vertical position
and fire this bad
boy up!!
Step 2 - when
the logs at the
bottom are well
alight, add two
more logs and move the fire to the rear of
the chamber, close the pizza dome door
slightly.
Step 3 - once the temperature has
reached and stabilised at around 350-
400°C, you’re good to go!!
Cool down - once you’ve finished with
the oven, push the pizza dome door firmly
closed and turn the flue damper (if you
have one) to horizontal.
• Wait until the fire has fully burnt out and
the fuel has turned to ash.
• Once the fuel has fully turned to ash,
remove the pizza dome door to let the
heat escape.
• Never put the hot ashes on the ground,
patio, wheely bin or near any plants or
trees.
• Never extinguish the oven with water
this will damage the oven and may cause
injury.
Tasty Stuff
Your ACR outdoor oven can be used for so much more than just pizza’s, from grilling to
roasting and everything in between, it’s the perfect companion for that authentic, al
fresco life.
Don Anthony’s pizza dough recipe
straight from the old country...
Ingredients to make 6 to 8
12”- 14” pizza bases:
• 800g of ‘00’ Tipo flour OR Strong white
bread flour
• 200g of fine semolina flour
• 14g fast acting dried yeast
• 2 teaspoons (10g) fine sea salt
• 1 tablespoon (15g) golden caster sugar
• 4 tablespoons (60ml) of olive oil
• 600ml of tepid warm water
Method:
• Mix the oil with the water in a suitable
jug, add the yeast and the sugar, leave
for five minutes to start fermentation
process
• Sieve the flour and the semolina flour,
together with the salt onto a clean
surface or sizable bowl
• Make a well in the middle of the flour,
slowly pour in the yeasty water mixture
Step 1
Step 2
ACR pizza ovens x3 user manual 2021 0321-7 27/04/2021 16:23 Page 10

Nonna Pam’s pizza sauce recipe...
Ingredients:
• 1 can of chopped tomatoes
• 500g of tomato passata
• 1 teaspoon (5g) dried garlic powder
• 1 teaspoon (5g) of dried oregano
• 1 teaspoon (5g) dried thyme
• 1 teaspoon (5g) golden caster sugar
• ½ teaspoon (2.5g) fine sea salt
• 2 teaspoons (10ml) of olive oil
• ½ teaspoon (2.5ml) of lemon juice
• ½ teaspoon of dried chilli flakes
(only if you like it hot use with
caution!!)
Method:
• Put all of the ingredients into a
saucepan, stir to combine over a gentle
heat and slowly simmer until reduced by
half
• Remove from the heat and allow to cool
slightly
• Wizz up in a blender until smooth and
adjust the seasoning to suit
• Either use immediately or pop it in the
fridge to use as necessary
and bring the flour into the centre with a
fork
• Once all of the water is added, bring the
rest of the mixture together using clean
flour dusted hands
• If using a bowl, tip all of the contents
onto a clean flour dusted surface, bring
all of the flour together and knead until
you have a smooth, springy dough,
about 5-10 minutes
• Lightly grease the inside of a large bowl
with olive oil, put the dough in the bowl,
cover with cling film and leave to rest in
a warm space until the dough has at
least doubled in size, about 2 hours
• Remove the dough from the bowl onto a
lightly flour dusted surface, knock the
dough back, this just means kneading
the dough for a minute or so
• You can either use the dough straight
away, or wrap in cling film and keep in
the fridge until needed
• If you can’t wait to use it, divide the
dough into 6 -8 little balls ready for
rolling out
• Roll out to about 5mm in thickness on a
lightly floured surface, top with nonna
Pam’s pizza sauce leaving about a 25mm
space around the edge of the dough
• Garnish with whatever you fancy and
pop in the outdoor oven.
Don’t forget to flour your pizza peel well,
it helps the pizza to slide off into the
oven!!
ACR pizza ovens x3 user manual 2021 0321-7 27/04/2021 16:23 Page 11
ACR Heat Products Limited, Unit 1, Weston Works,
Weston Lane, Tyseley Birmingham B11 3RP, England.
Oven cleaning and maintenance
2 Year Warranty
Always make 100% sure that the ashes
and the oven are completely cold before
you attempt to clean your outdoor oven
■ Clean the ash from the oven floor using
a soft brush and metal pan, deposit the
ashes in a safe manner, as wood ash is
all natural, you can use this as fertiliser
for your garden if you desire.
■ Clean the outside of the oven with a
soft cloth, please don’t use any abrasive
cleaners on the outside finishes, as this
may damage them.
■ The chamotte pizza stones are very
hardwearing, however they will develop
hairline cracks over time, this is nothing
to be concerned about and is to be
expected during the lifetime of the
oven.
■ To keep my good looks, please protect
me with a suitable cover when not in
use.
With the aim of constantly improving
our products, all modifications
considered necessary may be made
without notice.
This manual is correct at time of
printing.
Our appliances are guaranteed against
faults and hidden defects subject to
the following conditions:
The appliance must be installed and
operated in accordance with our
instruction manual.
All ACR ovens are covered by a 2 year
warranty which covers all oven body
steel panels.
It does not include items such as
vermiculite panels, chamotte bricks,
insulation, oven door, storage shelves,
wheels, external bolts/screws and the
painted finish.
It does not include damage caused by
incorrect maintenance, over heating of
the appliance and damage caused by
accidental damage or misuse.
The manufacturer disclaims any liability
for incidental, or consequential
damages.
ACR Heat Products Ltd shall in no
event be liable for any special,
indirect, consequential or other
damages of any nature whatsoever in
excess of the original purchase price
of ACR Heat Products ltd.
Your statutory rights are not affected
by this warranty.
The specifications within this document
are provided for information purposes
only and are under no circumstances
binding.
ACR pizza ovens x3 user manual 2021 0321-7 27/04/2021 16:23 Page 12
This manual suits for next models
2
Table of contents


