ACRONIS Cyber Appliance User manual

Acronis Cyber Appliance
R E V I S I O N : 6 / 1 4 / 2 0 2 1
Quick Start Guide
acronis.com

Table of contents
1 About Acronis Cyber Appliance 3
1.1 Acronis Cyber Appliance exterior 3
2 Safety instructions 5
3 Installing Acronis Cyber Appliance 6
3.1 Unpacking Acronis Cyber Appliance 6
3.2 Mounting Acronis Cyber Appliance into rack 6
3.3 Connecting cables to Acronis Cyber Appliance 9
3.4 Configuring Acronis Cyber Appliance 11
3.4.1 Creating a new cluster 11
3.4.2 Joining the existing cluster 14
3.4.3 Configuring the cluster by using the admin panel 17
4 Managing licenses 18
4.1 Installing license keys 19
4.2 Installing SPLA licenses 20
5 Managing updates 21
6 Configuring Acronis Cyber Infrastructure and Acronis Cyber Protect 23
6.1 Deploying the compute cluster 23
6.2 Deploying the Acronis Cyber Protect “All-in-One” Appliance virtual machine 23
6.2.1 Downloading the Acronis Cyber Protect “All-in-One” Appliance 23
6.2.2 Deploying the Acronis Cyber Protect “All-in-One” Appliance 24
6.3 Creating backup storage 26
6.4 Performing backup operations 26
6.4.1 Adding machines to be backed up 26
6.4.2 Configuring a protection plan 26
7 Getting technical support 29
8 Appendix: Specifications 30
8.1 Technical specifications 30
8.1.1 Power supply specifications 30
8.2 Environmental specifications 31
8.2.1 Air quality requirements 31
2 © Acronis International GmbH, 2003-2021

1 About Acronis Cyber Appliance
Acronis Cyber Appliance provides a 5-node Acronis Cyber Infrastructure cluster in a 19-inch 3U
rackmount server chassis. Acronis Cyber Appliance deploys into a universal and easy-to-use
software-defined infrastructure solution that combines virtualization and storage. Powered by
Acronis Cyber Infrastructure, it allows you to create and manage virtual machines, and offers object,
block, and file storage, including a local repository for cloud backups. You can also deploy Acronis
Cyber Protect in the Acronis Cyber Infrastructure compute cluster, and have both the storage and
the backup server running on Acronis Cyber Appliance.
Acronis Cyber Appliance comes in several models, which vary by storage capacity:
Model Raw storage, TB Usable storage1, TB
Capacity Performance
15031 60 31 18
15062 120 62 36
15078 150 78 45
15093 180 93 54
15108 210 108 60
15124 240 124 69
1With the recommended redundancy scheme. Erasure coding 3+2 is recommended for capacity;
replication=3 is recommended for performance.
1.1 Acronis Cyber Appliance exterior
Acronis Cyber Appliance consists of five identical nodes. On the front of the appliance, under the
front bezel are the power/reset buttons, a power LED of each node, as well as the main power
switch. The front panel also provides access to the disks for each node: three per node, ordered left
to right, that is, the leftmost three disks are for node #1, the next three are for node #2, etc.
On the back of Acronis Cyber Appliance are two power sockets and a number of connectivity
options.
3 © Acronis International GmbH, 2003-2021

Each node has its own network, IPMI, USB, and VGA ports.
The IPMI, USB, and VGA ports are only needed for advanced diagnostics. IPMI allows accessing the
nodes over the network for out-of-band management via a remote console. The default IPMI
password to access the management node via SSH is Acronis!Infra%30 (it changes to a user-
specified password during deployment). The USB and VGA ports allow you to connect a keyboard
and a monitor to a node if the network is unavailable.
Day-to-day management of Acronis Cyber Appliance is done over the network through the admin
panel, as described later in the guide.
4 © Acronis International GmbH, 2003-2021

2 Safety instructions
Warning!
Acronis Cyber Appliance may only be repaired by a certified service technician. You may only
perform troubleshooting as authorized by the support team. Damage due to unauthorized repairs
is not covered by the warranty.
If you need to reset a node to the factory default settings, contact the support, as described in
"Getting technical support" (p. 29).
5 © Acronis International GmbH, 2003-2021

3 Installing Acronis Cyber Appliance
Before installing Acronis Cyber Appliance, make sure you have the following:
l3U of server rack space in a standard 19-inch cabinet
lAt least five free 1/10 GbE ports in a network switch (10 GbE recommended)
lAt least five RJ45-to-RJ45 patch cables to connect the appliance to the switch
lTwo power sockets
If you want to set up network bonding, you will additionally need (a) five free 1/10 GbE ports in a
network switch (10 GbE recommended) and (b) five RJ45-to-RJ45 patch cables to connect the
appliance to the switch.
If you want to have access to the nodes from a remote console for out-of-band management, you
will additionally need (a) six free 1 GbE ports in a network switch and (b) six RJ45-to-RJ45 patch
cables to connect the appliance to the switch.
To install Acronis Cyber Appliance, perform the following steps:
1. Unpack Acronis Cyber Appliance.
2. Mount the appliance into a rack.
3. Connect cables to the appliance.
4. Configure Acronis Cyber Appliance by using the wizard.
5. Log in to the admin panel and install a license.
6. Set up the desired workloads in the admin panel.
Steps one through five are described in the following sections. For more information about step six,
refer to the Administrator Guide.
3.1 Unpacking Acronis Cyber Appliance
Inspect the packaging contents for damage before mounting the appliance and connecting power.
Before continuing, make sure the following items are present in the packaging: the appliance
chassis, mounting rails, two power cables, and this quick start guide.
3.2 Mounting Acronis Cyber Appliance into rack
The appliance comes with a set of server rails. Follow the steps below to install the rail and mount
Acronis Cyber Appliance into the rack.
1. Separate the inner and outer rails.
Separate the inner rail from the outer rail by sliding the inner rail forward until the locking tab is
visible, as per the illustration below. Depress the tab and separate the inner rail from the outer
rail by sliding the two apart.
6 © Acronis International GmbH, 2003-2021

2. Attach the inner rail to the appliance.
Align the rectangular cutouts on the inner rail to the pre-formed bayonets on the side of the
chassis. Secure the inner rail with a screw from the standard screw kit after all the bayonets go
through the cutouts and properly engage.
3. Install the outer rail into the rack.
When selecting the location, note that the rails are in the middle of the appliance. Make sure that
you install the outer rails with 1U clearance above and below.
Make sure that the safety lock is unlocked before mounting the brackets.
Insert the locating pins into the upper and lower square holes on the rail from the back of rail.
Push the safety lock forward to secure the bracket.
7 © Acronis International GmbH, 2003-2021

4. Mount the chassis into the cabinet.
Important
Two people are required to perform this step.
Insert the inner rail into the outer rail as shown in the figure.
Important
Make sure that the ball retainer is fully open before installing the chassis. Otherwise, you risk
damaging the chassis!
8 © Acronis International GmbH, 2003-2021

3.3 Connecting cables to Acronis Cyber Appliance
Note
For more details on configuring the network infrastructure, refer to the Administrator Guide.
To prepare Acronis Cyber Appliance for configuration, do the following:
1. Connect the appliance to the electrical outlets by using the supplied power cables.
2. On every node, connect any SFP+ or RJ45 network port (1 on the diagram) to a switch (2 on the
diagram) with access to a dedicated subnet for your infrastructure. Then, connect the admin
laptop (3 on the diagram) to the same switch. The diagram below shows an example of the cable
connection.
9 © Acronis International GmbH, 2003-2021
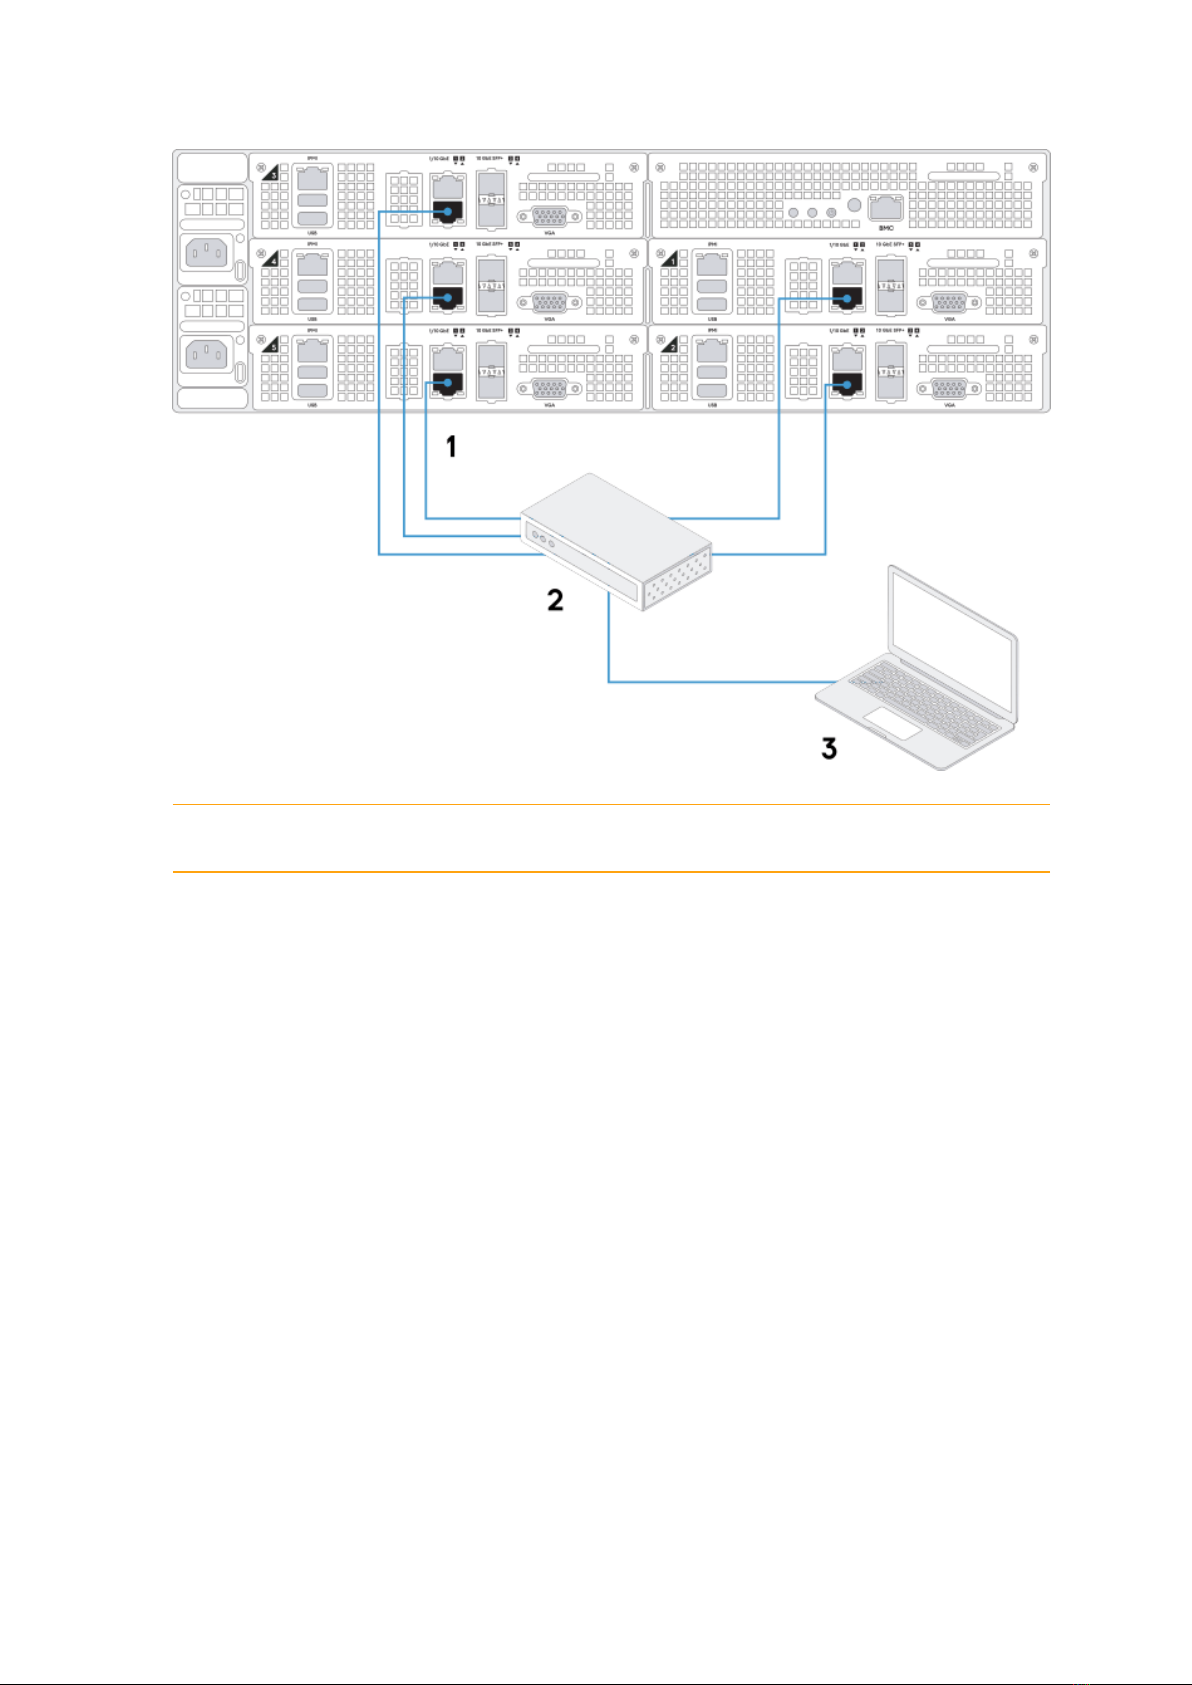
Important
The nodes have preconfigured IP addresses: 10.20.20.11 to 10.20.20.15.
3. (Optional) Connect the out-of-band management network interfaces of each node and the
chassis (1 on the diagram) to a switch with access to the IPMI subnet for your appliance (2 on the
diagram). The nodes have preconfigured IPMI IP addresses: 10.20.30.11 to 10.20.30.15. The
chassis has the preconfigured IPMI IP address 10.20.30.10. Connect the admin laptop (3 on the
diagram) to the same switch.
10 © Acronis International GmbH, 2003-2021

3.4 Configuring Acronis Cyber Appliance
Perform the following steps to configure Acronis Cyber Appliance:
1. Turn on the power: (a) press and hold down the main switch for five seconds, (b) press the power
buttons of each node.
2. Connect an admin laptop (from which you will configure Acronis Cyber Appliance) to the
network. Assign a static IP address to it from the same subnet that the nodes are in, for example,
10.20.20.100. As mentioned before, the nodes have preconfigured IP addresses: 10.20.20.11 to
10.20.20.15.
3. On this computer, open a web browser and visit the default primary node IP address
10.20.20.11. The configuration wizard has been tested to work in the latest Firefox, Chrome, and
Safari web browsers.
In the wizard, you can create a new cluster or connect the appliance to a cluster already created
with Acronis Cyber Infrastructure
3.4.1 Creating a new cluster
1. Once the configuration wizard is displayed, click Configure. Do not disconnect the appliance
until the end of the configuration.
2. Review and accept the license agreement. Then, click Next.
11 © Acronis International GmbH, 2003-2021

3. At the next step, select Create a new cluster.
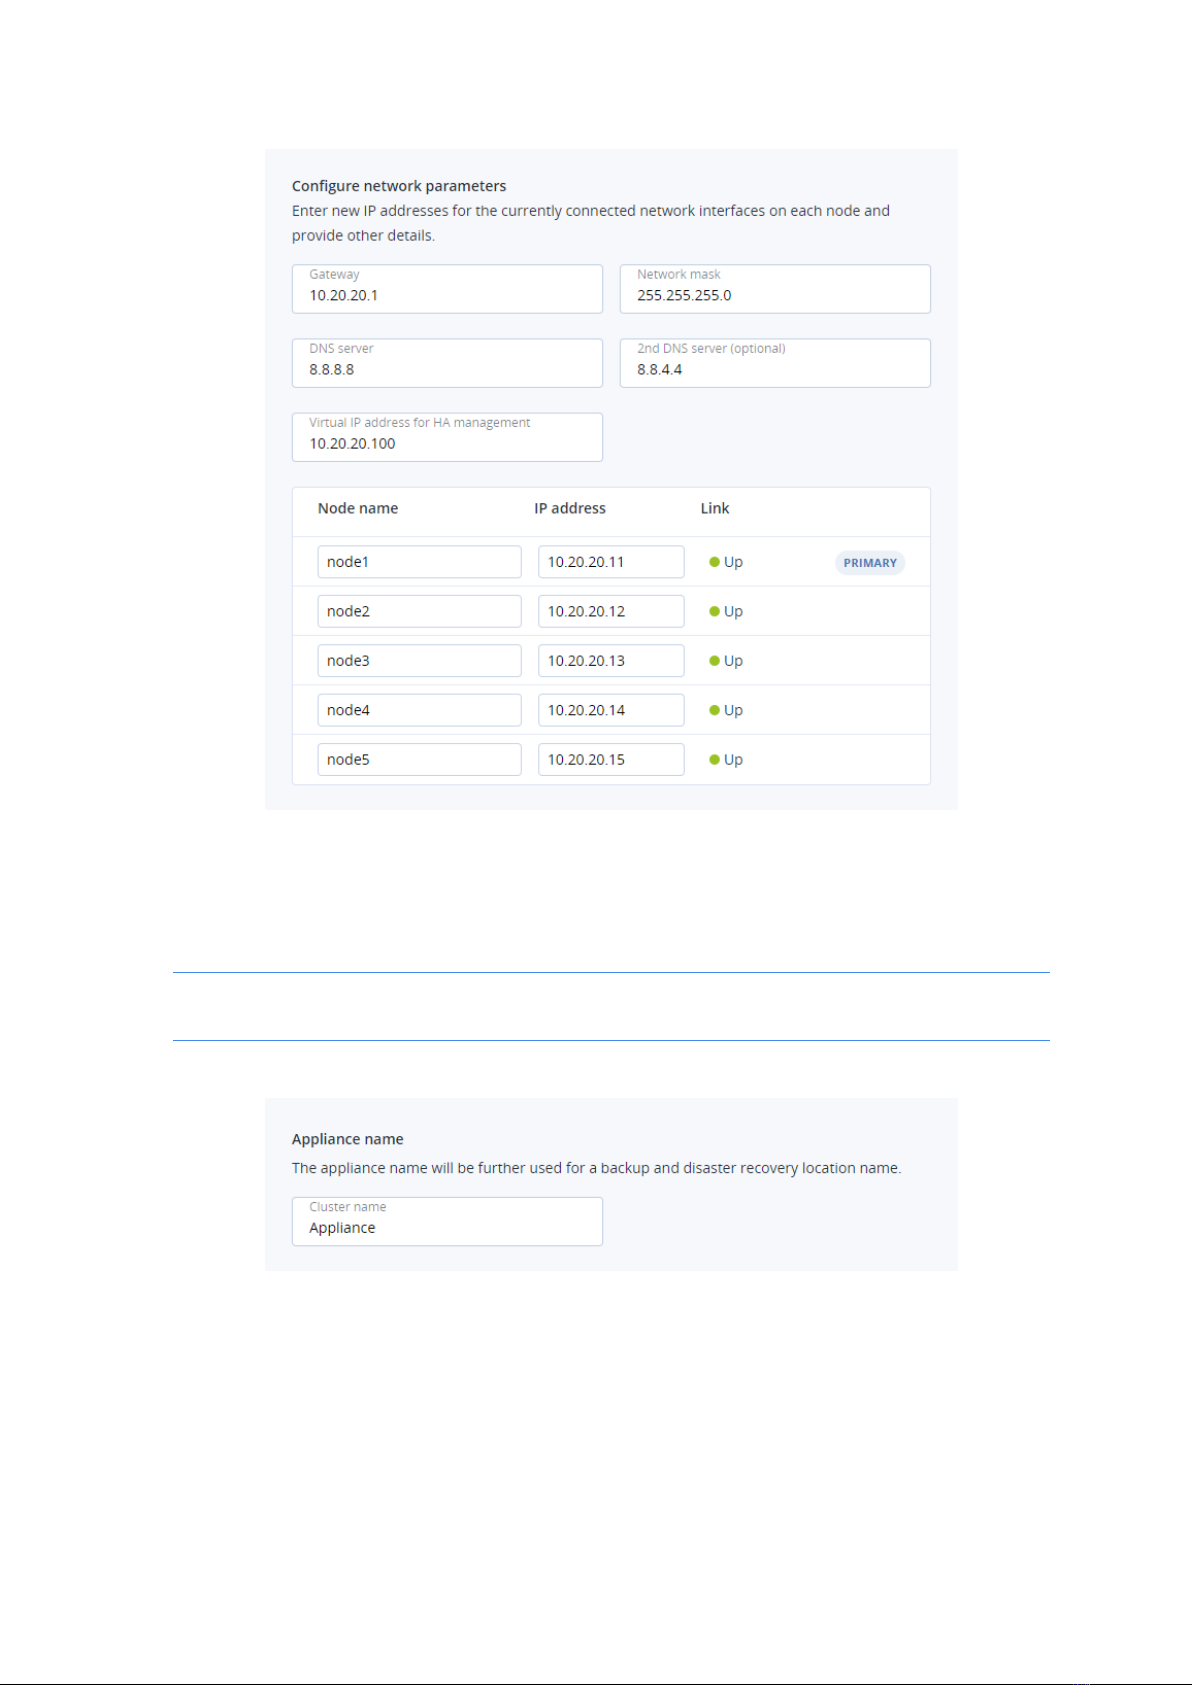
4. Under Configure network parameters, enter the following:
lA gateway. Consult your network administrator for the proper gateway address.
lA network mask. Consult your network administrator for the proper network/subnet mask.
lAt least one local DNS server.
lA virtual IP address at which you will access the admin panel. You can read more about its
high availability in the "Enable management node high availability" in the Administrator Guide.
lNew host names for all nodes (or leave the default names). Each node must have a unique
name. Otherwise, the installation will stop. You can rename the nodes to fit your
organization’s naming policies.
lNew static IP addresses for the network interfaces connected on all the nodes. If you leave the
fields empty, the default addresses of 10.20.20.11 to 10.20.20.15 will be used.
12 © Acronis International GmbH, 2003-2021
If one or more nodes are not reachable from the primary node, they will be marked as offline. In
this case, make sure the nodes are powered on and connected to the correct network. The
deployment will be blocked until all nodes are green (which means they can be accessed and
configured from the primary node).
Note
You will be able to configure bonds and VLANs later in the admin panel.
5. Under Appliance name, enter the cluster name. You cannot change it later.
6. Under Password, enter a password to log in to the local Acronis Cyber Infrastructure admin
panel.
13 © Acronis International GmbH, 2003-2021
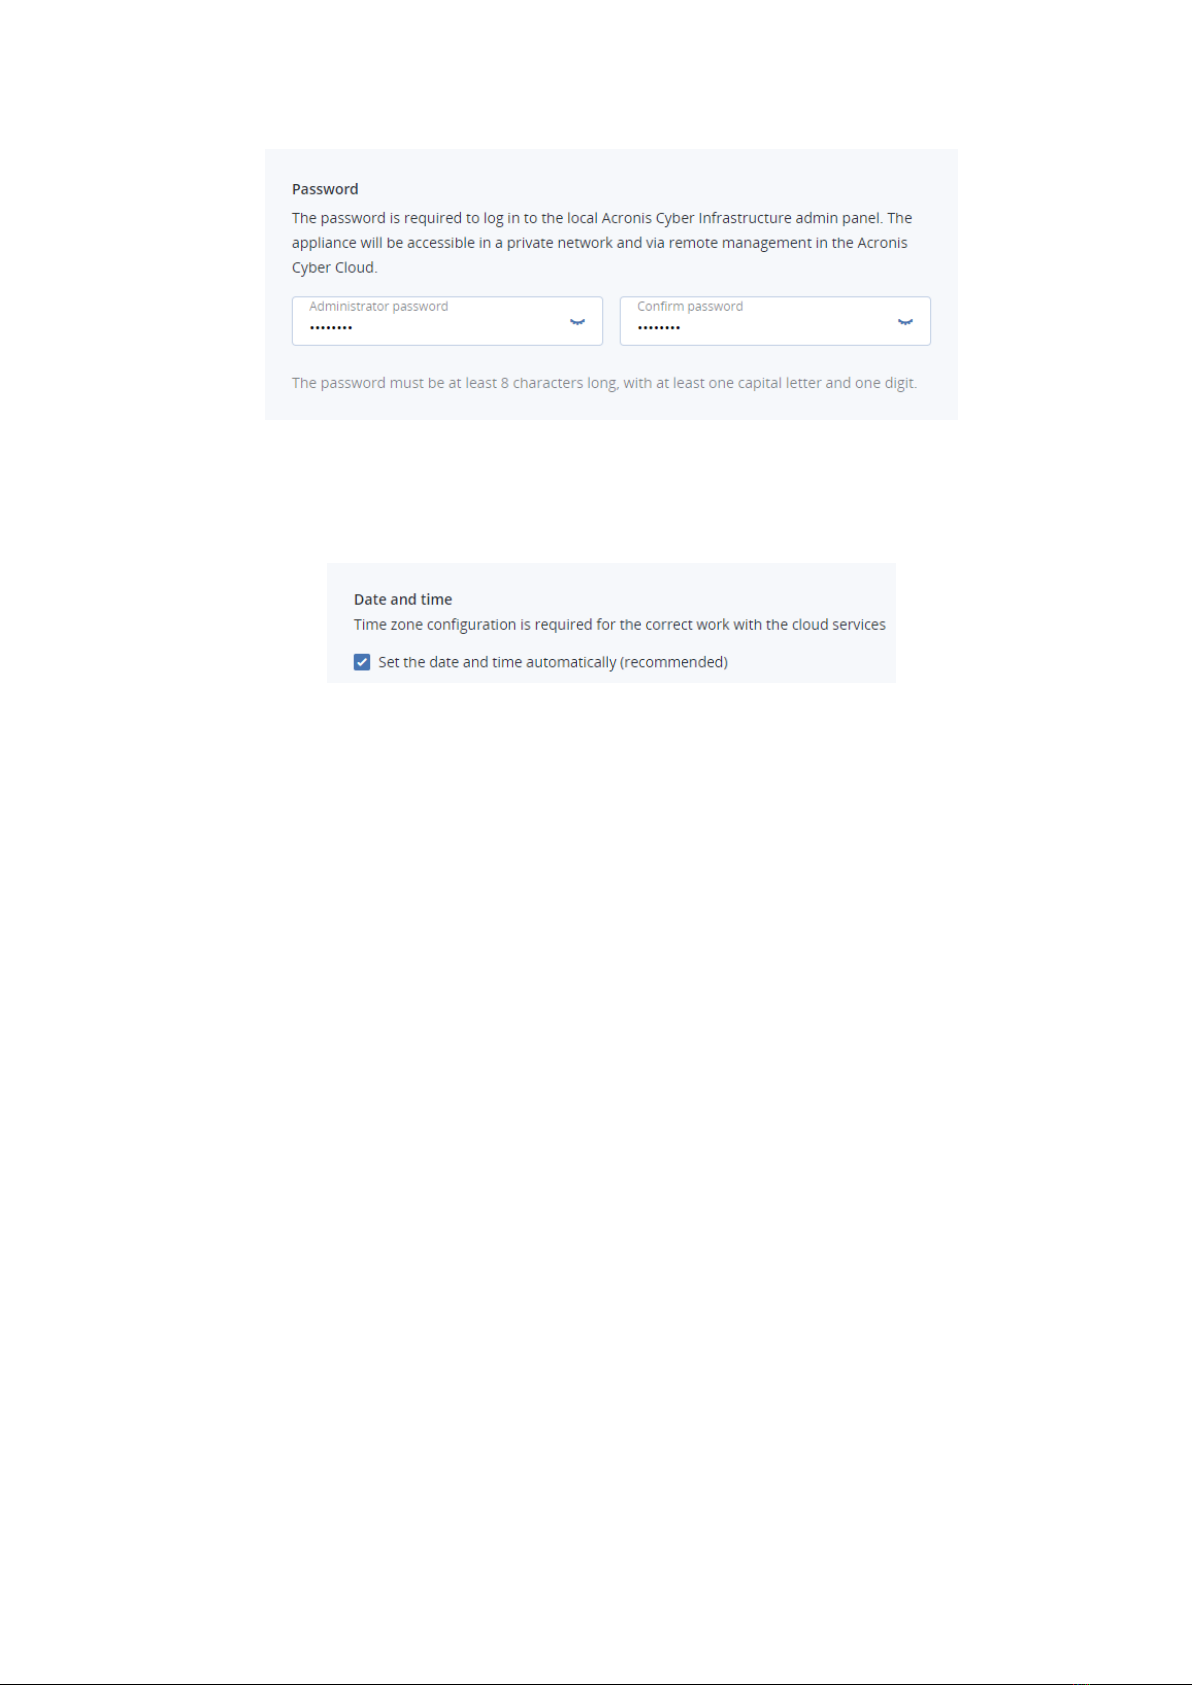
7. Under Date and time, it is recommended to select the Set the date and time automatically
check box. You can clear it to select a custom time zone and time. Keep in mind that the nodes
communicate with each other. Therefore, they must be on the same time zone and have the
same time in order to ensure proper synchronization.
8. Click Submit. The configuration will begin, as indicated on the progress bar.
9. Wait until the progress bar reaches the end. If you changed the nodes’ default IP addresses,
assign a static IP address from the nodes’ new subnet to the admin laptop from which you can
access Acronis Cyber Appliance.
3.4.2 Joining the existing cluster
You can connect the appliance to the existing Acronis Cyber Infrastructure cluster. For this, you will
need the private IP address of the management node and the administrator credentials for the
existing cluster. After the appliance is configured, all five nodes will be added to and managed from
the admin panel of the existing cluster.
1. Once the configuration wizard is displayed, click Configure. Do not disconnect the appliance
until the end of the configuration.
2. Review and accept the license agreement. Then, click Next.
14 © Acronis International GmbH, 2003-2021

3. On the next step, select Join the existing cluster.
4. Under Configure network parameters, enter the following:
lA network mask. Consult your network administrator for the proper network/subnet mask.
lNew host names for all nodes (or leave the default names). You can rename the nodes to fit
your organization’s naming policies.
Note
Each node in the existing cluster and in the appliance must have a unique name. If at least
two nodes have the same name, the installation will stop.
lNew static IP addresses for the network interfaces connected on all the nodes.
Note
Use IP addresses from the network/subnet of the existing cluster. The installation will be
blocked until all of the five nodes are given IPs from the same subnet/network as the existing
cluster.
15 © Acronis International GmbH, 2003-2021

If one or more nodes are not reachable from the primary node, they will be marked as offline.
In this case, make sure the nodes are powered on and connected to the correct network. The
deployment will be blocked until all nodes are green (which means they can be accessed and
configured from the primary node).
Note
You will be able to configure bonds and VLANs later in the admin panel.
5. Under Join existing cluster, enter the private IP address of the management node and the
administrator password of the existing cluster.
6. During the deployment, the Acronis Cyber Infrastructure versions are compared in the existing
cluster and in the appliance. If there are major discrepancies, you will be asked to specify a
network configuration for access to the Internet. Then, the necessary updates will be
downloaded, and the appliance will be upgraded or downgraded to match the version of the
existing cluster.
16 © Acronis International GmbH, 2003-2021

3.4.3 Configuring the cluster by using the admin panel
1. Once the configuration is completed, you will see a link to the cluster admin panel. Log in with
the username and password for the cluster.
2. If you need to make additional changes to the network configuration, for example, create bonds
and VLANs, connect the cables to other network ports and follow the instructions in "Creating
network bonds" and "Creating VLAN interfaces" in the Administrator Guide.
3. In case you created a new cluster, update the product to the latest version after the deployment
(refer to "Managing updates" (p. 21)). Proceed to Settings > Licenses and upgrade the default
trial license either by a key or an SPLA (for more details, refer to "Managing licenses" (p. 18)). If
you do not have a license, contact your sales representative.
4. Then, you can configure the cluster for using Acronis Cyber Protect (refer to "Configuring Acronis
Cyber Infrastructure and Acronis Cyber Protect" (p. 23)), or another desired workload, as
described in the Administrator Guide.
17 © Acronis International GmbH, 2003-2021

4 Managing licenses
Acronis Cyber Appliance is licensed for two types of deployments:
lHybrid cloud. Comes with a 3-year hardware warranty and requires a subscription for Acronis
Cyber Protect Cloud. After 3 years, the hardware warranty needs to be renewed for another 1 or
3 years.
For this deployment type, you will need to install an SPLA license, as described in "Installing SPLA
licenses" (p. 20).
lPrivate cloud. Comes with a 3-year license for Acronis Cyber Infrastructure and hardware
warranty. After 3 years, both the license and warranty need to be renewed for another 1 or 3
years.
For this deployment type, you will need to install a license key, as described in "Installing license
keys" (p. 19).
For more details on licensing options, see https://kb.acronis.com/content/62324.
Acronis Cyber Infrastructure supports the following licensing models for production environments:
lLicense key. Implementing the provisioning model, keys are time-limited (subscription) or
perpetual and grant a certain storage capacity. If a commercial license is already installed, a key
augments its expiration date or storage limit.
lServices provider license agreement (SPLA). The SPLA implements a pay-as-you-go model: it
grants unlimited storage capacity and customers are charged for their actual usage of these
resources. With an SPLA, Acronis Cyber Infrastructure automatically sends reports to Acronis
Cyber Cloud once every four hours. The license is displayed with the expiration date of two
weeks, which counts from the last sent report and is prolonged after each report. If no reports
have been received for two weeks, the license expires. For reports to reach their destination, the
cluster must be able to access the Acronis datacenter that has been used to enable the SPLA.
Make sure that TCP port 443 is open.
Note
An SPLA license is valid for Cloud Partners. If an SPLA is enabled, you can connect Backup
Gateway only to Acronis Cyber Protect Cloud and not to Acronis Cyber Protect. To connect
Backup Gateway to these products, you will need to use license keys. Furthermore, Acronis
Backup Gateway usage is not counted in the SPLA in Acronis Cyber Infrastructure. The SPLA only
counts universal usage that is not related to backup. Backup usage is shown in the Acronis Cyber
Protect Cloud section of Acronis Cyber Cloud.
You can switch the licensing model at any time:
lSwitching the licensing mode (for example, from a license key to an SPLA, or from a subscription
to perpetual) terminates the previously used key even if it has not yet expired. Terminated keys
cannot be used again.
18 © Acronis International GmbH, 2003-2021

lSwitching from an SPLA to a license key changes the licensing model to subscription or perpetual.
After doing so, ask your service provider to terminate your SPLA by either disabling the Acronis
Cyber Infrastructure application for your account or deleting the account.
Important
If a license expires, all write operations to the storage cluster stop until a valid license is installed.
4.1 Installing license keys
To install a license key, do the following:
1. If you are switching from an SPLA, ask your service provider to terminate the agreement by
either disabling the Acronis Cyber Infrastructure application for your account or deleting the
account.
2. On the Settings > Licenses screen, click Upgrade, and then click Register key.
3. In the Register license key window, paste the license key, and then click Register.
4. Back on the Licenses screen, click Activate if you are activating from a trial, or select one of the
following:
lUpgrade, to add storage capacity to the active license.
lProlong, to prolong the license which is about to expire.
19 © Acronis International GmbH, 2003-2021

Then click Activate.
The expiration date or storage capacity will change according to what the key grants.
4.2 Installing SPLA licenses
To install an SPLA license, do the following:
1. On the Settings > Licenses screen, click Upgrade, and then click Use SPLA.
2. In the Use SPLA window, select a region from the drop-down list. If your datacenter is not listed
there, just enter its URL directly into the drop-down field, for example: https://eu-
cloud.acronis.com. Then, click Activate. You will be redirected to the login page of Acronis
Cyber Cloud.
Note
For more information on datacenters, refer to https://kb.acronis.com/servicesbydc.
3. Log in to Acronis Cyber Cloud.
4. In the Register cluster window, accept the license agreement.
5. In the registration confirmation window, click Done.
The registered cluster will show up in Acronis Cyber Cloud. You will be able to monitor its resource
usage and download reports.
20 © Acronis International GmbH, 2003-2021
This manual suits for next models
6
Table of contents
Other ACRONIS Server manuals


