Actia ACT550 User manual
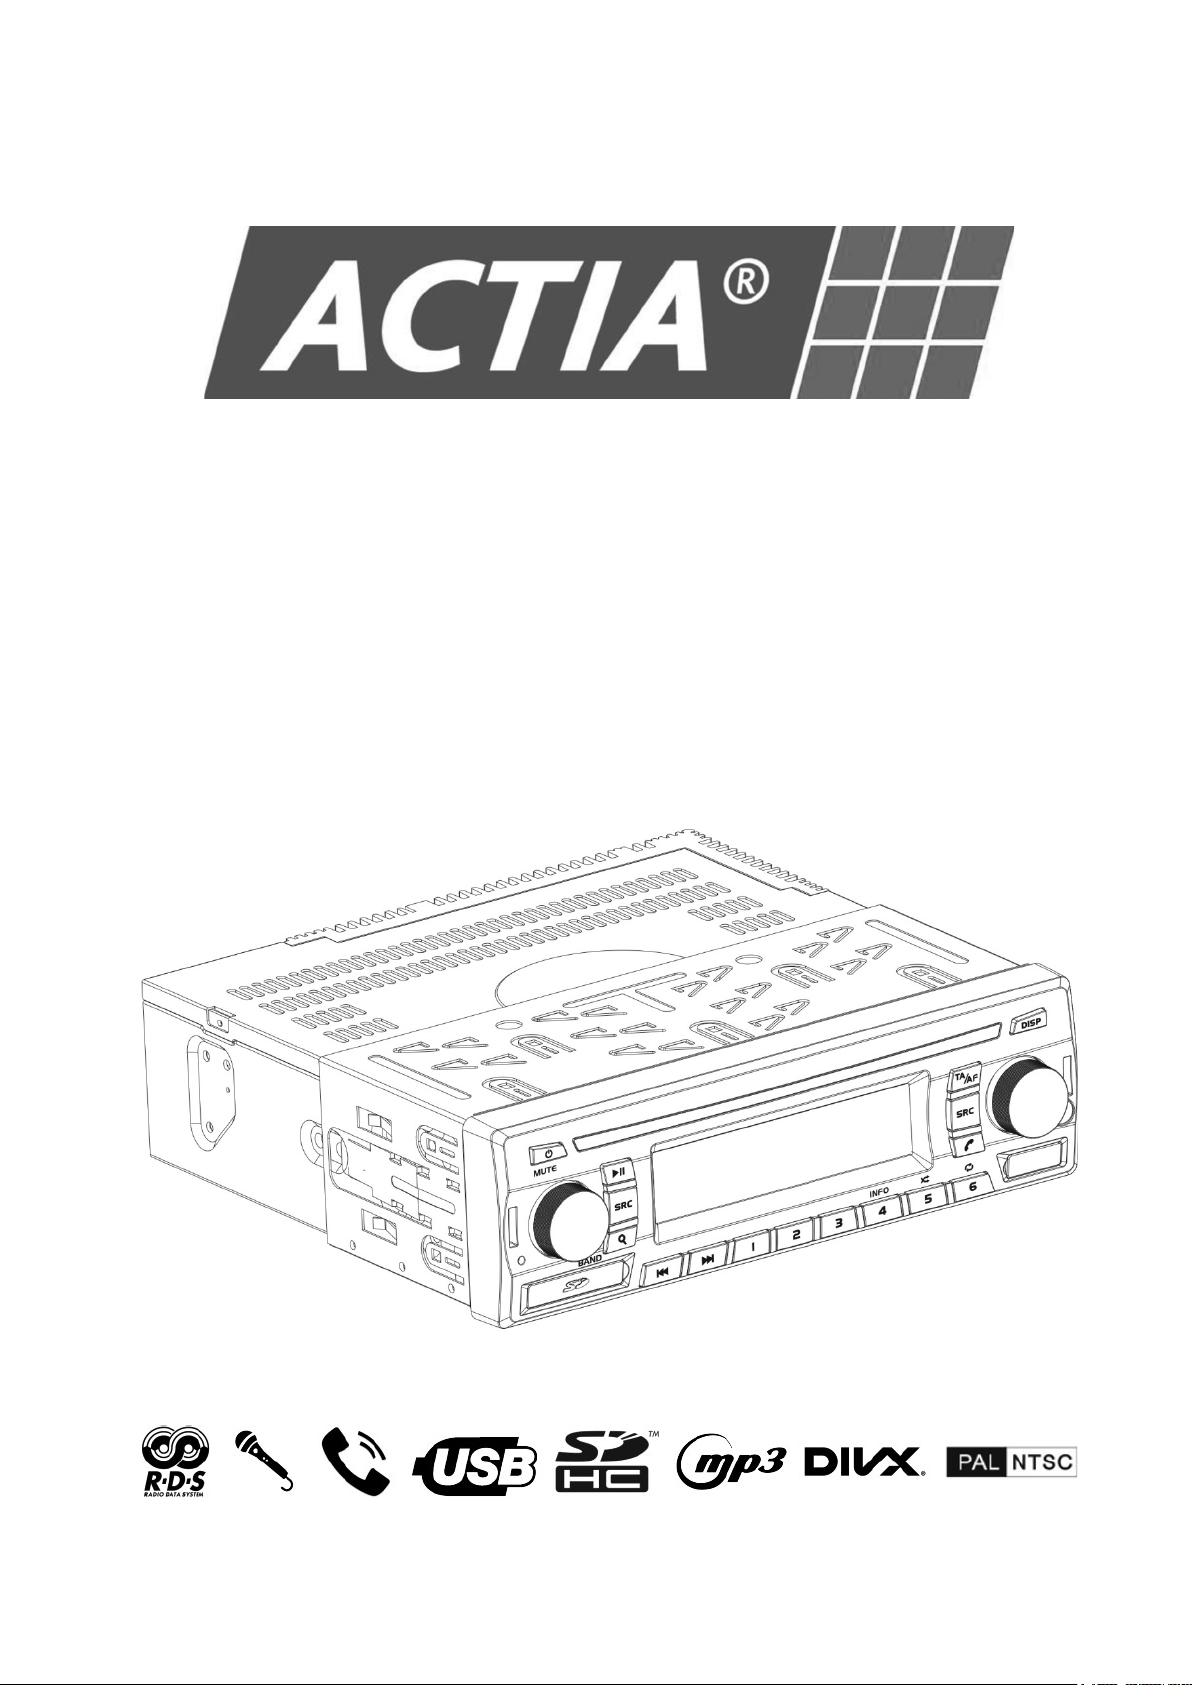
User Manual
ACT550
Dual-zone AV Media Player
ACT550 USER MANUAL
480258EN-1.0 29/06/2016 Page 1 of 34
POL.
C/ CALIDAD, 66
28906 GETAFE
Tel: +34 91 665 26 26
Fax: +34 91 665 23 24
N.I.F. ES-A-28905065
ER-
1482/1999
TABLE OF CONTENTS
1. Before Use ............................................................................................................................................... 2
2. The ACT550 Equipment ......................................................................................................................... 3
3. Basic Operation ...................................................................................................................................... 6
4. AM/FM Radio ........................................................................................................................................... 9
5. USB / SD Card ....................................................................................................................................... 14
6. Hands-Free and Wireless Audio ......................................................................................................... 18
7. Aux ......................................................................................................................................................... 21
8. Microphone ........................................................................................................................................... 22
9. Audio Settings (Any Source) ............................................................................................................... 23
10.General Settings ................................................................................................................................... 24
11.Maintenance .......................................................................................................................................... 25
12.Troubleshooting ................................................................................................................................... 26
13.Technical Specifications ..................................................................................................................... 27
14.Package Contents ................................................................................................................................ 33
15.Installation and Connection ................................................................................................................ 34
ACT550 USER MANUAL
480258EN-1.0 29/06/2016 Page 2 of 34
POL.
C/ CALIDAD, 66
28906 GETAFE
Tel: +34 91 665 26 26
Fax: +34 91 665 23 24
N.I.F. ES-A-28905065
ER-
1482/1999
1. Before Use
WARNING
Avoid using this product if it might hinder driving safety.
Do not operate any function that takes your attention away from safe driving.
CAUTION
General:
Keep this manual handy as a reference for operating procedures and precautions.
Protect the equipment from moisture.
Volume setting:
Always keep the volume low enough so you can hear sounds outside of the vehicle.
Remote control:
PULL OUT THE INSULATION SHEET BEFORE THE FIRST USE.
Remove the battery if the remote control is not used for a month or longer.
Do not recharge, disassemble, heat or dispose of the battery on a fire.
Do not store the battery with metallic materials.
In the event of battery leakage, wipe the remote control completely clean and install a new battery.
Comply with the environmental regulations that apply in your country/area regarding batteries
disposal.
When replacing the battery, make sure that the position of the new one is correct (with positive
(+)
and negative (-) poles facing the proper directions).
How to read this manual
Operations explained mainly using buttons of the faceplate.
[XX] indicates the selected items (buttons).
ACT550 USER MANUAL
480258EN-1.0 29/06/2016 Page 3 of 34
POL.
C/ CALIDAD, 66
28906 GETAFE
Tel: +34 91 665 26 26
Fax: +34 91 665 23 24
N.I.F. ES-A-28905065
ER-
1482/1999
2. The ACT550 Equipment
The ACT550 Equipment plays different audio and video sources independently in the driver and
passenger areas (Dual-Zone). For this, it has controls on the front panel, remote control and external
control via CAN bus (if the vehicle has the necessary equipment).
Main characteristics:
Dual-Zone.
Radio AM/FM RDS.
Digital audio and video playing from USB devices and SD Cards.
Audio playing from iPhone, iPod and iPad devices through the USB connection.
Microphone inputs for driver and guide.
IR remote control.
Hands-free function compatible with Bluetooth devices.
Audio playing from Bluetooth devices.
External control by CAN bus.
Auxiliary audio and video inputs and outputs.
Radio line output.
Integrated audio amplifier 20W per loudspeaker.
Note!
Each zone, driver (DRV) or passenger (PSG) has its
own volume control and source selection
key (SRC). The rest of controls are common for both areas.
DIVX
This DivX Certified® device has passed rigorous testing to ensure it plays DivX® video.
To play purchased DivX movies, first register your device at vod.divx.com. Find your registration
code in the DivX® VOD section of your device USB/SD Car Settings menu.
Covered by one or more of the following U.S. patents:
7,295,673; 7,460,668; 7,515,710; 8,656,183; 8,731,369; RE45,052.
ACT550 USER MANUAL
480258EN-1.0 29/06/2016 Page 4 of 34
POL.
C/ CALIDAD, 66
28906 GETAFE
Tel: +34 91 665 26 26
Fax: +34 91 665 23 24
N.I.F. ES-A-28905065
ER-
1482/1999
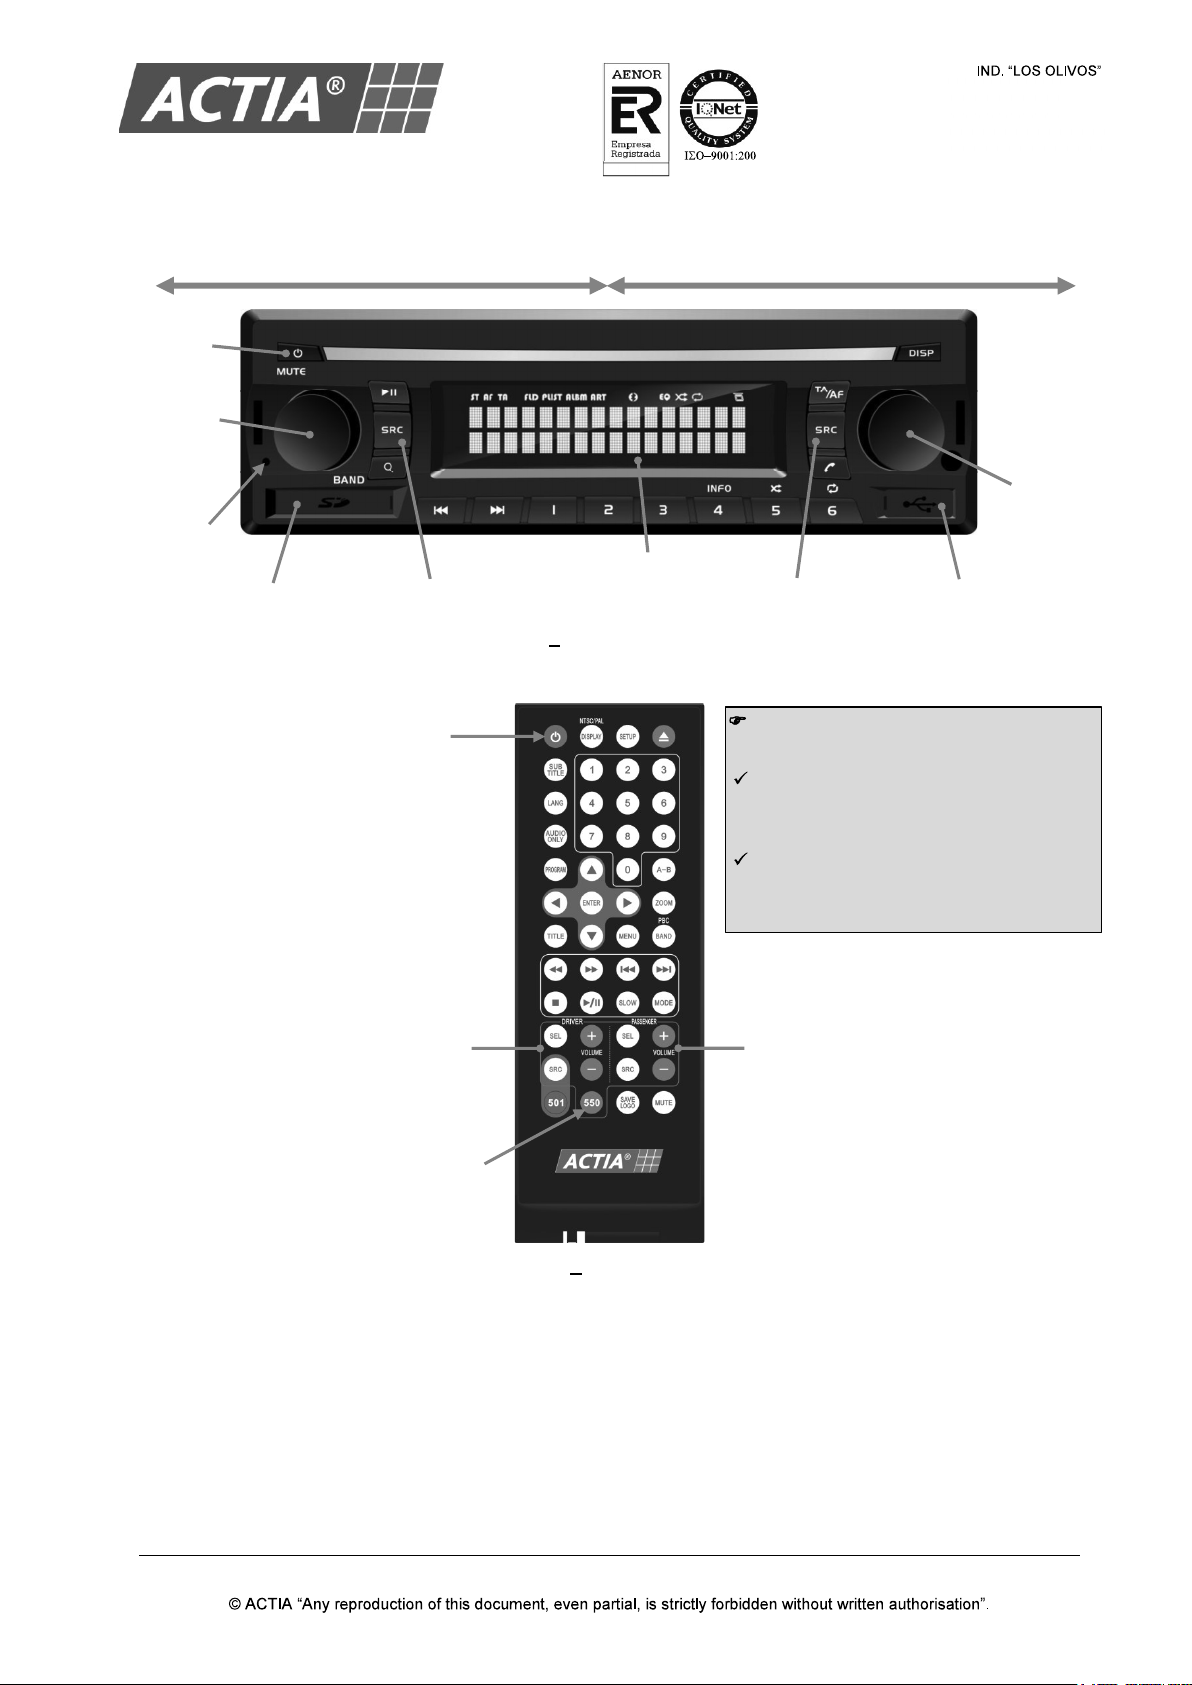
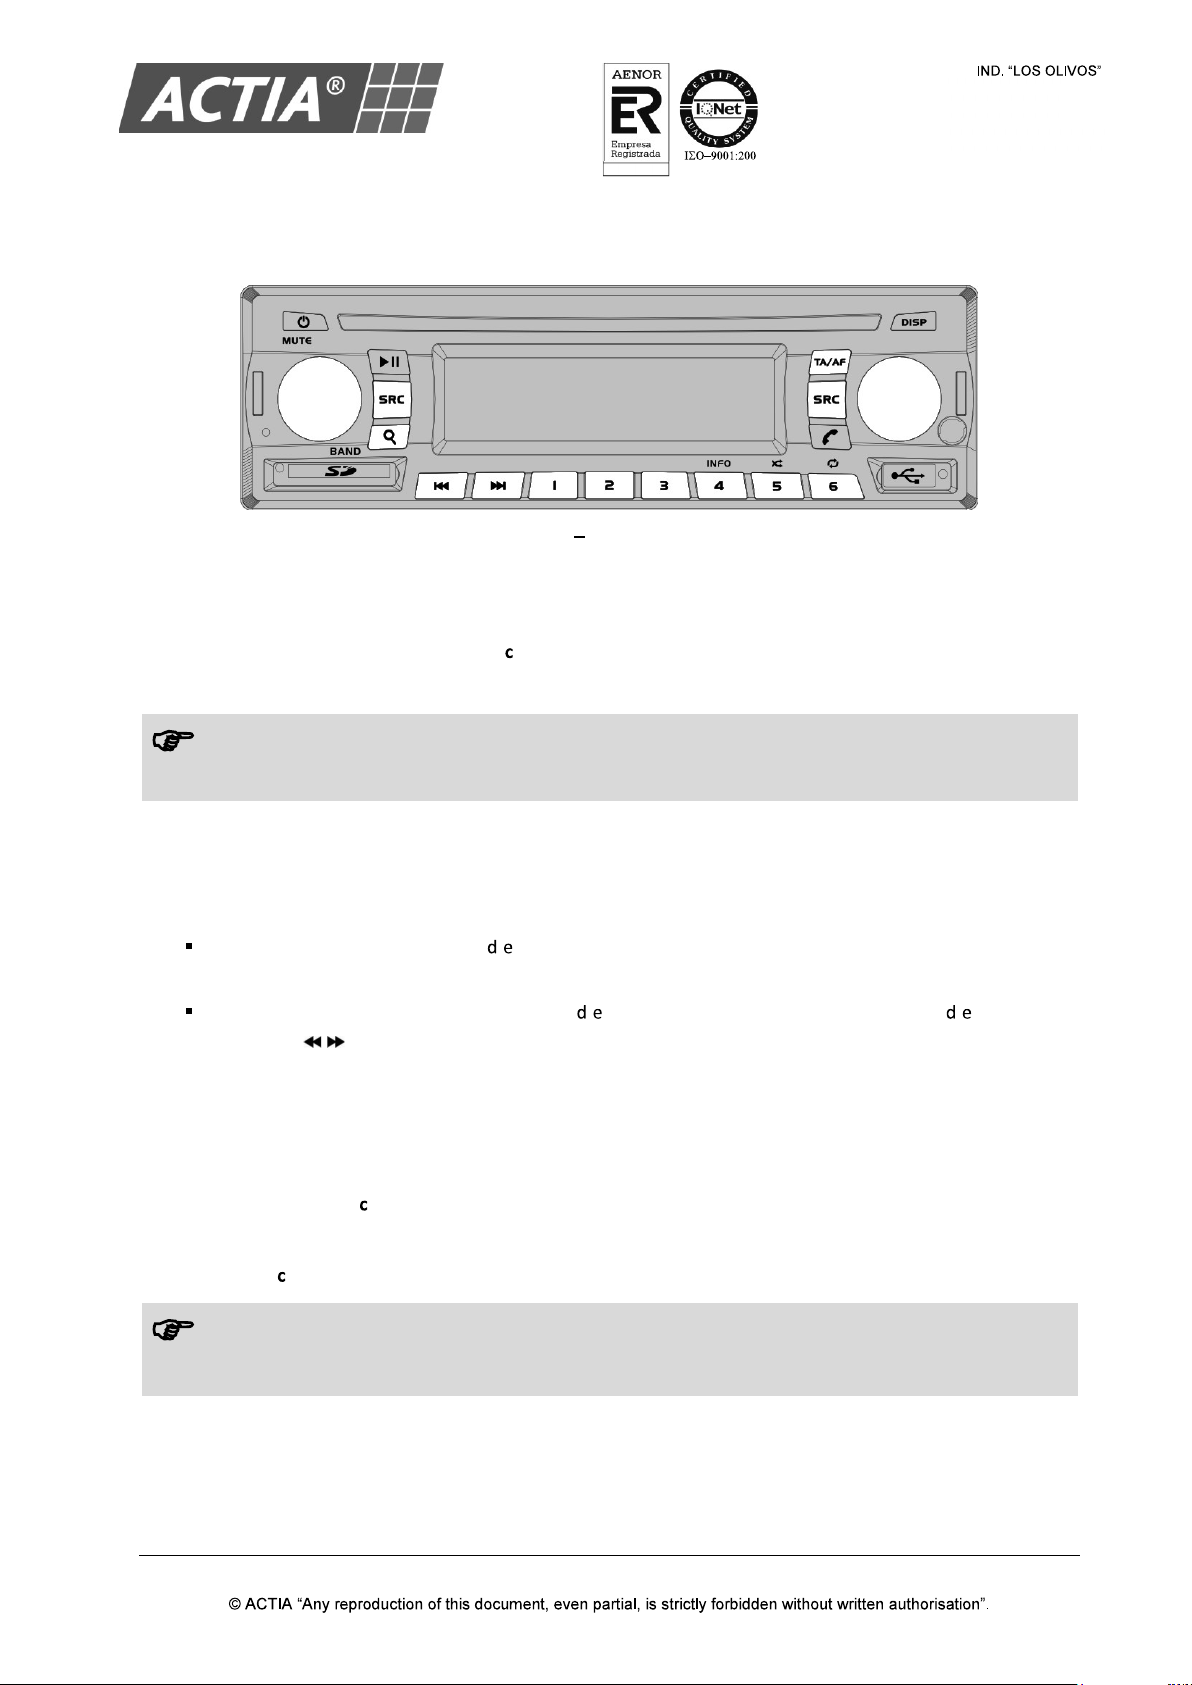
Figure 1 ACT550 Front Panel
Figure 2 Remote Control
Note!
Before the first use:
Pull out the battery insulation sheet
protruding from the bottom of the
remote control.
Press the key [550]
to link the
remote control to the
Equipment
ACT550.
USB PORT
LCD SCREEN
SD CARD SLOT
POWER
DRIVER ZONE VOLUME
AND SOURCE SELECTIO
N
CONTROLS (DRV)
PASSENGER
ZONE VOLUME
AND SOURCE SELECTION
CONTROLS (PSG)
LINK THE REMOTE
CONTROL TO THE
EQUIPMENT ACT550
DRV
VOLUME
KNOB
POWER
DRV SOURCE
SELECTOR
PSG SOURCE
SELECTOR
PSG
VOLUME
KNOB
RESET
BUTTON
DRIVER ZONE (DRV) PASSENGER ZONE (PSG)
ACT550 USER MANUAL
480258EN-1.0 29/06/2016 Page 5 of 34
POL.
C/ CALIDAD, 66
28906 GETAFE
Tel: +34 91 665 26 26
Fax: +34 91 665 23 24
N.I.F. ES-A-28905065
ER-
1482/1999
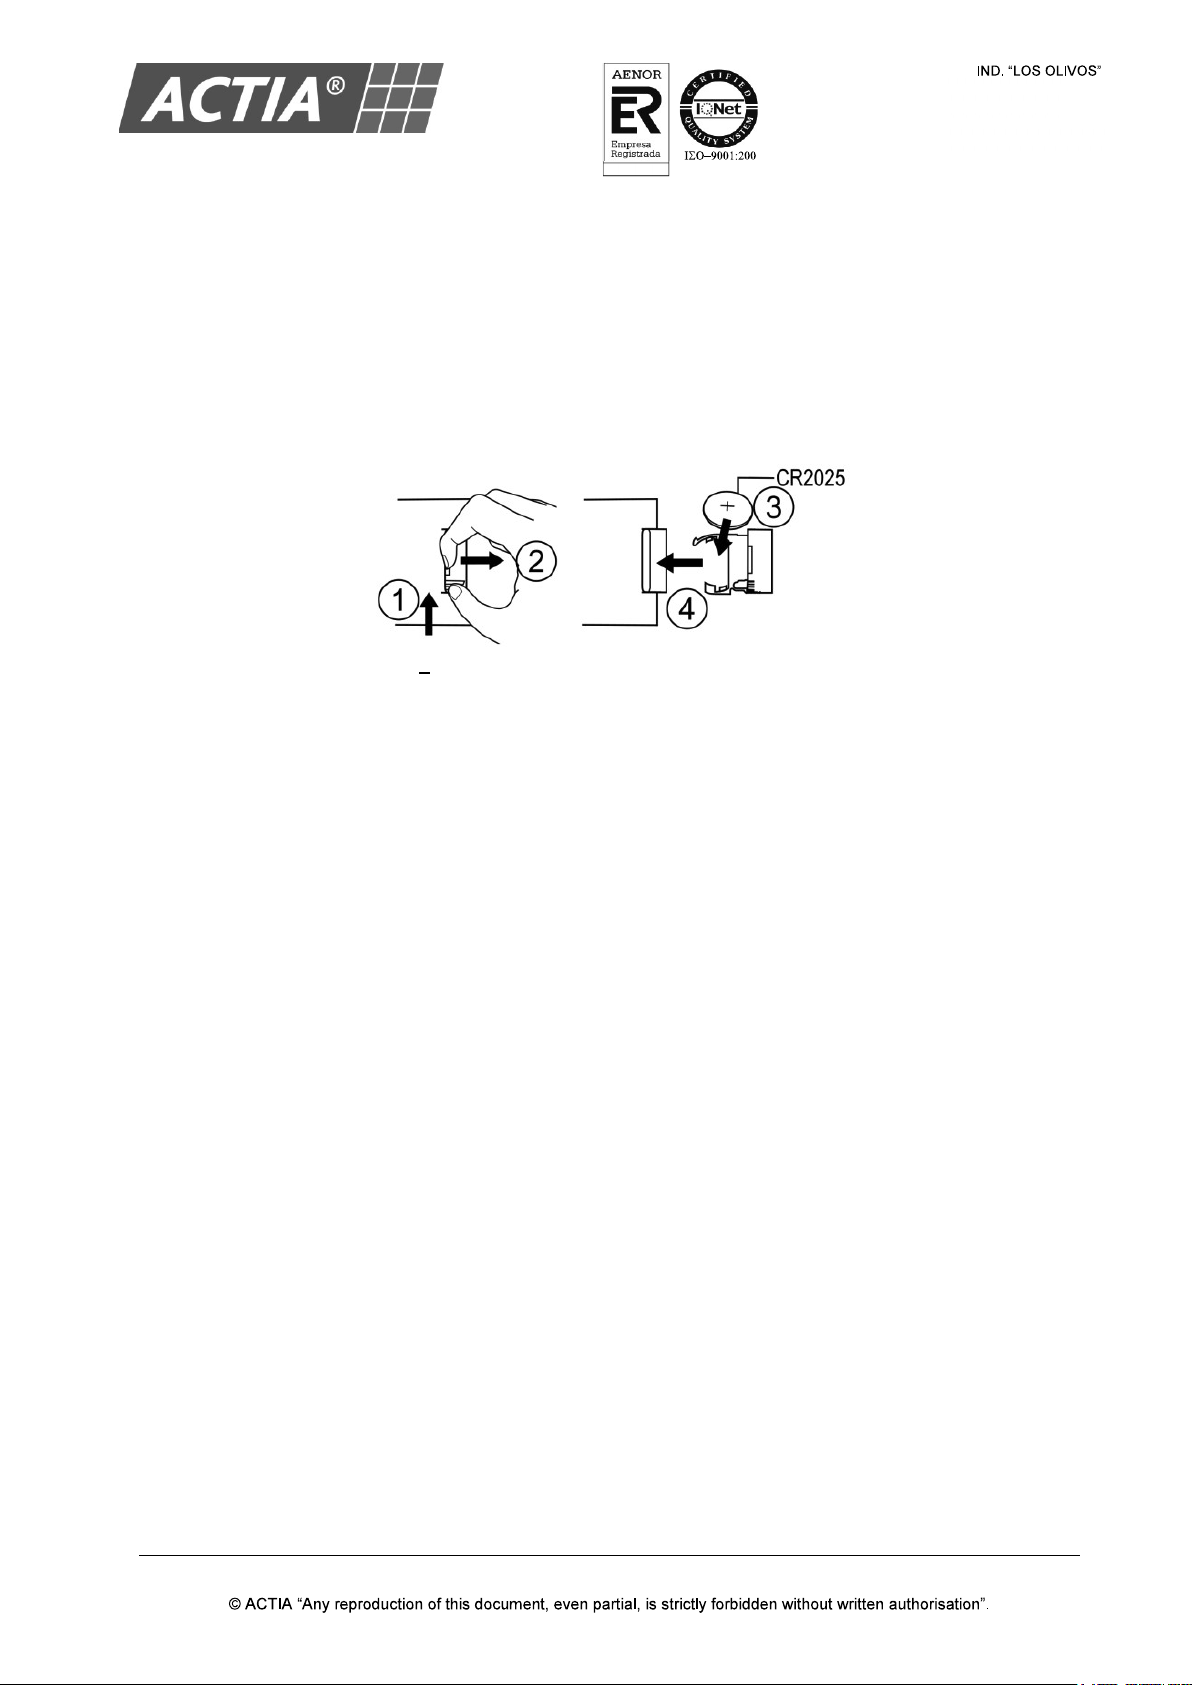
2.1. Replacement of the Battery of the Remote Control
To replace the remote control battery:
1. On the back of the remote control, press the tab on the side of the battery cover
2. Slide and remove the cover
3. Install a battery type CR2025 with positive (+) and negative (-) poles facing the proper position
4. Push the cover into place. Make sure it is fully seated.
Figure 3 Replacement of the Battery of the Remote Control

ACT550 USER MANUAL
480258EN-1.0 29/06/2016 Page 6 of 34
POL.
C/ CALIDAD, 66
28906 GETAFE
Tel: +34 91 665 26 26
Fax: +34 91 665 23 24
N.I.F. ES-A-28905065
ER-
1482/1999
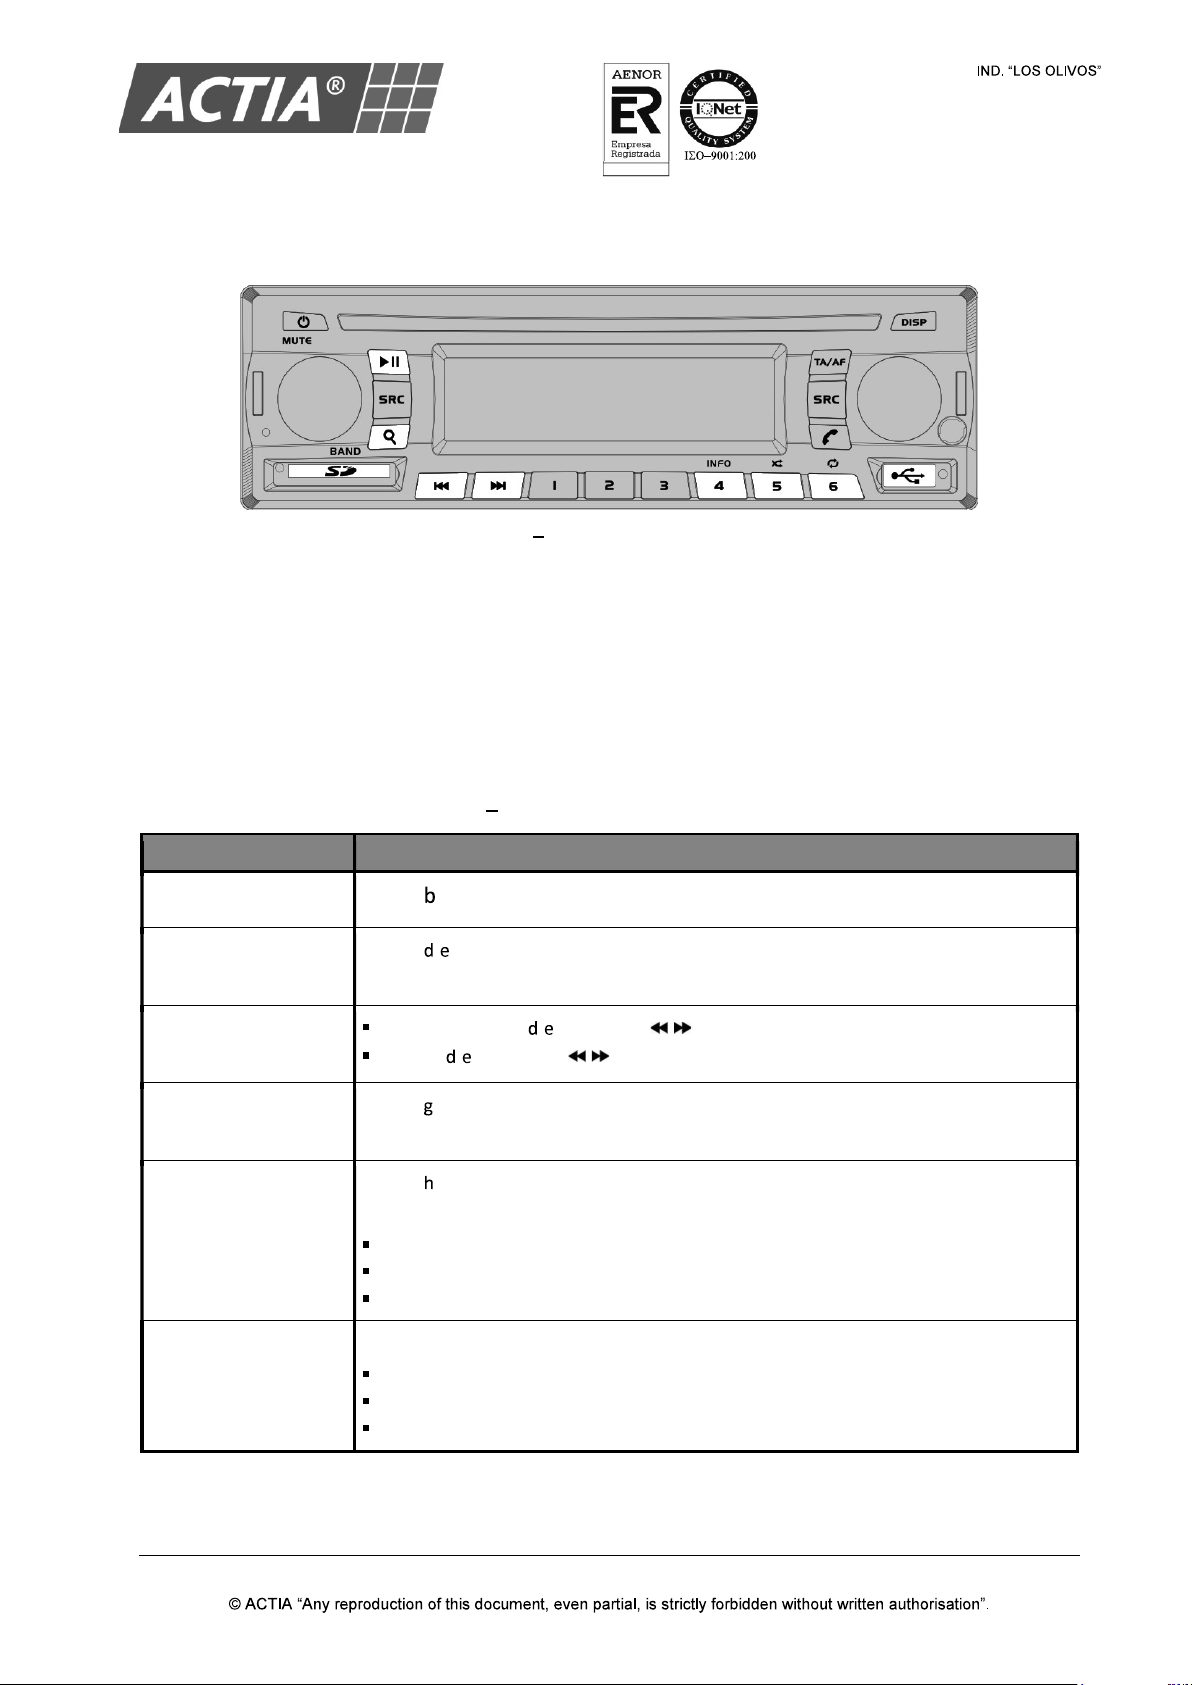
3. Basic Operation
Figure 4 Basic Controls
Table 1 Basic Controls
TO ACTION
Turn on/off the equipment 1. Put the vehicle ignition to ACC
2. Press [ ] to turn on the equipment
3. Press and hold [ ] to turn off the equipment.
Adjust the volume Turn the [VOLUME] knob or press the [VOLUME] keys on the remote
control.
Select a zone Press the [VOLUME] knob or the [SEL] key on the remote control, for the
concerned zone (driver or passenger).
The icons (Driver) o (Passenger) on the LCD screen indicate the
active zone at all times.
Select a source Press [SRC] repeatedly for the concerned zone until select the desired
source:
Radio AM/FM.
USB Player.
SD Card Player.
AV AUX (Auxiliary Input).
Wireless Audio (only available in the driver zone).
Silence the speakers Press [MUTE].
To release:
Press [MUTE] again to return to previous volume.
Reduce the volume and then increase it to unlock the silence.
Turn on the passenger
screens
Press [DISP] to turn on/off manually the passenger screens.
the LCD screen indicates that the passenger screens are ON.
Note!
For the remote control works with the ACT550 equipment, link the remote control with the
equipment by pressing [550].
ACT550 USER MANUAL
480258EN-1.0 29/06/2016 Page 7 of 34
POL.
C/ CALIDAD, 66
28906 GETAFE
Tel: +34 91 665 26 26
Fax: +34 91 665 23 24
N.I.F. ES-A-28905065
ER-
1482/1999
Note!
Some controls may not be available in the vehicle controls.
3.1. Restore the Factory Settings
To restore the values of the factory settings:
1. Switch off the equipment
2. Press and hold [DISP] while switching on the equipment [ ].
3.2. Reset of the Equipment
Note!
Perform a reset only if the equipment no longer responds to user controls.
To perform a reset, press the button [RESET] located on the left of the front panel (refer to Figure 1).
3.3. Reset and Restore the Factory Settings
Note!
Perform a reset and restore the factory settings only if the equipment no longer responds
to user
controls.
1. Press [RESET] + [DISP] simultaneously for 5 seconds
2. Release the button [RESET] while holding the key [DISP] until 3 beeps are heard.
3.4. Equipment Firmware Version
To display the equipment firmware version:
1. Select a source other than Radio
2. to Section 10)
3. Press and hold the key [1]. The firmware version is displayed in the LCD screen.
ACT550 USER MANUAL
480258EN-1.0 29/06/2016 Page 8 of 34
POL.
C/ CALIDAD, 66
28906 GETAFE
Tel: +34 91 665 26 26
Fax: +34 91 665 23 24
N.I.F. ES-A-28905065
ER-
1482/1999
3.5. Media Player Firmware Version
1.
2. 10)
3. To display the firmware version of the USB player:
press and hold the key [2] to display the firmware type BE
press and hold the key [3] to display the firmware type FE
4. To display the firmware version of the SD Card player:
press and hold the key [4] to display the firmware type BE
press and hold the key [5] to display the firmware type FE
5. When finished, press [VOLUME]
ACT550 USER MANUAL
480258EN-1.0 29/06/2016 Page 9 of 34
POL.
C/ CALIDAD, 66
28906 GETAFE
Tel: +34 91 665 26 26
Fax: +34 91 665 23 24
N.I.F. ES-A-28905065
ER-
1482/1999
4. AM/FM Radio
Figure 5 Radio Controls
4.1. Select a Frequency Band
With the Radio source selected, press [ ] / [BAND] repeatedly to select a frequency band: FM1, FM2,
FM3, AM1 or AM2.
Note!
Each frequency band has associated 6 memory positions.
4.2. Tune a Radio Station
With the Radio source selected:
Auto tuning (SEEK): press [ / ] to tune automatically to the next or previous station to the
current frequency.
Manual tuning (TUNE): press and hold [ / ] to activate the manual tuning. Press [ / ] repeatedly
(or press [ / ] on the remote control) to adjust the tuning frequency.
4.3. Radio Stations Continuous Scan
With the Radio source selected:
1. Press and hold [ ] / [BAND] to start the continous scan
When the equipment finds a valid radio station, the scan stops for a few seconds.
2. Press [ ] / [BAND] to stop the scan.
Note!
If the TA function is activated, the radio will only stop at those stations broadcasting traffic
news
and information.
ACT550 USER MANUAL
480258EN-1.0 29/06/2016 Page 10 of 34
POL.
C/ CALIDAD, 66
28906 GETAFE
Tel: +34 91 665 26 26
Fax: +34 91 665 23 24
N.I.F. ES-A-28905065
ER-
1482/1999
4.4. Tune and Memorize the Best Stations
This function performs a scan of the selected frequency band and memorizes the best stations in the
6-position memory.
With the source Radio selected:
1. Press and hold [SRC] to access the "Radio Settings" menu
2. Press the [VOLUME] knob repeatedly to select "AUTO MEM SCAN"
3. Press [ ] to start the stations scan and memorization process
Press [ ] to stop the process at any time.
4.5. Radio Stations Memory Management
With the Radio source selected:
Memorize a tuned radio station: press and hold any memory button [1] to [6] (or the keys [1] to
[6] on the remote control).
Select a memorized radio station: press [1] to [6] (or the keys [1] to [6] on the remote control)
corresponding to the memory where the radio station is memorized.
Note!
LCD screen will display the number of the selected memory along with the frequency of the radio
station.
4.6. RDS Functions
With the Radio source selected and the RDS system activated (refer to Section 4.7, Radio Settings):
AF Function: press [TA/AF] to activate or deactivate automatic retune to alternative frequencies.
TA Function: press and hold [TA/AF] to enable or disable the search for stations broadcasting
news and traffic announcements.
and/or icons light up on the LCD screen when the corresponding function is ON.
RDS System
The radio data system (RDS) provides additional information relating to an FM radio station.
AF Function
In case of loss of signal from a FM station, the AF
function searches for an alternative frequency
for the same FM station. If after a while, it has not located an alternative frequency the search
stops automatically.
TA Function
It allows searching a station broadcasting traffic news or announcements.
ACT550 USER MANUAL
480258EN-1.0 29/06/2016 Page 11 of 34
POL.
C/ CALIDAD, 66
28906 GETAFE
Tel: +34 91 665 26 26
Fax: +34 91 665 23 24
N.I.F. ES-A-28905065
ER-
1482/1999
4.7. Radio Settings
With the Radio source selected:
1. Press and hold [SRC] to enter the menu
2. Press the [VOLUME] knob repeatedly to select the desired parameter
3. Turn the [VOLUME] knob (o press the [VOLUME] keys on the remote control) to select the value
for the desired function. Refer to Table 2
4. If not operation is done for a few seconds, the equipment automatically returns to the main
screen.
Table 2 Radio Settings
PARAMETER VALUE DESCRIPTION
AUTO MEM SCAN
- Search and automatically memorizes the six radio stations
with better signal. Press [ ] / [BAND] to start a search.
REGION ASIA / EUROPA /
AMERICA Select the geographic area.
RDS SYSTEM ON/OFF Activate or deactivate the RDS system
AF REGIONAL
ON Automatic retuning between regional stations only.
OFF Automatic retuning between any station, regional or
national.
ACT550 USER MANUAL
480258EN-1.0 29/06/2016 Page 12 of 34
POL.
C/ CALIDAD, 66
28906 GETAFE
Tel: +34 91 665 26 26
Fax: +34 91 665 23 24
N.I.F. ES-A-28905065
ER-
1482/1999
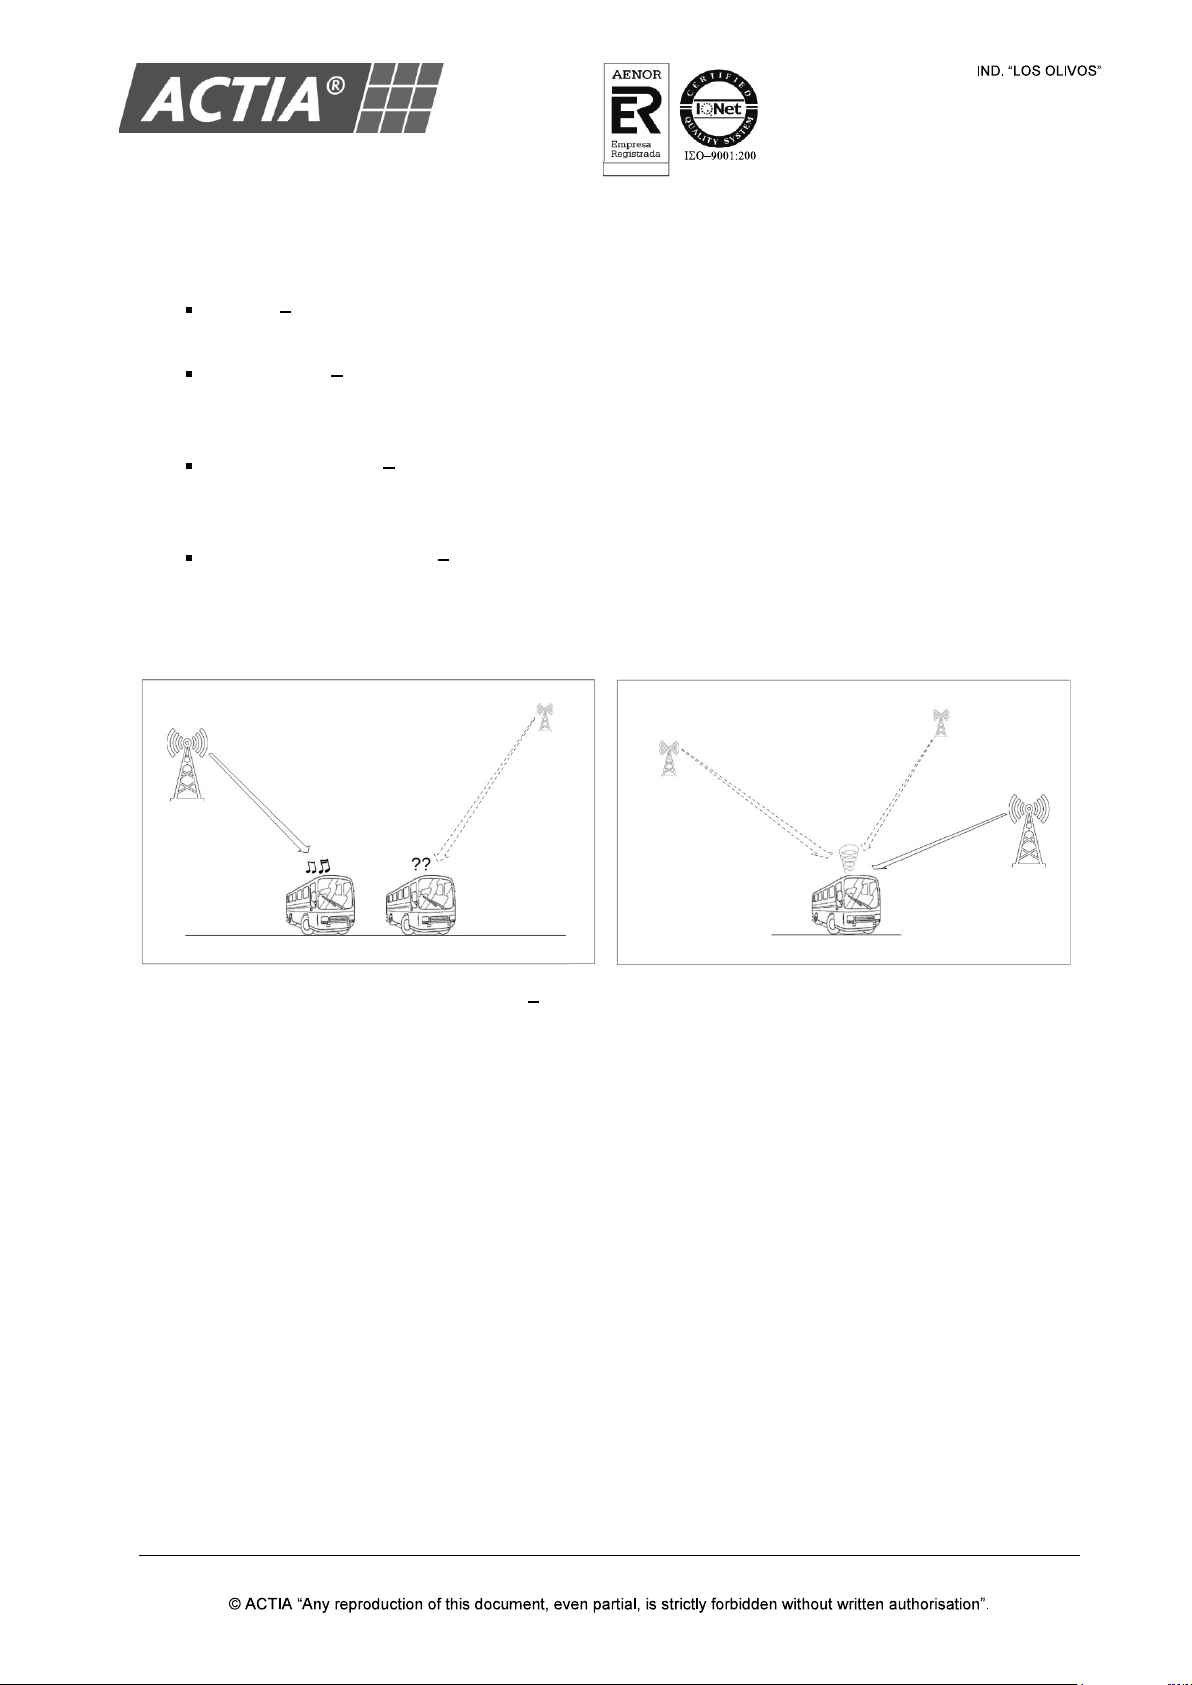
4.8. How the Reception of Radio Works
AM and FM radio signals are broadcast from transmitter towers located around your city. They are
intercepted by the radio antenna on your vehicle. This signal is then received by the radio and sent to the
vehicle speakers.
When a strong radio signals has reached the vehicle, the precise engineering of your radio system
ensures high quality reproduction. However, in some cases the signal coming to the vehicle is not strong
and clear. This can be due to factors such as the distance from the radio station, closeness of other
strong radio stations or the presence of buildings, bridges or other large obstructions in the area.
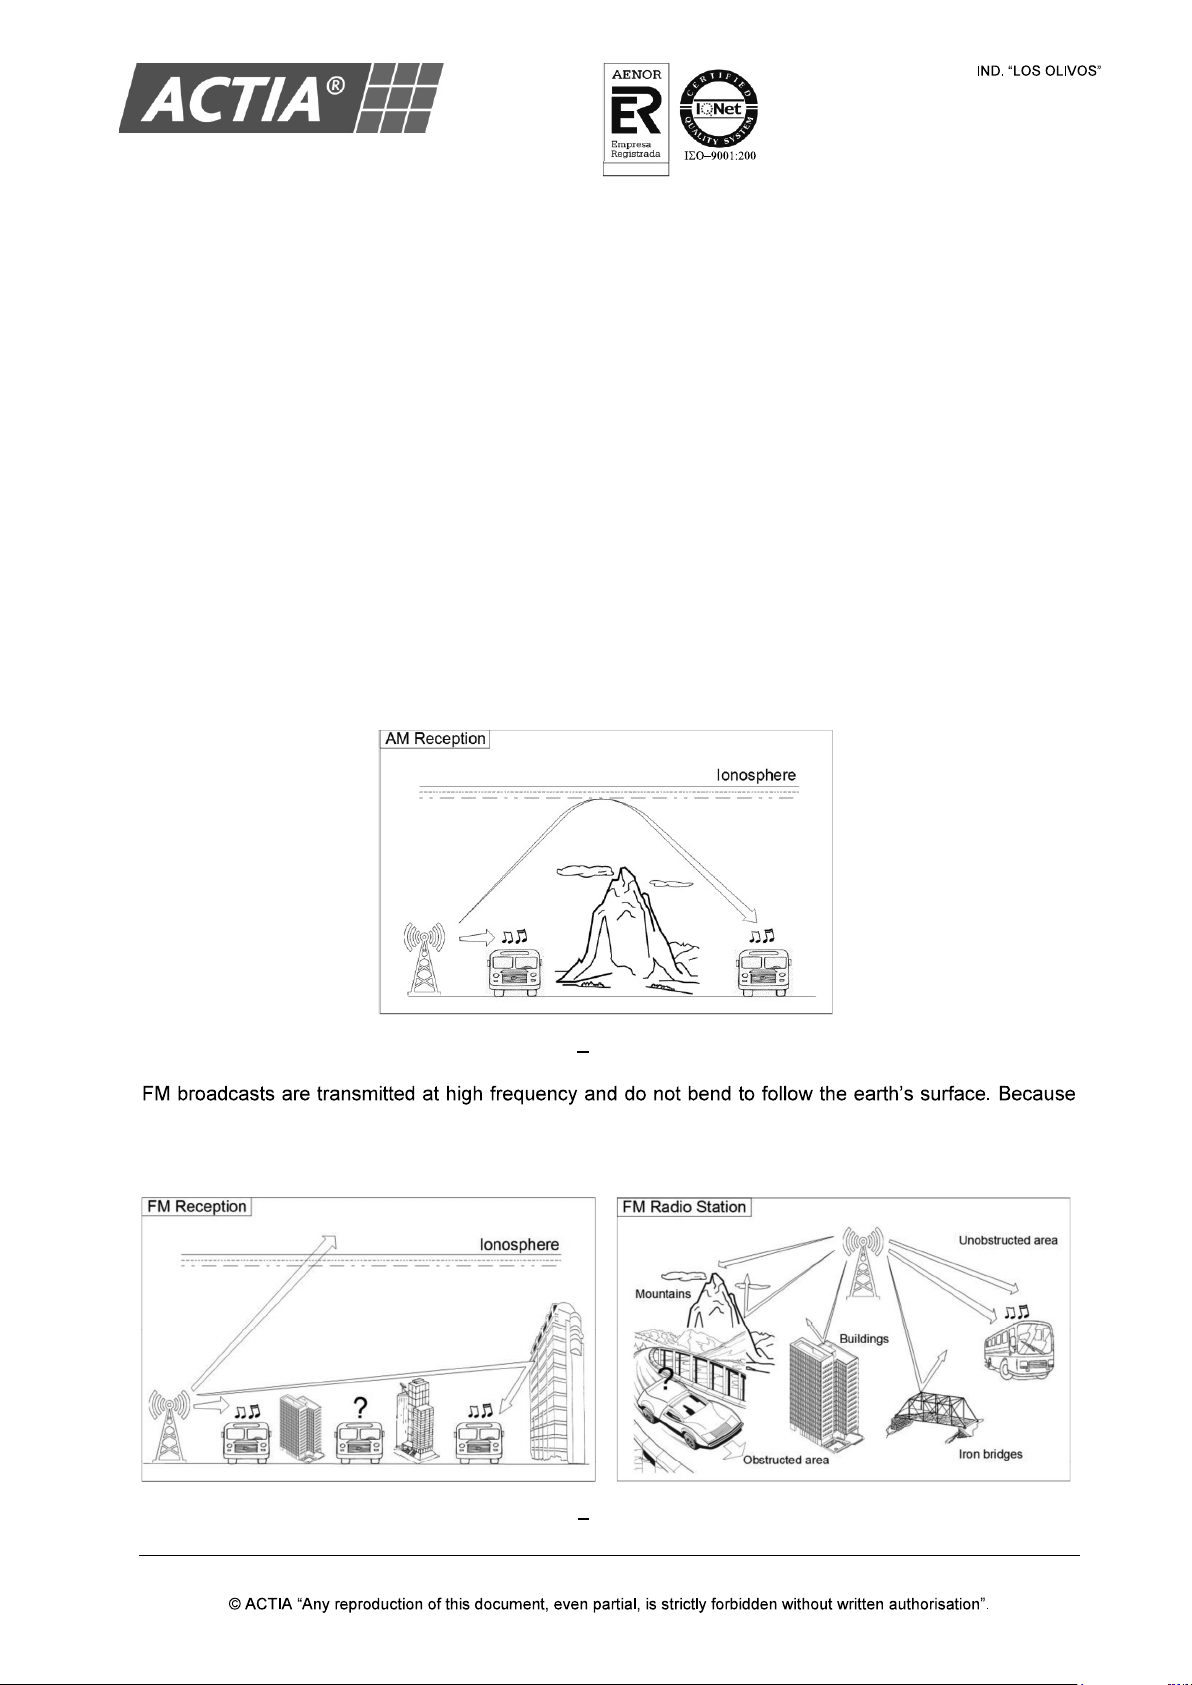
AM signal reception is usually better than FM reception. This is because AM radio waves are transmitted
at low frequency. These long, low frequency radio waves can follow the curvature of the earth rather than
travelling straight out into the ionosphere. In addition, they curve around obstructions so that the can
provide better signal coverage. Because of this, clear AM broadcasts can be received at greater
distances than FM broadcasts.
Figure 6 AM Reception
of this, FM broadcasts generally begin to fade at short distances from the station. Also, FM signals are
easily affected by buildings, mountains, or other obstructions.
Figure 7 FM Reception
ACT550 USER MANUAL
480258EN-1.0 29/06/2016 Page 13 of 34
POL.
C/ CALIDAD, 66
28906 GETAFE
Tel: +34 91 665 26 26
Fax: +34 91 665 23 24
N.I.F. ES-A-28905065
ER-
1482/1999
These can result in certain listening conditions, which might lead you to believe a problem exists with your
radio. The following conditions are normal and do not indicate radio trouble:
Fading As the vehicle moves away from the radio station, the signal will weaken and sound will
begin to fade. When this occurs, it is suggested that you select another stronger station.
Flutter/Static Weak FM signals or large obstructions between the transmitter and the radio can
disturb the signal causing static or fluttering noises to occur. Reducing the treble level may lessen
this effect until the disturbance clears.
Station Swapping As a FM signal weakens, another more powerful signal near the same
frequency may begin to play. This is because the radio is designed to lock onto the clearest
signal. If this occurs, select another station with a stronger signal.
Multi-Path Cancellation Radio signals being received from several directions can cause
distortion or fluttering. This can be caused by a direct and a reflected signal from the same station
or by signals from two stations with close frequencies. If this occurs, select another station until
the condition has passed.
Figure 8 FM Reception Conditions
RDS function retunes to alternative frequencies (AF) allowing the above situations to be managed
automatically by selecting alternative frequencies for the same station to minimize cases of poor
reception. However, if a station does not provide the information within the required RDS (alternative
frequencies list) or does not have adequate coverage of radio stations, the radio will not be able to
act in situations of poor reception described above.
ACT550 USER MANUAL
480258EN-1.0 29/06/2016 Page 14 of 34
POL.
C/ CALIDAD, 66
28906 GETAFE
Tel: +34 91 665 26 26
Fax: +34 91 665 23 24
N.I.F. ES-A-28905065
ER-
1482/1999
5. USB / SD Card
Figure 9 USB / SD Card Controls
5.1. Play the Content on a Device
With the USB or SD Card source selected:
1. Insert a SD card, connect a USB storage device or a USB Apple device
2. Playback automatically starts, playing the first element of the device or the last item played
3. Control the playback as indicated in the Table 3.
Table 3 USB / SD Card Playback Controls
TO ACTION
Play / pause playback
Press [ ].
Reverse / Forward to
the next item
Press [/].
Change playback
speed
Press and hold [/] or press [ / ] on the remote control: (x2).
Press [/] or press [ / ] on the remote control: (x4), (x8), (x16).
Activate / deactivate
random play
Press [ ] (or press and hold [MODE] on the remote control).
Change playback
mode
Press [ ] (or press [MODE] on the remote control) to switch between the
different repeat modes:
REP 1: repeat the current file.
REP DIR: repeat all files in the current folder.
REP ALL: repeat all files in the current device.
Change the LCD
screen information
Press [INFO] to switch between the different information modes:
File name and time of track.
File name and time to finish.
Folder and file name.
ACT550 USER MANUAL
480258EN-1.0 29/06/2016 Page 15 of 34
POL.
C/ CALIDAD, 66
28906 GETAFE
Tel: +34 91 665 26 26
Fax: +34 91 665 23 24
N.I.F. ES-A-28905065
ER-
1482/1999
5.2. Content Selection
With the USB or SD Card source selected:
1. Press [ ] (or [MENU] on the remote control) to enter the content selection menu
2. Press [ ] repeatedly (or [MENU] on the remote control) to surf through the various levels of the
contents of the device:
USB and SD Card:
1. List of files
2. List of folders
3. Type of content to play: AUDIO, IMAGE or VIDEO.
iPod: multimedia library
3. Use [/] keys and/or the [VOLUME] knob, (or keys on the remote control) to select
the level and file to be played.
Note
!
The control [VOLUME]
will be only available if there is an external screen associated to the
driver zone and the parameter is activated.
4. Press [ ] / [VOLUME] (or [ENTER] on the remote control) to play the selected item.
Note!
By default, the LCD screen displays
the content selection menu of the equipment. If an external
screen is available, associated with an area (driver or passenger) where the USB or SD Card is
selected, the content selection menu is displayed on that screen.
Note!
To use an external screen associated with the driver zone, it is necessary to enable the
Driver
Monitor parameter (refer to Section 10, General Settings)
Note!
If playing a video and an external screen associated with the driver zone is available, the driver
screen will turn off after a few seconds from the start of playback.
Note!
The selection of content from a device type
iPod is only possible if an external display associated
to any area is available or if it is allowed by the device interface.

ACT550 USER MANUAL
480258EN-1.0 29/06/2016 Page 16 of 34
POL.
C/ CALIDAD, 66
28906 GETAFE
Tel: +34 91 665 26 26
Fax: +34 91 665 23 24
N.I.F. ES-A-28905065
ER-
1482/1999
5.3. USB / SD Card Settings
With the USB or SD Card source selected in the passenger zone, using the remote control and
visualizing the passenger screen:
1. Press [SETUP] to enter the settings menu
2. Use and [ENTER] key to surf the different settings. Refer to Table 4 for the available
settings
3. Press [SETUP] again to exit the settings menu.
Note!
USB and SD Card sources have independent settings.
The settings menu is only accessible via the remote control and the passenger screen.
Table 4 AV Playback Settings
MENU PARAMETER VALUE
FACTORY
VALUE
SYSTEM SETUP
TV SYSTEM NTSC / PAL / AUTO PAL
SCREEN SAVER ON /OFF OFF
VIDEO
INTERLACE-YUV / TV-RGB /
P-SCAN YPBPR / PC-VGA /
S-VIDEO / CVBS
S-VIDEO
TV TYPE 4:3PS / 4:3LB / 16:9 4:3PS
PASSWORD --- UNDEFINED
RATING 1 KID SAFE / 2 G / 3 PG / 4 PG13 /
5PG-R / 6 R / 7 NC-17 / 8 ADULT 8 ADULT
DEFAULT RESTORE (RESTORE THE
FACTORY VALUES) ---
LANGUAGE SETUP
OSD LANGUAGE
ENGLISH / GERMAN / SPANISH /
FRENCH / PORTUGUESE
/ ITALIAN /
RUSSIAN / CHINESE
ENGLISH
AUDIO LANG
CHINESE / ENGLISH / JAPANESE /
FRENCH / SPANISH / PORTUGUESE
/ LATIN / GERMAN
ENGLISH
SUBTITLE LANG
CHINESE / ENGLISH / JAPANESE /
FRENCH /
SPANISH / PORTUGUESE
GERMAN / OFF
ENGLISH
MENU LANG
CHINESE / ENGLISH / JAPANESE /
FRENCH / SPANISH / PORTUGUESE
/ GERMAN / LATIN
ENGLISH
DIVX® VOD DIVX LICENSE ---
ACT550 USER MANUAL
480258EN-1.0 29/06/2016 Page 17 of 34
POL.
C/ CALIDAD, 66
28906 GETAFE
Tel: +34 91 665 26 26
Fax: +34 91 665 23 24
N.I.F. ES-A-28905065
ER-
1482/1999
MENU PARAMETER VALUE
FACTORY
VALUE
AUDIO SETUP
AUDIO OUT SPDIF/OFF - SPDIF/RAW -
SPDIF/PCM SPDIF/PCM
MIC SETUP AUTO / OFF AUTO
KEY -4 to +4 0
ECHO OFF / 2 to 8 4
MIC VOL OFF / 2 to 8 6
VIDEO SETUP
BRIGHTNESS 0 to 12 6
CONTRAST 0 to 12 6
HUE -6 to +6 0
SATURATION 0 to 12 0
SHARPNESS 0 to 8 0
SPEAKER SETUP
DOWNMIX LT / RT STEREO VSS - OFF VSS
SUBWOOFER OFF / ON ON
CENTER DELAY 0 to 4 0
REAR DELAY 0 to 12 6
FRONT LARGE / SMALL LARGE
DIGITAL SETUP
OP MODE LINE OUT / RF REMOD LINE OUT
DYNAMIC RANGE OFF 2/8 4/8 6/8 FULL OFF
DUAL MONO STEREO / MONO L / MONO R/ MIX
MONO MIX MONO

ACT550 USER MANUAL
480258EN-1.0 29/06/2016 Page 18 of 34
POL.
C/ CALIDAD, 66
28906 GETAFE
Tel: +34 91 665 26 26
Fax: +34 91 665 23 24
N.I.F. ES-A-28905065
ER-
1482/1999
6. Hands-Free and Wireless Audio
Figure 10 Hands-Free and Wireless Audio Controls
Note!
The Hands-Free and Wireless Audio service is only available for the driver zone.
Note!
The source Driver/Guide Microphone overrides the Hands-
Free service. If an incoming or
outgoing call takes place, the driver zone will not switch to Hands-
Free mode while any
microphone is active.
During a call, it is not possible to switch to other source in the driver zone.
6.1. Pair a Device
With the equipment powered on:
1. Activate the Bluetooth function of the device to pair (for instance a smartphone)
2. From the menu of the device to pair, search for devices
3. Select
4. The icon on the LCD screen indicates that pairing has been sucessful.
6.2. Unpair a Device
To remove pairing with a device:
1. From any source, press and hold [ ] for 3 seconds
2. Two seconds later, the icon on the LCD screen will turn off indicating that there is no paired
device.

ACT550 USER MANUAL
480258EN-1.0 29/06/2016 Page 19 of 34
POL.
C/ CALIDAD, 66
28906 GETAFE
Tel: +34 91 665 26 26
Fax: +34 91 665 23 24
N.I.F. ES-A-28905065
ER-
1482/1999
6.3. Use of the Microphone
CAUTION
When activate
the Driver microphone during a call, the conversation may be transmitted to other
diffusion systems to which the microphone is connected.
No need to activate the Driver microphone to talk during a phone call.
Note
The driver microphone must be an ACTIA or compatible model.
6.4. Make a Phone Call
With a paired phone:
1. Enter the desired number from the phone and initiate the call
2. The equipment automatically switches to Hands-Free mode in the driver zone and a ringtone is
audible from the speakers of that zone
3. Talk into the Driver microphone
4. To end the call, press [ ]
Redialling
To make a phone call to the last number dialled; press [ ] twice consecutively from any source.
6.5. Receive a Phone Call
With a paired phone:
1. The equipment automatically switches to the Hands-Free mode in the driver zone when there
is an incoming call, and a ringtone is audible from the speakers of that zone
2. To answer the call press [ ] or the [VOLUME] knob of the driver zone
To reject the call press [ ]
3. Talk into the Driver microphone
4. To end the call press [ ] or the [VOLUME] knob of the driver zone.
Other manuals for ACT550
1
Table of contents
Other Actia Media Player manuals


