cymatic audio Live Player LP-16 User manual

PRODUCT MANUAL
Version 1.0
Firmware Release 83859
December 2014

PRODUCT MANUALPRODUCT MANUAL 32
TABLE OF CONTENT
1. SAFETY PRECAUTIONS....................................................................................................4
1.1. AC adapter ........................................................................................................................................ 4
1.2. Environment ...................................................................................................................................... 4
1.3. Handling ............................................................................................................................................ 4
1.4. Connecting cables and input and output jacks ................................................................................. 4
1.5. Alterations ......................................................................................................................................... 4
1.6. Volume .............................................................................................................................................. 4
2. USAGE PRECAUTIONS .....................................................................................................5
2.1. Electrical interference ....................................................................................................................... 5
2.2. Cleaning ............................................................................................................................................ 5
3. LIMITED WARRANTY.........................................................................................................5
4. INTRODUCTION .................................................................................................................6
5. WHAT’S IN THE BOX..........................................................................................................6
6. LP-16 CONNECTIONS AND USER INTERFACE ...............................................................7
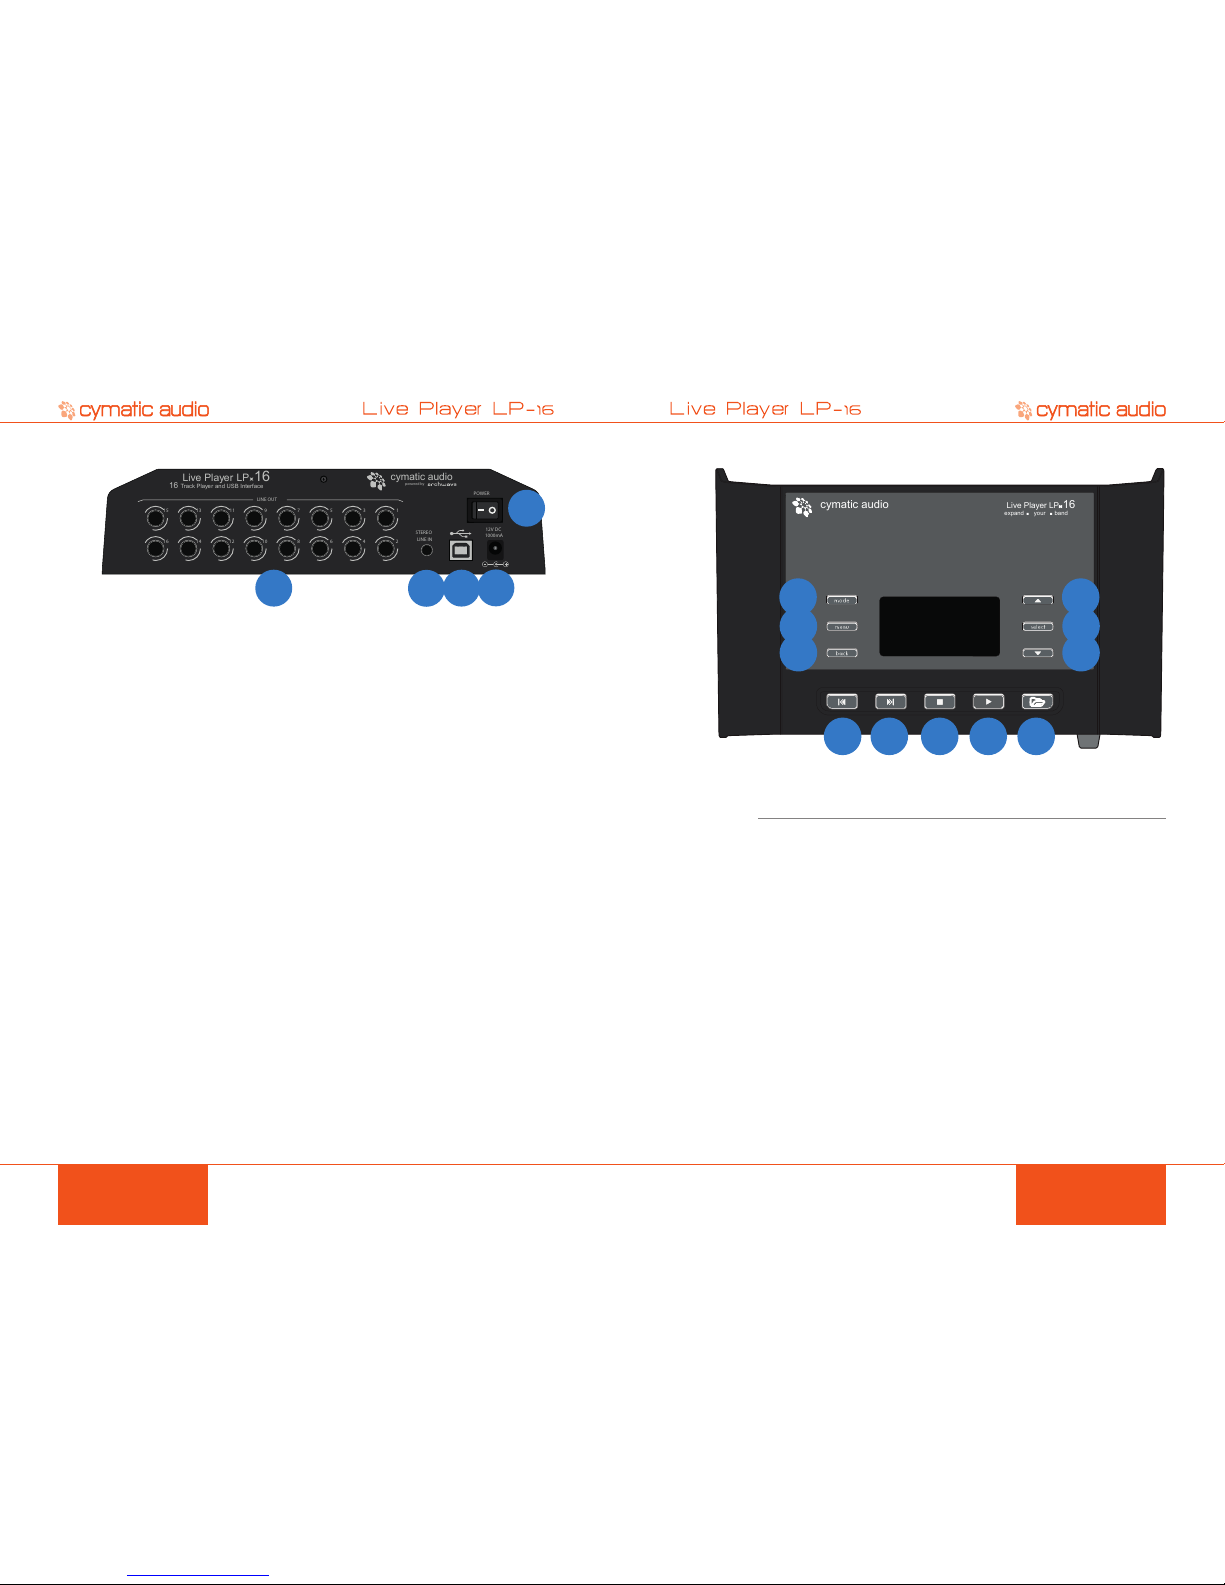
6.1. Front Panel........................................................................................................................................ 7
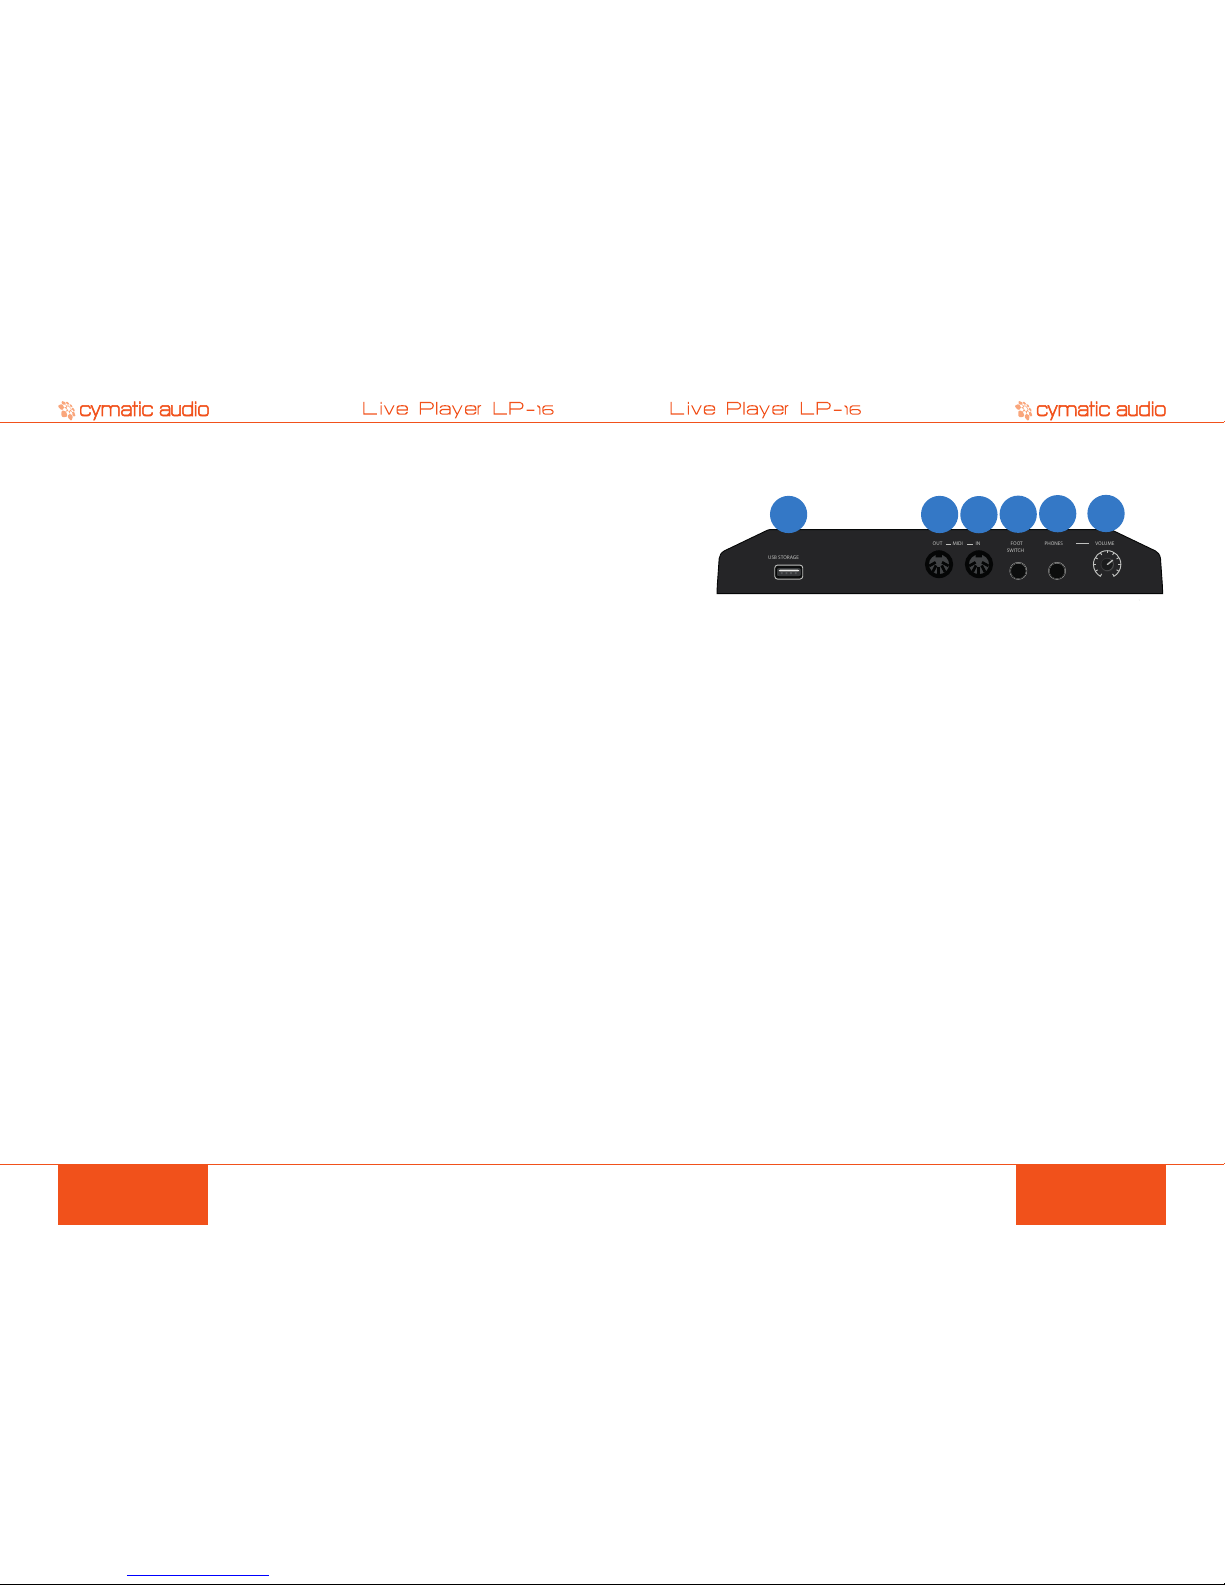
6.2. Rear Panel ........................................................................................................................................ 8
6.3. Top Panel .......................................................................................................................................... 9
7. MODES OF OPERATION .................................................................................................10
7.1. Multi-Track Mode............................................................................................................................. 10
7. 2 . Stereo Mode.................................................................................................................................... 10
7.3. USB Interface Mode .......................................................................................................................11
8. SIGNAL FLOW ..................................................................................................................11
9. LP-16 FILE TERMINOLOGY AND FOLDER STRUCTURE ..............................................12
9.1. Music Folder.................................................................................................................................... 12
9.2. Recording Folder............................................................................................................................. 12
10. LP-16 TRANSPORT BEHAVIOR.......................................................................................12
10.1. Using the Skip Forward/Skip-Back Buttons.................................................................................... 12
10.2. Using the Stop Button ..................................................................................................................... 13
10.3. Using to the Playlist Folder ............................................................................................................. 13
11. WORKING WITH USB MEDIA ..........................................................................................13
11.1. Test failed: Wrong file system ......................................................................................................... 14
11. 2 . Test failed: Disk error ...................................................................................................................... 14
12. MULTI-TRACK (MT) MODE OPERATIONS AND MENUS ...............................................15
12.1. Multitrack Mode Home Screen ....................................................................................................... 15
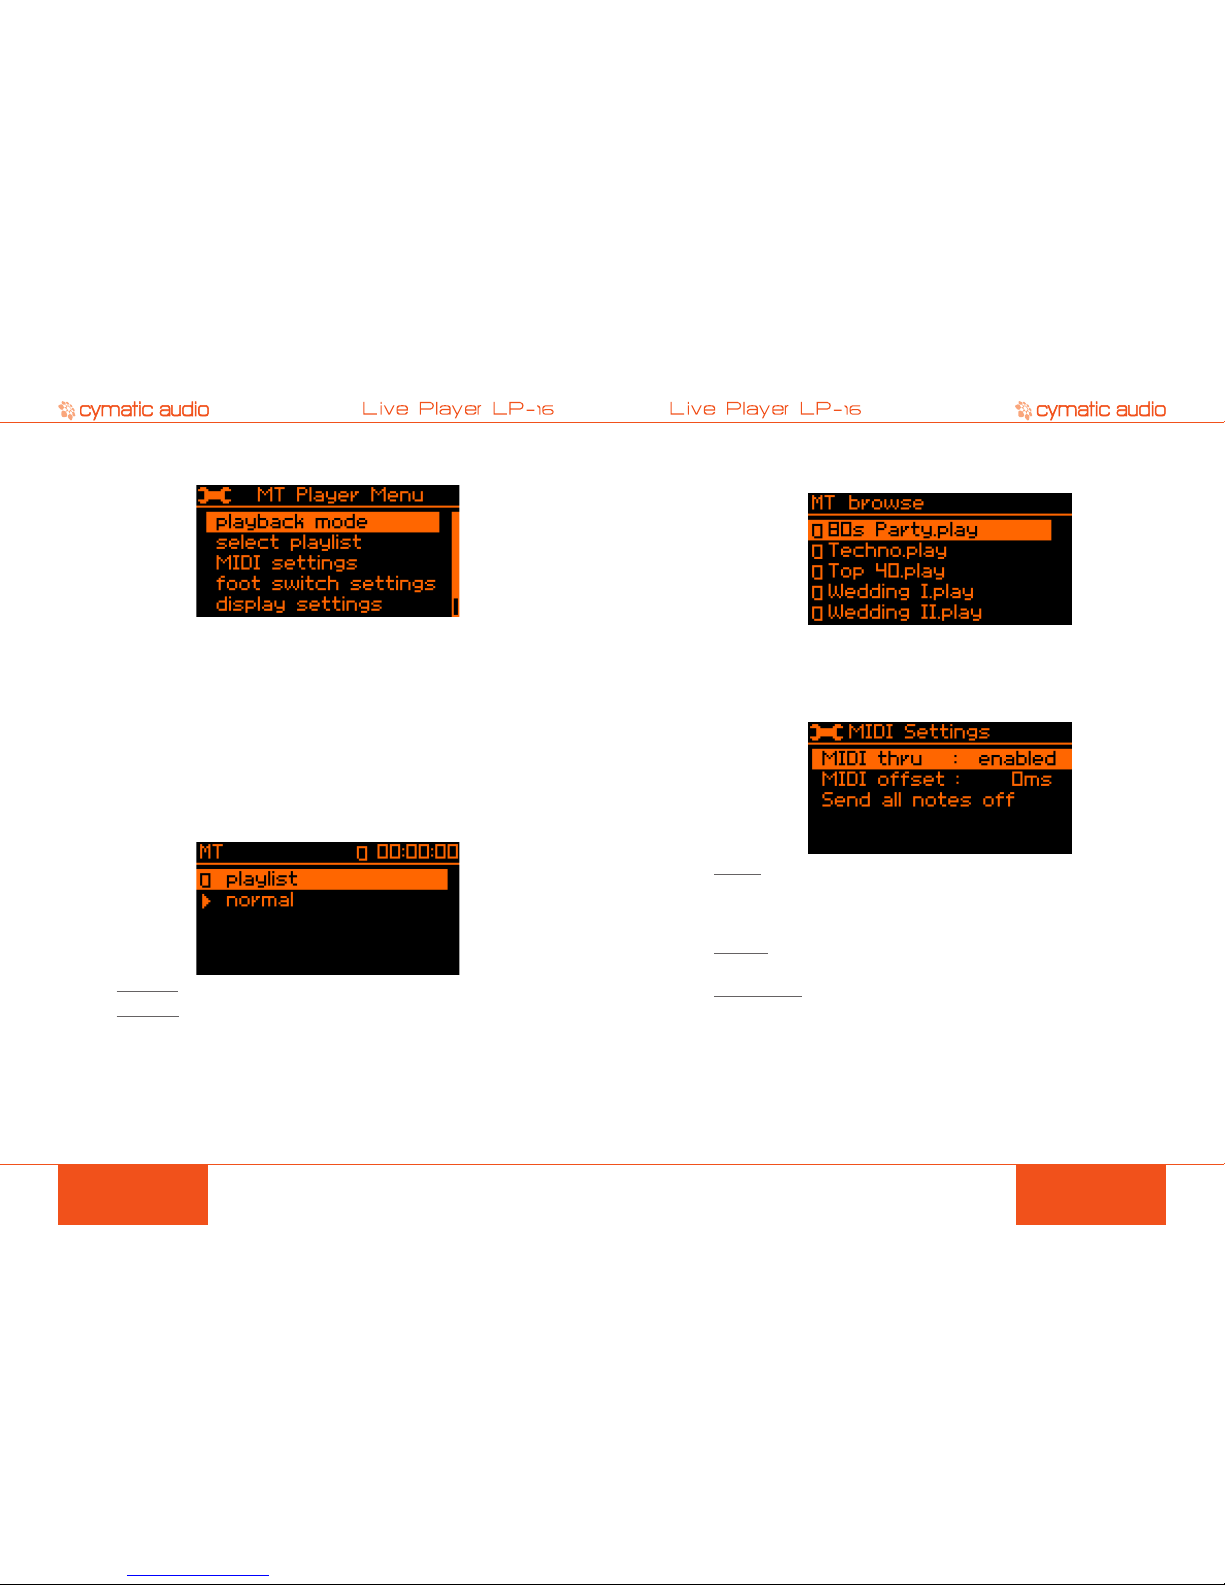
12.2. Multitrack Mode Menus................................................................................................................... 16
12.2.1. Playback Mode..................................................................................................................................................16
12.2.2. Select Playlist....................................................................................................................................................17
12.2.3. MIDI Settings.....................................................................................................................................................17
12.2.4. Foot Switch settings ..........................................................................................................................................18
12.2.5. Display settings .................................................................................................................................................18
12.2.6. Format USB Device ..........................................................................................................................................19
13. STEREO (ST) MODE OPERATIONS AND MENUS .........................................................20
13 .1. Stereo Mode Home Screen (Playlist).............................................................................................. 20
13.2. Stereo Mode Menus........................................................................................................................ 21
13 . 2.1. Playback Mode..................................................................................................................................................21
13.2.2. Play-out Channels............................................................................................................................................ 22
14. SUPPORTED USB STORAGE DEVICES ........................................................................22
14.1. USB 2.0 Thumb Drives ................................................................................................................... 22
14.2. USB 2.0 Hard Drives....................................................................................................................... 22
15. CONNECTING THE LP-16 TO AN AUDIO MIXER ...........................................................22
15.1. Connecting the LP-16 to a Mixer with Unbalanced Line Inputs ...................................................... 22
15.2. Connecting the LP-16 to a Mixer with Balanced Line Inputs........................................................... 23
16. USB INTERFACE MODE ..................................................................................................24
16.1. Using the LP-16 as an Audio Interface with Microsoft Windows .................................................... 25
16.1.1. Minimum System Requirements ...................................................................................................................... 25
16.1. 2. WDM and ASIO Driver Installation .................................................................................................................. 25
16.2. LP-16 Mixer / Control Panel for PC ................................................................................................. 25
16. 2.1. Mixer View........................................................................................................................................................ 26
16.2.2. Settings View: Synchronization Tab ............................................................................................................... 28
16.2.3. Settings View: Buffers Tab.............................................................................................................................. 29
16.2.4. Settings View: Input Channels Tab.................................................................................................................. 30
16.2.5. Settings View: Output Channels Tab ................................................................................................................31
16.2.6. Settings View: About Tab ................................................................................................................................. 32
16.3. Using the LP-16 as an Audio Interface with OS X .......................................................................... 33
16. 3.1. Minimum System Requirements ...................................................................................................................... 33
16.3.2. Driver Installation ............................................................................................................................................. 33
16.4. Using the LP-16 as an Audio Interface with an Apple® iPad® ....................................................... 33
16. 4.1. Minimum System requirements ....................................................................................................................... 33
16.4.2. Driver Installation ............................................................................................................................................. 33
17. UPDATING THE FIRMWARE ON YOUR LP-16................................................................33
18. TROUBLESHOOTING.......................................................................................................34
18.1. Standalone Player Mode................................................................................................................. 34
18.2. USB Audio Interface Mode ............................................................................................................. 34
19. SPECIFICATIONS .............................................................................................................35
20. LEGAL DISCLAIMER........................................................................................................35

PRODUCT MANUALPRODUCT MANUAL 54 SAFETY PRECAUTIONS USAGE PRECAUTIONS
1. SAFETY PRECAUTIONS
1.1. AC adapter
• Be sure to use only the supplied 12 V DC, 1000 mA AC adapter, which is equipped with a
“center-positive” plug. The use of an adapter other than the specied type may damage the
unit and could pose a safety hazard.
• Connect the AC adapter only to an AC outlet that supplies the rated voltage required by the
adapter.
• When disconnecting the AC adapter from the AC outlet, always grasp the adapter itself and
do not pull at the cable.
• During lightning or when not using the unit for an extended period, disconnect the AC
adapter from the AC outlet.
1.2. Environment
To prevent the risk of re, electric shock or malfunction, avoid using your Live Player LP-16 in
environments where it will be exposed to:
• Extreme temperatures
• Heat sources
• Excessive humidity or moisture
• Excessive dust or sand
• Excessive vibration or shock
1.3. Handling
• Never place objects lled with liquids on the LP-16, as this can cause electric shock.
• Do not place an open ame source, such as a lighted candle, on the LP-16 since this can
cause re.
• The LP-16 is a precision instrument. Do not exert undue pressure on the keys and other
controls. Also take care not to drop the unit, and do not subject it to shock or excessive
pressure.
• Take care that no foreign objects (coins, pins etc.) or liquids can enter the unit.
1.4. Connecting cables and input and output jacks
Always turn off the power to the LP-16 and all other equipment before connecting or disconnecting
the power source. Make sure to disconnect all connection cables and the power cord before
moving the LP-16.
1.5. Alterations
Do not open the case of the LP-16, or attempt to modify the product in any way. Doing so will void
the warranty. There are no serviceable parts inside the unit.
1.6. Volume
Do not use the headphone output of the LP-16 at a loud volume for a long time since this can
cause hearing impairment.
2. USAGE PRECAUTIONS
2.1. Electrical interference
For safety considerations, the LP-16 has been designed to provide maximum protection against
the emission of electromagnetic radiation from inside the device, and protection from external
interference. However, equipment that is very susceptible to interference or that emits powerful
electromagnetic waves should not be placed near the LP-16, as the possibility of interference
cannot be ruled out entirely. With any type of digital control device, the LP-16 included,
electromagnetic interference can cause malfunctioning and can corrupt or destroy data. Care
should be taken to minimize the risk of damage.
2.2. Cleaning
Use a soft, dry cloth to clean the LP-16. If necessary, slightly moisten the cloth. Do not use
abrasive cleanser, wax, or solvents (such as paint thinner or cleaning alcohol), since these may
dull the nish or damage the surface.
3. LIMITED WARRANTY
For the applicable warranty terms and conditions and additional information on Cymatic Audio’s
Limited Warranty, please see complete details online at www.cymaticaudio.com/warranty
CERTIFICATIONS
This product complies with the European Union Council Directives and
Standards relating to Directive 2004/108/EC for Electromagnetic compatibility
(EMC) and Low Voltage Directive 2006/95/EC
This product is compliant with the EU Directive 2011/65/EU for the Restriction
of the use of Certain Hazardous Substances in Electrical and Electronic
Equipment. No lead (Pb), cadmium (Cd), mercury (Hg), hexavalent chromium
(Cr+6), PBB or PBDE is intentionally added to this device. Any traces of
impurities of these substances contained in the parts are below the RoHS
specied threshold levels.
This equipment has been tested and found to comply with the requirements
of 47 CFR of PART 15 limit for radiation and conduction emission relating to
FCC rules Part 15B: 2010.

PRODUCT MANUALPRODUCT MANUAL 76 INTRODUCTION LP-16 CONNECTIONS AND USER INTERFACE
4. INTRODUCTION
Thank you for purchasing the Cymatic Audio Live Player LP-16. The LP-16 is the world’s easiest
to use direct from USB 16-track / MIDI player and 18-output, 2-input USB audio interface for PC,
Mac® and iPad®.
The LP-16 works as a dedicated multi-track player for live performances, while sparing users the
hassles of using a laptop and computer audio interface in a live environment. The LP-16 does not
require any additional computer hardware, other than a USB hard drive and cabling, in order to
play back 16 separate audio tracks directly into the line inputs of a live sound mixer. These pre-
recorded tracks can be individually mixed alongside the audio from live performers to augment
their performance.
Used in connection with a Windows PC, Mac® or iPad®, the LP-16 also serves as an 18-output/
2-input USB audio interface. With a large number of outputs, the individual tracks of a multi-track
DAW session can easily be connected to the individual inputs of an analog studio mixer, perfect
for analog summing and mixing “out of the box”, imparting classic analog avor to your next mix
session.
The LP-16 User Manual contains in-depth details of your Live Player’s features and functionality,
including:
• Direct from USB hard drive multi-track playback (16 tracks at 24-bit or 16-bit, 44.1/48kHz)
• Intuitive user interface to edit and save settings, song and playlist les
• Creation and editing of settings and playlist les ofine, using Windows playlist software
• 16 unbalanced analog 1/4” tip-sleeve outputs
• 1/8” Stereo Line level input
• Front panel ¼” headphone output with dedicated level control
• Zero latency hardware input monitoring (USB Interface Mode)
• 2-input / 18-output USB audio interface, 24 bit/44.1/48 kHz USB Class Compliant
• Mac® OS-X® compatible: Core Audio plug and play drivers
• Windows® PC compatible (Windows XP, Vista, 7 & 8 32-bit/64-bit) WDM and ASIO®
drivers.
• IPad® compatible: Plug and play. USB adapter required including
• Apple® Lightning to USB Camera Adapter
• Apple® USB Camera Connection Kit
• Foot Switch connector for hands free playback/pausing of track playback
• MIDI I/O with synchronized Standard MIDI File player functionality
5. WHAT’S IN THE BOX
• LP-16 recorder
• AC/DC power adapter and power cable
• USB cable
• Quick Start Guide
6. LP-16 CONNECTIONS AND USER INTERFACE
6.1. Front Panel
PHONES
VOLUME
USB STORAGE
FOOT
SWITCH
MIDI
OUT
IN
12
346
5
1. USB Storage Connector
Attach a USB thumb drive or USB hard drive to this connector, when using the LP-16 in either
MT or ST mode.
2. MIDI input
The MIDI input receives incoming MIDI messages, and can also be congured as a MIDI through
port using the MIDI settings menu.
Conguring the MIDI input as a through port can be useful in certain live sound scenarios. On
stage, you could have a MIDI Keyboard connected to the LP-16’s MIDI input, and play over the
same MIDI device that the LP-16 is using. Alternatively, you can turn MIDI through off to if you
want to prevent ‘accidental’ play-out.
3. MIDI Output
The MIDI output connector can output the MIDI data from Standard MIDI Files (SMF) that reside
in the attached drive’s project folder, alongside the multitrack les. With this capability, the LP-
16 can trigger external MIDI hardware such as MIDI synthesizers or MIDI-enabled lighting
controllers, at the same time it plays back multi-track audio les.
4. Foot Switch Connector
The footswitch connector allows connection of a standard on/off foot pedal, which can be
congured to start, pause, and un-pause playback of the current song.
5. Headphone Out
The headphone connector outputs a stereo signal, which works as follows:
• In MT mode, the connector outputs a mono mix of all 16 tracks, mixed together at unity gain
• In ST mode, the connector outputs the stereo le currently being played back
• In USB mode, the connector outputs the stereo DAW signal
6. Headphone Volume
This knob allows volume adjustment of the front-panel headphone output.
!For more details of the above connectors’ functions, refer to the “Menus” section of this user’s
manual.

PRODUCT MANUALPRODUCT MANUAL 98 LP-16 CONNECTIONS AND USER INTERFACE LP-16 CONNECTIONS AND USER INTERFACE
6.2. Rear Panel
15
STEREO
LINE IN
13
11
9
7
5
3
1
16
14
12
10
8
6
4
2
POWER
12V DC
1000mA
Track Pla
y
er
and USB Interface
16
LINE OUT
L
i
v
e
P
l
a
y
er
LP
16
powered by
cymatic audio
1234
5
1. Mono Line-Level Output Connectors
These unbalanced connectors each output a separate mono audio track, sourced from the
currently playing multi-track song le.
2. Stereo 3.5mm Input
This connector is used as a 2-channel, unbalanced line-level input when the LP-16 is operating
in USB interface mode.
3. USB Device Connector
This female USB connector is used to attach the LP-16 to an OS X or Windows computer, or an
iOS device, allowing the LP-16 to act as a 2-input, 18-output audio interface.
4. External Power Supply Connector
Connect the included external power supply to this connector.
5. Power Switch
Use this switch to turn power on/off to the LP-16.
6.3. Top Panel
expand
your
band
cymatic audio
Live Player LP
16
1
2
3
9
10
11
4 5 6 7 8
The top panel buttons perform the following functions, depending on which of the three modes
is currently active :
Multitrack Mode Stereo Mode USB Interface Mode
1Switch to stereo mode Switch to multitrack mode No Function
2Show multitrack mode menu Show stereo mode menu Show input settings menu
3Go back to previous screen Go back to previous screen Go back to previous screen
4Go to previous song Go to previous song No Function
5Go to next song Go to next song No Function
6Pause/Stop playback Pause/Stop playback No Function
7Start playback Start playback No Function
8Show folder contents screen Show folder contents screen No Function
9Selection up Selection up Selection up
10 Select Select Select
11 Selection down Selection down Selection down
In addition, four separate key combinations are also available that perform the following functions:
6+7 Stop & Play Toggles between stereo player and multi-track player mode
6+5 Stop & Next increment next song while in play list mode
6+4 Stop & Previous Decrement next song while in play list mode
4/5/10 Previous/Next/Select Send midi all notes off in multi-track player mode

PRODUCT MANUALPRODUCT MANUAL 1110 MODES OF OPERATION SIGNAL FLOW
7. MODES OF OPERATION
The LP-16 offers three different modes of operation, depending on your specic needs:
7.1. Multi-Track Mode
This mode, hereby abbreviated as “MT Mode”, is the main operational mode of the LP-16. In
MT mode, the unit can play back up to 16 separate tracks of audio, which are each output to a
separate physical ¼” output connector on the rear panel of the unit.
The most common use for MT mode is to play back separate, pre-recorded “backing tracks” in a
live music environment, used to augment and expand upon live tracks played by live musicians.
By feeding the pre-recorded tracks into separate channels of the live sound mixer, the FOH
engineer can mix together the individual pre-recorded tracks alongside the live tracks, just as if
they were coming from individual live musicians. This provides much more exibility than if all
the pre-recorded tracks were “pre-mixed” to a stereo track that could not be altered or adjusted
in any way.
You may copy multiple .wav les to a USB drive, attach the drive to the LP-16, and playback the
les in MT mode, without any external software, using the following steps:
• Create a folder within the ‘Recording’ Folder (this folder is created on the USB device when
you rst plug it in)
• Copy 16 .wav les to this folder
• If the .wav les do not contain any numbering, they will be assigned to the LP-16 channels in
alphabetical order.
• In order to get a channel assignment you can number them in two ways:
Number as prex with underscore (always two digits)
○01_Guitar.wav
○02_ Drums.wav
○09_vocals.wav
○16_bass.wav
Number as Sufx with underscore (always two digits)
○Guitar_01.wav
○Drums_02.wav
○vocals_04.wav
○bass_12.wav
Additionally, the LP-16 also works with an external Windows software named “LP-16 Playlist
Editor“, available for download at www.cymaticaudio.com/downloads
The LP-16 Playlist Editor is required to congure a “multi-track le playlist”, with the ability to step
through them in order as the concert progresses.
The external playlist software also allows for applying assorted playback settings to each playlist
le.
For specic details of operation for the external playlist software, please refer to its user’s manual,
available at: www.cymaticaudio.com/downloads
7. 2 . Stereo Mode
The LP-16 also offers a “stereo player mode”, hereby referred to as “ST Mode”. This mode is ideal
for playback of stereo audio les, such as pre-show, post-show, and break music.
In ST mode, the LP-16 plays back 44.1 and 48 kHz stereo wave les that are stored in the “Music”
folder on the attached USB drive. The stereo les can be congured to output from a specic pair
of rear-panel audio connectors of your choosing, and can also be monitored from the front panel
headphone output.
To transfer stereo audio les to the Music folder of the USB drive:
• Attach your USB drive to the LP-16
• The LP-16 will check the drive for proper formatting, and place the needed folders on the
drive
• Unplug the drive from the LP-16 and attach it to a computer containing the desired stereo
audio les
• Copy the desired les from the computer’s hard drive, to the “Music” folder on the USB drive
• Attach the USB drive to the LP-16.
• The les now residing in the “Music” folder of the attached drive are now available to the LP-
16 when used in ST mode.
! NOTE:TheLP-16onlyplaysbackstereolesinthe“.wav”format.Itdoesnotplaybackstereo
lesinothercommonlyavailableconsumerformatssuchasMP3,AAC,WMA,andFLAC.
Ifthestereolesyouwishtouseareinoneoftheseotherformats,makesuretorstconvert
themtothe.wavleformat,usinganaudioutilityonyourcomputer.
Therearemanyfreewareutilitiesavailableonlinethatcanconvertfromtheaboveunsupported
formats,toastandardwavele.Forexample,thefreeAppleITunessoftwareperformsthistype
ofconversion;instructionsfordoingsocanbereadathttp://support.apple.com/kb/HT1550
7.3. USB Interface Mode
In USB Interface mode, the LP-16 acts as a 2-input, 18-output audio interface for OS X, Windows,
and iOS. For more details, please refer to the section titled “USB Interface Mode”;
8. SIGNAL FLOW
• The LP-16 contains 16 separate line-level outputs, which are sent out of 16 separate mono,
unbalanced line-level outputs.
• In MT mode, the LP-16 also contains an internal digital mixer that provides a mono mix down
of the 16 separate audio streams, mixed together at unity gain. This internal mix is sent out
of the front-panel headphone output.
• When operating as a USB computer audio interface, the stereo line input allows recording of
2 incoming channels to the DAW, while 18 separate DAW output channels can be sent to the
LR-16 (16 to the rear-panel outputs and an additional stereo channels sent to the headphone
output).
DIGITAL TO
ANALOG
CONVERTER
(18 Ch)
STEREO
ANALOG TO
DIGITAL
CONVERTER
MIDI IN
MIDI OUT
USB Media
USB 2.0
USB 2.0
Computer
STREAM
CONTROLLER
INTERNAL
DIGITAL 2x16
MIXER
STEREO
PHONES
OUTPUT
Phones
level
1/8“
STEREO
LINE
INPUT
xx
xx
xx
STEREO
LINE LEVEL
OUTPUT (x16)

PRODUCT MANUALPRODUCT MANUAL 1312 LP-16 FILE TERMINOLOGY AND FOLDER STRUCTURE WORKING WITH USB MEDIA
9. LP-16 FILE TERMINOLOGY AND FOLDER STRUCTURE
The LP-16 uses audio les on an attached USB drive, to play back assorted audio, either stereo
wav les, or groups of up to 16 mono wave les. These LP-16’s menus interact with these les
based on how they are specically placed on the attached USB drive.
When a USB drive is rst attached to the LP-16’s front panel USB port, it is tested for compatible
formatting, and then the following folders are automatically created on the USB drive:
• Music
• Recording
When you attach the USB drive to your computer to copy wave les from your local hard drive
to the USB device, the les should be placed in these folders so that the LP-16 knows where to
look for them.
The folders work as follows:
9.1. Music Folder
This folder is where you copy stereo wav les, that are intended to be used when the LP-16 is
set to stereo (ST) mode. This mode is best used for functions like playing “walk-in” music, “break
music” and “walk-out” music at a live event. When the LP-16 is set to ST mode and set to “normal”
instead of playing back a playlist, it will playback the les in this folder in alphabetical order. One
way to congure a playback order you would like, is to prepend the les with “001”, “002”, etc.
Using your computer, you may create additional folders, within the music folder and then place
different stereo wave les within them, and then navigate to the specic folders and their contents
using the LP-16’s “folder browse” button on the top panel. For example, you could create one
folder called “rock” and ll it with rock tunes, while creating another folder called “Jazz” and lling
it with Jazz tunes. With such an approach, you could have different folders of musical styles at
the ready, for music playback at different events.
The music folder also contains an automatically created folder called “PLAYLISTS”. This folder
is where any user-created playlist les are stored (using the LP-16 Playlist Editor software). A
playlist le is shown as “xxxx.play”; they can be selected from the LP-16 using the menu’s “Select
Playlist” command.
9.2. Recording Folder
The recording folder is where you store the audio that is used when the LP-16 is set to Multi-Track
(MT) mode. This mode is used when the LP-16 is playing back up to 16 separate audio tracks,
meant to be fed into a live sound console and mixed alongside live performers.
When the USB drive is attached to a computer, you can make a new folder with the name of the
song you are making a collection of les for, and then copy up to 16 mono wave les into that
folder. When that folder is selected on the LP-16, the 16 les will playback, in sync with each
other, out of the 16 rear panel outputs.
A folder containing the 16 wave les may also contain a “song” le (shown as xxxx.set), which
would be created with the LP-16 Playlist Editor software. The song le contains additional settings
related to the multi-track playback functions.
The LP-16 can also play back a standard MIDI le (.midi) in sync with the collection of 16 tracks.
To perform this function, place the .midi le in the same song folder as the 16 wave tracks. The
.midi le’s MIDI data will automatically play out of the LP-16’s MIDI Out connector, when the
tracks in the same song folder are playing.
10. LP-16 TRANSPORT BEHAVIOR
10.1. Using the Skip Forward/Skip-Back Buttons
When playing back song les, the transport and navigation controls work as follows:
• Pressing the skip forward button will increment, by one song, the next song to be played
in the playlist. For example, if the next song to be played is the 4th song in the playlist,
pressing the top panel skip forward button will “skip” the 4th song, and instead play the 5th
song next.
• Pressing the skip back button will decrement, by one song, the next song to be played in the
playlist. For example, if the next song to be played is the 4th song in the playlist, pressing
the top panel skip back button will “skip” the 4th song, and instead play the 3rd song next.
• To stop a currently playing song before it has completed, or skip to the next or previous song
in a playlist:
○Press the “stop” button
○While the transport is stopped, press the skip back or skip forward buttons.
The LP-16 will then allow you to navigate to the next song in the playlist that will be played,
when the play key is next pressed.
The above playback behavior is designed for the most exible playback of tracks at a
live sound event. It allows you to spontaneously change what song will play next, without
interrupting playback of the current song.
10.2. Using the Stop Button
When the LP-16 is currently playing back a song:
• The rst press of the stop button will pause the transport. Pressing the play button resume
playback of the current song, from the pause point forward.
• The 2nd press puts the transport into stop mode. Pressing the play button begins playback
of the next song in the playlist.
10.3. Using to the Playlist Folder
To navigate to a playlist folder, use one of the three following methods:
• Press the top panel “folder” button; you will be taken to the folder on the attached drive
where the currently playing song resides. You can then navigate to the playlist folder.
• If no playlist is currently selected yet, pressing the stop and play buttons at the same time
will activate (toggle playlist mode) and you will be taken directly the playlist folder.
• Press the “menu” button and then select the “Go to Playlist” menu option
11. WORKING WITH USB MEDIA
• Turn on the device
• Connect the LP-16 to its external power supply and turn it on. After the start-up screen
briey displays, you will see the following screen:
• Connect a USB storage device
• Plug in a USB hard drive or USB thumb drive into the USB storage connector on the front of
the LP-16.

PRODUCT MANUALPRODUCT MANUAL 1514 WORKING WITH USB MEDIA MULTI-TRACK (MT) MODE OPERATIONS AND MENUS
• If the LP-16 determines that the storage device is suitable for playback, a new screen will
appear for a few seconds, displaying the amount of free space available on the attached
drive
After displaying this information for a few seconds, the LP-16 display will switch to the playback
“home screen”.
11.1. Test failed: Wrong le system
If the inserted drive is not formatted in the required FAT32 format, the LP-16 will display an error
message.
Please see the section “Format USB device” to format the attached USB drive in the FAT32
format.
Please keep in mind that formatting the attached USB drive will erase all data currently residing
on the drive.
11. 2. Test failed: Disk error
If the inserted drive is defective the screen will give a “Disk Error”
If this occurs, please remove the device and refer to section “Supported USB storage devices”
12. MULTI-TRACK (MT) MODE OPERATIONS AND MENUS
12.1. Multitrack Mode Home Screen
After the attached USB drive has been successfully tested, the LP-16’s screen will display the MT
mode “home screen”.
1234
5
6
78
11
910
1. LP-16 Mode Status
Shows the currently selected playback mode for the LP-16: Multitrack (MT), Stereo (ST), or USB
(USB). When the LP-16 is in USB interface mode, the status message will display “PC” or “MAC”
2. Playback Status
These four animated playback icons move when playback of the current song is active.
3. Playback Mode Icon
This icon displays whether the LP-16 is operating in normal mode ( ) or playlist mode ( ).
4. Remaining time
This number represents the remaining playback time of the currently playing song.
5. Name of Current Playlist
This line displays the name of the currently selected playlist.
6. Number and Name of Current Song
7. Next Song Icon
This icon indicates how the next song will play back relative to the currently playing song:
• There will be no pause between the current and the next song
• The next song will pause until play / footswitch is pressed
• The next song will play after seconds specied in playlist. Can be overruled by play
button / footswitch
8. Name of Next Song in Playlist
This line displays the name of the next song in the playlist, which will play when the current song
is completed.
9. Signal Level Meters (-30dB / -3dB / 0dB)
This group of meters displays the approximate signal strength of the audio tracks that are playing
back.
10. MIDI Input Indicator Light
This circle ashes in time with the data stream of any incoming MIDI signals that are feeding the
MIDI input connector.
11. MIDI Output Indicator Light
This circle ashes in time with the data stream of any outgoing MIDI signals that are sent out of
the MIDI output connector.

PRODUCT MANUALPRODUCT MANUAL 1716 MULTI-TRACK (MT) MODE OPERATIONS AND MENUS MULTI-TRACK (MT) MODE OPERATIONS AND MENUS
12.2. Multitrack Mode Menus
Pressing the Menu Button while in multitrack mode will take you to the Multitrack Mode Menu.
This menu contains assorted settings that affect the operation of the LP-16 when it is operating
in multitrack mode, including the following:
• Playback Mode
• Select Playlist
• MIDI Settings
• Footswitch Settings
• Display Settings
• Format USB Device
Use the Next / Previous buttons, or alternatively the Up / Down buttons, to navigate to the desired
menu setting, which will be highlighted on the display.
Press the Select button to adjust the highlighted selection, and the display will switch to the
specic settings for that menu selection, as detailed below:
12.2.1. Playback Mode
This screen allows you to select between the two playback modes available in MT mode:
• Playlist Mode: In this mode, the LP-16 will play back les in the order that has been set up in
the playlist. To make a playlist, use the LP-6 Playlist Editor software.
• Normal Mode: In this mode, all MT les residing in the currently selected folder will display
and can be played.
12.2.2. Select Playlist
This screen allows you to select a playlist to load into memory, from the available playlists located
on the attached USB drive.
• The LCD display shows a list of all available playlists.
• Use the up and down buttons to scroll to the desired playlist
• Use the select button to select the highlighted playlist.
12.2.3. MIDI Settings
This screen allows adjustment of various setting related to the MIDI input and output connectors.
MIDI Thru: Use this menu to toggle a “MIDI Through” function on/off for the front panel MIDI
output.
• When MIDI through is activated, all MIDI messages coming into the LP-16 will be merged
with the currently playing MIDI le (if one is being played back) and then routed to the LP-
16’s MIDI output.
• If MIDI through is turned off, this merge activity does not occur
MIDI Offset: Adjust this setting to provide an offset (delay) between the start time of a loaded
standard MIDI le, and the start time of the associated song. This setting allows you to ne-tune
the synchronization timing between the MIDI le and the triggered audio.
Send All Notes Off: Select this menu to issue an “all notes off” out of the LP-16’s MIDI output,
message to a connected MIDI device, useful if any “stuck notes” occur on a connected MIDI
playback device.
Usually when a MIDI “all notes off” message is required, the need for it is time sensitive due to a
stuck MIDI note on the downstream sound generator. To issue the command immediately, press
the “prev + next + select”

PRODUCT MANUALPRODUCT MANUAL 1918 MULTI-TRACK (MT) MODE OPERATIONS AND MENUS MULTI-TRACK (MT) MODE OPERATIONS AND MENUS
12.2.4. Foot Switch settings
The LP-16 can use a standard ¼” equipped footswitch to perform various functions. The foot
switch settings screen allows you to adjust what specic actions occur when you press the
attached foot switch.
Typ e: Adjust the “type” setting to tell the LP-16 if you are using a “normally open” or “normally
closed” type footswitch. Consult your footswitch’s documentation to determine which type you
have.
Function: Adjust this setting to congure what specic function the footswitch will perform, when
it is pressed
• Play: Pressing the footswitch mimics the top panel “play” button.
• Play and Pause: Pressing the footswitch will begin playback. A second press of the
footswitch will pause playback, and a third press will un-pause the playback.
12.2.5. Display settings
This screen allows you to adjust the LCD display’s contrast, as well as its brightness, in order to
ensure optimal readability at different viewing angles.
• Press the Up/Down buttons to choose between setting the contrast or the brightness
• Press the Select button to select the highlighted setting
• Press the Up/Down buttons to adjust the value of the highlighted setting
12.2.6. Format USB Device
The format function can be used to format an attached hard drive or thumb drive that is
connected to the Live Player.
This operation can be useful in the following scenarios:
• The attached drive has not passed the LP-16’s drive test, because it is not currently
formatted in the required FAT-32 disk format
• The attached drive has been previously formatted in the correct FAT-32 format, but has not
had its data blocks optimized properly by the computer it was formatted on, resulting in a
failure of the LP-16 disk test.
In these cases, formatting the drive on the LP-16 may allow the disk to pass, since the LP-16 will
format the attached disk with the best possible settings for using with itself.
ALL DATA AS WELL AS ALL PARTITIONS ON THE
THUMB OR HARD DRIVE WILL BE DELETED
WHEN THE FORMAT FUNCTION IS USED!

PRODUCT MANUALPRODUCT MANUAL 2120 STEREO (ST) MODE OPERATIONS AND MENUS STEREO (ST) MODE OPERATIONS AND MENUS
13. STEREO (ST) MODE OPERATIONS AND MENUS
13.1. Stereo Mode Home Screen (Playlist)
If the LP-16 has been switched to stereo mode, the ST mode home screen will be displayed.
The ST mode home screen displays pertinent settings and displays, when performing a stereo
playback operation.
1234
5
6
78
9
1. Mode Status
This icon will display “ST” to show that the LP-16 is currently operating in Stereo mode.
2. Playback Status
This icon shows the current state of the playback transport (play/stop/pause)
3. Playback Mode Icon
This icon shows the specic song-to-song mode that the LP-16 is set to while in stereo mode
(playlist, normal, continuous, repeat, or shufe).
4. Remaining Time In Song
This counter shows the remaining time left in the currently playing song
5. Playlist Name
This eld shows the name of the currently selected playlist
6. Current Song Name
This eld shows the name of the song in the playlist that is currently playing back
7. Next Song Icon
This icon indicates how the next song will play back relative to the currently playing song:
• There will be no pause between the current and the next song
• The next song will pause until play / footswitch is pressed
• The next song will play after seconds specied in playlist. Can be overruled by play
button / footswitch
8. Next Song Name
This eld shows the name of the next song in the playlist that will play back when the current one
is completed.
9. Level Meters (-30dB / -3dB / 0dB)
These meters show the output level of the currently playing song. In ST mode, only the 2 output
channels that have been assigned the stereo playback will illuminate with meter activity.
13.2. Stereo Mode Menus
Pressing the Menu Button while in stereo mode will take you to the Stereo Mode Menu.
This menu contains assorted settings that affect the operation of the LP-16 when it is operating
in stereo mode, including the following:
• Playback Mode
• Select playlist (see previous section for details)
• Play-out channels
• Foot switch Settings (see previous section for details)
• Display Settings (see previous section for details)
• Format USB Device (see previous section for details)
Use the Next / Previous buttons, or alternatively the Up / Down buttons, to navigate to the desired
menu setting, which will be highlighted on the display.
Press the Select button to adjust the highlighted selection, and the display will switch to the
specic settings for that menu selection, as detailed below:
13.2.1. Playback Mode
This menu allows you to set the LP-16’s stereo mode to use one of 4 specic playback modes,
which operates as follows:
• Playlist: Files will be played back as part of the playlist they belong to, as congured in the
Playlist Editor software
• Normal: Files will be played back in alphabetical order from the music folder they reside in
• Continuous Play: All of the songs contained in the “Music” folder will be played in
alphabetical sequence
• Repeat: The currently selected song will be repeated endlessly
• Shufe: The LP-16 will continuously choose songs to play at random.
The currently selected playback mode will be shown, as an icon, at the top of the home page, to
the left of the time counter.

PRODUCT MANUALPRODUCT MANUAL 2322 SUPPORTED USB STORAGE DEVICES CONNECTING THE LP-16 TO AN AUDIO MIXER
13.2.2. Play-out Channels
This menu allows you to set which specic pair of rear-panel outputs the stereo audio le will be
output to.
Use the select arrows and select button to select between outputs 1 and 2, 3 and 4, etc.
14. SUPPORTED USB STORAGE DEVICES
The LP-16 player can play back directly from two different types of USB drives:
• Small-format USB “thumb drives” that connect directly to the front-panel USB port and are
bus-powered by the USB port itself.
• External USB hard drives, that connect to the front-panel USB port with a separate USB
cable, and are either powered from their own power supply, or are bus-powered from the
USB port.
Each of these two types of drives has their own unique considerations to keep in mind, when
using them with the LP-16, as described below.
14.1. USB 2.0 Thumb Drives
Thumb drives used for Direct-from-USB playback must be USB2.0 compatible
USB thumb drives traditionally tend to offer a less predictable and less consistent read speed
than traditional USB hard drives. Their unpredictable read speed makes them a less preferred
playback storage medium than a traditional USB hard drive, especially for ‘mission critical’
multitrack playback situations.
14.2. USB 2.0 Hard Drives
USB Hard drives used for multi-track playback must be:
• Fully compatible with the USB2.0 specication without requiring custom software drivers
• Powered from their own external power supply
• If “bus-powered”, the drive must be bus-powerable from the standard amount of USB bus-
power offered by computer USB ports, and not require any extra amount of USB bus power
beyond this standard.
USB hard drives traditionally tend to offer a more reliable and predictable read speed than USB
thumb drives.
15. CONNECTING THE LP-16 TO AN AUDIO MIXER
15.1. Connecting the LP-16 to a Mixer with Unbalanced Line Inputs
The LP-16 offers 16 unbalanced analog ¼” output connectors, using a TS (tip-sleeve) conguration.
Thus, it is best connected to a mixing console with unbalanced, tip-sleeve line inputs.
expand
your
band
cymatic audio
Live Player LP
16
Mic Inputs
(x 16)
LP-16
Line Outputs (x 16)
MIDI
Keyboard
MIDI Sound
Module
The illustration above shows the following connections:
• 16 tracks of pre-recorded playback are sent from the LP-16 to 16 separate line inputs of a
large format live sounding mixing console
• MIDI keyboard connected to LP-16 MIDI in, MIDI sound module connected to MIDI out
• Additional live musicians are fed into another 16 inputs of the console, using its mic inputs
• The live sound engineer mixes the pre-recorded backing tracks of the LP-16 alongside
the live signals. In effect, the pre-recorded tracks from the LP-16 act as “virtual band
members”, allowing for a more eshed out production without the added expense of extra
live musicians.
15.2. Connecting the LP-16 to a Mixer with Balanced Line Inputs
In some situation, the LP- 16 will be connected to inputs of a mixing console that only offers
balanced inputs, in the form of tip-ring-sleeve (TRS) inputs. As long as the mixing console has a
properly designed balanced input, you can use a normal unbalanced TS to TS ¼” cable, with no
special cables or adapters required.
In the event that you are using a console that does not have a properly balanced input and
the connection does not work properly, use a TS to TS cable, and on the end of the cable
that connects to the mixing console’s balanced TRS inputs, add a TS-to-TRS adapter. This will
convert the unbalanced signal from the LP-16 to a TRS signal that will operate correctly with the
console’s balanced inputs.
TS-to-TRS Adapter (ring not connected)

PRODUCT MANUALPRODUCT MANUAL 2524 USB INTERFACE MODE USB INTERFACE MODE
16. USB INTERFACE MODE
In addition to functioning as a direct from USB 16-track player, the LP-16 has the ability, when
connected to your Mac®, PC, or iPad®, to operate as a 2-input, 18-output, 24 bit kHz USB class
compliant computer audio interface, running at 44.1 or 48kHz.
To operate the LP-16 as a computer audio interface, perform the following steps:
• Make sure that there is no USB storage device connected to the front-panel USB storage
connector. If any drive is connected to the front panel USB port, the LP-16 will only operate
in standalone playback mode.
• Connect one end of the included USB cable to the LP-16’s rear panel USB port on one end,
and an available USB port of your Mac/PC on the other end
• If using the LP-16 with an Ipad, connect the USB cable to the USB port of an: Apple Ipad
Camera Connection Kit or Apple Lightning to USB Camera Adapter
expand
your
band
cymatic audio
Live Player LP
16
LP-16
Line Out
1-2 Phones
USB to
Mac/PC
Powered Speakers
w/ volume control
Outboard Mic
Preamp / Mixer
LP-16 Stereo
1/8“ Input
• Microphones or other input sources are connected to the inputs of a standalone microphone
preamplier.
• Audio is fed from the microphone preamp or mixing console to the 2-channel 1/8” TRS input
of the LP-16.
• A set of headphones is connected to the front panel headphone output, allowing you to
monitor the 2-channel stereo output of your favorite DAW software, the stereo output of the
LP-16’s internal mixer, or a combination of both signal paths
16 .1. Using the LP-16 as an Audio Interface with Microsoft Windows
16.1.1. Minimum System Requirements
Operating Systems (32 or 64bit):
• Windows® XP (SP2), Windows Vista, Windows 7, Windows 8
• Microsoft .NET Framework 4.0 (usually installed automatically by Windows update.)
• For Windows versions where the .NET Framework 4.0 is not already installed, the
installation wizard will automatically start when the mixer / control panel is started for the
rst time.)
• The LP-16 device drivers do not require the .NET Framework.
Hardware:
• Pentium® IV 1.2 GHz or better
• 512 MB Ram ( 1GB or more recommended)
• 1 free USB2.0 compatible port on PC
! NOTE:Thespeedofyour computer’sprocessor,amount ofRAM,andthe capacity,size,and
speedof yourharddriveswill greatlyaffecttheoverallperformanceof yourrecordingsystem.
A faster processor and more RAM can reduce signal latency (delay) and improve overall
performance.
16.1. 2. WDM and ASIO Driver Installation
Before connecting the LP-16 to your PC, please download the driver package from www.
cymaticaudio.com/downloads.
After the download has nished:
• Unzip the downloaded archive to a folder on your PC.
• In the resulting folder, double click the “setup.exe” le and follow the on-screen instructions.
(It is strongly recommended that you exit all other programs before running the LP-16 driver
installation program)
• When prompted by the installation program, connect the LP-16 to your PC by connecting
the supplied USB cable to the LP-16 USB 2.0 connector on the rear panel and an available
USB2.0 port on your PC.
16.2. LP-16 Mixer / Control Panel for PC
The LP-16 driver installer program will automatically install the LP-16 Mixer / Control panel on
your Windows PC.
You can launch it by clicking on the LP-16 icon that will be present in the Windows task bar, or by
locating the program’s entry in the Windows start menu.
The Mixer control panel allows adjustment of the LP-16’s internal DSP mixer. When connected
to a computer and operating as a USB interface, graphical control of the internal DSP mixer is
offered, for quicker and easier adjustments.
You can use the internal DSP mixer to generate a monitor mix that has a lower latency (delay)
when monitoring tracks you are recording, than is often possible when monitoring through your
DAW software.

PRODUCT MANUALPRODUCT MANUAL 2726 USB INTERFACE MODE USB INTERFACE MODE
16. 2.1. Mixer View
The mixer screen of the control panel is where most of the interaction with the LP-16 occurs,
when it is serving as a computer audio interface. It offers the following controls:
Input 1&2 Level Faders
These on-screen faders control the input levels of analog signals that feed the LP-16’s 1/8” stereo
input. Adjust the level of the faders to congure an optimum level on the corresponding input
meter.
Link Button
Press this button to link both input channels. Input level adjustments made to either fader will
affect the input level of both channels.
Linking both channels is useful when you are feeding the 1/8” analog input a single stereo channel
and you wish to adjust its overall input level.
Input 1&2 Level Meters
The input level meters display the signal level of the audio feeding the LP-16’s 1/8” analog input.
Mute
Press the mute button of either input channel to mute the incoming audio for that channel.
Settings Display
The orange text in this display indicates various settings that are congured in other tabs of the
control panel, including:
• Sample Rate
• Synchronization Source
• Synchronization Status
Line Output Meters
These 16 separate level meters display the signal level of any audio that is being streamed from
the 16 outputs of the computer’s DAW software, and are being routed to the LP-16’s 16 separate
line level outputs.
If you see any of the 16 channels showing an overload (red light) on its corresponding level meter,
be sure to reduce the level of the signal source, from the DAW software itself.
Settings Button
Click the settings button to navigate to the different settings tabs of the control panel, where you
can make further adjustments.
USB Icon
The USB icon illuminates in a green color when the LP-6 has made a valid connection to the
Windows computer, and the LP-16 can serve as a computer audio interface for that machine.
Bus Level
These on-screen faders control the input levels coming from the connected PC
Line Level
These on-screen faders control the input levels of the analog signals that feed the LP-16’s 1/8”
stereo input.
Bus Mute
Mutes the input signal coming from the connected PC
Line Mute
Mutes the input signal coming from the LP-16’s 1/8” stereo input.

PRODUCT MANUALPRODUCT MANUAL 2928 USB INTERFACE MODE USB INTERFACE MODE
16.2.2. Settings View: Synchronization Tab
Device Name
The device name eld controls what device name will appear in your DAW software. The default
name is “LP-16” but it can be modied to the name of your choosing.
Sample Rate
Click on this eld to select what sample rate you wish to operate the LP-16 at when using it as an
audio interface. Choices include:
• 44.1k Hz
• 48kHz
Sync Source Display
This eld displays the current synchronization source.
16.2.3. Settings View: Buffers Tab
The control panel’s buffers screen allows adjustment of the ASIO buffers used by your ASIO
compatible DAW software.
USB Streaming Mode
Adjust this value to set the basic mode of operation of the LP-16 drivers.
ASIO Buffer Depth
Adjust this setting to congure the size of the ASIO buffer, measured in samples.
When using an older, slower computer, you may need to set your latency value to a higher
amount. This will reduce the overhead to the computer’s CPU and allow your DAW session to run
more smoothly, but will result in a higher amount of delay between the original incoming audio
signal, and the DAW software’
When using a newer, faster computer, the buffer depth can be set to a lower amount, and latency
will be minimized.
ASIO Dropout Statistics
This display eld indicates how many “drop-outs” have occurred, if any, with the currently selected
buffer settings.
Dropouts indicate that your computer’s CPU cannot keep up with the demand that is placed on
it by the current buffer depth. If any dropouts occur, increase the size of the buffer depth and / or
change the streaming mode until no more dropouts are reported.

PRODUCT MANUALPRODUCT MANUAL 3130 USB INTERFACE MODE USB INTERFACE MODE
16.2.4. Settings View: Input Channels Tab
Double click on any entry in the “channel name” column to modify the input channel names as
they will appear in your DAW.
Click on the checkbox labeled ‘Include device name in ASIO display name’ if you wish for the
channel names to be prepended with the device name.
16.2.5. Settings View: Output Channels Tab
Double click an entry in the “channel name” column to modify the output channel names as they
will appear in your DAW.
Click on the checkbox labeled ‘Include device name in ASIO display name’ if you wish for the
channel output names to be prepended with the device name.

PRODUCT MANUALPRODUCT MANUAL 3332 USB INTERFACE MODE UPDATING THE FIRMWARE ON YOUR LP-16
16.2.6. Settings View: About Tab
Revision
Displays the revision number of the control panel itself.
Live Player LP-16
Displays the connection-status for the LP-16, indicating if the device is connected and recognized
by the computer.
Serial Number
Displays the specic serial number of the connected LP-16 unit.
Driver Version
Displays the version number of the installed device driver
Firmware Version
Displays the current rmware version of the connected LP-16 unit.
16.3. Using the LP-16 as an Audio Interface with OS X
16.3.1. Minimum System Requirements
Operating Systems:
• Mac OS X® 10.8
Hardware:
• Any Mac hardware compatible with OS X 10.7 or higher
• 512 MB Ram (1GB or more recommended)
• 1 free USB 2.0 compatible port
! NOTE:Thespeedofyourprocessor,amountofRAM,andcapacity,size,andspeedofyourhard
driveswillgreatlyaffecttheoverallperformanceofyourrecordingsystem.
A faster processor and more RAM can reduce signal latency (delay) and improve overall
performance.
16.3.2. Driver Installation
There is no driver installation for OS X Computers necessary. Simply connect the LP-16 to your
Mac® by connecting the supplied USB cable to the LP-16 USB2.0 connector on the rear panel,
and an available USB2.0 port on your Mac.
The device will now be selectable in the “Audio MIDI Setup” application, which can be found in
the Applications/Utilities folder.
Note that no custom LP-16 mixer control panel is available for the Mac, as there is when using
the LP-16 with Windows. The internal DSP mixer of the LP-16 is not available when connected to
a Mac, so all monitoring must be done through the DAW software.
16.4. Using the LP-16 as an Audio Interface with an Apple® iPad®
16. 4.1. Minimum System requirements
Operating Systems:
• iOS® 5 or higher
Hardware:
• iPad® 2 or newer
• Apple® iPad Camera Connection Kit
• Apple Lightning to USB Camera Adapter
16.4.2. Driver Installation
There is no driver installation for the iPad® necessary. Simply connect the LP-16 to your iPad®
by connecting the supplied USB cable to the LP-16 USB2.0 connector on the rear panel and the
iPad® using the appropriate Apple USB adapter.
The LP-16 can now be used as a 2-input, 18-output audio interface with the iPad® and appropriate
iOS recording software.
17. UPDATING THE FIRMWARE ON YOUR LP-16
Please check the Cymatic Audio website (www.cymaticaudio.com) for any available rmware
updates.
The LP-16’s currently installed rmware version is shown briey on the start screen when the unit
is powering up and can also be found in the PC Mixer Panels ‘About’ tab
If you nd that your rmware version number is lower than the latest rmware released on
the website, please download and install the newer rmware, following the instructions that
accompany the rmware download le.

PRODUCT MANUALPRODUCT MANUAL 3534 TROUBLESHOOTING SPECIFICATIONS
18. TROUBLESHOOTING
Always make sure that you have downloaded and installed the latest drivers and rmware for your
Live Player LP-16. The latest rmware and driver downloads for the LP-16 are available at www.
cymaticaudio.com/downloads
18 .1. Standalone Player Mode
Problem Possible Solutions
I do not understand how to create a playlist
to use with my LP-16
Playlists for the LP-16 are created using the external,
Windows compatible LP-16 playlist software. Download
the playlist software and refer to its documentation on
how to create a playlist, then export it to a USB drive
that you connect to your LP-16
My connected USB device is recognized by
the LP-16 and does not pass the device test
when connected.
The connected USB device must be formatted FAT-32.
Format it as FAT-32 on your computer or allow the LP-
16 to format the device
I am playing back a group of stereo les on
the LP-16 and the playback behavior is not
working as expected
From the stereo player menu, select “Playback Mode”
and make sure you have congured the specic
playback mode that corresponds to the playback
behavior you desire
I have manually copied some audio les to
the USB drive I have attached to the LP-16,
but I cannot gure out how to make a playlist
of the les for use with my LP-16
The LP-16’s external playlist software is required to
congure a playlist and copy it to an attached USB
drive. See the user’s manual for the external playlist
software for more details
18.2. USB Audio Interface Mode
Problem Possible Solutions
On my Windows PC, the LP-16 is not
recognized by the PC, even though I the
device drivers have been installed and the
device is plugged in using the supplied USB
cable.
Make sure that there is no USB storage device
connected to the front panel USB storage connector of
the LP-16. Doing so will automatically put the LP-16 into
“recorder mode” and it will not be usable as a computer
audio interface at the same time.
When I connect channels 1-2 of the rear-
panel line output to my powered speakers,
the signal is too loud and I have no way to
adjust the listening volume.
The line outputs of the LP-16 do not have a volume
control of their own. To use it with a set of powered
speakers, you can:
1-Connect the outputs to a pair of powered speakers
that have their own onboard volume control
2-Connect the output of the LP-16 to the line inputs of a
small desktop audio mixer or standalone volume control
unit and then connect the outputs of those to your
powered monitors.
I cannot nd the Macintosh OS X version of
the monitor mixer control panel
Currently, no OS X version of the monitor mixer control
panel is available.
19. SPECIFICATIONS
LINE OUTPUTS Full-scale output 8.2dBu, 2 Vrms
Frequency response ± 0.2 dB, 20 Hz-20 kHz
THD+N @ 0dBFS (1kHz sine wave) -85dB, < 0.005, 20 Hz-20 kHz
THD+N @ -6dBFS < -82dB, < 0.008, 20 Hz-20 kHz
SNR > 100dB, < 0.001%, 20 Hz-20 kHz
Crosstalk < -95 dB, 20 Hz- 20 kHz
HEADPHONES Full-scale output 8.2dBu, 2 Vrms
OUTPUT Frequency response ± 0.2 dB, 20 Hz-20 kHz
THD+N @ 0dBFS (1kHz sine wave) -80dB, < 0.005% Vrms, 20 Hz-20 kHz
SNR > 90 dB, 20 Hz-20 kHz
STEREO LINE Full-scale input Unbalanced, +8.6dBu, 2 Vrms
INPUT Frequency response ± 0.2 dB, 20 Hz-20 kHz
THD+N @ -1dBFS -73dB, < 0.022% Vrms, 20 Hz-20 kHz
SNR >95dB, A-weighted
20. LEGAL DISCLAIMER
Technical specications and appearance are subject to change without notice and accuracy
is not guaranteed. Cymatic Audio accepts no liability for any loss which may be suffered by
any person who relies either wholly or in part upon any description, photograph or statement
contained herein. Colors and specications may vary from the actual product.
Cymatic Audio products are sold through resellers only. Fulllers and resellers are not agents of
Cymatic Audio and have absolutely no authority to bind Cymatic Audio by any express or implied
undertaking or representation.
Apple Macintosh is a trademark of Apple Inc., registered in the U.S. and other countries. Windows
is a registered trademark of Microsoft Corporation in the United States and other countries. ASIO
is a registered trademark of Steinberg Media Technologies GmbH.
All other trademarks, product names, and company names mentioned in this document are the
property of their respective owners.

Cymatic Technologies B.V.
P.O. Box 208
6590 AE Gennep
The Netherlands
www.cymaticaudio.com
Support:
For Europe:
support-EMEA@
cymaticaudio.com
Rest of the world:
suppor[email protected]
© copyright 2015 Cymatic Audio B.V.
PRODUCT MANUAL
Version 1.0
Firmware Release 83859
December 2014
Other manuals for Live Player LP-16
2
Table of contents