ACTICHECK THE ASSURE User manual

The Assure™
User guide
2

3
Welcome to your Assure.
At Acticheck we believe life should be lived with confidence.
Living with confidence means knowing even when you are out of immediate touch
you can call for help if you need it.
This is true for solo sports people, lone workers, solo seniors and those who might
feel vulnerable travelling alone.
The Assure system gives you a comfortable stylish smartband that connects you to
your personal network. As it is water resistant and never needs recharging it will be
with you if you need it, however you live your life.
As well as giving you the option to easily and discretely summon help we are
looking out for falls and unusual biometric readings; the wellness check asks you
to respond that you are OK at times you choose. Additionally other people can
monitor your wellbeing remotely so there is peace of mind all round.
The rest of this guide will tell you in detail how to install your Assure, more about the
functions and how you can tailor them to fit your life.
We hope The Assure helps you live with confidence.
Karl Gibbs
Founder

4

5
Contents
Overview 6
Setting up your base and band 7
Setting up your Power Supply Unit 9
Connecting your base 10
Pairing your band to a base 12
Adding Responders to your network 13
Fitting your Assure band 14
Using your Assure smartband 16
Understanding your alerts 19
Troubleshooting 26
Customer service 29
What’s in the box
1 x Assure band
1 x Assure base
1 x Internet cable
1 x Power/charging cable
1 x Wall plug (international)
1 x User instruction booklet
3 x Responder invitation

6
Overview
The Acticheck AssureTM is a revolutionary ‘fit & forget’ smart band that continuously
monitors your wellbeing & connects you to help whenever and wherever you may need
it. Comprising of a lightweight smart band, base unit and an optional smartphone
app and a website; the system will detect if you are in need of assistance and will
automatically summon help from your pre-selected ‘responders’. It has a one year
battery life so never needs recharging and is water resistant and shockproof. As the
Assure is always with you, you will have peace of mind no matter wherever you go.
In order to begin protecting you, the system needs to be set up as explained in this
user guide.
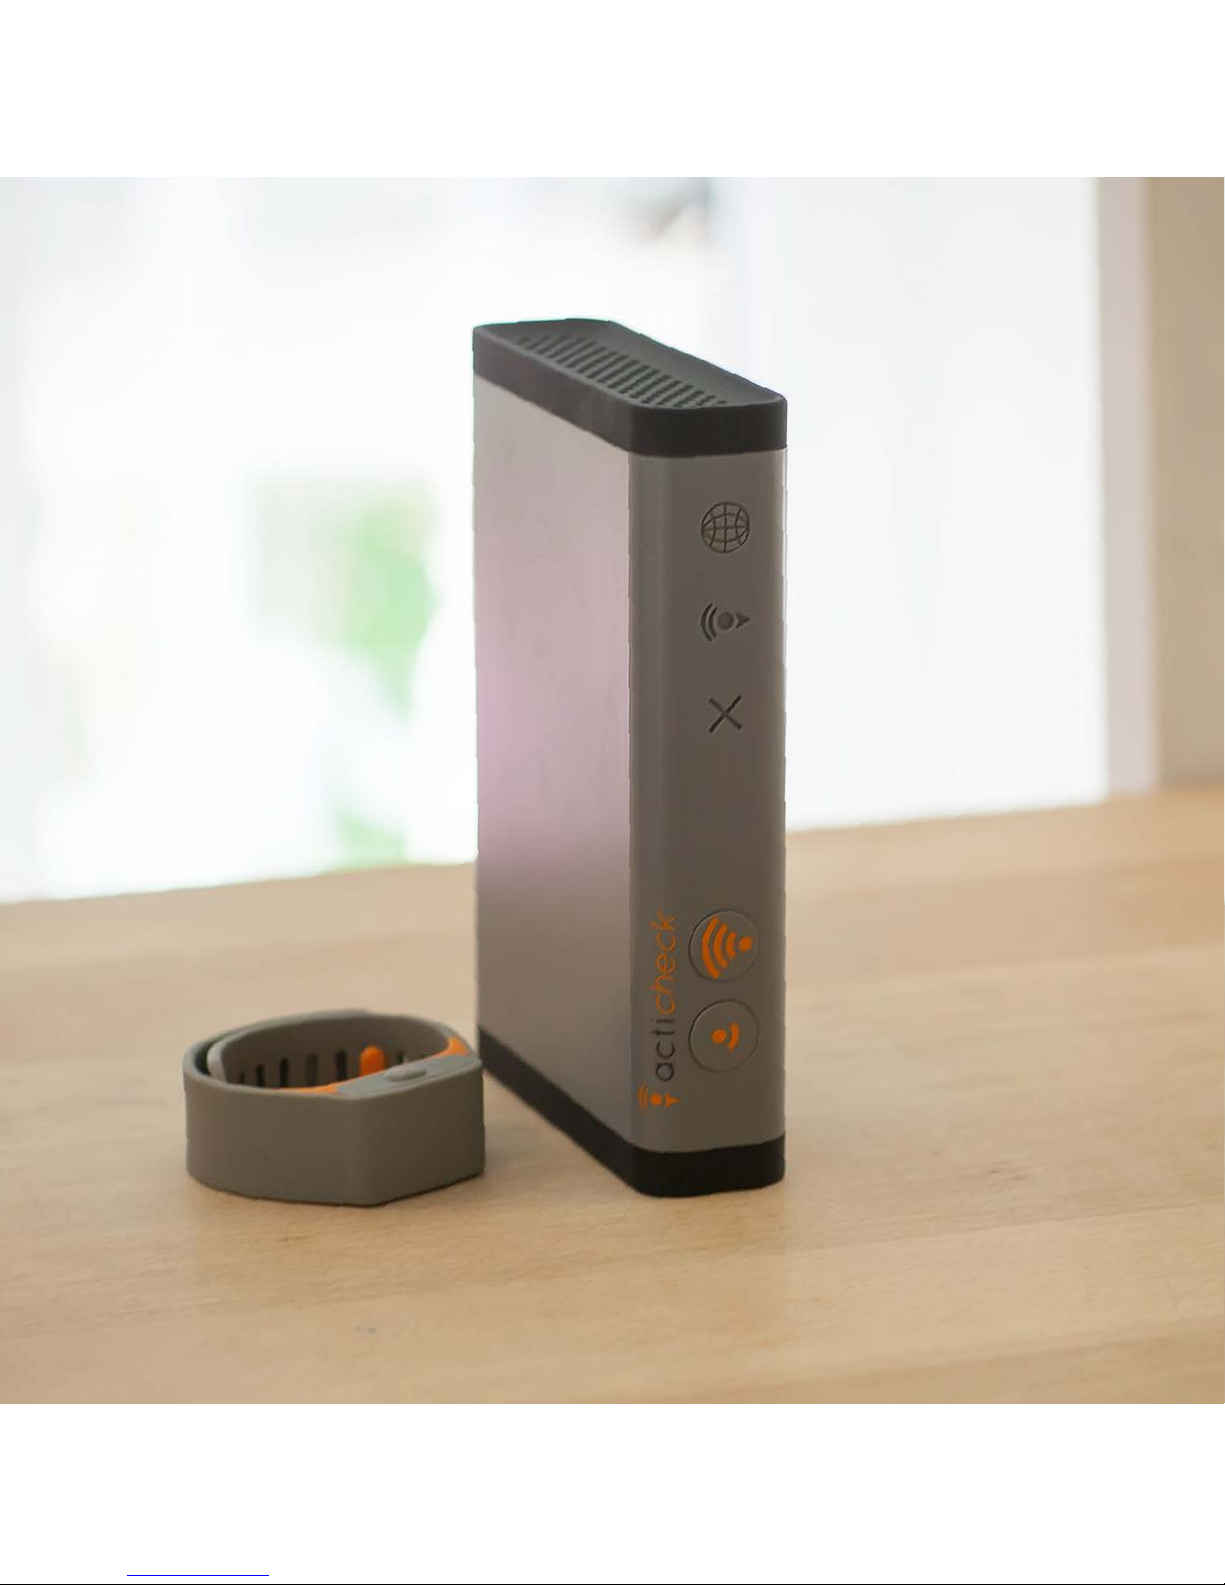
Your system
The Assure base
The Assure base passes messages from your band to the outside world and has
excellent home and garden coverage. It has been designed for reliability of service,
simplicity of use and elegance of design.
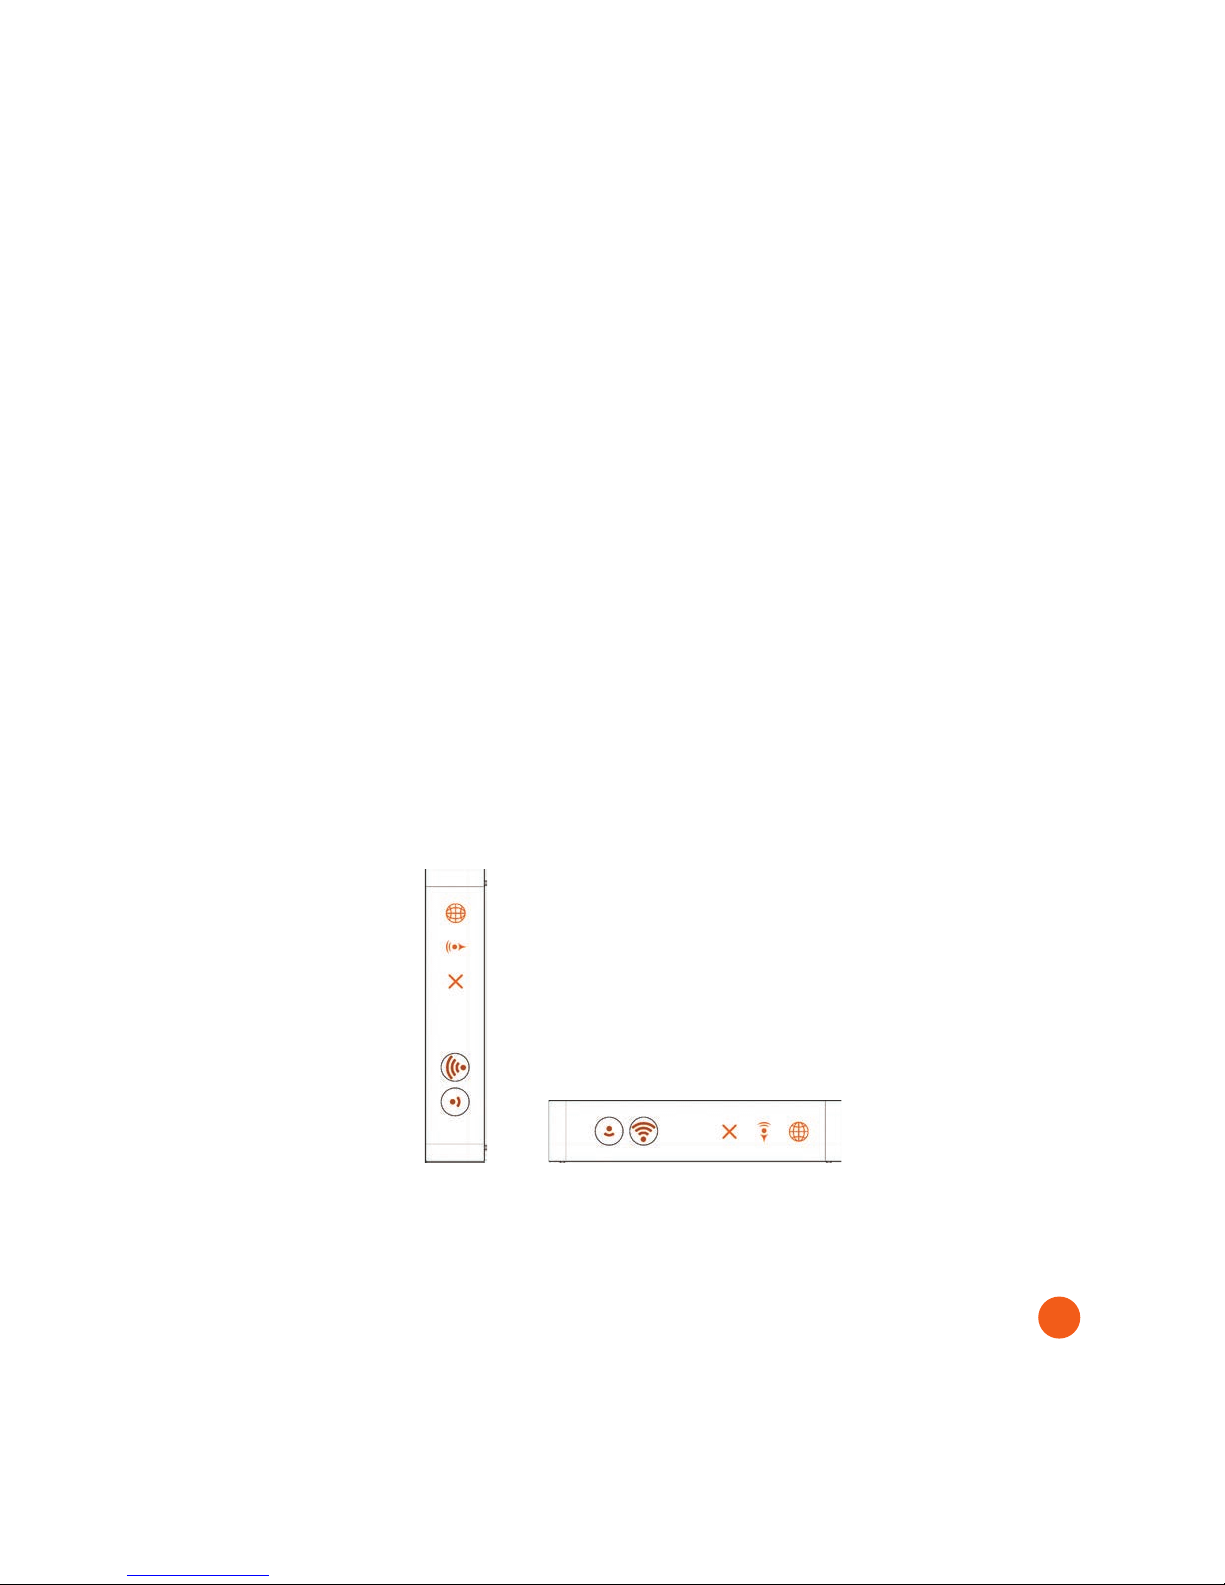
SocketsButtons Lights
Internet (RJ45)
Front Back
Power (mini USB)
Volume down
Volume up
Internet connect
Band connect
Warning
7
Setting up your base and band
You will need access to the internet for this.
Positioning your base
Your base comes with two 1.8m cables. One is a blue internet connection cable (RJ45)
and this needs one end to connect your internet router and the other into the back of
your Assure base.
The other is a power/charging (mini-USB) cable. If there is a spare USB socket on your
internet router this should be plugged in there, otherwise it will need to plug in via the
Power Supply Unit (provided, see page 9) into a wall socket.
You should find a position in which both cables can be easily connected and where the
Assure base is at least 30cm away from the router.
To help with this the Assure base is designed to be used in either an upright or flat
position (see below).
Your Assure base can be set to make sounds when an incident occurs. This can be
configured in your account at myacticheck.com.

8
9
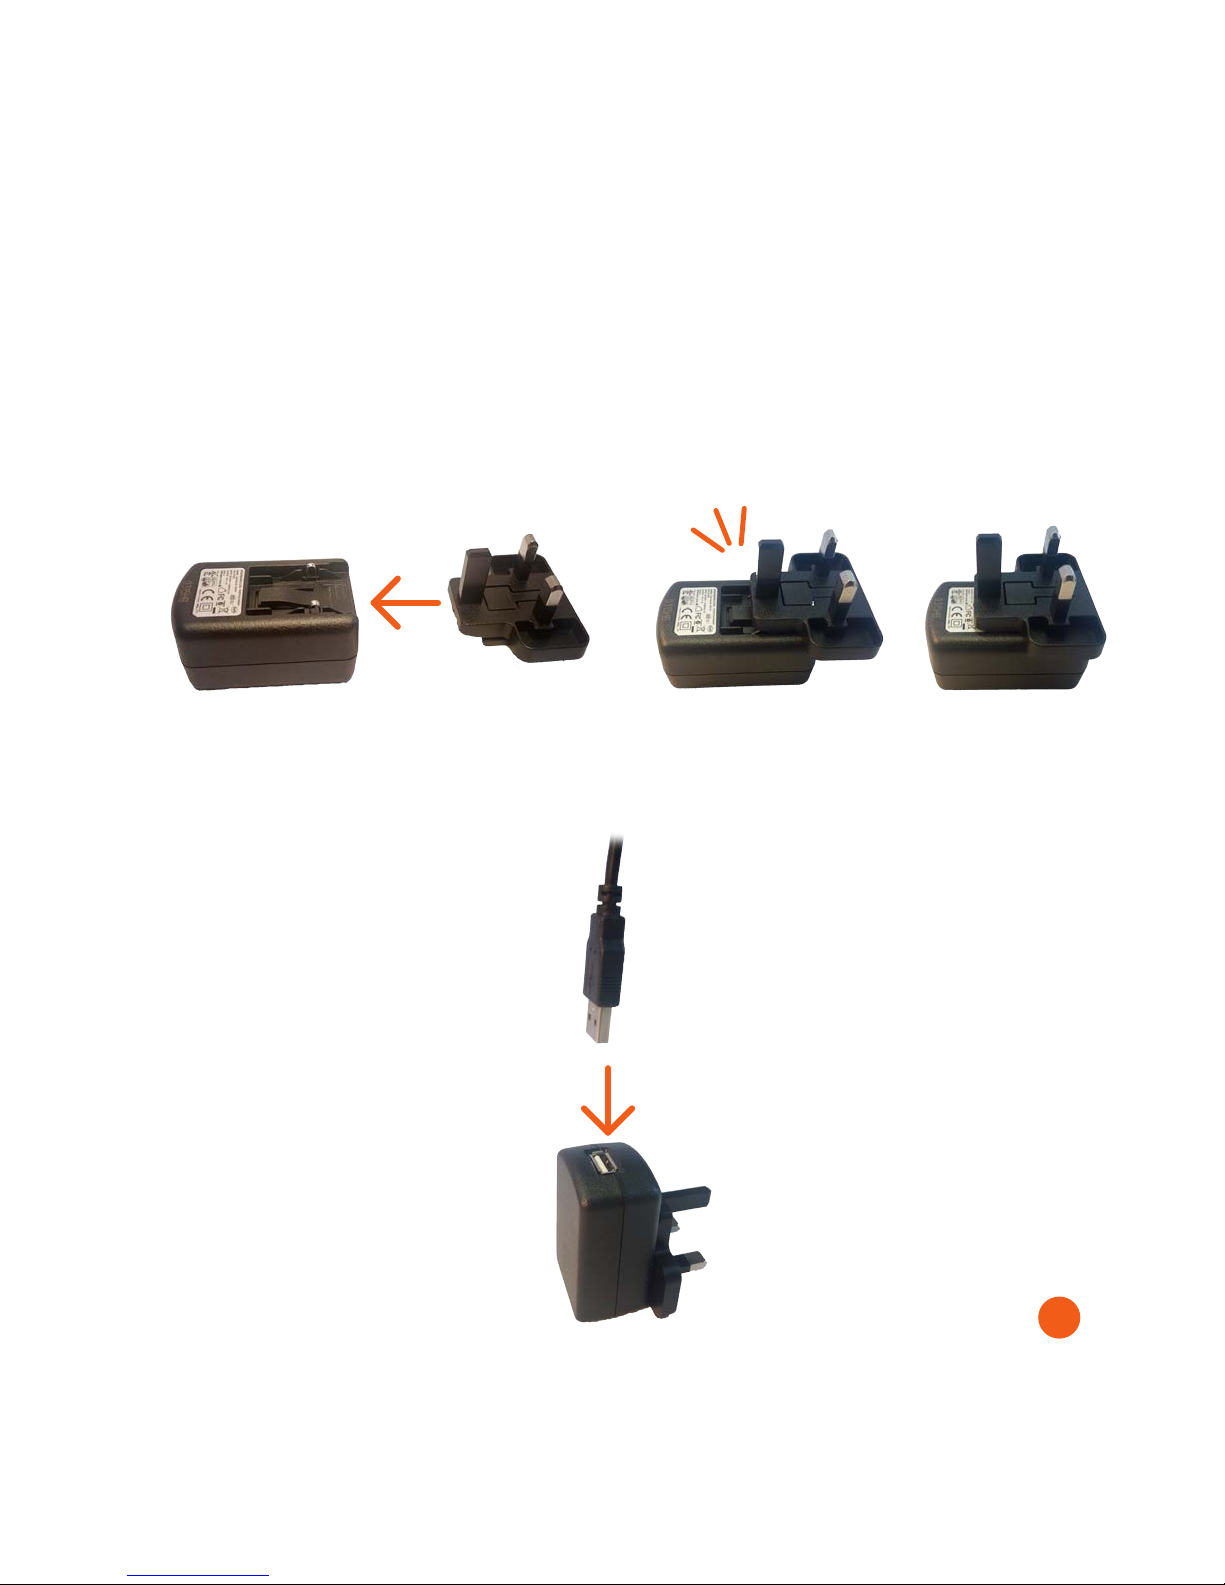
Setting up your Power Supply Unit
Your Power Supply Unit works anywhere in the world and so comes with four adapters.
You will need to fit the 3-pin UK adapter as shown.
Once your adapter is fitted, push in the USB cable (as shown) and plug into a standard
3-pin socket.
ClickInsert

10
Connecting your base
Plug one end of your blue internet connection cable into a spare socket on your
internet router and the other into the socket on the back of your Assure base. Now
plug the small end of your charging cable into the mini USB socket on the back of your
Assure base.
Plug the larger end into the USB socket on your internet router or the wall plug (and
plug in the wall plug). The ‘Internet connect’ light on your Assure base should be active
and will remain constantly lit when connected.
Registering your base
Your base is now linked to the Assure system but needs to be linked specifically to your
account. If you registered at the time of purchase you will have received an e-mail with
a link to help you complete your set-up.
If you didn’t register at the time of purchase you should visit www.myacticheck.com
and register a new account. If this is your first visit you will be invited to enter the code
for your base. If you already have an account you will need to log in and click on My
bases and then on ‘Add base’. Your 12 character code can be found on both the side of
the package and the underside of your Assure base. Once logged in please keep this
window open as myacticheck.com will guide you through the rest of the set-up.
Sockets
Power (mini USB) Internet (RJ45)

11

12
Pairing your band to a base
IMPORTANT: When Pairing your band to the base for the first time it should NOT be
worn and the back of the band should not be next to any skin.
Initiating pairing
Pairing to a base for the first time
When a base is first registered it will listen for a band to be paired with it.
It will default to pairing mode as indicted by a flashing BAND light. On screen
instructions will guide you through this process.
Subsequent pairing to a base (BAND light not flashing)
Once a base has been registered and paired with a band it will only pair if specifically
asked to do so. To pair a band to such a base press and hold the VOLUME DOWN
button until the BAND light starts to flash. This shows that the base is waiting for 60
seconds to pair with a new band.
Completing pairing
IMPORTANT: Once started this process must be allowed to complete with the band
close to the base. Do not walk away with the band until the lights show solidly to signify
the end of the process.
Now hold your band and press a single button close to the base (within 2m). The base
INTERNET and BAND lights will alternate and the on screen installation process will
require you to confirm the pairing. Once confirmed, both the INTERNET and the BAND
lights should now show solidly.

13
Adding Responders to your network
It is important that the Assure system knows who you would like to be contacted in the
event of an alert. Visit your portal at myacticheck.com and click on ‘my responders’.
When you click on ‘add a new responder’ you will be invited to add key information
for the Assure system to send them an invitation. You might like to confirm with them
personally before asking our automated system to invite them.
We will not ask anyone to respond to an alert who has not confirmed their willingness
to be a responder.
Those responders who you mark as ‘Administrators’ will be able to see and manage
your account, though your ‘In case of emergency’ information remains hidden.
Please note that the information on how to access your property in the case of an
emergency will be encrypted (scrambled) and can only seen when an alert is raised
This means that even when someone has access to your account they cannot see this
information. However, you can overwrite it at any time.
IMPORTANT: Once
you have set up
your system and
understand how the
band works you must
perform a range test
to ensure you have
adequate coverage
(see page 22).

14
Fitting your Assure band
Your comfort is important to us and so is your wellbeing. To ensure this we need to
know when the Assure band is being worn. The Assure uses capacitive sensing, similar
to that on a touchscreen, which relies on proximity to skin.
Whilst the user initiated alert is always active none of the other functions will work
reliably if the band is not being worn next to the skin. The band should be both snug
and comfortable..
Note the band can be worn on either wrist and is made from medical grade silicone.
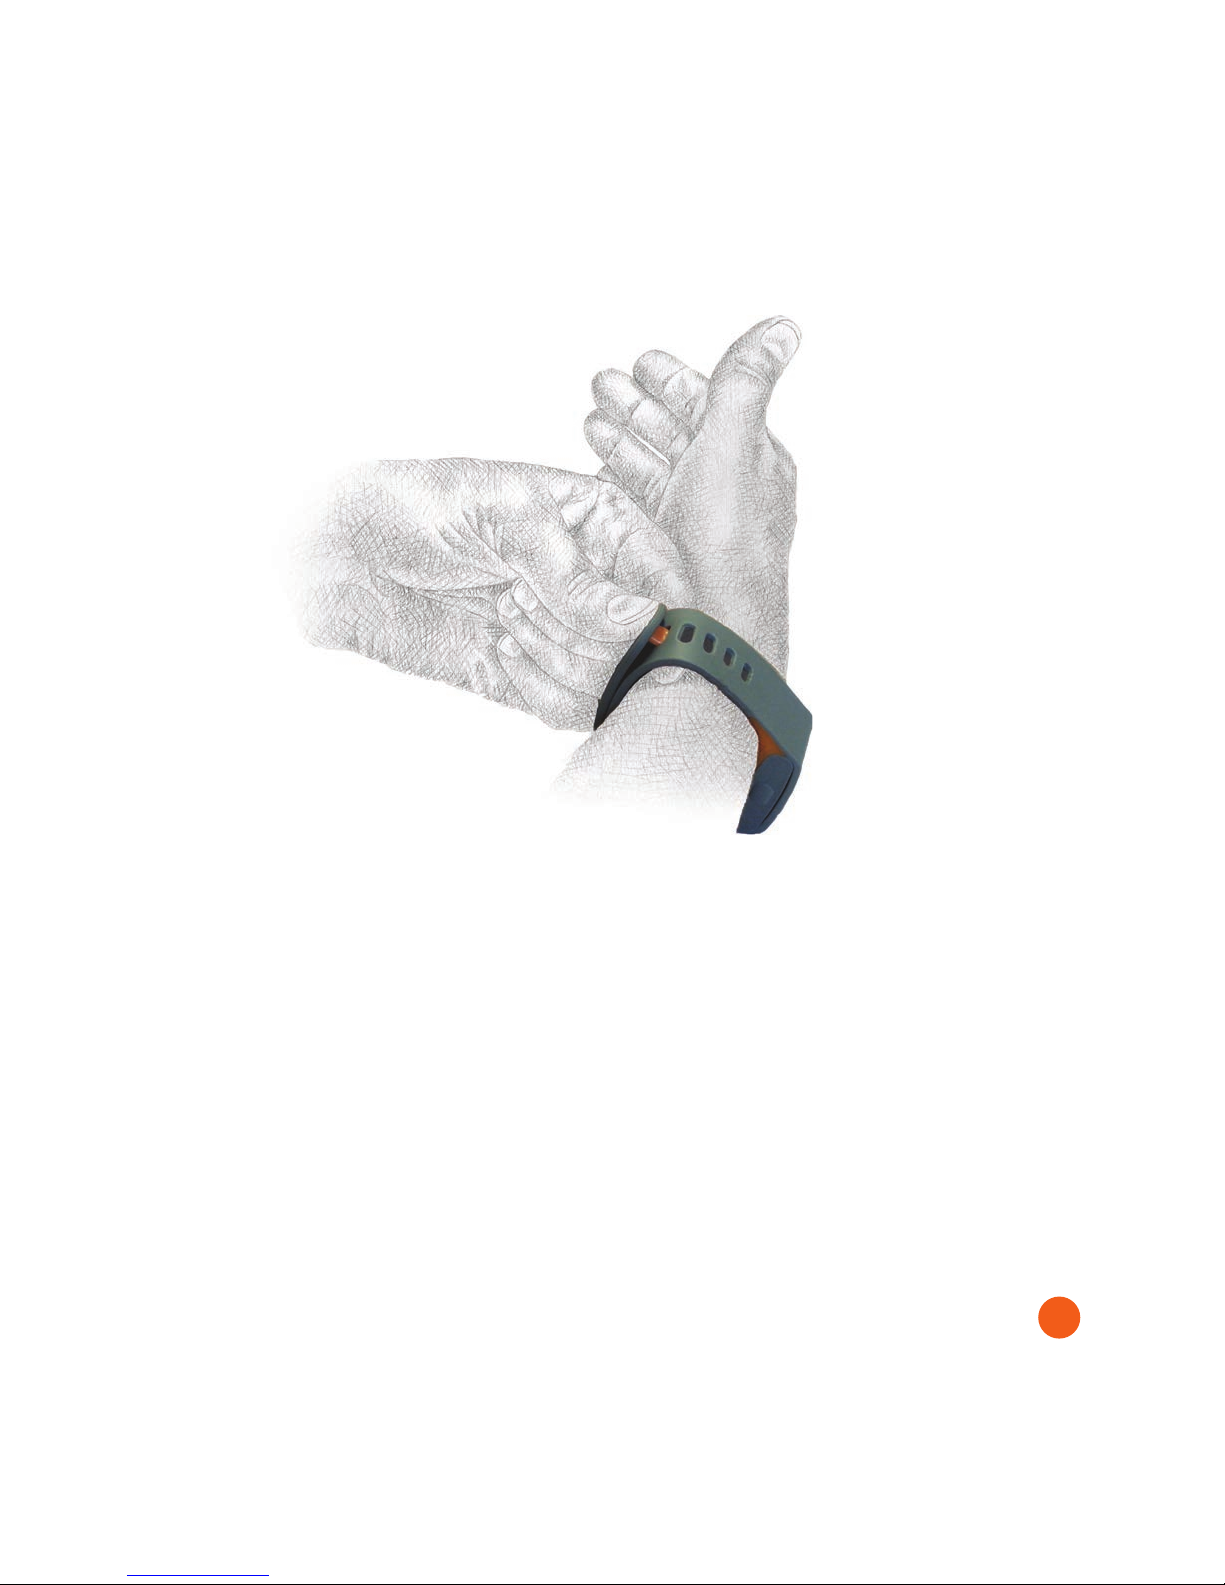
15
To fasten the Assure you should
·Rest your band upside down and with the holes facing away from you. Rest the top
of your wrist against the orange segment. Pull the holes towards you and then wrap
the other end over the top. Identify a suitable hole for the mushroom to fasten in and
placing one finger behind, gently push through with thumb.
·To release gently push the mushroom out with a finger from behind.

16
Using your Assure smartband
The Assure band is your link to others when you need it. It links to the Assure base
station at home, work or to a smartphone running the Acticheck app when out
& about. The smartband knows when it is being worn and is always monitoring
movement; it also periodically reports on movement and gives you the ability to
summon help by squeezing the buttons on either side at any time.
When the smartband buzzes on the wrist it is requesting confirmation of wellness
which is achieved by a ‘single button press’ on the band (see next page).
Basic user instructions
Essentially there are two things the
wearer needs to know. If you want help
squeeze the band (press both buttons).
If the band buzzes and you don’t want
help press a single button.
The squeeze
Place a thumb on a button on one side
and forefinger on the other and gently
squeeze together until you are aware of
a click.

17
The single button press
The wellness confirmation
and alert cancel
Place first and second finger against
the outer edges of the puck on one
side. This will hold the wristband
stable as the button is pressed. It does
not make any difference which button
is pressed as long as they are not
both pressed together.
Then press thumb against the button
on the other side and gently push
towards the gap between your
first and second fingers. You should
become aware of a gentle click when
the button has been pressed.
The single button press can be used
as a confirmation of wellbeing or to
cancel an alert.

18

19
Understanding your alerts
Your Assure system has four different alert triggers to cover an array or eventualities.
User initiated
A simple squeeze of the band initiates an alert.
Biometric snapshot
Periodically a snapshot report is sent checking the band is being worn and enabling
unusual movement patterns to trigger an alert.
Unusual activity
The Assure system is always ‘listening’ for a movement that could be a fall and
analysing whether there is ‘normal’ movement afterwards.
IMPORTANT: Though the band is learning from the wearer, the physical action of a
fall is difficult to discern simply through the movement of person’s wrist. The Assure
may trigger the pre-alert sequence as a consideration of trying to minimise the risk of
missing a fall or collapse.
Wellness check
The Assure band can be set to buzz at selected times each day. This is asking the
wearer to confirm that they do not need assistance, with a ‘single button press’. The
band will buzz three times over a few minutes. If there is no positive response an alert
sequence will start.
IMPORTANT: This function can only work when the band has connectivity through
a base station or smartphone and should not be used as the sole mechanism for
remembering medicines. A wellness check should be scheduled at least 20 minutes in
advance, and while the band can be set to buzz more than once a day the stated one
year battery life would be reduced.
There is an option to be notified by text or email if the wellness check is
undeliverable (for instance the wearer is out of range).

20
System sounds
Your Assure base is programmed to make sounds to let you know when it is in a pre-
alert state and when it is raising an alert. These can be set in the ‘My Base’ section of
your portal.
Volume
You can set the volume either in the portal or by repeatedly pressing using the VOL UP
and VOL DOWN buttons on the base. The volume set by the buttons is only active if the
portal is set to ‘Set using buttons on base’ which is achieved by moving the slider in ‘my
base’ to the far left.
Other manuals for THE ASSURE
3
Table of contents


