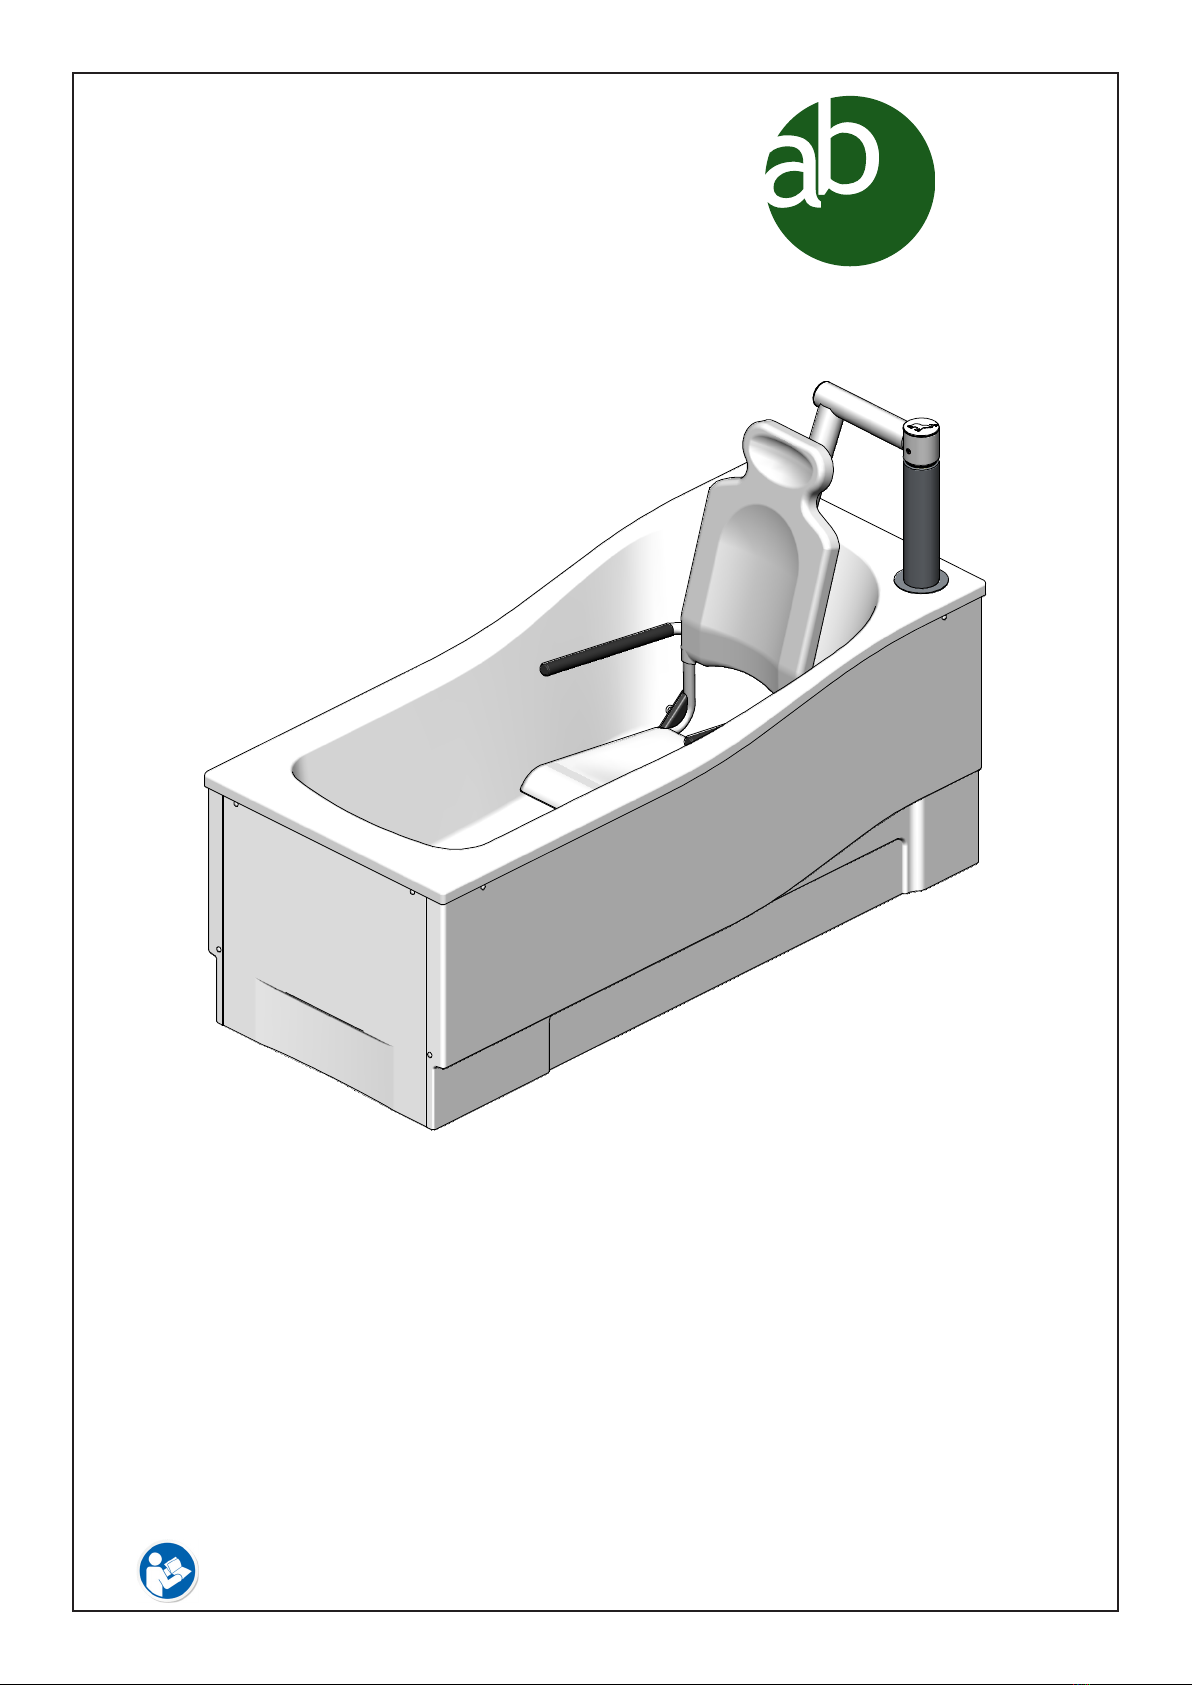
Active Bathing Compact Operating instructions
INSTALLATION & OWNERS MANUAL
IMPORTANT: READ THIS MANUAL BEFORE INSTALLATION AND USE
Active
bathing
Compact fixed height power traverse bath
Compact fixed height manual traverse bath

Active
bathing
2
Contents
Safety & Warranty information 03
Installation instructions 04
- Technical information
- Positioning & fixing
- Plumbing & Electrical
- Gantry & Tap attachment (Optional)
User instructions 09
- Product operation
- Seat arm & lap strap adjustment
- Tap options
Maintenance & Troubleshooting 13
Certificate of conformity 14
Contact details 15
© 2013 Active Bathing
Ourpolicyisoneofcontinuousdevelopment,andwethereforereservetherighttomaketechnicalalterationswithout
notice.Thecontent ofthispublicationmaynotbe copiedeitherwhole orinpart withouttheconsent ofActiveBathing.
Active
bathing
3
SAFETY INFORMATION
WARNING:
Before installing or using this equipment you must read and fully
understand these instructions.
Thank you for purchasing a Compact Bath.
The Compact Bath is intended for bathing children and adults who are capable
of maintaining an upright sitting position. The bath must not be used for any
other purpose.
Product description.
The Compact bath is powered by a 24 volt direct current control system with
battery backup. This is to enable the client to transfer out of the bath in the
event of supply failure. It is essential that the mains power is switched on at all
times to charge the backup batteries.
Warranty.
This product is guaranteed against all defects in manufacture for a period of
one year. This does not effect your statutory rights.
It is important that you keep these instructions for future reference.

Active
bathing
4
Electrics.
A.C. Input 230V~, 50Hz, 1.25 kW Maximum.
DC Output, 24v, 8 Amps.
Duty cycle 10%. maximum: 2min on & 18mins off.
Water pressures.
• Minimum: 1 Bar (Hot & Cold water supplies)
• Maximum: 10 bar (Hot & Cold water supplies)
• Pressures should be equal.
Misc. 1600mm 1700mm
• Water capacity at ave. 300mm depth: 210Ltr 225Ltr
• Product weight (Dry): 110kg 125kg
• Maximum weight (product, User & Water): 470kg 500kg
• Maximum user weight (Seat): 150kg 150kg
• ‘A’ weighted sound emission: <70dB(A) <70dB(A)
Transport and storage.
• Ambient temperature range: 5°C to 70°C
• Relative humidity range: 10 - 80% not condensed at 20°C
• Atmospheric pressure range: 50kPa to 106kPa
Recycling.
• Battery: Recyclable. Not for disposal. Environmental danger
• Packaging: Wood and corrugated cardboard, recyclable
• The product: Electrical components, batteries, steel and plastic parts to
be separated and recycled to local requirements.
Product dimensions.
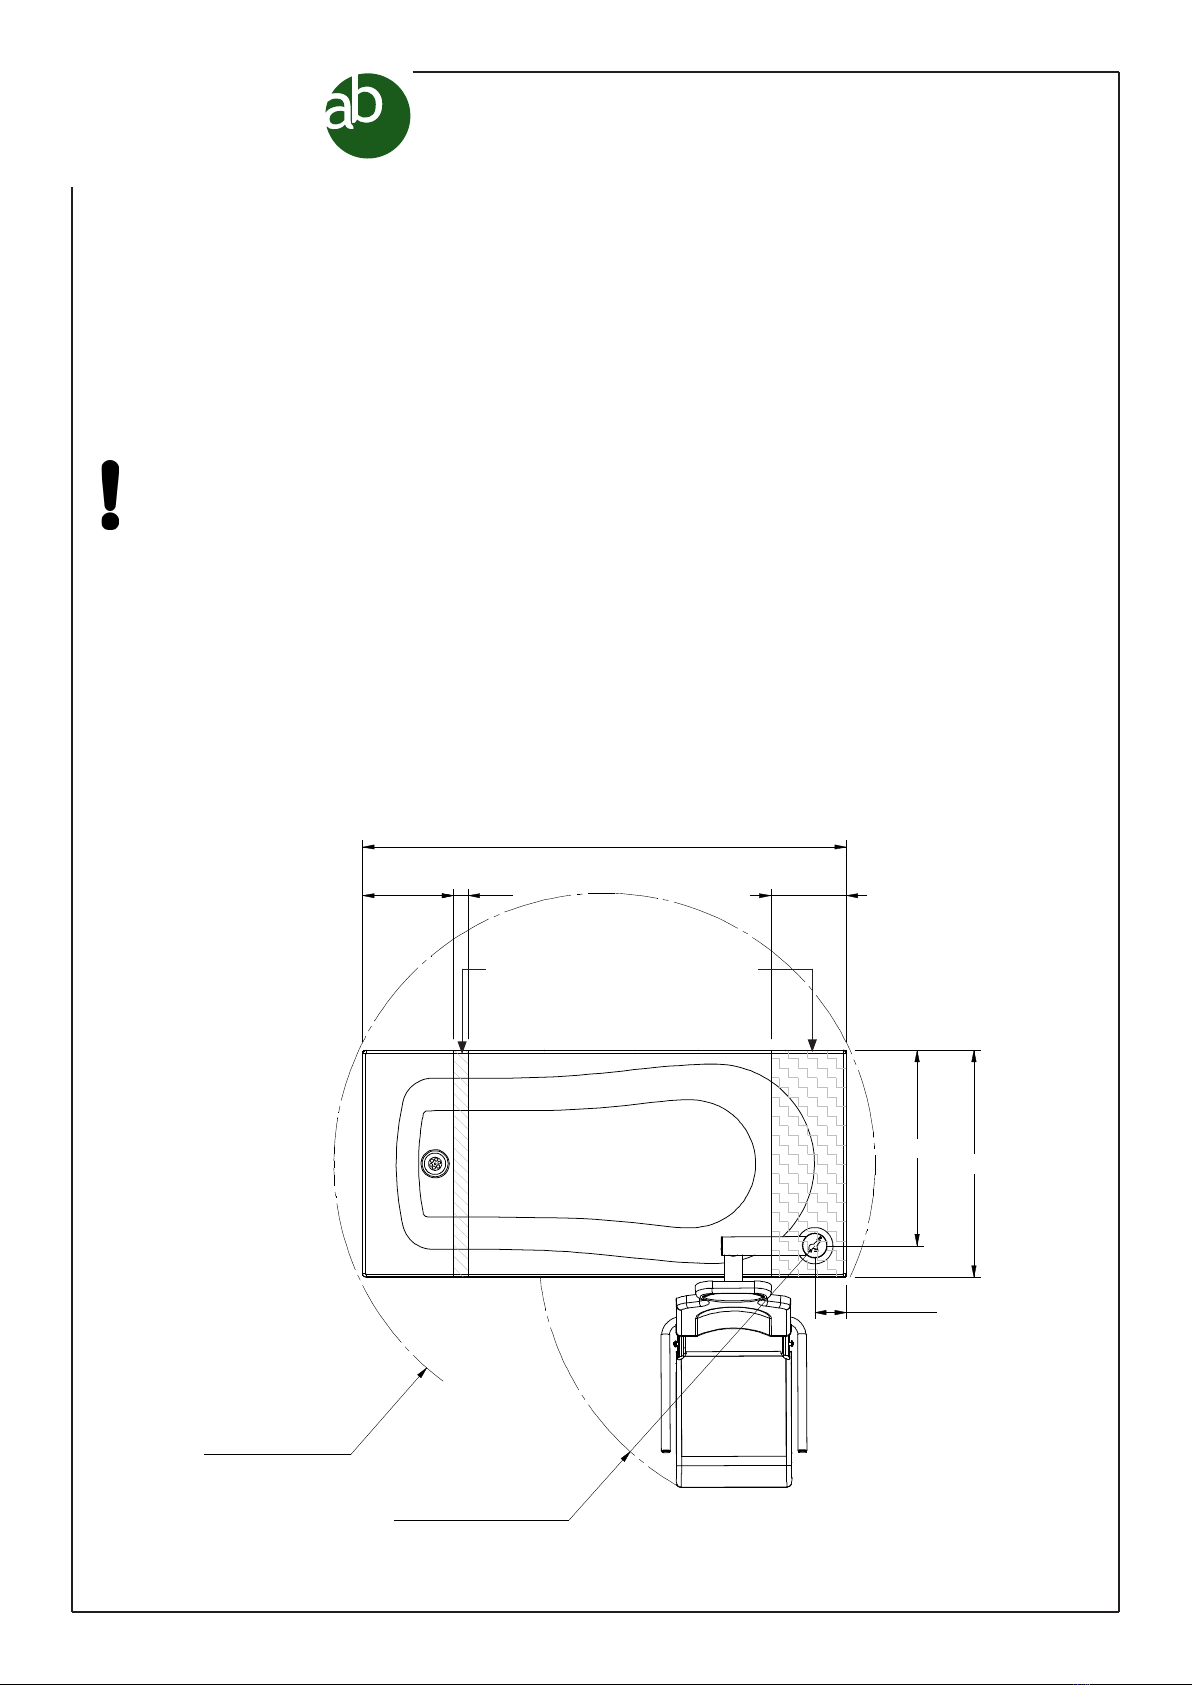
INSTALLATION
Technical information
Diagram includes optional
Showersafe gantry
Active
bathing
5
R915
SEAT SWING RADIUS
TURNING CIRCLE
INSTALLATION:
300 50 250
750
108
646
BATH LENGTH
INSTALLATION
Positioning
• All wall decoration including floor coverings and tiling, MUST be complete before
the bath is installed, where applicable, skirting boards may be left in place.
• Adjacent walls MUST be plumb, flat and clear of obstructions e.g. No Electric
showers or towel rails in the area where the chair operates.
• The bath can be fitted as a corner, alcove or peninsular unit.
There must be enough space to clear the users legs when the chair swings out
of the bath and sufficient space to transfer on and off the seat.
• The floor MUST be clear of obstructions including pipe work and wiring in the
shaded area’s shown at both ends of the bath, this includes under floor heating
etc...
•The floor must be strong enough (especially in the shaded areas) to carry the
weight of the bath when full and occupied.
No obstructions can be laid on
the floor in the shaded areas
Bath Lengths: 1600mm, 1700mm
Turning Circle: 1790mm, 1880mm

Active
bathing
6
66
150
319
175
576
39
134
400
INSTALLATION
Fixing
• The bath MUST be secured to the floor via the 5 mounting points as shown
below. Note: Suitable fixing’s for the type of floor MUST be used.
• Hole positions are as shown, measured from rim of tub. We recommend the
floor be marked out, drilled and the mounting bracket fitted before the bath is
placed in position. The bath can then be slid fully into the bracket before fixing
the other feet into position.
ALWAYS fit mount
bracket on opposite
side to seat.
• Where the bath is fitted with one side against a wall, a corner trim is fitted
instead of a full side panel as shown below.
Trim may be cut to
length when fitted to
the foot end panel

Active
bathing
7
INSTALLATION
Plumbing and electrical
• The bath requires a 1 off 230 volt, 1.25 kW, wall mounted waterproof flex
outlet, supplied from a protected fused spur.
• The electrical outlet can be located at either end of the bath, but MUST be
100mm from the edge of the bath.
• We recommend the waste and water supply pipes be mounted at the tap end
of the bath and positioned to the dimensions indicated in the above diagram.
• The pipes can be wall mounted, fed through the wall or through the floor,
but both supply pipes MUST have a 22mm ball type isolation valves fitted and
orientated for easy access.
• Note: If the site piping is 15mm then this should be expanded to 22mm at the
valve end to accommodate the valves (see diagram below).
• Where baths are fitted with Thermostatic mixing valves they must
be calibrated before use to avoid the risk of scalding.
250mm
300mm
400mm to centre
80mm to centre
of pipework
100mm wall to
end of fitting
900mm wall to centre of waterproof flex outlet
450mm to centre
of box
VALVE
15mm 22mm
REDUCER

Active
bathing
8
INSTALLATION
Plumbing
Gantry attachment (Showersafe system)
The gantry attachment MUST be fitted to
the bath before the bath is located into
position.
• Remove the side panel on the opposite
side to the seat to gain access.
• Fit the gantry attachment through the top
of the tub and fix in place as illustrated.
• Attach compression fitting to the bottom
of the gantry tube and connect the supply
hose already fitted to the bath.
• Refit side panel.
Fitting own taps
When fitting third party taps to the bath they MUST ONLY be mounted in the
shaded area indicated below with the supplied flexible hoses attached.
34
237
237
276
48
Active
bathing
9
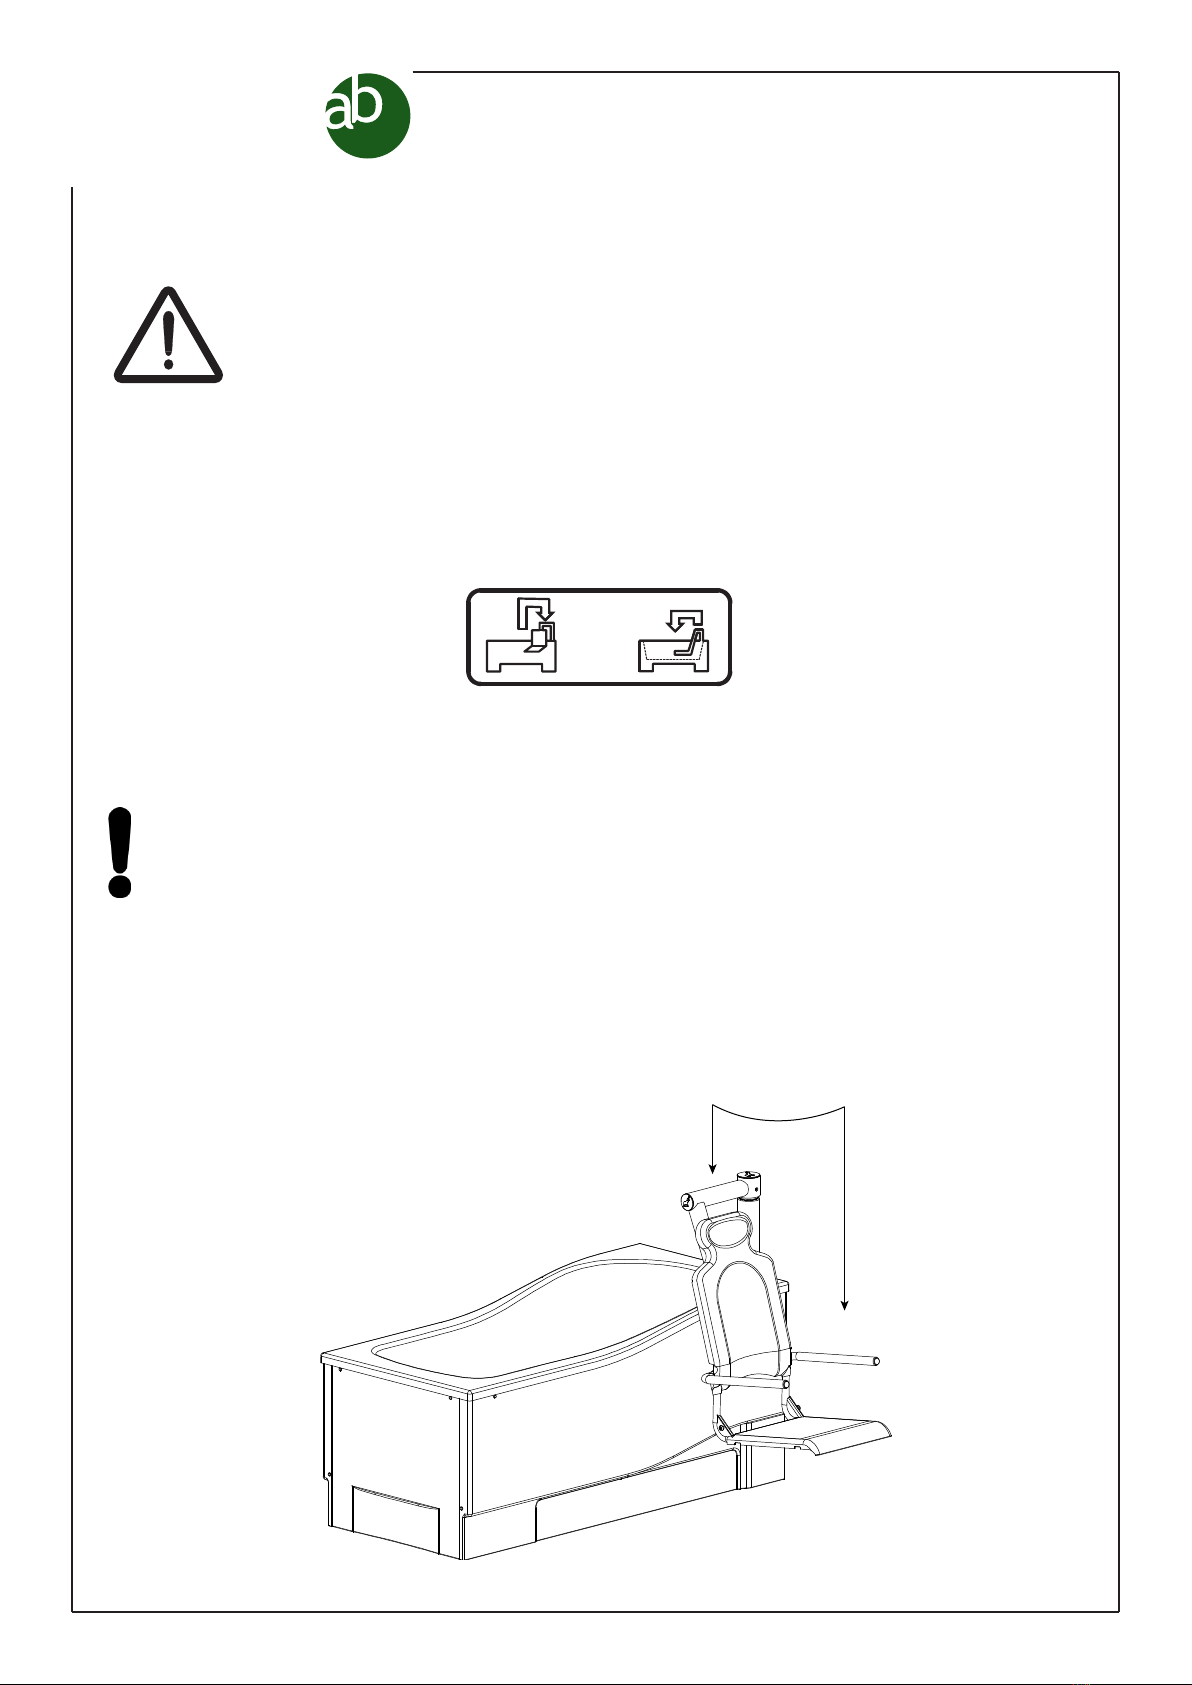
USER INSTRUCTION
Power traverse - Operation
WARNING:
• This equipment must be used as described in these instructions.
• When filling the tub ensure the water temperature is correct before
entering the bath.
• The seat height is operated via the remote handset.
• To lift the seat in/out of the bath (A) press and hold the following buttons. The
operation can be stopped at any time by releasing the button.
• Once the seat reaches the uppermost position the seat will automatically
traverse before lowering again.
Obstacle detection: If while lowering the seat it comes into contact with an
object, the seat will automatically stop and lift slightly. Once the object is
removed normal operation can be resumed.
Seat out Seat in
A
Table of contents
Popular Bathroom Aid manuals by other brands

Pressalit Care
Pressalit Care R2040 Assembly instruction

Invacare
Invacare 9630E Styxo Assembly, installation and operating instructions

Leckey
Leckey firefly splashy BIG user manual

NRS Healthcare
NRS Healthcare H85350 User instructions

WENKO
WENKO 23285100 Assembly instructions

Dietz SmartCare
Dietz SmartCare TAYO operating instructions


